with brave wings she flies

Hi everyone! Hope you’ve had a good weekend! This month’s ATC Challenge is live over at Happy Little Stampers and I’m excited to share my DT inspiration project with you today! The theme for our February ATC Challenge is Stencils and we’d love to see what you create for our challenge this month!

february 2019

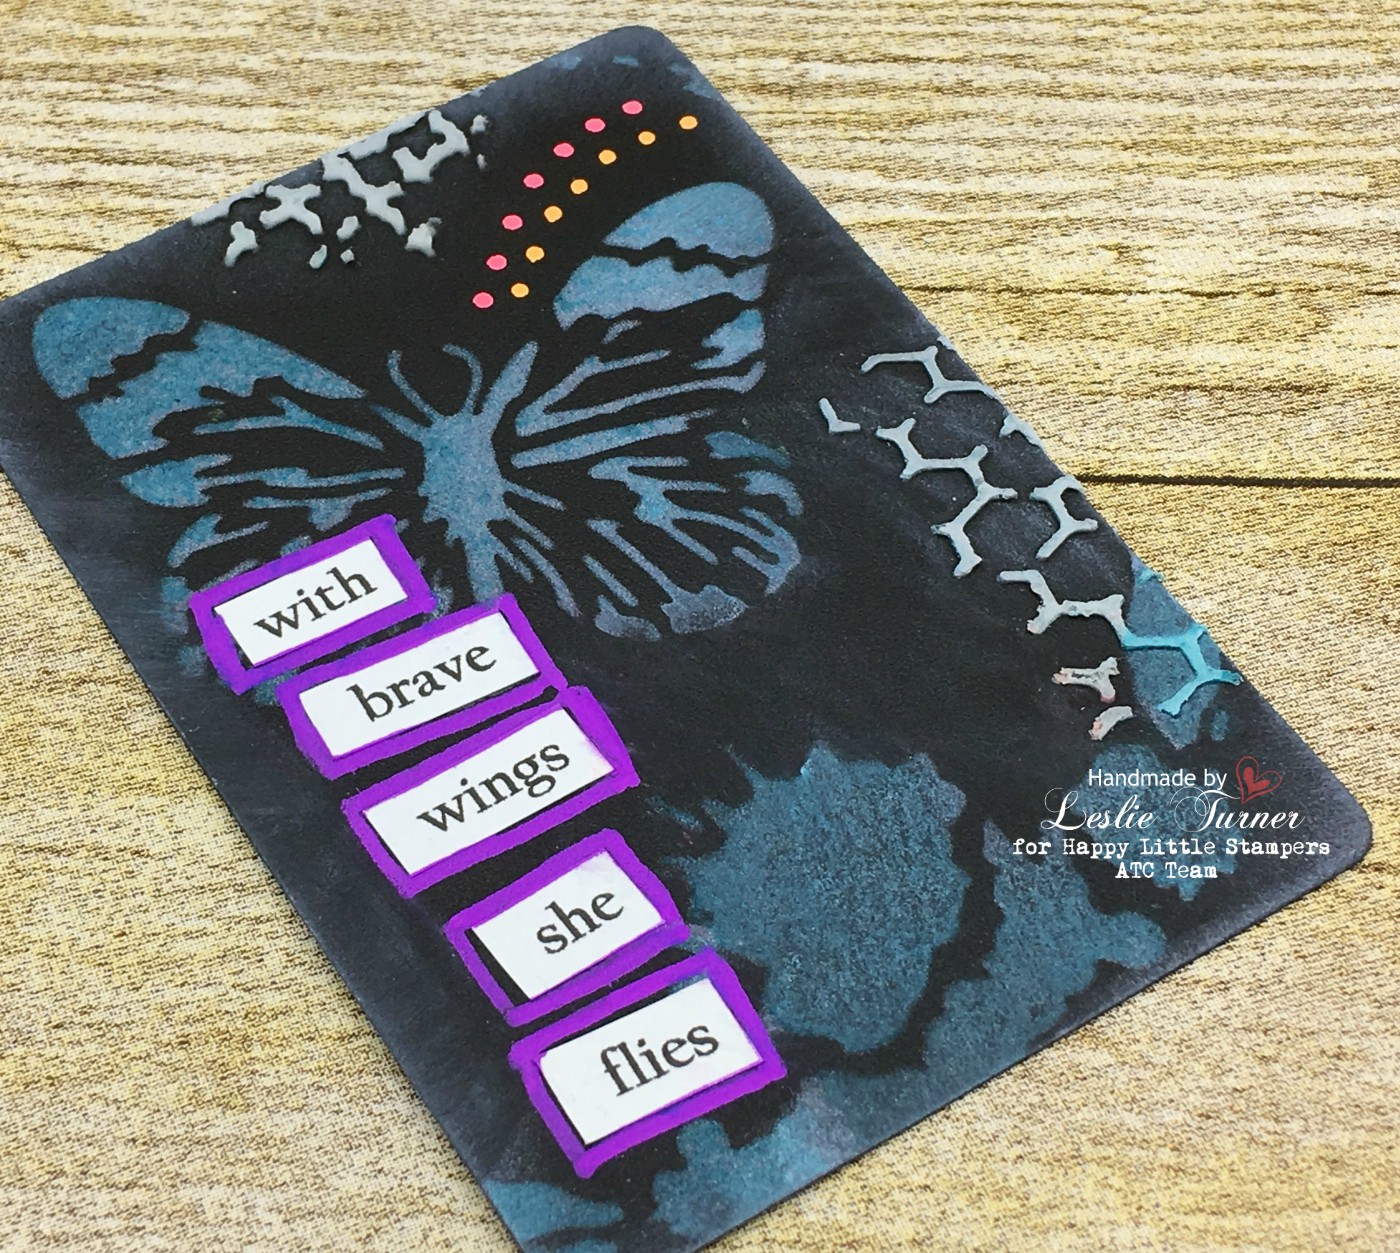
I created my ATC for this challenge from Chalkboard cardstock. I’ve had this in my stash for a couple years, actually, and this is only the second time I’ve used it. Don’t ask me why… it’s a pretty fun product, especially with chalk markers!

2018_12250013a

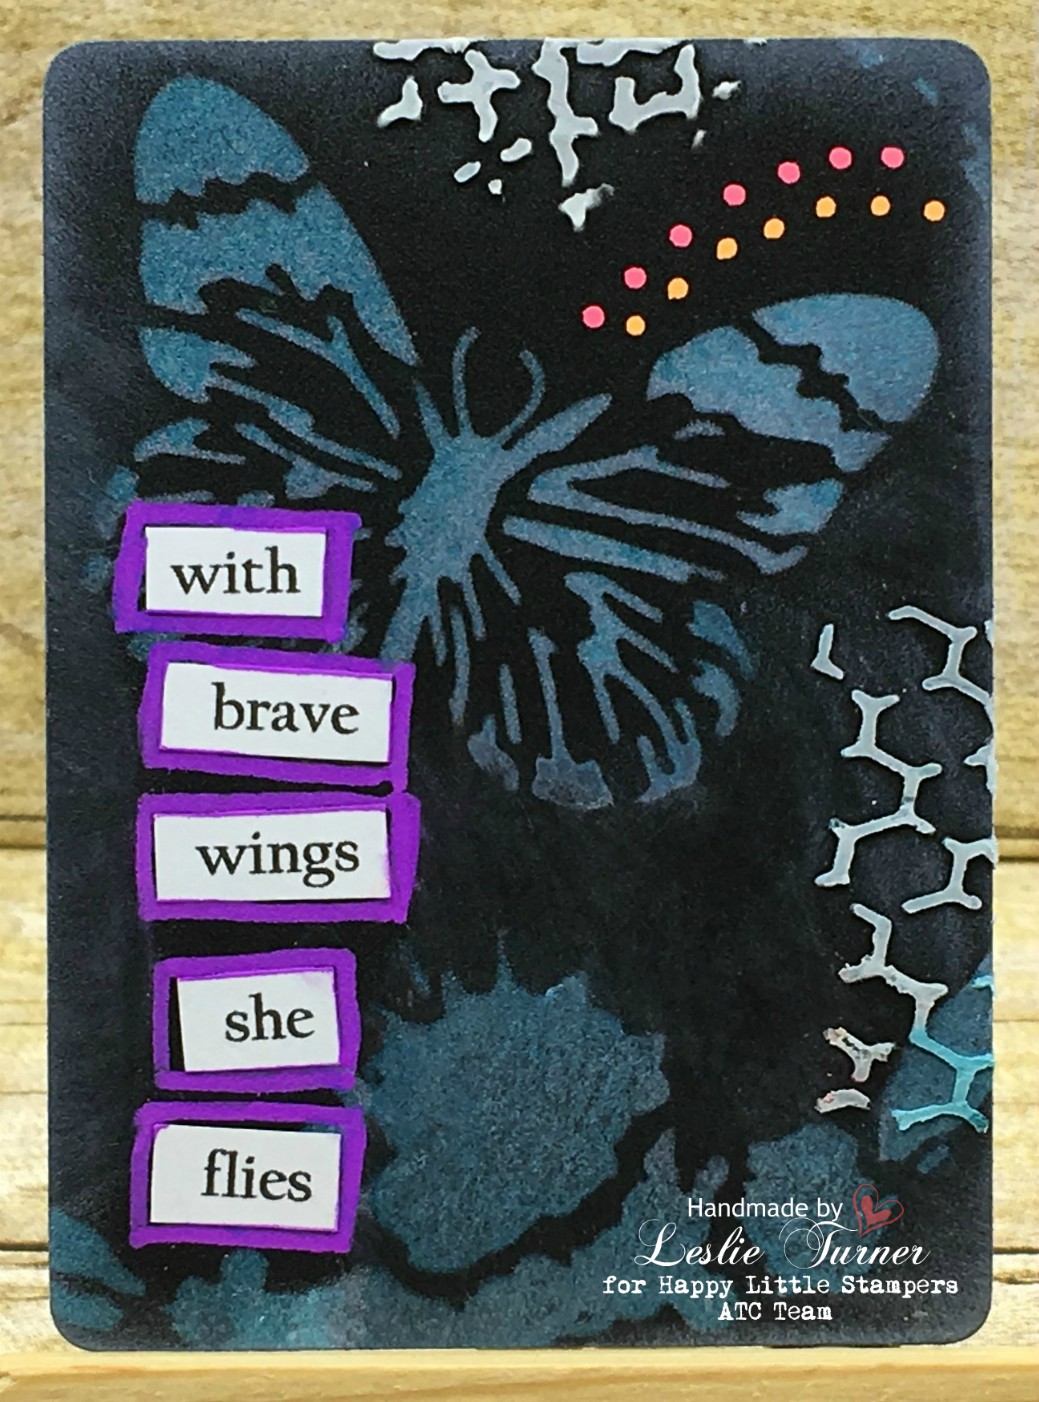
I pounced white dye ink through the butterfly and ink splotch portion of the stencil and then spritzed Glimmer Mist over it to give it some gorgeous shimmery color. I applied dimensional paste with a spatula over two other areas of the stencil and let that dry.

2018_12250014a

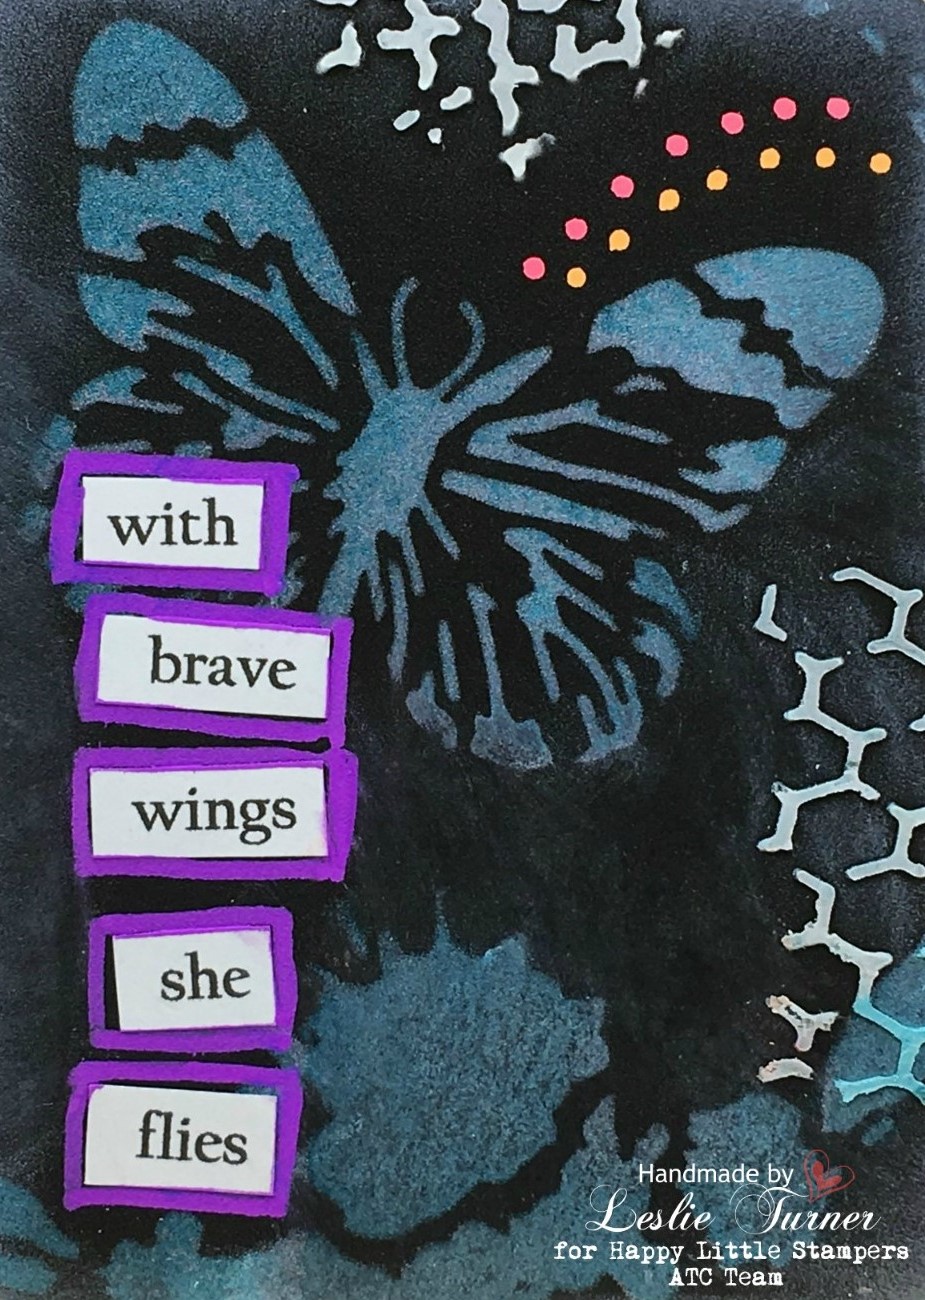
I created the sentiment on the computer, hand-cut the words and adhered them to the left side of the ATC, then outlined them with a purple chalk marker. The finishing touch were pink and yellow dots created with chalk markers. I sprayed a matte fixative over the entire ATC so nothing would rub off.

2018_12250015a

Products used:
Cardstock/Paper: Darice All Chalked Up cardstock
Ink: Memento Tuxedo Black Marker; Sweet Stamps White Dye Ink; Bistro Chalk Markers- Purple, Pink and Orange, Tattered Angels Dragonfly Glimmer Mist
Accessories:  Kadomaru Pro Corner Rounder, The Crafter’s Workshop Mini Butterfly Collage Stencil, DecoArt Dimensional Effects, Krylon Matte Fixative

I hope you’ve enjoyed today’s project and will link up an ATC with us this month! We’d love to see what you create – either a card or a coin! Thanks so much for stopping by today – we’ll see you next time! ;)

Scrappy hugs,
lesliesig

Valentine Greetings bookmark

Hello, my crafty peeps! Hope you had a great weekend! I’m excited to announce that I’ve joined the UnstampaBelles design team – woo-hoo! I’m very excited and am looking forward to creating with these talented ladies! A new challenge launched over at UnstampaBelles last Monday and today is my showcase day on the blog! I’m thrilled to share my DT inspiration project for Challenge #86 – Simply Bright & Cheerful! The twist this month is Arty Creations. And there’s a prize in the mix… a $15 gift voucher (via PayPal or direct to an online store)… so let’s see what you got! The twist is not mandatory to play but we’d love to see your creativity and it will put you in the running for DT Favorite!

I created a fun Valentine’s Day bookmark. It’s been many years since I created a bookmark and I thought this would be a fun debut project for the UnstampaBelles Challenges.

2019_02020014a

The best aspect of being a new designer on this design team is that there is no stamping allowed, hence the name UnstampaBelles. I do occasionally create a project without stamping but not very often, so this is a challenge and I’m definitely up for it! I love how this bookmark turned out!

2019_02020015a

I started with a tag, then added papers, a layered image and sentiment, and finally a few finishing touches such as the heart stickers and gold Skinny Washi tape. This is absolutely one of the cutest images I’ve ever worked with and I can’t wait to gift this!

2019_02020016a

Products used:
Cardstock/Paper: Tim Holtz Distress Tag; Papers, Image and Sentiment from Polly’s Paper Studio Charming Cherubs Valentine Creativity Kit; Colorbok Primary Cardstock
Dies/Punches: Stampin’ Up 3/4″ circle punch, 1/4″ hole punch
Accessories:  Heart Stickers from October Afternoon Daily Flash Girl Talk; Me & My Big Ideas Gold Skinny Washi Tape; Prairie Bird Boutique Red Wrinkled Ribbon; Hemptique Bamboo Cord

I hope you’ve enjoyed today’s project and will come on over and play with us this month! You’ll see new inspiration every week! We can’t wait to see what you create without the use of stamps! Thanks so much for stopping by today – we’ll see you next time! ;)

Scrappy hugs,
lesliesig

happy Birthday wishes

Hello, my crafty friends! Hope you’ve had a great week! This month’s Anything Goes with Dies Challenge is live over at Happy Little Stampers and I’m thrilled to share my DT inspiration project with you today!

HLS AG with Dies Badge

I used the Crafter’s Companion Die’sire ‘Ruth’ Create-A-Card die set along with a Sizzix Dotted Ovals die for my project this month. I looked at my dwindling stash of birthday cards and decided that a pretty birthday card was in order. I cut the card base from Whisper White cardstock and the layer from Rich Razzleberry cardstock.

2018_12230008a

I have a huge stash of digital images I’ve never used and have vowed to use some of them in this new year. I chose the purple version of Fred She Said’s Lenten Roses for the focal image and cut it with the dotted ovals die. I added some Spectrum Noir Crystal Clear Sparkle overlay marker to the flower petals for a little shimmer and they look gorgeous! I’m so smitten!

2018_12230008aa

For the inside, I cut a Rich Razzleberry layer and then a white layer, and stamped a simple sentiment.

2018_12230009a

And here’s another look… I’m in love with this one! Very happy with the result!

2018_12230010a

Products used:
Cardstock/Paper: Stampin’ Up Whisper White and Rich Razzleberry cardstock
Stamps: Fred She Said Lenten Roses (purple version), Stampin’ Up Petite Pairs and Birthday Blossoms stamp sets
Ink: Stampin’ Up Rich Razzleberry ink, Spectrum Noir Crystal Clear Sparkle Overlay Marker
Dies/Punches: Crafter’s Companion Die’sire ‘Ruth’ Create-A-Card die set, Sizzix Dotted Ovals die
Accessories:  Tim Holtz Stamp Platform

I hope you’ve enjoyed today’s card and will link up a project with us this month using dies! We’d love to see what you create! Thanks so much for stopping by today – we’ll see you next time! ;)

Scrappy hugs,
lesliesig

winter wishes

Hi everyone! It’s the first Tuesday in February and I’m happy you’ve stopped by! It’s time for another fun challenge over at Stinkin’ Inkers Challenge Blog and I’m happy to share my DT inspiration project for our February Baby, It’s Cold Outside challenge! We’d love to see your project featuring hot cocoa, sweaters, mittens, or quilts. I created a Christmas card in non-traditional colors featuring a quilt created with the My Favorite Things Die-namics Diagonal Quilt Square Cover-Up die and vintage marketplace papers. So fun!

2018_12020005a

I picked out several patterned papers and some brown cardstock, and proceeded to cut several quilts. Then I pieced them together with the different papers and the brown cardstock, so I now have several finished quilts to use on other projects. :) I stamped a sentiment in the lower right-hand corner and added some Rox stones to complete the front.

2018_12020006a

I decorated in the inside panel with strips of brown and pink cardstock, stamped the Christmas sentiment and then layered the panel on the brown cardstock.

2018_12020007a

And one more peek… I love quilts (and the warmth they bring) and I love Christmas cards in non-traditional colors!

2018_12020008a

Products used:
Cardstock/Paper: Stampin’ Up thick and regular Whisper White cardstock, Stampin’ Up Blushing Bride cardstock, Darice Premium Brown cardstock, Bazzill Basics Vintage Marketplace Mini Prints 6×6 paper pad
Stamps: Hero Arts Holiday Messages and Frames stamp set
Ink: Stampin’ Up Chocolate Chip ink
Dies/Punches: My Favorite Things Die-namics Diagonal Quilt Square Cover-Up die
Accessories:  Darice Pink Foamies foam, Tim Holtz Stamp Platform, Queen & Co. Chocolate Delight Rox

I hope you’ve enjoyed my quilt card and will link up a ‘warm’ project with us this month! We can’t wait to see what you create! Thanks for stopping by today – we’ll see you soon! ;)

Scrappy hugs,
lesliesig

snowball fight

Hi everyone! Happy Friday and February 1st! It’s time for another fun challenge over at Love To Scrap Challenge Blog and I’m excited to share my DT inspiration project for LTSCB #118 – Anything Goes with optional twist of Monochrome! We are being sponsored this month by The Paper Shelter so come on over and play with us for a chance to win a prize!

I created a fun quirky friendship card using the adorable Snowball Fight digital stamp which includes the focal image and background paper. Loving the blue/teal/green blend which is perfect for a monochrome project!

Leslie

I printed the background paper several times and cut out the scalloped circles in the center and layered them. I embellished all the snowflakes with Clear Star Gelly Roll pen. I fussy cut the image and popped it up on foam squares for a little dimension. I printed the sentiment on vellum, cut it in a strip and added it to the left side, then layered the entire panel on gold cardstock. I added several gold sequins to finish the front.

2018_11240006a

I created the sentiment for the inside on the computer, cut the panel and layered it on gold cardstock.

2018_11240007a

One more look… such an adorable image and paper! Love how this turned out!

2018_11240008a

Products used:
Cardstock/Paper: Stampin’ Up thick and regular Whisper White cardstock, Marco’s Venicelux cardstock, Strathmore 30# Vellum
Stamps: The Paper Shelter Snowball Fight digital stamp, Polkadoodles Octavia Moonfly digital alphabet stamps
Ink: Sakura Clear Star Gelly Roll pen
Accessories:  Pretty Pink Posh Metallic Gold sequins

I hope you’ve enjoyed today’s card and will link up a monochrome project with us this month! Be sure to check out all the fun goodies at The Paper Shelter – I know you’re gonna love what you find! Thanks so much for stopping by today – we’ll see you again soon! ;)

Scrappy hugs,
lesliesig

You are too kind.

Hi everyone! I’m back with another fun project this morning! A new challenge is live over at Mix It Up Challenge Blog and I’m stoked to share my DT inspiration project for MIUCB #22 – Anything Goes + Rubberband Stamping! Nope, I’m not out of my mind, lol! You really CAN stamp with rubberbands – either wrapped around an acrylic block or a brayer! I created a clean and simple thank you card using two sizes of rubberbands wrapped around a 3″ square acrylic block, and it turned out pretty neat!

2018_11180004a

I masked the top and bottom portions of the panel, inked the center with two light shades of distress ink, stamped in the center with two darker shades of distress ink, and then removed the masking paper. I stamped a large sentiment across the bottom and then layered the panel and attached it to the card base. I stamped large flowers on Valspar paint cards and punched them out. I affixed glitter gumdrops to the centers of the flowers and adhered them to the front of the card.

2018_11180005a

I embellished the inside panel with strips of the same cardstock used to layer the front panel and adhered a stamped/punched flower. I left the inside blank to write a custom sentiment.

2018_11180006a

And here’s one more look… I really like rubberband stamping! ;)

2018_11180007a

Products used:
Cardstock/Paper: Stampin’ Up thick and regular Whisper White cardstock, Stampin’ Up Pumpkin Pie cardstock, Valspar paint cards- Caramel Cream, Orange Ochre, Vivid Orange and Classic Red
Stamps: Stampin’ Up Flower Shop and One Big Meaning stamp sets
Ink: Ranger distress ink- dried marigold, wild honey, rusty hinge, barn door; StazOn White ink
Dies/Punches: Stampin’ Up Pansy Punch
Accessories:  Tim Holtz Stamp Platform, YNS White Glitter Gumdrops, Masking Paper, thin and medium rubberbands

I hope you’ve enjoyed today’s project and will link up with us this month! Remember, all of our challenges are ‘anything goes’ and the technique twist is not required to play! Although you have to admit that you’re now intrigued with rubberband stamping, arent’t you, lol, so give it a go! Thanks for stopping by today and we’ll see you again soon! ;)

Scrappy hugs,
lesliesig

merry everything happy always

Hello, everyone! It’s the first day of the month and you know what that means, lol… busy busy morning! A new challenge is live over at Merry Little Christmas Challenge Blog and I’m excited to share my DT inspiration project for MLCCB #7 – February Anything Christmas Goes! I’ve been bitten by the Impossible Card bug and have made several  of these over the past couple months. They are just so cool!

Leslie

The patterned paper and fussy-cut elements are all from the KaiserCraft Letters To Santa 6×6 paper pack which I’ve fallen madly in love with! I used the traditional red and green color combo with Santa, holly and poinsettias. ;)

2018_08050013a

And here’s another view with the flap down, ready for mailing. L-O-V-E this card!

2018_08050014a

Products used:
Cardstock/Paper: Stampin’ Up Garden Green cardstock, KaiserCraft Letters To Santa 6xy6 Paper Pad, Marco’s Gold Venicelux cardstock
Stamps: Stampin’ Up Suite Seasons stamp set
Ink: Stampin’ Up Cherry Cobbler ink
Accessories: Tim Holtz Stamp Platform, Stampin’ Up Window Sheet, YNS Gold Glitter Gumdrops

I hope you’ve enjoyed this Impossible Card and will link up a Christmas project with us this month! We’d love to see what you create! Thanks so much for stopping by and we’ll see you again… real soon! ;)

Scrappy hugs,
lesliesig

thanks

Hello, crafty peeps! Happy February 1st! Today would have been my parents’ 71st wedding anniversary – I know they are celebrating in Heaven! It’s time for another fun challenge over at Love To Craft Challenge Blog and I’m stoked to share my DT inspiration project for LTCCB #31 – February Anything Goes! I was commissioned by a co-worker a to create a thank you card and this is what I came up with. She loved it!

2018_08230001a

I heat embossed this large image in black and colored it with Spectrum Noir markers, keeping it very simple with just shades of yellow and green. I cut the image with a dotted rectangle die and layered it on pastel green pearlized cardstock and then on thick black foam for dimension.

2018_08230002a

I embellished the inside panel with a strip of the pearlized cardstock, layered it on black cardstock and stamped a simple greeting.

2018_08230003a

And here’s one final look… love this image as it sure packs a powerful punch!

2018_08230004a

Products used:
Cardstock/Paper: Stampin’ Up thick and regular Very Vanilla cardstock, Stampin’ Up Basic Black cardstock, Paper Accents Pearlized Pastels cardstock
Stamps: Stampin’ Up Floral Statements stamp set, Paper Smooches Word Salad stamp set
Ink: Memento Tuxedo Black ink; Versamark Dazzle; Spectrum Noir- CT1, CT2, CT4 ,LG1, LG3
Dies/Punches: Sizzix Dotted Rectangles die
Accessories:  Tim Holtz Stamp Platform, Hero Arts Clear Embossing Powder, thick black foam

I hope you’ve enjoyed today’s project and will link something up with us this month! We can’t wait to see what you’re working on! Thanks so much for stopping by today and we’ll see you very soon! ;)

Scrappy hugs,
lesliesig

Congratulations

Hi everyone! Welcome to February… it sure got here fast! It’s time for another fun challenge over at Polkadoodles Craft Challenge and I’m super stoked to share my DT inspiration project for Week 5 – Anything Goes Challenge, a pretty wedding congratulations card created with the absolutely adorable Bride and Groom digital image, one digital paper from Winnie Sugar Sprinkles Paper Heaven 2 Bundle and two digital papers from Winnie Sugar Sprinkles Paper Heaven 5. I also used sentiments from Winnie Celebrations 1 Sentiments and Winnie Celebrations 2 Sentiments.

2019_0120001a

I really enjoyed coloring up this adorable image and pairing it with the soft digital papers and pop of gold. I used one of my favorite dotted dies to cut the image and layered the sentiment in vertical fashion.

2019_0120002a

I decorated the inside with some leftover strips of paper used on the front, and cut the sentiment with a mini stitched scalloped die (another favorite). I had a scrap piece of Paper Heaven 2 digital paper from Octavia Moonfly Big Kahuna Digital Craft Download Bundle laying on my desk that I used to layer the panel on.

2019_0120003a

Here’s one more look… love how this turned out!

2019_0120004a

I’d love to enter this card into the following challenges:
A Perfect Time To Craft Open Challenge: #2 – Anything Goes
Classic Design Team Challenge Blog: #2 – Anything Goes
Creatalicious Challenges: #156 – Anything Goes with optional Love/Hearts

Products used:
Cardstock/Paper: Polkadoodles digital paper from Winnie Sugar Sprinkles Paper Heaven 2 Bundle and Winnie Sugar Sprinkles Paper Heaven 5, Marco’s Gold Mirror cardstock
Stamps: Polkadoodles Bride and Groom digital image; sentiments from Winnie Celebrations 1 Sentiments and Winnie Celebrations 2 Sentiments
Ink: Spectrum Noir- FS3, FS6, FS7, FS8, PP1, GB8, GB10, EB1, EB2, IG1, IG3, IG4, IG5, DG3; Sakura Clear Star Gelly Roll pen
Dies/Punches: Sizzix Dotted Squares die, My Favorite Things Die-namics Stitched Mini Scallop Rectangle STAX die
Accessories:  Darice pink gemstones

I hope you’ve enjoyed today’s project and will link up an ‘anything goes’ project with us this week! Be sure to check out all the fun stamps, dies, papers and digital images over at the Polkadoodles shop! OMG, you’ll be in heaven! Thanks so much for stopping by today – we’ll see you next time!

Scrappy hugs,
lesliesig

life is full of wonderful

Hello crafty peeps! Gosh, the month of January has gotten away from us already! Today is my Featured Post Day on the Gecko Galz blog and I’m excited to share my DT inspiration project featuring a gorgeous image from the True Loves Kiss Collage Set, Bo Peep paper from Miss Muffet Paper Pack, Pixie Dust paper from Neverland Paper Pack, and sentiment from the Charming Words Collage Set. This is my last post for Gecko Galz and I’d like to shout out to Lee Ann and the rest of the team for having me along these last few months! I’ve thoroughly enjoyed myself!

2018_12250005a

Despite the complex look, this really was an easy card to put together. I love the colors in the background papers (which match her dress) and built the card elements and layers off the colors. The pop of gold really makes a hit.

2018_12250006a

I embellished the inside panel with leftover strips of paper and cardstock used on the front, and stamped a fun quirky sentiment. :P

2018_12250007a

And here’s one more look… very pleased with how this turned out. These images are so pretty!

2018_12250008a

I’d love to enter this card into the following challenges:
A Bit More Time To Craft: #84 – Anything Goes
Aud Sentiments Challenge Blog: #219 – Anything Goes + A Sentiment
Cards In Envy: Love Me or Love My Pet Card Challenge
C.R.A.F.T. Challenge: #498 – Love/Valentines
Crafting By Designs: Layer It Up
Creative Moments: #161 – Anything Goes
Dragonfly Dreams: Anything Goes
Not Just Cards: January Anything Goes
The Creative Crafters: #12 – Anything Goes
World Wide Open Design Team Challenge Blog: #1 – Anything Goes

Products used:
Cardstock/Paper: Stampin’ Up thick and regular Whisper White cardstock, Stampin’ Up Watermelon Wonder and Flirty Flamingo cardstock, Marco’s Gold Metallic Venicelux Paper, Gecko Galz True Loves Kiss Collage Set, Gecko Galz Bo Peep paper from Miss Muffet Paper Pack, Gecko Galz Pixie Dust paper from Neverland Paper Pack, Gecko Galz Charming Words Collage Set
Stamps: STAMPlorations Funny Kinda Love stamp set
Ink: Stampin’ Up Watermelon Wonder ink
Dies/Punches: Squared Squares die set
Accessories:  Tim Holtz Stamp Platform

I hope you’ve enjoyed today’s card and will link up a ‘love’ project with us this month! And don’t forget to check out all the fun goodies at the Gecko Galz Etsy store! Thanks so much for stopping by today – we’ll see you next time! ;)

Scrappy hugs,
lesliesig