
Hey, everybody! Happy Happy Friday! Today is my baby boy’s 36th birthday and I don’t even know how that happened! He’s grown into such a wonderful young man (son, brother, uncle, husband and father), so here’s to many more happy birthdays! I’m thrilled to be back on the Clear Scraps blog today with another awesome DT inspiration project! I haven’t made any ornaments yet using Clear Scraps products and the Mini Shaker Star and 4×6 Stars Stencil spoke to me, so that’s the direction I went!
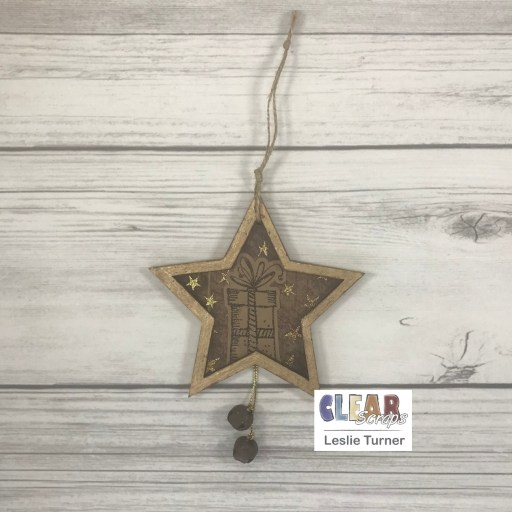
I started by swiping Memento Rich Cocoa ink and Memento Espresso Truffle ink in a downward motion onto the chipboard back of the Mini Shaker Star. I applied transfer gel with a spatula over the 4×6 Stars Stencil onto the chipboard back, let it dry, and pressed a piece of gold foil onto it with a brayer. Next, I painted the front chipboard form of the with a gold paint pen and set it aside to dry. I stamped the Christmas present on light brown cardstock in brown archival ink, stamped it again in Versamark, and heat embossed it with clear embossing powder with flecks of white embossing powder in it. Whole ‘nother story… I must have accidentally dumped some stray white into the container of clear at some point but when I discovered it a little over a year ago, I liked it so I’ve been using it like that, lol!
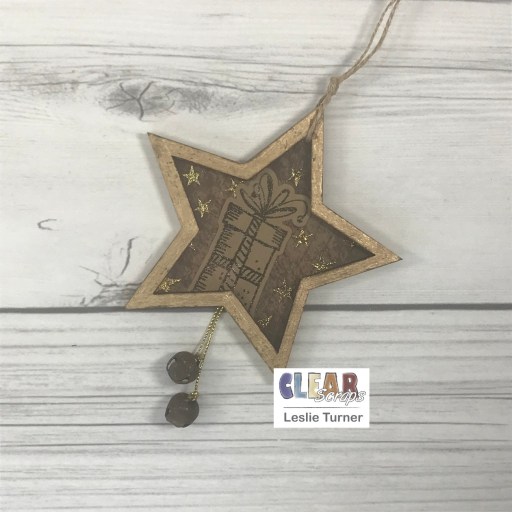
I die cut the embossed present with the coordinating die and adhered it slightly off-kilter but mostly centered on the chipboard back. Working from the bottom up, I adhered the next two chipboard forms and punched a hole through the three layers with my Crop-A-Dile Big Bite. I adhered the acrylic divider (with the protective film removed from both sides) to the front chipboard form, punched a hole through those two layers, and adhered them to the bottom part of the star. I clamped the star for about 10-15 minutes to be sure the layers adhered well, and then ran the gold paint pen around the outside edges to match the front.
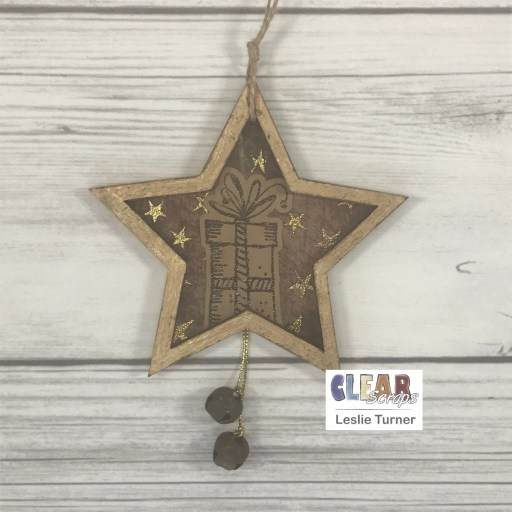
Once the gold paint was completely dry, I lightly sanded it and wiped brown dye ink on it with my finger tip to add to the rustic look. I threaded jute rope through the hole at the top for the hanger, catching a piece of gold cording in it, and tied two knots. I tied rusted jingle bells to the end of the gold cording which completed the project.

Sharing in the following challenges:
1. ABC Christmas Challenge Blog: L is for Little & M is for Music (little – mini shaker)
2. Ally’s Angels: #59 – Anything Goes
3. My Time To Craft Christmas: #37 – Christmas Music, Caroling, Hymn or Song (Jingle Bells)
4. The Creative Crafters: #53 – Anything Goes
Clear Scraps products used:
Mini Shaker Star
4×6 Stars Stencil
Other products used:
Cardstock/Paper: CutCardStock Basis Light Brown cardstock
Stamps: STAMPlorations Warm Hands Warm Hearts stamp set
Ink/Paint: Memento Rich Cocoa ink, Memento Espresso Truffle ink, Marvy Uchida DecoColor Gold Paint Pen, Ranger ground espresso archival ink, Versamark, Catherine Pooler Icing on the Cake ink
Dies/Punches: STAMPlorations Warm Hands Warm Hearts die set
Accessories: Bearly Art precision craft glue, MISTI stamp tool, Big Shot, Ranger Clear Embossing Powder, Hero Arts White Embossing Powder, Deco Foil Transfer Gel Duo, Spellbinders Glimmer Gold Foil, brayer, Canvas Corp Jute Rope, GKD Gold Cording, The Funkie Junkie Boutique Rusted Jingle Bells
I hope you’ve enjoyed today’s project and you’re inspired to get those craft supplies out to play! Be sure to check out all the amazing acrylic, wood and chipboard goodies at Clear Scraps… OMGoodness, you won’t be disappointed! And head on over to the Clear Scraps Facebook Page for lots of inspiration! And while you’re at it, join the Clear Scraps Facebook Creative Group to connect with other Clear Scraps fans! Thanks so much for stopping by today – we’ll see you next time!
Scrappy hugs,

