Random Acts of Kindness ATCs

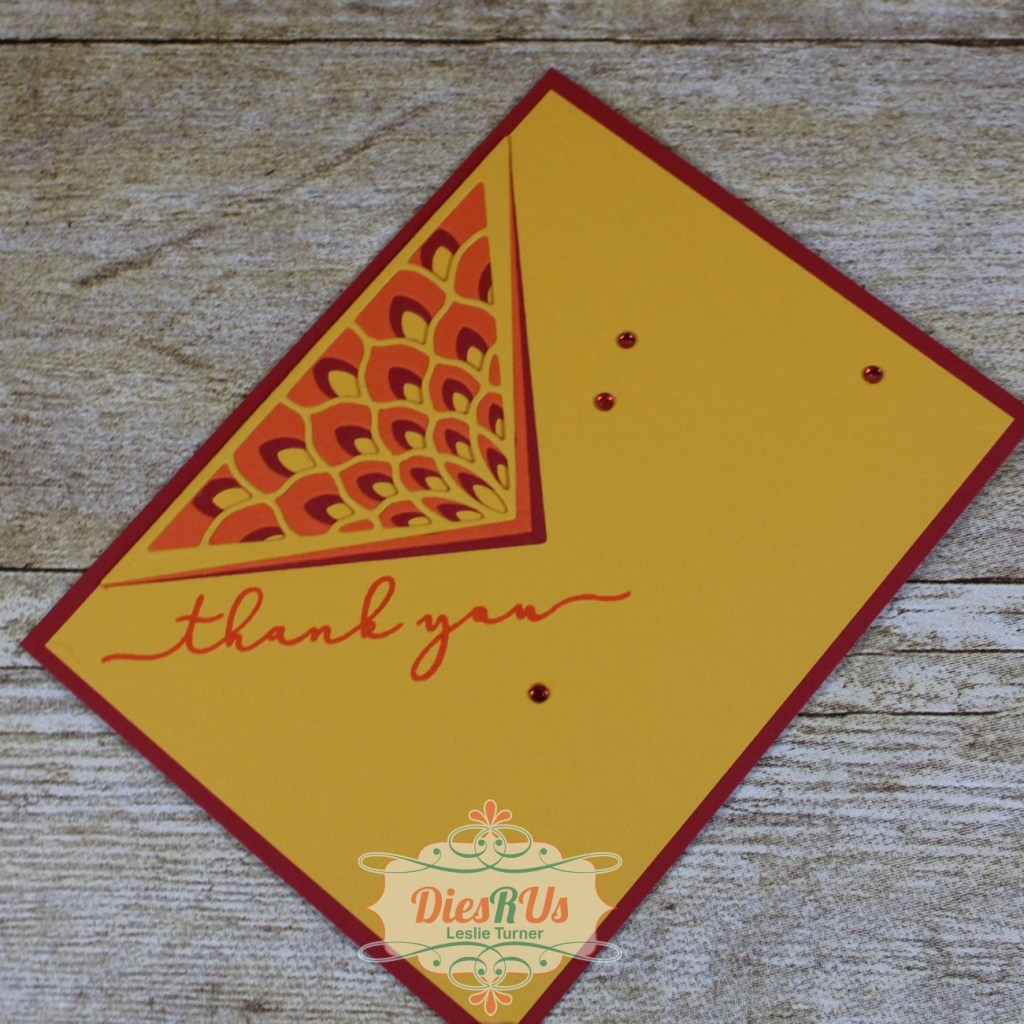
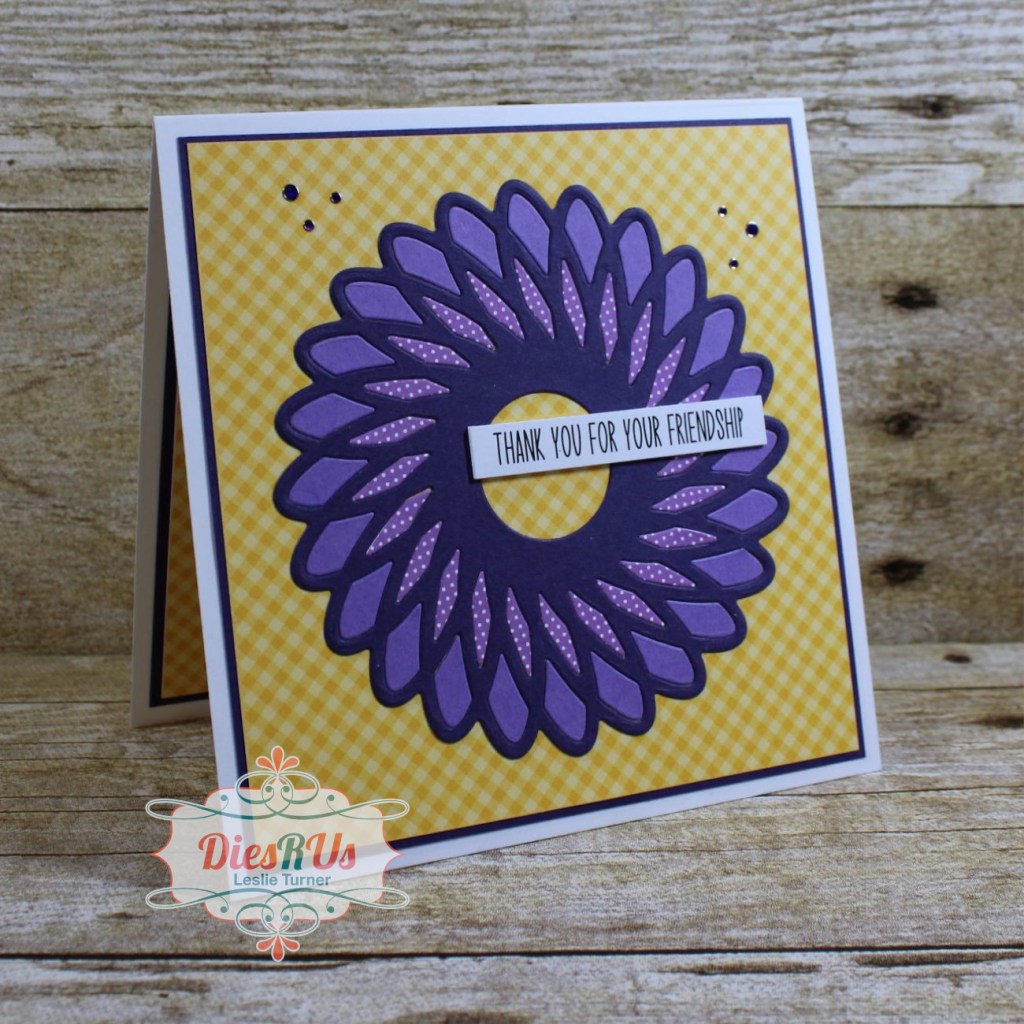
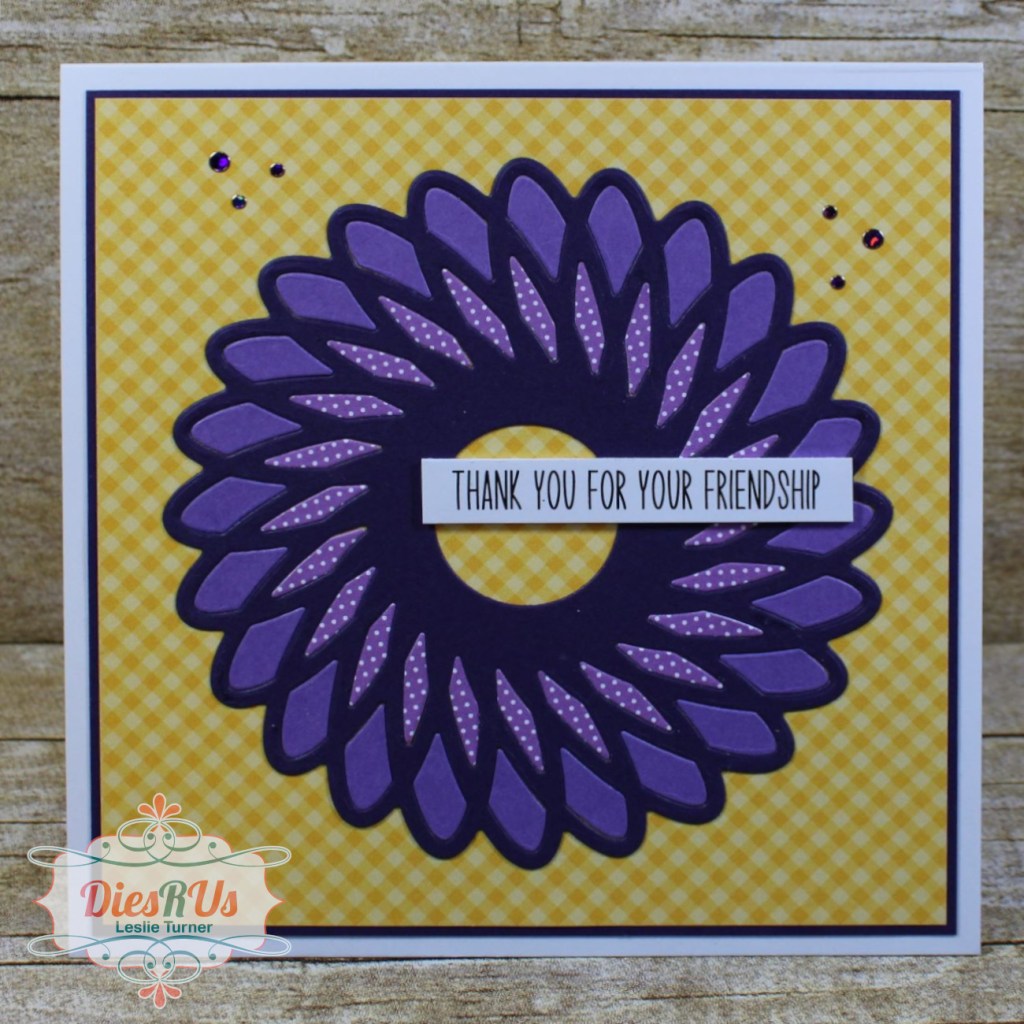
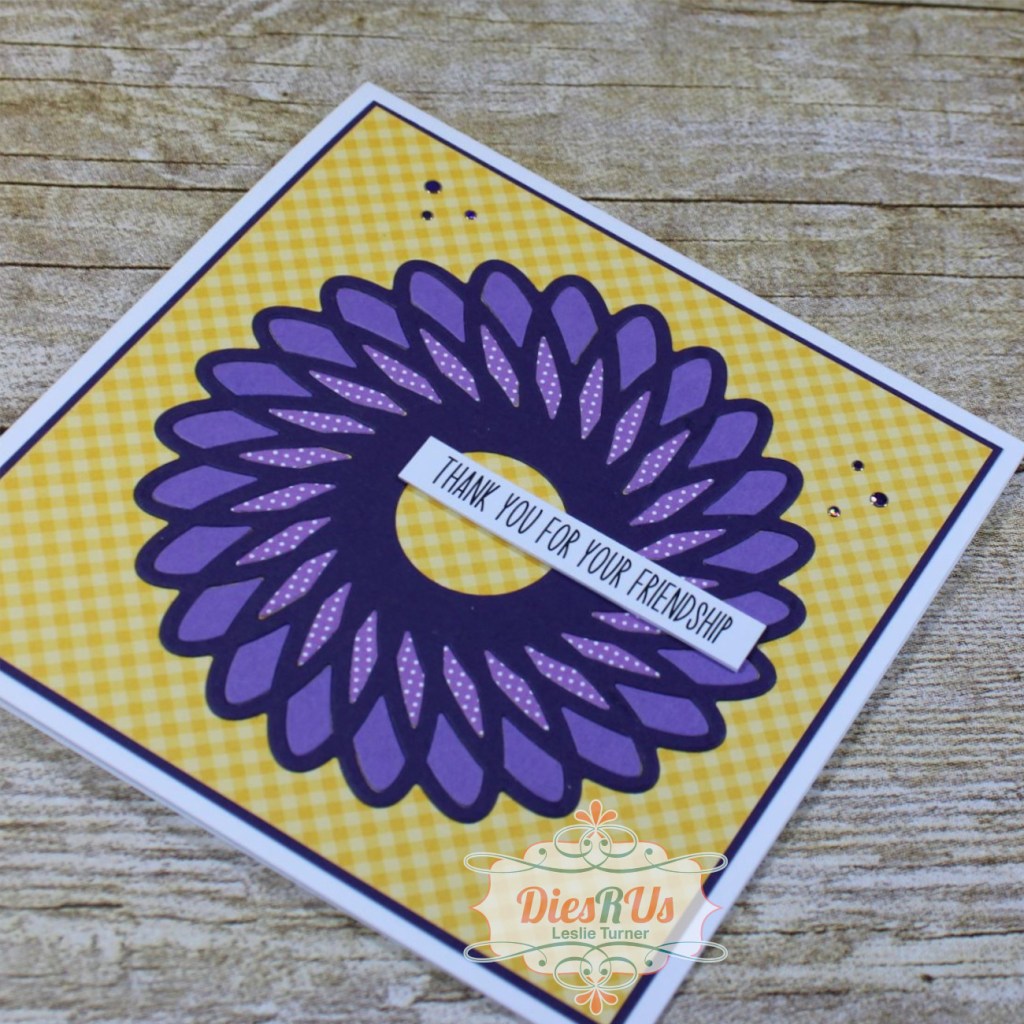
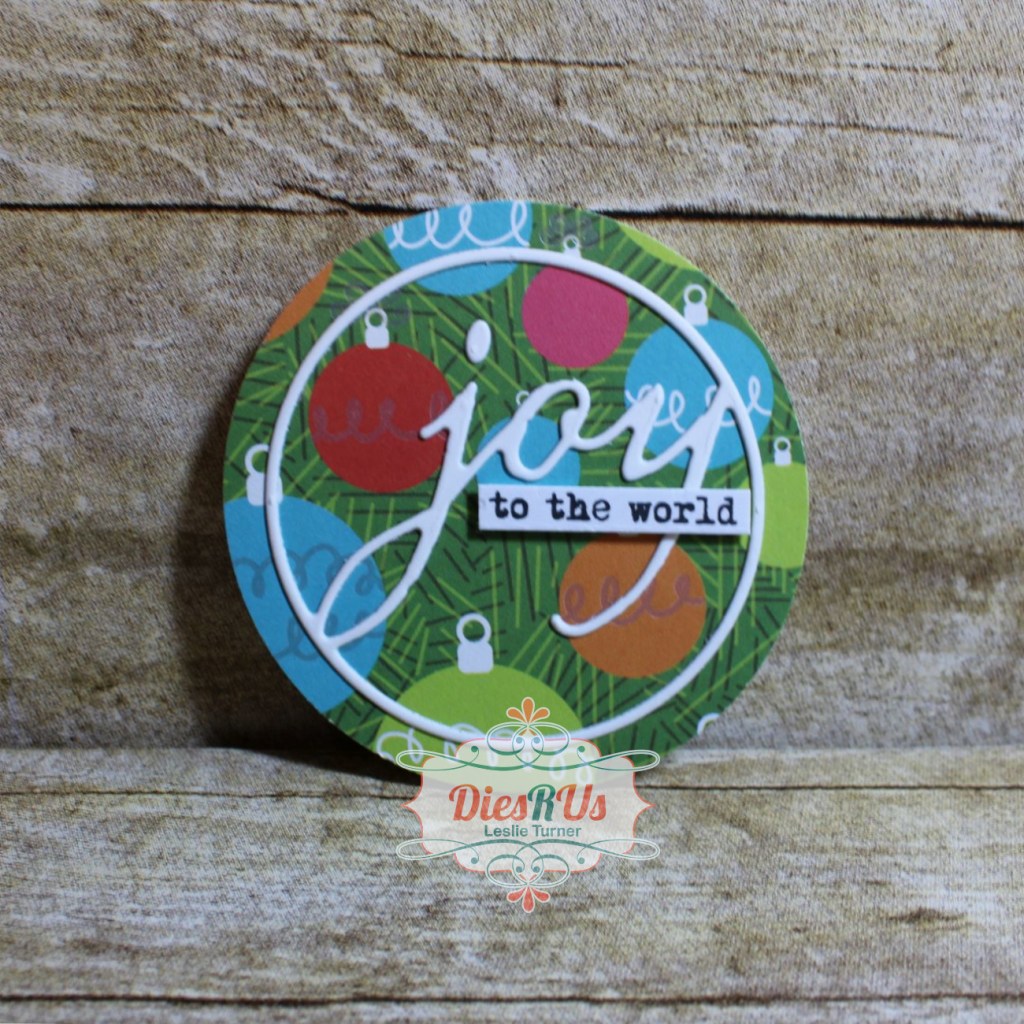
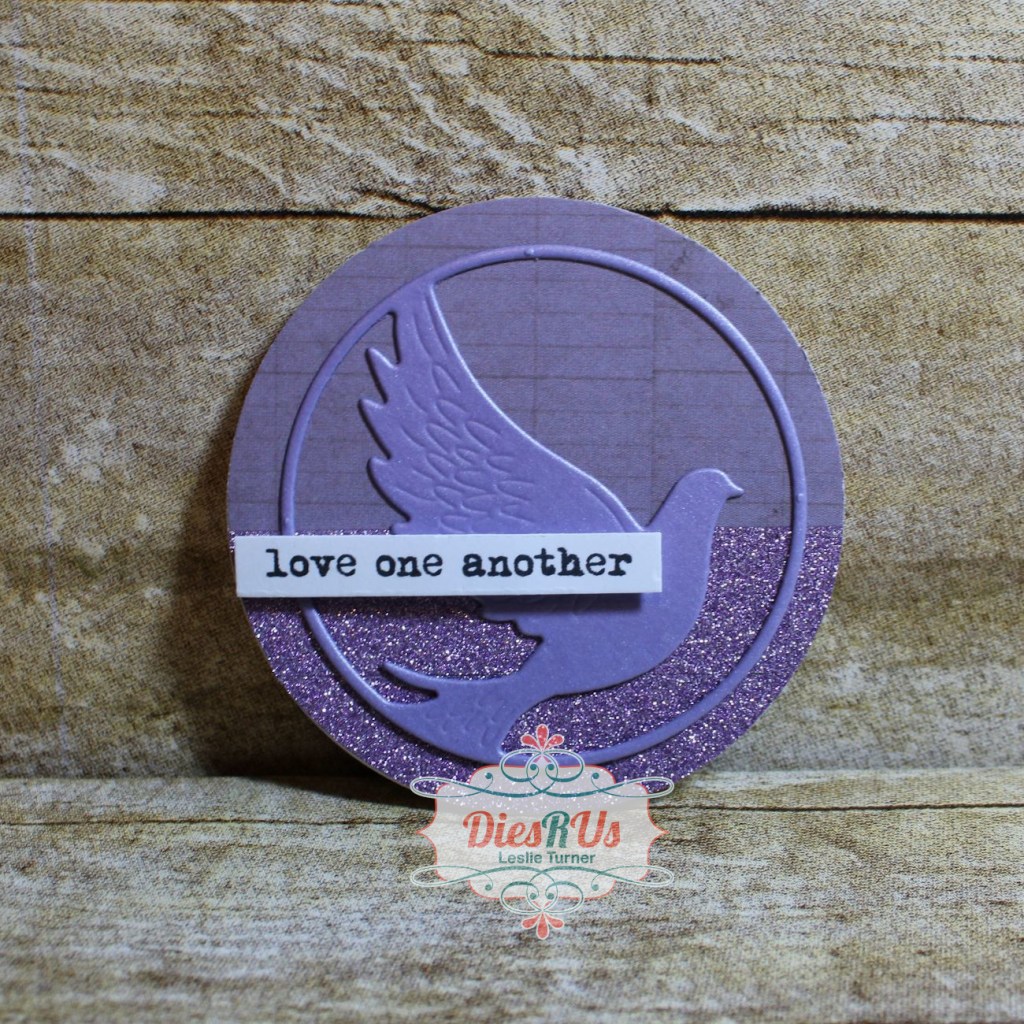
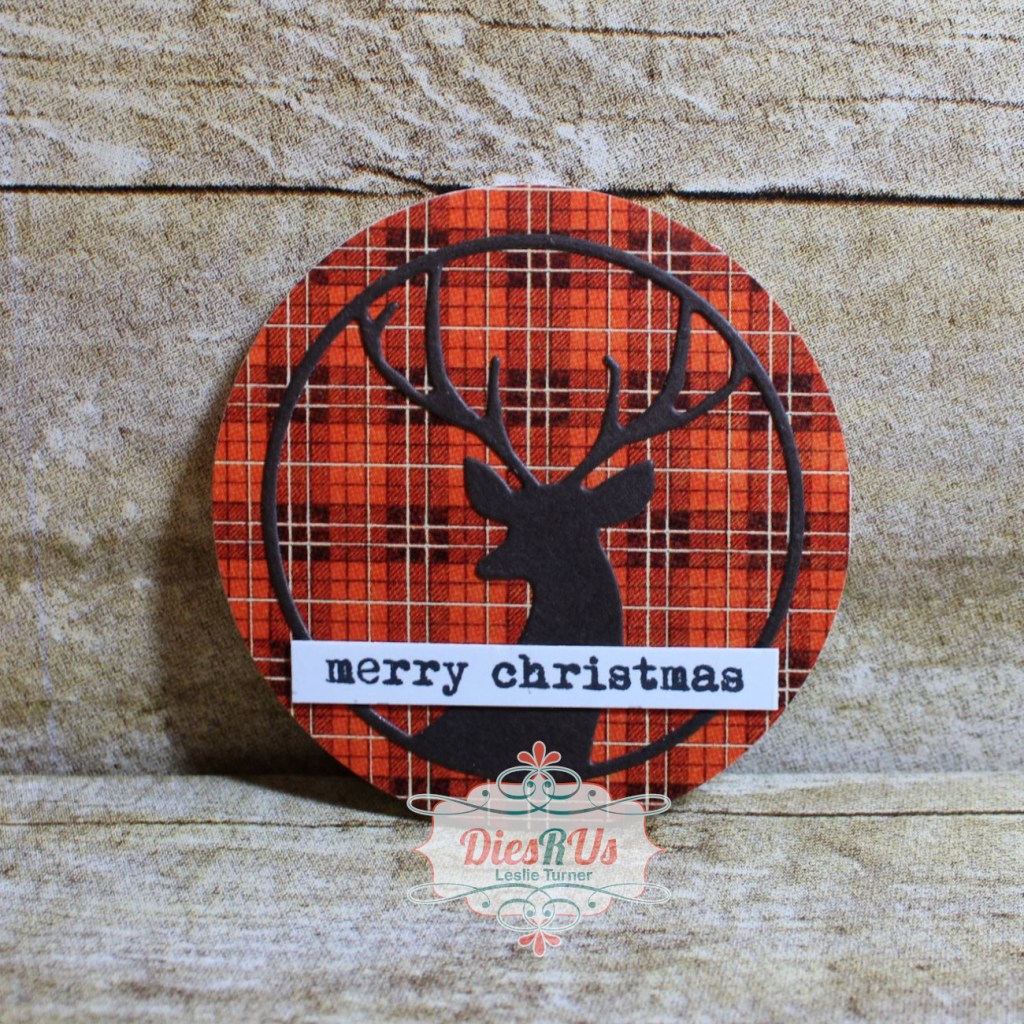
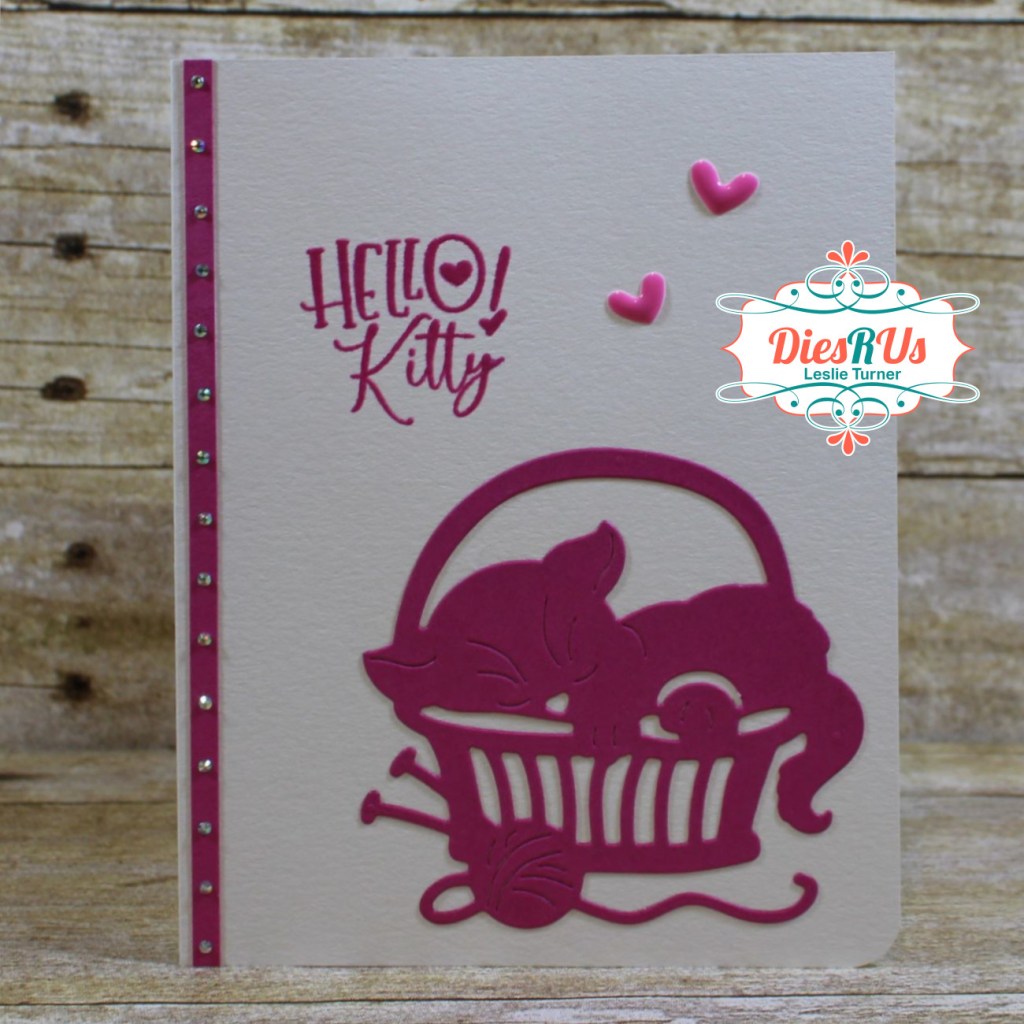
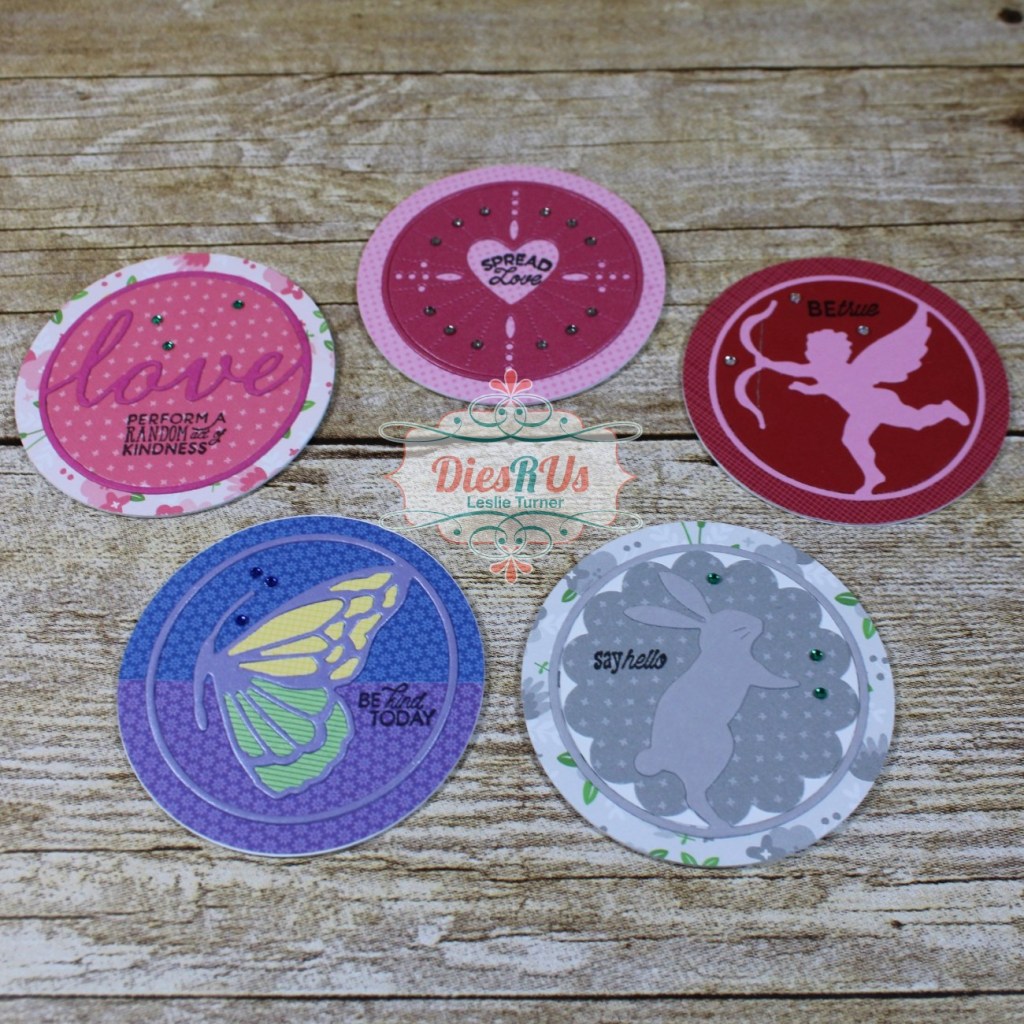
Hi everyone! Woot-woot, another Friday has rolled around and it’ll be Christmas before we know it! I can’t wait! Our weather has cooled off out here in Colorado and we are loving life – the cooler climate is what attracted us nearly five years ago! Affiliate links are used in this post at no cost to you. I really appreciate your support! I’m delighted to be back on the Dies R Us Inspiration Blog today with another awesome DT inspiration project! I’ve been on an ATC kick again lately and created a set of RAK artist trading coins using the Memory Box Love Circle, Pinpoint Heart Circle, Cupid Circle, Peaceful Butterfly Circle and Jumping Bunny Circle to add to my growing collection! If you know me, you know I absolutely love all kinds of artist trading cards, coins and cubes, and I typically don’t trade them, lol! I’ve never made any ATCs with a random acts of kindness theme so I thought that would be different and fun, and these dies were just the ticket!

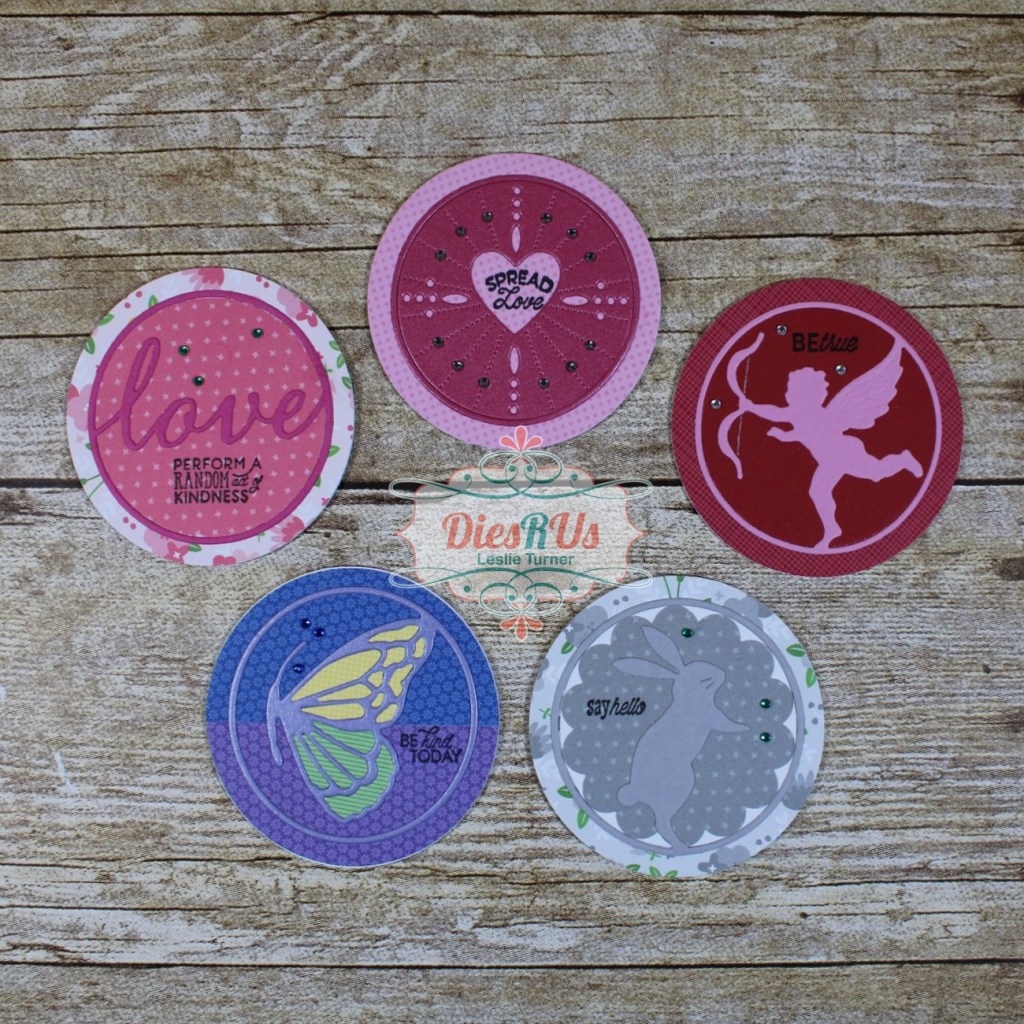
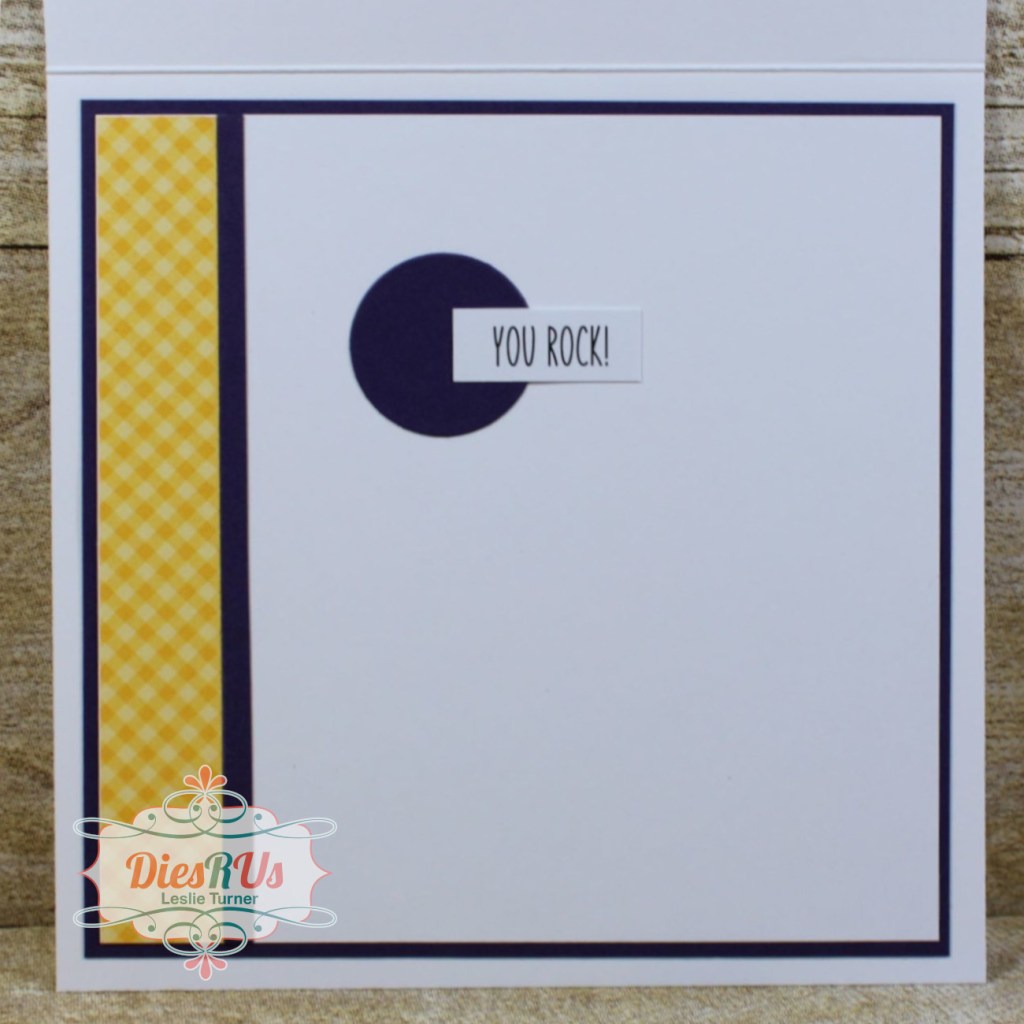
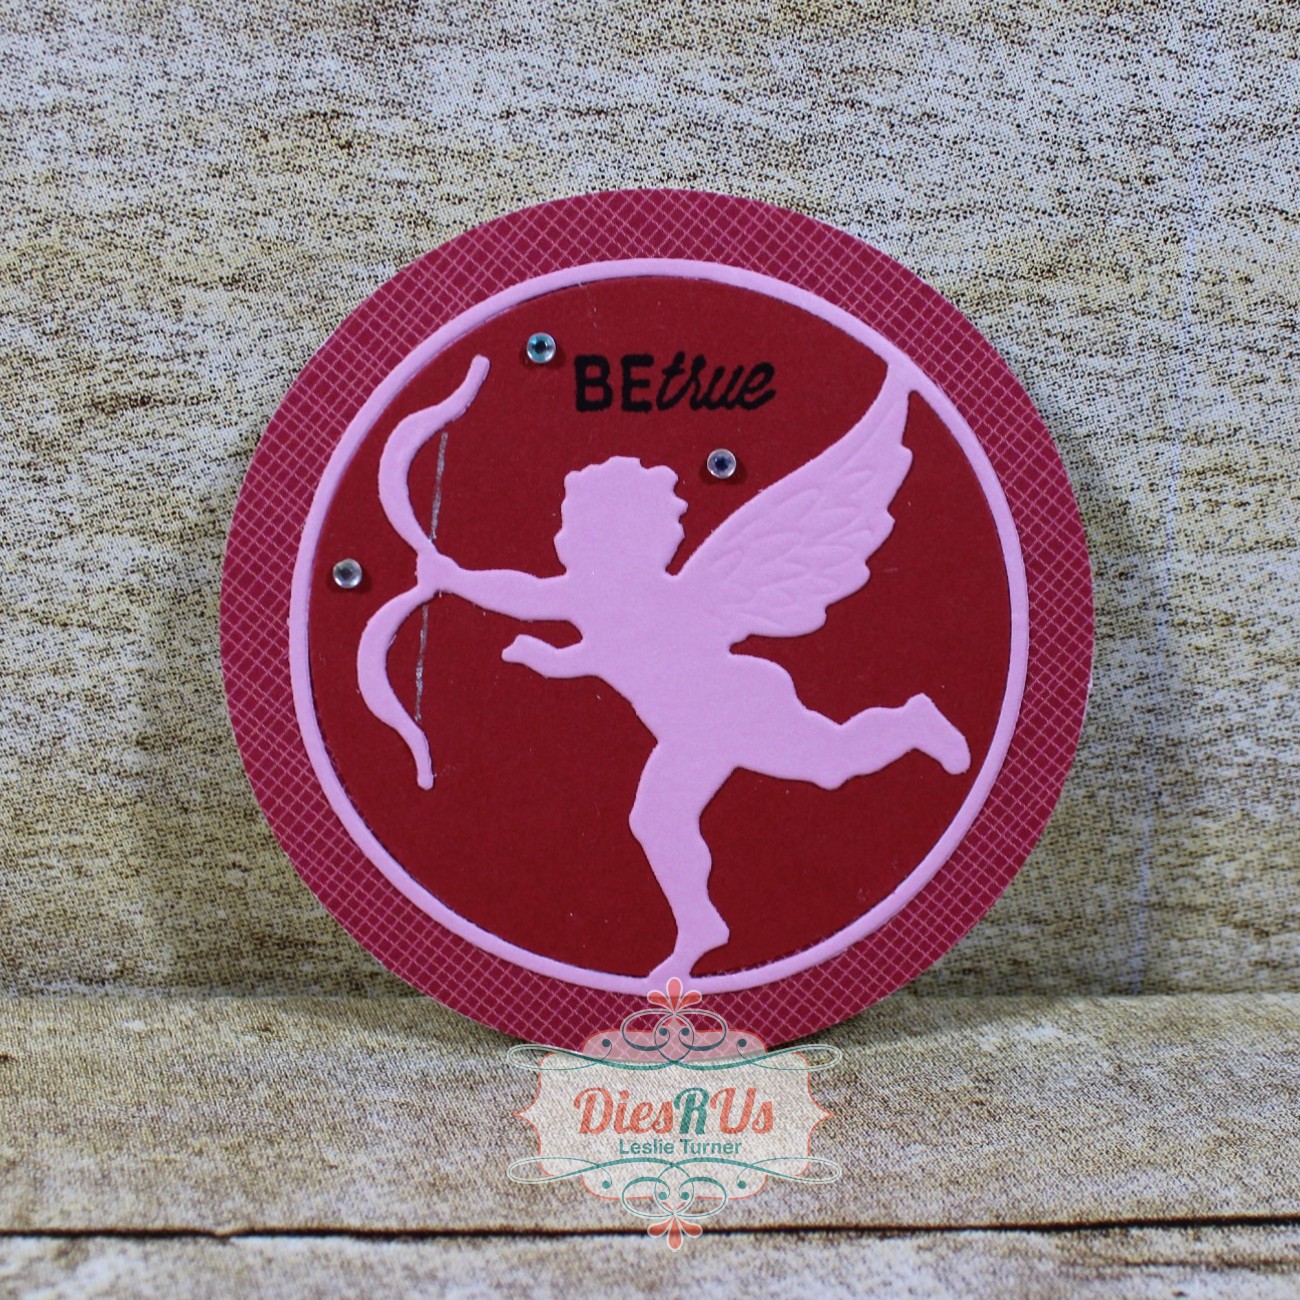
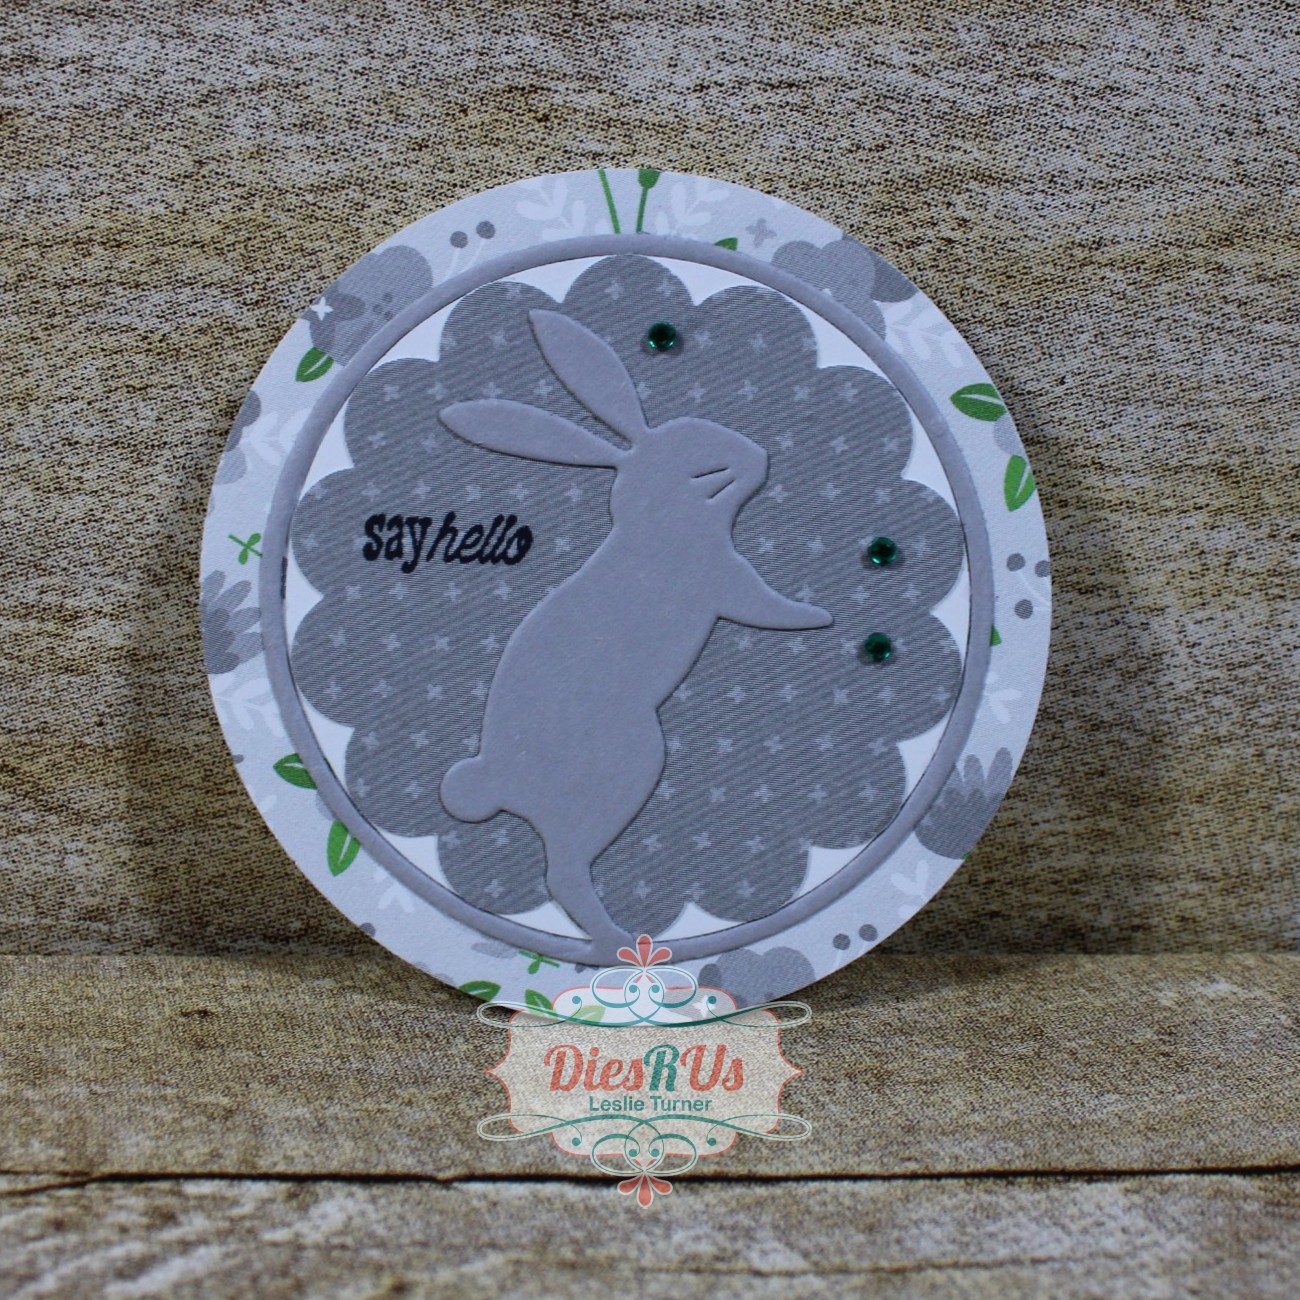
I die cut the Memory Box Love Circle, Pinpoint Heart Circle, Cupid Circle, Peaceful Butterfly Circle and Jumping Bunny Circle from CutCardStock Pop-Tone Cotton Candy cardstock, CutCardStock Raspberry Ice cardstock, CutCardStock Stardream Metallic Azalea cardstock, CutCardStock Dolphin cardstock, CutCardStock Stardream Metallic Amethyst cardstock and set them aside. I punched the coin bases from Neenah Classic Crest Solar White 110# cardstock, two per coin for stability, and also punched the background pieces from patterned paper and one from CutCardStock Basis Red cardstock. I adhered all the layers and elements, stamped a kindness sentiment on each one, and added gemstones.

And one more look at the set… absolutely loving these circle dies and the amazing ATCs created with them! ;)

Dies R Us products used:
Memory Box Love Circle
Memory Box Pinpoint Heart Circle
Memory Box Cupid Circle
Memory Box Peaceful Butterfly Circle
Memory Box Jumping Bunny Circle

Other products used:
Cardstock/Paper: Neenah Classic Crest 110# and 80# Solar White cardstock, CutCardStock Basis Red cardstock, CutCardStock Pop-Tone Cotton Candy cardstock, CutCardStock Raspberry Ice cardstock, CutCardStock Stardream Metallic Azalea cardstock, CutCardStock Dolphin cardstock, CutCardStock Stardream Metallic Amethyst cardstock, Doodlebug Designs Dot-Grid-Daisy-Stripe and Gingham-Linen Rainbow Petite Prints 6×6 paper pads, Lawn Fawn Spring Fling 6×6 petite paper pack
Stamps: Julie Nutting Make Kindness Happen stamp set
Ink: Memento Tuxedo Black ink
Dies/Punches: Fiskars 2-1/2″ circle punch, EK Success 2″ scallop circle punch, Stampin’ Up 2″ circle punch
Accessories: Big Shot, Bearly Arts precision craft glue, MISTI stamp tool, Darice assorted color tiny gemstones

I hope you’ve enjoyed today’s project! Be sure to check out all the fun goodies at the Dies R Us store! They not only sell dies… they also carry stamps, embossing tools and supplies, all kinds of craft supplies, slimline products and even Yupo paper! Be sure to join in the fun going on over at the Dies R Us Challenge Blog – there’s a new challenge theme posted on the 1st and 15th of each month and one lucky random winner will receive a gift voucher prize to the Dies R Us store! And be sure to ‘like’ and ‘follow’ Dies R Us Facebook Page for lots of creative inspiration and to keep up with the latest news! Thanks so much for stopping by today – we’ll see you next time! ;)

Scrappy hugs,
lesliesig

eeek!

Hi everyone! Woo-hoo, another Friday has rolled around and I hope you have a fabulous weekend planned! Affiliate links are used in this post at no cost to you. I really appreciate your support! I’m delighted to be back on the Dies R Us Inspiration Blog today with another awesome DT inspiration project! I created an adorable Halloween card featuring a spider wreath, lol! Yep, you read that right… a spider wreath created with the Birch Press Design Roundabout Layer Set in black, orange and yellow, with eeeky spiders! This was definitely a fun one! ;)

Using the Birch Press Design Roundabout Layer Set, I cut the wreath layers from CutCardStock Basis Black cardstock, CutCardStock Pop-Tone Tangy Orange cardstock and CutCardStock Basis Gold cardstock. I assembled the wreath, added spider sequins with tiny orange gemstones, and set it aside. I cut a standard A2 size top-folding card base from Neenah Classic Crest Solar White 110# cardstock along with layering panels from CutCardStock Pop-Tone Tangy Orange cardstock and American Crafts Halloween 6×6 paper. I adhered a smaller panel of the Halloween paper to the bottom of the striped panel and added a narrow strip of orange cardstock and a strip of orange dotted washi tape. I adhered the panels together and then to the card base. I adhered the wreath to the background panel and stamped the eeeky sentiments in black ink, and added three orange gemstones across the bottom to complete the card front.

I cut the inside panel from Neenah Classic Crest 80# Solar White cardstock and embellished it with strips of the Halloween patterned paper and orange cardstock used on the front, stamped the sentiment in black ink, and layered the panel on the orange cardstock.

And one more peek… totally loving how this turned out! Another terrific die set by Birch Press Design! I love them all! ;)

Dies R Us products used:
Birch Press Design Roundabout Layer Set

Other products used:
Cardstock/Paper: Neenah Classic Crest 110# and 80# Solar White cardstock, CutCardStock Basis Black cardstock, CutCardStock Pop-Tone Tangy Orange cardstock, CutCardStock Basis Gold cardstock, American Crafts Halloween 6×6 paper pad
Stamps: Stampin’ Up Spooky Fun stamp set
Ink: Memento Tuxedo Black ink
Accessories: Tonic Studios 12″ Guillotine Paper Trimmer, Big Shot, Bearly Art precision craft glue, spider sequins from stash, Eyelet Outlet Orange Dots Washi Tape, MISTI stamp tool, Eyelet Outlet orange jewel bling

I hope you’ve enjoyed today’s project! Be sure to check out all the fun goodies at the Dies R Us store! They not only sell dies… they also carry stamps, embossing tools and supplies, all kinds of craft supplies, slimline products and even Yupo paper! Be sure to join in the fun going on over at the Dies R Us Challenge Blog – there’s a new challenge theme posted on the 1st and 15th of each month and one lucky random winner will receive a gift voucher prize to the Dies R Us store! And be sure to ‘like’ and ‘follow’ Dies R Us Facebook Page for lots of creative inspiration and to keep up with the latest news! Thanks so much for stopping by today – we’ll see you next time! ;)

Scrappy hugs,
lesliesig

merry Christmas

Hi everyone! Happy Friday! August has almost bit the dust and we’ll soon be into September. Just shaking my head at how fast the time is flying! Affiliate links are used in this post at no cost to you. I really appreciate your support! I’m stoked to be back on the Dies R Us Inspiration Blog today with another awesome DT inspiration project! I created a pretty Christmas card in non-traditional colors featuring the gorgeous Tutti Designs Ornament Circle! I love a pink Christmas card and I really love these new Sparkling Sheets which are so shimmery and iridescent!

I cut the Tutti Designs Ornament Circle from the pink sparkling sheet and set it aside. I cut a square top-folding card base from Neenah Classic Crest Solar White 110# cardstock along with a layering panel just a tad smaller from CutCardStock Basis Magenta cardstock. I stamped the sentiment in white ink, scored diagonal lines every half-inch in both directions on the layering panel, and adhered the panel to the card base. I adhered the die cut with spray adhesive, and added tiny iridescent gemstones inside the circular part of the die cut and several larger ones in the upper right and lower left corners to complete the front.

I cut the inside panel from Neenah Classic Crest Solar White 80# cardstock and embellished it with a strip cut from the pink sparkling sheet and a narrow strip of the CutCardStock Basis Magenta cardstock. I stamped the sentiment in pink ink and layered the panel on the magenta cardstock.

And one more peek… this die is amazing and I see more Christmas cards made with it in my future! LOVE how this turned out!

Dies R Us products used:
Tutti Designs Ornament Circle

Other products used:
Cardstock/Paper: Neenah Classic Crest 110# and 80# Solar White cardstock, CutCardStock Basis Magenta cardstock, PaperWishes Sparkling Sheets
Stamps: Lawn Fawn Happy Happy Happy stamp set, Lawn Fawn Happy Happy Happy Add-On stamp set
Ink: Memento Luxe Wedding Dress ink
Dies/Punches: Catherine Pooler Pucker Up ink
Accessories: Tonic Studios 12″ Guillotine Paper Trimmer, Bearly Art precision craft glue, , Elmer’s Craft Bond Spray Adhesive, Big Shot, MISTI stamp tool, Darice iridescent gemstones

I hope you’ve enjoyed today’s project! Be sure to check out all the fun goodies at the Dies R Us store! They not only sell dies… they also carry stamps, embossing tools and supplies, all kinds of craft supplies, slimline products and even Yupo paper! Be sure to join in the fun going on over at the Dies R Us Challenge Blog – there’s a new challenge theme posted on the 1st and 15th of each month and one lucky random winner will receive a gift voucher prize to the Dies R Us store! And be sure to ‘like’ and ‘follow’ Dies R Us Facebook Page for lots of creative inspiration and to keep up with the latest news! Thanks so much for stopping by today – we’ll see you next time! ;)

Scrappy hugs,
lesliesig

thank you so much

Hi everyone! A big ole’ Happy Friday to you all! I hope you’ve had a great week and have something fun planned this weekend! Affiliate links are used in this post at no cost to you. I really appreciate your support! I’m delighted to be back on the Dies R Us Inspiration Blog today with another awesome DT inspiration project! I created a clean and simple thank you card featuring the Birch Press Design Petal Triangle Layer Set that I used in a very bright and bold fashion with a red, orange and yellow color combo! I love me some color but I have to admit that I wasn’t sure about this when I started it, but the longer I looked at the finished card the more I like it! It’s extremely rare that I don’t have some white in my cards and this has absolutely no white whatsoever!

I cut a standard A2 size side-folding card base from CutCardStock Basis Red cardstock along with a layering panel from CutCardStock Basis Gold cardstock which I adhered to the card base. Using the Birch Press Design Petal Triangle Layer Set, I cut the three pieces from CutCardStock Basis Red cardstock, CutCardStock Basis Orange cardstock, CutCardStock Basis Gold cardstock, adhered them together, and adhered the piece to the card front. I stamped the sentiment in orange ink and added some gemstones to complete the front.

I cut the inside panel from CutCardStock Basis Gold cardstock and embellished it with strips cut from CutCardStock Basis Red cardstock, CutCardStock Basis Orange cardstock, CutCardStock Basis Gold cardstock. I stamped the sentiment in orange ink and layered the panel on the orange cardstock.

And one more peek… such a simple design that really packs a powerful punch with the bright colors! This Petal Triangle Layer Set is amazing and I highly recommend any of the Birch Press Design layer sets!

Dies R Us products used:
Birch Press Design Petal Triangle Layer Set

Other products used:
Cardstock/Paper: CutCardStock Basis Red cardstock, CutCardStock Basis Orange cardstock, CutCardStock Basis Gold cardstock [Update: CutCardStock no longer carries the Basis Orange cardstock but these other orange cardstock options are available – Pop-Tone Tangy Orange, Pop-Tone Orange Fizz and Basis Dark Orange. I have all three of these in my stash so I can personally vouch for the wonderful orange colors that would be good substitutions!]
Stamps: Waffle Flower Sentiment Additions stamp set
Ink: Catherine Pooler Orange Twist ink
Accessories: Tonic Studios 12″ Guillotine Paper Trimmer, Big Shot, Bearly Art precision craft glue, MISTI stamp tool, Eyelet Outlet red jewel bling

I hope you’ve enjoyed today’s project! Be sure to check out all the fun goodies at the Dies R Us store! They not only sell dies… they also carry stamps, embossing tools and supplies, all kinds of craft supplies, slimline products and even Yupo paper! Be sure to join in the fun going on over at the Dies R Us Challenge Blog – there’s a new challenge theme posted on the 1st and 15th of each month and one lucky random winner will receive a gift voucher prize to the Dies R Us store! And be sure to ‘like’ and ‘follow’ Dies R Us Facebook Page for lots of creative inspiration and to keep up with the latest news! Thanks so much for stopping by today – we’ll see you next time! ;)

Scrappy hugs,
lesliesig

eat more bananas

Hi everyone! A big ol’ Happy Friday to you! I hope you’ve had an exceptional week! Can you believe we’re headed into August already?! Affiliate links are used in this post at no cost to you. I really appreciate your support! I’m delighted to be back on the Dies R Us Inspiration Blog today with another awesome DT inspiration project! I created an adorable clean and simple birthday card featuring the super cute Elizabeth Crafts Jungle Leaves die set carried in the store. I originally thought child birthday (specifically one of our youngest grands) but I know some adults who would love it, too! ;)

I cut a standard A2 size top-folding card base from Neenah Classic Crest 110# Solar White cardstock, layering panel from Neenah Classic Crest 80# Solar White cardstock and a slightly larger layering panel from CutCardStock Pop-Tone Jellybean Green cardstock, and rounded the bottom right corner on all the pieces. I stamped that adorable little monkey, his bananas, and the sentiment in brown ink on the layering panel, colored them with alcohol markers and adhered the panels to the card base. I stamped his right hand a second time on a scrap piece of white cardstock, colored it, fussy cut it, and set it aside to later paper-piece onto the vine. Using the Elizabeth Craft Designs Jungle Leaves die set, I die cut vines and leaves from CutCardStock Pop-Tone Gumdrop Green cardstock and CutCardStock Pop-Tone Jellybean Green cardstock, layered them together for a little dimension, and adhered them to the card front. The finishing touch was paper-piecing that tiny little fussy-cut hand onto the vine with the Crystal Katana Pick-Up & Glue Tool. I LOVE this tool for maneuvering small paper-pieced items into place!

I cut the inside panel from Neenah Classic Crest 80# Solar White cardstock and embellished it with strips of the green cardstock, stamped the sentiment in green ink and layered the panel on CutCardStock Pop-Tone Jellybean Green cardstock.

And one more peek… what an adorable card! The die cut jungle leaves worked perfectly with this stamp set! Love it when that happens!

Dies R Us products used:
Elizabeth Craft Designs Jungle Leaves die set
Crystal Katana Pick-Up & Glue Tool

Other products used:
Cardstock/Paper: Neenah Classic Crest Solar White cardstock, CutCardStock Pop-Tone Gumdrop Green cardstock, CutCardStock Pop-Tone Jellybean Green cardstock
Stamps: STAMPlorations Chikoo Goes Bananas stamp set, Pretty Pink Posh Everyday Greetings stamp set
Ink: Memento Rich Cocoa ink; Nuvo alcohol markers- 405, 461, 466
Dies/Punches: Kadomaru Pro corner rounder
Accessories:  Big Shot, MISTI stamp tool, Tonic Studios 12″ Guillotine Paper Trimmer, Bearly Art precision craft glue, Tombow Mono permanent adhesive,

I hope you’ve enjoyed today’s project! Be sure to check out all the fun goodies at the Dies R Us store! They not only sell dies… they also carry stamps, embossing tools and supplies, all kinds of craft supplies, slimline products and even Yupo paper! Be sure to join in the fun going on over at the Dies R Us Challenge Blog – there’s a new challenge theme posted on the 1st and 15th of each month and one lucky random winner will receive a gift voucher prize to the Dies R Us store! And be sure to ‘like’ and ‘follow’ Dies R Us Facebook Page for lots of creative inspiration and to keep up with the latest news! Thanks so much for stopping by today – we’ll see you next time! ;)

Scrappy hugs,
lesliesig

thank you for your friendship

Hi everyone! Well, another Friday has rolled around and I’m sure not complaining because every day is like a Friday when you’re retired! Affiliate links are used in this post at no cost to you. I really appreciate your support! I’m stoked to be back on the Dies R Us Inspiration Blog today with another awesome DT inspiration project! I created a pretty friendship card featuring some paper piecing with the gorgeous Memory Box Twirly Circle die! Putting all the small pieces into the negative spaces of the frame reminded me a lot of putting a puzzle together. It was well worth the time it took, as I sure do love the end result!

I cut a square top-folding card base from Neenah Classic Crest Solar White 110# cardstock along with layering panels from CutCardStock Basis 80# Dark Purple cardstock and Doodlebug Design Gingham-Linen Rainbow Petite Prints which I adhered together. Using the Memory Box Twirly Circle die, I cut the focal element once from CutCardStock Basis 80# Dark Purple cardstock, once from CutCardStock Pop-Tone 65# Grape Jelly cardstock and once from Doodlebug Design Swiss Dots Rainbow Petite Prints. I removed and discarded all the inner pieces from the dark purple cardstock, and retained the outermost circle of pieces from the grape jelly cardstock as well as the innermost circle of pieces from the purple swiss dots paper. Then the fun began! I adhered the dark purple cardstock frame to the background layers and proceeded to place all the outermost and then innermost pieces into the negative spaces on the frame using the Crystal Katana Pick-Up & Glue Tool. I have to tell you that this tool is a lifesaver when handling lots of small pieces and parts! I added the Brutus Monroe sentiment to the focal element and the Dot Sparklers to the background, and then adhered the panel to the card base.

I cut the inside panel from Neenah Classic Crest 80# Solar White cardstock and embellished it with strips of the yellow gingham paper and dark purple cardstock, as well as the center circle from the twirly circle die cut. I added another Brutus Monroe sentiment and layered the panel on the dark purple cardstock.

And one more peek… super happy with how this turned out! I can actually think of several friends this could go to! ;)

Dies R Us products used:
Memory Box Twirly Circle
Crystal Katana Pick-Up & Glue Tool

Other products used:
Cardstock/Paper: Neenah Classic Crest 110# and 80# Solar White cardstock, CutCardStock Basis 80# Dark Purple cardstock, CutCardStock Pop-Tone 65# Grape Jelly cardstock, Doodlebug Design Gingham-Linen and Swiss Dot Rainbow Petite Prints 6×6 paper pads
Accessories: Tonic Studios 12″ Guillotine Paper Trimmer, Gemini Junior, Bearly Art precision craft glue, Brutus Monroe Sweet Sayings Conversation Clippings, Stampendous Violet Dot Sparklers

I hope you’ve enjoyed today’s project! Be sure to check out all the fun goodies at the Dies R Us store! They not only sell dies… they also carry stamps, embossing tools and supplies, all kinds of craft supplies, slimline products and even Yupo paper! Be sure to join in the fun going on over at the Dies R Us Challenge Blog – there’s a new challenge theme posted on the 1st and 15th of each month and one lucky random winner will receive a gift voucher prize to the Dies R Us store! And be sure to ‘like’ and ‘follow’ Dies R Us Facebook Page for lots of creative inspiration and to keep up with the latest news! Thanks so much for stopping by today – we’ll see you next time! ;)

Scrappy hugs,
lesliesig

Christmas ATCs (Coins)

Hi everyone! Happy Friday! We are doing the happy dance out here in Colorado, as we’ve had a little bit of rain just about every day this week and we’re waking up to temps in the 50s. It’s absolutely wonderful! ;) Affiliate links are used in this post at no cost to you. I really appreciate your support! I’m delighted to be back on the Dies R Us Inspiration Blog today with another awesome DT inspiration project! I created a set of four Christmas Artist Trading Coins using several amazing Memory Box circle dies! Yep, if you know me, you know I’m an ATC fiend with a growing collection that I started several years ago, and I typically don’t trade them because I’m greedy that way, lol!

Using the Memory Box Joy Circle, Dove Circle, Peace Circle and Fancy Deer Circle dies, I cut the elements for the fronts of the coins from Neenah Classic Crest 110# Solar White cardstock, CutCardStock Stardream Metallic 105# Amethyst cardstock and CutCardStock Pop-Tone 65# Hot Fudge cardstock. Then I punched eight 2-1/2″ circles from Neenah Classic Crest Solar White 110# cardstock (two for each coin for added stability) with my Fiskars punch, along with circles from several different patterned papers from Polly’s Paper Studio. I created the sentiments on the laptop, printed them on Solar White cardstock, and cut them into strips. I used glitter washi tape on two of the backgrounds, and adhered the die cut elements and sentiments to the patterned paper circles, then adhered those to each coin base. Here are individual shots of each coin:

Dies R Us products used:
Memory Box Joy Circle
Memory Box Dove Circle
Memory Box Peace Circle
Memory Box Fancy Deer Circle

Other products used:
Cardstock/Paper: Neenah Classic Crest 110# Solar White cardstock, CutCardStock Stardream Metallic 105# Amethyst cardstock, CutCardStock Pop-Tone 65# Hot Fudge cardstock, Polly’s Paper Studio patterned paper
Stamps: Computer-generated sentiments
Dies/Punches: Fiskars 2-1/2″ Circle Punch
Accessories: Tonic Studios 12″ Guillotine Paper Trimmer, Bearly Art precision craft glue, Gemini Junior, Eyelet Outlet Purple Glitter Washi Tape, Eyelet Outlet Skinny Blue Glitter Washi Tape,

I hope you’ve enjoyed today’s project! Be sure to check out all the fun goodies at the Dies R Us store! They not only sell dies… they also carry stamps, embossing tools and supplies, all kinds of craft supplies, slimline products and even Yupo paper! Be sure to join in the fun going on over at the Dies R Us Challenge Blog – there’s a new challenge theme posted on the 1st and 15th of each month and one lucky random winner will receive a gift voucher prize to the Dies R Us store! And be sure to ‘like’ and ‘follow’ Dies R Us Facebook Page for lots of creative inspiration and to keep up with the latest news! Thanks so much for stopping by today – we’ll see you next time! ;)

Scrappy hugs,
lesliesig

Hello Kitty!

Hey everybody! Well, another week has almost bitten the dust – they are passing by so fast it’s making my head spin! Affiliate links are used in this post at no cost to you. I really appreciate your support! I’m stoked to be back on the Dies R Us Inspiration Blog today with another awesome DT inspiration project! I created a super sweet CAS kitty card featuring the most adorable Tutti Designs Cat In Basket die paired with some pink enamel hearts and iridescent bling! Perfect for a cat lover!

I cut a standard A2 size side-folding card base from CutCardStock Basis Natural 110# cardstock (which is perfect for an almost one-layer card) and rounded the bottom right corner. I cut the Tutti Designs Cat In Basket and a single narrow strip from CutCardStock Magenta 80# cardstock. I stamped the sentiment in pink ink, stamped it again in Versamark and applied Hero Arts Clear Embossing Powder. I adhered the die cut and the strip, and added two pink enamel hearts. Using the Crystal Katana Pick Up Tool, I added quite a few tiny iridescent gemstones to finish off the card front.

I cut the inside panel from Neenah Classic Crest Baronial Ivory 80# cardstock and embellished it with leftover strips of CutCardStock Magenta 80# cardstock and CutCardStock Basis Natural 110# cardstock for a tone-on-tone effect, stamped the sentiment in pink ink and layered the panel on the magenta cardstock.

And one more peek… this is so stinkin’ cute I can’t stand it! What an absolutely ah-DOR-able die! Wouldn’t it be fun to die cut a bunch of these cats in a basket in different colors to create a set to give as a gift?!

Dies R Us products used:
Tutti Designs Cat In Basket die
Versamark
Crystal Katana Pick Up Tool

Other products used:
Cardstock/Paper: CutCardStock Basis Natural 110# cardstock, CutCardStock Magenta 80# cardstock, Neenah Classic Crest Baronial Ivory 80# cardstock
Stamps: The Cat’s Pajamas Good Meowning stamp set
Ink: Catherine Pooler Pucker Up ink
Dies/Punches: Kadomaru Pro corner rounder
Accessories: Tonic Studios 12″ Guillotine Paper Trimmer, Gemini Junior, MISTI stamp tool, Hero Arts Clear Embossing Powder, Bearly Arts precision craft glue, Eyelet Outlet Enamel Hearts, ScraPerfect Iridescent Gemstones

I hope you’ve enjoyed today’s project! Be sure to check out all the fun goodies at the Dies R Us store! They not only sell dies… they also carry stamps, embossing tools and supplies, all kinds of craft supplies, slimline products and even Yupo paper! Be sure to join in the fun going on over at the Dies R Us Challenge Blog – there’s a new challenge theme posted on the 1st and 15th of each month and one lucky random winner will receive a gift voucher prize to the Dies R Us store! And be sure to ‘like’ and ‘follow’ Dies R Us Facebook Page for lots of creative inspiration and to keep up with the latest news! Thanks so much for stopping by today – we’ll see you next time! ;)

Scrappy hugs,
lesliesig

Happy Holidays Trifold Window Card

Hi everyone! Happy Friday – I hope you’ve had a wonderful week! Can’t believe another week is almost behind us! Affiliate links are used in this post at no cost to you. I really appreciate your support! I’m stoked to be back on the Dies R Us Inspiration Blog today with another awesome DT inspiration project! I created a fun trifold window card. This came in a recent Splitcoast Stampers newsletter (tutorial is HERE if you’re interested) but I already had handwritten notes in my tutorial folder from a few years back which followed basically the same super easy process. I have made several horizontal trifolds over the years and this vertical one with the window is particularly fun. I used the amazing Birch Press Design Wreath Layer Set as the focal, along with a sentiment and bow from the Sizzix Christmas Ribbon Thinlits, some pretty coordinating Christmas papers, and lots of bling.

I cut a standard A2 size top-folding card base from Neenah Classic Crest Solar White 110# cardstock, along with a CutCardStock Basis Green cardstock folded panel, a Neenah Classic Crest Solar White 80# cardstock layer, and diagonally-cut patterned paper layers from the Christmas Print 6×6 paper pad. I adhered the patterned papers to the CutCardStock Basis Red cardstock panel, added a diagonal embellishing strip, and then die cut a large circular aperture in the layers with a Tutti Designs Dotted Nesting Circle die. I traced the aperture on the front flap and then cut a slightly larger circular aperture on the front flap and adhered the layered panel to it. I added a bow created with the Sizzix Christmas Ribbon Thinlits to the bottom of the aperture along with a stamped sentiment.

I adhered the CutCardStock Basis Green cardstock folded panel to the inside of the card base with the fold at the bottom, opened it up, and adhered the Neenah Classic Crest Solar White 80# cardstock layer. I embellished this layer with strips of green glitter paper and the holly patterned paper from the Christmas Print 6×6 paper pad along with a narrow red cardstock strip. I adhered the sentiment cut from the Sizzix Christmas Ribbon Thinlits with Elmer’s Craft Bond Spray Adhesive, then folded it upwards into the card base, closed the front flap, and adhered the Birch Press Design Wreath into the opening. The finishing touch was the addition of tiny clear gemstones to the wreath and some larger ones to the diagonal strip, along with a large red gemstone in the center.

And one more peek… this was so much fun! Now to decide who will receive it in the mail! I’m starting to earmark certain Christmas cards for certain people! I like to be ahead of the game, lol! ;)

Dies R Us products used:
Birch Press Design Wreath Layer Set
Sizzix Christmas Ribbon Thinlits
Tutti Designs Dotted Nesting Circles

Other products used:
Cardstock/Paper: Neenah Classic Crest 110# and 80# Solar White cardstock, CutCardStock Basis Green cardstock, CutCardStock Basis Red cardstock, CutCardStock Canvas Texture Galax 4×6 cardstock, Christmas Print 6×6 paper pad
Stamps: Lawn Fawn Happy Happy Happy stamp set
Ink: Memento Tuxedo Black ink
Accessories: Tonic Studios 12″ Guillotine Paper Trimmer, Gemini Junior, MISTI stamp tool, Bearly Art precision craft glue, Elmer’s Craft Bond Spray Adhesive, Flourish with a Bling clear rhinestones, large red gemstone

I hope you’ve enjoyed today’s project! Be sure to check out all the fun goodies at the Dies R Us store! They not only sell dies… they also carry stamps, embossing tools and supplies, all kinds of craft supplies, slimline products and even Yupo paper! Be sure to join in the fun going on over at the Dies R Us Challenge Blog – there’s a new challenge theme posted on the 1st and 15th of each month and one lucky random winner will receive a gift voucher prize to the Dies R Us store! And be sure to ‘like’ and ‘follow’ Dies R Us Facebook Page for lots of creative inspiration and to keep up with the latest news! Thanks so much for stopping by today – we’ll see you next time! ;)

Scrappy hugs,
lesliesig

BOAT (Break Out Another Thousand)

Hi everyone! Happy Friday! I hope you’ve had a great week and have something fun planned this weekend! Just stay safe! Affiliate links are used in this post at no cost to you. I really appreciate your support! I’m delighted to be back on the Dies R Us Inspiration Blog today with another awesome DT inspiration project! I created a fun masculine card for that boat lover which features the amazing Twisted Rope Background Die from Tutti Designs! I love this die – it makes the BEST masculine cards!

The standard A2 size landscape top-folding card base was cut from CutCardStock Twine 80# cardstock along with layering panels cut from CutCardStock Basis Navy 80# cardstock and CutCardStock Basis Red 80# cardstock. I die cut the Twisted Rope Background from the twine cardstock and adhered it to the navy panel with spray adhesive (the fastest and easiest way I’ve found to adhere ‘lacy’ type die cuts) and then adhered the panel to the red layer. I layered the sentiment on red cardstock and adhered it to the front panel, and added a red anchor brad before adhering the piece to the card base.

I cut the inside panel from CutCardStock Twine 80# cardstock and embellished it with strips of the navy, red and twine cardstock (for a tone-on-tone look), stamped the sentiment in blue ink, and layered the panel on navy and then red cardstock.

Dies R Us products used:
Tutti Designs Twisted Rope Background Die

Other products used:
Cardstock/Paper: CutCardStock Twine 80# cardstock, CutCardStock Basis Navy 80# cardstock, CutCardStock Basis Red 80# cardstock
Stamps: The Project Bin Anchors Away stamp set
Ink: Memento Paris Dusk ink
Accessories: Tonic Studios 12″ Guillotine Paper Trimmer, Big Shot, Elmer’s Craft Bond Spray Adhesive, Bearly Art precision craft glue, MISTI stamp tool, Eyelet Outlet Anchor Brads

I hope you’ve enjoyed today’s project! Be sure to check out all the fun goodies at the Dies R Us store! They not only sell dies… they also carry stamps, embossing tools and supplies, all kinds of craft supplies, slimline products and even Yupo paper! Be sure to join in the fun going on over at the Dies R Us Challenge Blog – there’s a new challenge theme posted on the 1st and 15th of each month and one lucky random winner will receive a gift voucher prize to the Dies R Us store! And be sure to ‘like’ and ‘follow’ Dies R Us Facebook Page for lots of creative inspiration and to keep up with the latest news! Thanks so much for stopping by today – we’ll see you next time! ;)

Scrappy hugs,
lesliesig