just wanting to say Hi!

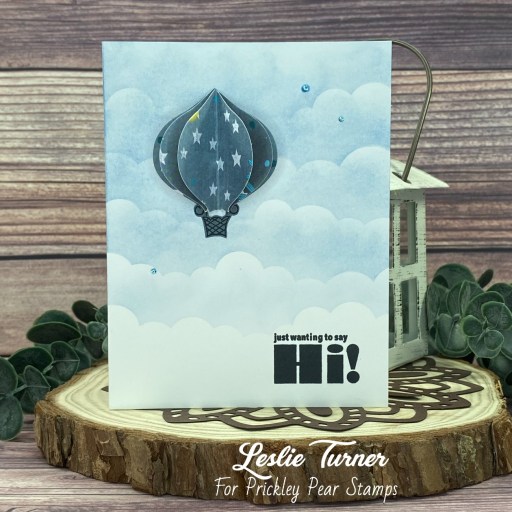
Hey everybody! Happy Monday – can you believe we’re almost a week into February already?! Christmas will be here before you know it! Bahahaha (just kidding)! I’m up on the Pajama Crafter Stamps blog today with an inspiration project featuring the Prickley Pear Stamps Hot Air Balloons stamp set and coordinating Hot Air Balloon die! I stenciled a nice cloud background in stormy sky distress ink for this 3D hot air balloon that I created with several balloon die cuts!

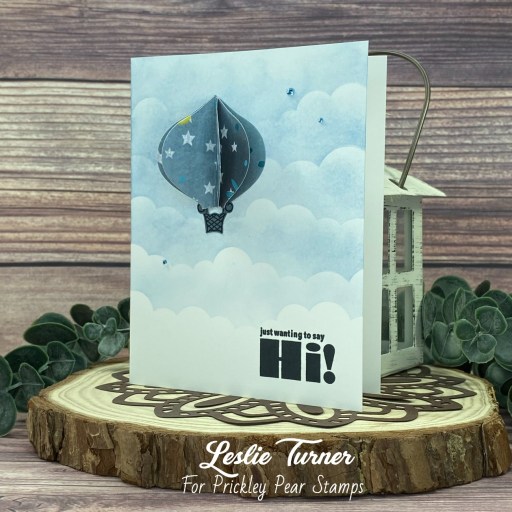
The card base was cut from Neenah Classic Crest 110# Solar White cardstock along with five hot air balloon die cuts (using the Hot Air Balloon die) from KNC Essentials Showering Nature 12×12 paper. Using the My Favorite Things Mini Cloud Edges Stencil, a blending brush and Ranger stormy sky distress ink, I stenciled the entire card front. I gave it good cloud coverage, lighter at the bottom and darker at the top.

I stamped the balloon and sentiment from the Hot Air Balloons stamp set in Memento Tuxedo Black ink. I cut the bottom off of each balloon die cut and scored them down the middle. I adhered the right side of one to the left side of the next until all five were attached to each other and then affixed them to the card front over top of the stamped balloon. The finishing touch was adding several blue gemstones.

Sharing in the following challenges:
1. https://aperfecttimetocraft.blogspot.com/2024/02/a-perfect-time-to-craft-open-challenge.html
2. https://hereisaplacetostart.blogspot.com/2024/02/february-2024-monochrom-you-pick-palette.html
3. https://cardsgalorechallenges.blogspot.com/2024/02/february-2024-crafts-galore-encore.html

Affiliate links are used in this post at no cost to you – I really appreciate your support!

Pajama Crafter Stamps products used:
Prickley Pear Stamps Hot Air Balloons stamps
Prickley Pear Stamps Hot Air Balloon die

Other products used:
Cardstock/Paper: Neenah Classic Crest 110# Solar White cardstock, KNC Essentials Showering Nature 12×12 paper
Ink: Ranger stormy sky distress ink, Memento Tuxedo Black ink
Accessories: Tonic Studios 12″ Guillotine Paper Trimmer, My Favorite Things Mini Cloud Edges Stencil, blending brush, Art Glitter Dries Clear adhesive, MISTI stamp tool, Big Shot, Darice blue gemstones

I hope you’ve enjoyed this project! Be sure to check out all the awesome stamps, dies and other goodies at Pajama Crafter Stamps which is the new home of the Prickley Pear Stamps brand and the Pajama Crafter Stamps line! Be sure to keep up with news and sales by following us on Facebook, Instagram and Pinterest, and join Pajama Crafter Stamps & Friends for lots of fun crafty ideas and to share your creativity! And finally, we’d love for you to visit the Pajama Crafter Stamps blog and sign up for our newsletter to stay in touch! Thanks so much for stopping by today – we’ll see you next time! ;)

Scrappy hugs,

Your Special Day

Hey everybody! I’m back for a second time on this fine last Sunday of 2023 with one more inspiration project for Prickley Pear Stamps! This building block card features the super adorable Hello Jack stamps along with the Kokopelli – Happy Birthday stamps and the Rainbow Dreams stamps. My inspiration for this fun fold came from an older Splitcoast Stampers tutorial HERE. Another one I’ve had in my arsenal for a while and I’m not sure why I haven’t tried it until now, lol! Oh, and don’t forget the Hello Lily and Hello Jack stamps and dies are on sale at Prickley Pear Stamps (up to 50% off) and the sale has been extended through January 1st at 11:59 PM! Get ’em while you can!

I used Neenah Classic Crest Solar White cardstock for the card base and several coordinating prints from an oldie-but-goodie Recollections Bold Basics paper pad for the layering panels. I used the Rainbow Dreams stamp set for the clouds, and all three sentiments are from the Kokopelli – Happy Birthday stamp set. The clouds, Jack and the grass washi tape are adhered to an acetate panel which I popped up on foam strips for a little interest.

I used American Crafts Newsprint Thickers alphas for the LOVE YOU! sentiment on the building blocks, and stamped the other sentiments on the left and right sides. I really love how this turned out!

Sharing in the following challenges:
1. Classic Design Challenge: December #12 – Anything Goes

Affiliate links are used in this post at no cost to you – I really appreciate your support!

Prickley Pear Stamps products used:
Hello Jack stamp set
Kokopelli – Happy Birthday stamp set
Rainbow Dreams stamp set

Other products used:
CARDSTOCK/PAPER: Neenah Classic Crest 80# Solar White cardstock, CutCardStock Basis Teal cardstock, Recollections Bold Basics paper pad
INK: Catherine Pooler Midnight ink, Memento Tuxedo Black ink (pad and marker); Arteza alcohol markers- BR08/28/58/82/95, RP09; Marvy Uchida DecoColor Liquid Silver paint marker
ACCESSORIES: Fiskars 12″ SureCut paper trimmer, Tonic Studios 12″ Guillotine Paper Trimmer, Elmer’s Craft Bond Tape Runner, Bearly Art precision craft glue, MISTI stamp tool, Grafix Crystal Clear Craft Plastic, 1/4″ red liner tape, 1″ double-sided foam strip, American Crafts Newsprint Thickers alphas, Eyelet Outlet Reptile Brads

I hope you’ve enjoyed this project! Be sure to check out all the awesome stamps and dies at Prickley Pear Stamps! Save 10% on anything on the site when you shop at Prickley Pear Stamps by using coupon code LESLIE10 at checkout! And be sure to ‘like’ and ‘follow’ the Prickley Pear Stamps Facebook page to keep up with news and sales, and join Prickley Pear Pals (the fan group) for lots of fun crafty ideas and to share your creativity! And finally, we’d love to see you visit the Prickley Pear Stamps blog and become a Follower! Hope to see you there! Thanks so much for stopping by today – we’ll see you next time! ;)

Scrappy hugs,

Happy Birthday fun fold

Hey everybody! I hope you’re having a GREAT last weekend of 2023! Are you going to stay up to see the ball drop at midnight?! We haven’t seen that ball in several years, lol! I’ve popped in this morning with a DT inspiration project for Prickley Pear Stamps featuring the super adorable Hello Lily stamps and dies! I also used sentiments from the Flourished Oval – Spring stamps. You know me and fun folds… this version of the double flap fun fold is one of my favorites! The Hello Lily and Hello Jack stamps and dies are on sale at Prickley Pear Stamps (up to 50% off) and the sale has been extended through January 1st at 11:59 PM! Get ’em while you can!

I used Neenah Classic Crest Solar White for the card base layers, Lily and the inside sentiment. The pretty patterned papers are from the Asuka Studio 6×6 Dusty Rose Collection Pack. Lily’s dress and hair bow were stamped on a paper in the Keep It Simple Royal 12×12 Collection Pack and I used two ephemera hearts (from the same Royal Collection) on the second flap. The finishing touch on the front was adding several Eyelet Outlet ivory pearls.

The sentiments on the second flap and inside are from the Flourished Oval – Spring stamps. The inside sentiment was cut with a Keep It Simple Stitched Ovals Nested Die.

Sharing in the following challenges:
1. Classic Design Challenge: December #12 – Anything Goes
2. The Crafter’s Cafe Challenge Blog: #303 – Feminine

Affiliate links are used in this post at no cost to you – I really appreciate your support!

Prickley Pear Stamps products used:
Hello Lily stamp set
Hello Lily die set
Flourished Oval – Spring stamp set

Other products used:
CARDSTOCK/PAPER: Neenah Classic Crest 110# and 80# Solar White cardstock, Keep It Simple Royal 12×12 Collection Pack (paper and ephemera), Asuka Studio 6×6 Dusty Rose Collection Pack
INK: Catherine Pooler Midnight ink; Arteza alcohol markers- BR08/28, B18, RP09, YR14/17, PB25; Memento Tuxedo Black marker
DIES/PUNCHES: Kadomaru Pro Corner Rounder, Keep It Simple Stitched Ovals Nested Dies
ACCESSORIES: Tonic Studios 12″ Guillotine Paper Trimmer, Scotch Advanced Tape Glider, Bearly Art precision craft glue, MISTI stamp tool, Big Shot, Eyelet Outlet 5mm ivory pearls

I hope you’ve enjoyed this project! Be sure to check out all the awesome stamps and dies at Prickley Pear Stamps! Save 10% on anything on the site when you shop at Prickley Pear Stamps by using coupon code LESLIE10 at checkout! And be sure to ‘like’ and ‘follow’ the Prickley Pear Stamps Facebook page to keep up with news and sales, and join Prickley Pear Pals (the fan group) for lots of fun crafty ideas and to share your creativity! And finally, we’d love to see you visit the Prickley Pear Stamps blog and become a Follower! Hope to see you there! Thanks so much for stopping by today – we’ll see you next time! ;)

Scrappy hugs,

Warm Thoughts

Howdy peeps! Happy Thursday and Happy Birthday to my bestie from middle school, my nephew, and my older brother in Heaven. Lots of special people born on this day. I’m up on the Prickley Pear Stamps blog today with an inspiration project created with the Snow Ladies Trio stamp set along with the Nesting Tag Dies. I totally love this stamp set and have used all three images and three sentiments in the set to create a double flap fun fold, and I love how it turned out! I always love using non-traditional colors on Christmas cards!

The card bases, inside layering panel and one tag were cut from Neenah Classic Crest Solar White cardstock. Another tag was cut from CutCardStock Stardream Metallic Azalea cardstock and the layering panels were cut from coordinating prints in the My Favorite Things Cheerful Plaid 6×6 paper pad. I fashioned a bow from some pink gingham ribbon in my stash to embellish the pink tag. I have to say I’m really enjoying the Nesting Tag Dies because each one has a different stitched edge and they are so fun!

All three Snow Ladies were stamped in Memento Tuxedo Black ink and colored with alcohol markers, and each one sports a different sentiment. I totally love that different images and sentiments can be used on the multiple layers of this fun fold, providing little surprises for the recipient as each layer is lifted!

Sharing in the following challenges:
1. A Perfect Time To Craft Open Challenge: December #12-2023 – Anything Goes
2. A Place To Start: December 2023 – Anything Goes w/ optional New
3. ABC Christmas Challenge: Y & Z are for? (Y for Your Choice/Anything Goes)
4. Classic Design Challenge: December #12 Anything Goes
5. Crafts Galore Encore Challenge Blog: #118 – Anything Goes
6. Crafty Gals Corner: #250 – ‘Tis The Season
7. Creative Creases Challenge: #72 – Anything Goes with a Fun Fold
8. Cut It Up Challenges: #293 – Celebrate

Affiliate links are used in this post at no cost to you – I really appreciate your support!

Prickley Pear Stamps products used:
Snow Ladies Trio stamp set
Nesting Tag Dies

Other products used:
CARDSTOCK/PAPER: Neenah Classic Crest 80# Solar White cardstock, CutCardStock Stardream Metallic Azalea cardstock, My Favorite Things Cheerful Plaid 6×6 paper pad
INK: Memento Tuxedo Black ink; Arteza alcohol markers- BG23, B28, YR32, R23, RP23, GB08, NG02, YG04, G06
ACCESSORIES: Tonic Studios 12″ Guillotine Paper Trimmer, Tombow Mono Dots adhesive, Bearly Art precision craft glue, MISTI stamp tool, Big Shot, Keep It Simple Back To Basics Rose Ribbon

I hope you’ve enjoyed this project! Be sure to check out all the awesome stamps and dies at Prickley Pear Stamps! Save 10% on anything on the site when you shop at Prickley Pear Stamps by using coupon code LESLIE10 at checkout! And be sure to ‘like’ and ‘follow’ the Prickley Pear Stamps Facebook page to keep up with news and sales, and join Prickley Pear Pals (the fan group) for lots of fun crafty ideas and to share your creativity! And finally, we’d love to see you visit the Prickley Pear Stamps blog and become a Follower! Hope to see you there! Thanks so much for stopping by today – we’ll see you next time! ;)

Scrappy hugs,

‘Tis The Season To Be Jolly

Hi friends, Happy Saturday! I hope you have something fun planned this weekend… and if you’re a crafter, maybe you have some crafting up your sleeve?! I’m definitely doing some of that here today! I’m up on the Prickley Pear Stamps blog with an inspiration project featuring the Snowflake Inserts stamp set and the Snowflake Pendant die. I totally love these because the snowflake is large and definitely takes charge on any project! I love cards with apertures so I cut a large circle in the front flap for the snowflake to show through.

The card base was cut from Neenah Classic Crest Solar White and I used two coordinating prints from the Keep It Simple Royal 12×12 Collection Pack for the front and inside layering panels. I used Keep It Simple Stitched Circles Nested Dies for the large and small circle die cuts.

I adhered three snowflake die cuts together (cut from CutCardStock Stardream Metallic Vista cardstock using the Snowflake Pendant die) which I embellished with blue gemstones. The sentiment from the Snowflake Inserts stamp set was stamped in Catherine Pooler Cove Blue ink. The finishing touch was adding die cut corners cut from Solar white with the JustRite A2 Card Front Basics die set embellished with blue gemstones.

Sharing in the following challenges:
1. 613 Avenue Create: December 2023 – Anything Goes w/ optional Any Winter Holiday
2. A Perfect Time To Craft Open Challenge: December #12-2023 – Anything Goes
3. Classic Design Challenge: December #12 Anything Goes

Affiliate links are used in this post at no cost to you – I really appreciate your support!

Prickley Pear Stamps products used:
Snowflake Pendant die
Snowflake Inserts stamps

Other products used:
CARDSTOCK/PAPER: Neenah Classic Crest 80# Solar White cardstock, CutCardStock Stardream Metallic Vista cardstock, Keep It Simple Royal 12×12 Collection Pack
INK: Catherine Pooler Cove Blue ink
DIES/PUNCHES: Keep It Simple Stitched Circles Nested Dies, JustRite A2 Card Front Basics
ACCESSORIES: Tonic Studios 12″ Guillotine Paper Trimmer, Tombow Mono Dots adhesive, Bearly Art precision craft glue, MISTI stamp tool, Big Shot, blue gemstones

I hope you’ve enjoyed this project! Be sure to check out all the awesome stamps and dies at Prickley Pear Stamps! Save 10% on anything on the site when you shop at Prickley Pear Stamps by using coupon code LESLIE10 at checkout! And be sure to ‘like’ and ‘follow’ the Prickley Pear Stamps Facebook page to keep up with news and sales, and join Prickley Pear Pals (the fan group) for lots of fun crafty ideas and to share your creativity! And finally, we’d love to see you visit the Prickley Pear Stamps blog and become a Follower! Hope to see you there! Thanks so much for stopping by today – we’ll see you next time! ;)

Scrappy hugs,

Happy Winter

Hey everybody! Happy Friday – I hope you’re having an awesome week and have something fun planned this weekend! I’m delighted to be back with an inspiration project for Prickley Pear Stamps. I know I have mentioned many times that this is my favorite time of year. I love all the Wintery Christmas sights, sounds and smells, and of course all the delightful crafting! Our design team has created some gorgeous Winter-themed projects for our Winter Celebrations Insta-Hop using a fun sketch. The hop starts on the Prickley Pear Stamps Instagram page today and we hope you’ll join us!

You’ll find the complete hop list and the sketch on the Prickley Pear Stamps page, and by following and leaving comments or likes at all the stops on the hop, you’ll be in the running for a $25 gift card from Prickley Pear Stamps! A random winner will be chosen from all comments and likes left by 11:59 PM EST on December 15th and announced on the Prickley Pear Stamps Instagram and Facebook pages on December 17th.

I created a front flap card featuring one of the ladies in the awesome Snow Ladies Trio stamp set, and I structured the flaps around the sketch. I totally love how it turned out! I do love this image!

The card base and flap were cut from CutCardStock Basis Natural and a stitched circle cut from Basis Dark Red cardstock. The layering panels were cut from coordinating prints in The Paper Shelter Mirabelle cardstock pad. I stamped the image from the Snow Ladies Trio stamp set on Basis Natural in Memento Tuxedo Black ink, colored it with alcohol markers and cut it with a Keep It Simple Stitched Circles Nested Die. I stamped the sentiment from the same stamp set in the upper right corner and added three gemstones from the Trinity Stamps Ruby Radiance Embellishment Mix with my Trinity Pick Up Stick.

Using the Keep It Simple Stitched Circles Nested Dies, I cut one more circle from Basis Natural and adhered it beneath the flap for a handwritten message and signature.

You should totally use Prickley Pear Stamps products and our hop sketch, and post your Winter Celebrations project on your Instagram page! Tag us using the hashtag #ppswintercelebrations and you may be asked to join us as a Guest Designer in one of our future hops! Here’s the sketch we used:

Sharing in the following challenges:
1. 613 Avenue Create: December 2023 – Anything Goes w/ optional Any Winter Holiday
2. A Perfect Time To Craft Open Challenge: December #12-2023 – Anything Goes
3. Christmas Crafts All Year ‘Round: December Challenge – 12 Drummers Drumming, 12 of Something, Musical Theme or Anything Christmas or Holiday Goes

Affiliate links are used in this post at no cost to you – I really appreciate your support!

Prickley Pear Stamps products used:
Snow Ladies Trio stamp set

Other products used:
CARDSTOCK/PAPER: CutCardStock Basis 110# Natural, Basis 80# Natural and Basis Dark Red cardstock, The Paper Shelter Mirabelle cardstock pad
INK: Memento Tuxedo Black ink; Arteza alcohol markers- YR14/32, R20, RP09, YG45/46, CG04, GB08, B32, GS05/07; Sharpie white paint marker
DIES/PUNCHES: Keep It Simple Stitched Circles Nested Dies
ACCESSORIES: Tonic Studios 12″ Guillotine Paper Trimmer, Tombow Mono Dots adhesive, Bearly Art precision craft glue, MISTI stamp tool, Big Shot, Trinity Stamps Ruby Radiance Embellishment Mix, Trinity Pick Up Stick

I hope you’ve enjoyed this project! Be sure to check out all the awesome stamps and dies at Prickley Pear Stamps! Save 10% on anything on the site when you shop at Prickley Pear Stamps by using coupon code LESLIE10 at checkout! And be sure to ‘like’ and ‘follow’ the Prickley Pear Stamps Facebook page to keep up with news and sales, and join Prickley Pear Pals (the fan group) for lots of fun crafty ideas and to share your creativity! And finally, we’d love to see you visit the Prickley Pear Stamps blog and become a Follower! Hope to see you there! Thanks so much for stopping by today – we’ll see you next time! ;)

Scrappy hugs,

It’s the most wonderful time of the year

Hi friends! Happy Friday AND Happy December 1st! Can you believe it?! I’m up on the Prickley Pear Stamps blog today with an inspiration project featuring the Flourished Oval 3 – Holidays stamp set along with the Flourished Oval Die and Flourished Oval Nesting Dies! This was a super easy and fun card to put together with the whimsical Christmas papers in the ‘A Perfect Christmas’ Collection Kit from Echo Park!

The card base was cut from Neenah Classic Crest 80# Solar White cardstock and layered with a panel cut from the Echo Park ‘A Perfect Christmas’ Collection Kit which already had faux lace and off-kilter horizontal flags across the bottom that I thought looked so cute with the stamped snowmen! I used the Flourished Oval 3 – Holidays stamp set along with the Flourished Oval Die and Flourished Oval Nesting Dies to create the focal image. I also used a journaling card from the collection to layer the focal image. The finishing touches were an off-kilter vertical flag cut from a leftover strip and some iridescent gemstones.

Sharing in the following challenges:
1. A Perfect Time To Craft Open Challenge: December #12-2023 – Anything Goes
2. Christmas Crafts All Year ‘Round: December Challenge – 12 Drummers Drumming, 12 of Something, Musical Theme or Anything Christmas or Holiday Goes

Affiliate links are used in this post at no cost to you – I really appreciate your support!

Prickley Pear Stamps products used:
Flourished Oval 3 – Holidays stamp set
Flourished Oval Die
Flourished Oval Nesting Dies

Other products used:
CARDSTOCK/PAPER: Neenah Classic Crest 80# Solar White cardstock, CutCardStock Pop Tone Jellybean Green cardstock, Echo Park ‘A Perfect Christmas’ Collection Kit
INK: Memento Tuxedo Black and Bamboo Leaves inks; Arteza alcohol markers- R31/43, GB08, YR32, NG04, B14, YG45
DIES/PUNCHES: Tonic corner punch
ACCESSORIES: Tonic Studios 12″ Guillotine Paper Trimmer, Bearly Art precision craft glue, MISTI stamp tool, Big Shot, iridescent gemstones

I hope you’ve enjoyed this project! Be sure to check out all the awesome stamps and dies at Prickley Pear Stamps! Save 10% on anything on the site when you shop at Prickley Pear Stamps by using coupon code LESLIE10 at checkout! And be sure to ‘like’ and ‘follow’ the Prickley Pear Stamps Facebook page to keep up with news and sales, and join Prickley Pear Pals (the fan group) for lots of fun crafty ideas and to share your creativity! And finally, we’d love to see you visit the Prickley Pear Stamps blog and become a Follower! Hope to see you there! Thanks so much for stopping by today – we’ll see you next time! ;)

Scrappy hugs,

Christmas Gift Tags in Non-Traditional Colors

Hey everybody! We’re on the downslide into December and I hope you all had a very happy Thanksgiving! This month has flown by and Christmas is on our heels! I’m up on the Prickley Pear Stamps blog today with a super fun set of Christmas gift tags in non-traditional colors! I used the Christmas Holiday Gift Tags stamp set and Gift Tags dies along with the Nesting Tags dies. I pulled out a variety of Karin markers and alcohol markers to color these beauties and I love how they turned out! You know me… I’m always down for using non-traditional colors for my Christmas projects!

I stamped all five images from the Christmas Holiday Gift Tags stamp set in Memento London Fog ink and then again in Versamark, and heat embossed them with Hero Arts clear embossing powder. I used a variety of bold colored markers to color the images, cut them with the coordinating Gift Tags dies and added tiny red gemstones to several of them.

I used the Nesting Tag dies and cut a tag from CutCardStock Pop Tone Grape Jelly, Pop Tone Razzleberry, Pop Tone Tangy Orange, Pop Tone Limeade and Basis Gray cardstock (backed each one with a tag cut from Solar White cardstock), stamped ‘To and From’ on the back of each one in London Fog ink, and adhered the images. I punched a 1/4″ hole at the top of each tag, threaded a coordinating color ribbon (from Really Reasonable Ribbon) through the hole at the top, and tied it (along with a piece of knotted silver string, also from Really Reasonable Ribbon) with Doodlebug Design Lily White Doodle Twine.

Sharing in the following challenges:
1. Classic Design Challenge: November #11 – Anything Goes

Affiliate links are used in this post at no cost to you – I really appreciate your support!

Prickley Pear Stamps products used:
Christmas Holiday Gift Tags stamp set
Gift Tags dies
Nesting Tag dies

Other products used:
CARDSTOCK/PAPER: CutCardStock Pop Tone Grape Jelly, Pop Tone Razzleberry, Pop Tone Tangy Orange, Pop Tone Limeade and Basis Gray cardstock; Neenah Classic Crest 110# Solar White cardstock
INK: Memento London Fog ink, Versamark, assorted Karin markers and alcohol markers
ACCESSORIES: Tonic Studios 12″ Guillotine Paper Trimmer, Bearly Art precision craft glue, MISTI stamp tool, Big Shot, Hero Arts Clear embossing powder, Milwaukee Heat Tool, Stampin’ Up 1/4″ circle punch, Really Reasonable Ribbon silver string and assorted ribbon, Doodlebug Design Lily White Doodle Twine, red gemstones

I hope you’ve enjoyed this project! Be sure to check out all the awesome stamps and dies at Prickley Pear Stamps! Save 10% on anything on the site when you shop at Prickley Pear Stamps by using coupon code LESLIE10 at checkout! And be sure to ‘like’ and ‘follow’ the Prickley Pear Stamps Facebook page to keep up with news and sales, and join Prickley Pear Pals (the fan group) for lots of fun crafty ideas and to share your creativity! And finally, we’d love to see you visit the Prickley Pear Stamps blog and become a Follower! Hope to see you there! Thanks so much for stopping by today – we’ll see you next time! ;)

Scrappy hugs,

fa la la la la

Hey everybody! Today is the day for Giving Thanks and I hope you all have a wonderful day with family and/or friends, and get stuffed to the gills with yummy food, lol! I’m up on the Prickley Pear Stamps blog today with an inspiration project featuring the Snowflake Pendant die and Snowflake Inserts stamp set! OMGosh, these are some ah-maazing products which I quickly fell in love with! And this rotating center circle fun fold was a blast to make and it didn’t take me long to make a couple more which you’ll see showcased soon, so stayed tuned! My inspiration came from a new YouTube channel sub (Purple_Girl_Crafts) who obviously loves fun folds as much as I do, and her video for this one is HERE if you’re interested. It looks complicated but it isn’t really, and it sure packs a punch!

The square card base was cut from CutCardStock Basis Teal and I used Hot Off The Press Snowfall 6×6 double-sided papers for the layering panels. I layered two snowflake die cuts together (cut from CutCardStock Stardream Metallic Neptune and Lagoon cardstock using the Snowflake Pendant die) and stamped the sentiment from the Snowflake Inserts stamp set on CutCardStock Pop Tone Sno Cone in Catherine Pooler Daydream ink. I used some 7gypsies ephemera alpha stickers for the ‘Deck the Halls’ sentiment on the frame along with quite a few embellishments and sequins from Buttons Galore & More added with my Trinity Pick Up Stick to give it lots of bling. ;)

Here’s a few-second video showing what it looks like opening and closing. How freaking cool is that?! I L-O-V-E it!

Sharing in these additional challenges:
1. A Perfect Time To Craft Open Challenge: #11-2023 – Anything Goes
2. Classic Design Challenge: November #11 – Anything Goes
3. Creative Creases Challenge: #70 – Anything Goes with a Fun Fold
4. Inkspirational: #303 – Seasonal (Christmas)

Affiliate links are used in this post at no cost to you – I really appreciate your support!

Prickley Pear Stamps products used:
Snowflake Pendant die
Snowflake Inserts stamps

Other products used:
CARDSTOCK/PAPER: CutCardStock Basis Teal, Stardream Metallic Neptune, Stardream Metallic Lagoon and Pop Tone Sno Cone cardstock, Hot Off The Press Snowfall 6×6 double-sided papers
INK: Catherine Pooler Daydream ink
DIES/PUNCHES: Spellbinders Standard Circles Large and Small
ACCESSORIES: Tonic Studios 12″ Guillotine Paper Trimmer, Bearly Art precision craft glue, MISTI stamp tool, Big Shot, 7gypsies Architext Create Ephemera, Buttons Galore & More Frozen Mix Upz Embellishments and Blizzard Sequin Mix, Trinity Pick-Up Stick

I hope you’ve enjoyed this project! Be sure to check out all the awesome stamps and dies at Prickley Pear Stamps! Save 10% on anything on the site when you shop at Prickley Pear Stamps by using coupon code LESLIE10 at checkout! And be sure to ‘like’ and ‘follow’ the Prickley Pear Stamps Facebook page to keep up with news and sales, and join Prickley Pear Pals (the fan group) for lots of fun crafty ideas and to share your creativity! And finally, we’d love to see you visit the Prickley Pear Stamps blog and become a Follower! Hope to see you there! Thanks so much for stopping by today – we’ll see you next time! ;)

Scrappy hugs,

NOEL mini slimline

Hi friends! Happy Wednesday – I hope you’re having a wonderful week! I’m up on the Prickley Pear Stamps blog today with an inspiration project featuring the beautiful Christmas Trees 2 stamps and Tree die! There are SO many options for creating pretty projects with these stamps! I chose to do a tone-on-tone mini slimline using the trees to spell out NOEL, and I love how it turned out! I spritzed some Let’s Resin Chameleon Powder mixed with water in a Mini Mister over the white heat embossed trees just to give them a little color!

I cut my go-to 3-1/2″ x 6″ size mini slimline card base from Neenah Classic Crest 110# Solar White cardstock along with a three-layer die cut frame (using the Kat Scrappiness Mini Slimline Tri-Frame Dies) from CutCardStock Stardream Metallic Eris cardstock. I reserved the inner portion of one of the frame die cuts to put back into the center when assembling the card front. I stamped one of the trees four times on Eris cardstock and heat embossed them with Hero Arts White Embossing Powder using my Milwaukee Heat Tool.

I spritzed some Let’s Resin grape Chameleon Powder mixed with water in a Ranger Mini Mister over the white heat embossed trees and then once dry added the N-O-E-L letters cut from Eris cardstock using the Waffle Flower Bold Alpha Dies. I adhered the trees to the card front using 1/2″ double-sided foam strips and added several gemstones from the Trinity Stamps Sparkling Sapphire Embellishment Mix using my Trinity Pick Up Stick.

Sharing in the following challenges:
1. 613 Avenue Create: November 2023 – Anything Goes w/ optional Embossing
2. A Perfect Time To Craft Open Challenge: #11-2023 – Anything Goes
3. Alphabet Challenge Blog: Q is for Quadruple Shapes or Images
4. Classic Design Challenge: November #11 – Anything Goes
5. Fab ‘n’ Funky Challenges: #584 – Blue Hues
6. If You Give A Crafter A Cookie: #186 – November White
7. Jan’s Digi Stamps Challenge: November/December Anything Goes

Affiliate links are used in this post at no cost to you – I really appreciate your support!

Prickley Pear Stamps products used:
Christmas Trees 2 stamp set
Tree die

Other products used:
CARDSTOCK/PAPER: Neenah Classic Crest 110# Solar White cardstock, CutCardStock Stardream Metallic Eris cardstock
INK: Versamark
DIES/PUNCHES: Kat Scrappiness Mini Slimline Tri-Frame Dies, Waffle Flower Bold Alpha Dies
ACCESSORIES: Tonic Studios 12″ Guillotine Paper Trimmer, Gina K Designs Adhesive Dot Runner, Bearly Art precision craft glue, MISTI stamp tool, Big Shot, Hero Arts White Embossing Powder, Milwaukee Heat Tool, Let’s Resin grape Chameleon Powder, Ranger Mini Mister, 1/2″ double-sided foam strip, Trinity Stamps Sparkling Sapphire Embellishment Mix, Trinity Pick Up Stick

I hope you’ve enjoyed this project! Be sure to check out all the awesome stamps and dies at Prickley Pear Stamps! Save 10% on anything on the site when you shop at Prickley Pear Stamps by using coupon code LESLIE10 at checkout! And be sure to ‘like’ and ‘follow’ the Prickley Pear Stamps Facebook page to keep up with news and sales, and join Prickley Pear Pals (the fan group) for lots of fun crafty ideas and to share your creativity! And finally, we’d love to see you visit the Prickley Pear Stamps blog and become a Follower! Hope to see you there! Thanks so much for stopping by today – we’ll see you next time! ;)

Scrappy hugs,