Merry Christmas

Hey everybody! I hope you’re having a fantastic week! I’m stoked to be back with another Keep It Simple DT inspiration project to share today! This adorable disappearing nine patch Christmas card features quite a few items from the Scandinavian Christmas collection! I used the Santa & Friends Stamps and Dies, a variety of patterned papers from both the 6×9 Collection Pack and 6×9 Cardstock Pack, and inside sentiments from the Congratulations Sentiments Stamp Set and Gnome Stamps.

I cut a standard A2 size top-folding card base from Neenah Classic Crest 110# Solar White cardstock along with layering panels cut from papers in the 6×9 Cardstock Pack and 80# Solar white cardstock. I created the disappearing nine patch panel using a variety of patterned papers in the 6×9 Collection Pack. I stamped the reindeer from the Santa & Friends Stamps (in Memento Rich Cocoa ink) on brown paper in the 6×9 Cardstock Pack and cut it with the coordinating Outline Die. I colored his spots and antlers with an alcohol marker and added a dot of Nuvo Autumn Red Crystal Drops on his nose. I die cut three more reindeer shapes and adhered them all together with the brown one on top, ran a brown alcohol marker around the edge of the stack, and added a twine bow around his neck. I stamped a sentiment from the Santa & Friends Stamps in Memento Rich Cocoa ink and added several snowflakes cut from a scrap of patterned paper used in the disappearing nine patch panel.

I cut the inside panel from 80# Solar White cardstock and embellished it with strips of two of the papers used on the front and a couple more snowflakes cut from a scrap of patterned paper used in the disappearing nine patch panel. I stamped the sentiment in brown ink using stamps from the Congratulations Sentiments Stamp Set and Gnomes Stamps.

Keep It Simple products used:
Santa & Friends Stamps
Santa & Friends Outline Dies
Scandinavian Christmas 6×9 Collection Pack
Scandinavian Christmas 6×9 Cardstock Pack
Back to Basics Congratulations Sentiments Stamp Set
Gnomes Stamps

Affiliate links are used in this post at no cost to you – I really appreciate your support!

Other products used:
Cardstock/Paper: Neenah Classic Crest 110# and 80# Solar White cardstock
Ink: Memento Rich Cocoa ink; Arteza alcohol markers- BR86/92
Accessories: Tonic Studios 12″ Guillotine Paper Trimmer, Bearly Art precision craft glue, MISTI stamping tool, Big Shot, Canvas Corp twine, Nuvo Autumn Red Crystal Drops, Stampin’ Up Dimensionals and Mini Dimensionals

I hope you’ve loved seeing this project as much as I loved creating it, and you’re inspired to get crafty! Be sure to check out ALL the fun goodies in the Keep It Simple store such as paper, stamps, die cuts, ephemera, washi tape and enamel dots to name just a few! You’ll go cray-cray! Be sure to Follow us on Facebook, Instagram, and Pinterest for lots of crafty inspiration! Thanks so much for stopping by today – we’ll see you next time!

Scrappy hugs,

Merry Christmas

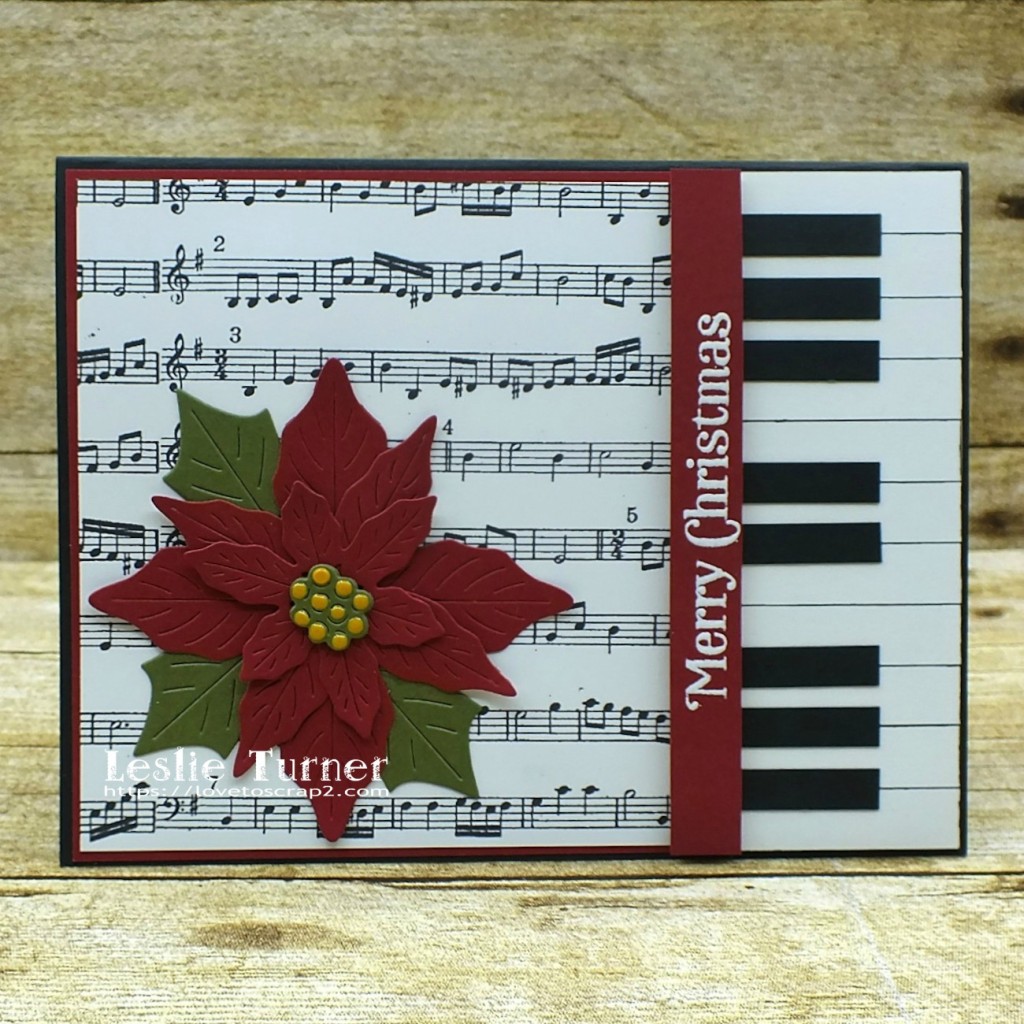
Happy Friday, friends! I hope you’ve had a fabulous week! It’s the first of the month and you know what that means – lots of posts – so stay tuned! Affiliate links are used in this post at no cost to you. I really appreciate your support! Our new challenge is live this morning over at Merry Little Christmas Challenge Blog and I’m thrilled to share my DT inspiration project for MLCCB #30 – January Anything Christmas Goes! I created a pretty pop-up music-themed Christmas card! I’ve seen a ton of piano cards on Pinterest and I really liked the concept so I designed my own version. My first card on the books for this year’s Christmas card stash! I know what you’re thinking… and there’s no such thing as ‘too early’ lol!

I cut 11 white piano keys from Neenah Classic Crest Solar White cardstock and eight narrow black piano keys from American Crafts black cardstock for each piano top (one for the front and one for the inside) and assembled them. For definition, I ran a black marker around each white piano key before adhering. I die cut and assembled the poinsettia. I have to say that I’ve had the best time with this poinsettia die set… I’ve created several cards with it and it’s definitely one of my favorites! I adhered a panel of sheet music to red cardstock to use on the front. For the final step, I heat embosssed the Merry Christmas sentiment in white on red cardstock, and adhered it to the top of the piano top with dimensional foam tape. I then adhered all the elements to the front of the card base.

I stamped the inside sentiment in red ink and then adhered the pop-up mechanism cut from Neenah Classic Crest Solar White cardstock to the center of the inside of the card base. I then adhered the piano top to the pop-up mechanism. I included an angled shot below so you can see how easy the construction is – very basic.

And here’s one more peek… I’m absolutely smitten with how this turned out! One of my favorite ever cards!

Sharing in the following challenges:
1. A Perfect Time To Craft Open Challenge Blog: #1-2021
2. Cardz 4 Galz: #137 – More Than One Fold
3. Classic Design Challenge: January 2021 #1 – Anything Goes
4. Crafts Galore Encore Challenge Blog: #83 – January Anything Goes
5. Crafty Friends Challenge Blog: #148 – Anything Goes
6. Lemon Shortbread Challenge Blog: #136 – Anything Goes
7. Paperbabe Stamps: #134 – Anything Goes
8. QKR Stampede: #411 – Anything Goes
9. The Crafter’s Cafe: #257 – Holidays
10. Word Art Wednesday: Weeks #470/473 – Christmas Blog Hop/Anything Goes
11. Your Scrapbook Place: January Anything Goes

Products used:
Cardstock/Paper: Neenah Classic Crest Solar White cardstock, American Crafts Black and Rouge cardstock, GKD Fresh Asparagus cardstock, Free Vintage Digital Sheet Music, Hammermill 60# copy paper
Stamps: Hero Arts Christmas Messages stamp set
Ink: Versamark, Stampin’ Up Cherry Cobbler ink, Memento Tuxedo Black marker
Dies/Punches: Hero Arts Paper Layering Poinsettia die set
Accessories:  ScraPerfect Best Glue Ever, MISTI stamp tool, Hero Arts white embossing powder, Milwaukee heat tool, Gemini Junior

I hope you’ve enjoyed this card and will link up an ‘anything Christmas goes’ project with us this month! Thanks so much for stopping by today – we’ll see you again soon! ;)

Scrappy hugs,
lesliesig

Merry Christmas

Hi everyone! Wowzers, can you believe we’re finishing out October?! Unbelieveable! I’m happy to be back on the Eyelet Outlet blog today with another awesome DT inspiration project! I created a festive Christmas card in traditional red and green featuring some fun washi tape, brads and bling!

I created a side-folding A2 card base and a slightly smaller panel from textured red cardstock. I cut a smaller panel that I covered with Christmas Pattern Washi Tape. I covered a scrap piece of white cardstock with green foiled paper and then die cut letters spelling M-E-R-R-Y which I added to the panel.

I affixed a Santa Hat Brad at an angle on the M and two Stocking Brads at the end just past the Y. I stamped ‘Christmas’ in green ink on a scrap piece of white cardstock, trimmed it and adhered it beneath the main part of the sentiment. The finishing touch was the addition of a few green 8 mm Cut Jewels.

I embellished the inside panel with a piece of the Christmas Pattern Washi Tape and a thin strip of the textured red cardstock, stamped the sentiment in green ink and layered it on more of the textured red cardstock.

And one more look… super happy with this design! Loving the traditional Christmas colors!

Sharing in the following challenges:
1. Aud Sentiment Challenge Blog: #263 – Anything Goes + A Sentiment
2. Crafty Catz: #252 – Anything Goes w/ optional Winter
3. Just Us Girls: Wild Card Challenge #560 – Word Die Cuts

Eyelet Outlet products used:
Christmas Pattern Washi Tape
Santa Hat Brads
Stocking Brads
8 mm Cut Jewels

Other products used:
Cardstock/Paper: Neenah Classic Crest Solar White cardstock, CutCardStock Habanero Red 4×6 cardstock, Rinea Peacock Variety Pack double-sided foiled paper
Stamps: The Project Bin Mid Century Christmas stamp set
Ink: Hero Arts Pine ink
Dies/Punches: My Favorite Things Die-namics Stitched Alphabet dies
Accessories:  Tombow Mono permanent adhesive, Bearly Art precision craft glue, Gemini Junior, MISTI stamp tool

I hope you’ve enjoyed today’s project! Be sure to check out all the fun goodies at Eyelet Outlet! I can already see you drooling, lol! Be sure to ‘like’ and ‘follow’ Eyelet Outlet Facebook Page to keep up with news and sales, and while you’re at it, join the Eyelet Outlet Fans Facebook group for lots of creative inspiration! Thanks so much for stopping by today – we’ll see you next time! ;)

Scrappy hugs,
lesliesig

Merry Christmas

Hello, my friends! Hope you’re having a good week! This month’s ATC Challenge is live over at Happy Little Stampers and I’m excited to share my DT inspiration project with you today! The theme for our April ATC Challenge is Make Your Own Background and we’d love to see what you create for our challenge this month!

april 2020 atc
I created a diagonal stripe background using red and green glitter Washi Tape and gold Skinny Washi Tape. Super easy. No measuring – just free-hand.

2019_1210012a

I adhered a gold glitter ‘merry’ die cut layered onto a white one, then added the stamped ‘Christmas’ sentiment and a green tree brad to complete the ATC.

2019_1210013a

And here’s one more look… super happy with how this one turned out! Very festive! ;)

2019_1210014a

I’d love to enter this ATC into the following challenges:
613 Avenue Create: #232 – Anything Goes w/optional Geometric Papers
A Bit More Time To Craft: #113 – Anything Goes
A Bit More Time To Craft Extra: April Anything Goes
A Perfect Time To Craft Open Challenge: #4-2020 – Anything Goes
Allsorts Challenge Blog: Week #566/7 – Something Old, Something New, Something Borrowed, Something Blue (old Washi Tape, stamp/die set and tree embellishment)
Aud Sentiments Challenge Blog: #248 – Anything Goes + Sentiment
Christmas Crafts All Year Round: April Challenge – Anything Christmas/Winter Holidays Goes or Snow Buddies
Crafty Hazelnut’s Christmas Challenge: #484 – Anything Goes
Classic Design Challenge: 4th Birthday Challenge
Crafting Happiness Challenges: #43 – Anything Goes w/optional Easter
Crafty Catz: #500 – Anything Goes w/optional One For The Girls
Jan’s Digi Stamps Challenges: #11 – Anything Goes
Let’s Craft and Create: #158 – Anything Goes w/optional Through a Window
Lil Patch of Crafty Friends: #129 – Anything Goes
Make My Monday Challenge Blog: #119 – Make Your Own Background

Products used:
Cardstock/Paper: Stampin’ Up thick Whisper White cardstock
Stamps/Dies: Hero Arts Merry Stamp & Cuts
Ink: Stampin’ Up Real Red ink
Accessories:  ScraPerfect Best Glue Ever, Peachy Cheap green and red glitter Washi Tape, Me & My Big Ideas gold glitter Skinny Washi Tape, Gemini Junior die cutting machine, MISTI stamp tool, Christmas tree brad from stash, Faber-Castell Magenta pitt pen

I hope you’ve enjoyed today’s project and will link up an ATC with us this month! Feel free to create either a card or a coin… or both (wink-wink)! Thanks so much for stopping by today – we’ll see you next time! ;)

Scrappy hugs,
lesliesig

Merry Christmas

Hi everyone! Hope you’re having a great week so far! This month’s ATC Challenge is live over at Happy Little Stampers and I’m excited to share my DT inspiration project with you today! The theme for our June ATC Challenge is Christmas and we’d love to see what you create for our challenge this month!

I’m really diggin’ creating ATCs and I’m SO happy to be on this design team! I belong to a couple ATC trading groups and have gotten a couple very awesome coins from a gal in the UK!

2019_0310001a

I used 120# kraft cardstock for my ATC base and I rounded the corners on this one. I adhered two KaiserCraft Letters to Santa papers together to create the background, cut the panel to size, rounded the corners and inked the edges. I stamped some text on the plain side of the background panel and added some skinny gold glitter Washi Tape to distinguish the two sides.

2019_0310002a

I created a couple of tags, inked the edges and connected them at the top with some green bamboo cord. I added a file tab decorated with some black/gold skinny Washi Tape to the left side of the top tag and a faux wax stamp (paper coated with Glossy Accents). I colored a tiny doily with a green alcohol marker and tucked it under the right side of the embellished tags. Super easy and fun – and I love how it turned out!

2019_0310003a

Products used:
Cardstock/Paper: Paper Accent 120# Kraft cardstock, KaiserCraft Letters to Santa 6-1/2″ paper pad
Stamps: Blockheads Paper Arts Backgrounds for All Occasions stamp set
Ink: Ranger walnut stain distress ink, Studio 71 alcohol marker- YG7
Dies/Punches: Kadomaru Pro corner rounder
Accessories:  Me & My Big Ideas Skinny Washi Tape, American Crafts file tab, Momenta mini doily, green Hemptique bamboo cord, Glossy Accents

I hope you’ve enjoyed today’s project and will link up an ATC with us this month! We’d love to see what you create – either a card or a coin! Thanks so much for stopping by today – we’ll see you next time! ;)

Scrappy hugs,
lesliesig

Merry Christmas

** 5/21/17 Winner at Christmas Card Challenges! **
** 5/22/17 Top 3 at Ooh-La-La Creations! **
** 5/25/17 Top 3 at Cardz 4 Gals! **
** 6/14/17 Top 3 at Christmas at Sweet Stampin’! **

Hi everyone! Hope you’ve had a great week and you’re having wonderful spring-like weather where you are! I’m happy to say that I’m once again a guestie over at Scrapping4fun Challenges! Another one of my cards was chosen as a Featured Creation a few weeks ago, so here I am! I’m absolutely thrilled to share my inspiration Challenge #90 – Ladies!

I created a very feminine shabby chic Christmas card featuring both tool and ink distressing, smeared grit paste and watered-down Gesso splatters on the front, and stamping on the inside. I had a great time with this!

LeslieTurner-May12-Ladies

All the elements were distressed with tool first and then ink, and then randomly layered on the background.

2017_04300014a

I smeared small amounts of grit paste and splattered watered-down Gesso on the front when I had all the pieces in place.

2017_04300015a

2017_04300016a

I kept the inside fairly simple with a stamped sentiment on a layered panel.

2017_04300017a

I’d love to enter this card into the following challenges:
A Perfect Time to Craft Open Challenge Blog – #5 – Anything Goes
Cards 4 Galz: #47 – Add Some Texture
Christmas at Sweet Stampin: May Anything Christmas
Christmas Card Challenges: #12 – Anything Goes with optional photo inspiration
Craftyhazelnut’s Christmas Challenge Extra: May Anything Goes
Creative Craft Cottage: #87 – Three of a Kind (three bells)
Happy Little Stampers: May Christmas Challenge
Inspiration Destination: #127 – Anything Goes w/ optional twist of Masculine (no twist)
Lil Patch of Crafty Friends: #57 – Anything Goes
Making Memories Crafting Challenge Blog: #5 – Anything Goes
Ooh-La-La Challenges: #228 – Something beginning with B (bells)
Word Art Wednesday: #282/283 – Anything Goes

Recipe:
Cardstock: 
Spectrum Noir Ultra Smooth Premium white cardstock, Papers from Polly’s Paper Studio
Stamps: Stampin’ Up! Cozy Christmas stamp set
Ink: Ranger Walnut Stain distress ink
Accessories: Colorbok Flea Market rhinestones, ephemera from Polly’s Paper Studio, Prairie Bird Boutique ribbon scrap, white Gesso, Idea-ology gem clip

I hope you’ve enjoyed today’s project and will create a project for our challenge this time! We’d love to see how you interpret the theme “Ladies” and can’t wait to see what you create! Thanks so much for stopping by today – we’ll see you again soon! ;)

Scrappy hugs,
lesliesig