you color my world

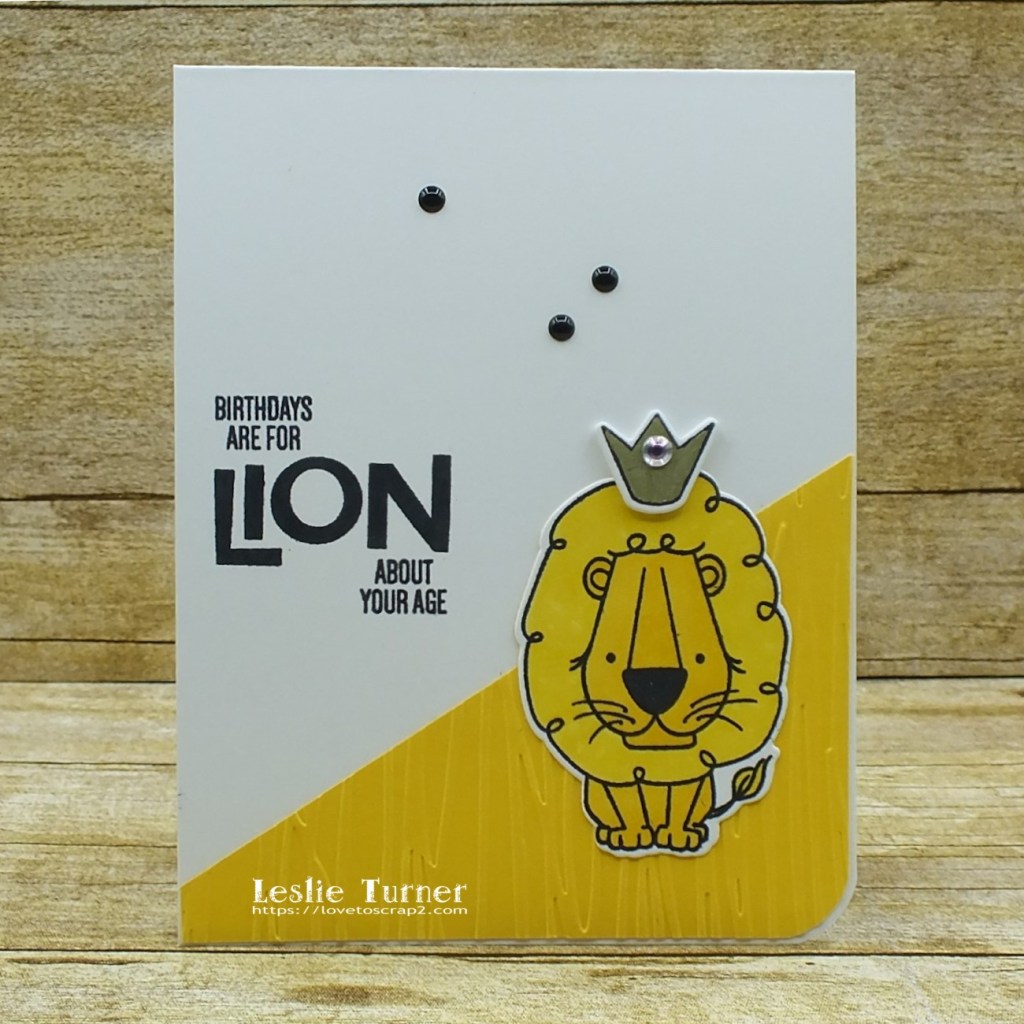
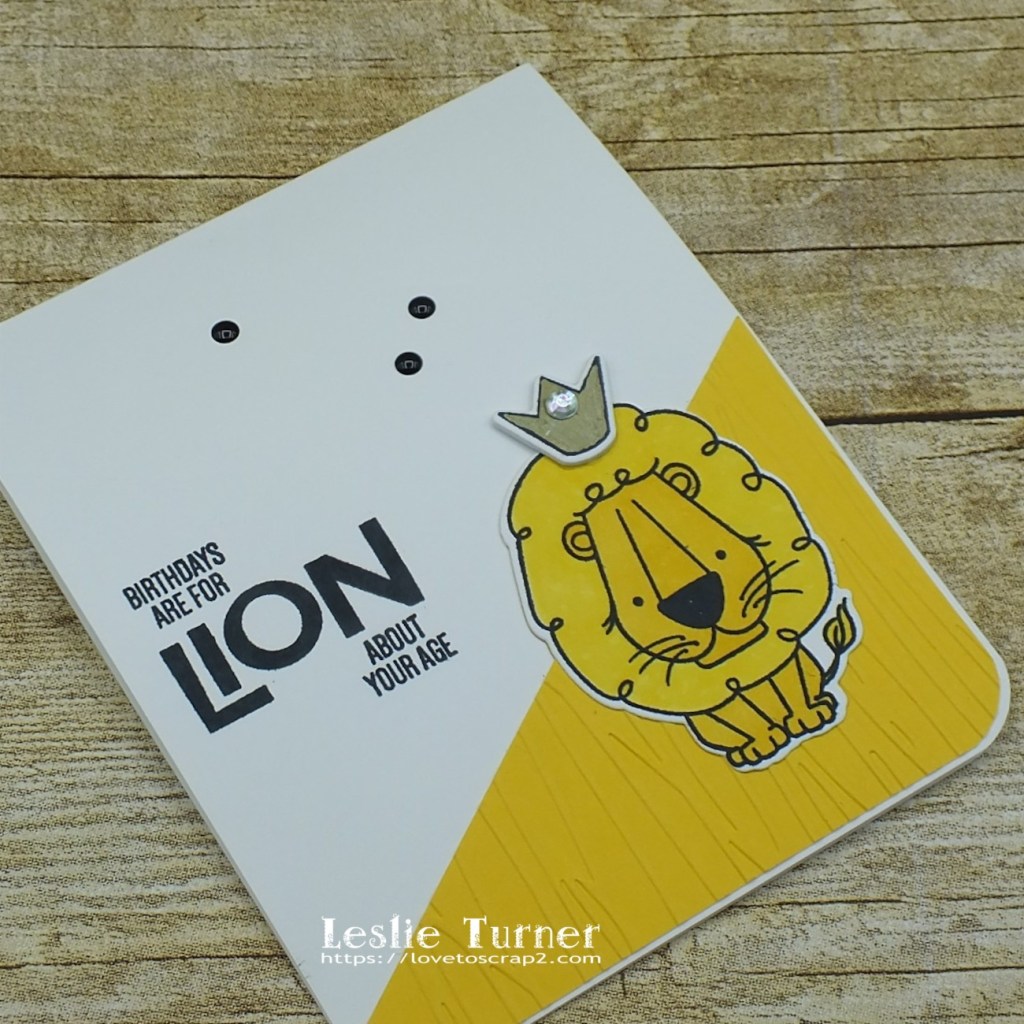
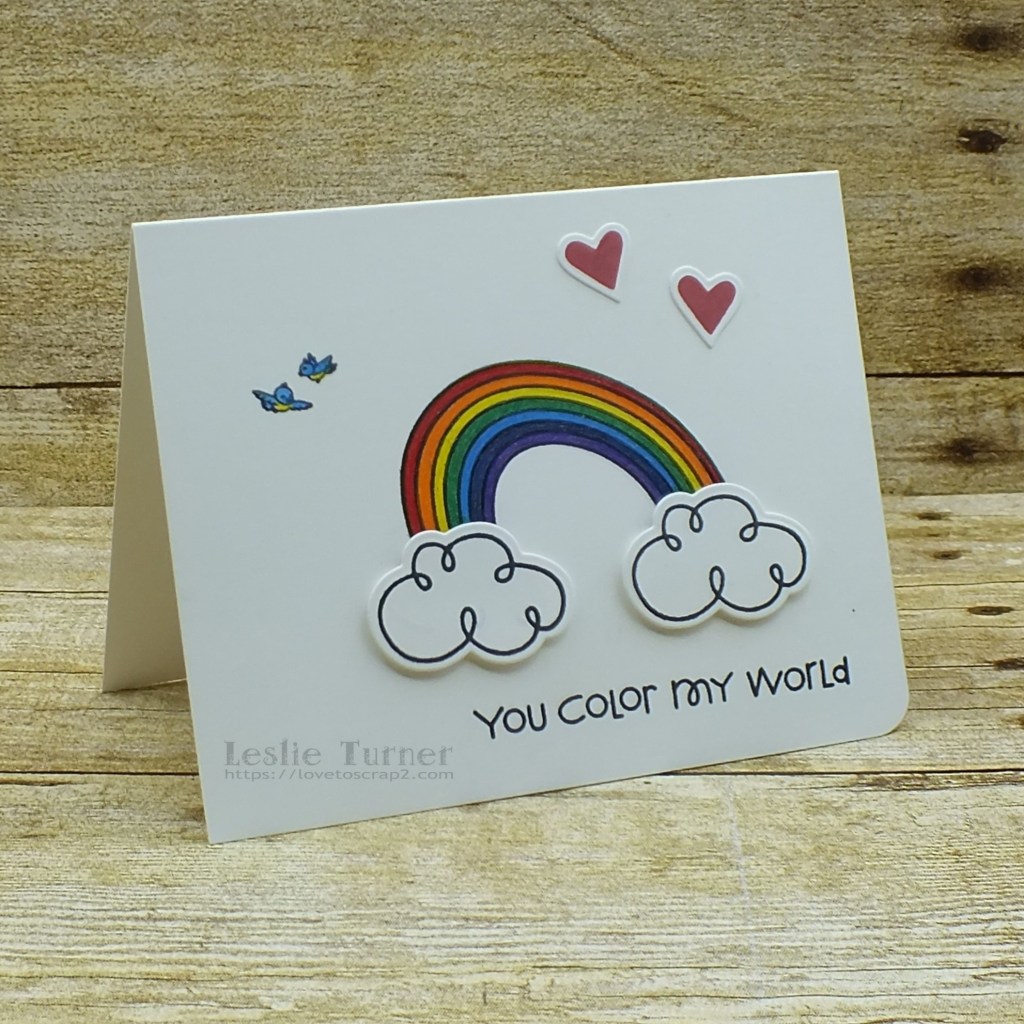
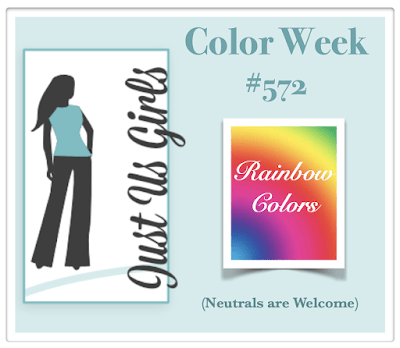
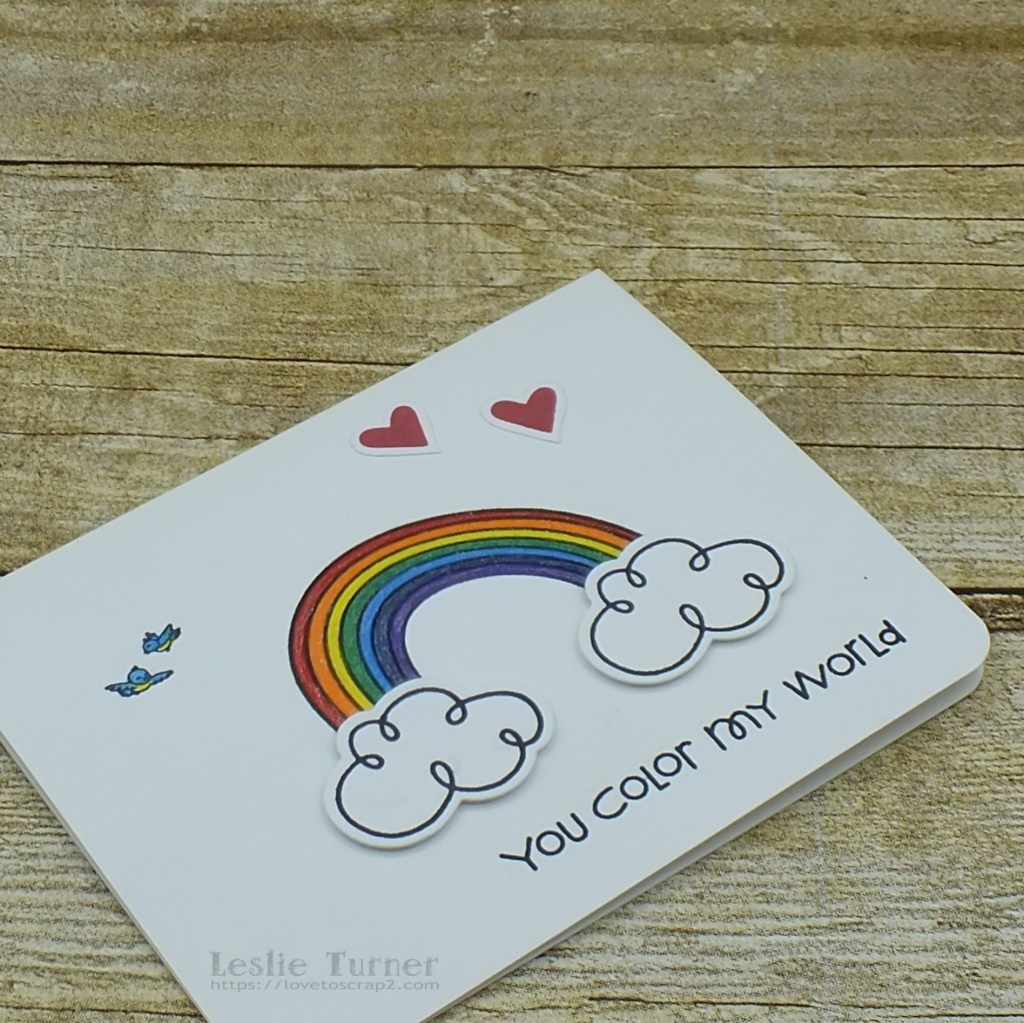
Hi friends! I hope you had a great week and have something fun planned this weekend! Affiliate links are used in this post at no cost to you. I really appreciate your support! I’m guesting this month for Just Us Girls Challenge and I’m delighted to share my project for Color Week #572 – Rainbow Colors! I’ve mentioned before that clean and simple cards have always been intimidating, but over the last year or so I’ve become more comfortable creating them. When Vicki sent me the challenge graphic, I knew immediately what I was going to create! I used stamp sets from Paper Smooches and Prickley Pear Stamps to create a CAS love-themed card featuring a shimmery rainbow with puffy clouds. How stinkin’ cute is this?!

And here is our color prompt:

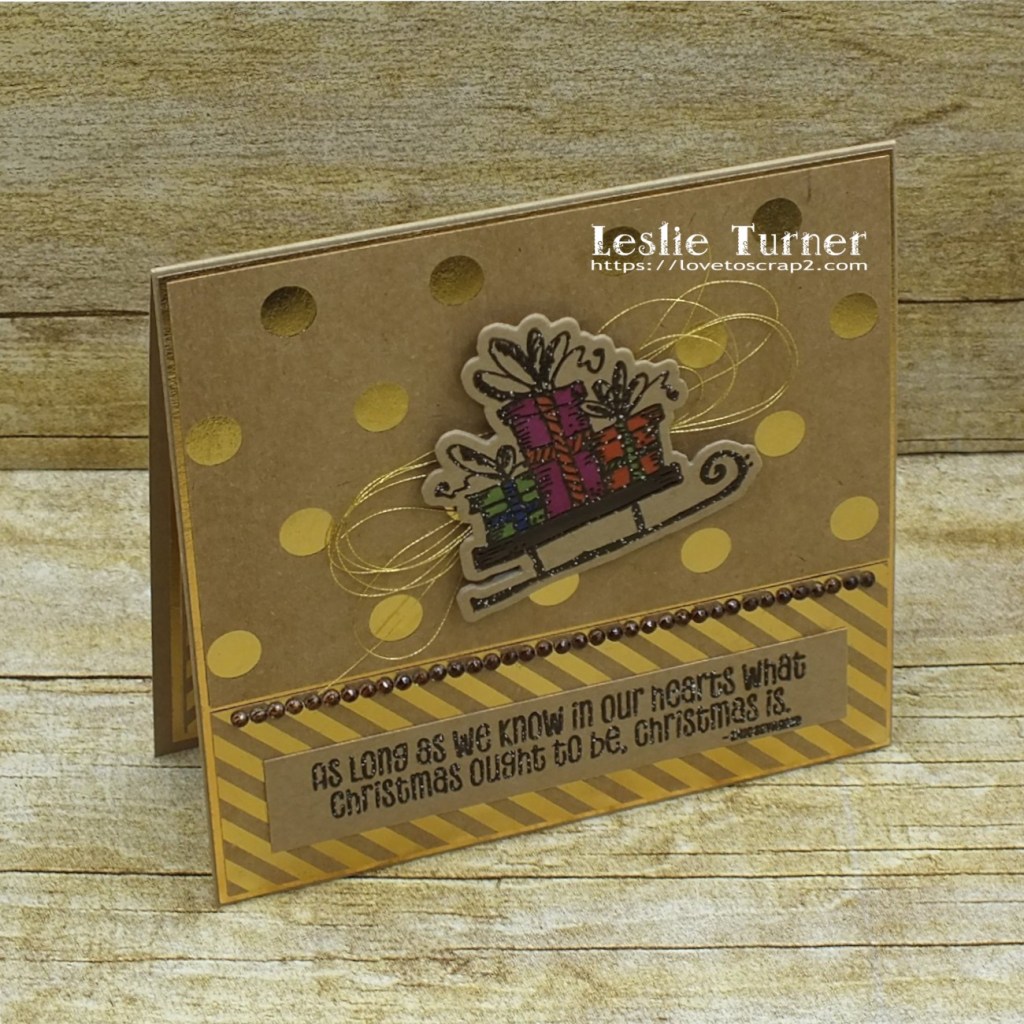
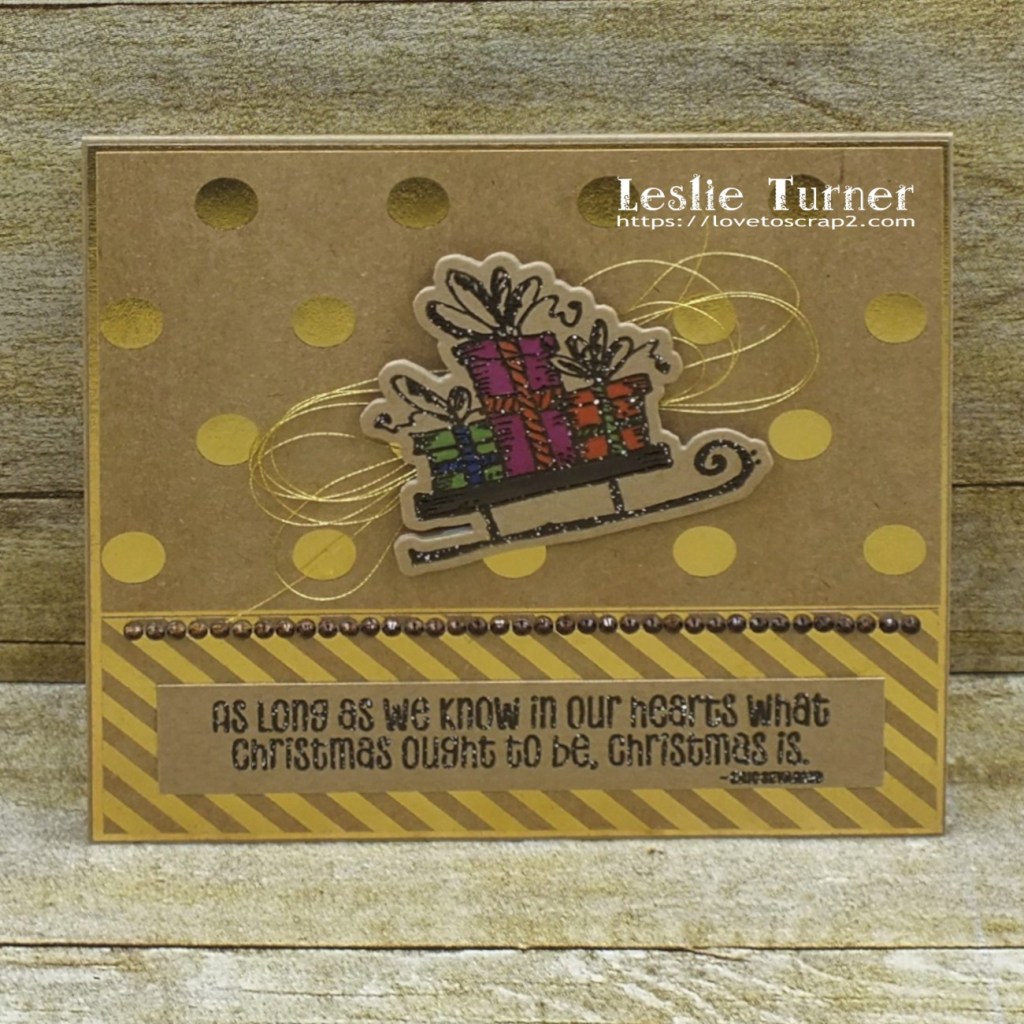
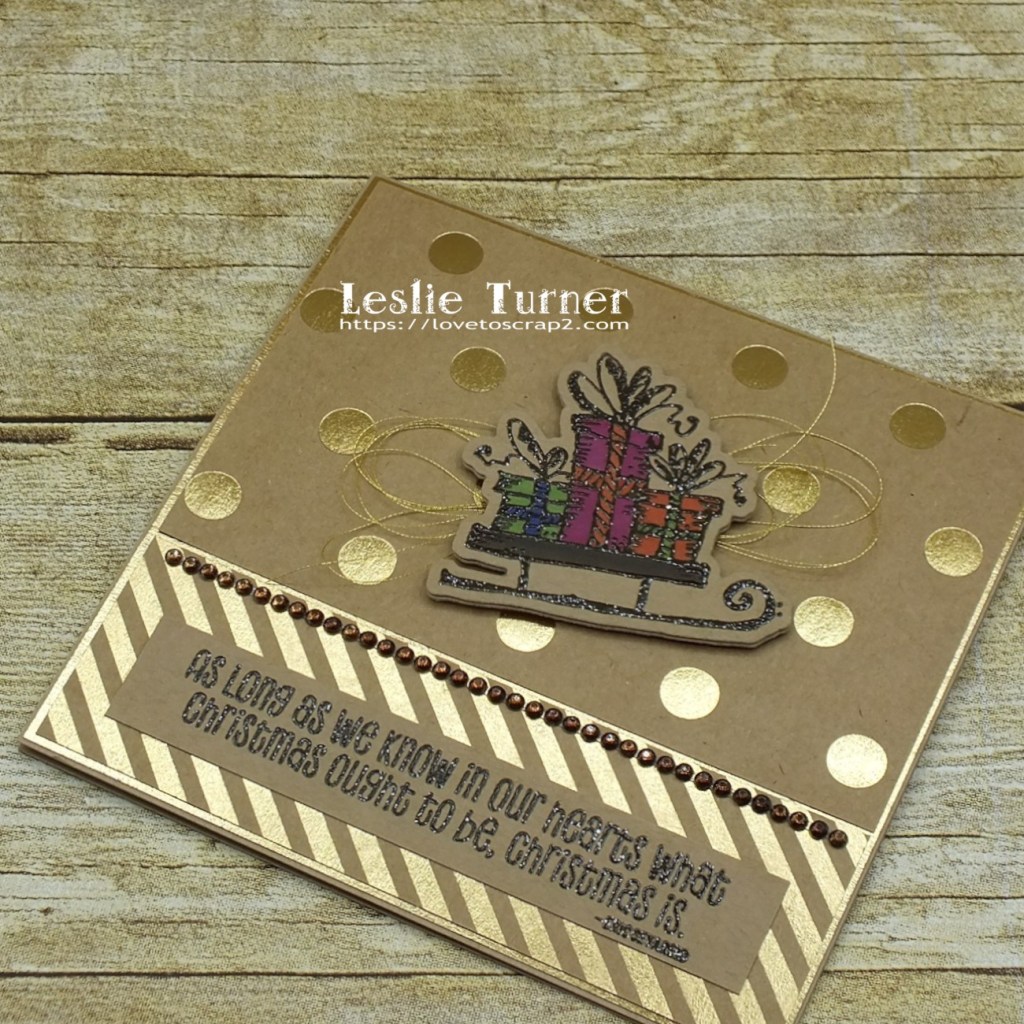
I created a standard A2 top folding landscape card base from Neenah Classic Crest Solar White 110# cardstock and rounded the bottom right corner. I stamped the rainbow and little birds on the card base and colored them with Prismacolor pencils. I added shimmer to the rainbow with a Clear Star Gelly Roll pen. I stamped the clouds on a Neenah Classic Crest Solar White 110# cardstock scrap, die cut them with the coordinating die and affixed them to the ends of the rainbow with foam tape. I stamped the sentiment in the bottom right corner and added two hearts stamped on a Neenah Classic Crest Solar White 110# cardstock scrap and die cut with the coordinating die.

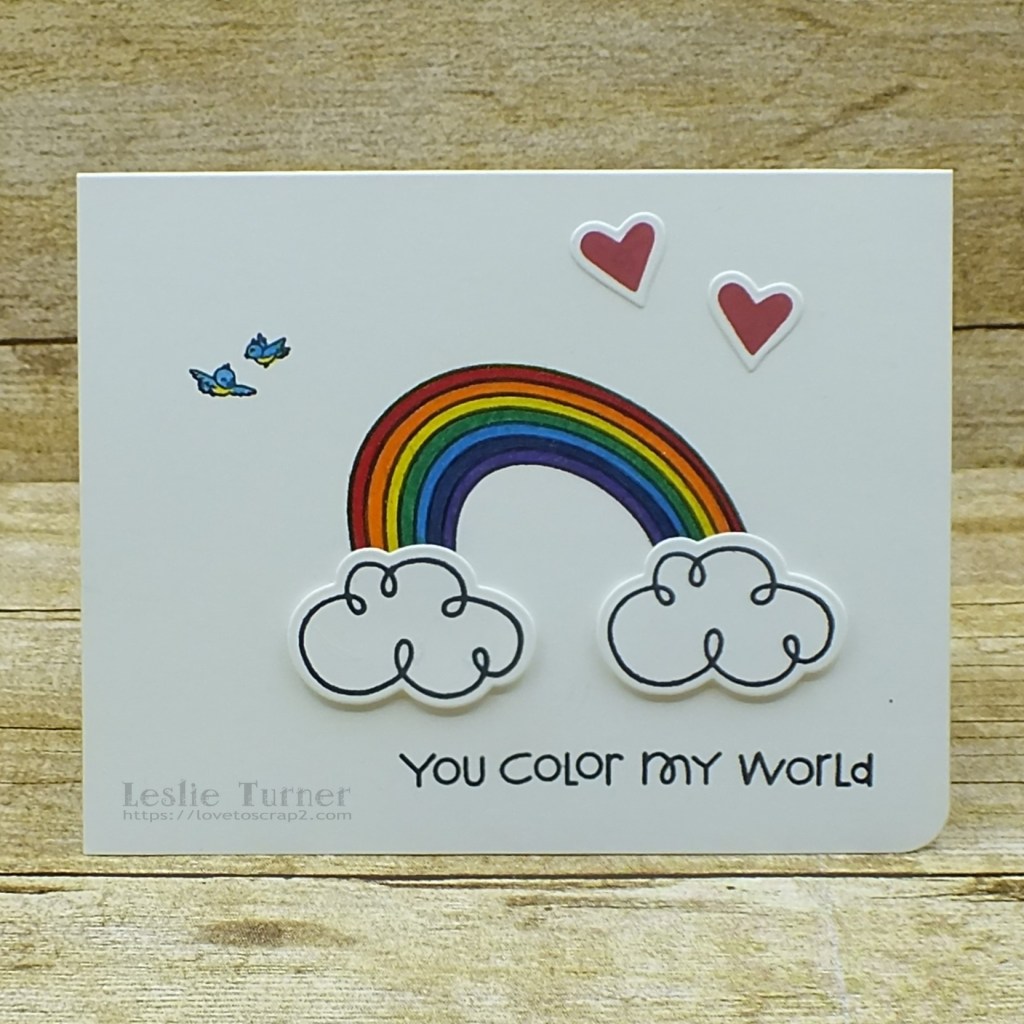
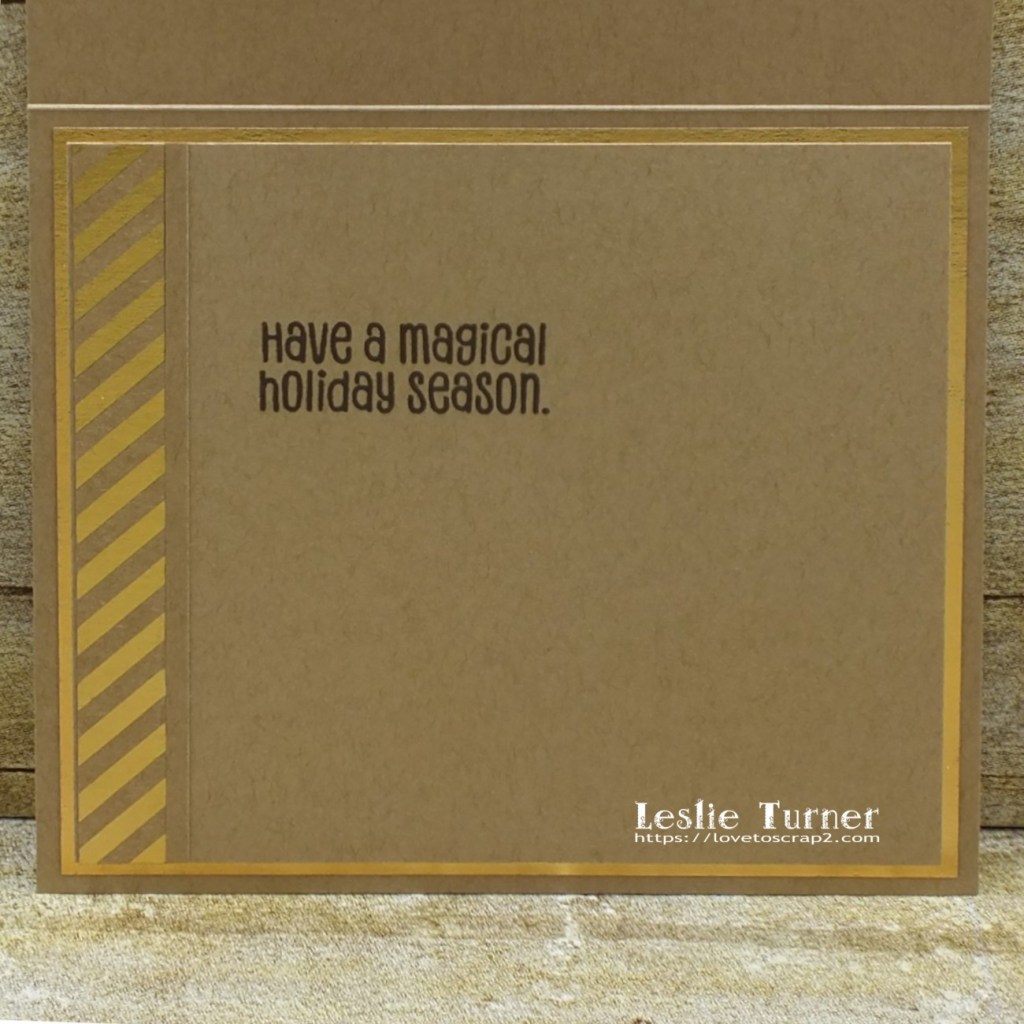
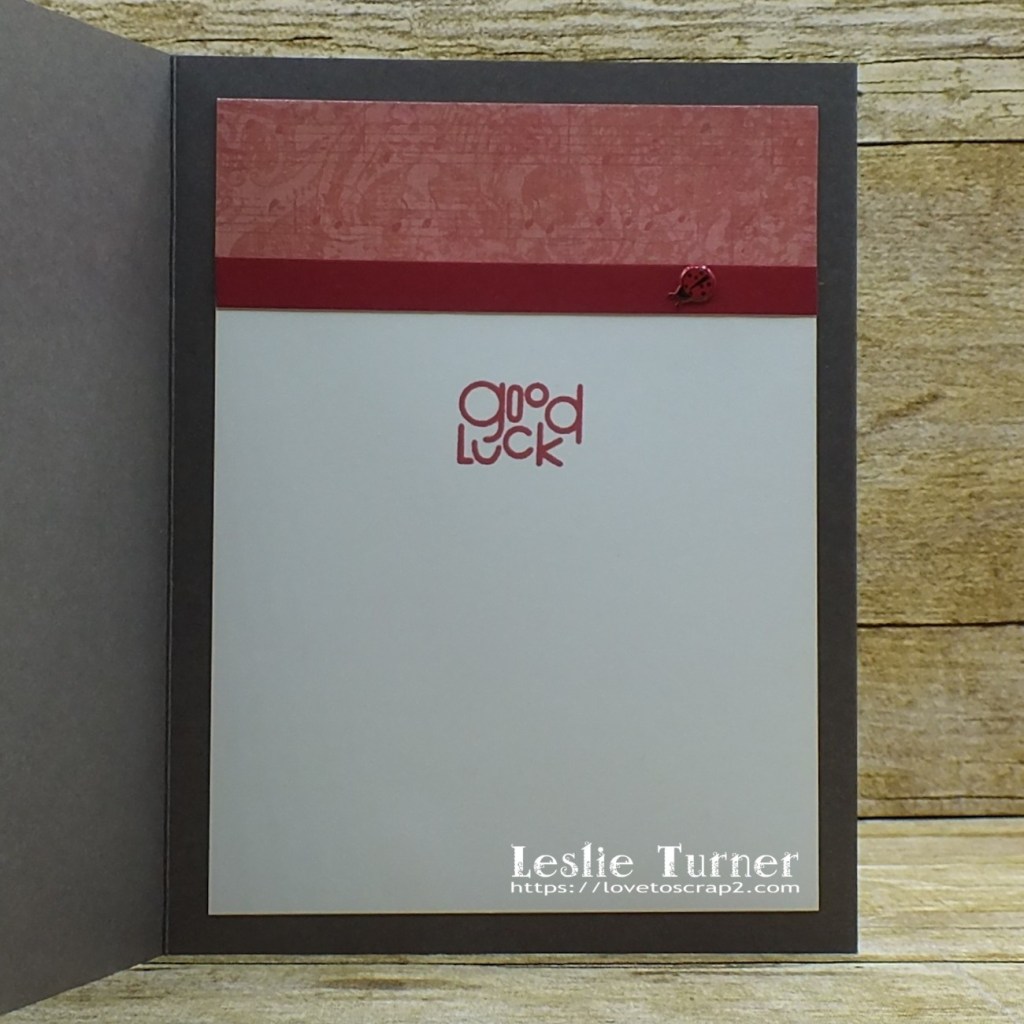
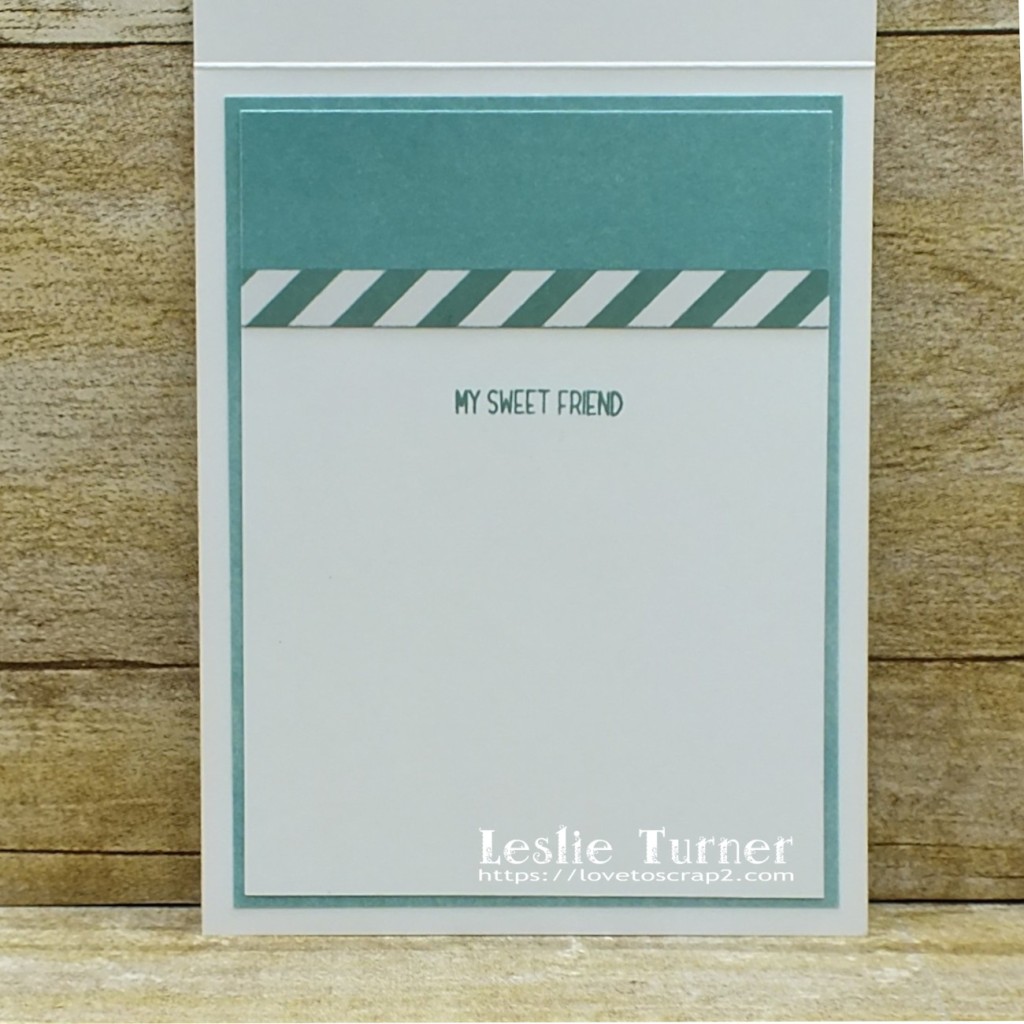
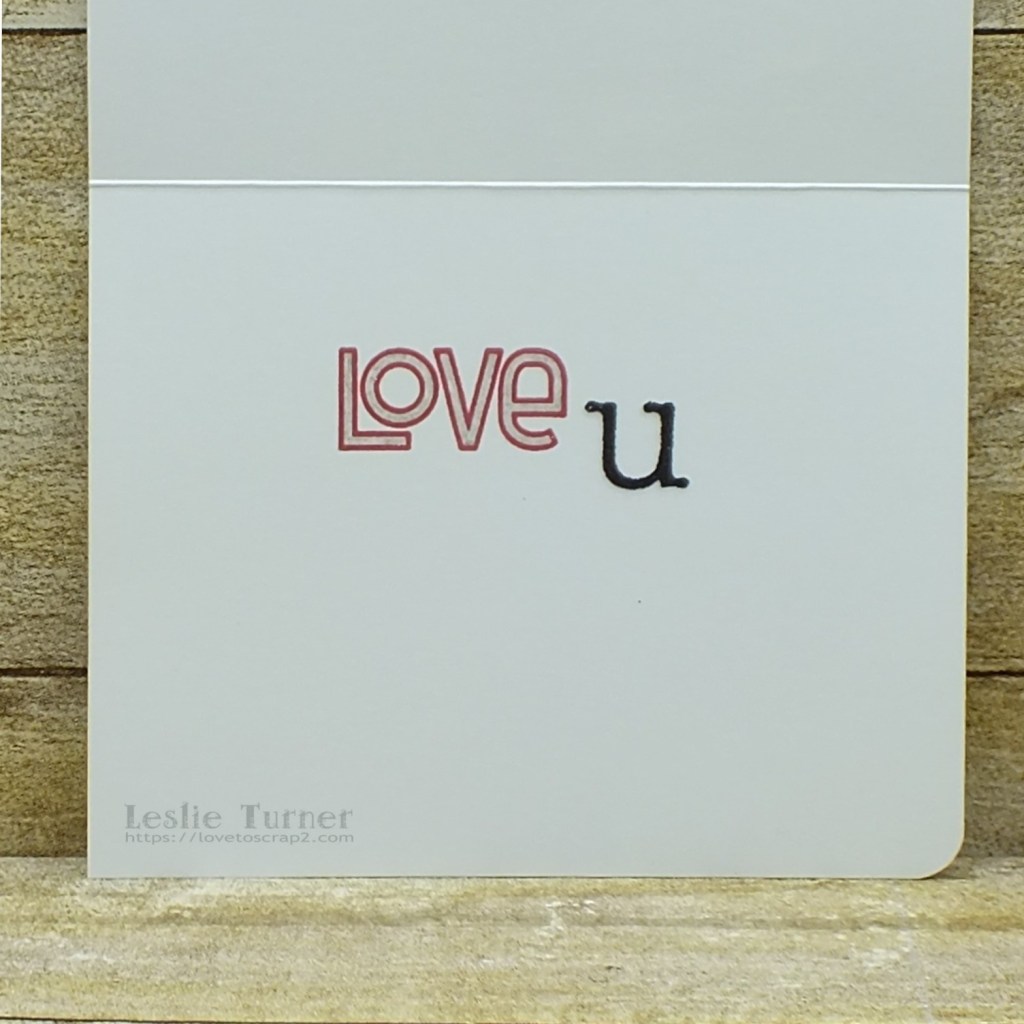
I kept the inside super simple with just a sentiment stamped in red and colored in with the Clear Star Gelly Roll pen, and an added black glitter alpha sticker.

And one more look… such a fun design! Sometimes less is more! ;)

Sharing in the following challenges:
1. 613 Avenue Create: #2 February 2021 – Anything Goes w/ optional Heart and Soles
2. Crafty Gals Corner: #216 – Add A Heart!
3. Scrapping4fun Challenges: #186 – Anything Goes
4. The Creative Crafters: #37 – Anything Goes
5. World Wide Open Design Team Challenge Blog: #02 – Anything Goes

Products used:
Cardstock/Paper: Neenah Classic Crest Solar White 110# cardstock
Stamps: Paper Smooches Cosmos and Word Salad stamp sets, Prickley Pear Stamps Noah’s Ark stamp set
Ink: Memento Tuxedo Black and Rhubarb Stalk ink; Sakura Clear Star Gelly Roll pen
Dies/Punches: Kadomaru Pro corner rounder, Paper Smooches Cosmos die set
Accessories: Bearly Art precision craft glue, MISTI stamp tool; Prismacolor pencils- Crimson Red, Orange, Canary Yellow, Grass Green, True Blue, Indigo Blue, Violet; Gemini Junior, Scotch 3M foam tape, Darice black glitter alpha stickers

I hope you’ve enjoyed this project and will link up a project with us this week at JUGS using rainbow colors! Can’t wait to see what you create! Thanks so much for stopping by today – we’ll see you next time! ;)

Scrappy hugs,
lesliesig

I miss your face!

Hi everyone! A very Happy Saturday to you! Affiliate links are used in this post at no cost to you. I really appreciate your support! I’m thrilled to be back on the Eyelet Outlet blog today with another awesome DT inspiration project! We were gifted some pretty cool quarantine-inspired brads that are new in the store, and all the designers on the team have been creating some pretty amazing stuff, so be sure to check them out! I have been slowly migrating toward CAS for a while now and I made a series of clean and simple cards using these new brads as a way to pay tribute to our frontline healthcare workers during this pandemic. Hopefully we will see an end to this soon.

I created a standard A2 size top-folding card base from black cardstock. I created the front sentiment on the computer so I printed it on Neenah Classic Crest Solar White 80# cardstock and trimmed the panel so that the sentiment was in the lower right corner. I embellished the panel with two strips of silver Glitter Skinny Washi Tape spaced a short distance apart with a narrow strip of black cardstock adhered between them slightly offset to the right. Using a Hero Arts stamp set, I stamped the face just above the sentiment and added a Mask Brad. I added three randomly placed Black Enamel Dots to the background and adhered the panel to the front of the card base.

I embellished the inside panel with a strip of the silver glitter skinny washi tape and a narrow strip of black cardstock, stamped the sentiment in black ink and adhered the panel to the inside of the card base.

And one more look… really happy with how this turned out! As I’ve said many times, sometimes less is more! And this image really reminds me of Audrey Hepburn back in her younger years!

Sharing in the following challenges:
1. Sweet Stampers challenge Blog: #53 – CAS

Eyelet Outlet products used:
Mask, Hand Sanitizer & Soap Brads
Glitter Skinny Washi Tape
Black Enamel Dots

Other products used:
Cardstock/Paper: American Crafts black cardstock, Neenah Classic Crest Solar White 80# cardstock
Stamps: Hero Arts You Are Fabulous stamp set
Ink: Memento Tuxedo Black ink
Accessories: Tombow Mono permanent adhesive, Bearly Art precision craft glue, MISTI stamp tool

I hope you’ve enjoyed today’s project! Be sure to check out all the fun goodies at Eyelet Outlet! I can already see you drooling, lol! Be sure to ‘like’ and ‘follow’ Eyelet Outlet Facebook Page to keep up with news and sales, and while you’re at it, join the Eyelet Outlet Fans Facebook group for lots of creative inspiration! Thanks so much for stopping by today – we’ll see you next time! ;)

Scrappy hugs,
lesliesig

CO-FF-EE

Hi everyone! I hope you’ve had a great week! How’s the weather where you are? It’s still a bit chilly here and we still have snow on the ground, which we love! Affiliate links are used in this post at no cost to you. I really appreciate your support! I mentioned last week that I was invited to guest for Just Us Girls Challenge, and I’m thrilled to share my project for Trend Week #571 – Slimline Card. I’ve jumped on the slimline card wagon too, along with everyone else, so this was a card I enjoyed creating!

And here is our trend prompt:

My card has gold glitter washi tape and skinny washi tape striped elements, and features stamped and die cut coffee cups on the front with a gift card holder on the inside. Perfect for that coffee-loving friend with a birthday – or some other reason to celebrate! My slimline cards are 9″ x 3-3/4″ because this slightly larger size fits better in a #10 envelope. I cut the card base from CutCardStock Wild Blueberry cardstock along with three stitched oval die cuts and the alphabet letters using the CUTplorations Uppercase Alphabet die Plate to spell COFFEE. I cut front and inside layering panels from CutCardStock Sandcastle cardstock and rounded the bottom corners of the card base and all the layers. I stamped four coffee cups on the CutCardStock Sandcastle cardstock in navy blue ink which I cut with the coordinating die. I arranged three sets of washi tape stripes horizontally across the front panel and adhered it to the card base. I adhered the stitched ovals to the panel and then the coffee cups with the letters.

I embellished the inside panel cut from CutCardStock Sandcastle cardstock with a single set of vertical washi tape stripes and adhered it to the inside of the card base. I created a gift card envelope from CutCardStock Wild Blueberry cardstock with my WRMK Envelope Punch Board and adhered a Sizzix die cut sentiment. I then adhered the remaining die cut coffee cup and gift card envelope to the panel, leaving plenty of room for a signature.

And one more look… so pleased with how this turned out! I CASE’d my own design that I created for the Prickley Pear Stamps Hochanda showcase back in late October, but this one is slightly different.

Products used:
Cardstock/Paper: CutCardStock Wild Blueberry cardstock, CutCardStock Sandcastle cardstock
Stamps: Prickley Pear Stamps Coffee Cup stamp set
Ink: Stampin’ Up Night of Navy ink, Pentel Slicci Gold pen
Dies/Punches: Memory Box Stitched Oval Layers die, Prickley Pear Stamps Coffee Cup die, CUTplorations Uppercase Alphabet die Plate, Sizzix Celebration Words: Script die set, Kadomaru Pro corner rounder
Accessories: Tombow Mono permanent adhesive, Bearly Art precision craft glue, Peachy Cheap Gold Glitter Washi Tape, Me & My Big Ideas Skinny Washi Tape, MISTI stamp tool, Gemini Junior, We R Memory Keepers Pocket Punch Board

I hope you’ve enjoyed this project and will link up a slimline card with us this week at JUGS! Can’t wait to see what you create! Thanks so much for stopping by today – we’ll see you next time! ;)

Scrappy hugs,
lesliesig

birthdays are for LION about your age

Hello again, friends! I’m back with another card I created a couple days ago for The Outlawz Challenges. Affiliate links are used in this post at no cost to you. I really appreciate your support! This adorable clean and simple birthday card is for The Outlawz Festive Fridays Challenge. The sponsor this time is Jan’s Digi Stamps and the themes to choose from are Winter, Spring, Valentine, Birthday or Christmas. I chose birthday so I could use this fun Ellen Hutson stamp set and coordinating dies! Here’s a shout-out to my friend, Aimeslee, who reminded me that I have this fun ‘lion’ stamp set in my stash after she posted a card last week she made for her friend telling her she should be lyin’ about her age, lol!

I created my typical standard A2 size top-folding card base from Neenah Classic Crest Solar White cardstock and rounded the bottom right corner. I’ve been on an ‘angle kick’ lately so I cut a short angled panel from CutCardStock Camomile cardstock for the bottom and ran it through the machine with an embossing folder for a little texture, and adhered it to the card base. I have a ton of embossing folders and hardly ever use them, and I really need to change that because they add so much texture to a project! I stamped the lion and his crown on a Neenah Classic Crest Solar White cardstock scrap, colored them and die cut them with the coordinating dies. I layered the crown on a few more plain die cuts for dimension, and added an iridescent gemstone. I stamped the sentiment in black ink, adhered the lion and his crown, and added a few small black enamel dots to finish the front.

I kept the inside really simple by adding a couple scraps of the CutCardStock Camomile cardstock and stamping the sentiment in black ink.

And one more peek… love, love, love! My first thought was to give this to my hubby on his birthday in June, but he doesn’t lie about his age, so it wouldn’t be as much fun, lol!

Sharing in these additional challenges:
1. 613 Avenue Create: #2 – February Anything Goes w/ optional twist of Heart and Soles
2. A Perfect Time To Craft Open Challenge: #2-2021 – Anything Goes
3. AAA Cards: #183 – One Corner + optional twist Create A Scene

4. Addicted to Stamps & More: #398 – Birthdays
5. Cardz 4 Guyz: #264 – CAS Clean and Simple
6. Classic Design Challenge: #2 – Anything Goes
7. Sweet Stampers Challenge Blog: #53 – CAS

Products used:
Cardstock/Paper: Neenah Classic Crest Solar White cardstock, CutCardStock Camomile cardstock
Stamps: Ellen Hutson Bravehearted stamp set
Ink: Memento Tuxedo Black ink; Nuvo alcohol markers- 401, 403; American Crafts gold metallic marker
Dies/Punches: Fiskars corner rounder, Ellen Hutson Bravehearted die set
Accessories: Bearly Art precision craft glue, MISTI stamp tool, Gemini Junior, Cuttlebug Forest Branches embossing folder, Darice iridescent gemstones, Eyelet Outlet black enamel dots

I hope you’ve enjoyed this project and will come join us in The Outlawz Challenges! Lots of fun going on! Thanks so much for stopping by – we’ll see you next time!

Scrappy hugs,
lesliesig

what Christmas ought to be

Hi everyone! Well, we’re another day closer to Fri-YAY for all of you who work! I’m back this morning with a couple more cards I created for The Outlawz Challenges. I’ve spent the last few days in my studio doing what I love to do! Life is good! Affiliate links are used in this post at no cost to you. I really appreciate your support! I created this pretty kraft and gold Christmas card for The Outlawz Wednesday Sketch Challenge! I really liked the sketch this time so I pulled out a STAMPlorations stamp set with coordinating CUTplorations dies to create this card. Never too early to get started on those Christmas cards! Sherry West Art is the sponsor this time and here’s the sketch:

I’m in love with this American Crafts kraft and gold 6×6 Christmas paper pad and have only used it once before and it was the first thing that came to mind when I saw the sketch. Funny how I struggle with some card designs while others just pop into my head and work up quickly – and look exactly as planned. Love it when that happens, lol!

I went literal with the sketch except I didn’t use ribbon or twine – I used a partial clear bling strip that I colored with an alcohol marker to match the brown ink I used for stamping/embossing. I created a square top-folding card base from CutCardStock Twine cardstock, along with layering panels from solid gold, dotted and striped papers from the paper pad. I stamped the sled full of presents and the sentiment from the STAMPlorations Warm Hands Warm Hearts stamp set in brown archival ink on CutCardStock Twine cardstock, then stamped over the brown with Versamark and heat embossed them with clear embossing powder. I learned this trick many, many years ago and haven’t bought colored embossing powder since (except for metals)! I noticed that this clear embossing powder has flecks of white in it and I’m not sure whether I accidentally dumped some stray white in the container the last time I used it (which I don’t remember because it’s been a good while ago). It looks good, though! But I’m not sure why I would have had clear and white embossing powder out at the same time so this is a real mystery. Things that make you go Hmmm…

Okay, back to the card. I colored the presents with fine point Sharpies and the sled with an alcohol marker, die cut it with the coordinating die and layered it on three more plain die cuts for a little dimension. I adhered some looped gold thread on the background panel before adhering the focal image with foam pads. I adhered the sentiment to the bottom panel and then added clear string bling that I colored with the same alcohol marker used to color the sled.

I embellished the inside panel cut from CutCardStock Twine cardstock with a strip of kraft and gold striped paper and a strip of plain kraft (both from the American Crafts paper pad) for a tone-on-tone look, stamped the sentiment in brown ink and layered the panel on solid gold paper from the paper pad.

And one more look… totally loving how this turned out in spite of how darn hard foil is to photograph!

Sharing in these additional challenges:
1. 613 Avenue Create: #2 – February Anything Goes w/ optional twist of Heart and Soles
2. A Perfect Time To Craft Open Challenge: #2-2021 – Anything Goes
3. Classic Design Challenge: #2 – Anything Goes
4. Lemon Shortbread Challenge Blog: #139 – Anything Goes
5. Lil Patch of Crafty Friends: #151 – Anything Goes
6. Pammie’s Inky Pinkies Challenges: #2106 – Anything Goes
7. STAMPlorations: Never-Ending Anything Goes

8. Winter Wonderland Challenge Blog: February Anything Christmas Goes

Products used:
Cardstock/Paper: American Crafts 6×6 kraft and gold Christmas paper pad, CutCardStock Twine cardstock
Stamps: STAMPlorations Warm Hands Warm Hearts stamp set
Ink: Ranger ground espresso archival ink; Versamark, Sharpie fine point markers- Lime, Orange, Blue and Berry; Spectrum Noir alcohol marker EB7 (used to color the clear bling string)
Dies/Punches: STAMPlorations Warm Hands Warm Heart die set
Accessories: Tombow Mono permanent adhesive, Bearly Art precision craft glue, Ranger clear embossing powder, Hero Arts white embossing powder, Coats gold metallic thread, Eyelet Outlet clear bling strip

I hope you’ve enjoyed this project and will come join us in The Outlawz Challenges! Lots of fun going on! Thanks so much for stopping by – we’ll see you next time!

Scrappy hugs,
lesliesig

Oh, Lovely Ladybug

Howdy peeps! I’m back this morning with a fun ‘good luck’ card I created for The Outlawz Sunday Songs & Rhymes Challenge. The sponsor this time is Wink Wink Ink so come on over and play! Affiliate links are used in this post at no cost to you. I really appreciate your support! When I read the ‘Oh, Lovely Ladybug’ rhyme by Lora Hollings it totally made me think of retirement and the typical carefree life retirees enjoy so that’s the angle I went with. I’ve heard all my life that ladybugs are good luck so that solidified my card idea!

Several weeks ago I swapped my studio space with our master bedroom (yep, it was hubby’s idea so he was totally onboard with it, lol) and when I was reorganizing, I unearthed a ton of 7 Gypsies embellishments that I forgot I had. This typewriter was among those embellishments and worked out perfectly for this card. I created a standard A2 side-folding card base from CutCardStock Curious Metallic Chestnut cardstock because it complimented the bronze-y color of the typewriter. I used a bone folder to make the paper wavy and inserted it into the typewriter through a horizontal slit cut with a craft knife. I adhered the typewriter to a pretty red vintage patterned paper panel, added some mini ladybug brads to tie in the rhyme, and adhered the panel to the card base. I added a few tiny iridescent gemstones to finish the front of the card.

Here’s a close-up of the rhyme. I did not attach the top of the long flowing piece of paper coming out of the typewriter so it will lay flat when put in an envelope.

I embellished the inside panel cut from Neenah Classic Crest Solar White cardstock with a leftover piece of the red vintage patterned paper and a narrow strip of red cardstock cut from a scrap. I added a ladybug brad, stamped the sentiment in red ink and adhered the panel to the inside of the card.

And one more peek… I’m totally smitten! So glad I found all these fun embellishments! I reorganized all my 6×6 paper pads a while back and go through them periodically to remind myself of what I have, so I’ve made a plan to do the same with all my embellishments. Need to also do this with my stamps and dies. I have all my craft supplies catalogued in EverNote, which I’ve been using for years, but it really helps me to actually look at the tangible supplies and not just a list. Gotta refresh this old brain occasionally, lol!

Sharing in these additional challenges:
1. 613 Avenue Create: #2 – February Anything Goes w/ optional twist of Heart and Soles
2. A Perfect Time To Craft Open Challenge: #2-2021 – Anything Goes
3. Classic Design Challenge: #2 – Anything Goes
4. Creative Moments: #208 – Anything Goes
5. Let’s Craft and Create: #168 – Anything Goes w/ optional Red, Pink and/or White
6. Lil Patch of Crafty Friends: #151 – Anything Goes

Products used:
Cardstock/Paper: CutCardStock Curious Metallic Chestnut cardstock, Neenah Classic Crest Solar White cardstock, The Paper Studio Tattered and Worn 12×12 paper pad
Stamps: Paper Smooches Word Salad stamp set
Ink: Memento Rhubarb Stalk cardstock
Accessories: Tombow Mono permanent adhesive, Bearly Art precision craft glue, MISTI stamp tool, 7 Gypsies Standard Typewriter embellishment, Eyelet Outlet Mini Ladybug brads, Darice iridescent gemstones

I hope you’ve enjoyed this project and will come join us in The Outlawz Challenges! Lots of fun going on! Thanks so much for stopping by – we’ll see you next time!

Scrappy hugs,
lesliesig

Happy Mother’s Day

2/28/21 Spotlight Winner at A Perfect Time To Craft Open Challenge!

Hi everyone! Happy Hump Day! I created a pretty hybrid Mother’s Day card using a Jan’s Digi Stamps digital stamp set paired with sentiments from Julie Nutting and Clearly Besotted clear stamp sets. Affiliate links are used in this post at no cost to you. I really appreciate your support! I’d love to enter this card into The Outlawz Monday Greetings Challenge which is Anything Goes this time, and the sponsor is Lee Holland Art. I’m also entering this card into The Outlawz Twisted Thursdays Challenge where the challenges are always Anything Goes with an optional twist, and the sponsor is Cute As A Button. The twist this time is Stitching (real or faux) which I pulled off with a stitched rectangle die.

I cut a standard A2 size top-folding card base from Neenah Classic Crest Solar White cardstock. I printed the Jan’s Digi Stamps image on white antique linen cardstock, cut it with a stitched die and layered it on a purple cardstock die cut layer to compliment the color of the pansies, and adhered the panel to the card base. I stamped the Julie Nutting Mother’s Day sentiment in black ink directly onto the digital image to complete the front.

I printed a single flower from the digital stamp set on Neenah Classic Crest Solar White cardstock and made sure the flower was centered at the bottom of the die cut layer. I stamped the Clearly Besotted sentiment in black ink, layered the panel on a purple cardstock die cut layer and then adhered them to the inside of the card base.

And one more look… such a gorgeous digital stamp set which made an awesome Mother’s Day card!

Sharing in these additional challenges:
1. A Perfect Time To Craft Open Challenge: #2-2021 – Anything Goes
2. Classic Design Challenge: #2 – Anything Goes
3. Jan’s Digi Stamps Challenge: February Anything Goes
4. Lemon Shortbread Challenge Blog: #139 – Anything Goes
5. Pammie’s Inky Pinkies Challenges: #2106 – Anything Goes

Products used:
Cardstock/Paper: Neenah Classic Crest Solar White cardstock, Marco’s White Antique Linen cardstock, GKD Wild Lilac cardstock
Stamps: Jan’s Digi Stamps Pansies For Mom digital stamp set, Julie Nutting Mama’s Day stamp set, Clearly Besotted One In A Million stamp set
Ink: Memento Tuxedo Black ink
Dies/Punches: JustRite A2 Card Basics and Stitched A2 Banners and Rectangles die sets
Accessories: Tombow Mono permanent adhesive, Gemini Junior, MISTI stamp tool

I hope you’ve enjoyed this project and will come join us in The Outlawz Challenges! Lots of fun going on! Thanks so much for stopping by – we’ll see you next time!

Scrappy hugs,
lesliesig

hello

Howdy peeps! Well, it’s Tuesday already – do you feel like you just bypassed the weekend altogether?! Can’t believe how fast the time is flying by! Affiliate links are used in this post at no cost to you. I really appreciate your support! I’ve popped in this morning to share a fun friendship card I created yesterday afternoon for The Outlawz Freebie/Progressive February Challenge! Our sponsor this month is All Dressed Up and we were gifted the adorable Piggy Back digital image! A free digital image is the perk for playing in this challenge each month! Come join us! I’m also entering this card in The Outlawz Twisted Thursday Challenge where the theme is Anything Goes with an optional twist of Stitching, real or faux. I used stitched oval and rectangle dies.

I cut my usual A2 sized top-folding card base from Neenah Classic Crest Solar White cardstock and adhered a panel of pretty teal paper. I cut a stitched rectangle from emboss resist cardstock, inked it with teal ink and adhered it to the paper panel. I printed the image on Neenah Classic Crest Solar White cardstock, cut it with a stitched oval die and colored it with alcohol markers. I dug into my scrap bin and found a piece of textured teal cardstock and cut a slightly larger stitched oval die which I layered in an offset fashion beneath the focal image and then adhered the piece to the paper panel. I stamped the sentiment in teal ink on a scrap piece of Neenah Classic Crest Solar White cardstock, cut it with the coordinating die and layered it on three more die cuts for a little dimension. I added several gold rim pearls in three of the corners to finish the card front.

I embellished the inside panel with leftover strips of the teal paper and inked emboss resist cardstock, stamped the sentiment in teal ink and layered the panel on more of the teal paper.

And one more peek… I thoroughly enjoyed working with this sweet image!

Sharing in these additional challenges:
1. 613 Avenue Create: #2 – February Anything Goes w/ optional twist of Heart and Soles
2. A Perfect Time To Craft Open Challenge: #2-2021 – Anything Goes
3. Classic Design Challenge: #2 – Anything Goes
4. Creative Moments: #208 – Anything Goes
5. Lemon Shortbread Challenge Blog: #139 – Anything Goes
6. Scrapping4fun Challenges: #185 – Wedding/Valentine/Friendship

Products used:
Cardstock/Paper: Neenah Classic Crest Solar White cardstock, Stampin’ Up Perfectly Artistic DSP, Stampin’ Up Irresistibly Yours Specialty DSP
Stamps: Trinity Stamps Hello Sweet Friend stamp set
Ink: Nuvo alcohol markers- 461, 420, 379, 369, 360 391, 405; Spectrum Noir alcohol markers- FS4, FS7, IG1; Stampin’ Up Lost Lagoon ink
Dies/Punches: Memory Box Stitched Oval Layers dies, My Favorite Things Stitched Rectangle STAX dies, Trinity Stamps Hello Sweet Friend die set
Accessories: Tombow Mono permanent adhesive, Bearly Art precision craft glue, ScraPerfect gold rim pearls

I hope you’ve enjoyed this project and will come join us in The Outlawz Challenges! Lots of fun going on! Thanks so much for stopping by – we’ll see you next time!

Scrappy hugs,
lesliesig

How you doin’?

Hi everyone! A very Happy Monday to you! I hope you had a fabulous weekend! I’m stoked to be back on the CutCardStock blog today with an awesome DT inspiration project featuring Classic Crest cardstock that was included in our Designer’s Pack – which happens to be on sale this month so be sure to get some! Affiliate links are used in this post at no cost to you. I really appreciate your support! I created a whimsical ‘missing you’ card is a super simple design that could easily be mass produced so you have several in your stash at any given time. I’m sure you also have family members and/or friends you miss seeing during these crazy times.

I cut a standard A2 size top-folding card base from Classic Crest Solar White 110# cardstock and rounded the bottom left corner, and then cut a patterned paper layer for the front using two coordinating papers. I adhered a narrow strip of Curious Metallic Chestnut cardstock to the seam where the two pattern papers meet. I stamped the sentiment in brown archival ink just beneath the cardstock strip. I stamped, die cut and colored the adorable ostrich with alcohol markers, and adhered it to the bottom right of the card front. I adhered his chest flat to the paper and then added foam tape behind his head for a little dimension to look like he’s coming off the card. I added a few brown enamel dots to finish the front.

I cut a layering panel for the inside from Classic Crest Solar White 80# cardstock and embellished it with a strip of the gingham paper used on the front and a narrow strip of the Curious Metallic Chestnut cardstock. I stamped the sentiment in brown ink, layered the panel on Curious Metallic Chestnut cardstock and adhered it to the inside of the card base.

And one more peek… so loving this ostrich! And I really love the Classic Crest cardstock – so much so that it has become a staple in my studio and I rarely use any other white cardstock for card bases!

Sharing in the following challenges:
1. 2 Crafty Critter Crazies: #47 – February Anything Goes
2. 613 Avenue Create: #2 – February Anything Goes w/ optional twist of Heart and Soles
3. A Perfect Time To Craft Open Challenge: #2-2021 – Anything Goes
4. Classic Design Challenge: #2 – Anything Goes
5. Creative Moments: #208 – Anything Goes
6. Lil Patch of Crafty Friends: #151 – Anything Goes
7. Pammie’s Inky Pinkies Challenges: #2106 – Anything Goes

CutCardStock products used:
Classic Crest Solar White 110# cardstock
Classic Crest Solar White 80# cardstock
Curious Metallic Chestnut 111# cardstock

Other products used:
Paper: Simple Stories Wood & Gingham Basics 12×12 paper pad
Stamps: Whimsy Stamps Hey Ostrich stamp set
Ink: Memento Tuxedo Black and Espresso Truffle ink; Nuvo alcohol markers- 466, 479, 404, 449
Dies/Punches: Kadomaru Pro corner rounder, Whimsy Stamps Hey Ostrich die set
Accessories: Tombow Mono permanent adhesive, Bearly Art precision craft glue, MISTI stamp tool, Gemini Junior, Scotch 3M foam tape, Eyelet Outlet Brown Enamel Dots

I hope you’ve enjoyed today’s project and you’re inspired to get crafty! Be sure to check out all the awesome cardstock and other goodies at CutCardStock (adhesives, labels, stickers, pens, watercolors and ribbon to name a few). And head on over to the CutCardStock Facebook Page for more inspiration! Thanks so much for stopping by today – we’ll see you next time!

Scrappy hugs,
lesliesig

Love Note for CutCardStock Valentine’s Day Blog Hop!

2/17/21 Top 3 Winner at Mod Squad Challenge!
2/19/21 Top 5 at Scrapping4fun Challenges!

Hi friends! A big giant WELCOME to the CutCardStock blog‘s Valentine’s Day Blog Hop going on February 6th and 7th – starting at 7:00 AM Central Time today and ending at 11:55 PM Central Time tomorrow! Affiliate links are used in this post at no cost to you. I really appreciate your support! SO COME HOP WITH US!

AND there is a $40 CutCardStock gift card up for grabs! Woo-hoo!

The winner will be randomly selected via number generator and announced on Monday, February 8th, on the CutCardstock blog and Facebook page! To be eligible for the $40 gift card, you must comment at each stop along the hop (good for ONE gift card entry) or upload a Valentine-themed project using CutCardStock products (good for TWO gift card entries). We would absolutely LOVE IT if you link up a project with us, PLUS it will increase your chances to win the gift card! ;)

To get your mojo going, here’s a pretty mood board with TONS of inspiration!

=  =  =  =  =  =  =  =  =  =  =  =  =  =  =  =

Now, let me side-track you for a minute or three to share my clean and simple Valentine’s Day card featuring Classic Crest Solar White cardstock along with Pop-Tone Razzleberry cardstock and a few rolls of washi tape! This is a super simple design that came together pretty quickly!

I paired some new Valentine washi tape with some older washi tape that I had in my stash to create the diagonal panel on this card, and used Pop-Tone Razzleberry cardstock for the die cut and punched hearts.

Here is a quick tutorial showing you my process for making this awesome CAS card. I started by cutting a standard A2 size top-folding card base from Classic Crest Solar White 110# cardstock. I also cut an angled panel for the front (wide enough for four strips of washi tape), an inside panel and a narrow strip (wide enough for one strip of washi tape) for the inside panel, all from Classic Crest Solar White 80# cardstock. And I die cut two hearts from Pop-Tone Razzleberry cardstock.

I stamped the sentiment in pink ink in the lower right corner of the card base, adhered the angled panel, and then adhered the die cut hearts to the angled panel. I punched six tiny hearts from a scrap of the Pop-Tone Razzleberry cardstock and colored three of them with a pink alcohol marker to make them just a tad darker than the cardstock. I adhered a tiny punched heart to the center of the two die cut hearts and randomly placed three in the background.

For the inside, I adhered the washi tape strip to the narrow strip of cardstock, stamped the sentiment in pink ink and adhered two tiny punched hearts.

Sharing in the following challenges:
1. A Perfect Time To Craft Open Challenge: #2-2021 – Anything Goes
2. Classic Design Challenge: #2 – Anything Goes
3. Jan’s Digi Stamps Challenge: February Anything Goes
4. Let’s Craft and Create: #168 – Anything Goes w/ optional Red, Pink and/or White
5. Mod Squad Challenge: All About Love
6. Moving Along With The Times: #127 – Valentines/Love
7. My Time To Craft: #450 – Love
8. Penny’s Paper-Crafty Challenge Blog: #489 – Anything Goes
9. Scrapping4fun Challenges: #185 – Wedding/Valentine/Friendship

CutCardStock products used:
Classic Crest Solar White 110# cardstock
Classic Crest Solar White 80# cardstock
Pop-Tone Razzleberry 65# cardstock

Other products used:
Stamps: Stampin’ Up Sealed With Love stamp set
Ink: Ranger picked raspberry archival ink, Nuvo alcohol marker- 453 (Paradise Pink)
Dies/Punches: Stampin’ Up Love Notes Framelits, Stampin’ Up Cookie Cutter punch (tiny heart)
Accessories: Bearly Art precision craft glue, Tombow Mono permanent adhesive, Eyelet Outlet Valentine’s Day washi tape, Stampin’ Up pink pattern washi tape, Me & My Big Ideas skinny glitter washi tape

=  =  =  =  =  =  =  =  =  =  =  =  =  =  =  =

Okay, let’s get back to the hop! Here is the complete list of stops:

1. CutCardStock blog
2. Leslie >>> you’re here! <<<
3. Maureen
4. Judy VZ
5. Teri
6. Judy M
7. CutCardStock blog… C’mon, you know you want to link up! The linky tool is at the end of the post on the CutCardstock blog so that’s where you’ll want to head to link up your project – each upload is worth two entries for the gift card! Two entries per person!

You should have arrived here from the CutCardStock blog and your next stop is Maureen‘s blog! I hope you enjoy the hop and love all the gorgeous Valentine’s Day projects you’ll be seeing! If you get lost along the way or if you landed here in the middle of the hop somehow and want to join in the fun, be sure to head on over to the CutCardstock blog to read all the details and start from the beginning!

In closing, I hope you’ve enjoyed seeing my Valentine’s Day card and you’re inspired to get crafty AND hop with us AND link up a Valentine-themed project! Be sure to check out all the awesome cardstock and other goodies at CutCardStock (adhesives, labels, stickers, pens, watercolors and ribbon to name a few). And head on over to the CutCardStock Facebook Page for more inspiration! Thanks so much for stopping by today – we’ll see you next time!

Scrappy hugs,
lesliesig