2/8/25 Weekly Favorite at Splitcoast Stampers!
Hey everybody! Happy first Tuesday in February… I hope you’re having a good week. My lovely friend, Jo, invited me to be her Guest Elf (yep, you read that right…ELF… lol!) for Christmas Kickstart Challenge #95 this month. The theme is ‘Fold It Fancy’ so obviously I couldn’t say no… you know how I love me some fun folds!

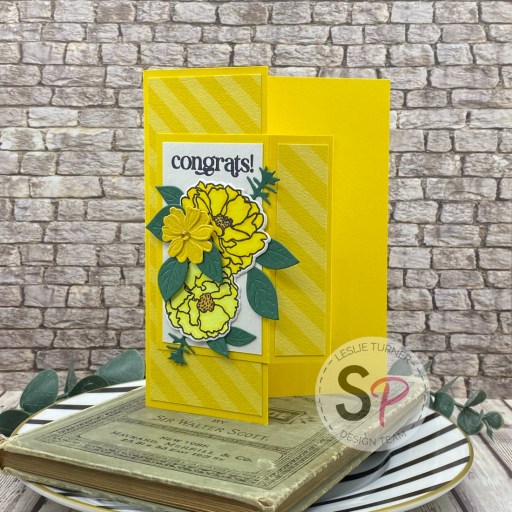
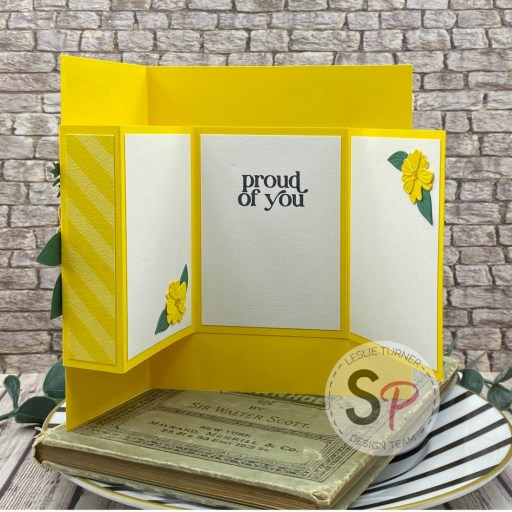
You may remember a couple months ago I posted a multi panel pop out card (HERE if you’d like to see it) that I had originally seen on Lisa Curcio’s blog. It was a 5×7 size, which is larger than I typically make, so I painstakingly reworked the measurements and came up with an A2 size. I’m happy to share the measurements for all the pieces below if you’d like to learn how to make one.

From solid cardstock, cut the following:
— Card base: 5-1/2″ x 12″ scored at 4-1/4″, 6″ and 7-3/4″.
— Large pillars (cut two): 4″ x 4-1/2″ scored at 1-1/8″, 2-1/4″ and 3-3/8″.
— Side panels (cut two): 3″ x 3-3/4″ scored at 1/2″, 2-3/4″ and 3-1/4″.
— Center panel: 2-1/2″ x 4-1/2″ scored at 3/4″, 2-1/4″ and 3-3/4″.
From your choice of patterned papers, cut the following:
— Card base: front 4″ x 5-1/4″, inside panels (cut two) 4″ x 5-1/4″, inside M-sections (cut two) 1-1/2″ x 5-1/4″, back 4″ x 5-1/4″ from white or ivory cardstock for a signature panel.
— Large pillars (cut four): 7/8″ x 3-3/4″.
— Side panels (cut two): 2″ x 2-3/4″.
— Center panel (cut two): 1-1/4″ x 2-1/4″.
It’s best to first adhere all the patterned paper pieces to the solid cardstock pieces, in order of how I listed them above. Embellish the card front, side panels, center panel, and back panel as desired. I used fussy cut ephemera from the Traci Vanover Designs Christmas Cocoa 6×6 paper pad I used. Feel free to visit my other post linked above for the link to Lisa’s video in case you want to watch it for the actual assembly. Even though my pieces are sized differently than those on her video, the assembly is the same. I promise it’s not as daunting as it looks! ;)

Here’s a shot of the back panel embellished with a patterned paper strip and layered piece of ephemera. I hope you enjoyed this as much as I did. I definitely love the smaller A2 size, and see more of these in my future, lol!

Affiliate links are used in this post at no cost to you – I really appreciate your support!
Products used:
CARDSTOCK/PAPER: American Crafts Black 12×12 cardstock, Neenah Classic Crest Baronial Ivory cardstock, Traci Vanover Designs Christmas Cocoa 6×6 paper pad (papers and ephemera)
INK: Memento Tuxedo Black marker
DIES/PUNCHES: Spellbinders Emerald Cut Labels and Tag Dies, Sizzix Script Holiday Words Thinlits, Stampin’ Up 1″ Circle Punch
ACCESSORIES: Fiskars 12″ ProCision Rotary Bypass Paper Trimmer, Bearly Art precision craft glue, My Sweet Petunia Precision Glue Press, Big Shot, Scrapbook Adhesives Thin 3D Foam Squares, brown gemstones
I hope you’ve enjoyed seeing this festive fancy fold card and will link up one with us this month! Thanks so much for stopping by today – we’ll see you next time! ;)
Scrappy hugs,