Beach Memory Album

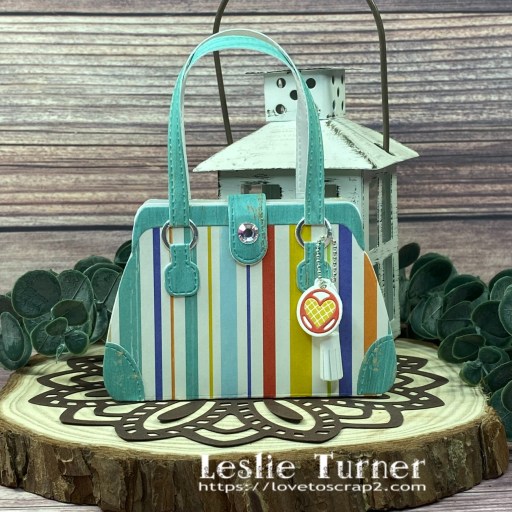
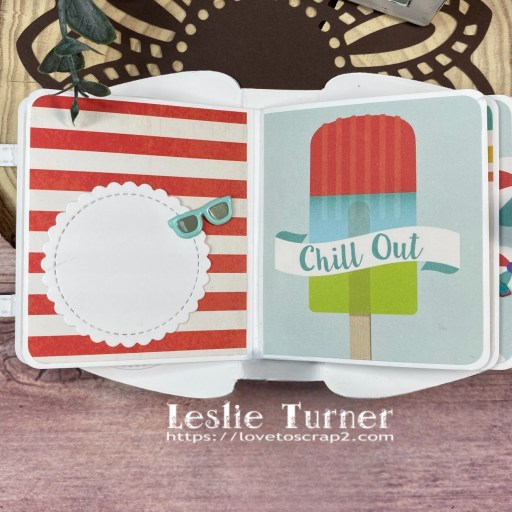
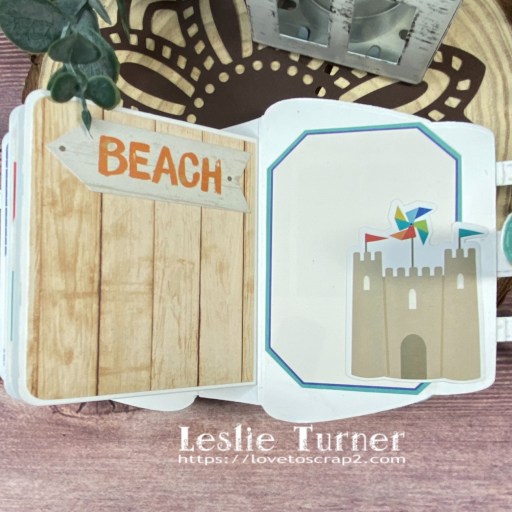
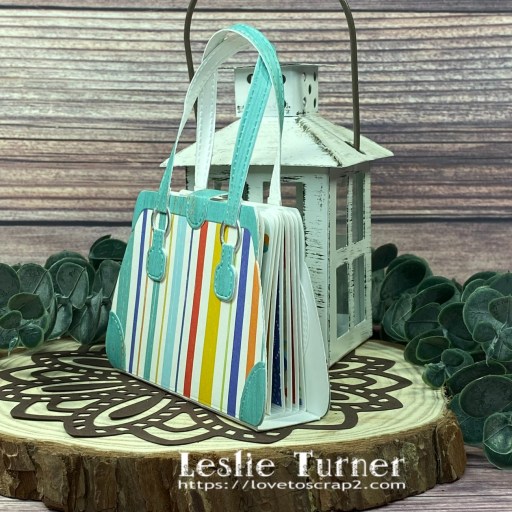
Hey everybody! Happy Friday – I hope you have a fun weekend planned! Our very first challenge is live this morning over at Mini Album Mania and I’m super excited to share my debut DT inspiration project for MAM #1 – Any Type of Mini Album Goes! We have room for a few more design team members, so if you’re interested, let me know! I created a purse-shaped Beach Memory Album for our first challenge with lots of room for photos and journaling!

Here’s a quick run-down of how our new challenge works: We host challenges every other (odd) month and each challenge lasts six weeks. We welcome all types of handmade mini albums. The size should be no more than 6″ on any side, the album must have at least three pages, and it must be embellished and decorated. Photos are optional. Mini albums can have any kind of binding such as rings, wire, ribbon, staples, glued tabs, etc. Or they can be an accordion or flap type with no binding. Just remember they must have at least three pages, and we don’t want to see any blank undecorated albums. 

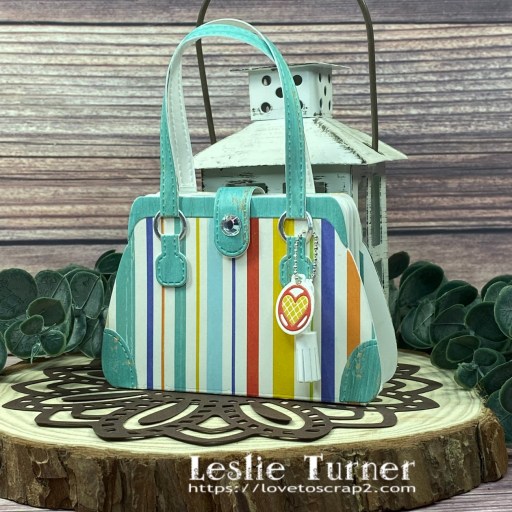
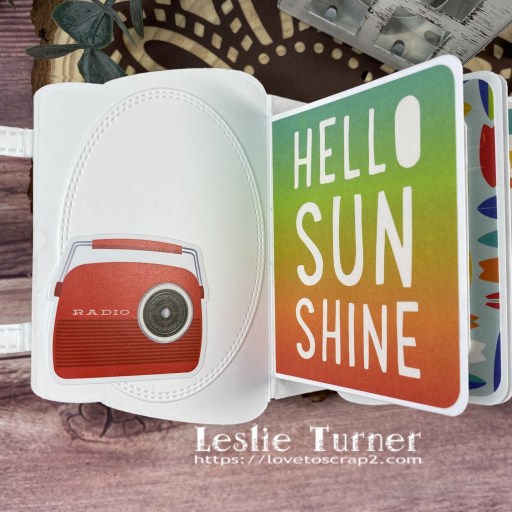
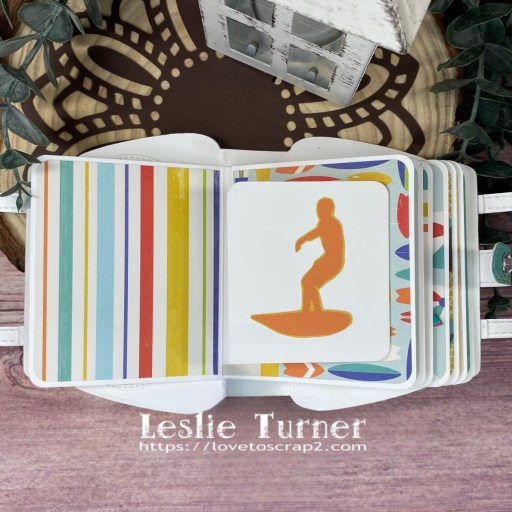
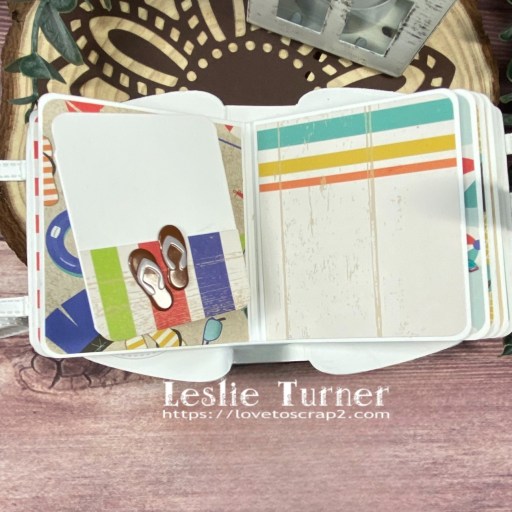
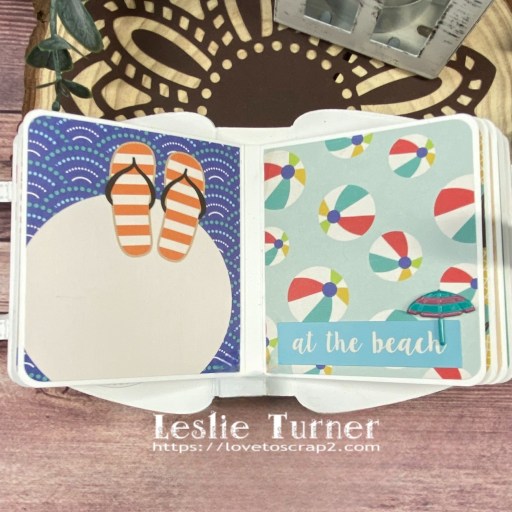
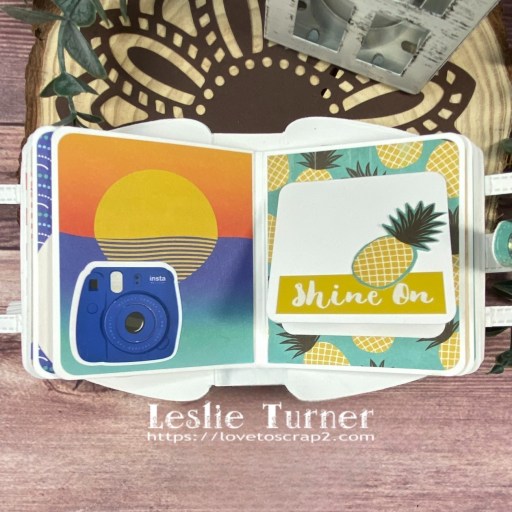
Using the Concord & 9th Everyday Purse Builder dies, I created the album base from Neenah Classic Crest 110# Solar White cardstock. I cut the album pages from 110# Solar White cardstock as well and rounded the two outside corners of each page. I used papers from the Carta Bella Beach Party Collection Kit to cover the base. I used coordinating papers and stickers from the collection kit as well as Eyelet Outlet Sunglasses, Flip Flops, Beach Umbrella, and Sun/Cloud Brads to embellish the pages.

There are several pull-ups and pull-outs, as well as die cut panels made with My Favorite Things Stitched Mini Scallop STAX, Stitched Rectangle STAX and Stitched Square STAX and CottageCutz Double-Stitched Ovals. I used CutCardStock Bright Silver Foil cardstock for the rings on the base of the straps. I used a Velcro fastener on the flap closure and embellished it with a Darice iridescent gemstone. I made a charm and tassel which I attached with a tiny ball chain and clasp from my stash.

Sharing in the following challenges:
1. A Perfect Time To Craft Open Challenge: September #9-2023 – Anything Goes
2. Classic Design Challenge: September #9 – Anything Goes
3. Crafty Gals Corner: #246 – Summer Fun
4. Sparkles Monthly Challenges: #167 – Tropical and/or Beach

Affiliate links are used in this post at no cost to you – I really appreciate your support! 

Products used:
CARDSTOCK/PAPER: Neenah Classic Crest 110# and 80# Solar White cardstock, CutCardStock Bright Silver Foil cardstock, Carta Bella Beach Party Collection Kit
DIES/PUNCHES: Concord & 9th Everyday Purse Building Dies, Kadomaru Pro Corner Rounder; My Favorite Things Stitched Mini Scallop STAX, Stitched Square STAX, Stitched Rectangle STAX; CottageCutz Double-Stitched Ovals, Stampin’ Up 1/2″ Circle Punch
ACCESSORIES: Tonic Studios 12″ Guillotine Paper Trimmer, Bearly Art precision craft glue, Big Shot; Eyelet Outlet Sunglasses, Flip Flops, Beach Umbrella, and Sun/Cloud Brads; Velcro fastener, 1/4″ double-sided foam strip, Darice iridescent gemstones, tiny ball chain and clasp

I hope you’ve enjoyed seeing this project and will link up a mini album project in our debut challenge! If you have a lot of photos that need homes in mini albums, then this challenge is for you! Thanks so much for stopping by today – we’ll see you next time! ;)

Scrappy hugs,

LOVE phantom die cutting

Howdy peeps! Well, I have to ask… how is the weather where you are? It’s not too awfully bad here in southwestern Colorado. The temps are still a little warm but definitely tolerable. Our new challenge is live this morning over at Love To Craft Challenge Blog and I’m thrilled to share my DT inspiration project for LTCCB #76 – Anything Goes! I had this gorgeous Hot Off The Press paper pack out on my desk from another project and thought it would be so pretty to use to employ the phantom die cutting technique with the Love You die set from Prickley Pear Stamps! I absolutely love big sentiment dies and this turned out so pretty!

I cut a standard A2 size top-folding card base from Neenah Classic Crest 110# Solar White cardstock along with a layering panel from a pretty floral print in the Hot Off The Press Sweet Pea double-sided paper pack. Using the Prickley Pear Stamps Love You dies, I die cut the large LOVE sentiment into the floral layering panel. I die cut the word twice more from CutCardStock Kale Green cardstock, adhered them together and then into the negative space in the floral layering panel, and then adhered the floral one on top. The finishing touch was adding several hearts from the Buttons Galore & More Pink Sparkletz.

I cut the inside panel from 80# Solar White cardstock and embellished it with strips of the floral print and dark green cardstock used on the front. I stamped a sentiment from the Stampin’ Up Happy & Heartfelt stamp set in Memento Northern Pine ink.

Sharing in the following challenges:
1. A Perfect Time To Craft Open Challenge: September #9-2023 – Anything Goes
2. Classic Design Challenge: September #9 – Anything Goes

Affiliate links are used in this post at no cost to you – I really appreciate your support! 

Products used:
CARDSTOCK/PAPER: Neenah Classic Crest 110# and 80# Solar White cardstock, CutCardStock Kale Green cardstock, Hot Off The Press Sweet Pea double-sided papers
STAMPS: Stampin’ Up Happy & Heartfelt stamp set
INK: Memento Northern Pine ink
DIES/PUNCHES: Prickley Pear Stamps Love You dies
ACCESSORIES: Tonic Studios 12″ Guillotine Paper Trimmer, Tombow Mono permanent adhesive, Art Glitter Dries Clear adhesive, MISTI stamp tool, Big Shot, Buttons Galore & More Pink Sparkletz

I hope you’ve enjoyed seeing this project and will link up with us this time! Thanks so much for stopping by today – we’ll see you next time! ;)

Scrappy hugs,

Love you tons

Hey everybody! I’m back with another post on this busy September 1st morning! Our new challenge is live this morning over at Love To Scrap Challenge Blog and I’m delighted to share my DT inspiration project for LTSCB #163 – Anything Goes! I’ve had this adorable Lawn Fawn stamp and die set in my stash for quite some time and have never used them, so out they came for a play! I created a super cute birthday card in a green and pink color combo (one of my favs)!

I cut a standard A2 size side-folding card base from Neenah Classic Crest 110# Solar White cardstock along with layering panels from green and pink prints in the Hot Off The Press Sweet Pea 6×6 double-sided paper pack. I stamped the elephants from the Lawn Fawn Love You Tons stamp set on a scrap of Solar White cardstock and colored them with alcohol markers.

I stamped the sentiment from the same stamp set in Memento Tuxedo Black ink. I added a strip of Eyelet Outlet skinny XOXO washi tape along with buttons from the Buttons Galore & More Pink Grapefruit Buttons and some tiny hearts from the Buttons Galore & More Daydreams Mix Upz Embellishments.

I cut the inside panel from 80# Solar White cardstock, embellished it with the pink and green prints used on the front, and layered it on CutCardStock Mantis Green cardstock. I stamped a sentiment from the Keep It Simple Birthday Sentiments stamp set in Tuxedo Black ink and colored the word ‘ENJOY’ with a Kirarina Wink Lime Green marker.

Sharing in the following challenges:
1. AAA Birthday: #53 – Animals
2. A Perfect Time To Craft Open Challenge: September #9-2023 – Anything Goes
3. Classic Design Challenge: September #9 – Anything Goes
4. Critter Crazy Challenges: #78 – Anything Goes with a Featured Critter

Affiliate links are used in this post at no cost to you – I really appreciate your support! 

Products used:
CARDSTOCK/PAPER: Neenah Classic Crest 110# and 80# Solar White cardstock, CutCardStock Mantis Green cardstock, Hot Off The Press Sweet Pea 6×6 double-sided papers
STAMPS: Lawn Fawn Love You Tons stamps, Keep It Simple Birthday Sentiments stamp set
INK: Memento Tuxedo Black ink; Arteza alcohol markers- NG06/08; Kirarina Wink Lime Green marker
DIES/PUNCHES: Lawn Fawn Love You Tons dies
ACCESSORIES: Tonic Studios 12″ Guillotine Paper Trimmer, Art Glitter Dries Clear adhesive, MISTI stamp tool, Big Shot, Eyelet Outlet skinny XOXO washi tape, Buttons Galore & More Pink Grapefruit Buttons and Daydreams Mix Upz Embellishments

I hope you’ve enjoyed seeing this project and will link up with us this time! Thanks so much for stopping by today – we’ll see you next time! ;)

Scrappy hugs,

Ho Ho Ho

Hey everybody! It’s busy on my blog this morning with all the new challenges launching on this first day of September! Our new challenge is live this morning over at Merry Little Christmas Challenge Blog and I’m excited to share my DT inspiration project for MLCCB #52 – Anything Christmas Goes! I created an adorable card with a vintage feel featuring Santa and Rudolph! These stamps and dies are from Prickley Pear Stamps and are so cute I can’t stand it!

I cut a standard A2 side-folding card base from Cougar Smooth White cardstock along with layering panels from two coordinating prints from the Hot Off The Press Joyful Christmas 6×6 double-sided paper pack. I added several strips of Me & My Big Ideas striped skinny washi tape across the seam of the two papers. I stamped the images and sentiment from the Prickley Pear Stamps Santa and Rudolph stamp set on Cougar White cardstock in Memento Rich Cocoa ink, colored Santa and the reindeer with alcohol markers, and cut all of them with the coordinating Santa and Rudolph dies. The finishing touch was adding several red gemstones.

I cut the inside panel from Cougar Smooth White cardstock and embellished it with strips of the Hot Off The Press peach patterned paper and a strip of the MAMBI striped skinny washi tape used on the front. I stamped a sentiment from the same Santa and Rudolph stamp set in Memento Rich Cocoa ink and added two stamped and die cut snowflakes.

Sharing in the following challenges:
1. A Perfect Time To Craft Open Challenge: September #9-2023 – Anything Goes
2. Classic Design Challenge: September #9 – Anything Goes

Affiliate links are used in this post at no cost to you – I really appreciate your support!

Products used:
CARDSTOCK/PAPER: Cougar Smooth 80# White cardstock, CutCardStock Flamingo cardstock, Hot Off The Press Joyful Christmas 6×6 double-sided papers
STAMPS: Prickley Pear Stamps Santa and Rudolph stamp set
INK: Memento Rich Cocoa ink; Arteza alcohol markers- BR28/52/64/66/74, RP09/15, R31, YG04, Y02, PB09, B17; Pentel Slicci gold pen
DIES/PUNCHES: Kadomaru Pro corner rounder, Prickley Pear Stamps Santa and Rudolph die set
ACCESSORIES: Tonic Studios 12″ Guillotine Paper Trimmer, CutCardStock Plus High Capacity adhesive, Art Glitter Dries Clear adhesive, MISTI stamp tool, Big Shot, Me & My Big Ideas striped skinny washi tape, red gemstones

I hope you’ve enjoyed seeing this project and will link up with us this time! Thanks so much for stopping by today – we’ll see you next time! ;)

Scrappy hugs,

be filled with the magic of Christmas

Hey everybody! Happy Friday! Our new challenge is live this morning over at Christmas BINGO Challenges and I’m delighted to share my DT inspiration project for CBC #3 – Anything Goes with Featured Christmas BINGO Card! I went with Column B this time – black, tag, no stamping, and stripes. I love using tags on cards because they speak volumes but I don’t do it very often… why, I don’t know! I used the Carta Bella Christmas Collection kit for this card and I love how it turned out!

I cut a standard A2 size top-folding card base from Neenah Classic Crest 80# Solar White cardstock and rounded the bottom right corner. I cut a layering panel from a print in the Carta Bella Christmas Collection Kit and added a scalloped edge sticker from the sticker sheet in the kit across the top of the panel. I cut two tags and rounded the bottom corners. I tied Doodlebug Design lily white doodle twine to the top of the tags and adhered them to the card front with 1″ double-sided foam strip. Super easy!

I cut the inside panel from 80# Solar White cardstock and embellished it with a strip cut from a coordinating paper in the Carta Bella Christmas Collection Kit and a narrow strip of CutCardStock Pop Tone Black Licorice cardstock. I added a sentiment from the sticker sheet in the kit which completed the card.

Sharing in the following challenges:
1. A Perfect Time To Craft Open Challenge: September #9-2023 – Anything Goes
2. Classic Design Challenge: September #9 – Anything Goes

Affiliate links are used in this post at no cost to you – I really appreciate your support! 

Products used:
Cardstock/Paper: Neenah Classic Crest 80# Solar White cardstock, CutCardStock Pop Tone Black Licorice cardstock, Carta Bella Christmas Collection Kit
Dies/Punches: Kadomaru Pro Corner Rounder
Accessories: Tonic Studios 12″ Guillotine Paper Trimmer, Art Glitter Dries Clear adhesive, black eyelet from stash, WRMK Crop-A-Dile, Doodlebug Designs lily white doodle twine, Glossy Accents, 1″ double-sided foam strip

I hope you’ve enjoyed seeing this project and will link up with us this time! We can’t wait to see what you create! Thanks so much for stopping by today – we’ll see you next time! ;)

Scrappy hugs,

Just popping up

Hey everybody! I hope you’re having great weather and you have something fun planned this weekend! Our new challenge is live this morning over at Mix It Up Challenge Blog and I’m excited to share my DT inspiration project for MIUCB #67 – Anything Goes + optional Make Your Own Background! We’d love to see either you Anything Goes project or one playing the twist of making your own background! As always, the twist is not required to play! I created an inked background for this super cute shaker card featuring a message in a bottle!

I cut a standard A2 size side-folding card base from Neenah Classic Crest 110# Solar White cardstock along with a layering panel from 80# Solar White. I inked the layering panel with Catherine Pooler Tranquil, Stone Blue and Cove Blue inks, trimmed it, and cut a frame using a My Favorite Things Wonky Stitched Rectangle STAX die. Using the Stampin’ Up Whale Done stamp set, I stamped an underwater scene in Catherine Pooler Green Tea, Eucalyptus and Pink Champagne inks on the rectangle cut from the frame. I stamped the sentiment from the Neat & Tangled Out of the Box stamps in the bottom right corner of the frame in Memento Tuxedo Black ink.

I stamped the bottle and message from the Spellbinders Message in a Bottle stamps in Memento Tuxedo Black ink, inked the bottle, and cut both of the images with the coordinating Spellbinders Message in a Bottle dies. I assembled the shaker, using Kat Scrappiness 3mm and 4mm Sparkling Clear Droplets for the shaker mix.

I embellished a piece of 80# Solar White cardstock with a leftover piece of inked cardstock and cut a panel for the inside using the My Favorite Things Wonky Stitched Rectangle STAX die. I stamped another sentiment from the Neat & Tangled Out of the Box stamps and layered the panel on CutCardStock Basis Blue cardstock.

Sharing in the following challenges:
1. A Perfect Time To Craft Open Challenge: September #9-2023 – Anything Goes
2. Classic Design Challenge: September #9 – Anything Goes
3. Crafts Galore Encore Challenge Blog: #115 – Anything Goes
4. Di’s Digistamps Challenge: Die Cuts and/or Punches

Affiliate links are used in this post at no cost to you – I really appreciate your support! 

Products used:
Cardstock/Paper: Neenah Classic Crest 110# and 80# Solar White cardstock, CutCardStock Basis Blue cardstock
Stamps: Spellbinders Message in a Bottle stamps, Stampin’ Up Whale Done stamp set, Neat & Tangled Out of the Box stamps
Ink: Memento Tuxedo Black ink; Catherine Pooler Tranquil, Stone Blue, Cove Blue, Green Tea, Eucalyptus and Pink Champagne inks; Arteza alcohol marker- BR82
Dies/Punches: Spellbinders Message in a Bottle dies, My Favorite Things Wonky Stitched Rectangle STAX
Accessories: Tonic Studios 12″ Guillotine Paper Trimmer, Bearly Art precision craft glue, MISTI stamp tool, Big Shot, Grafix Crystal Clear Craft Plastic, Scotch 3M Foam Tape, Kat Scrappiness 3mm Sparkling Clear Droplets and 4mm Sparkling Clear Droplets

I hope you’ve enjoyed seeing this project and will link up with us this time! Thanks so much for stopping by today – we’ll see you next time! ;)

Scrappy hugs,

Keeping you in my prayers

Happy Friday, everybody! Wow, I cannot believe it’s the 1st day of September already! Where has this year gone?! Our new challenge is live this morning over at Birthstone Challenges and I’m thrilled to share my DT inspiration project for BSC #5 – Anything Goes with Sapphire & Opal Colors! I’ve used the gorgeous Sizzix Bohemian Botanicals 3-D Textured Impressions embossing folder to create the background on this pretty get well card. The texture on this background is phenomenal!

I cut a standard A2 size top-folding card base from Neenah Classic Crest 110# Solar White cardstock along with a layering panel from CutCardStock Basis Blue cardstock. I lightly spritzed the back of the layering panel with water in a Ranger distress sprayer and ran it through the Big Shot with the Sizzix Bohemian Botanicals 3-D Textured Impressions embossing folder. I stamped the sentiment from the Waffle Flower Essential Sentiments stamps in Catherine Pooler Suede Shoes ink on a Solar White cardstock scrap and cut it with a die from the Waffle Flower Essential Sentiments dies.

I cut the inside panel from 80# Solar White cardstock and stamped another sentiment from the Waffle Flower Essential Sentiments stamps in Catherine Pooler Suede Shoes ink.

Sharing in the following challenges:
1. A Perfect Time To Craft Open Challenge: September #9-2023 – Anything Goes
2. Classic Design Challenge: September #9 – Anything Goes

Affiliate links are used in this post at no cost to you – I really appreciate your support! 

Products used:
Cardstock/Paper: Neenah Classic Crest 110# and 80# Solar White cardstock, CutCardStock Basis Blue cardstock
Stamps: Waffle Flower Essential Sentiments stamps
Ink: Catherine Pooler Suede Shoes ink
Dies/Punches: Waffle Flower Essential Sentiments dies
Accessories: Tonic Studios 12″ Guillotine Paper Trimmer, Tape Runner, Art Glitter Dries Clear adhesive, Ranger Distress Sprayer, Big Shot, Sizzix Bohemian Botanicals 3-D Textured Impressions embossing folder, MISTI stamp tool

I hope you’ve enjoyed seeing this project and will link up with us this time! As always, we’d love to see what you create! Thanks so much for stopping by today – we’ll see you next time! ;)

Scrappy hugs,

Vintage Post Card

Hey everybody! Wowzers, get ready for some heavy traffic on my blog today as there is a lot going on! I’m delighted to share that at the end of June one of my projects scored Stand Out and Top 5 honors over at Scrapping4fun Challenges and I was invited to guest design for an upcoming challenge, so here I am! The theme for Challenge #227 is Vintage so I created a mixed media vintage post card using some older stamps in my stash.

I cut a post card base from CutCardStock Cougar Smooth 80# White cardstock and lightly swiped Catherine Pooler Sand Castle ink over it to give it a little color. Using my Tim Holtz distress sprayer, I spritzed water through my fingers onto the panel and blotted it with a paper towel. I randomly stamped images from the Paper Wings Productions Art Textures and Writing Backgrounds stamp sets over the background (using my finger tips) in Catherine Pooler Icing on the Cake and Cummerbund inks, stamping off once for a lighter impression. I inked the edges of the panel with Ranger walnut stain distress ink, making some tears in the edges and dirtying it up a bit.

I swiped Catherine Pooler All That Jazz ink on a scrap piece of Cougar White cardstock, stamped the vintage car from the Dare 2B Artzy Classic Dad stamp set in Icing on the Cake ink and then cut it with the coordinating die from the Classic Car die set. I stamped the Route 66 sign from the same stamp set in the brown ink and cut it with the coordinating die. I added a strip of Eyelet Outlet Road washi tape horizontally toward the bottom of the panel and adhered the car and sign to the panel, popping the car up on a foam strip. Finally, I stamped the sentiment across the bottom in Icing on the Cake ink which completed the front of the post card.

I created a snippet of a post card on the Gecko Galz Postage 1 digital image sheet which I enlarged a bit to fit the back of the post card and added a sticker ‘stamp’ from the Echo Park Away We Go Collection Kit.

Sharing in the following challenges:
1. A Perfect Time To Craft Open Challenge: September #9-2023 – Anything Goes
2. Classic Design Challenge: September #9 – Anything Goes
3. Crafts Galore Encore Challenge Blog: #115 – Anything Goes
4. Creative Artiste Challenge Blog: #97 – Anything Mixed Media Goes
5. Di’s Digistamps Challenge: Die Cuts and/or Punches
6. If You Give a Crafter a Cookie: #184 – September/Browns

Affiliate links are used in this post at no cost to you – I really appreciate your support! 

Products used:
CARDSTOCK/PAPER: Cougar Smooth 80# White cardstock
STAMPS: Paper wings Productions Art Textures and Writing Backgrounds stamp sets, Dare 2B Artzy Classic Dad stamp set, Gecko Galz Postage 1 digital image sheet
INK: Catherine Pooler Sand Castle, Icing on the Cake, Cummerbund and All That Jazz inks; Memento Tuxedo Black ink, Ranger walnut stain distress ink
DIES/PUNCHES: Dare 2B Artzy Classic Car die set, Kadomaru Pro Corner Rounder
ACCESSORIES: Tonic Studios 12″ Guillotine Paper Trimmer, Tombow Mono Dots adhesive, Bearly Art precision craft glue, MISTI stamp tool, Big Shot, Tim Holtz distress sprayer, Eyelet Outlet Road washi tape, 1/4″ double-sided foam strip, Echo Park Away We Go Collection Kit

I hope you’ve enjoyed seeing this project and will link up with us this time! Thanks so much for stopping by today – we’ll see you next time! ;)

Scrappy hugs,

A Wee Bit Wicked

Hey everybody! Happy Tuesday to you! I have a FABulous Keep It Simple DT inspiration project to share today created with items from our newest collection, A Wee Bit Wicked, that was released yesterday! We have been chomping at the bit for release day to arrive and we’re super excited to share our projects with you! You know how I love me some fun folds, so I created a double easel fold featuring papers, stamps, dies and die cut pieces! Oh my goodness, so much fun! And before I forget, coupon code WICKED10 gets you 10% off items in the A Wee Bit Wicked Collection! What a sweet deal! ;)

I cut the card base from Neenah Classic Crest 80# Solar White cardstock and the scored panel and a die cut oval from CutCardStock Basis Black cardstock. I cut layering panels and another die cut oval from papers in the 6×9 Collection Pack. I stamped the witch, broom and kitty in Memento Tuxedo Black ink and the pumpkin in Concord & 9th Marmalade ink on Solar White cardstock, and colored the witch and broom with alcohol markers. We hadn’t received the coordinating Best Witches dies yet because of a shipping delay so I fussy cut the images for this card. But the dies have come in and are available on the website. Dies are SO much easier than fussy cutting, lol! ;)

I embellished the tall panel with a large spider web and spider from the Wee Bits Die Cut Pieces. Then I layered the die cut ovals (cut with the Stitched Ovals Nested Dies) on the short front panel along with the stamped and colored images. I finished the card front with a few stars and a sentiment from the Wee Bits Die Cut Pieces

I cut the inside panel from Solar White cardstock and embellished it with strips of the patterned paper from the 6×9 Collection Pack and CutCardStock Basis Black cardstock used on the front. I stamped the sentiment from the Halloqueen Sentiments Stamps in Tuxedo Black ink on a scrap piece of Solar White cardstock and cut it with the coordinating Halloqueen Outline Dies.

Sharing in the following challenges:
1. Crafting Happiness Challenges: #145 – Anything Goes
2. Creative Creases Challenges: #64 – Anything Goes with a Fun Fold
3. Halloween Crafts All Year ‘Round: #7 – Anything Halloween Goes
4. My Time To Craft Challenge Blog: #515 – Die Cuts
5. Outlawz Twisted Thursday Challenge: Anything Goes w/ optional School Subjects (no twist)

Keep It Simple products used:
A Wee Bit Wicked 6×9 Collection Pack
A Wee Bit Wicked Best Witches Collection Stamps
A Wee Bit Wicked Halloqueen Sentiments Stamps
A Wee Bit Wicked Halloqueen Outline Dies
A Wee Bit Wicked Cards and Phrases Die Cut Pieces
A Wee Bit Wicked Wee Bits Die Cut Pieces
Stitched Ovals Nested Dies

Affiliate links are used in this post at no cost to you – I really appreciate your support!

Other products used:
CARDSTOCK/PAPER: CutCardStock Basis Black cardstock, Neenah Classic Crest 110# Solar White cardstock
INK: Memento Tuxedo Black ink, Concord & 9th Marmalade ink; Arteza alcohol markers- Y30/31, YR00, R05, RP09, BR28, GS09, NG02/04, P05/27, PB03/06; Sharpie Ultra Fine Point purple marker, Tombow 725 marker
ACCESSORIES: Tonic Studios 12″ Guillotine Paper Trimmer, Tombow Mono Dots adhesive, Bearly Art precision craft glue, MISTI stamping tool, Big Shot, Stampin’ Up Dimensionals

I hope you’ve loved seeing this project as much as I loved creating it, and you’re inspired to get crafty! Be sure to check out ALL the fun goodies in the Keep It Simple store such as paper, stamps, die cuts, ephemera, washi tape and enamel dots to name just a few! You’ll go cray-cray! Be sure to Follow us on Facebook, Instagram, and Pinterest for lots of crafty inspiration! Thanks so much for stopping by today – we’ll see you next time!

Scrappy hugs,

life is better with sandy feet

Hey everybody! Happy Hump Day! I have an awesome CutCardStock DT inspiration project to share with you today featuring our Brown Bag Kraft that I paired with the amazing Neenah Classic Crest 80# Solar White cardstock. This card design is super simple and only requires an inked sky, stamped water and torn kraft paper for the beach sand on the background panel! Then add any other elements you want to create a scene!

I cut a standard A2 size side-folding card base and background panel from Neenah Classic Crest 80# Solar White cardstock. I stamped the water in Catherine Poole Tranquil, Stone Blue and Cove Blue inks using the Hero Arts Color Layering Waves stamp set on a scrap piece of Solar white cardstock which I trimmed and added to the center of the background panel. Using the My Favorite Things Mini Cloud Edges Stencil, a blending brush and Ranger stormy sky distress ink, I created the sky on the upper third section of the panel.

The final step in creating the scene was tearing a piece of CutCardStock Brown Bag Kraft which I adhered to the bottom of the panel, and then trimmed the entire panel. I added an Adirondack chair sticker from the Carta Bella Beach Party Collection Kit along with Eyelet Outlet starfish and boat brads. I stamped a sentiment from the same stamp set in Catherine Pooler Icing on the Cake ink, and adhered the panel to the card base with 1″ double-sided foam strips.

I cut the inside panels from Solar White and Brown Bag Kraft paper, and stamped another sentiment from the Hero Arts stamp set in brown ink.

Sharing in the following challenges:
1. A Perfect Time To Craft Open Challenge: August #8-2023 – Anything Goes
2. Classic Design Challenge: August #8 – Anything Goes
3. Crafty Gals Corner: #246 – Summer Fun
4. My Time To Craft Challenge Blog: #514 – Stenciling (sky/clouds)
5. Outlawz Monday Greetings Challenge: Happy Summer Holiday w/ twist of Sun, Sea or Beach
6. Shopping Our Stash: #503 – Hot Hot Hot
7. Sparkles Monthly Challenges: #167 – Tropical and/or Beach
8. Try It On Tuesday: Let’s Go Outside

Affiliate links are used in this post at no cost to you – I really appreciate your support!

CutCardStock products used:
Neenah Classic Crest 80# Solar White cardstock
CutCardStock Brown Bag Kraft cardstock
Tombow Mono Dots adhesive

Other products used:
PAPER: Carta Bella Beach Party Collection Kit
STAMPS: Hero Arts Color Layering Waves stamp set
INK: Ranger stormy sky distress ink; Catherine Pooler Tranquil, Stone Blue, Cove Blue and Icing on the Cake inks
ACCESSORIES: Tonic Studios 12″ Guillotine Paper Trimmer, My Favorite Things Mini Cloud Edges Stencil, blending brush, MISTI stamp tool, Eyelet Outlet Seashore Brads and Boat & Lighthouse Brads, 1″ double-sided foam strips

I hope you’ve enjoyed today’s project and you’re inspired to get crafty! Be sure to check out all the awesome cardstock and other goodies at CutCardStock (adhesives, labels, stickers, pens, watercolors and ribbon to name a few). And head on over to the CutCardStock Facebook Page and for more inspiration! Also, be sure to join our Creating with Card Stock Facebook Group for even more crafty inspiration! Thanks so much for stopping by today – we’ll see you next time!

Scrappy hugs,