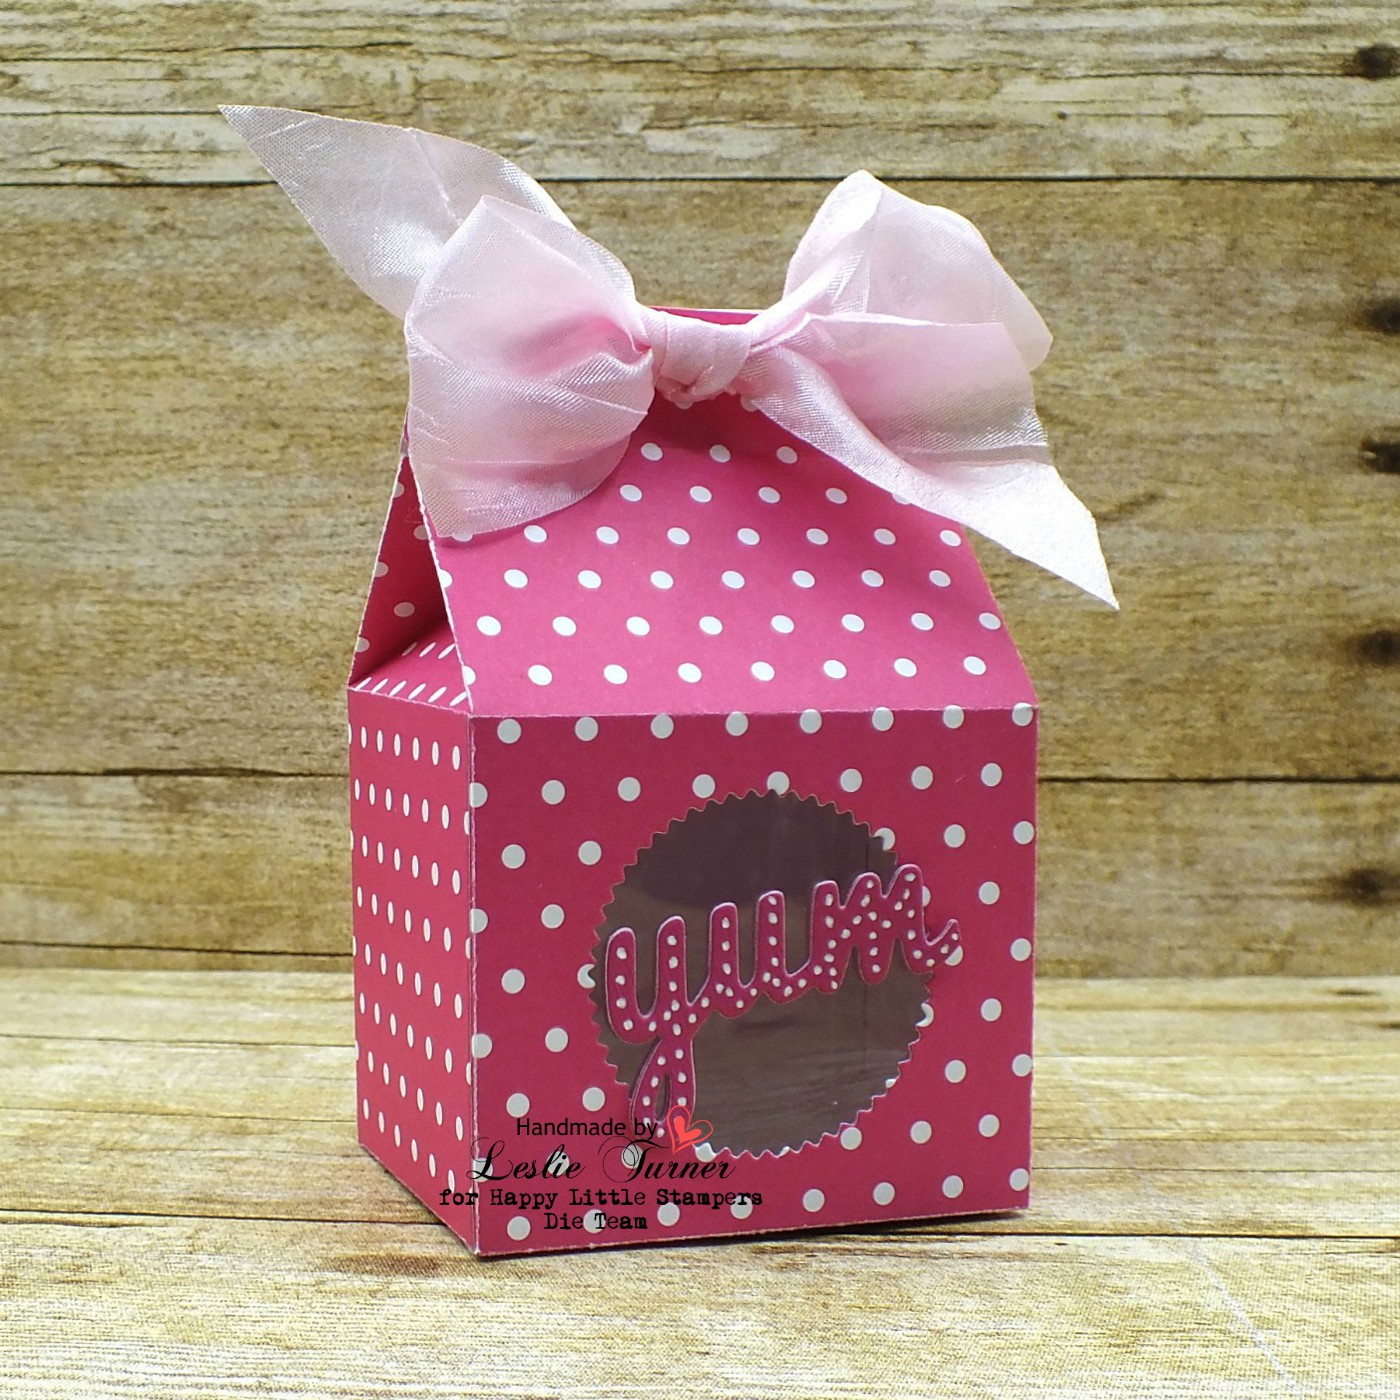
Hello, my crafty friends! Hope you’re having a good week! This month’s Anything Goes with Dies Challenge is live over at Happy Little Stampers and I’m thrilled to share my DT inspiration project with you today! This is my last post for the Happy Little Stampers Die Team and I’d like to thank Kylie and the rest of the crew for having me along for the last year and a half! I’ve thoroughly enjoyed myself!
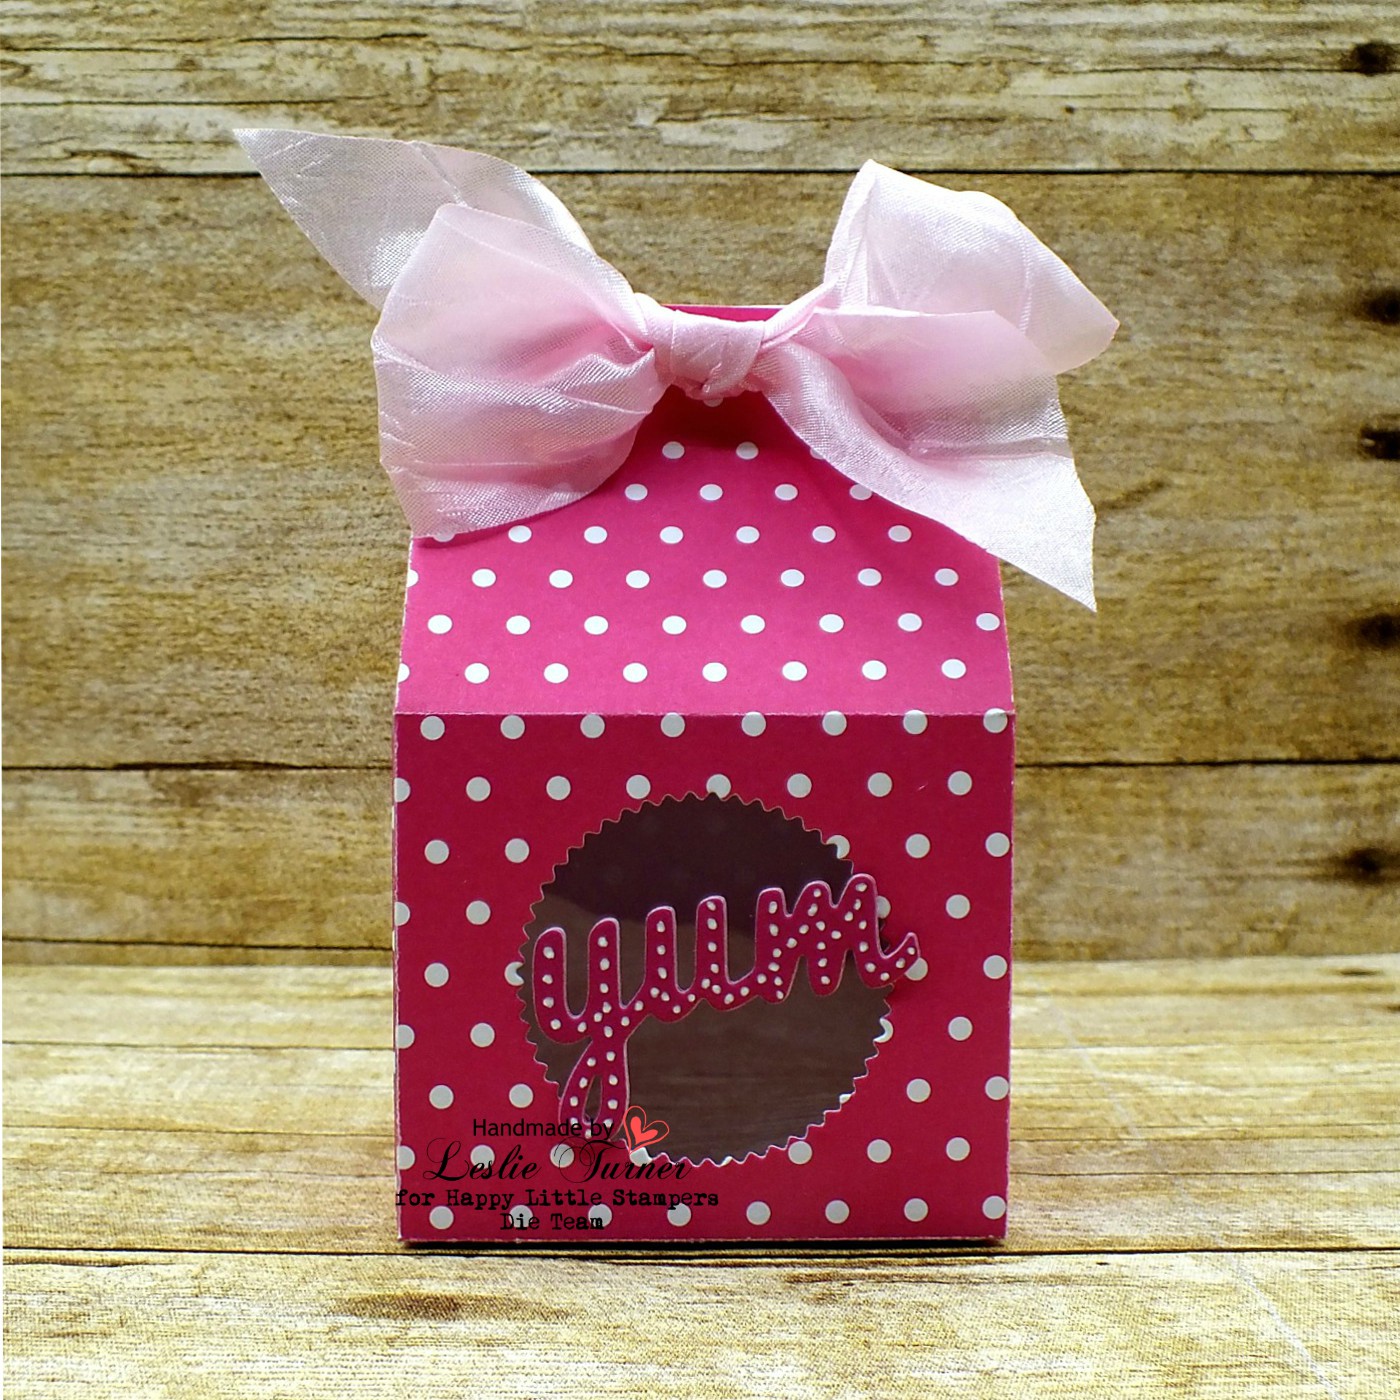
I created a super cute pink and white polkadot treat box using the Stampin’ Up Baker’s Box Thinlits. I cut three ‘yum’ sentiments from hot pink textured cardstock and adhered them on top of one another for a little dimension, and then added tiny dots with a white Gelly Roll pen. I used pink Silky Crush ribbon to tie the box closed.
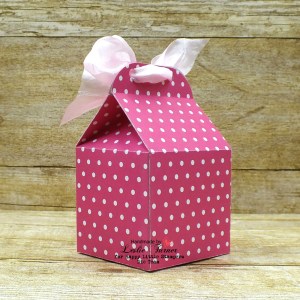
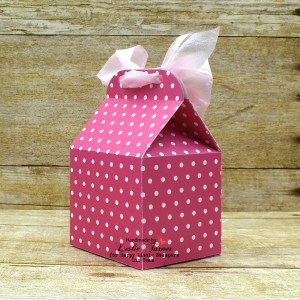
Here are a couple shots showing the back of the box. Reminds me of a little milk carton. So stinkin’ cute! ;)
Here’s one more look… I love how this turned out and it’ll look even cuter with some Jelly Belly jellybeans in it, lol! ;)
Products used: Cardstock/Paper: Colorbok Seeing Dots, DCWV Double-Sided Textured cardstock Ink: Sakura White Gelly Roll pen Dies/Punches: Stampin’ Up Baker’s Box Thinlits Accessories: Gemini Junior, ScraPerfect Best Glue Ever, Stampin’ Up Window Sheet, Really Reasonable Ribbon Pink Silky Crush Ribbon
I hope you’ve enjoyed today’s project and will link an anything goes project with us this month using dies! We’d love to see what you create! Thanks so much for stopping by today – we’ll see you next time! ;)
6/1/20 Winner AND Honorable Mention at Pammie’s Inky Pinkies Challenges!
6/4/20 Top Pick of the Week at The Outlawz Twisted Thursday Challenge!
Howdy, friends! Happy Friday – hope you are enjoying your down-slide to the weekend! I’ve popped in with a fun junk journal I finished yesterday afternoon for The Outlawz Twisted Thursdays Challenge where the challenges are always Anything Goes with an optional twist. Our sponsor this month is Vectoria Designs and this time the twist is pearls and lace which goes so well with their ‘shabby chic’ line.
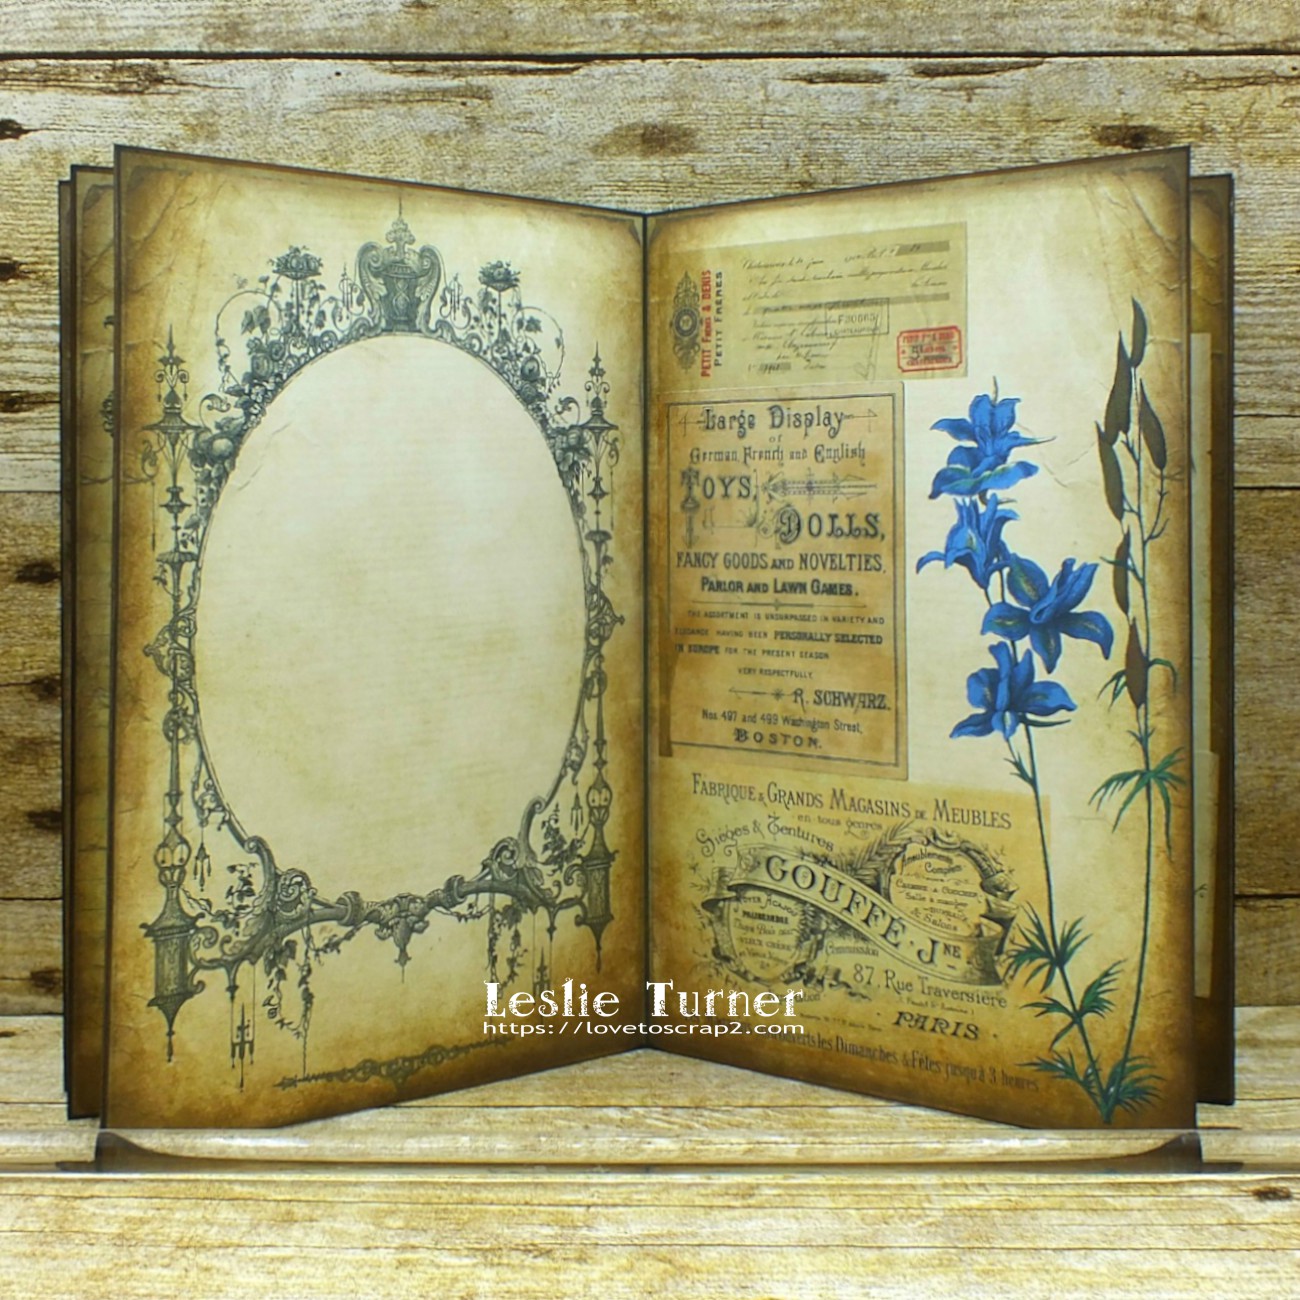
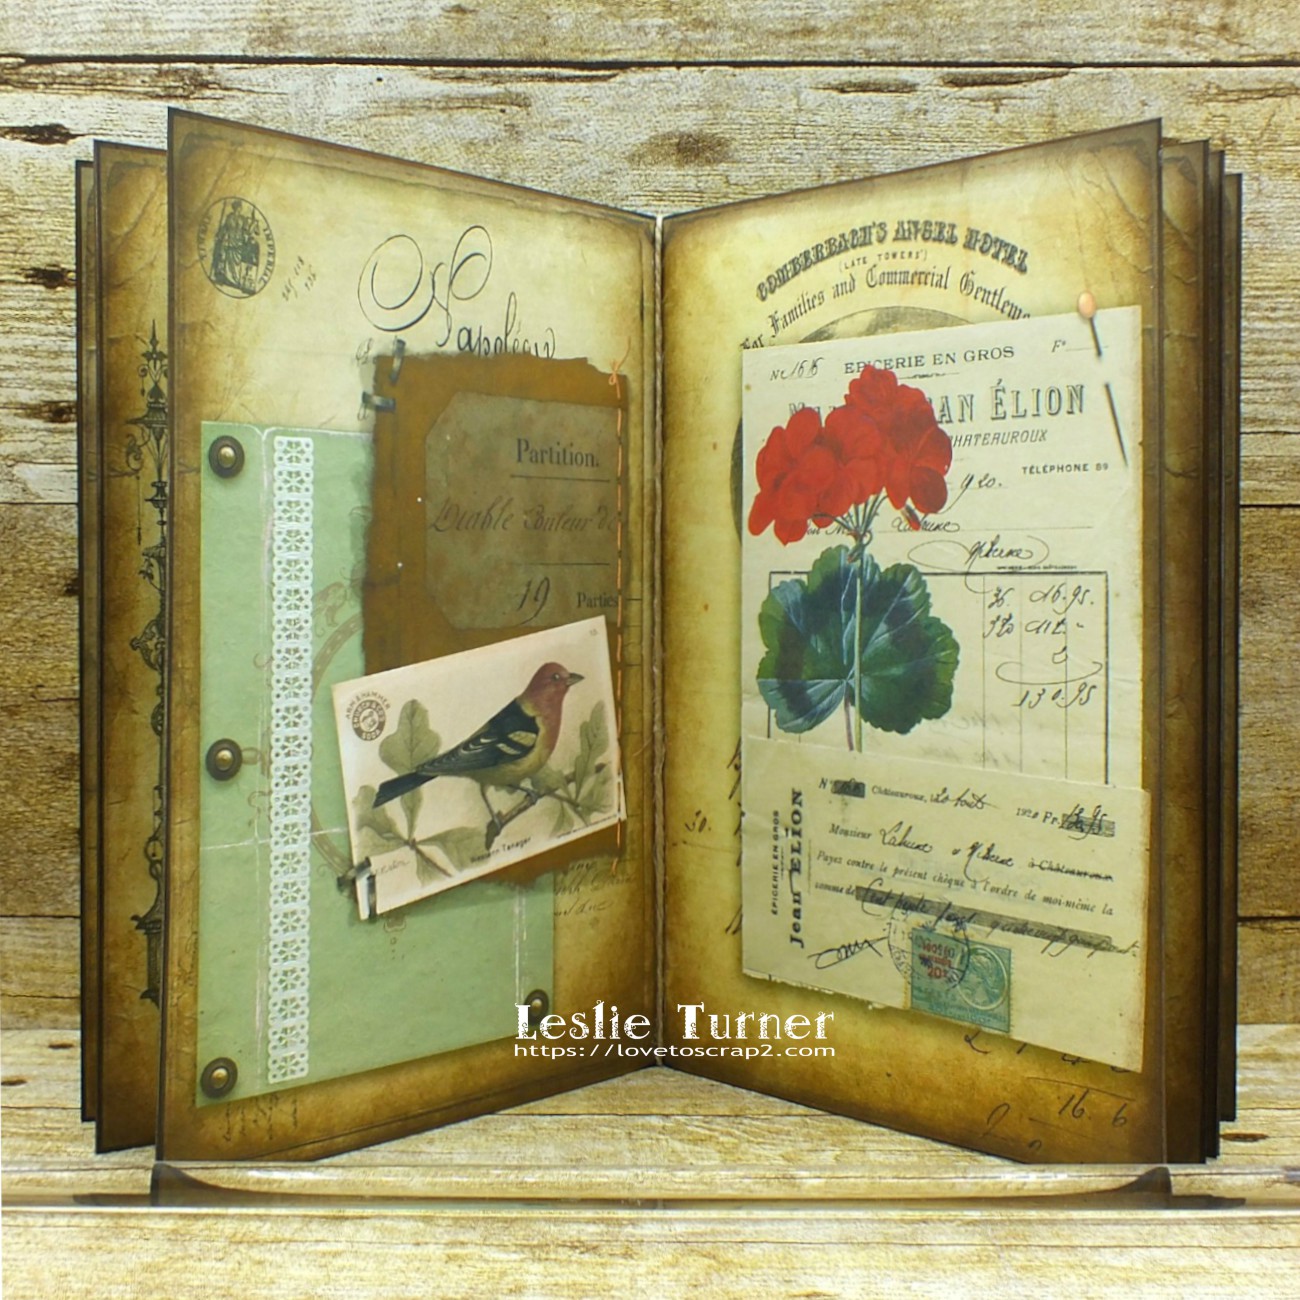
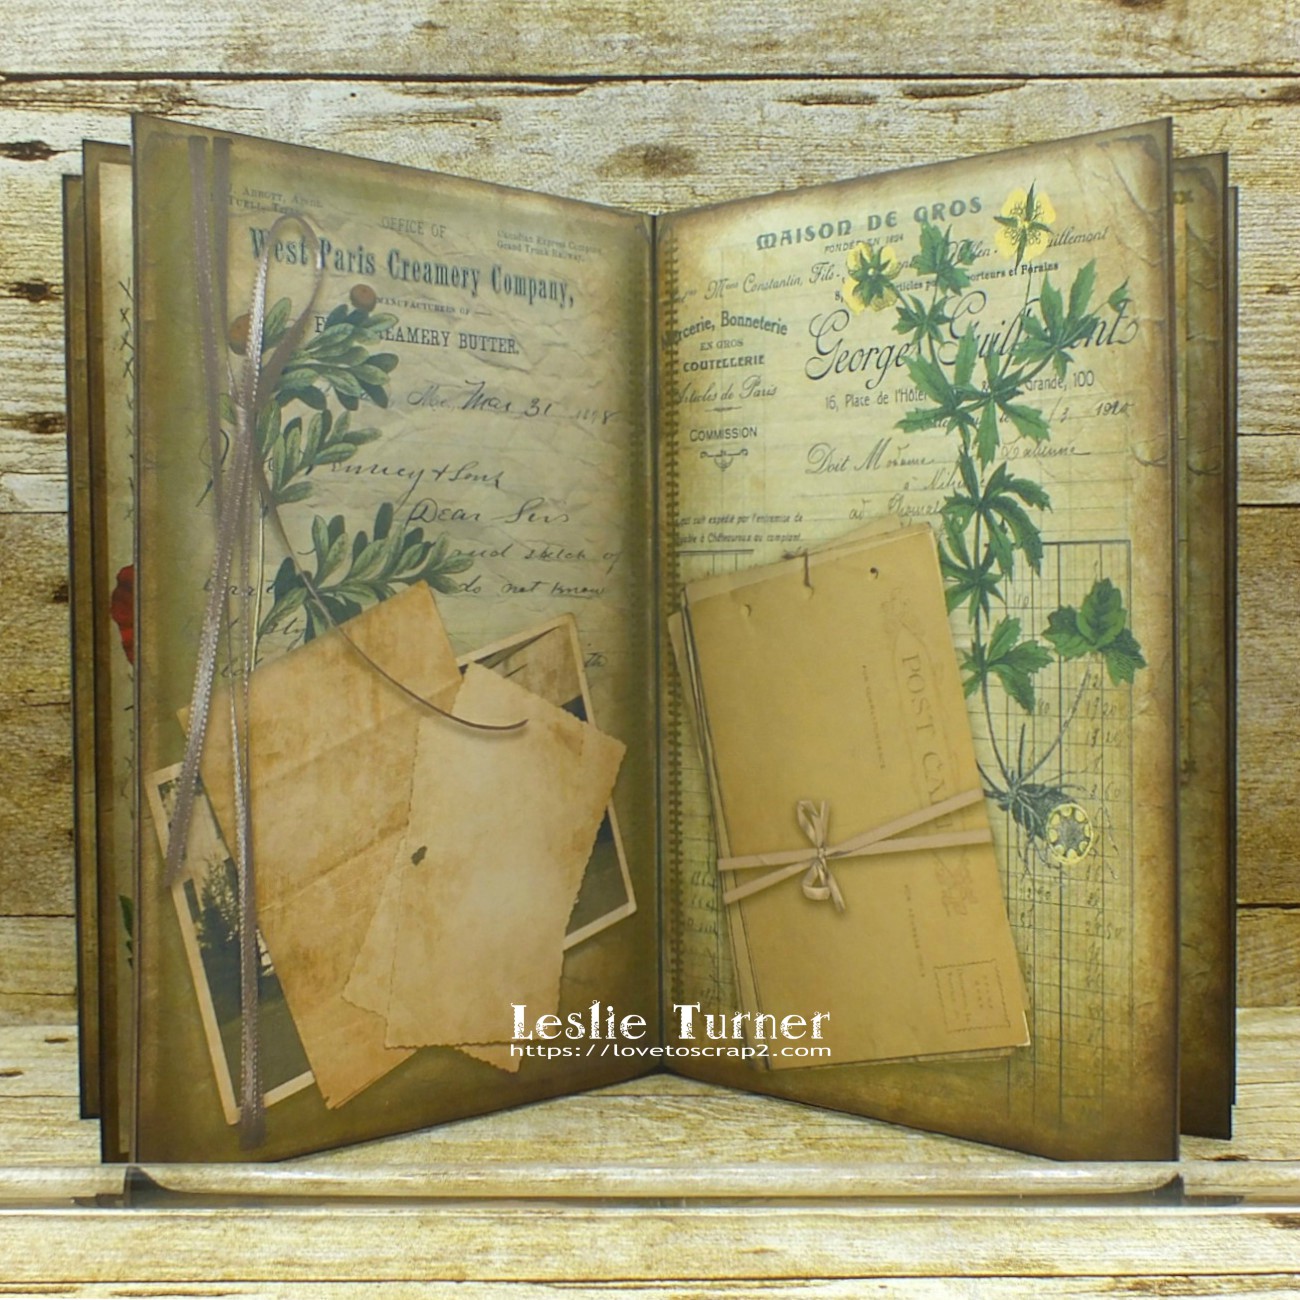
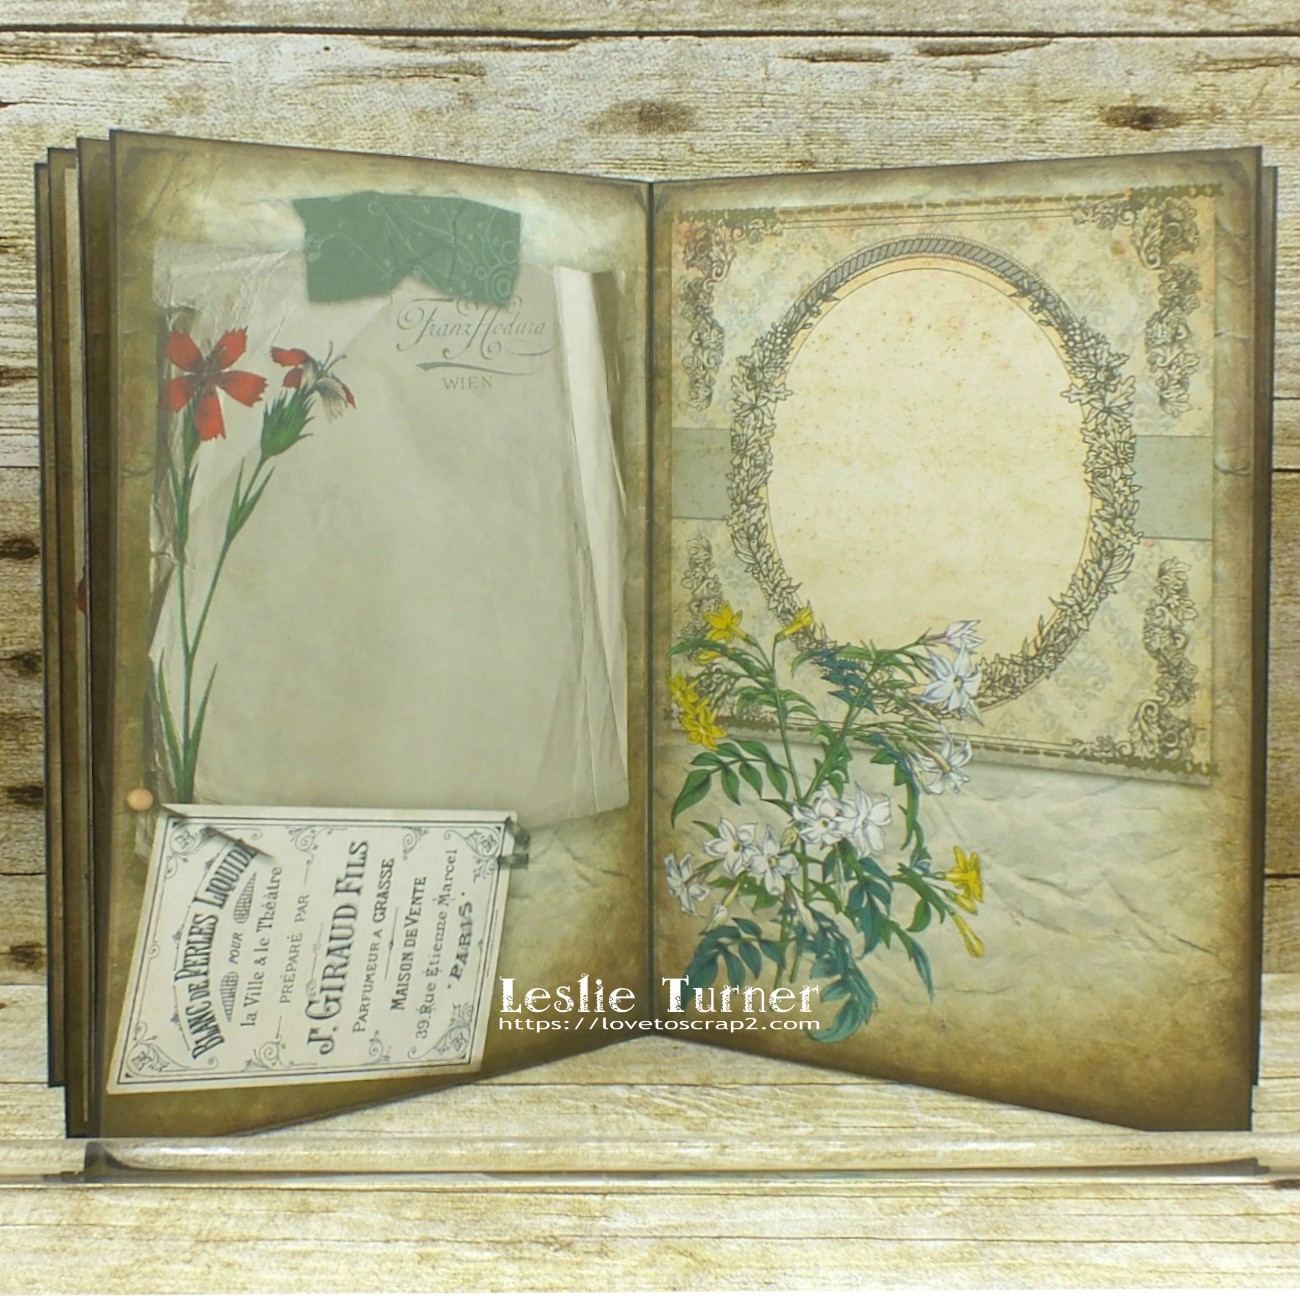
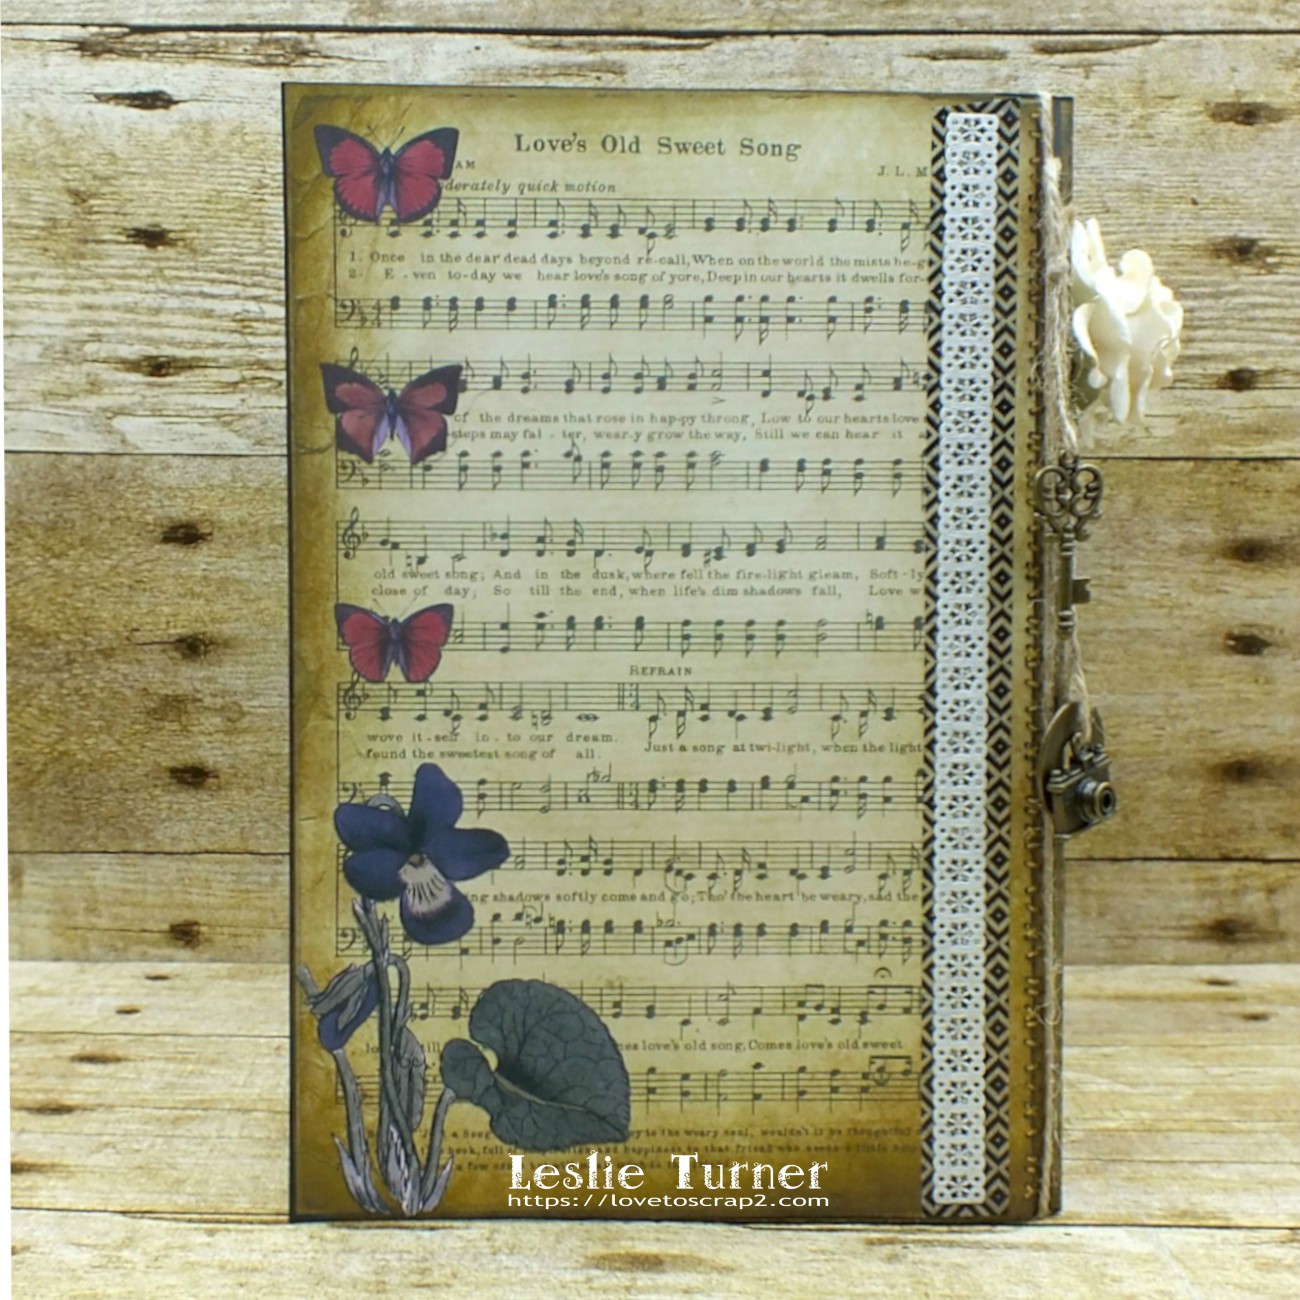
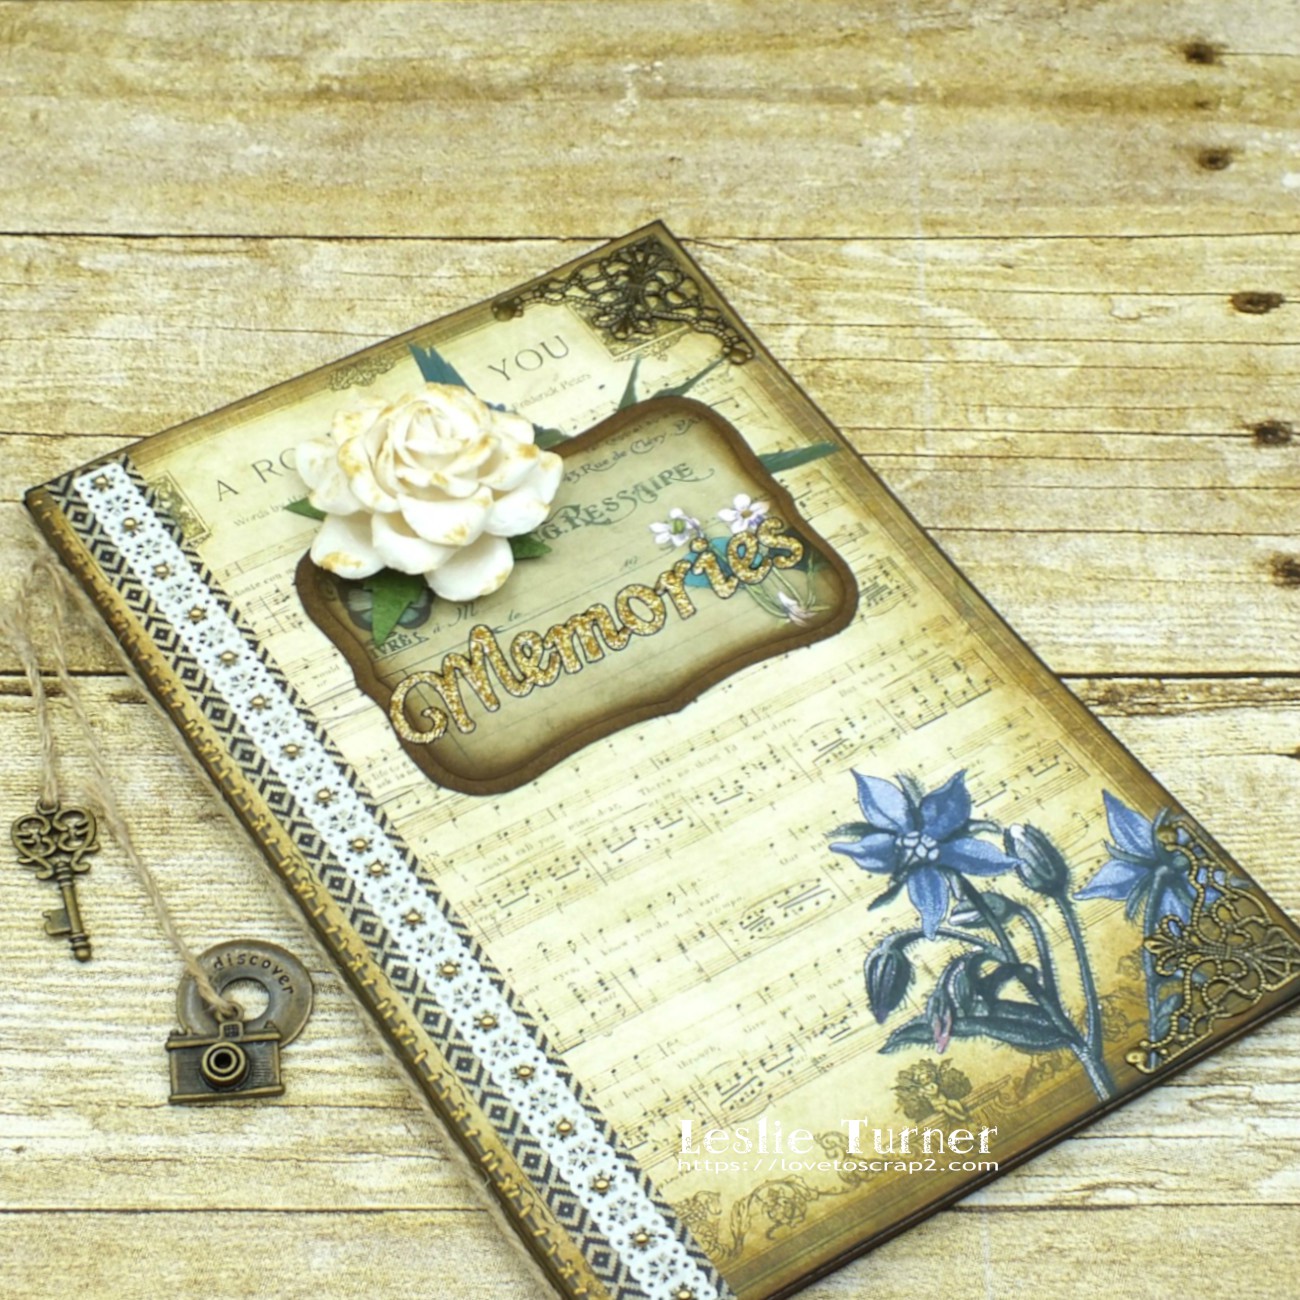
I had the Vectoria Designs Botanical Junk Journal Kit in my digital printable stash so I thought this was the perfect opportunity to use it. I printed the cover and all the pages on 60# Hammermill copy paper which yields the best print quality. I trimmed all the pages and inked the edges with walnut stain ink prior to assembling the journal. I added Washi Tape and paper lace along the spine on the front and back, and then added gold flat-back pearls to the paper lace on the front along with filigree metal pieces on the two outside corners. I attached jute cord with bronze charms to the spine. I adhered a label from the kit to the front and spelled out the word ‘Memories’ in gold glitter alpha stickers, and then added a large paper flower that I ‘dirtied up’ with some antique linen distress ink. I added small pieces of the paper lace to a few of the inside pages to complete the journal.
And here’s one more peek… absolutely loving how this turned out! There is plenty of room on every page for journaling and adding photos to capture those memories! ;)
Products used:
Cardstock/Paper: Paper Accents kraft cardstock
Stamps: Vectoria Designs Botanical Junk Journal Kit digital printable
Ink: Ranger walnut stain and antique linen distress ink, Memento Tuxedo Black marker
Dies/Punches: Spellbinders Labels Eight die
Accessories: Tombow Mono permanent adhesive, Carpe Diem Washi Tape, Canvas Corp jute cord, Canvas Corp paper lace, Darice gold glitter alpha stickers, Wild Orchid Crafts paper flower, ScraPerfect Best Glue Ever; The Funkie Junkie Boutique corner filigree metal pieces, small metal key, and discover and camera charms; Flourish With A Bling gold flat-back pearls
I hope you’ve enjoyed this project and will come join us in The Outlawz Challenges! Lots of fun going on! Thanks so much for stopping by – we’ll see you next time! ;)
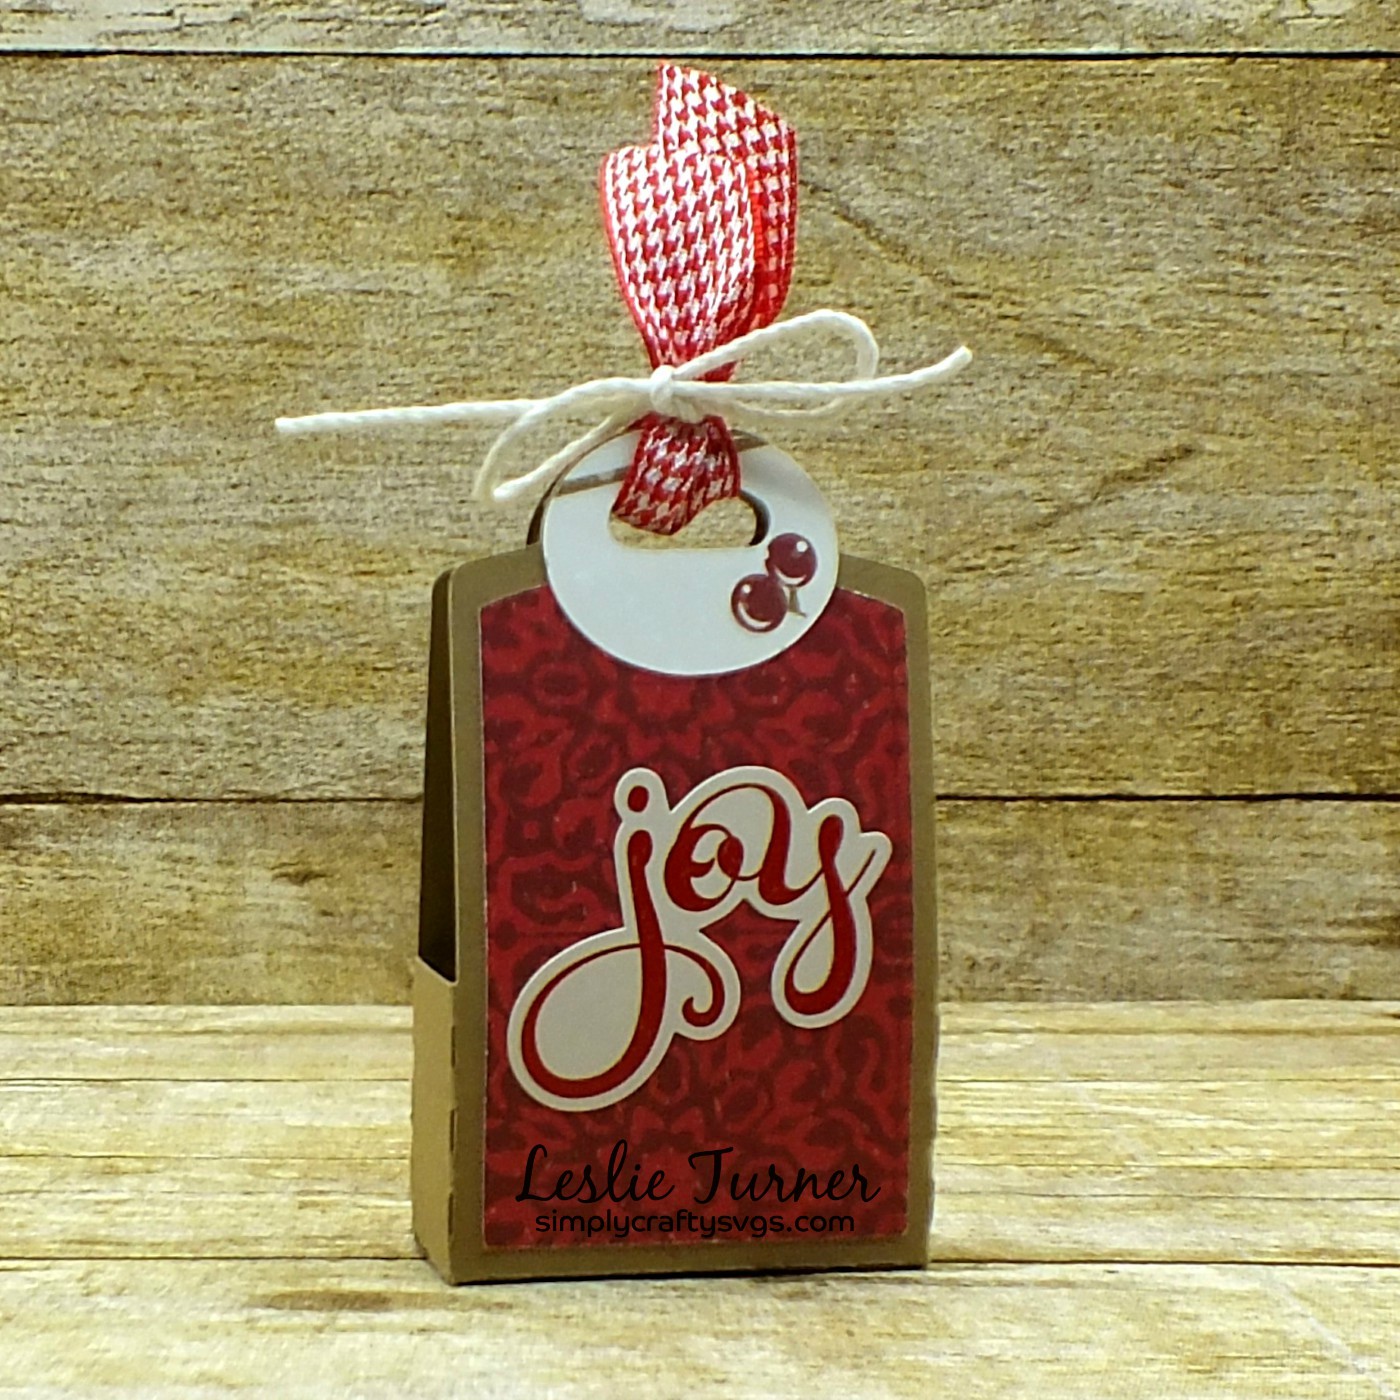
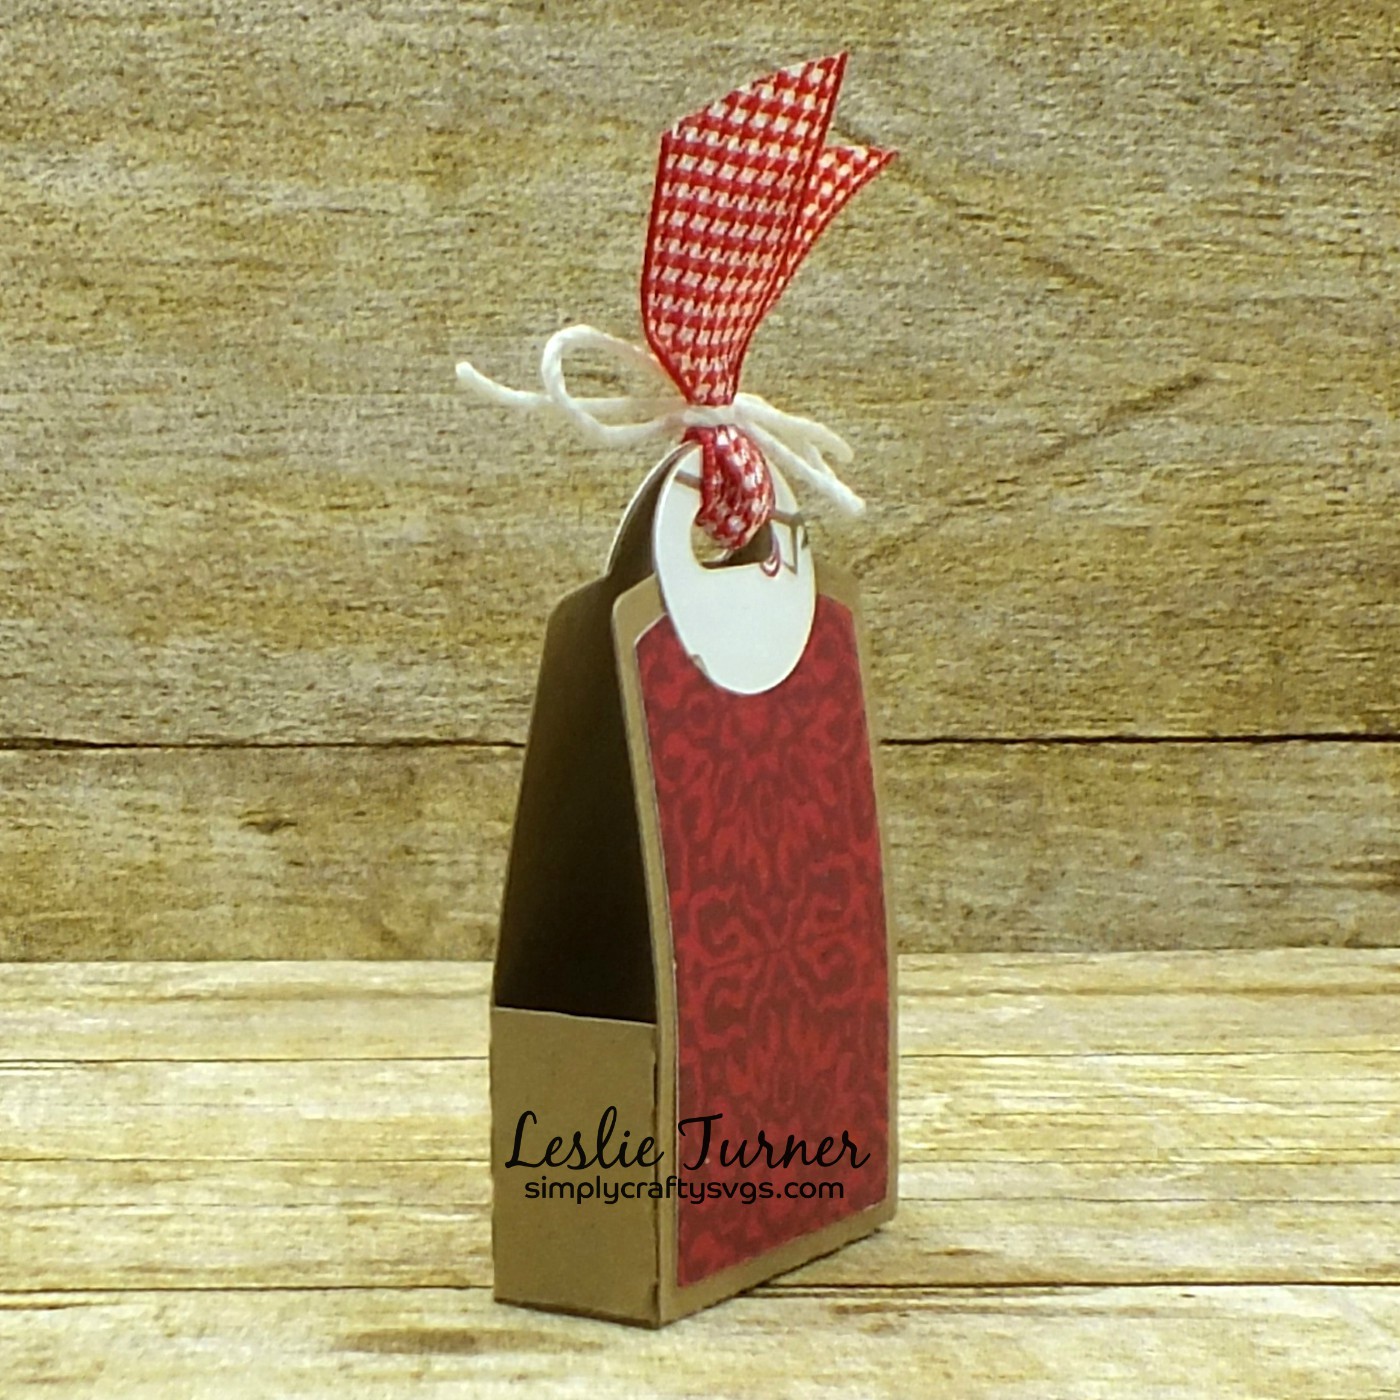
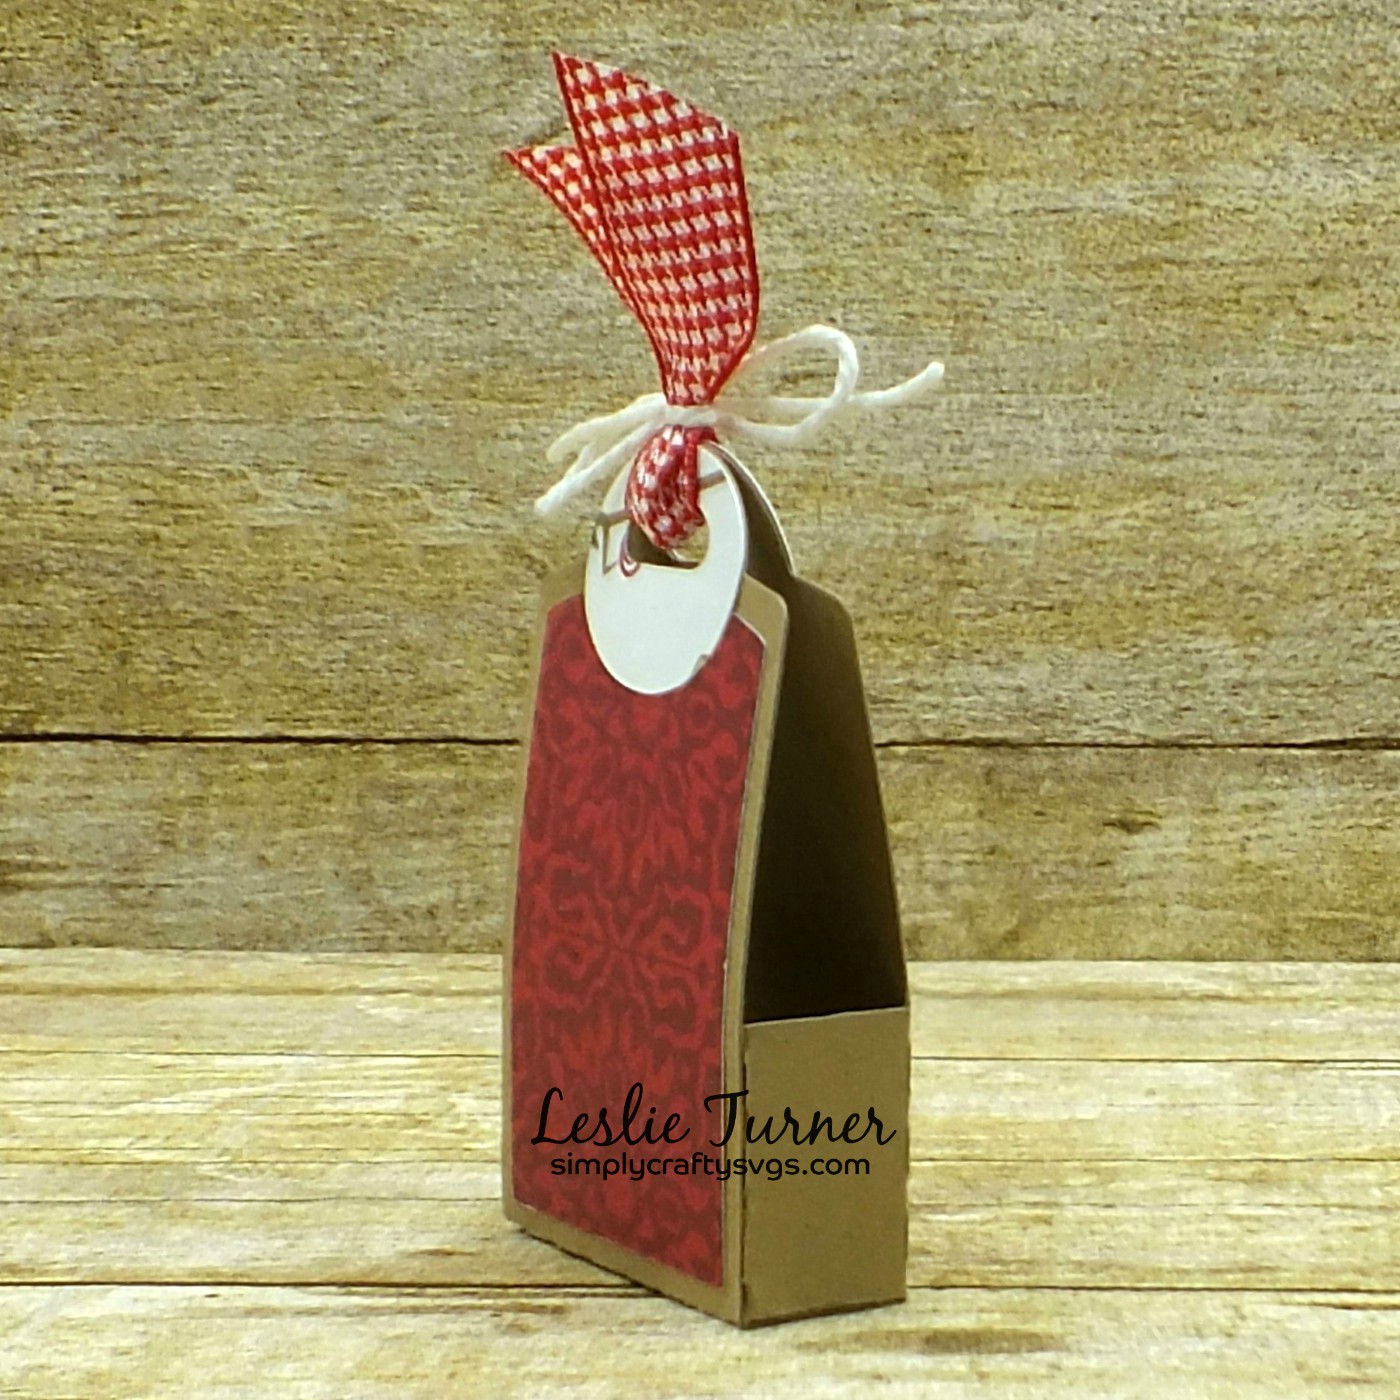
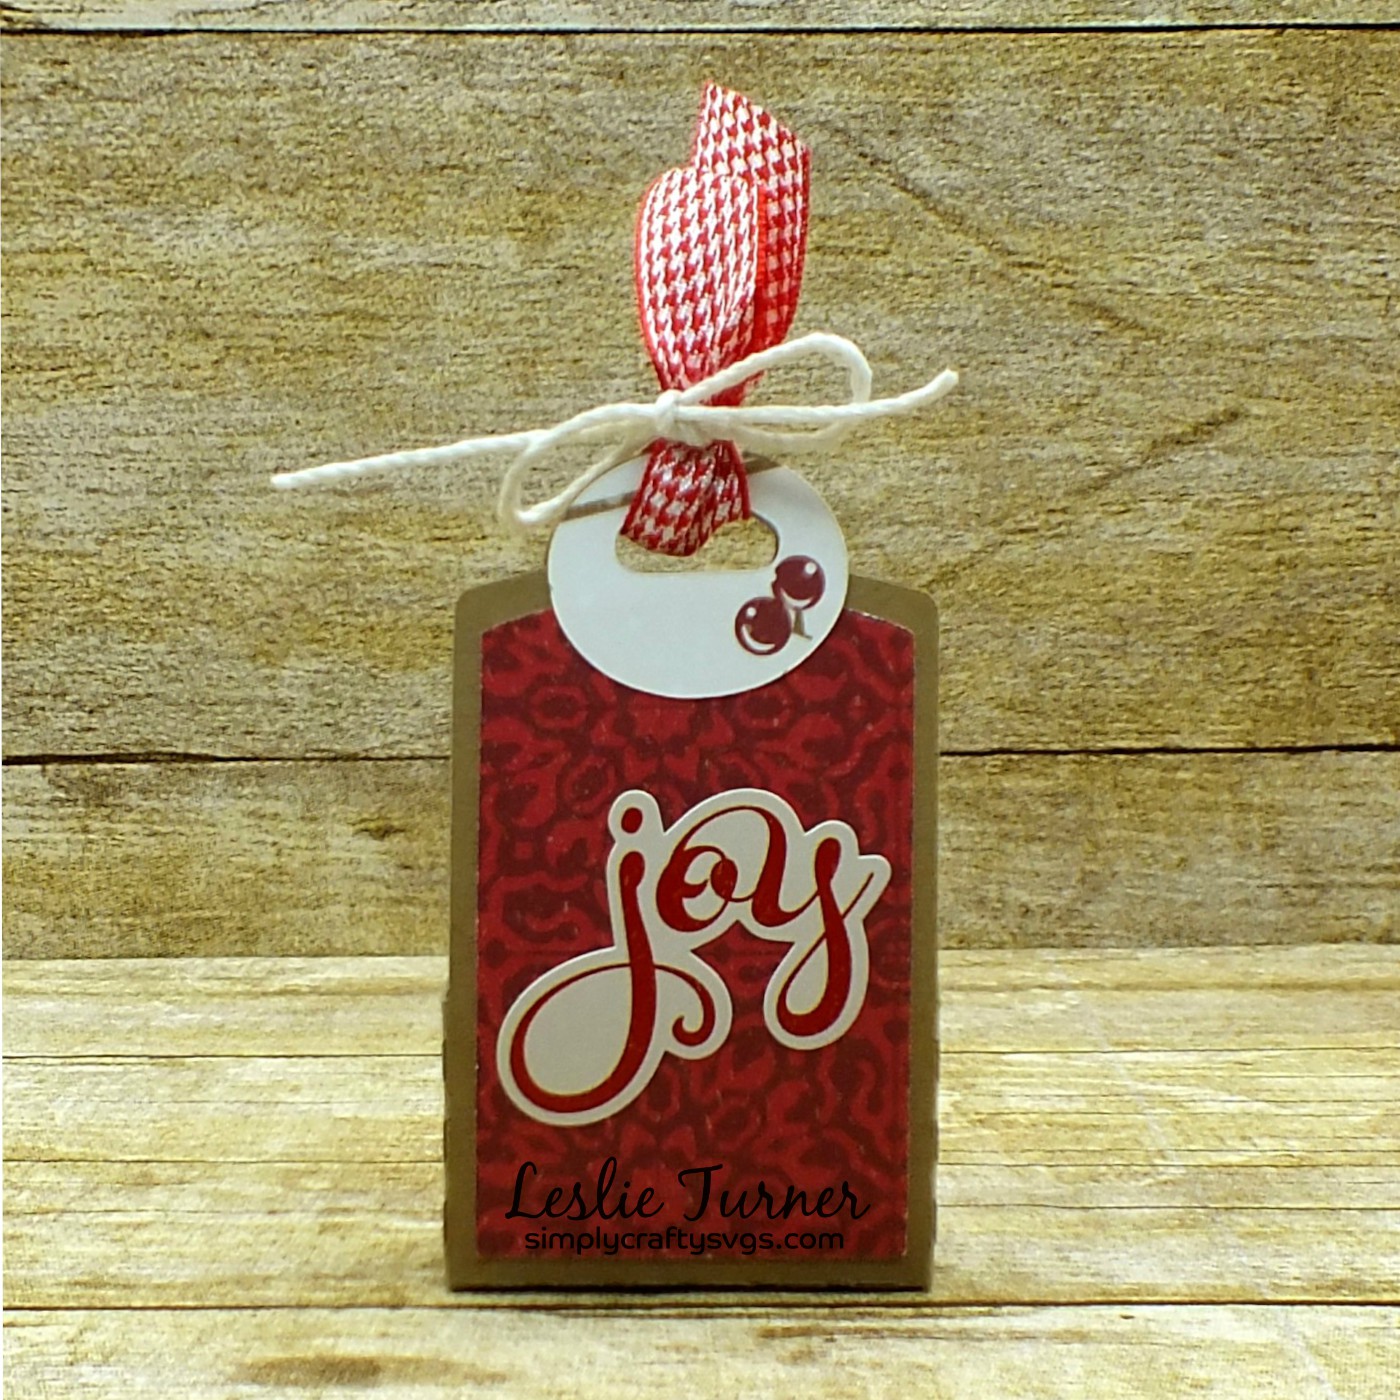
Hi everyone! Happy Hump Day! I’m not posting on the Simply Crafty SVGs Blog today but have popped in this morning to share an extra DT inspiration project with you, an adorable little treat box created with the free (yep, that’s what I said!) Simply Crafty SVGs Chocolate Squares Box cut file. OMGosh, is this cute or what?!
This was truly an easy one to put together. That’s the wonderful thing about Sandy… she takes all the guesswork out of her files. Instructions are straight-forward and easy to understand – in the form of written instructions downloaded with the file or a YouTube video where you can follow along interactively.
I cut the base from heavyweight kraft, the side panels from a pretty PhotoPlay red print and the handles from a holly print on the flip side of the red print. I tied a scrap of white and red hounds tooth ribbon through the handle with bamboo cord, and adhered a ‘joy’ sticker from the same PhotoPlay Collection Kit. The possibilities are endless with regard to colors, themes and occasions. I went with a Christmas theme here as Sandy did.
One more peek… so loving this! This would be a super cute project to mass produce to take chocolate to co-workers!
I hope you’ve enjoyed today’s project! Be sure to check out all the fun cut files in the Simply Crafty SVGs store – you’ll have so much fun! And there are tons of freebies to get started! Thanks so much for stopping by today – we’ll see you next time! ;)
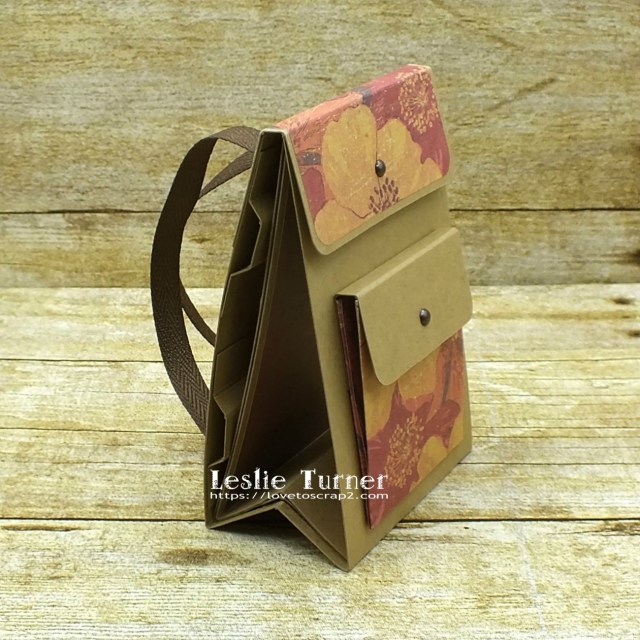
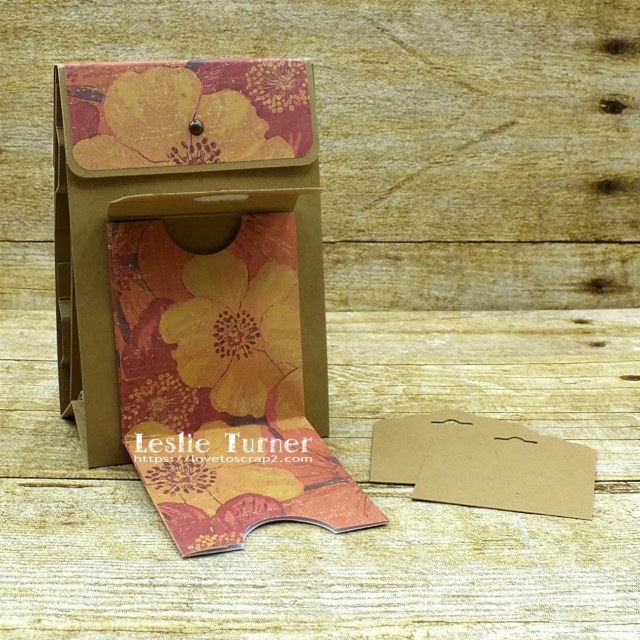
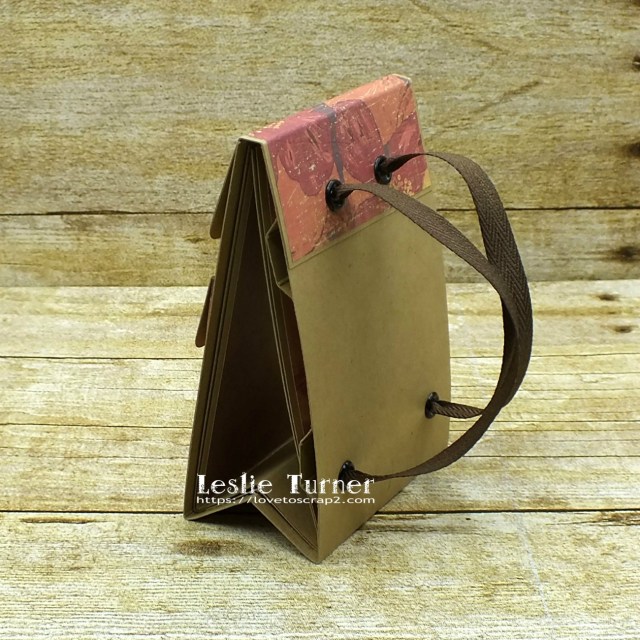
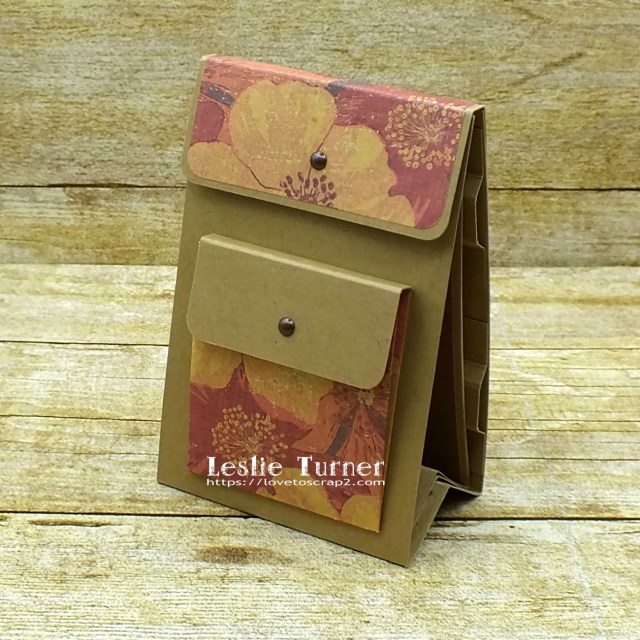
Hi friends! Happy Monday! It’s Memorial Day – please take a moment to remember what this day is really about… not just the start of summer, cooking out and chilling in the pool. Please take a moment to honor the men and women who died serving in the US Military. Now, on a happier note, I have a fun project to share with you today – a backpack mini album!
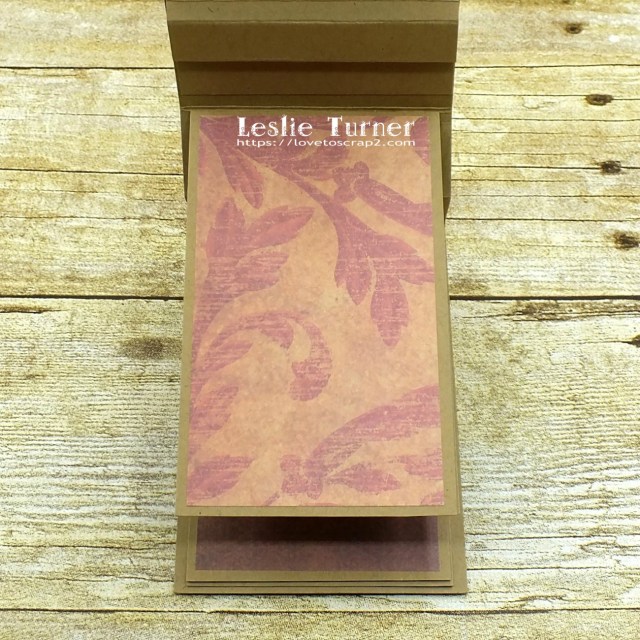
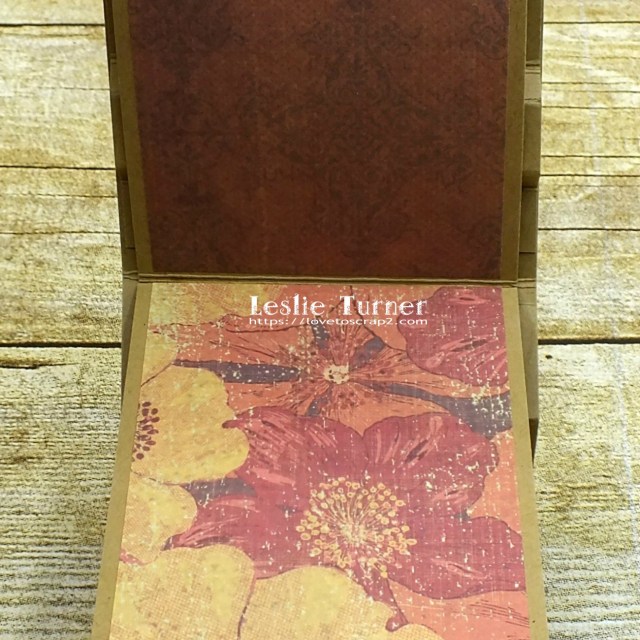
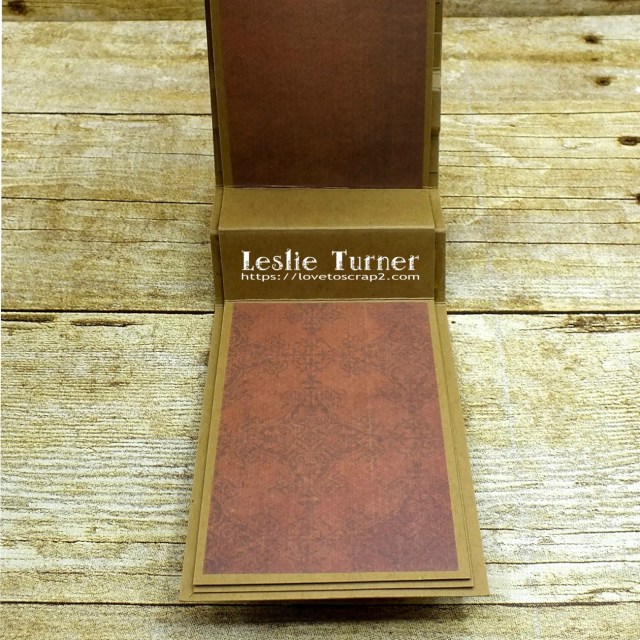
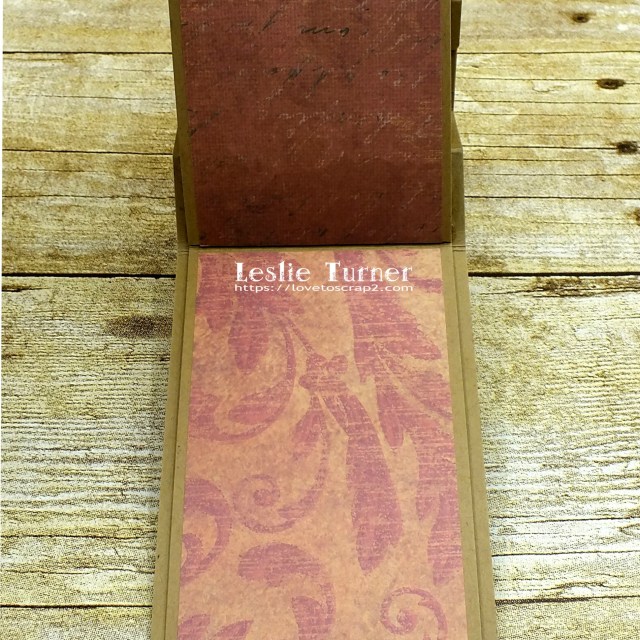
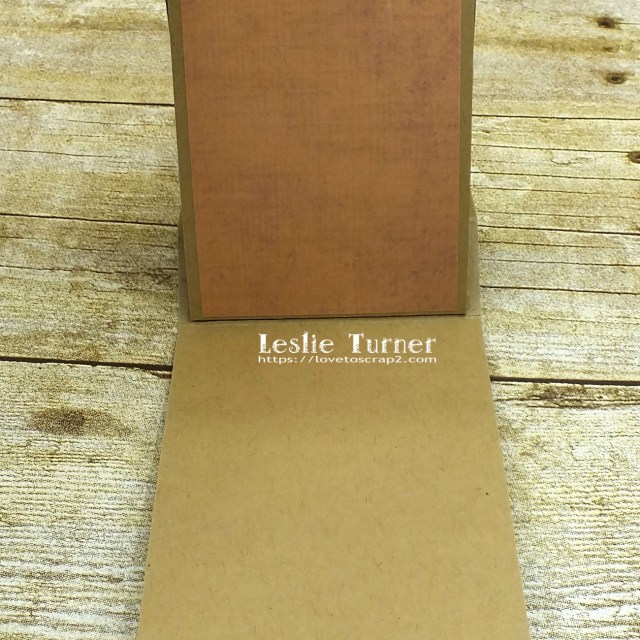
We moved last year and when unpacking my studio, I ‘unearthed’ a Technique Junkies mini album CD that I bought quite a while ago but am not able to play because I don’t have a CD-ROM on my laptop. I’ve had a lot of fun over the years creating projects from the tutorials on the CD, and this little backpack was one I particularly enjoyed so I reconfigured the measurements for my tutorials folder because I know I’ll be making more of them! The backpack base and flap, front pocket and inside pages were all cut from heavy kraft cardstock. I embellished the flap and created the front pocket from coordinating patterned paper. The front flap and little pocket both have small velcro circle closures. The little pocket on the front holds two journaling cards. The straps are made from brown twill ribbon. It’s not part of the tutorial but I created two scored pieces of kraft cardstock to cover the twill ribbon knots on the inside of the album to give it a more finished look.
There are eight pages on the inside embellished with more coordinating papers.
And one more peek… I’m so smitten! Love how this turned out and I can’t wait to gift it!
Products used: Cardstock/Paper: Cardstock Warehouse Brown Box kraft cardstock, The Paper Studio Tattered and Worn 12×12 paper pad Dies/Punches: Kadomaru Pro corner rounder, Stampin’ Up 1″ circle punch, Stampin’ Up Scalloped Tag Topper punch Accessories: ScraPerfect Best Glue Ever, brushed copper brads and black eyelets from stash, Crop-A-Dile, brown Totally Twill ribbon from Really Reasonable Ribbon, Velcro circles
I hope you’ve enjoyed this project! Thanks so much for stopping by today – we’ll see you next time! ;)
6/14/20 DT Favorite at World Wide Open Design Team Monthly Challenge!
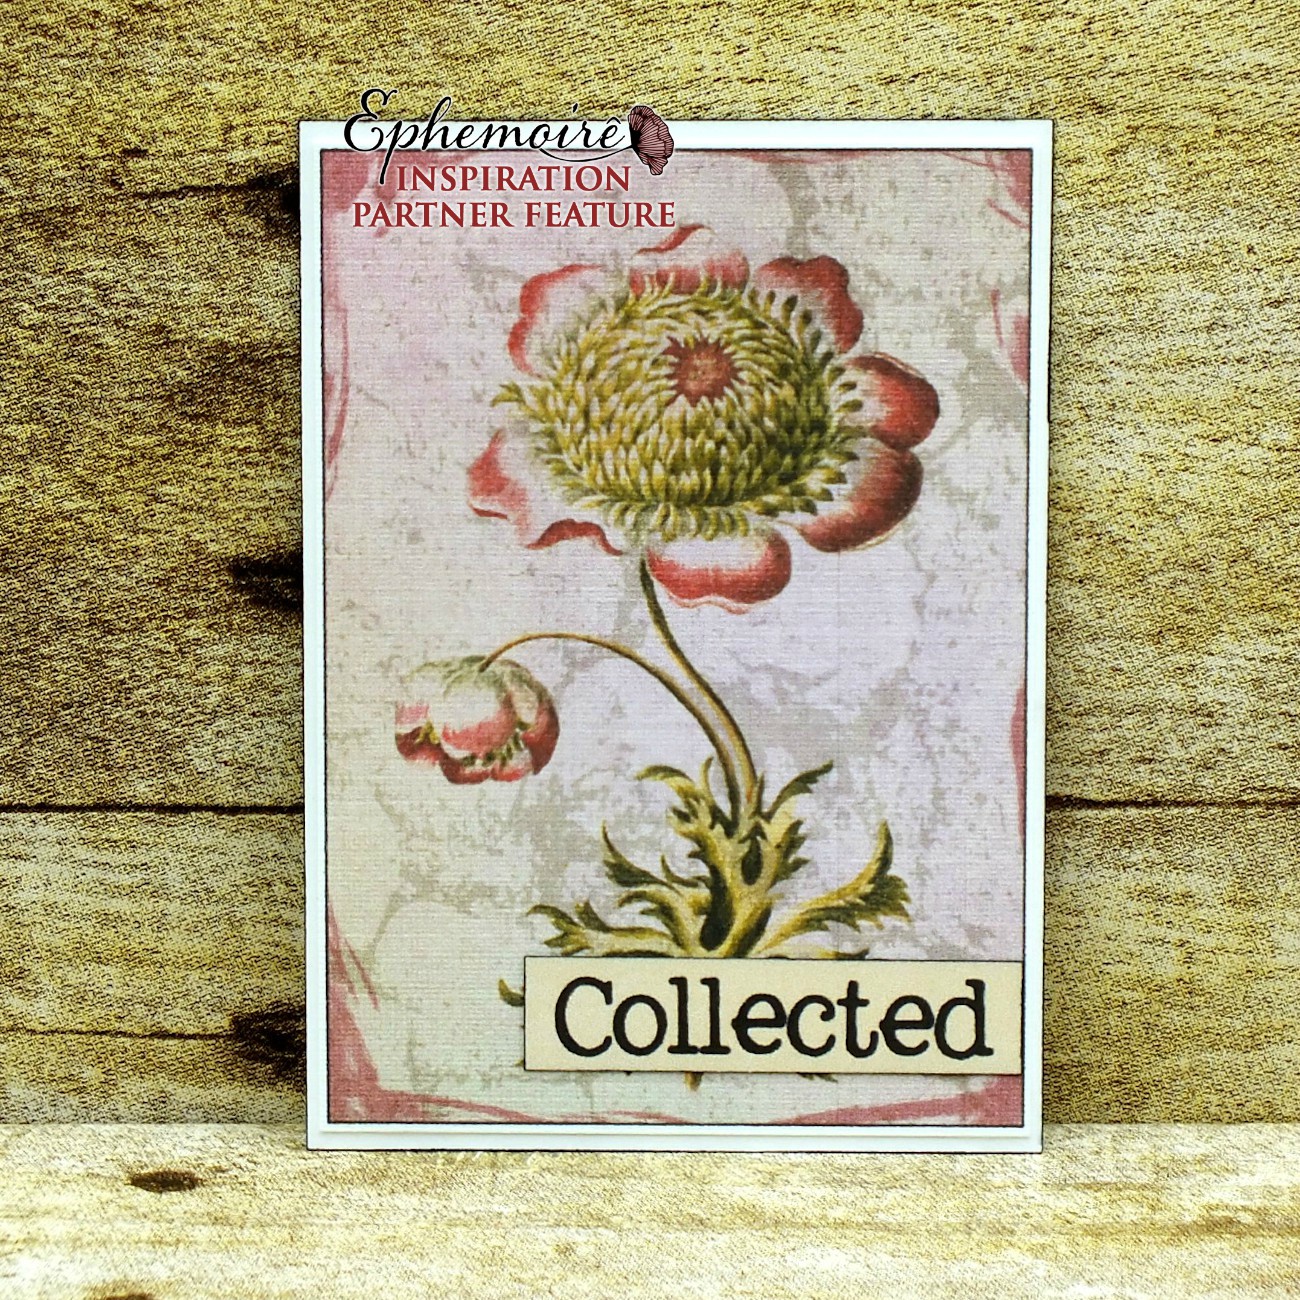
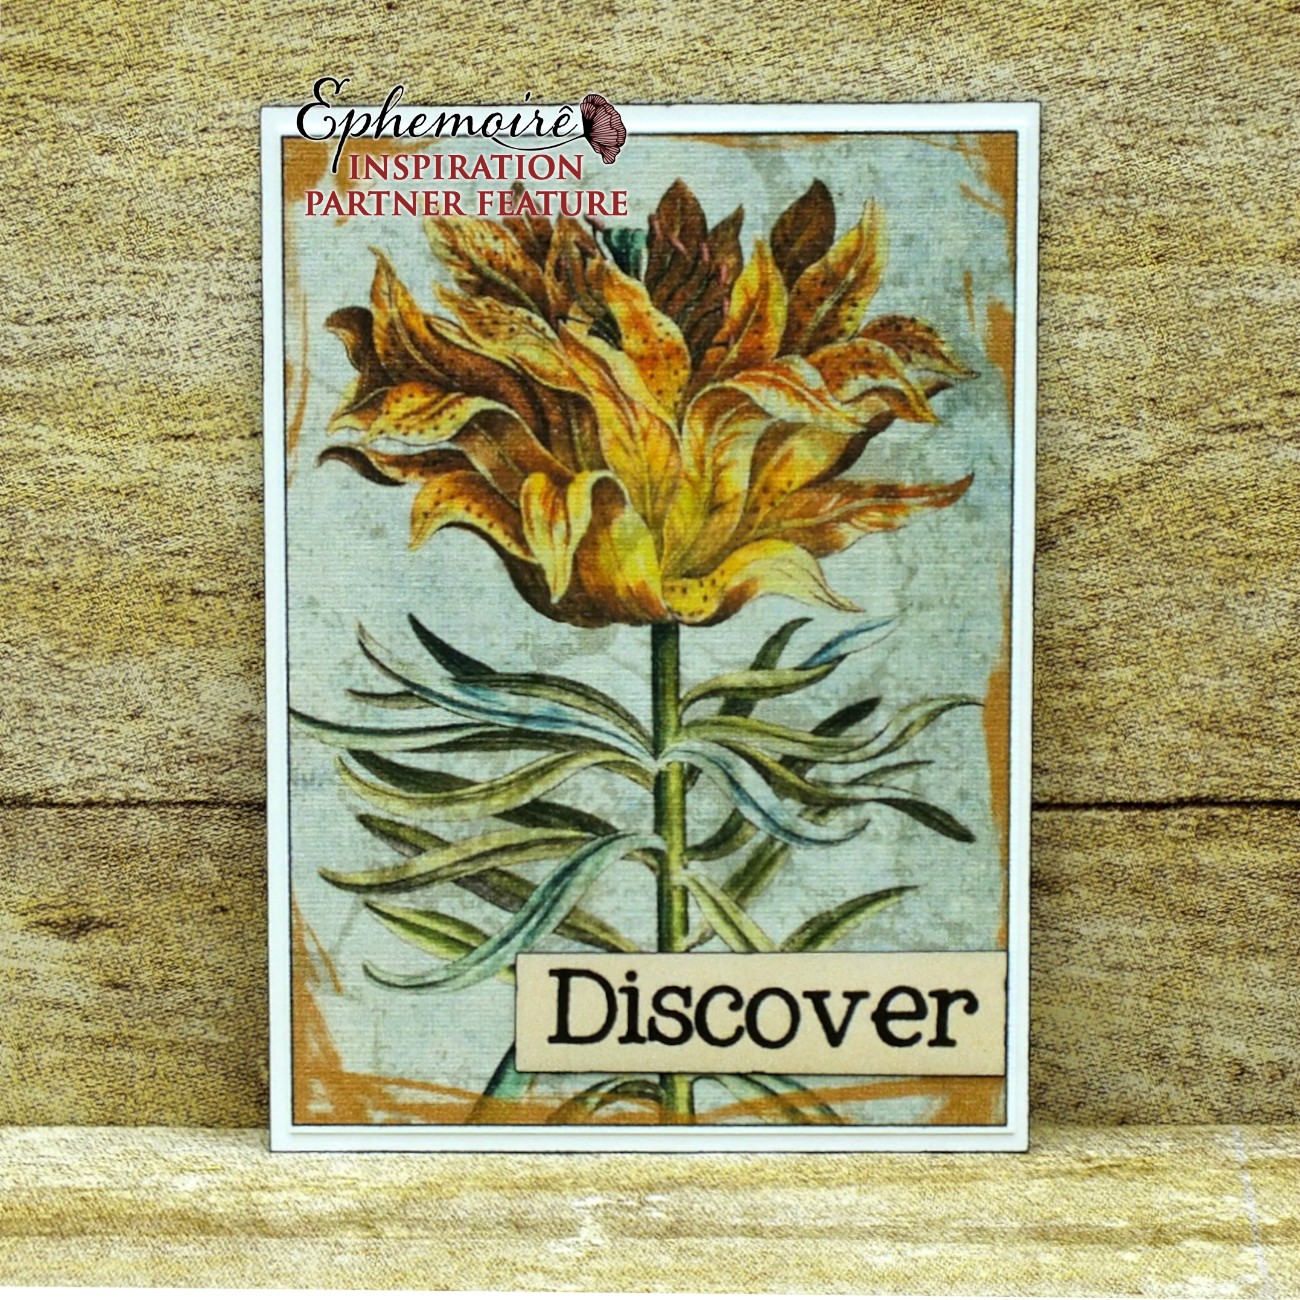
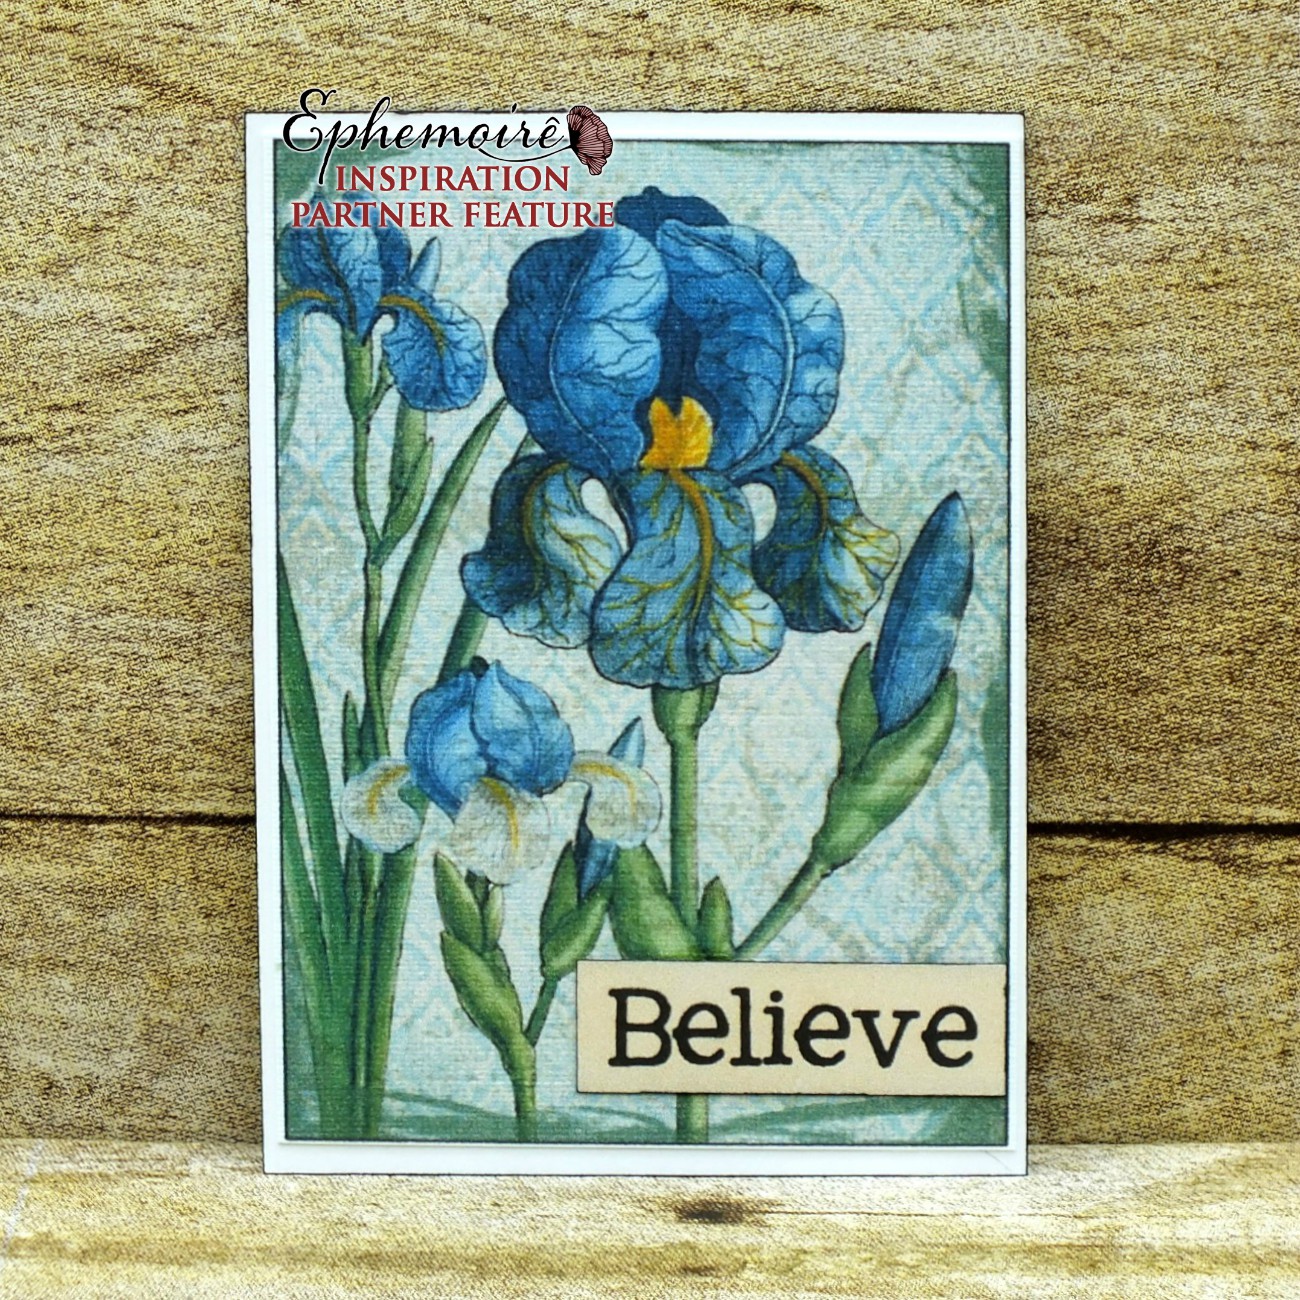
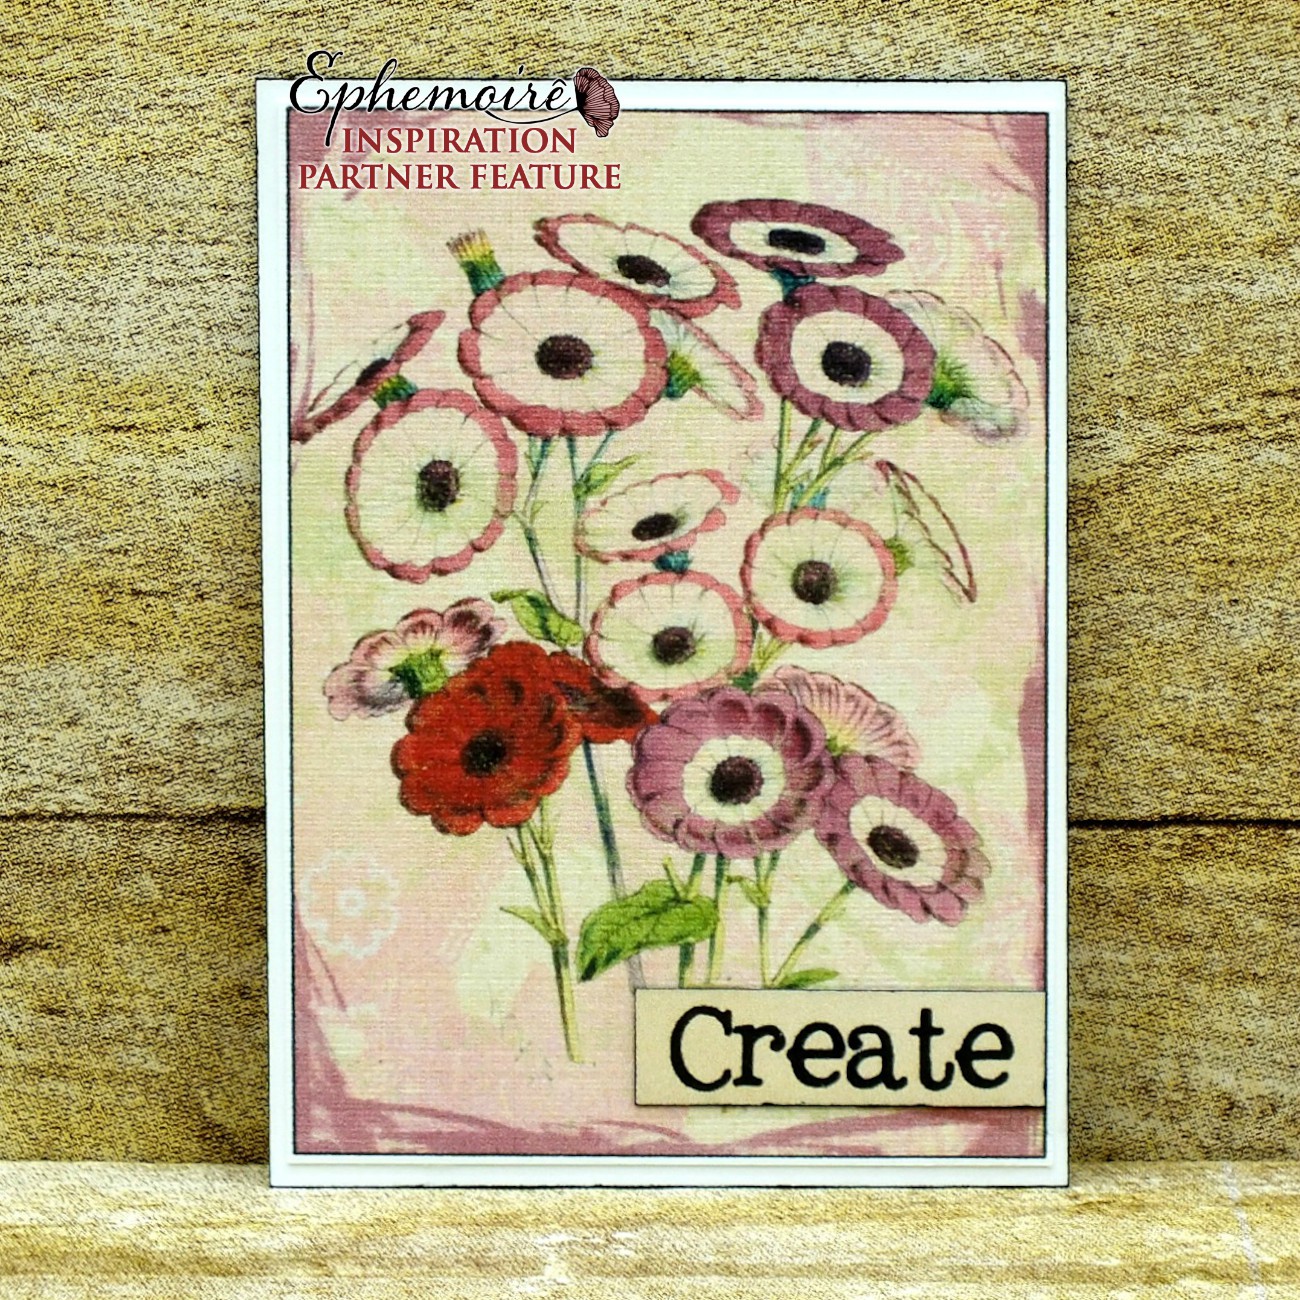
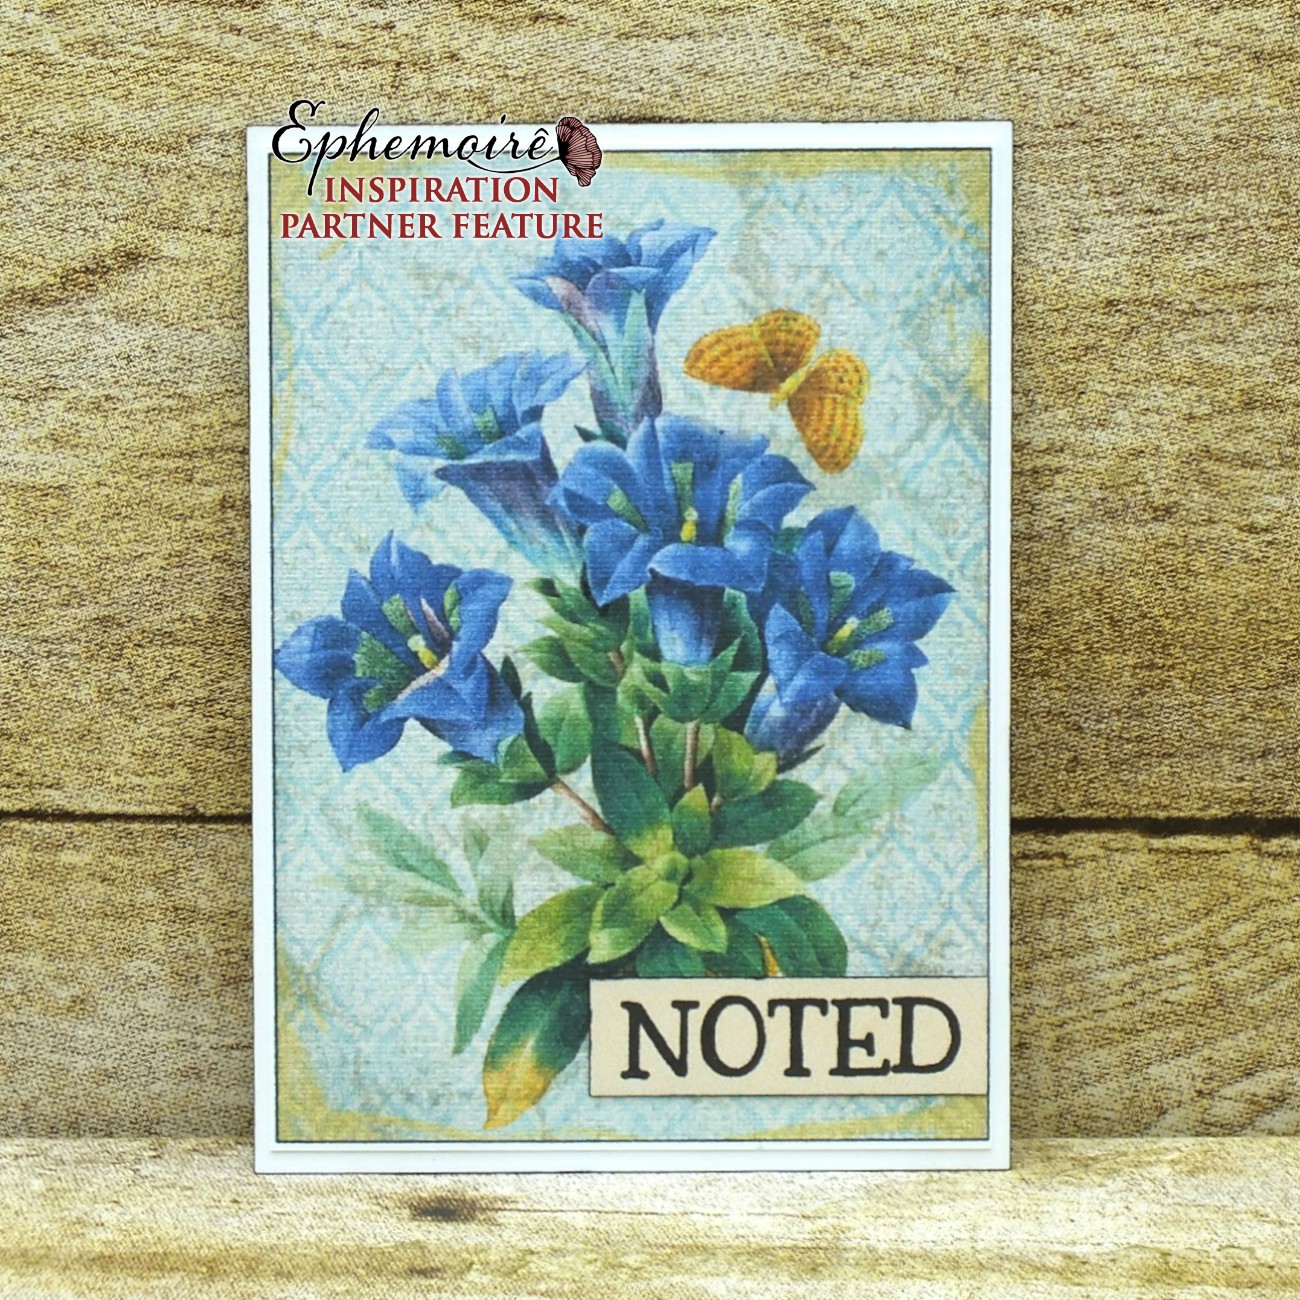
Howdy friends! I hope you’re having a Happy Friday! I’m super stoked to share my Ephemoire inspiration project with you this morning. If you haven’t already done so, be sure to head over to the Ephemoire Etsy Shop to check out all the amazing digital printables… there are collage sheets, digital papers, journal kits, clip art and mixed media printables, and the print quality is awesome! This is my last post for the Ephemoire Dream Team and I thank Traci and the rest of the crew for having me along for the past 13 months. I’ve thoroughly enjoyed myself and it has been such an honor to design with Traci’s gorgeous printables!
For the domes, I printed the 1″ circle collage sheet on 60# Hammermill copy paper and punched out each one with a 1″ circle punch. I adhered a 1″ plain white cardstock circle on the back of each 1″ floral circle and then added a clear epoxy dome over the top of each to create pretty floral embellishments.
For the buttons, I printed the 2″ circle collage sheet on Grafix shrink film and punched out each circle with a 1-3/4″ circle punch. I punched two holes in the center of each 2″ circle with my Big Bite to create the button holes and heated them with my heat tool to shrink them.
I printed the floral art cards on Classic Linen Solar White cardstock and then cut them apart leaving a tiny bit of a white edge. I cut the ATC bases from 110# Classic Crest Solar White cardstock and ran a black marker around the edge of each. I cut eight one-word sentiments that I wanted to use from the sentiment sheet and ran a black marker around the edge of each of those as well. I adhered a sentiment to each floral panel and then a floral panel to each ATC base. Here are shots of each card:
I’m totally loving how these embellishments and ATCs turned out! Can’t wait to use the domes and buttons on some projects, and the ATCs look absolutely amazing in my collector’s notebook! And you guessed it… I’m probably not going to trade any of these ATCs either, lol! ;)
I hope you’ve enjoyed today’s projects! Be sure to check out all the awesome printables at the Ephemoire Etsy Shop, and while you’re at it, head on over to the Ephemoire Facebook Page for tons of inspiration! Thanks so much for stopping by today – we’ll see you next time!
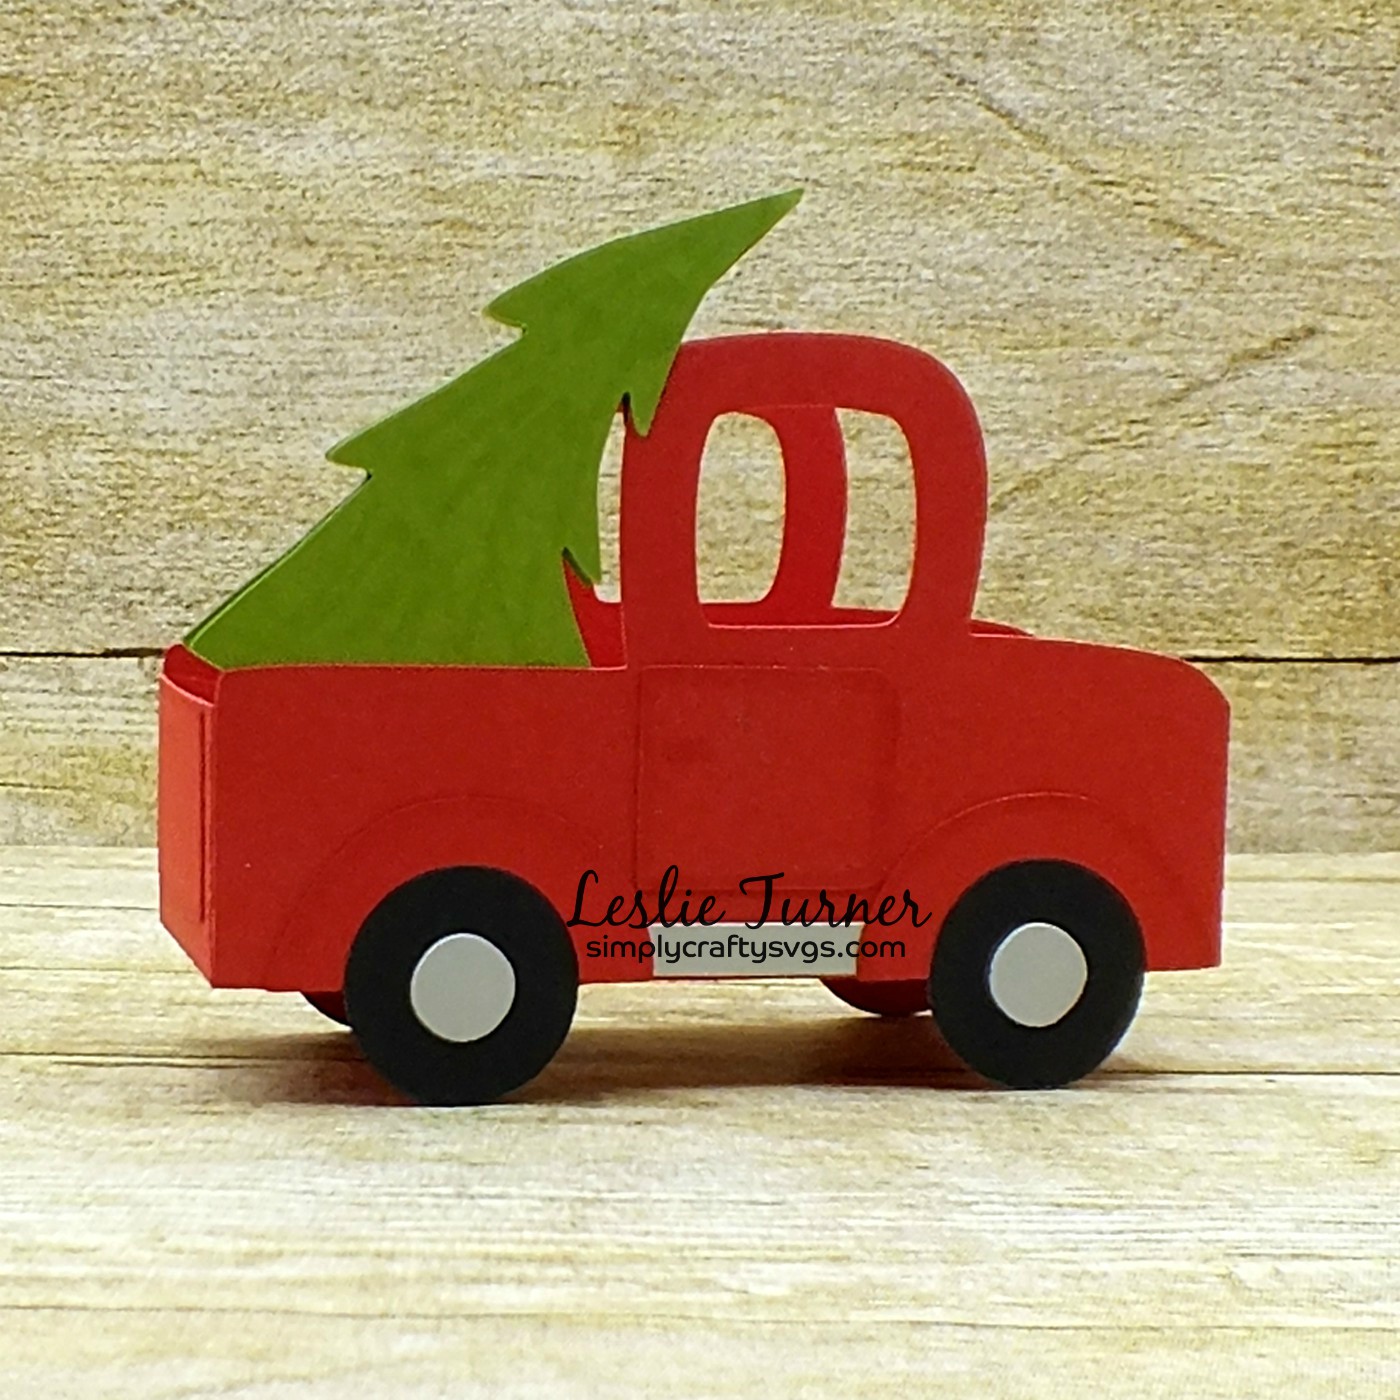
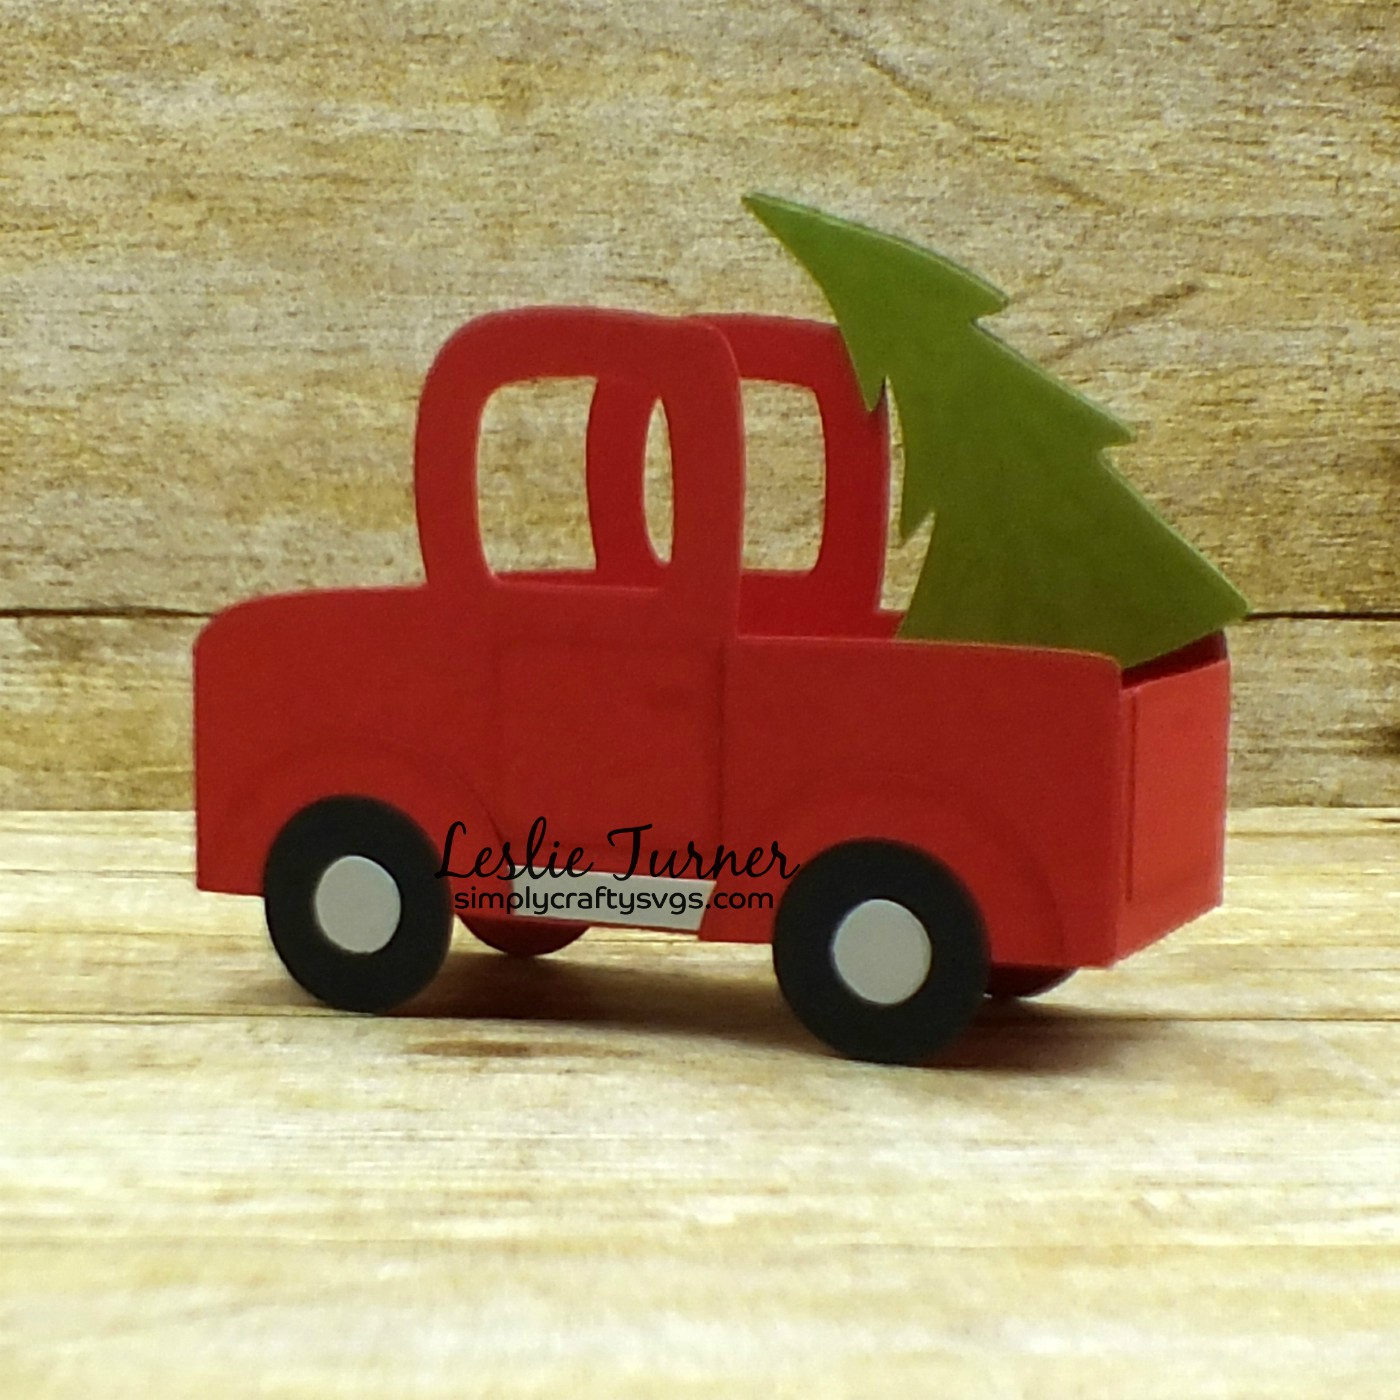
Hi everyone! Hope your week is off to a great start and you’re seeing some lovely Spring weather! Today is my post day on the Simply Crafty SVGs Blog and I’m excited to share my DT inspiration project with you, a sweet Christmas truck treat box created with the Simply Crafty SVGs Red Truck Treat Box cut file. Can you say adorable?! This is so stinkin’ cute, I can’t stand it! ;)
This is another one of Sandy’s amazing cut files with super simple construction. There’s not a long list of supplies, either… just a few colors of cardstock and some good glue! I use ScraPerfect Best Glue Ever on all my projects.
I drew some tree lines on both sides of the tree with a light gray Spectrum Noir alcohol marker. I LOVE how this turned out and can’t wait for Christmas! ;)
Products used: Cardstock/Paper: American Crafts black, leaf, crimson and white cardstock; Marco’s Metallic Silver cardstock Ink: Spectrum Noir- IG3 Dies/Punches: Simply Crafty SVGs Red Truck Treat Box cut file Accessories: ScraPerfect Best Glue Ever
I hope you’ve enjoyed today’s project! Be sure to check out all the fun cut files in the Simply Crafty SVGs store – you’ll have so much fun! And there are tons of freebies to get started! Thanks so much for stopping by today – we’ll see you next time! ;)
Hi everyone! Happy Saturday and a big giant WELCOME to the CutCardStock blog‘s DIY Wedding Blog Hop going on today and tomorrow – May 9th and 10th! Affiliate links are used in this post at no cost to you. I really appreciate your support!
Come hop with us! There is a $40 CutCardStock gift card up for grabs! Whaaaat?! The winner will be randomly selected via number generator and announced on Monday, May 11th on the CutCardstock Blog and Facebook page. To be eligible for the $40 gift card, you must comment at each stop along the hop (good for one entry into the giveaway) or upload a wedding-themed project (good for two entries into the giveaway). We would absolutely LOVE IT if you link up a project with us! ;)
= = = = = = = = = = = = = = = =
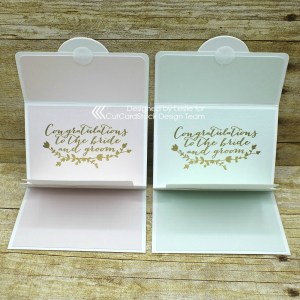
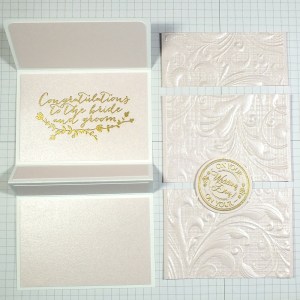
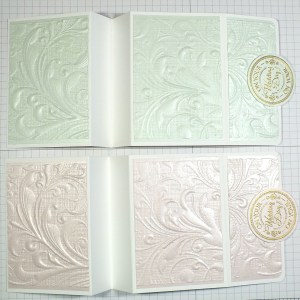
Now, let me side-track you for a moment or three to share two gorgeous embossed metallic gift card holders I created featuring Classic Crest Solar White 80# cardstock, Curious Metallic Pale Aloe cardstock and Curious Metallic Pink Quartz cardstock! This is a super simple gift card holder design that can be made for literally ANY occasion… glam it up, as I’ve done, for a special occasion or party it up in fun colors and patterned papers for a birthday – and anything in between! I have had these handwritten instructions in my tutorial arsenal for many years and I believe credit should be given to Gina K with StampTV.
I did some dry embossing with a gorgeous embossing folder on the outside panels, heat embossed the inside sentiment in gold and heat embossed the circle closure element in gold. These Curious Metallics do a FINE job of dry and heat embossing!
Here is a quick tutorial showing you my process for making these gift card holders. Cut 80# Classic Crest base at 4-1/4″ x 10″ and score at 3″, 4″ 5″ and 8″ on the long edge. Round the corners on the 2″ section (this is the front flap), then fold as shown.
Cut Curious Metallic panels for the inside – two at 2-3/4″ x 4″, two at 3/4″ x 4″ and one at 1-3/4″ x 4″ – and adhere to base.
Cut Curious Metallic panels for the outside – two at 2-3/4″ x 4″ and one at 1-3/4″ x 4″ – and dry emboss. Heat emboss the inside sentiment and then heat emboss the round element in gold and punch with a circle punch.
Adhere the embossed panels to the outside, adhere the circle element to the flap and apply a velcro circle for the closure. Apply a strong adhesive to the outside edge and sides of the narrow center section and pinch them together to bond. Don’t apply any adhesive to the center-most fold.
Flip the gift card holder over and trim 1/16″ off the center-most fold and then your gift card will slip into the opening. :)
Other products used: Stamps: Stampin’ Up For the New Two stamp set, Lil of the Valley For You Circular Sentiments stamp set Ink: Versamark Dies/Punches: Stampin’ Up 1-3/4″ circle punch Accessories: ScraPerfect Best Glue Ever, Crafter’s Companion Regency Swirls embossing folder, Gemini Junior die cutting machine, Kadomaru Pro corner rounder, Ranger Super Fine Detail Gold embossing powder, Milwaukee heat tool, ScraPerfect Perfect Crafting Pouch, 5/8″ Velcro circle
= = = = = = = = = = = = = = = =
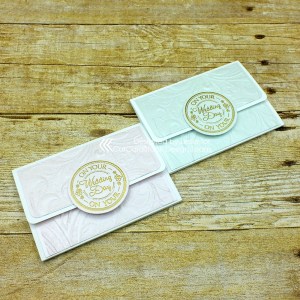
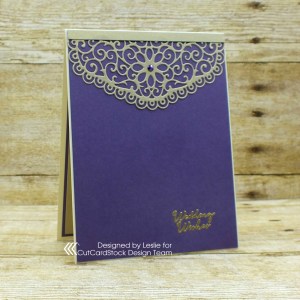
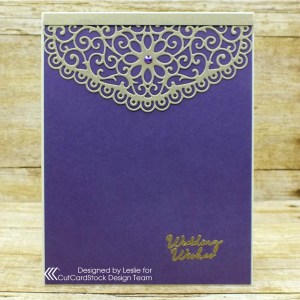
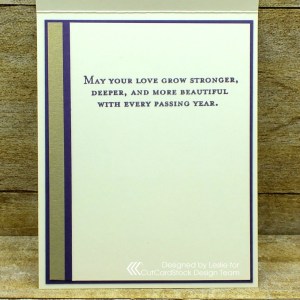
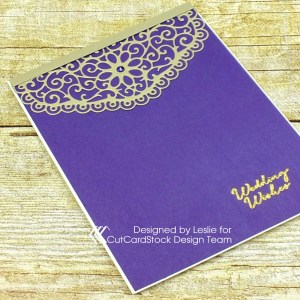
And I have one more quick ‘bonus’ project to share using the Classic Crest Baronial Ivory 80# cardstock paired with the amazing Curious Metallic Gold Leaf cardstock and Curious Metallic Violette cardstock which I absolutely LOVE together! The Curious Metallics are so awesome to work with and this color combo makes such an elegant wedding card! And this card is super simple – adhere a Gold Leaf cardstock die cut to the top of a Violette cardstock panel and embellish with a single iridescent gemstone for a little bling, and heat emboss a wedding sentiment in the lower right corner of the panel. Then embellish the inside panel with strips of leftover cardstock used on the front and stamp a wedding sentiment. And *poof* you have a gorgeous wedding card!
You should have arrived here from Janet Axtman‘s blog. I’m actually your final stop on the hop but the linky tool is at the end of the post on the CutCardstock Blog so that’s where you’ll want to head to link up your wedding-themed project, good for two entries into the giveaway! ;)
I hope you are enjoying the hop and seeing all the DIY Wedding projects! If you get lost along the way or if you landed here in the middle of the hop somehow and want to join in the fun, be sure to head on over to the CutCardstock Blog to read all the details and start from the beginning!
In closing, I hope you’ve enjoyed seeing my metallic gift card holders (and bonus wedding card) and you’re inspired to get crafty AND hop with us AND link up a wedding-themed project! Be sure to check out all the awesome cardstock and other goodies at CutCardStock (adhesives, labels, stickers, pens, watercolors and ribbon to name a few). And head on over to the CutCardStock Facebook Page for lots of crafty inspiration! Thanks so much for stopping by today – we’ll see you next time!
5/31/20 Best Technique Winner at Classic Design Challenge Blog
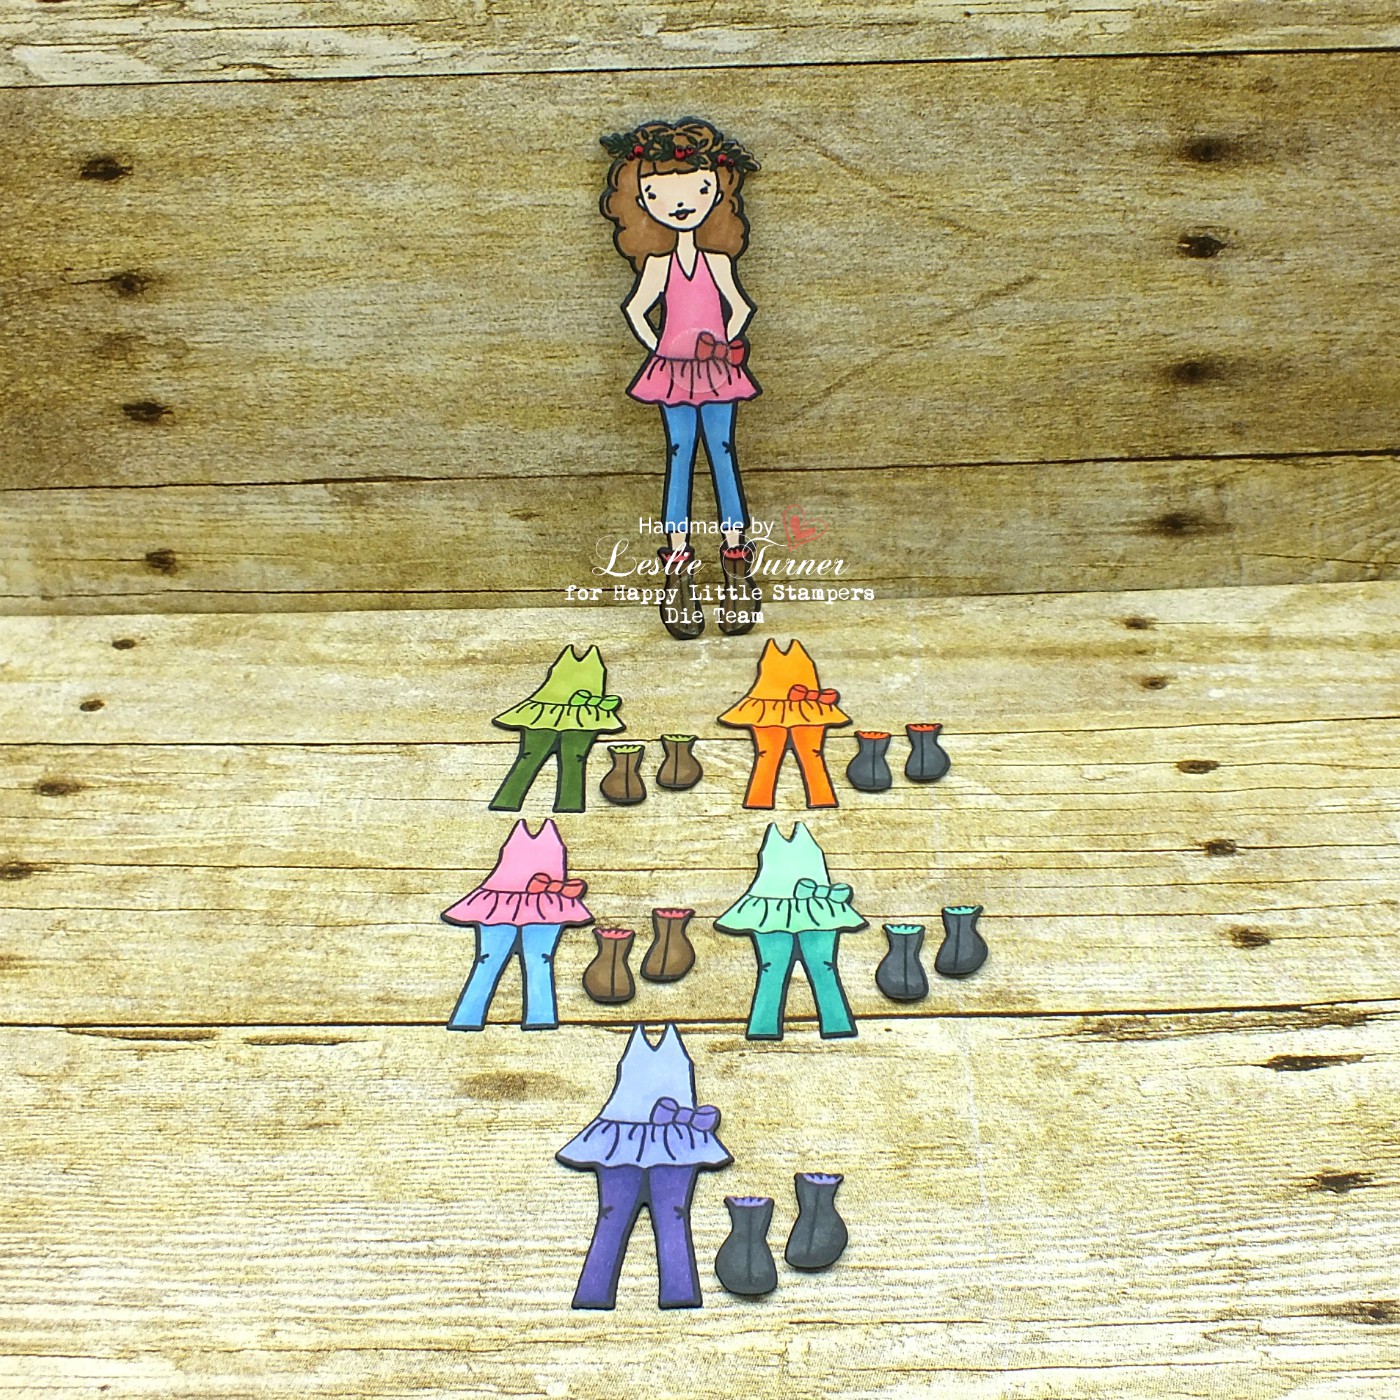
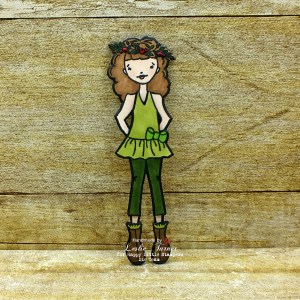
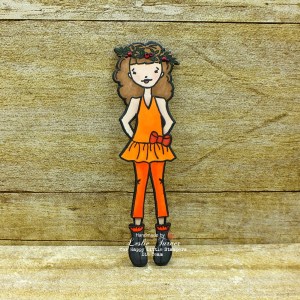
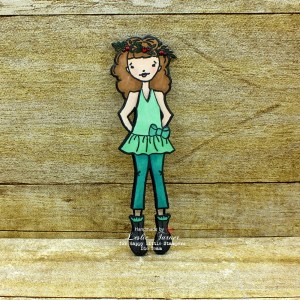
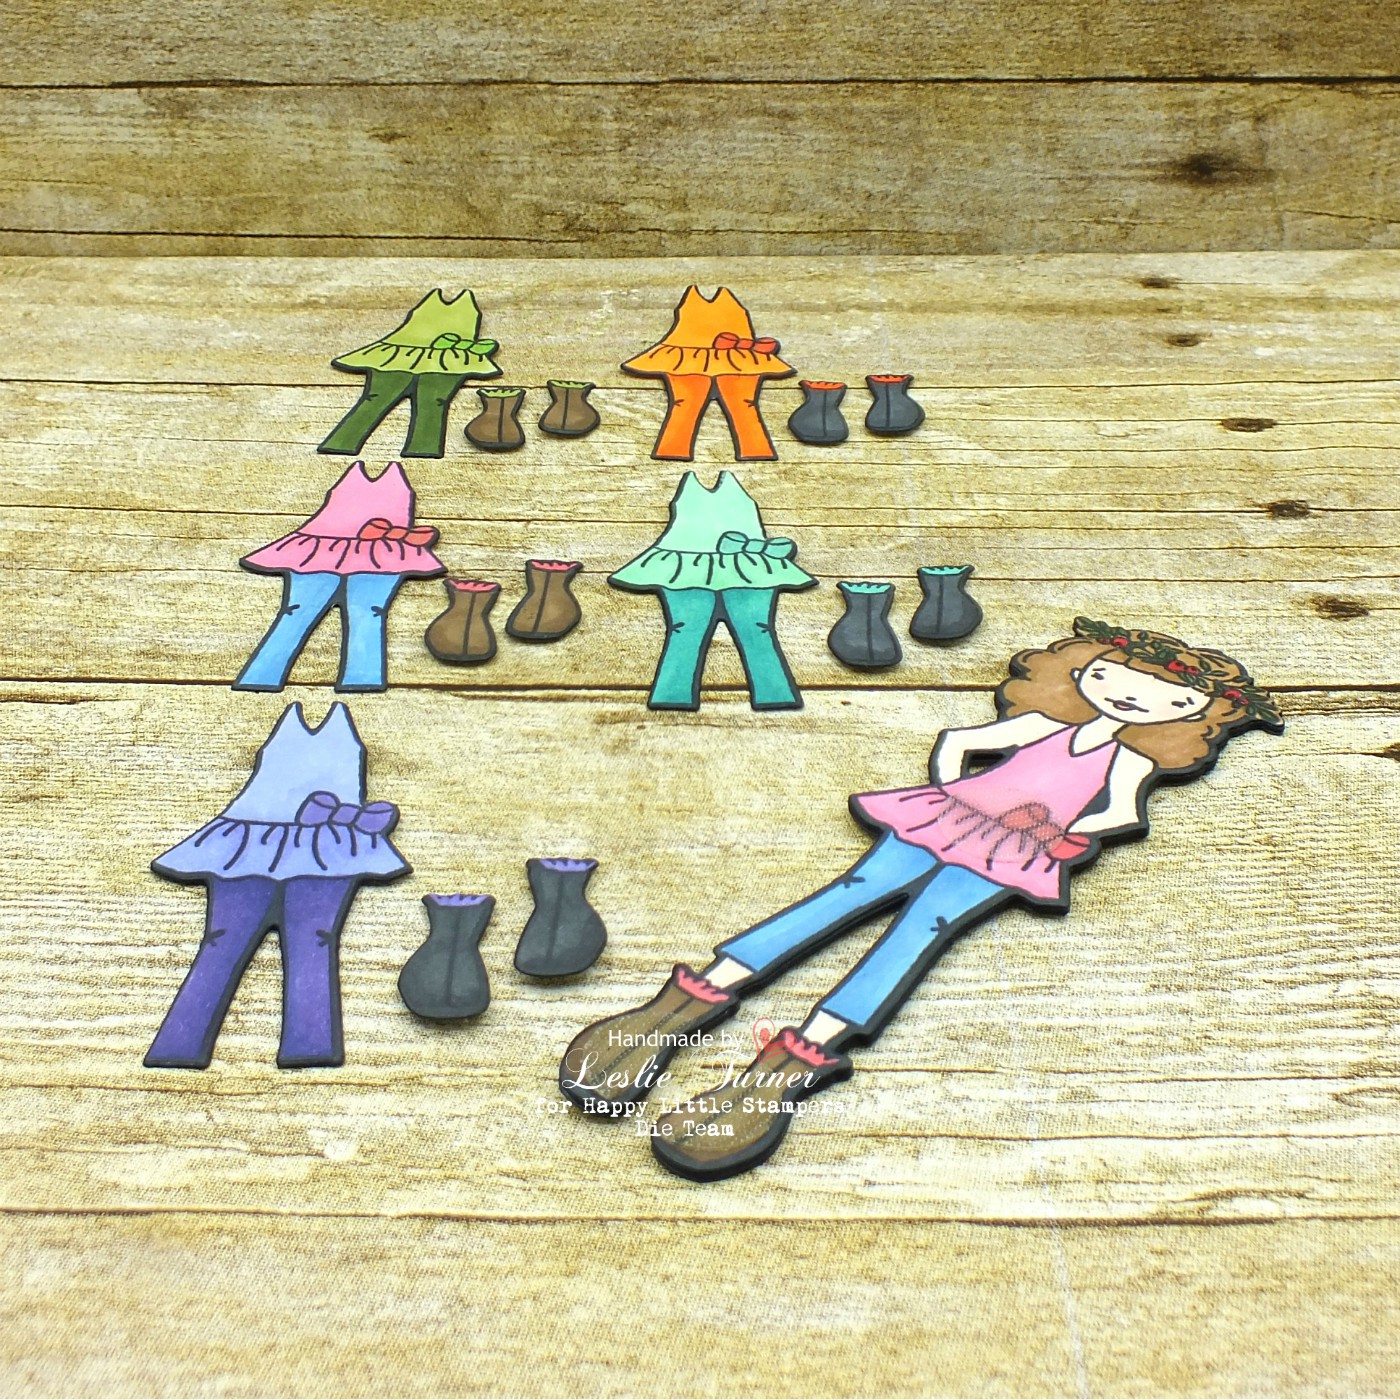
Hello, my crafty friends! Hope you’ve had a good week! This month’s Anything Goes with Dies Challenge is live over at Happy Little Stampers and I’m thrilled to share my DT inspiration project with you today! Several weeks ago I shared a childhood memory of my sisters and I frequently playing paper dolls, and showcased my Marisol Paper Doll Set that you can see HERE if you missed it. I have another paper doll set to share with you today created with Julie Nutting stamps and dies!
This super cute teenager is Violet, and she comes with five outfits complete with shoes, all colored with alcohol markers!
This set was also created for our middle granddaughter. Each outfit and pair of shoes attaches to the doll with Velcro circles. So let’s do another fashion show, this time with Violet, and here are pics of her in each outfit!
And here’s one more look… I also created Violet with several layers to withstand my granddaughter’s play! I thoroughly enjoyed creating these paper doll sets – it sure took me back a few years! When we were young, we would purchase one punch-out paper doll at the local five & dime store that came with a couple outfits. Then we’d spend hours upon hours tracing, cutting out and coloring new outfits with crayons! Great memories! ;)
Products used: Cardstock/Paper: GKD Ivory cardstock Stamps: Julie Nutting Violet rubber stamp set Ink: Memento Tuxedo Black ink (pad and marker); Studio 71 alcohol markers- BG3, BG10, BG15, BG16, V5, V13, V14, YR4, YR15, B4, B17, E6, E10, E15, E17, N8, R2, R3, R4, R6, R12; Sakura Clear Star Gelly Roll pen Dies/Punches: Julie Nutting Violet die set Accessories: MISTI stamp tool, Velcro circles
I hope you’ve enjoyed today’s project and will link an anything goes project with us this month using dies! We’d love to see what you create! Thanks so much for stopping by today – we’ll see you next time! ;)
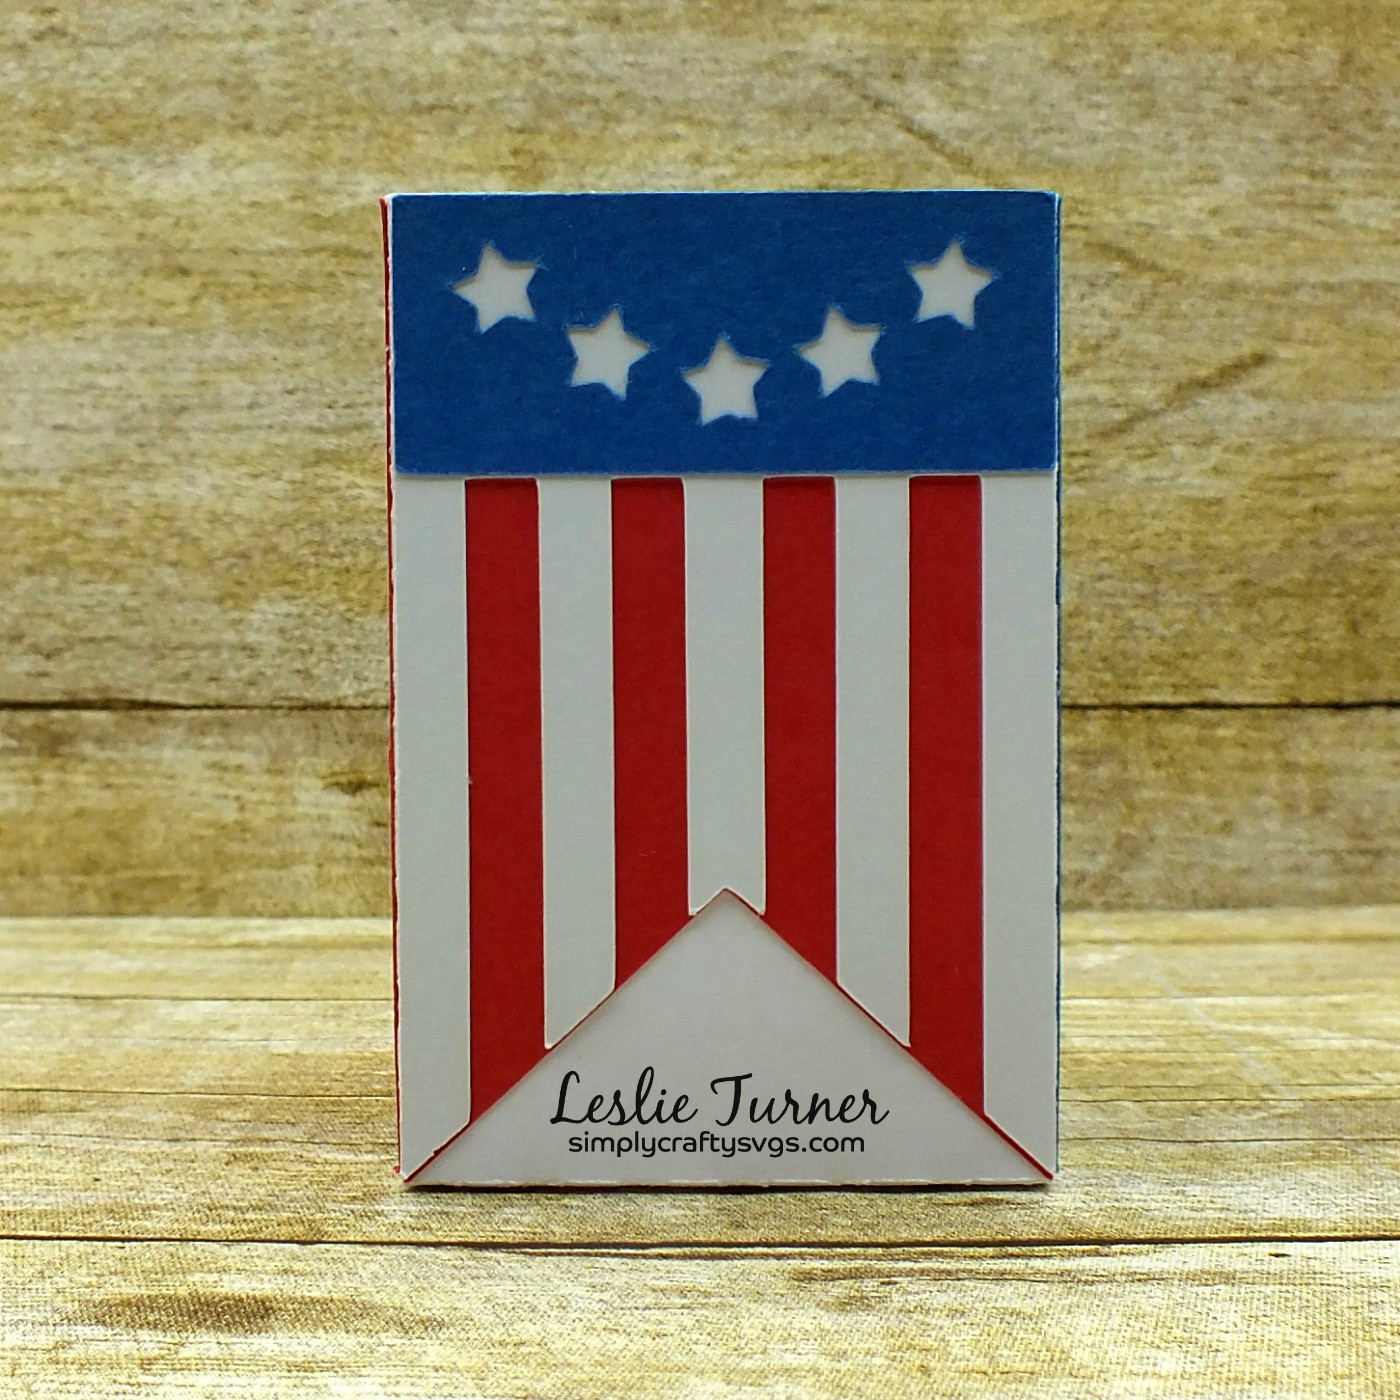
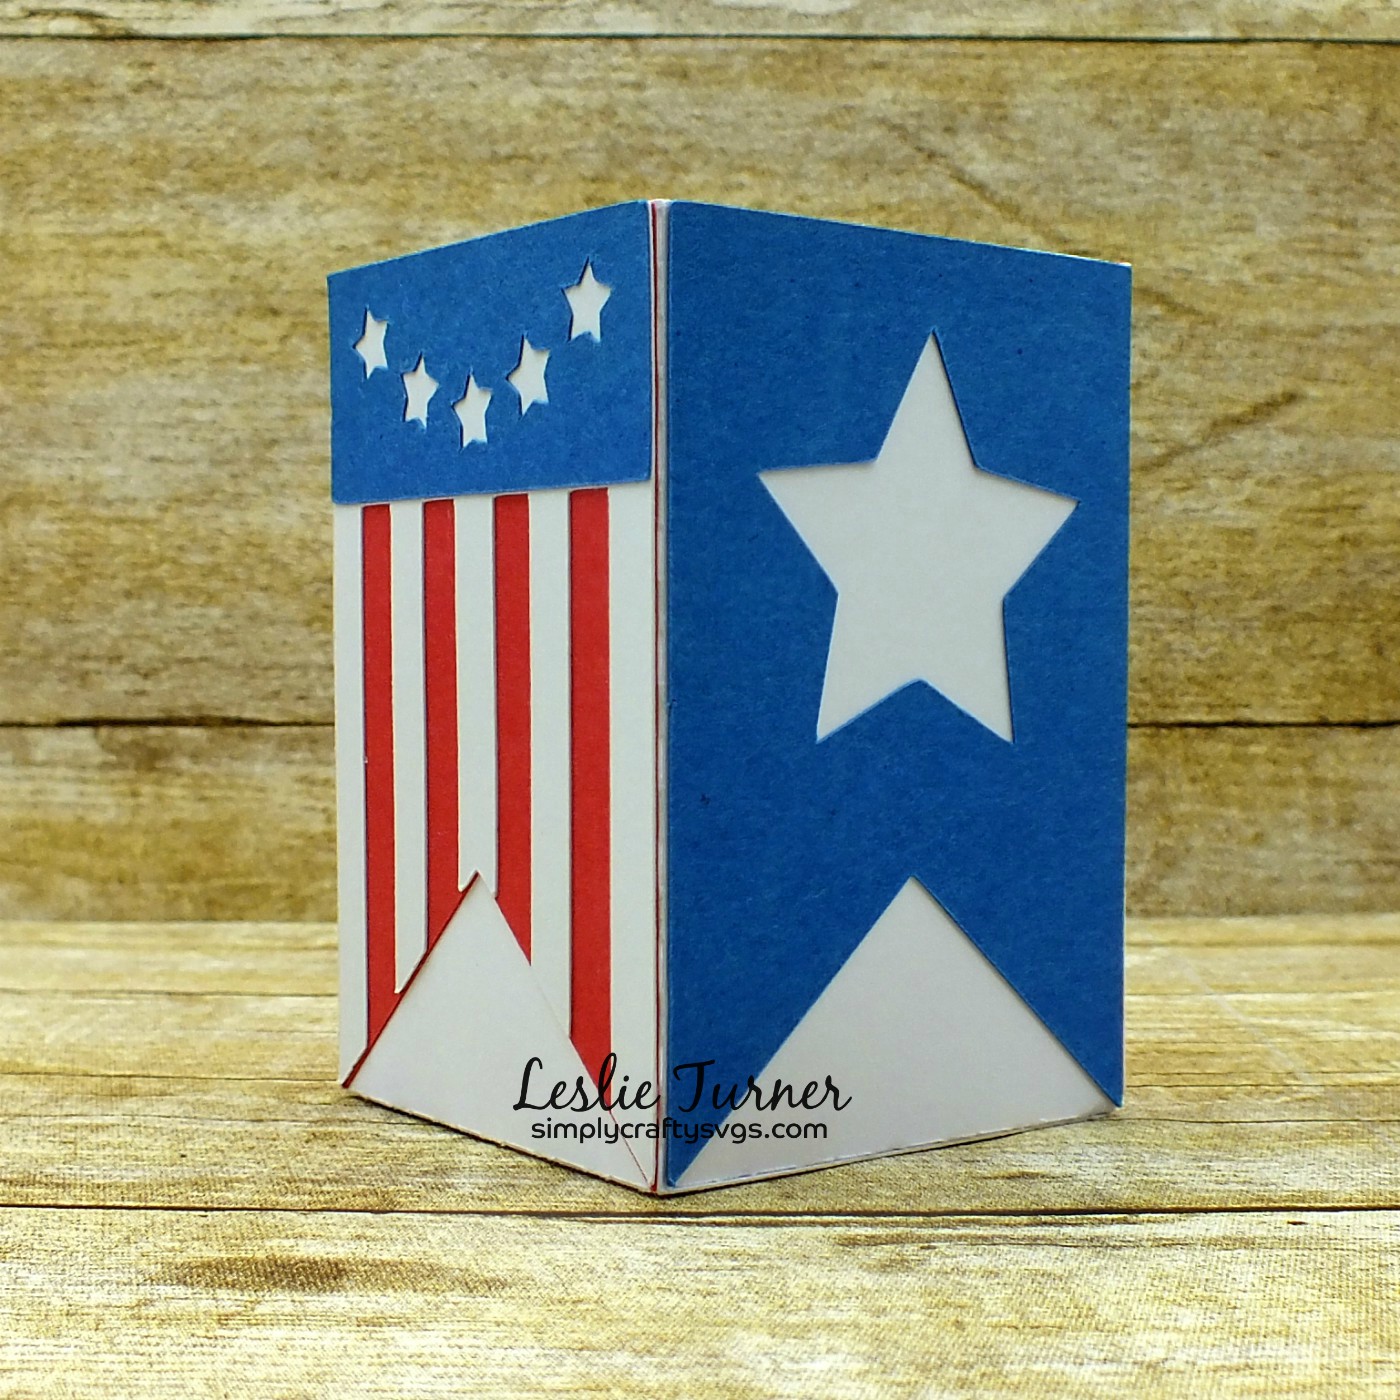
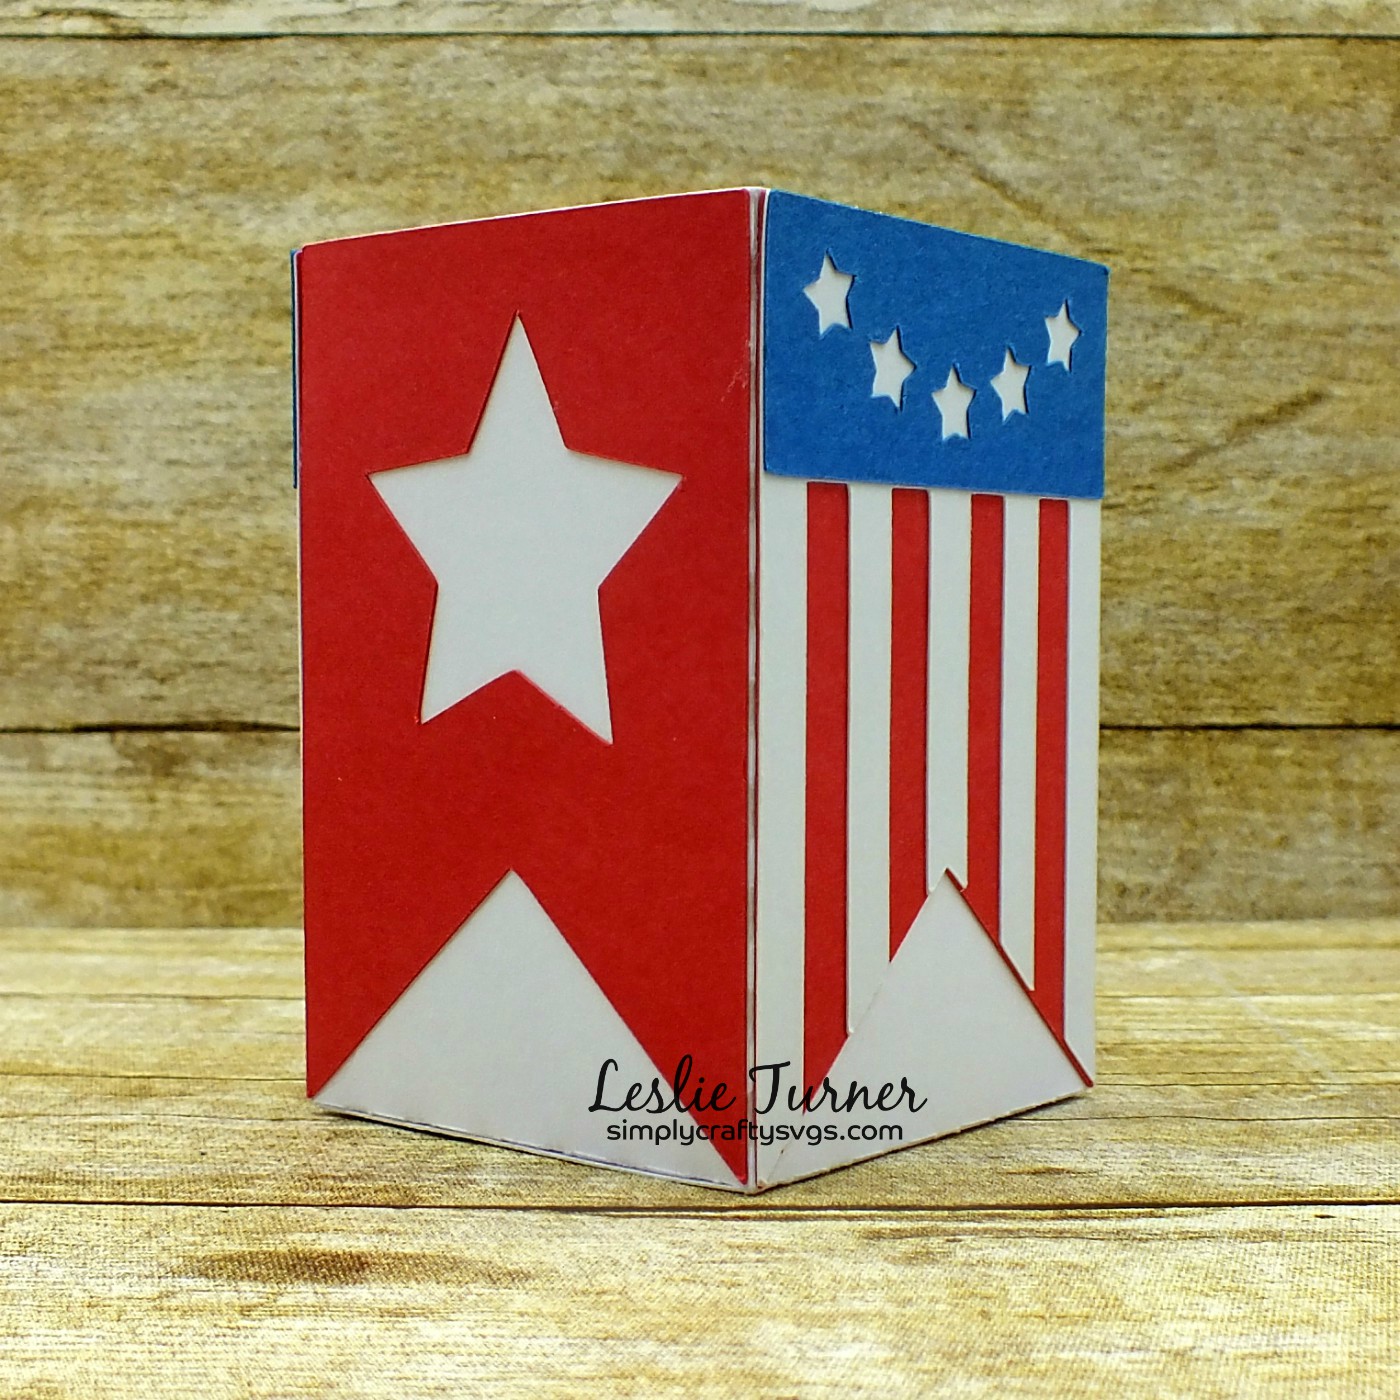
Hi friends! I hope you’re having a great week! I’m not posting on the Simply Crafty SVGs Blog today but have popped in this morning to share an extra DT inspiration project with you, an adorable patriotic treat box I created for the July 4th holiday using the free Simply Crafty SVGs USA Banner Box cut file. I love all things patriotic and this really fits the bill!
This was one of the easiest and quickest cut files I’ve ever worked with and packs a seriously big punch. It only takes red, white and blue cardstock, a little bit of die cutting, and *poof* you have a very cool box!
My plan is to create a small red, white and blue floral arrangement for this box, and will update this post with a photo or two when that happens. ;)
Products used:
Cardstock/Paper: American Crafts white cardstock, Colorbok red and blue cardstock
Dies/Punches: Simply Crafty SVGs USA Banner Box cut file
I hope you’ve enjoyed today’s project! Be sure to check out all the fun cut files in the Simply Crafty SVGs store – you’ll have so much fun! And there are tons of freebies to get started! Thanks so much for stopping by today – we’ll see you next time! ;)
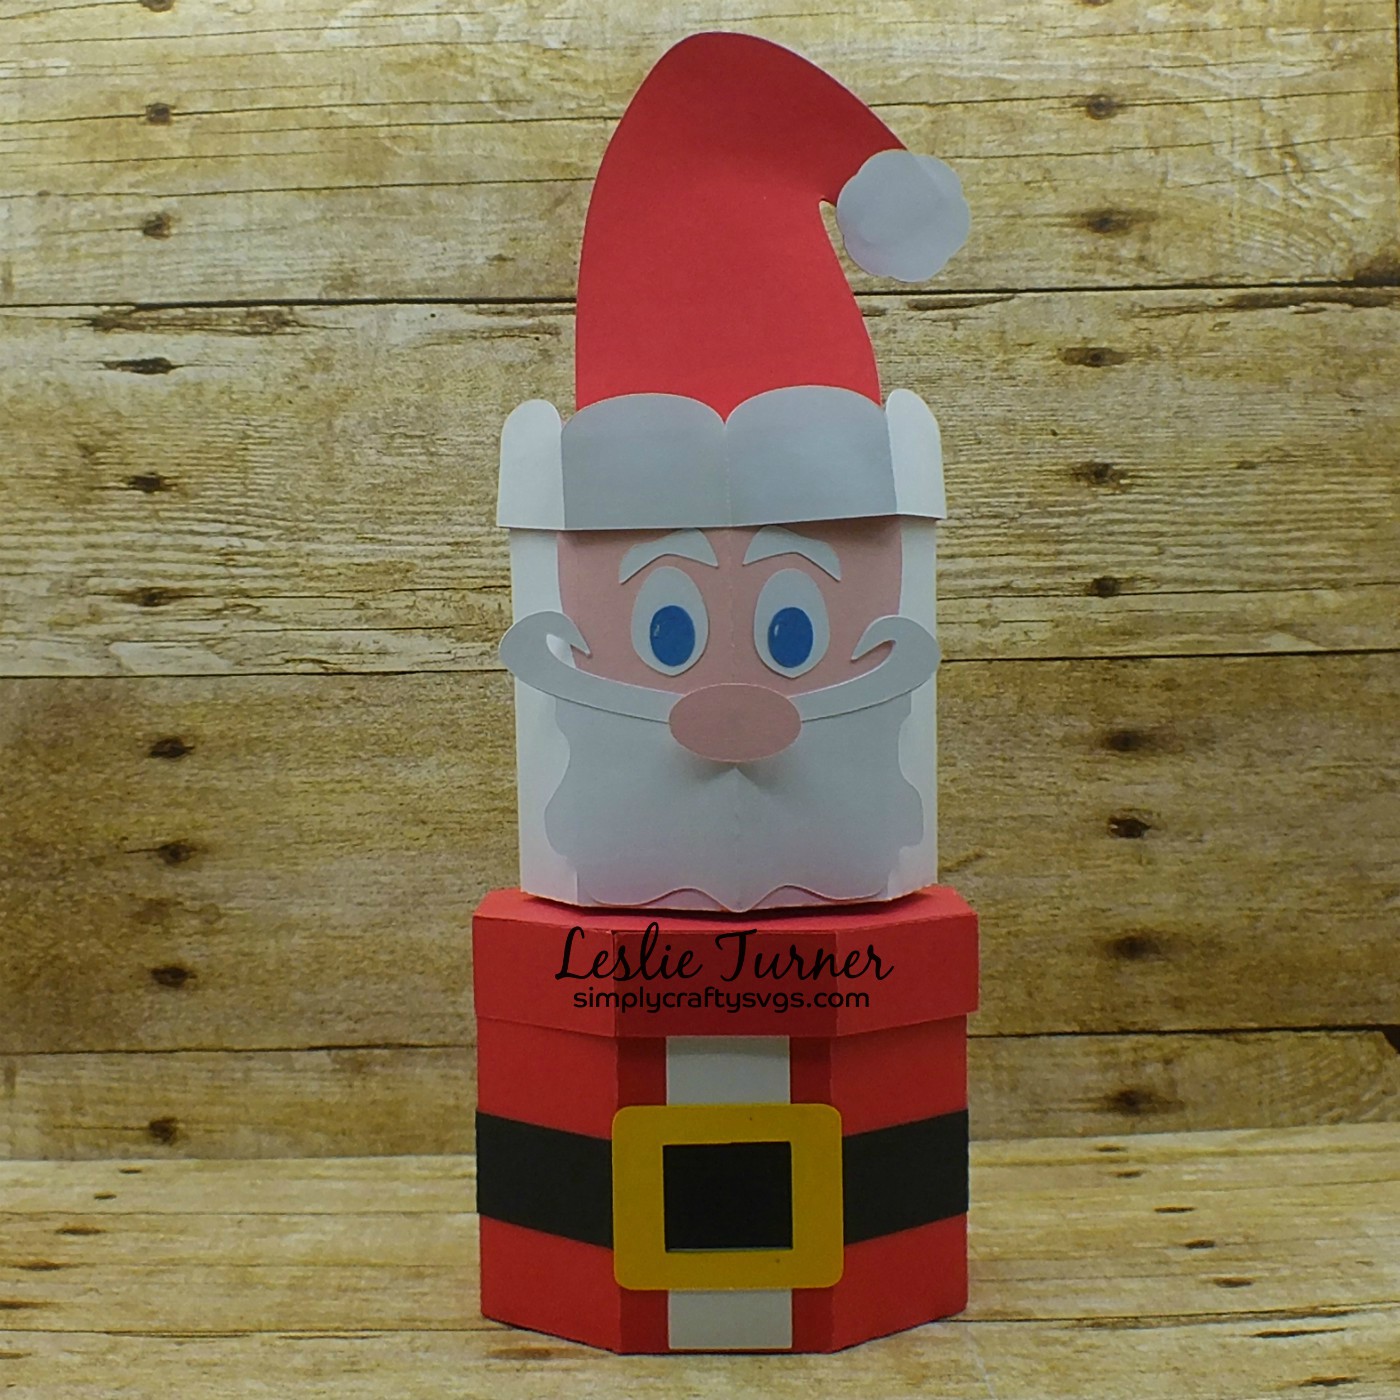
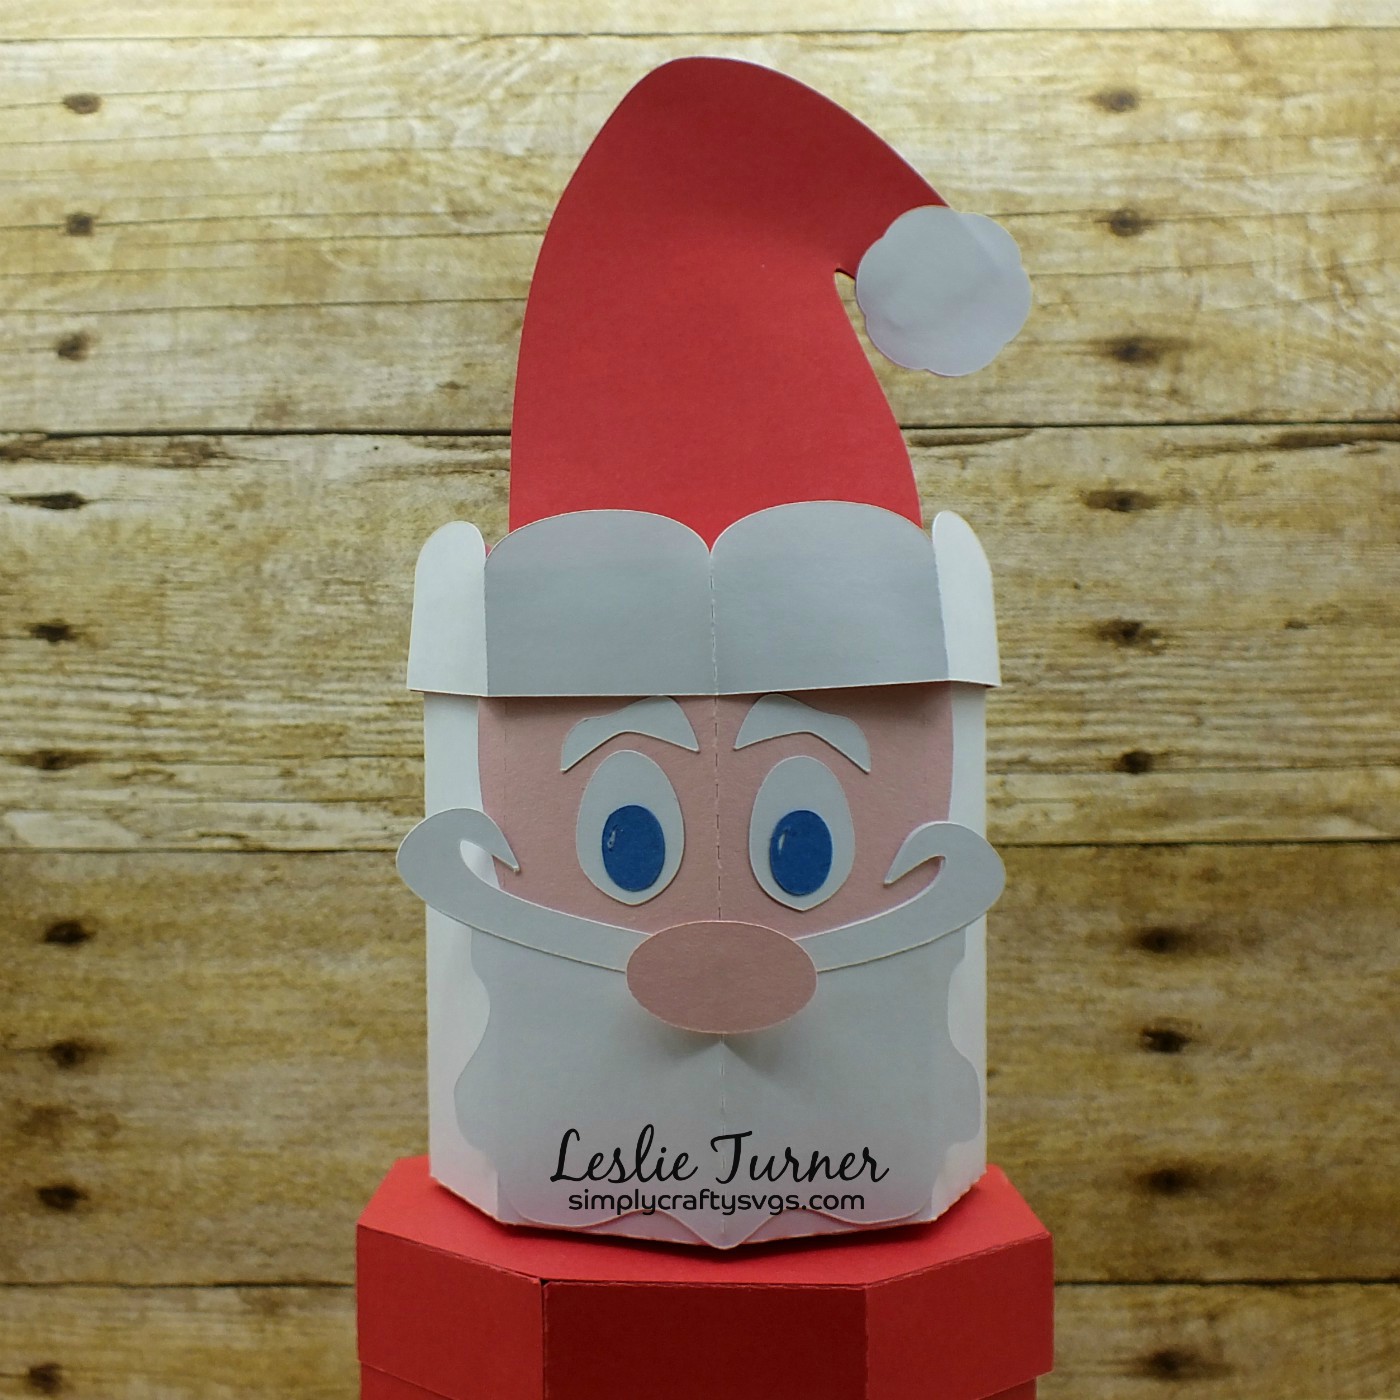
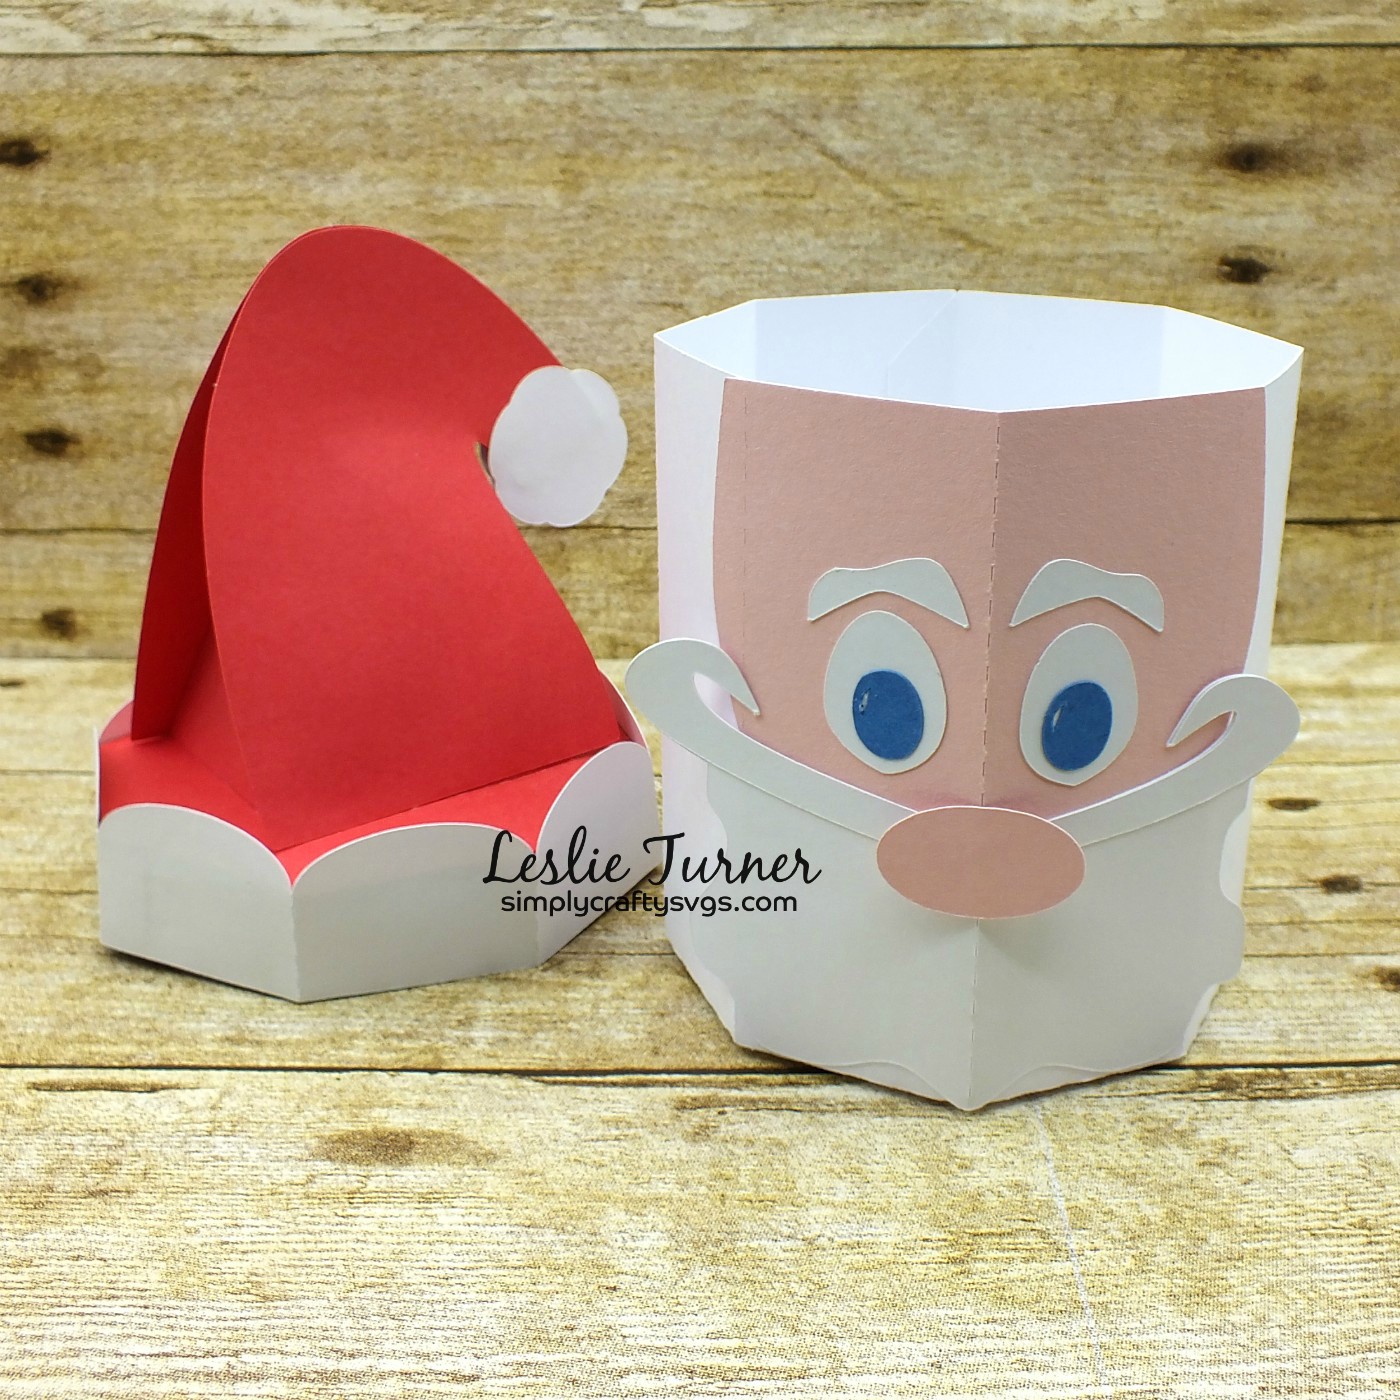
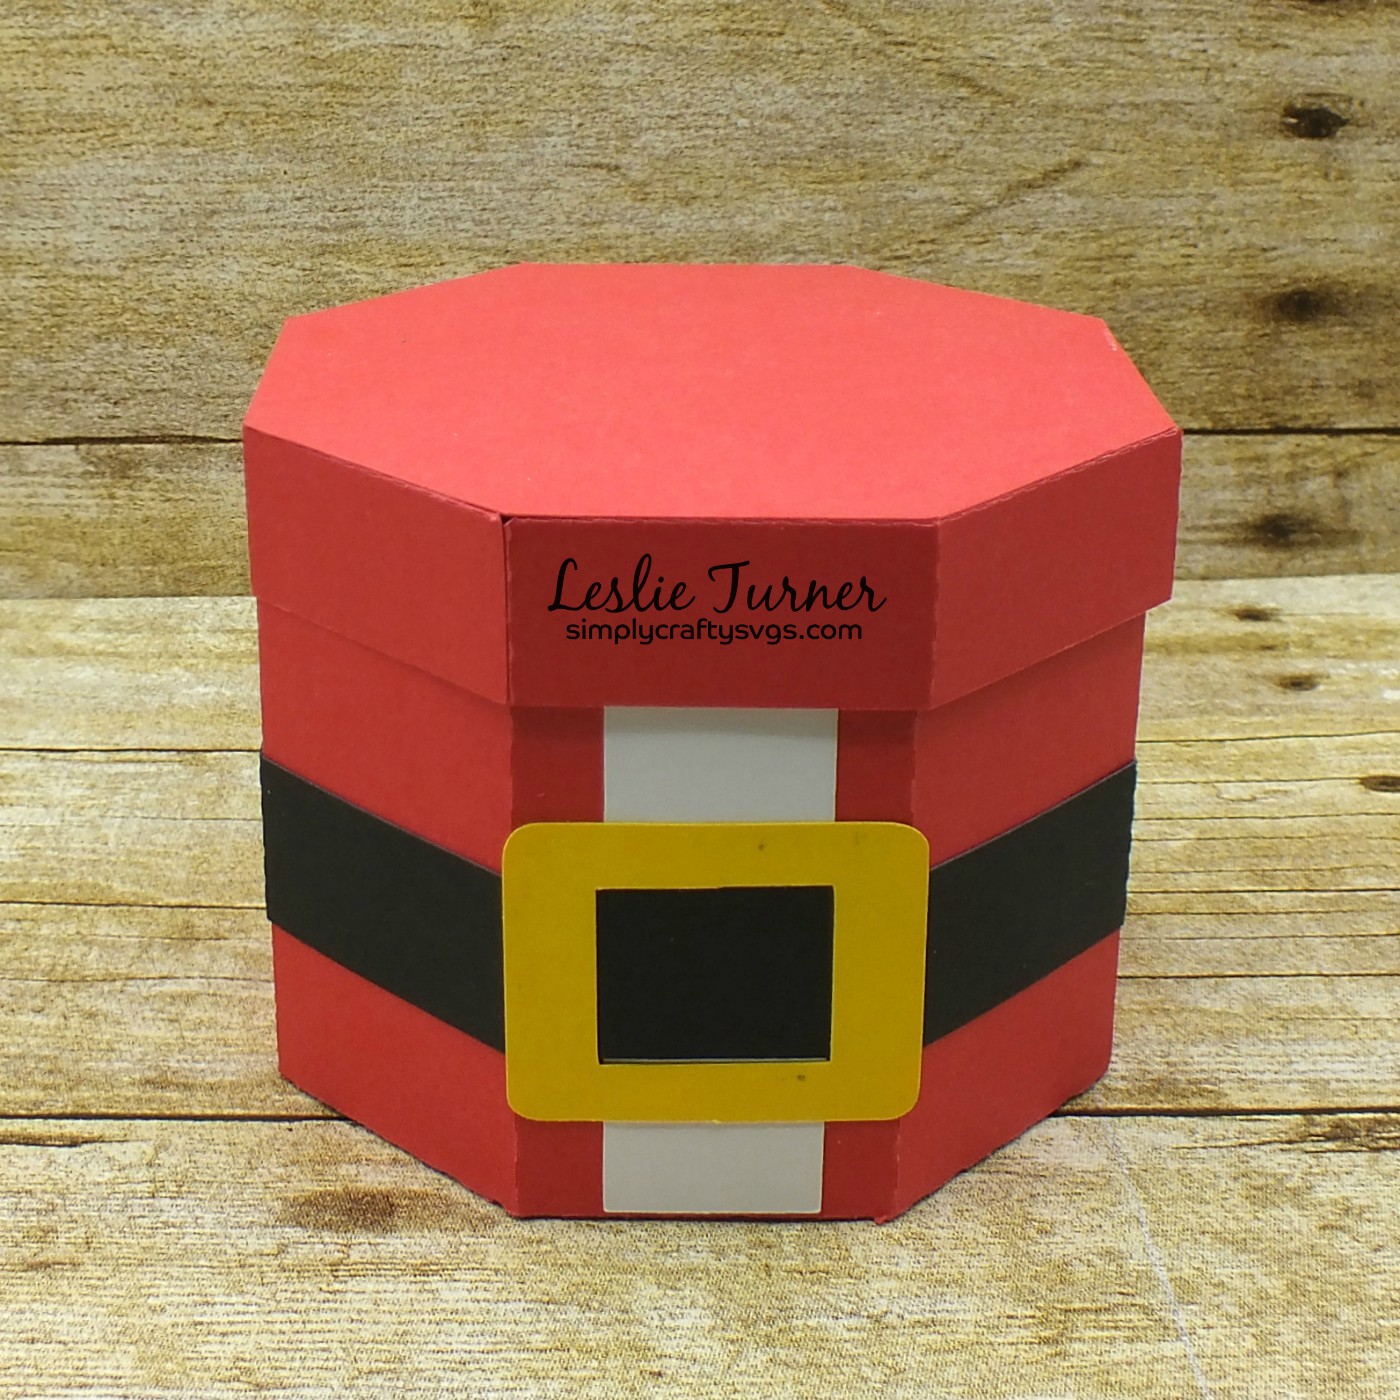
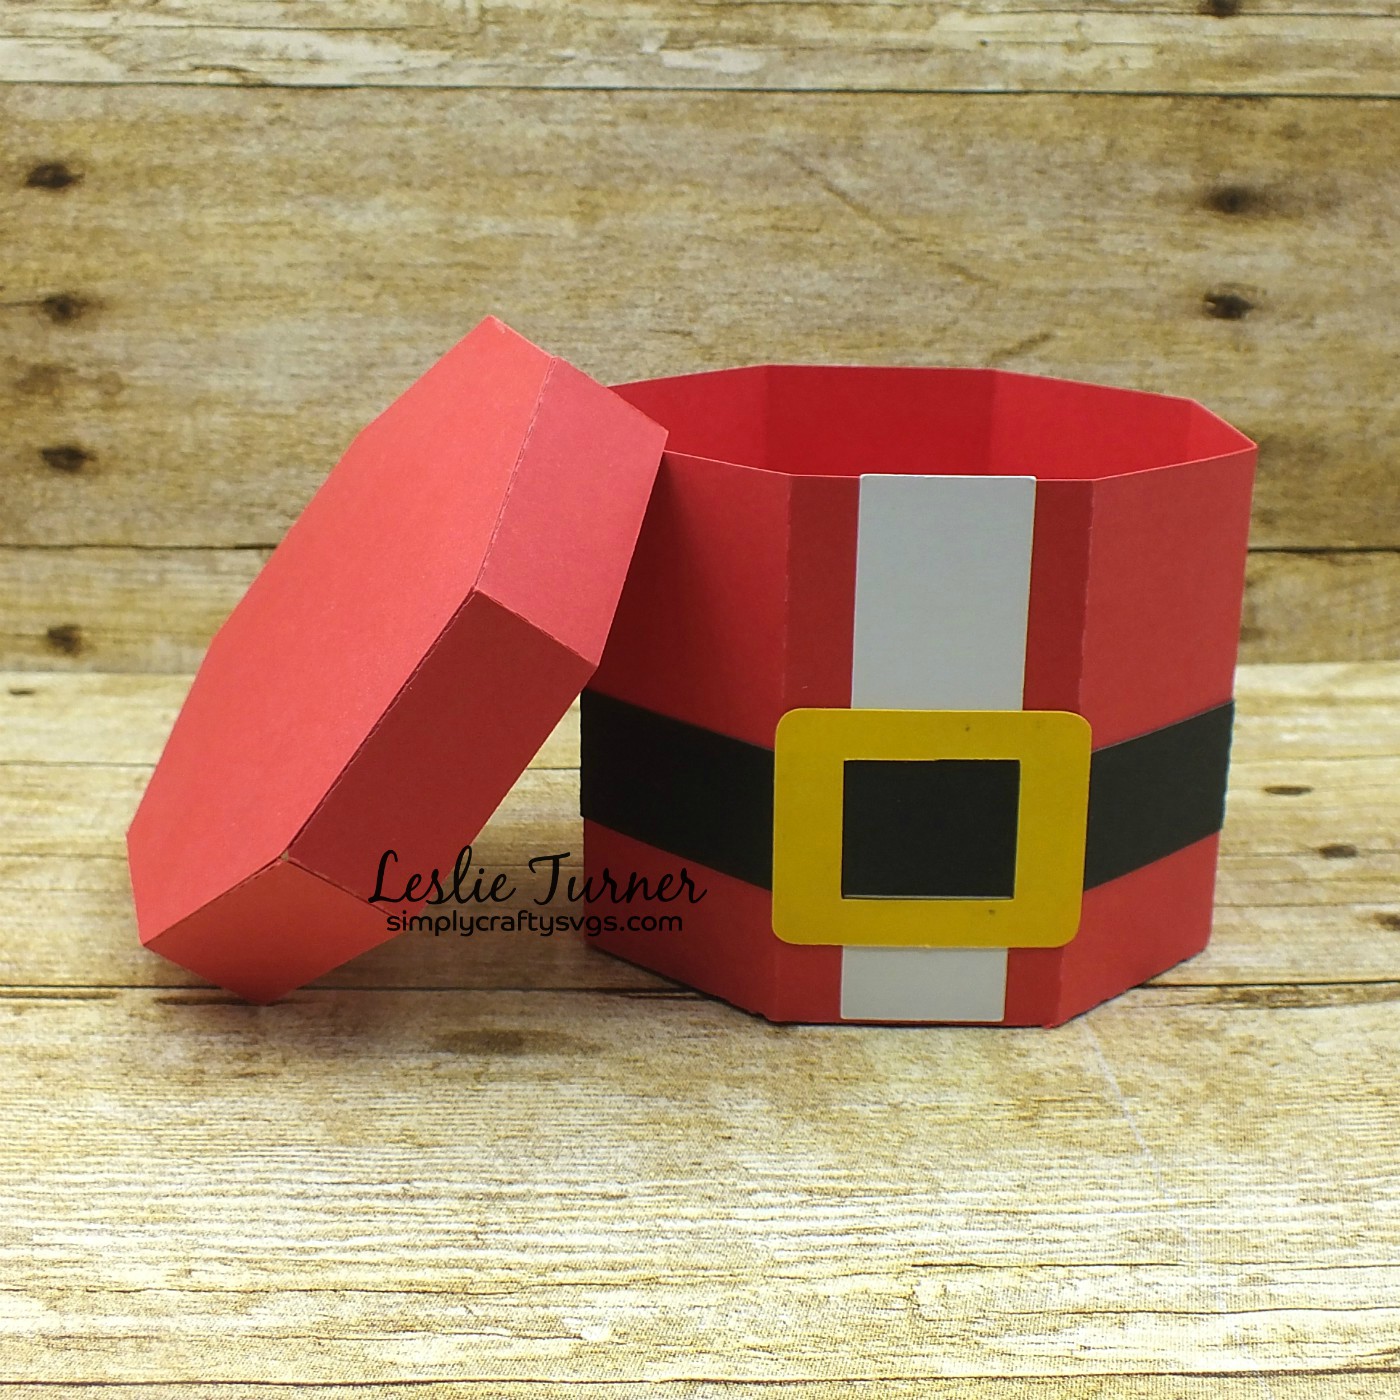
Hi friends! I hope you’re having a fantastic week! Today is my post day on the Simply Crafty SVGs Blog and I’m excited to share my DT inspiration project with you. I created the most adorable Santa box set using the Simply Crafty SVGs Santa Stacking Box Set cut file. O.M.G. Is he not the cutest guy ever?!
The top box is Santa’s top half and his hat comes off to reveal the box. ;)
The bottom box is Santa’s bottom half, and that lid comes off to reveal the box. I haven’t decided whether or not I’m going to put anything in these boxes – I’m thinking I may turn the set into a piece of Christmas decor! What would you do?!
Products used: Cardstock/Paper: Colorbok red, white, black and yellow cardstock, American Crafts blush cardstock Dies/Punches: Simply Crafty SVGs Santa Stacking Box Set cut file
I hope you’ve enjoyed today’s project! Be sure to check out all the fun cut files in the Simply Crafty SVGs store – you’ll have so much fun! And there are tons of freebies to get started! Thanks so much for stopping by today – we’ll see you next time! ;)