life is a journey

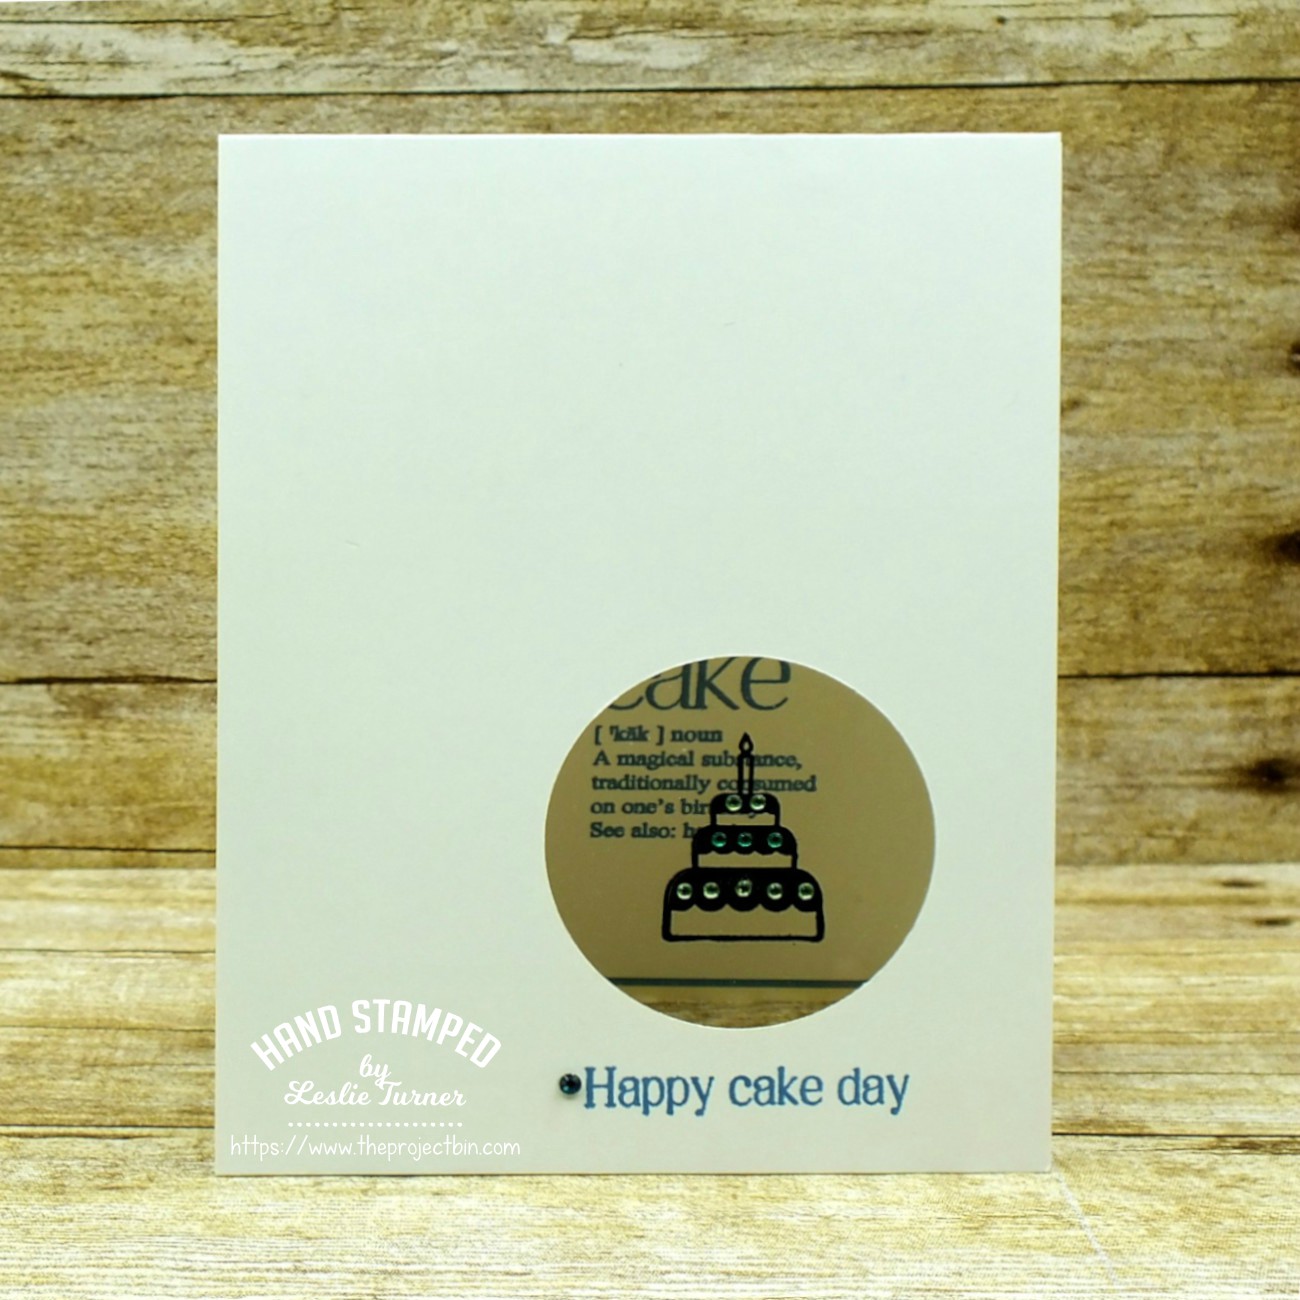
1/17/21 Winner at Lil Patch of Crafty Friends!
2/10/21 Favorite at Happy Little Stampers CAS Challenge!

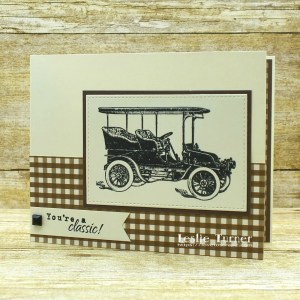
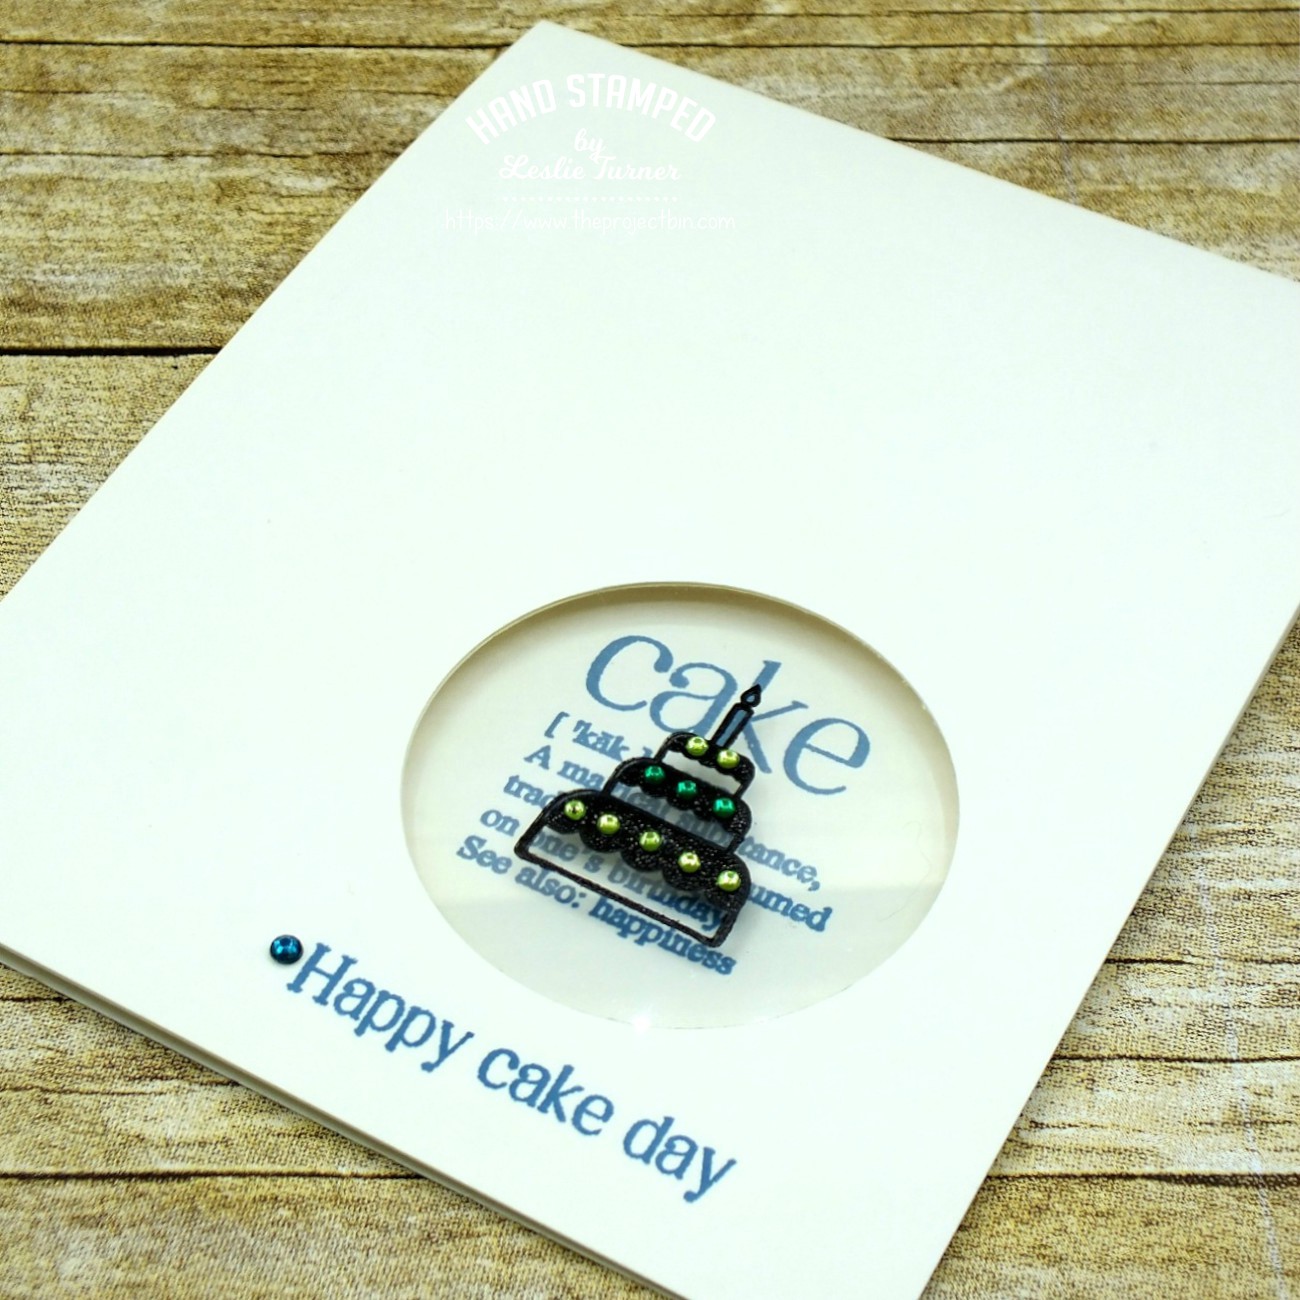
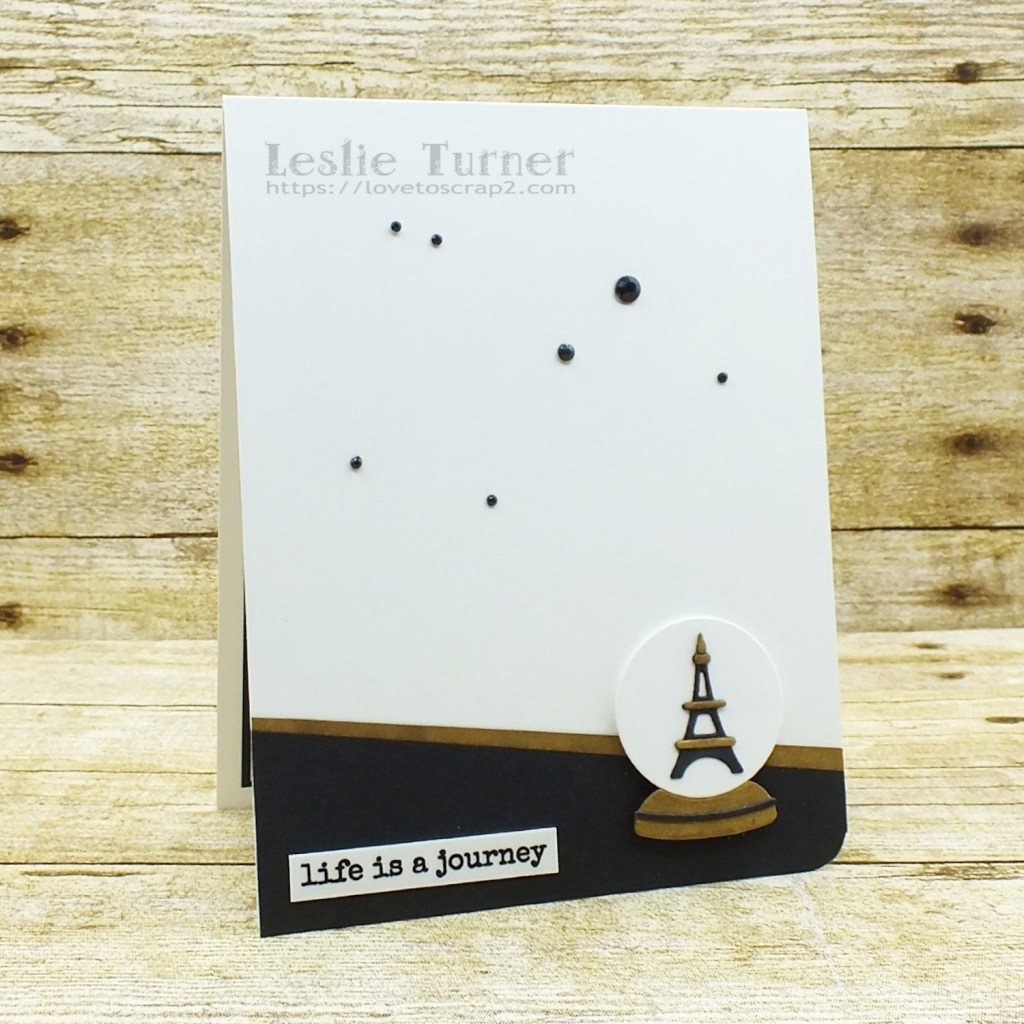
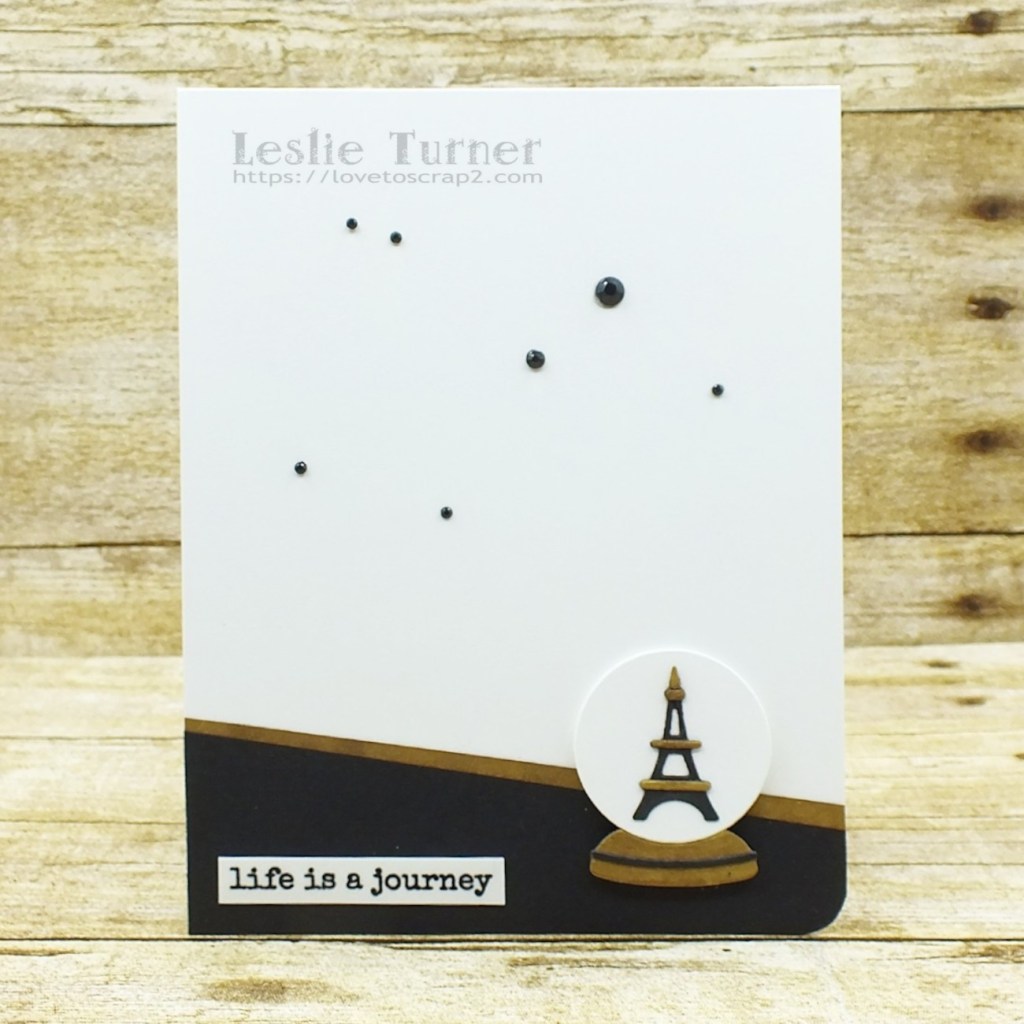
Happy Sunday, everybody! I hope your day is as beautiful as you are! Affiliate links are used in this post at no cost to you. I really appreciate your support! I’ve been having some fun in my studio and have popped in this morning to share a clean and simple masculine card that I created on Thursday to enter into The Outlawz Tuesday Color Challenge! Our sponsor this month is Sherry West Art and the challenge is to use black and white plus one color from the inspiration photo, with an optional twist of adding a circle. In addition to black and white, I used tan, and I’m playing the twist with the travel globe as my circle.

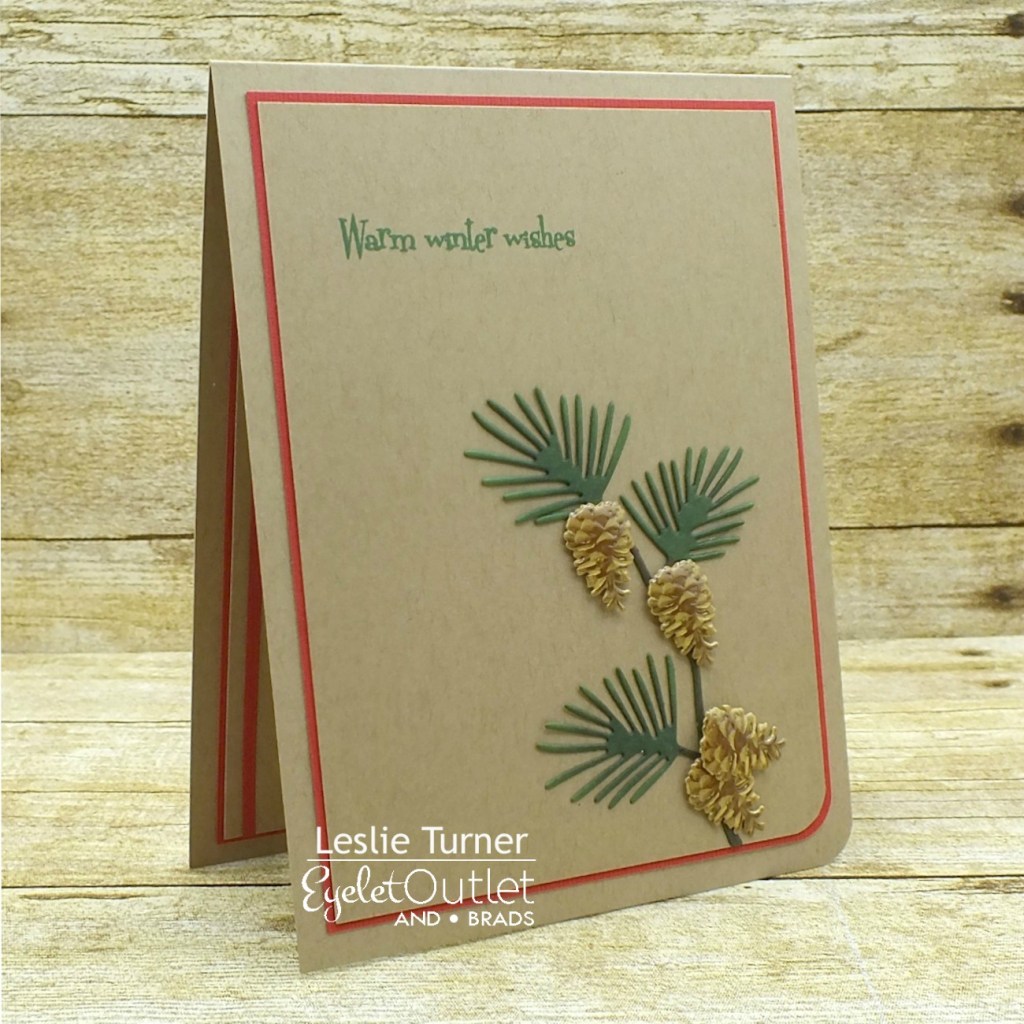
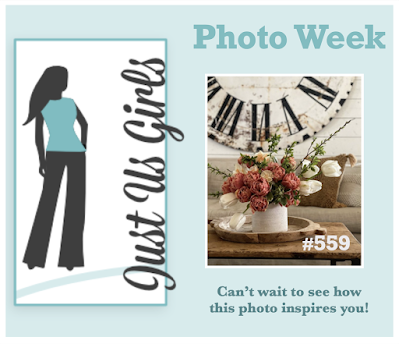
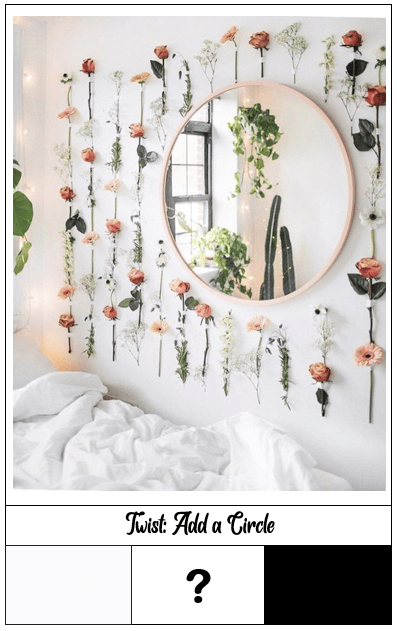
This is the photo inspiration we were given. I saw neutral tan, and rather than use kraft cardstock, I colored the tan elements on my card with a Nuvo alcohol marker.

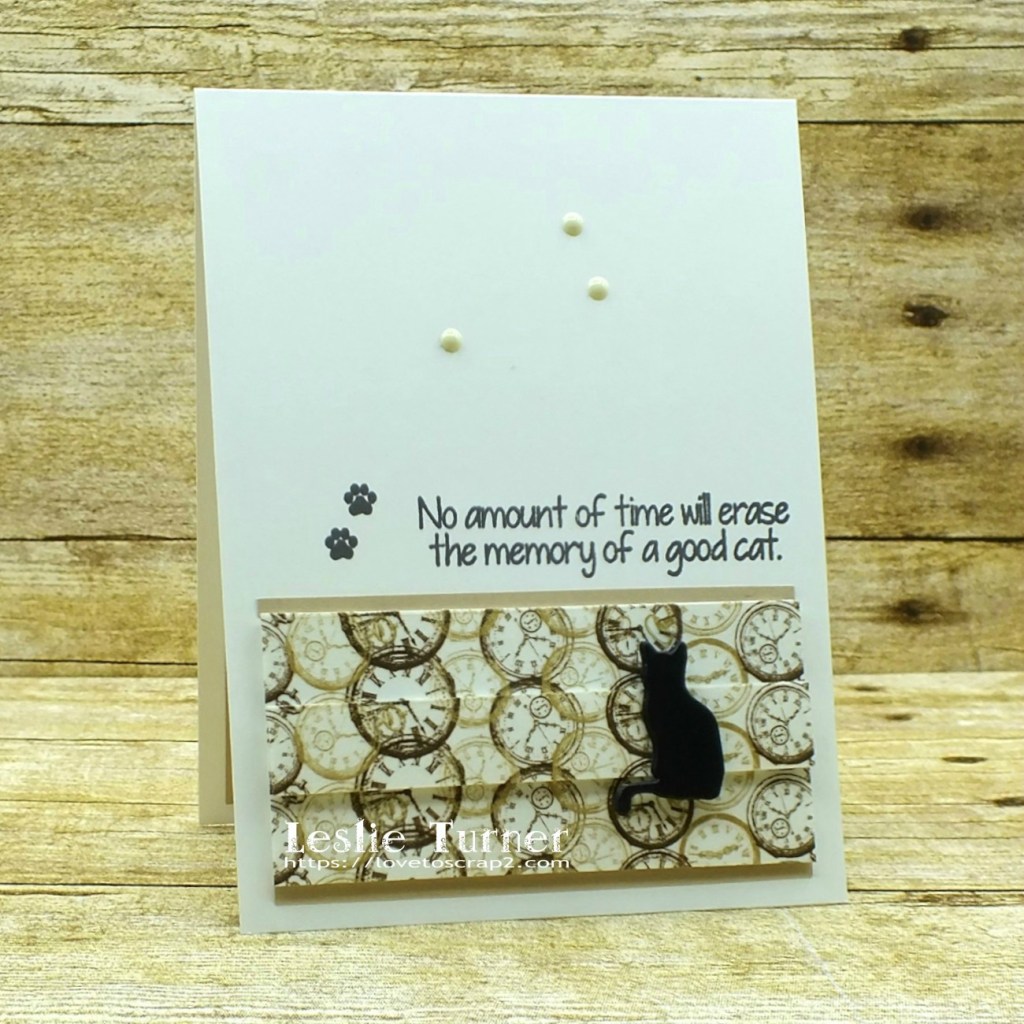
I cut a top folding A2 size card base from Neenah Classic Crest Solar White 110# cardstock and rounded the bottom right corner. I cut a piece of black cardstock at an angle and adhered it to the bottom of the card base. I cut a narrow strip of Neenah Classic Crest Solar White cardstock at a very slight angle, colored it with the tan alcohol marker and adhered it across the top of the black cardstock. I die cut the travel globe pieces from Neenah Classic Crest Solar White cardstock, colored them with tan and black alcohol markers, and assembled it. I applied a STAMPlorations Shine Bright Clear Stickers sentiment to a scrap of white cardstock, trimmed it and adhered it to the bottom left. I adhered the travel globe on foam dimensionals and added several different sizes of black gemstones to complete the front.

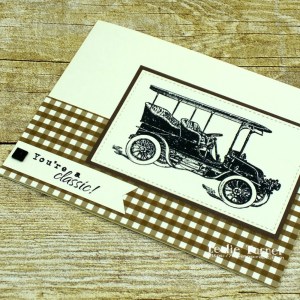
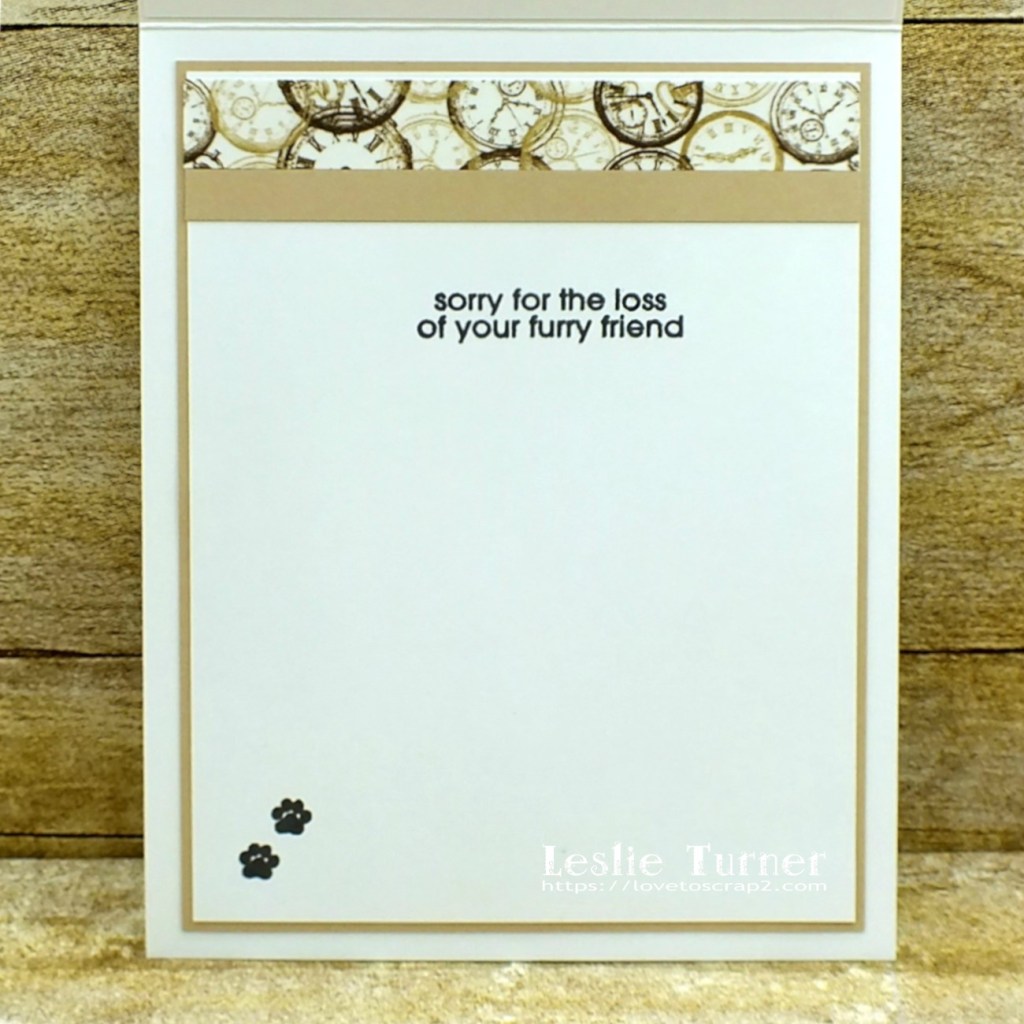
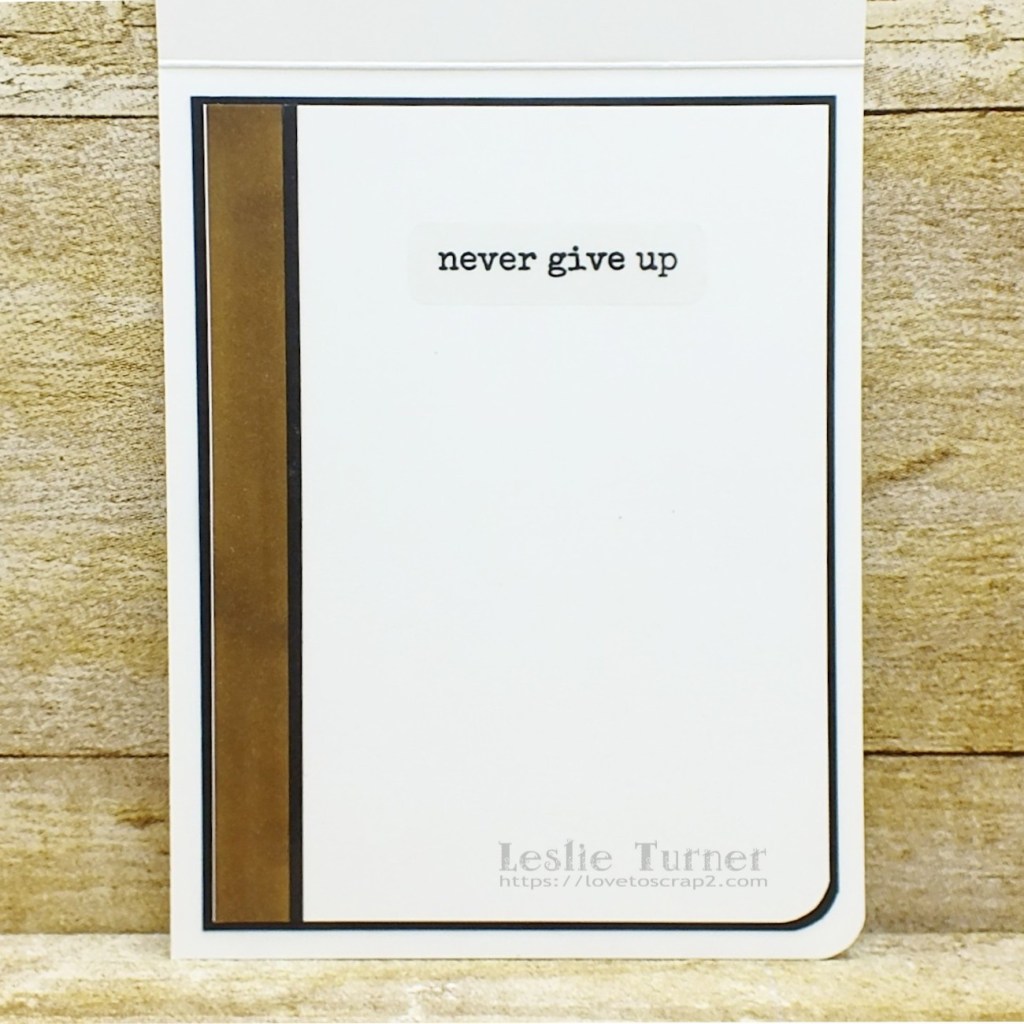
I cut the inside panel from Neenah Classic Crest Solar White cardstock and embellished it with a wide strip of Neenah Classic Crest Solar White cardstock that I colored with the tan alcohol marker along with a narrow strip of black cardstock. I applied another STAMPlorations Shine Bright Clear Stickers sentiment and layered the panel on black cardstock.

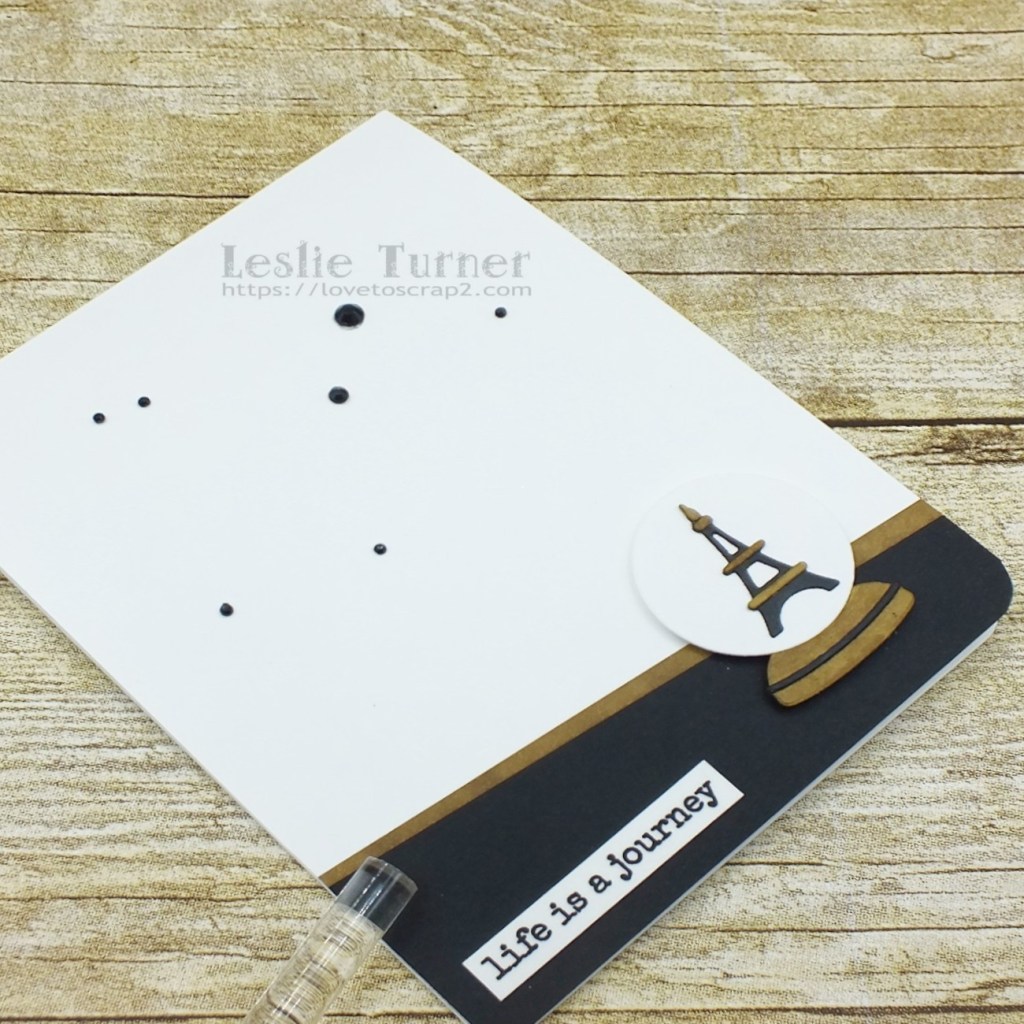
And one more peek… totally loving the masculine feel of this!

Sharing in these additional challenges:
1. 613 Avenue Create: #1 – January 2021 Anything Goes
2. AAA Cards: #182 – Up To One Third w/ optional Summer

3. A Perfect Time To Craft Open Challenge: #1-2021 – Anything Goes
4. A Place To Start: #1 – January 2021 Anything Goes
5. Classic Design Challenge: #1 – January Anything Goes
6. Happy Little Stampers: January Anything Goes with Dies
7. Happy Little Stampers: January CAS Challenge – Short and/or Tall
8. Lil Patch of Crafty Friends: #149 – 6th Birthday Celebration/Anything Goes
9. Penny’s Paper-Crafty Challenge Blog: #487 – Anything Goes

Products used:
Cardstock/Paper: Neenah Classic Crest Solar White cardstock, American Crafts Black cardstock
Ink: Nuvo alcohol markers- Pitch Black and Shorthorn Brown
Dies/Punches: Tim Holtz Tiny Travel Globe thinlits, Kadomaru Pro corner rounder
Accessories: Bearly Art precision craft glue, Tombow Mono permanent adhesive, Gemini Junior, Stampin’ Up Dimensionals, STAMPlorations Shine Bright Clear Stickers, Darice black gemstones

I hope you’ve enjoyed this project and will come join us in The Outlawz Challenges! Lots of fun going on! Thanks so much for stopping by – we’ll see you next time!

Scrappy hugs,
lesliesig

You’re a classic!

Hi friends! Happy Friday and Happy New Year! I hope you’ve had a wonderful week! Affiliate links are used in this post at no cost to you. I really appreciate your support! Our challenge is live this morning over at Love To Craft Challenge Blog and I’m happy to share my DT inspiration project for LTCCB #54 – January Anything Goes! I was commissioned to make some Father’s Day cards and I used some very cool digital vintage vehicle images and papers for these clean and simple designs.

I made one card in landscape orientation and the other in portrait orientation, using brown and ivory for one, and CutCardStock Basis Green cardstock and ivory for the other. I printed the images on linen cardstock, cut them with stitched rectangle dies and adhered them to coordinating cardstock. I printed the digital paper on linen cardstock as well, and trimmed pieces to go across the bottom of the card fronts.

The digital sentiments on the front and inside are the same on each card, printed on smooth ivory cardstock. I embellished each inside panel with the gingham paper used on the front, adhered the panels to coordinating cardstock and adhered them to the inside of the card bases.

And one more look at each… loving how these turned out!

Sharing in the following challenges:
1. A Perfect Time To Craft Open Challenge Blog: #1-2021
2. Alphabet Challenge Blog: T is for Traffic
3. Classic Design Challenge: January 2021 #1 – Anything Goes
4. QKR Stampede: #411 – Anything Goes
5. Word Art Wednesday: Weeks #470/473 – Christmas Blog Hop/Anything Goes

Products used:
Cardstock/Paper: Marco’s Antique Linen Ivory cardstock, The Paper Studio Cream cardstock, CutCardStock Basis Green cardstock, Colorbok brown cardstock, MHK Designs Gingham in Rustics digital papers
Stamps: MHK Designs Various Vehicles digital stamp set
Dies/Punches: Memory Box Stitched Rectangle Layers die, My Favorite Things Die-namics Stitched Rectangle STAX die, Stampin’ Up Banner Triple Punch
Accessories: ScraPerfect Best Glue Ever, Darice square black gemstones

I hope you’ve enjoyed seeing these cards and will link up with us this month! We’d love to see what you’re working on! Thanks so much for stopping by today – we’ll see you next time! ;)

Scrappy hugs,
lesliesig

Too many dogs…

Happy Saturday, peeps! Hope you’ve got something fun planned this weekend – you can relax a little now that Christmas is behind us! I’m stoked to be back on the Eyelet Outlet blog today with another awesome DT inspiration project! I created a fun card for a crazy dog person featuring some fun brads paired with awesome washi tape and enamel dots!

I decided to go with a brown and black color combo for this card. I put strips of Glitter Black Washi Tape and Glitter Brown Washi Tape horizontally across the bottom of the background panel. I stamped the sentiment in brown ink, added four Dog Brads and several White Enamel Dots, and then layered the panel on black cardstock and adhered it to the card base.

For the inside, I used the black and brown glitter washi tape vertically on the left side of the panel, stamped the sentiment in brown ink, and layered the panel on black cardstock.

And one more peek… loving how this turned out! Several friends have asked me to make some dog cards, so here’s one for the books! ;)

Sharing in the following challenges:
1. A Bit More Time To Craft Challenge: #130 – Anything Goes
2. A Bit More Time To Craft Extra Challenge: December Anything Goes
3. Classic Design Challenge: #12 – Anything Goes
4. Word Art Wednesday: Weeks #470-473 – Blog Hop/Anything Goes

Eyelet Outlet products used:
Glitter Black Washi Tape
Glitter Brown Washi Tape
Dog Brads
White Enamel Dots

Other products used:
Cardstock/Paper: Neenah Classic Crest Solar White cardstock, Colorbok Black cardstock
Stamps: The Project Bin Kinda Pawsome stamp set
Ink: Memento Rich Cocoa ink
Accessories: Tombow Mono permanent adhesive, MISTI stamp tool

I hope you’ve enjoyed today’s project! Be sure to check out all the fun goodies at Eyelet Outlet! I can already see you drooling, lol! Be sure to ‘like’ and ‘follow’ Eyelet Outlet Facebook Page to keep up with news and sales, and while you’re at it, join the Eyelet Outlet Fans Facebook group for lots of creative inspiration! Thanks so much for stopping by today – we’ll see you next time! ;)

Scrappy hugs,
lesliesig

Happy 29th Birthday

Hello, everyone! I’ve popped in again today to share another DT inspiration project for The Project Bin! I used the Born Yesterday stamp set to create a clean and simple birthday card with a round aperture, similar to the one I created last month with the acetate window but with a different sentiment and no acetate this time. This sentiment cracks me up and I can SO identify, lol!

I created a standard A2 top-folding card base and punched a 2-1/4″ circular aperture in the bottom right corner. I cut a thin frame from green cardstock using the 2-1/4″ circle punch along with a 2-1/2″ circle punch, and adhered it around the aperture.

I stamped the sentiment in the center of the aperture in green ink and the cake in pink ink, and then added lines of Crystal Drops to the cake and a few random dots to the background.

And one more look… what a fun card! I can think of several friends who would appreciate this!

Sharing in the following challenges:
1. A Perfect Time To Craft Open Challenge: #12-2020 – Anything Goes
2. Classic Design Challenge: #12 – Anything Goes
3. Lemon Shortbread Challenge Blog: #135 – Anything Goes
4. Lil Patch of Crafty Friends: #148 – Anything Goes
5. Word Art Wednesday: Weeks #470-473 – Blog Hop/Anything Goes

Products used:
Cardstock/Paper: CutCardStock Royal Sundance Linen Ivory cardstock, Neenah Classic Crest Baronial Ivory cardstock and Jellybean Green cardstock
Stamps: The Project Bin Born Yesterday stamp set
Ink: Stampin’ Up Mossy Meadow and Melon Mambo ink
Dies/Punches: Fiskars 2-1/2″ circle punch, EK Success 2-1/4″ circle punch
Accessories: Tombow Mono permanent adhesive, MISTI stamp tool, Nuvo Autumn Red Crystal Drops

I sure hope you’ve enjoyed this project! Be sure to check out all the awesome stamps and dies at The Project Bin, and while you’re at it, head on over to The Project Bin Facebook Page for more inspiration! Thanks so much for stopping by today – we’ll see you next time!

Scrappy hugs,
lesliesig

Happy Cake Day

Hi friends! Happy Hump Day! I’ve popped in today to share an awesome DT inspiration project for The Project Bin! I was provided the amazing Defined and Born Yesterday stamp sets and created a CAS birthday card featuring a peek-a-boo acetate window!

2020_0329001

I created a top-fold A-2 card base, cut another separate panel, and punched a 2″ circle in each. I sandwiched a piece of acetate between the two layers, and stamped the little birthday cake from the Born Yesterday stamp set in black StazOn ink and embellished it with tiny green gemstones.

2020_0329002

I stamped the front and inside sentiments from the Defined stamp set in blue ink matching the layering cardstock panel on the inside.

2020_0329003

One more look… so happy with how this turned out! Love the peek-a-boo effect with the cake overlay! So fun!

2020_0329004

Sharing in the following challenges:
1. Creative Moments: #203 – Anything Goes
2. Penny’s Paper-Crafty Challenge Blog: #485 – Anything Goes
3. QKR Stampede: #408 – Anything Goes
4. Time Out Challenges: #175 – Quick
5. Word Art Wednesday: Weeks #466/467 – Anything Goes

Products used:
Cardstock/Paper: Stampin’ Up Very Vanilla and Marina Mist cardstock
Stamps: The Project Bin Defined and Born Yesterday stamp sets
Ink: Jet Black StazOn ink, Stampin’ Up Marina Mist ink
Dies/Punches: Stampin’ Up 2″ circle punch
Accessories:  ScraPerfect Best Glue Ever, Acetate, MISTI stamp tool, Darice small teal gemstone and tiny light green and medium green gemstones

I sure hope you’ve enjoyed this project! Be sure to check out all the awesome stamps and dies at The Project Bin, and while you’re at it, head on over to The Project Bin Facebook Page for more inspiration! Thanks so much for stopping by today – we’ll see you next time!

Scrappy hugs,
lesliesig

Have a cozy Christmas

12/2/20 Top 5 at ABC Christmas Challenge!

Hi everyone! Well, here it is almost Thanksgiving and even though it’s hands-down my favorite time of year, I’m in serious Christmas mode! I’m stoked to be back on the CutCardStock blog today with an awesome DT inspiration project featuring more of the Bonsai Green and Habanero Red cardstock that was included in our Designer’s Pack – which happens to be on sale this month so be sure to get some! Affiliate links are used in this post at no cost to you. I really appreciate your support! I created a cozy Christmas card in my favorite traditional Christmas colors of red, white and green!

I was rummaging through my dies and found this adorable stocking die that I’ve had for AGES (probably 6-7 years) and I’m not even sure I’ve ever used it, so out it came for this project! It’s so stinkin’ cute I can’t stand it, lol! I cut a standard A2 size top-folding card base from Classic Crest Solar White 110# cardstock along with layering panels and 1/4″-ish strips (not measured) from Classic Crest Solar White 80# cardstock, Bonsai Green 80# cardstock and Habanero Red 80# cardstock. As I often love to do, I rounded the bottom right corner of the card base and all the layers. I arranged the strips in a diagonal fashion across the front panel, trimmed the edges and adhered the panel to the red layer, then adhered the piece to the front of the card base. I stamped the sentiment in red ink, then die cut three stockings from Classic Crest Solar White 80# cardstock, Bonsai Green 80# cardstock and Habanero Red 80# cardstock. I assembled the stockings and affixed them to the front of the card with foam squares, then added the flat-back pearls to the stockings and several in the upper left corner.

I embellished the inside panel with leftover red, white and green strips down the left side, stamped the sentiment in red ink, and adhered the panel to the green layer.

One more look… I’m absolutely smitten! ;)

Sharing in the following challenges:
1. A Perfect Time To Craft Open Challenge: #11-2020 – Anything Goes
2. ABC Christmas Challenge: W is for Winter Wonderland and/or X is for Xtra Special (Xtra Special)
3. Cardz 4 Galz: #135 – Cute Christmas
4. Classic Design Challenge: #11 – Anything Goes
5. Creative Moments: #203 – Anything Goes
6. Pammie’s Inky Pinkies Challenges: #2047 – Anything Goes
7. Time Out Challenges: #175 – Quick

8. Try it on Tuesday: Traditional Christmas Colors
9. Word Art Wednesday: Weeks #466/467 – Anything Goes

CutCardStock products used:
Classic Crest Solar White 110# cardstock
Bonsai Green 80# cardstock
Habanero Red 80# cardstock

Other products used:
Stamps: Stampin’ Up Cozy Christmas stamp set
Ink: Stampin’ Up Real Red ink
Dies/Punches: QuicKutz Stocking die
Accessories: Tombow Mono permanent adhesive, Bearly Art precision craft glue, Gemini Junior, MISTI stamp tool, Flourish with a Bling red and green flat-back pearls, Scrapbook Adhesives 3D Foam Squares Variety Pack (small white)

I hope you’ve enjoyed today’s project and you’re inspired to get crafty! Be sure to check out all the awesome cardstock and other goodies at CutCardStock (adhesives, labels, stickers, pens, watercolors and ribbon to name a few). And head on over to the CutCardStock Facebook Page for more inspiration! Thanks so much for stopping by today – we’ll see you next time!

Scrappy hugs,
lesliesig

Warm winter wishes

Happy Saturday, friends! I’m happy to be back on the Eyelet Outlet blog today with another awesome DT inspiration project! I created a clean and simple Christmas card featuring some absolutely gorgeous brads!

It’s amazing to me how something so simple can be so beautiful! I cut a standard A2 size top-folding card base along with smaller layering panels from kraft cardstock and red cardstock which I adhered together. I die cut a pine branch from white cardstock and colored it with an alcohol marker, adhered it to the front panel, and added the Pinecone Brads. The final touch was stamping the sentiment in green ink.

I embellished the inside panel with a strip of the red cardstock, stamped the sentiment in green ink, and layered the panel on red cardstock. I also added a Pinecone Brad in the lower right corner.

And one more peek… so loving this CAS design!

Sharing in the following challenges:
1. 613 Avenue Create: November Challenge – Anything Goes w/ optional Cute Critters (no twist)
2. A Perfect Time To Craft Open Challenge: #11-2020
3. ABC Christmas Challenge: W is for Winter Wonderland and/or X is for Xtra Special (X is for Xtra Special)
4. CAS Christmas: November Challenge – Non-Traditional Colors
5. Classic Design Challenge: #11 – November Anything Goes
6. Crafty Calendar Challenge: November Challenge – Anything Goes
7. Crafty Catz: #528 – Anything Goes w/ optional Christmas (playing twist)
8. Jan’s Digi Stamps Challenge: November Anything Goes
9. Lemon Shortbread Challenge Blog: #133 – Anything Goes
10. Let’s Craft and Create: #165 – Anything Goes w/ optional Sketch (no twist)
11. Lil Patch of Crafty Friends: #146 – Anything Goes
12. Not Just Cards Challenges: November Anything Goes
13. The Creative Crafters Challenge: #34 – Anything Goes
14. Time Out Challenges: #175 – Quick

15. Word Art Wednesday: Weeks #466/467 – Anything Goes
16. World Wide Open Design Team Challenge: #11 – Anything Goes

Eyelet Outlet products used:
Pinecone Brads

Other products used:
Cardstock/Paper: CutCardStock Twine cardstock, CutCardStock Habanero Red 4×6 cardstock
Stamps: Prickley Pear Stamps Christmas Trees 2 stamp set
Ink: Hero Arts Pine ink; Nuvo alcohol markers- 417, 465
Dies/Punches: Prickley Pear Stamps Pine Branch die
Accessories: Crafter’s Companion adhesive, Gemini Junior, MISTI stamp tool

I hope you’ve enjoyed today’s project! Be sure to check out all the fun goodies at Eyelet Outlet! I can already see you drooling, lol! Be sure to ‘like’ and ‘follow’ Eyelet Outlet Facebook Page to keep up with news and sales, and while you’re at it, join the Eyelet Outlet Fans Facebook group for lots of creative inspiration! Thanks so much for stopping by today – we’ll see you next time! ;)

Scrappy hugs,
lesliesig

A Merry Little Wish…

11/30/20 Top Rocker at 613 Avenue Create!

Hi everyone! Happy Saturday! Eeeek, it’s the middle of November already – how did that happen?! I’m happy to be back on the Eyelet Outlet blog today with another awesome DT inspiration project! I created another snowy (and CAS) Christmas card featuring some pretty awesome brads, bling and washi tape!

This was another fun one to watch come together. I cut a standard A2 top-folding card base and a green cardstock layer. I created three snow banks by tearing white cardstock, adhered them to the bottom of the green panel, and then added several Holiday Tree Brads and a stamped green sentiment. I applied two strips of Green Dots Skinny Washi Tape at the top of the green panel and adhered the panel to the card base. The final touch was adding Snowflake Bling.

I embellished the inside panel with a strip of the Green Dots Skinny Washi Tape, stamped the sentiment in green ink, and layered the panel on green cardstock.

And one more look… such a fun design! And this one, too, would be great to mass produce to send to those on your Christmas card list!

Sharing in the following challenges:
1. 613 Avenue Create: November Challenge – Anything Goes w/ optional Cute Critters (no twist)
2. A Perfect Time To Craft Open Challenge: #11-2020
3. ABC Christmas Challenge: W is for Winter Wonderland and/or X is for Xtra Special (W is for Winter Wonderland)
4. Classic Design Challenge: #11 – November Anything Goes
5. Crafty Calendar Challenge: November Challenge – Anything Goes
6. Creative Inspirations: November Challenge – Winter Wonderland
7. Jan’s Digi Stamps Challenge: November Anything Goes
8. Not Just Cards Challenges: November Anything Goes
9. Try it on Tuesday: Traditional Christmas Colors

Eyelet Outlet products used:
Holiday Tree Brads
Skinny Washi Tape Green Dots
Snowflake Bling 1-1/2″

Other products used:
Cardstock/Paper: Neenah Classic Crest Solar White cardstock, CutCardStock Bonsai cardstock
Stamps: Stampin’ Up Festival of Trees stamp set
Ink: Stampin’ Up Wild Wasabi ink
Accessories: Crafter’s Companion adhesive, MISTI stamp tool

I hope you’ve enjoyed today’s project! Be sure to check out all the fun goodies at Eyelet Outlet! I can already see you drooling, lol! Be sure to ‘like’ and ‘follow’ Eyelet Outlet Facebook Page to keep up with news and sales, and while you’re at it, join the Eyelet Outlet Fans Facebook group for lots of creative inspiration! Thanks so much for stopping by today – we’ll see you next time! ;)

Scrappy hugs,
lesliesig

Time

Hi everyone! Hope you’ve had a great Monday! Today is Day 1 of the 2020 Cat Lovers Hop and I’ve stopped in this evening to share a cat card I created this afternoon. We had our first snow of the season last evening (several inches) so it was a great day to stay indoors and craft! The Hop is going on until the 31st, so if you’re a fellow cat lover, come join us! There’s a lot of fun and games to join in every day, and Janis has been busy lining up some pretty awesome prizes to give away at the end!

While sympathy cards for humans or pets aren’t easy to create, we always need to have a few in our stash. I pulled out a cat sentiment stamp set that I’ve had in my stash for probably close to a year and have never used, and the sympathy sentiment spoke to me, so that’s the direction I went.

I cut a standard A2 size top folding card base, a small panel for the front and a panel for the inside from white cardstock. I covered the small panel with clock washi tape and cut a strip off which I popped up on white craft foam for a little interest. I die cut four cats from black cardstock and adhered them on top of each other. I adhered white craft foam to the back of the panel and positioned it on the card base to get an idea of where to stamp the sentiment.

I moved the panel out of the way, stamped the sentiment and paw prints, and then adhered the panel to the card base. I added a thin strip of light brown cardstock above and below the popped up panel, adhered the stacked cat die cuts and added a few enamel dots.

I embellished the inside panel with a piece of the clock washi tape and a narrow strip of the light brown cardstock, stamped the sentiment and paw prints in brown ink, and layered the panel on the light brown cardstock.

And one more look… totally loving how this turned out!

Sharing in the following challenges:
1. CRAFT Challenge: #574 – Memories
2. Creative Inspirations: October Anything Goes
3. Just Us Girls: #559 – Photo Week

4. Lemon Shortbread Challenge Blog: #131 – Anything Goes
5. My Time To Craft Challenge Blog: #443 – Halloween or Cats
6. Pammie’s Inky Pinkies Challenges: #2043 – Anything Goes

Products used:
Cardstock/Paper: Neenah Classic Crest Solar White cardstock, CutCardStock Sandcastle cardstock, GKD Black Onyx cardstock
Stamps: Frantic Stamper Cat Happiness stamp set, Paper Smooches Feline Friends stamp set
Ink: Memento Espresso Truffle ink
Dies/Punches: Impression Obsession Cats die set
Accessories: Bearly Art precision craft glue, Scotch ATG, Clock Washi Tape, Darice white craft foam, Eyelet Outlet Ivory Enamel Dots

I hope you’ve enjoyed today’s project and you’ll consider joining us! Pop over to the 2020 Cat Lovers Hop to get all the details! Thanks so much for stopping by today – we’ll see you next time! ;)

Scrappy hugs,
lesliesig

BOO! for CutCardStock Happy Halloween Blog Hop!

Hi friends! A big giant WELCOME to the CutCardStock blog‘s Happy Halloween Blog Hop going on October 17th and 18th – starting at 7:00 AM Central Time today and ending at 11:55 PM Central Time tomorrow! Affiliate links are used in this post at no cost to you. I really appreciate your support! SO COME HOP WITH US!

Woot-woot! There is a $40 CutCardStock gift card up for grabs!

The winner will be randomly selected via number generator and announced on Monday, October 19th, on the CutCardstock blog and Facebook page! To be eligible for the $40 gift card, you must comment at each stop along the hop (good for ONE gift card entry) or upload a Halloween-themed project using CutCardStock products (good for TWO gift card entries). We would absolutely LOVE IT if you link up a project with us, PLUS it will increase your chances to win the gift card! ;)

=  =  =  =  =  =  =  =  =  =  =  =  =  =  =  =

Now, let me side-track you for a minute or three to share my CAS card featuring Classic Crest Solar White cardstock along with Camomile cardstock, Granny Smith Apple Green cardstock, Pop-Tone Black Licorice cardstock, Pop-Tone Grape Jelly cardstock and Pop-Tone Orange Fizz cardstock. This is a super simple design that came together pretty quickly!

Did you ever have ric rac sewn on your clothes when you were younger?! I sure did – and I still love it! I used several fun dies along with some stamping to create this fun card.

Here is a quick tutorial showing you my process for making this awesome card. I started by cutting a standard A2 size top-folding card base from Classic Crest Solar White cardstock, and rounded the bottom right corner. I cut ric rac die cuts from Camomile cardstock, Granny Smith Apple Green cardstock, Pop-Tone Grape Jelly cardstock and Pop-Tone Orange Fizz cardstock. I cut four BOO! die cuts from Pop-Tone Black Licorice cardstock and layered them on top of each other for a little dimension. I cut one additional ric rac die cut from Granny Smith Apple Green cardstock to use on the inside.

I adhered the ric rac die cuts to the front of the card base at an angle and then trimmed the edges. I adhered the BOO! layered die cuts in the lower right corner and small gemstones in the Halloween colors above the ric rac die cuts. I stamped and die cut a skull (an after-thought and not shown in the photo above) and popped it up on dimensionals on top of the ric rac die cuts.

For the inside, I adhered the remaining ric rac die cut at the same angle as those on the front, and then stamped the sentiment and the spider in black ink.

Sharing in the following challenges:
1. 613 Avenue Create: October Anything Goes w/ optional Winged Things
2. Aud Sentiments Challenge Blog: #262 – Halloween/Fall Sentiment
3. Crafty Calendar Challenge: October Challenge – Halloween
4. Crafty Gals Corner: #212 – Halloween Colors
5. International Art & Soul: #94 – Halloween
6. My Time To Craft: #443 – Halloween or Cats
7. The Paper Funday Challenges: #22 – Anything Goes w/ optional Halloween
8. Through the Purple Haze: #172 – Halloween Fun
9. Try It On Tuesday: Halloween Time
10. Two Old Bats Halloween Challenge: Jump Start w/ Anything Goes

CutCardStock products used:
Classic Crest Solar White 110# cardstock
Camomile 80# cardstock
Granny Smith Apple Green 80# cardstock
Pop-Tone Black Licorice 65# cardstock
Pop-Tone Grape Jelly 65# cardstock
Pop-Tone Orange Fizz 65# cardstock

Other products used:
Stamps: Stampin’ Up Howl-o-ween Treat stamp set
Ink: Memento Tuxedo Black ink, Copic black multi-liner pen
Dies/Punches: My Favorite Things Die-namics Stitched Ric Rac die, Stampin’ Up Boo To You Framelits
Accessories: Bearly Art precision craft glue, Big Shot, MISTI stamp tool, Darice orange, black, purple, green and yellow gemstones

=  =  =  =  =  =  =  =  =  =  =  =  =  =  =  =

Okay, let’s get back to the hop! Here is the complete list of stops:

1. CutCardstock blog
2. Teri
3. Raechelle
4. Crystal
5. Judy M
6. Maureen
7. Leslie >>> you’re here! <<<
8. Judy V
9. Janet A
10. CutCardStock blog… C’mon, you know you want to link up! The linky tool is at the end of the post on the CutCardstock blog so that’s where you’ll want to head to link up your project – each upload is worth two entries for the gift card! Two entries per person!

You should have arrived here from Maureen‘s blog and your next stop is Judy V‘s blog! I hope you are enjoying the hop and seeing all the fun Halloween projects! If you get lost along the way or if you landed here in the middle of the hop somehow and want to join in the fun, be sure to head on over to the CutCardstock blog to read all the details and start from the beginning!

In closing, I hope you’ve enjoyed seeing my Halloween card and you’re inspired to get crafty AND hop with us AND link up a Halloween-themed project! Be sure to check out all the awesome cardstock and other goodies at CutCardStock (adhesives, labels, stickers, pens, watercolors and ribbon to name a few). And head on over to the CutCardStock Facebook Page for lots of crafty inspiration! Thanks so much for stopping by today – we’ll see you next time!

Scrappy hugs,
lesliesig