Let’s Get Together

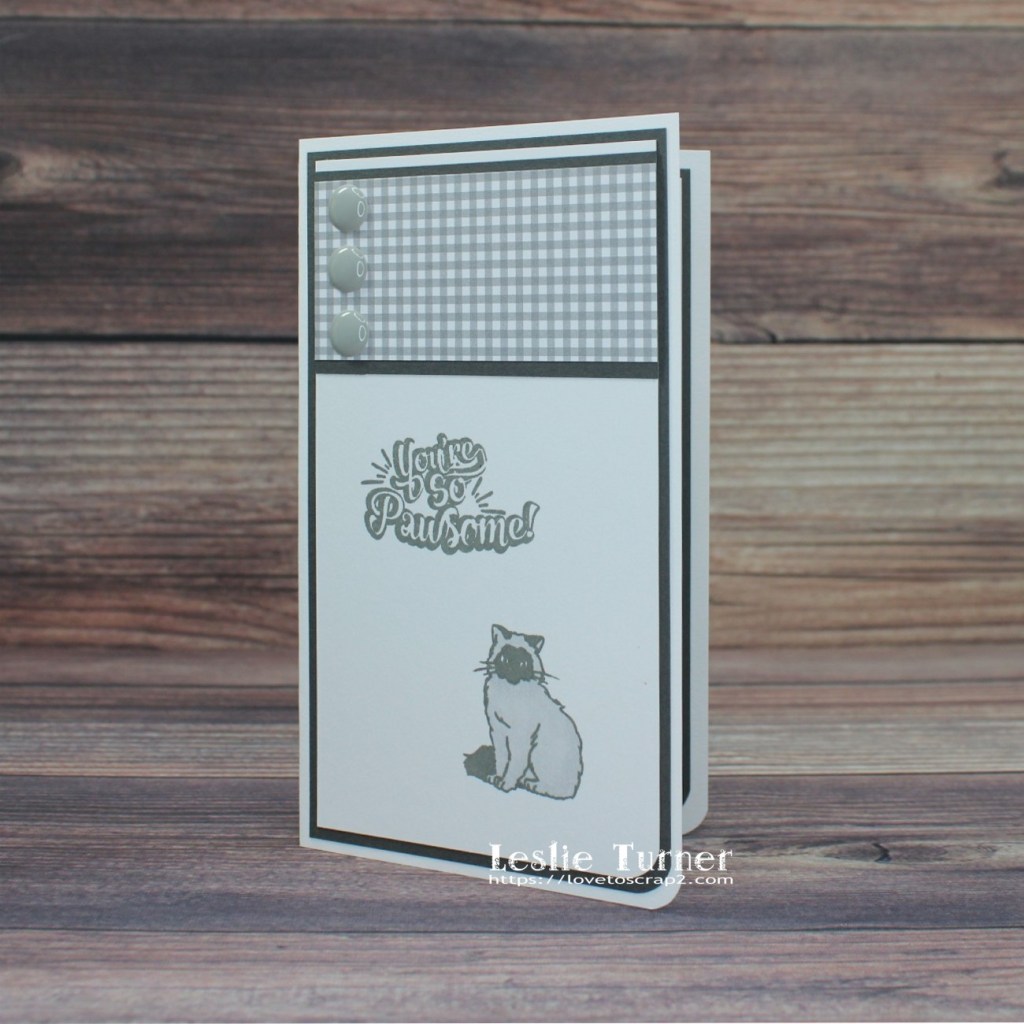
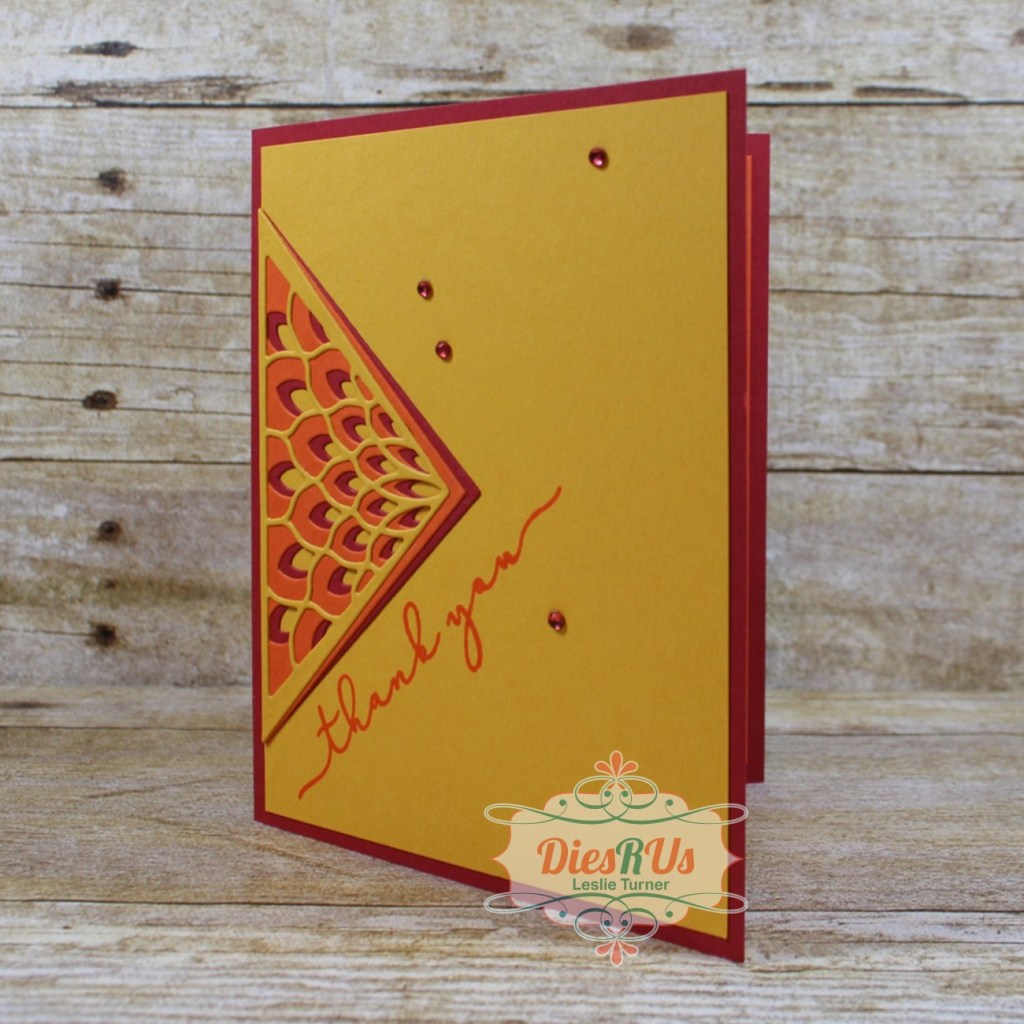
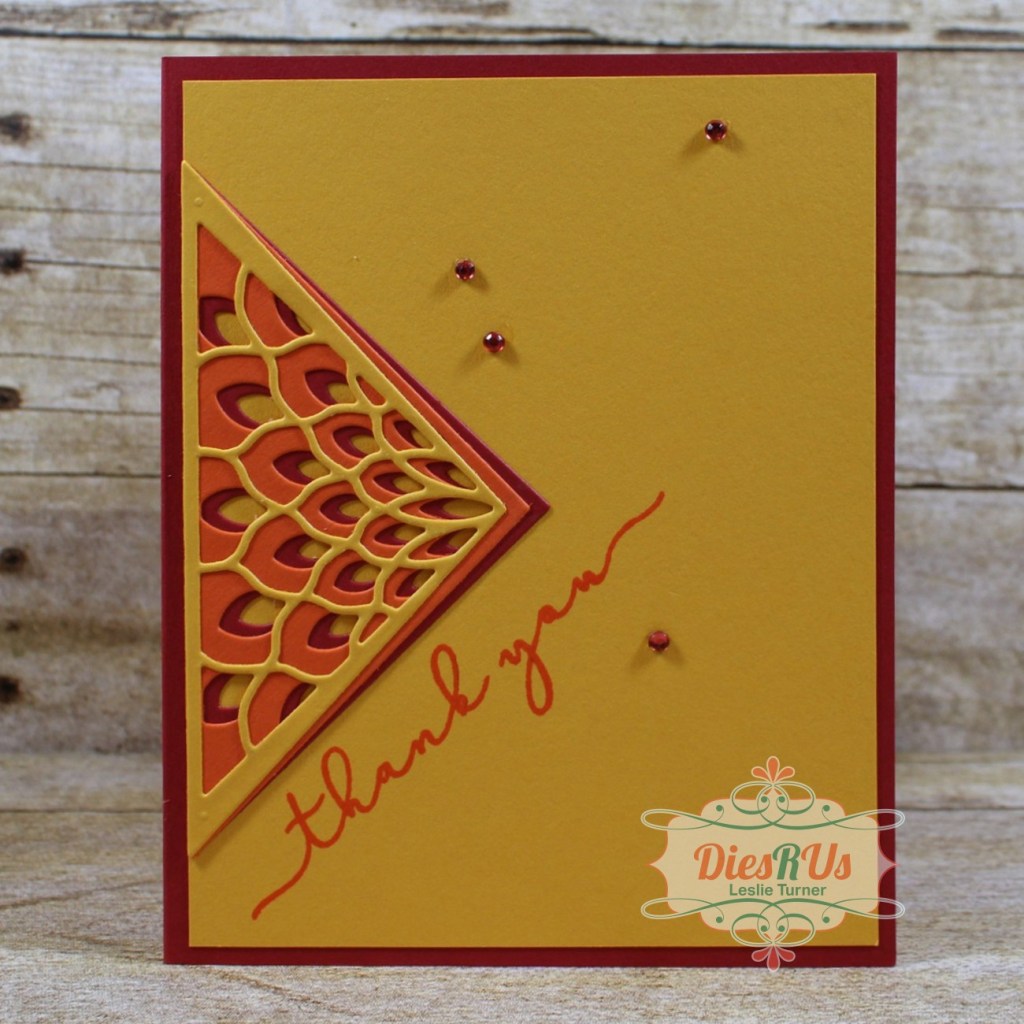
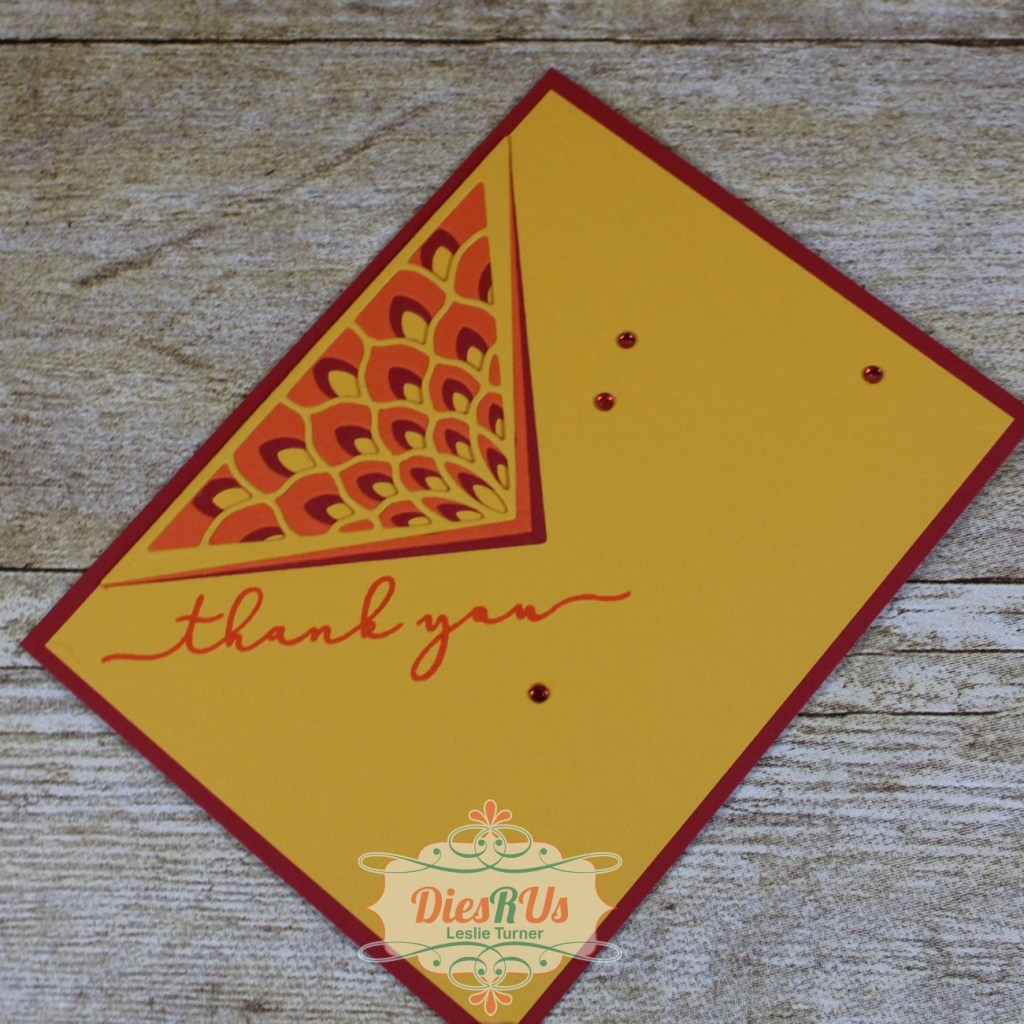
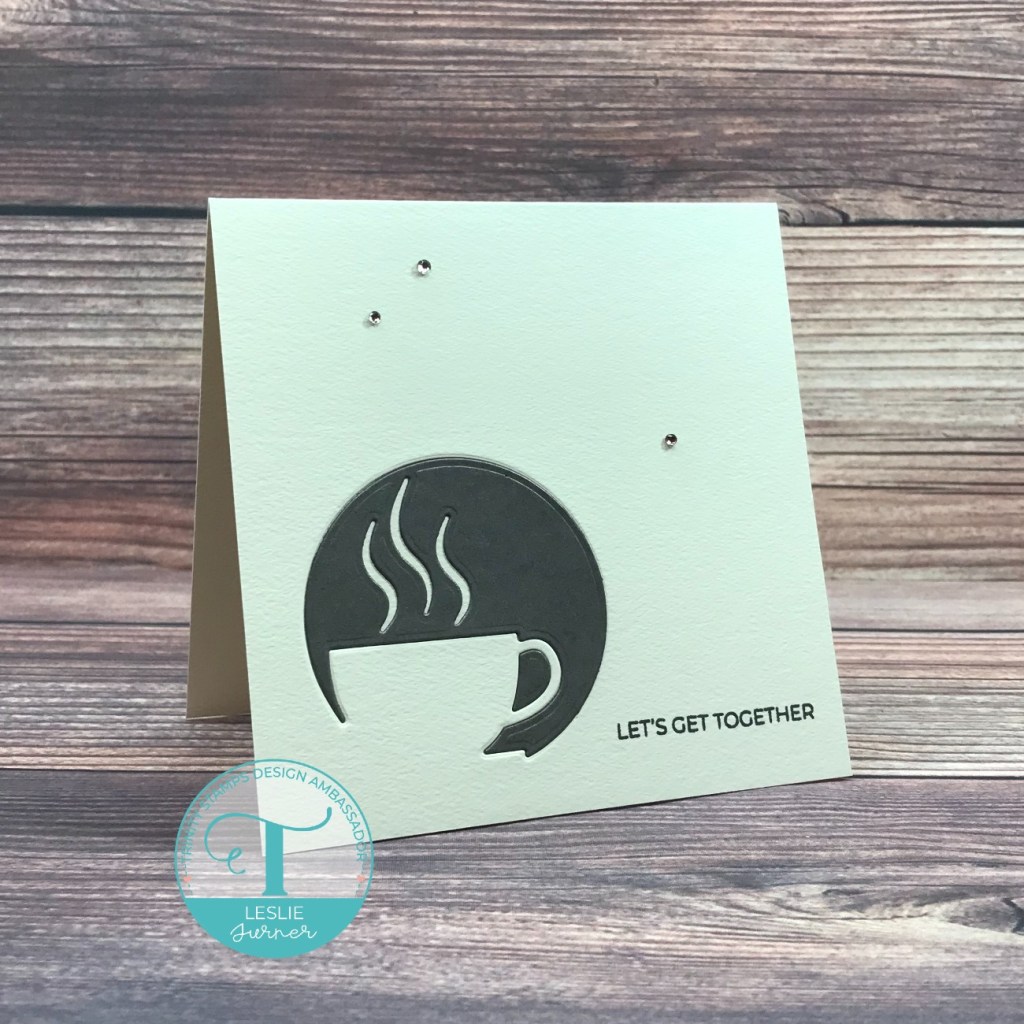
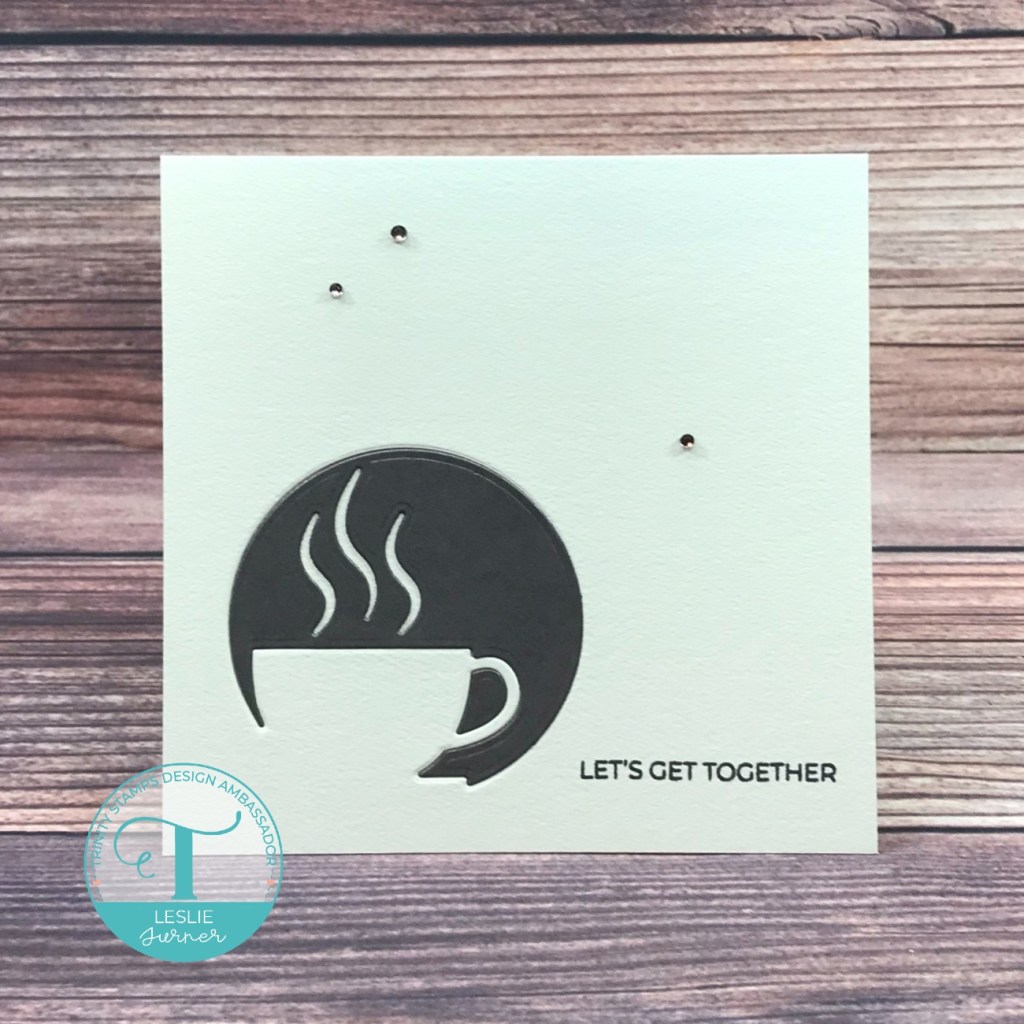
Hi friends! And this is the fourth project I’m showcasing for the Trinity Ambassador “A Few of Our Favorite Things” Social Media Hop on Instagram starting at 6:00 AM PST this morning and ending at 11:59 PM PST on Friday, December 3rd! My main post is HERE. This is a clean and simple friendship card that is almost a one-layer card. I did add a panel behind the front flap so I’d have something to adhere the negative space of the cut-out to. Affiliate links are used in this post at no cost to you – I really appreciate your support! This card features the Cafe Cup Cutout Die with sentiments from the A Sentiment for (Almost) Everything stamp set. It’s a super easy one that would be awesome to mass-produce to have several in your stash!


This image has an empty alt attribute; its file name is ts-ambassador-insta-hop-pic_11-29-21.jpg

For your chance to win a $20 gift card to the Trinity Stamps store, be sure to hop along with us on Instagram, starting at @trinitystampsllc – there will be a ton of inspiration! Winners will be announced on the Trinity Stamps blog by December 5th! Have fun hopping!


I cut a 5″ square top-folding card base and an extra panel from CutCardStock Royal Sundance Felt Natural cardstock. I die cut the cup into the front flap using the Cafe Cup Cutout Die and adhered the extra panel behind the front flap. I die cut the cup once more from CutCardStock Curious Metallic Chestnut cardstock and adhered the negative space into the cut-out on the front flap. I stamped the front sentiment from the A Sentiment for (Almost) Everything stamp set in brown ink and added some clear gemstones that I colored with a brown alcohol marker to complete the front.

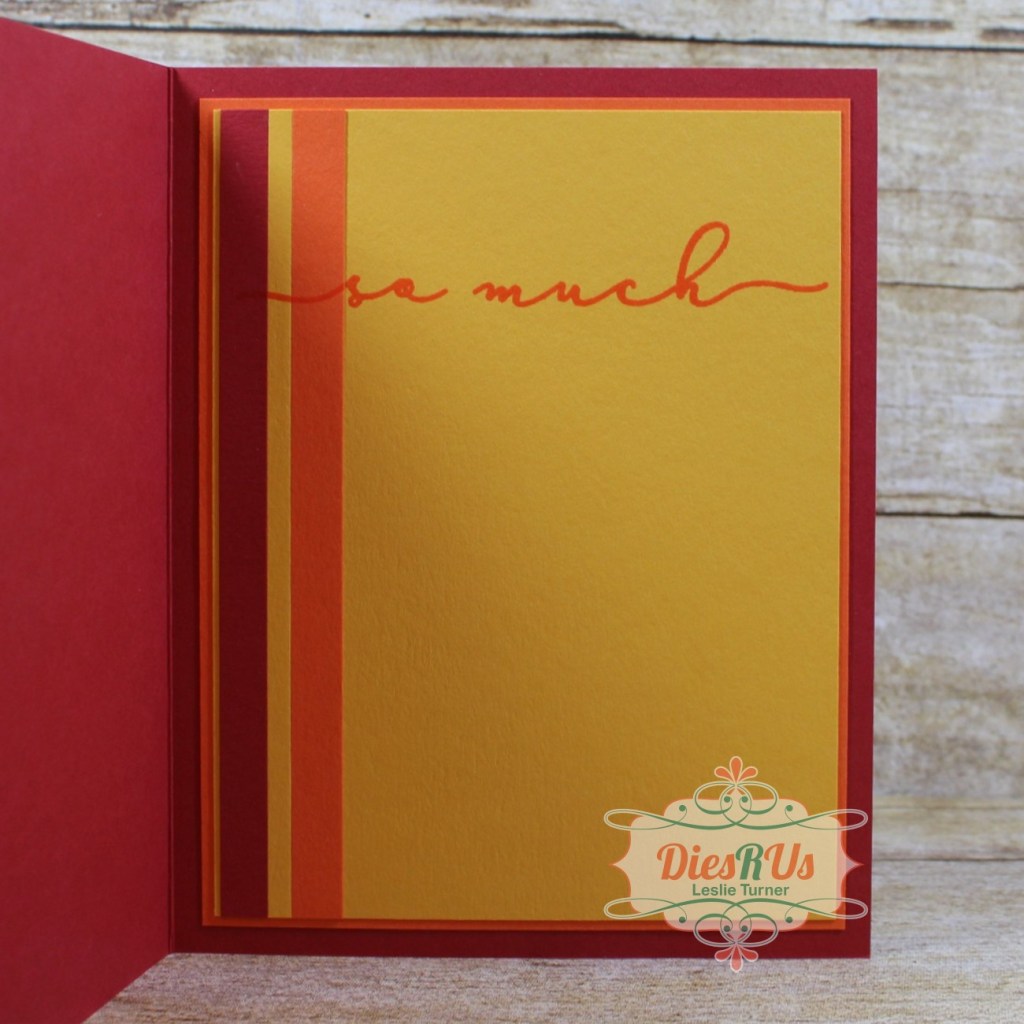
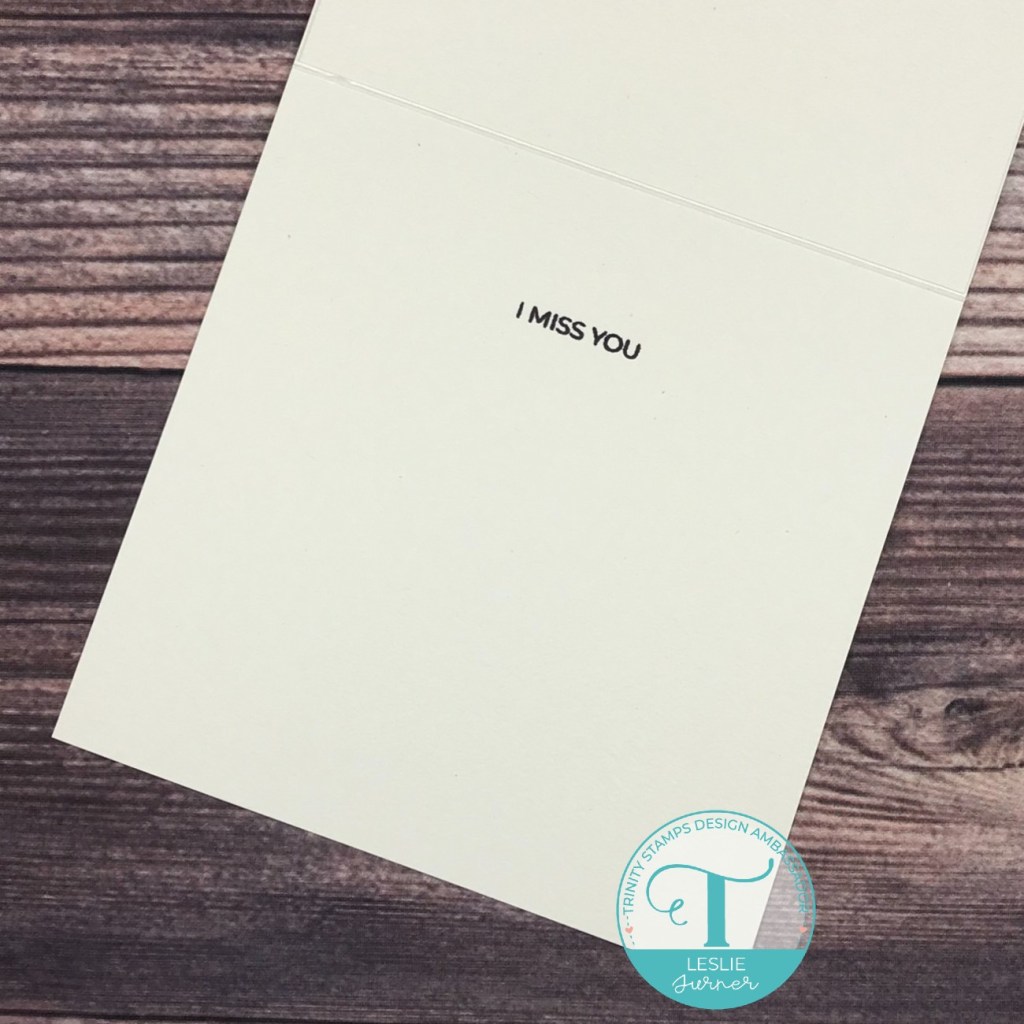
I stamped the inside sentiment from the A Sentiment for (Almost) Everything stamp set in brown ink directly on the inside flap without doing any layering. Very unusual for me, lol!

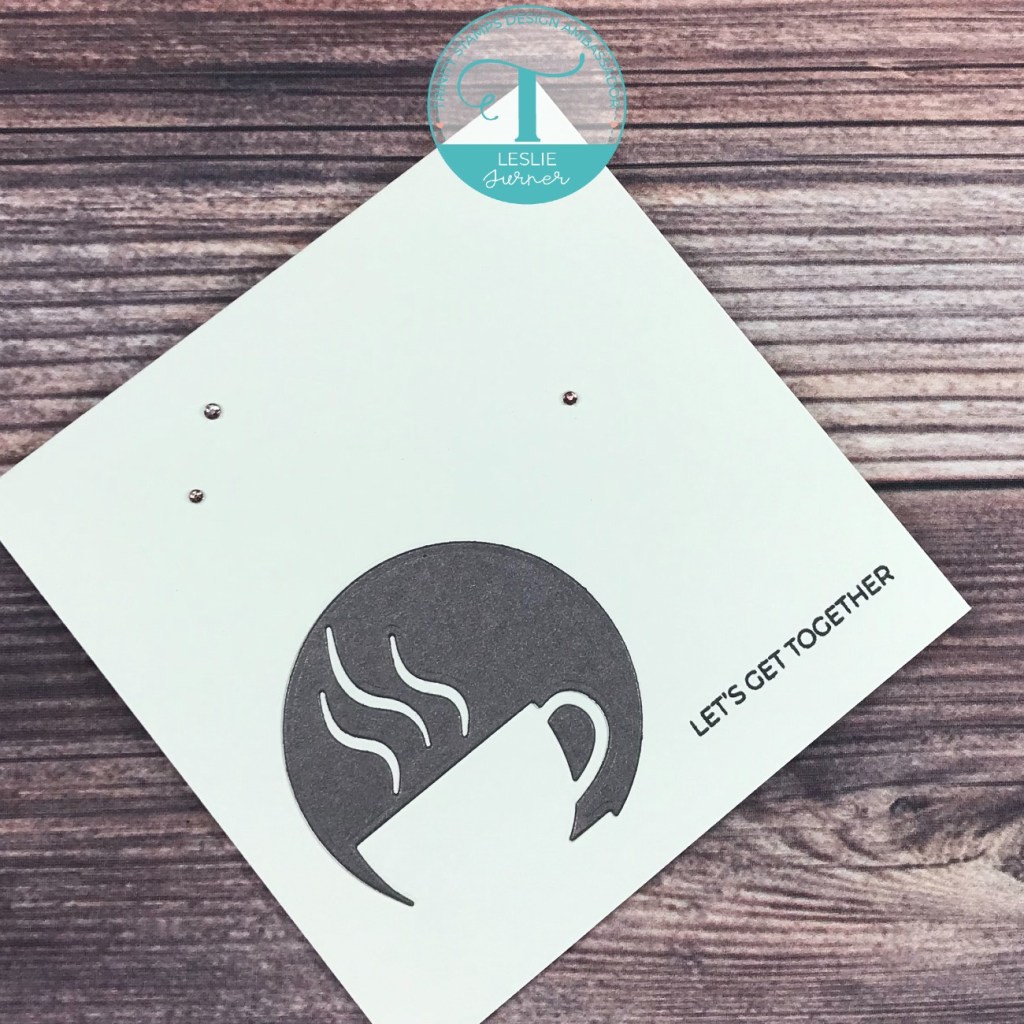
And one more look… super happy with how this turned out! As I mentioned above, this card would be super easy to mass-produce to have several in your stash!

Sharing in the following challenges:
1. Lemon Shortbread Challenges: #159 – Anything Goes
2. Lil Patch of Crafty Friends: #170 – Anything Goes

Trinity Stamps products used:
Cafe Cup Cutout Die
A Sentiment for (Almost) Everything stamp set

Other products used:
Cardstock/Paper: CutCardStock Royal Sundance Felt Natural cardstock, CutCardStock Curious Metallic Chestnut cardstock
Ink: Memento Espresso Truffle ink; Arteza BR92 alcohol marker (to color clear rhinestones)
Accessories: Tonic Studios 12″ Guillotine Paper Trimmer, MISTI stamp tool, Big Shot, Bearly Art precision craft glue, Flourish with a Bling clear rhinestones

I hope you’ve enjoyed this project and you’re inspired to get those craft supplies out to play! Be sure to check out all the amazing stamps, dies and other goodies at Trinity Stamps! And head on over to the Trinity Stamps Facebook Page for loads of inspiration! And while you’re at it, join the Trinity Stamps Facebook community group to connect with other Trinity Stamps fans! Thanks so much for stopping by today – we’ll see you next time!

Scrappy hugs,
lesliesig

Under the Mistletoe

12/1/21 Top Pick at ABC Christmas Challenge!

Hi friends! I hope you are having a wonderful Saturday! I started mine off taking photos in my studio, so you know I’m having a good one! Affiliate links are used in this post at no cost to you – I really appreciate your support! I’m one of those who makes extra cards all year long, in a variety of themes, and stash them away until I need them. Oftentimes, they’ll either be used for challenges that arise or for random design team projects if I happen to change my other mind (since I typically work way ahead on DT projects), lol. I’m sharing this card in The Outlawz Monday Greetings Challenge where our sponsor is Twinkle Lane Designs and the challenge is to Add Buttons and/or Bows. This sprig of mistletoe is ‘tied’ together with a bow, so win-win!

I cut a mini slimline card base from Neenah Classic Crest Solar White cardstock and layering panels using the Waffle Flower Mini Slimline Layers die set cut from Neenah Classic Crest Solar White cardstock and CutCardStock Pop-Tone Jellybean Green cardstock. Using black, green and two different red inks, I stamped the mistletoe, bow and sentiment (all from the STAMPlorations Layered Mistletoe stamp set) on the white cardstock layering panel. I adhered the panels together and then to the card base. I added several dots of white gloss Crystal Drops to finish the front panel.

I die cut the inside panel from Neenah Classic Crest Solar White cardstock and embellished it with narrow strips of CutCardStock Basis Red cardstock at the top and bottom of the panel, stamped the sentiment in red ink, and layered the panel on a die cut panel cut from CutCardStock Pop-Tone Jellybean Green cardstock.

And one more peek… so loving how this turned out! I’m in love with all of STAMPlorations’ layered stamp sets! The whimsical nature of the images is just so fun!

Sharing in the following challenges:
1. A Perfect Time To Craft: #11 – Anything Goes
2. ABC Christmas Challenge: W is for Whimsical
3. Aud Sentiments Challenge Blog: #288 – Anything Goes + A Sentiment
4. Classic Design Challenge: #11 – Anything Goes
5. Crafty Catz: #573 – Anything Goes with optional Add Some Metal
6. Creative Inspirations Challenge Blog: November – Wonderful Winter/Feeling Festive
7. Dragonfly Dreams: November – Christmas/Winter
8. Sweet Stampers Challenge Blog: #62 – Christmas
9. The Corrosive Challenge: #11 – November Anything Goes

Products used:
Cardstock/Paper: Neenah Classic Crest Solar White cardstock, CutCardStock Pop-Tone Jellybean Green cardstock, CutCardStock Basis Red cardstock
Stamps: STAMPlorations Layered Mistletoe stamp set
Ink: Catherine Pooler Midnight, Eucalyptus, Rockin’ Red and Cranberry Fizz inks
Dies/Punches:  Waffle Flower Mini Slimline Layers die set
Accessories: Tonic Studios 12″ Guillotine Paper Trimmer, MISTI stamp tool, Big Shot, Bearly Art precision craft glue, Nuvo White Gloss Crystal Drops

I hope you’ve enjoyed this project and will come over and join in all the fun at The Outlawz Challenges! Lots of fun going on! Thanks so much for stopping by today – we’ll see you next time! ;)

Scrappy hugs,
lesliesig

Merry Christmas Camper

11/30/21 November Rising Star at A Place To Start!
8/17/22 CAS Weekly Favorite at Splitcoast Stampers!

Hi everyone! It’s Monday already and I hope you had a fabulous weekend! Affiliate links are used in this post at no cost to you. I really appreciate your support! Our new challenge is live over at Merry Little Christmas Challenge Blog and I’m excited to share my DT inspiration project for MLCCB #40 – November Anything Christmas Goes! I created another clean and simple card and this one is near and dear to my heart – hubby and I were full-time RVers for nearly four years and just sold our fifth wheel last year. We sure had some good times and met some awesome people! This was a super fun project created with Prickley Pear Stamps Ham Camper Winter stamp set and Prickley Pear Stamps Ham Camper stamp set along with the coordinating Ham Camper die set!

I created a standard A2 size top-folding card base from Neenah Classic Crest 110# Solar White cardstock along with a slightly smaller layering panel. Using the Prickley Pear Stamps Ham Camper Winter stamp set and Prickley Pear Stamps Ham Camper stamp set, I stamped the camper and elements on a scrap of Neenah Classic Crest 80# Solar White cardstock, colored them with alcohol markers and then cut them with the Ham Camper die set, and then adhered the awning and door to the camper. I applied a strip of Eyelet Outlet Grass Washi Tape across the bottom of the front panel and adhered the camper. I adhered the panel to the card base, stamped the sentiment above the camper, and added three red gold rim flat-back pearls.

I cut the inside panel from Neenah Classic Crest 80# Solar White cardstock and kept it fairly CAS as well – embellished it with a narrow strip of red cardstock, stamped the sentiment and candy cane, and layered the panel on red cardstock.

And one more peek… what a fun card for that RVer on your Christmas card list!

Sharing in the following challenges:
1. A Bit More Time To Craft Extra Challenge: November Anything Goes
2. A Perfect Time To Craft Challenge: #11 November – Anything Goes
3. A Place To Start: #11 – Craft A Favorite Memory (we were full-time RVers in a fifth wheel for nearly 4 years)
4. Classic Design Challenge Blog: #11 November – Anything Goes

Products used:
Cardstock/Paper: Neenah Classic Crest Solar White cardstock, Colorbok red cardstock
Stamps: Prickley Pear Stamps Ham Camper Winter stamp set and Prickley Pear Stamps Ham Camper stamp set, and Build an Owl stamp set
Ink: Memento Tuxedo Black ink; Nuvo alcohol markers- Rich Reds Collection, Irish Clover Collection, Woodland Greens Collection; Pentel Slicci Silver pen
Dies/Punches: Prickley Pear Stamps Ham Camper die set
Accessories: Tonic Studios 12″ Guillotine Paper Trimmer, Tombow Mono permanent adhesive, Bearly Art precision craft glue, MISTI stamp tool, Gemini Junior, Eyelet Outlet Grass Washi Tape, ScraPerfect red gold-rim flat-back pearls

I hope you’ve enjoyed today’s card and will link up a Christmas project with us this month! We can’t wait to see what you create! Thanks so much for stopping by today – we’ll see you again soon! ;)

Scrappy hugs,
lesliesig

You’re So Pawsome!

Hi friends! It’s Hump Day and it’s Day 3 of the 2021 Cat Lovers Hop and I’ve popped in this morning with fun cat-themed mini slim thank you card! Affiliate links are used in this post at no cost to you – I really appreciate your support! The Hop is going on until the 30th, so if you’re a fellow cat lover, come join us! There’s a lot of fun and games to join in every day, and Janis has lined up some pretty amazing prizes to give away at the end!

I’ve been on a mini slimline kick lately so I created a CAS thank you card in a gray and white color combo featuring a pretty Siamese-looking kitty. I actually got a set of mini slimline layers dies a couple weeks ago but didn’t use them for this card because I rounded the bottom right corner and I just didn’t want to do that with die layers. The 3-1/2″ x 6″ mini slim size is legal to mail at the post office whereas the 3″ x 6″ mini slim size is not, so I’ve been making my card bases the slightly larger width and the layer dies are not as readily found as the 3″ x 6″ size which makes no sense to me. Whoever started the 3″ x 6″ size mini slim trend didn’t do their homework, lol!

I cut a 3-1/2″ x 6″ side-folding mini slimline card base and layering panel from CutCardStock Basis White cardstock along with a layering panel from CutCardStock Basis Gray cardstock and strip from Hot Off The Press light gray gingham paper, rounding the bottom right corner of the card base and layering panels. I stamped the cat image and sentiment in light gray ink and colored the cat with a lighter gray alcohol marker. I adhered a layered strip across the top of the white panel and added gray enamel dots.

I cut the inside panel from CutCardStock Basis White cardstock and embellished it with strips cut from CutCardStock Basis Gray cardstock and light gray gingham paper, added a CRAFTplorations Just Thank You Clear Sticker sentiment and layered the panel on the gray cardstock.

And one more peek… such an adorable kitty thank you! Love the clean and simple!

Products used:
Cardstock/Paper: CutCardStock Basis White cardstock, CutCardStock Basis Gray cardstock, Hot Off The Press Gingham #2 double-sided 6×6 papers
Stamps: STAMPlorations Purrfectly Pawsome stamp set
Ink: Catherine Pooler Twilight ink; Arteza alcohol marker- CG08
Dies/Punches: Kadomaru Pro Corner Rounder
Accessories: Tonic Studios 12″ Guillotine Paper Trimmer, MISTI stamp tool, Bearly Art precision craft glue, Eyelet Outlet Gray Enamel Dots, CRAFTplorations Just Thank You Clear Stickers

I hope you’ve enjoyed today’s project and you’ll consider joining us! Pop over to the 2021 Cat Lovers Hop to get all the details! Thanks so much for stopping by today – we’ll see you next time! ;)

Scrappy hugs,
lesliesig

You’re the Sweetest

Hi everyone! Well, another week has come and gone and we find ourselves busting into another weekend! I hope you have something fun planned! I’m happy to be back on the Eyelet Outlet blog today with another awesome DT inspiration project! I created a sweet friendship card featuring our new Cupcake Swirl Brads that hit the store last week! Don’t these look super yummy?! I paired them with White Enamel Dots on the front and used a little bit of Valentine Washi Tape on the inside. This easy design is just the ticket if you need some uplifting friendship cards in your stash!

I cut a standard A2 size top-folding card base and layering strip from Neenah Classic Crest Solar White cardstock along with a pink patterned paper layering panel and strip from one of my favorites, The Paper Studio Tattered and Worn paper pad. I rounded the bottom right corner of the card base and layering panel, and adhered the panels to the card base. I adhered the strips together, added three Cupcake Swirl Brads toward the top, and adhered the strip vertically to the card base. The final step to complete the front was adding a die cut digital sentiment embellished with White Enamel Dots.

I cut a short panel for the inside from Neenah Classic Crest Solar White cardstock, embellished it with strips of Valentine Washi Tape and stamped the sentiment from the Pretty Pink Posh Everyday Greetings stamp set, and layered it on a patterned paper layer.

And one more peek… such a fun friendship card that could be used for a variety of occasions! I’m in love with these cupcake brads!

Eyelet Outlet products used:
Cupcake Swirl Brads
Valentine Washi Tape
White Enamel Dots

Other products used:
Cardstock/Paper: Neenah Classic Crest Solar White cardstock, The Paper Studio Tattered and Worn 12×12 paper pad
Stamps: My Scrap Chick digital sentiment, Pretty Pink Posh Everyday Greetings stamp set
Ink: Hero Arts Bubble Gum ink
Dies/Punches: Kadomaru corner rounder, Memory Box Stitched Circle Layers
Accessories: Tonic Studios 12″ Guillotine Paper Trimmer, Tombow Mono permanent adhesive, Bearly Art precision craft glue, Big Shot, MISTI stamp tool

I hope you’ve enjoyed today’s project! Be sure to check out all the fun goodies at Eyelet Outlet! I can already see you drooling, lol! Be sure to ‘like’ and ‘follow’ Eyelet Outlet Facebook Page to keep up with news and sales, and while you’re at it, join the Eyelet Outlet Fans Facebook group for lots of creative inspiration! Thanks so much for stopping by today – we’ll see you next time! ;)

Scrappy hugs,
lesliesig

jolly

Hi everyone! A very Happy Saturday to you – I hope you’ve had a great week! We’ve had another busy week with doctor appointments for both Ed and I, and I’m feverishly playing catch-up, lol! Affiliate links are used in this post at no cost to you. I really appreciate your support! I’m stoked to be back on the Eyelet Outlet blog today with another awesome DT inspiration project! I created a festive and fun CAS Christmas card featuring our Santa Hat Brads, Santa Suit Brads and Snowflake Brads!

I cut a standard A2 size top-folding card base from Neenah Classic Crest Solar White 110# cardstock along with a stitched rectangle die cut for the background from Neenah Classic Crest Solar White 80# cardstock. I die cut the ‘jolly’ word from red glitter sheet and adhered it to the stitched panel. I added a Santa Hat Brad and and two boots from the Santa Suit Brads, along with several Snowflake Brads, and then adhered the panel to the card base.

I cut the inside panel from Neenah Classic Crest 80# Solar White cardstock and embellished it with a strip of red glitter sheet. I stamped the sentiment in black ink and cut it with a small stitched rectangle die. I added a Santa Suit Brad in the lower left corner and layered the panel on CutCardStock Pop-Tone Wild Cherry cardstock.

And one more look… super happy with how this turned out – super festive and super easy! ;)

Eyelet Outlet products used:
Santa Hat Brads
Santa Suit Brads
Snowflake Brads

Other products used:
Cardstock/Paper: Neenah Classic Crest 110# and 80# Solar White cardstock, CutCardStock Pop-Tone Wild Cherry cardstock, Brutus Monroe Red Glitter Sheet
Stamps: The Project Bin Merriest Christmas stamp set
Ink: Memento Tuxedo Black ink
Dies/Punches: Catherine Pooler Jolly Word Die, Memory Box Stitched Rectangle Layers, JustRite Stitched A2 Banners and Rectangles
Accessories: Tonic Studios 12″ Guillotine Paper Trimmer, MISTI stamp tool, Big Shot, Bearly Art precision craft glue, Darice 1/4″ Hercules double-sided tape

I hope you’ve enjoyed today’s project! Be sure to check out all the fun goodies at Eyelet Outlet! I can already see you drooling, lol! Be sure to ‘like’ and ‘follow’ Eyelet Outlet Facebook Page to keep up with news and sales, and while you’re at it, join the Eyelet Outlet Fans Facebook group for lots of creative inspiration! Thanks so much for stopping by today – we’ll see you next time! ;)

Scrappy hugs,
lesliesig

season’s greetings

Happy Friday, friends! I hope you have a great day and a great weekend with something fun planned! Our new challenge is live over at Merry Little Christmas Challenge Blog and I’m super excited to share my DT inspiration project for MLCCB #39 – October Anything Christmas Goes! I created a pair of adorable cards that are almost identical – the only difference is what’s on top of the little car! I just had to use both of those elements! Some more older Lawn Fawn stamps and dies that I absolutely love!

I created two standard A2 size top-fold card bases from Neenah Classic Crest 110# Solar White cardstock and rounded the lower right corner on each. I stamped the car twice and both of the elements on a scrap of Neenah Classic Crest Solar White cardstock, colored them with alcohol markers and cut them with the coordinating dies. I created the background on each card base with a strip of Eyelet Outlet Road Washi Tape and a Memory Box Cityscape cut from CutCardStock Dolphin cardstock. I stamped the exhaust hearts on the washi tape in Jet Black StazOn, adhered the elements to the top of each car, and adhered the cars to the road on dimensionals. I stamped the sentiment beneath the road and added a single iridescent gemstone on each.

I stamped the sentiment in black ink and added a narrow red cardstock strip down the left side for a little interest. The inside is the same on both cards, and I used the Stampingbella gnome sentiments stamp set again… funny how the gnome sentiments are coming in so handy for non-gnome cards, lol!

And one more peek at the pair… totally loving how these turned out! They are so stinkin’ cute I can’t stand it!

Products used:
Cardstock/Paper: Neenah Classic Crest Solar White cardstock, CutCardStock Dolphin cardstock, red cardstock scrap
Stamps: Lawn Fawn Home for the Holidays stamp set, Stampingbella Festive Gnome Sentiments stamp set
Ink: Memento Tuxedo Black ink, Ranger distress ink- black soot and peeled paint; Nuvo alcohol markers- Aquamarine Collection, Rich Reds Collection, Sunshine Yellow Collection, Marina Blues Collection, Palma Violets Collection, Natural Browns Collection, Stormy Greys Collection; Pentel Slicci Silver pen, StazOn Jet Black ink
Dies/Punches: Lawn Fawn Home for the Holidays die set, Memory Box Cityscape Nightline die, Kadomaru Pro corner rounder
Accessories: Tonic Studios 12″ Guillotine Paper Trimmer, Bearly Art precision craft glue, MISTI stamp tool, Gemini Junior, Stampin’ Up Dimensionals, Eyelet Outlet Road Washi Tape, ScraPerfect iridescent gemstone

I hope you’ve enjoyed seeing these cards and will link up a Christmas project with us this month! We’d love to see what you create! Thanks so much for stopping by today – we’ll see you again soon! ;)

Scrappy hugs,
lesliesig

Just Because

Hi everyone! It’s Friday and I swear they roll around so darn fast these days, lol! I hope you’ve had a great week! Our new challenge launched this morning over at Love To Craft Challenge Blog and I’m delighted to share my DT inspiration project for LTCCB #63 – October Anything Goes! I created a clean and simple card featuring a pretty gold heat embossed 3-Flower Collage image stamped with an old Stamp Camp stamp that my late sister gifted me a number of years ago. This stamp definitely has some sentimental value.

I created a standard A2 size top-folding landscape card base from Neenah Classic Crest 110# Solar White cardstock along with a layering panel for the front which I adhered to a CutCardStock Pop-Tone Wild Cherry cardstock panel. I stamped the 3-Flower Collage image in Versamark and heat embossed it in Ranger Super Fine Detail Gold embossing powder. I trimmed the stamped image, layered it on CutCardStock Pop-Tone Wild Cherry cardstock, and colored the negative spaces of the branches and flowers with fine point Pitt Artist pens, connecting the squares with the branches. I adhered a cardinal brad to each collage square and adhered the panel to the bottom of the card base. I stamped the sentiment in red ink and added three small red flat-back pearls.

I cut the inside panel from Neenah Classic Crest 80# Solar White cardstock and embellished the bottom of the panel with cardinal washi tape and a narrow strip of CutCardStock Pop-Tone Wild Cherry cardstock cardstock, stamped the sentiment in red ink, and layered the panel on the red cardstock.

And one more look… I’m smitten with this stamped image embossed in gold!

Products used:
Cardstock/Paper: Neenah Classic Crest Solar White cardstock, CutCardStock Pop-Tone Wild Cherry cardstock
Stamps: Stamp Camp Floral Blocks stamp, The Cat’s Pajamas Simply Stacked Sentiments stamp set
Ink: Versamark; Faber-Castell Pitt Artist Pens- May Green, Middle Purple Pink, Orange Glaze and Indianthrene Blue; Memento Rhubarb Stalk ink
Accessories: Tonic Studios 12″ Guillotine Paper Trimmer, Bearly Art precision craft glue, Tombow Mono permanent adhesive, Ranger Super Fine Detail Gold embossing powder, MISTI stamp tool, Eyelet Outlet Cardinal Brads, Eyelet Outlet Cardinal Washi Tape, Flourish with a Bling Red Pearls

I hope you’ve enjoyed today’s project and will link up an ‘anything goes’ project with us this month! Thanks so much for stopping by – we’ll see you again soon! ;)

Scrappy hugs,
lesliesig

thank you so much

Hi everyone! A big ole’ Happy Friday to you all! I hope you’ve had a great week and have something fun planned this weekend! Affiliate links are used in this post at no cost to you. I really appreciate your support! I’m delighted to be back on the Dies R Us Inspiration Blog today with another awesome DT inspiration project! I created a clean and simple thank you card featuring the Birch Press Design Petal Triangle Layer Set that I used in a very bright and bold fashion with a red, orange and yellow color combo! I love me some color but I have to admit that I wasn’t sure about this when I started it, but the longer I looked at the finished card the more I like it! It’s extremely rare that I don’t have some white in my cards and this has absolutely no white whatsoever!

I cut a standard A2 size side-folding card base from CutCardStock Basis Red cardstock along with a layering panel from CutCardStock Basis Gold cardstock which I adhered to the card base. Using the Birch Press Design Petal Triangle Layer Set, I cut the three pieces from CutCardStock Basis Red cardstock, CutCardStock Basis Orange cardstock, CutCardStock Basis Gold cardstock, adhered them together, and adhered the piece to the card front. I stamped the sentiment in orange ink and added some gemstones to complete the front.

I cut the inside panel from CutCardStock Basis Gold cardstock and embellished it with strips cut from CutCardStock Basis Red cardstock, CutCardStock Basis Orange cardstock, CutCardStock Basis Gold cardstock. I stamped the sentiment in orange ink and layered the panel on the orange cardstock.

And one more peek… such a simple design that really packs a powerful punch with the bright colors! This Petal Triangle Layer Set is amazing and I highly recommend any of the Birch Press Design layer sets!

Dies R Us products used:
Birch Press Design Petal Triangle Layer Set

Other products used:
Cardstock/Paper: CutCardStock Basis Red cardstock, CutCardStock Basis Orange cardstock, CutCardStock Basis Gold cardstock [Update: CutCardStock no longer carries the Basis Orange cardstock but these other orange cardstock options are available – Pop-Tone Tangy Orange, Pop-Tone Orange Fizz and Basis Dark Orange. I have all three of these in my stash so I can personally vouch for the wonderful orange colors that would be good substitutions!]
Stamps: Waffle Flower Sentiment Additions stamp set
Ink: Catherine Pooler Orange Twist ink
Accessories: Tonic Studios 12″ Guillotine Paper Trimmer, Big Shot, Bearly Art precision craft glue, MISTI stamp tool, Eyelet Outlet red jewel bling

I hope you’ve enjoyed today’s project! Be sure to check out all the fun goodies at the Dies R Us store! They not only sell dies… they also carry stamps, embossing tools and supplies, all kinds of craft supplies, slimline products and even Yupo paper! Be sure to join in the fun going on over at the Dies R Us Challenge Blog – there’s a new challenge theme posted on the 1st and 15th of each month and one lucky random winner will receive a gift voucher prize to the Dies R Us store! And be sure to ‘like’ and ‘follow’ Dies R Us Facebook Page for lots of creative inspiration and to keep up with the latest news! Thanks so much for stopping by today – we’ll see you next time! ;)

Scrappy hugs,
lesliesig

Happy Summer Days

Hi everyone! Happy Thursday – I hope you’re having a wonderful week! Hard to believe we’ve surpassed the middle of August already but I have to admit that I’m so ready for Fall and Winter to get here! I’m stoked to be back on the CutCardStock blog today with an awesome DT inspiration project featuring white cardstock, which is on sale this month (along with ivory – so be sure to stock up!) that I paired with red and green cardstock and a little bit of washi tape. Affiliate links are used in this post at no cost to you. I really appreciate your support! I created a super fun CAS Summer card boasting a picnic table with some handmade watermelon slices. I have several watermelon slice dies but they were too small for this card so I created my own with circle dies and a black marker… and what picnic is complete without little ants?!

I cut a standard A2 size top-folding card base from Neenah Classic Crest Solar White 110# cardstock along with a strip for the bottom from Neenah Classic Crest Solar White 80# cardstock which I covered in some red heart washi tape and made into a picnic table. I did my ‘thing’ of rounding the bottom right corner. I die cut green and red circles from CutCardStock Basis Red cardstock and CutCardStock Bonsai Green cardstock and layered them together, then cut them in half and cut one of the halves in half to make three slices of watermelon. I think I’ve forgotten to mention that I had to replace my Big Shot about six weeks ago because I wore the old one slam out! Have you ever heard of wearing out a Big Shot?! I guess after 11 years I got my money’s worth out of it, lol! The new one cuts like a dream. I had gotten several Magic Mats a while back and they make such a difference in cutting, plus they save a ton in cutting plates! Okay, back to the card… I added watermelon seeds with a black Flair marker, added ant brads to each slice, and adhered two of them to the picnic table. I stamped the sentiment in black ink, and the finishing touch was adding several red gemstones.

I cut the inside panel from Neenah Classic Crest Solar White 80# cardstock and embellished it with the red heart washi tape and a narrow strip of CutCardStock Basis Red cardstock, stamped the sentiment and added the remaining slice of watermelon, and layered the panel on the red cardstock.

And one more look… super happy with how this turned out! What a great Summer card created with amazing cardstock, and it was so easy to put together!

CutCardStock products used:
Neenah Classic Crest Solar White 110# and 80# cardstock
CutCardStock Basis Red cardstock
CutCardStock Bonsai Green cardstock

Other products used:
Stamps: Great Impressions Happy Summer Days sentiment stamp, Waffle Flower Sentiment Additions stamp set
Ink: PaperMate Flair Black medium point pen, Memento Tuxedo Black ink
Dies/Punches: Kadomaru Pro corner rounder, Spellbinders Standard Circles dies
Accessories: Tonic Studios 12″ Guillotine Paper Trimmer, MISTI stamp tool, Gemini Junior, Bearly Arts precision craft glue, Eyelet Outlet Mini Ant Brads, Eyelet Outlet Heart Washi Tape, Eyelet Outlet red jewel bling

I hope you’ve enjoyed today’s project and you’re inspired to get crafty! Be sure to check out all the awesome cardstock and other goodies at CutCardStock (adhesives, labels, stickers, pens, watercolors and ribbon to name a few). And head on over to the CutCardStock Facebook Page for more inspiration! Thanks so much for stopping by today – we’ll see you next time!

Scrappy hugs,
lesliesig