you’re one in a CHAMELEON

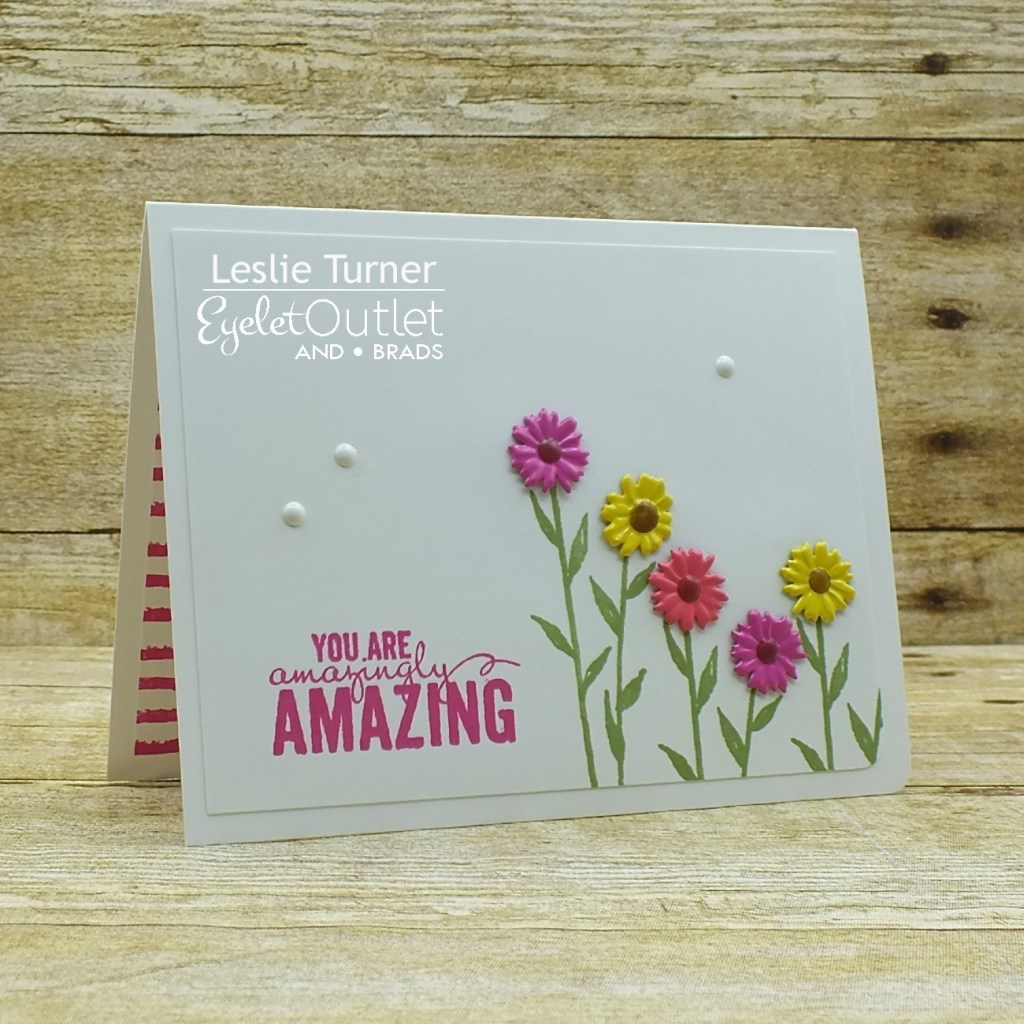
Hi everyone! A very Happy Saturday to you – I hope you’ve had a great week! They sure are flying by fast! Affiliate links are used in this post at no cost to you. I really appreciate your support! I’m stoked to be back on the Eyelet Outlet blog today with another awesome DT inspiration project! I created a fun clean and simple thank you card featuring some of the newest brads in the store which I paired with some awesome skinny washi tape and my favorite enamel dots!

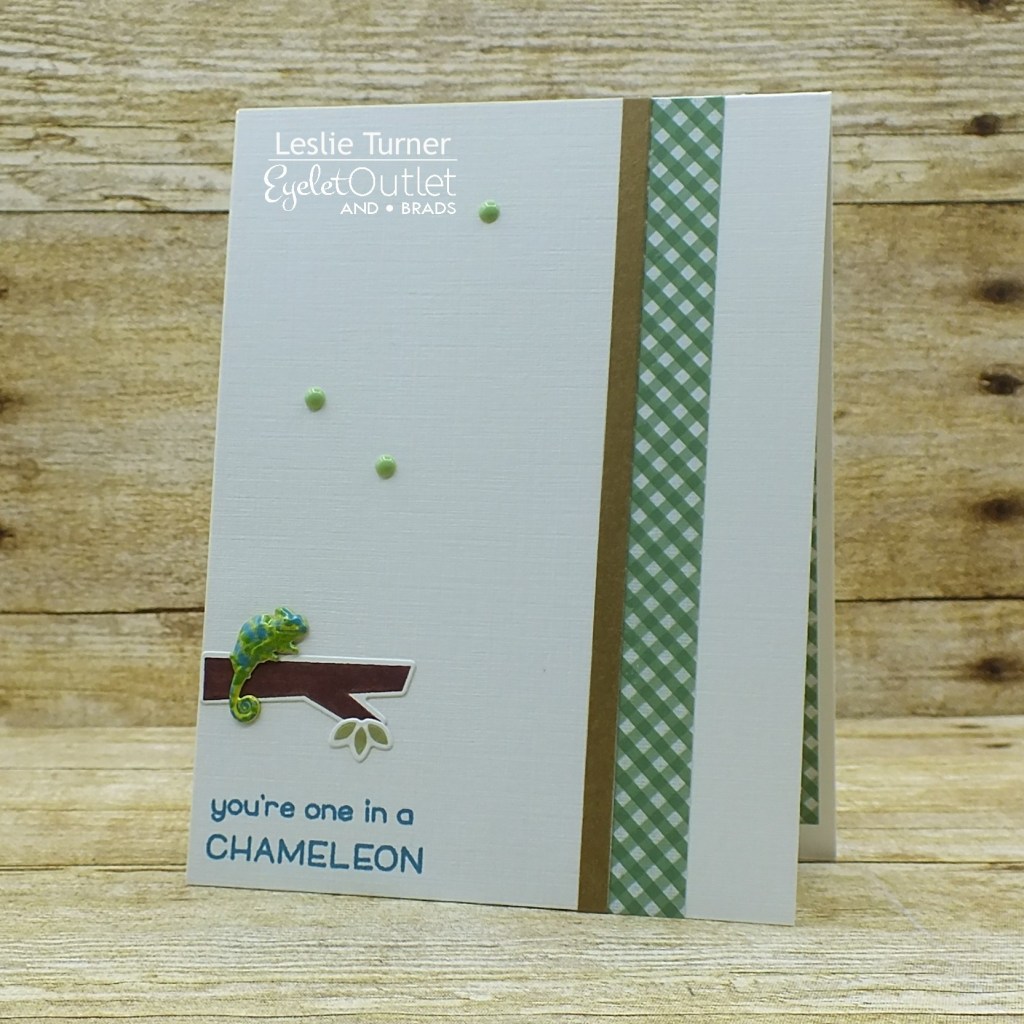
The top-folding card base is a standard A2 size cut from Neenah Classic Linen Solar White 100# cardstock which I embellished with a strip of patterned paper and a strip of Skinny Gold Washi Tape adhered to a skinny strip of white cardstock. The star of the show is a cute little chameleon from the Reptile Brads pack sitting on a stamped and die cut limb with a small cluster of leaves. I stamped the sentiment in teal ink in the lower left corner and added some Green Enamel Dots to complete the front.

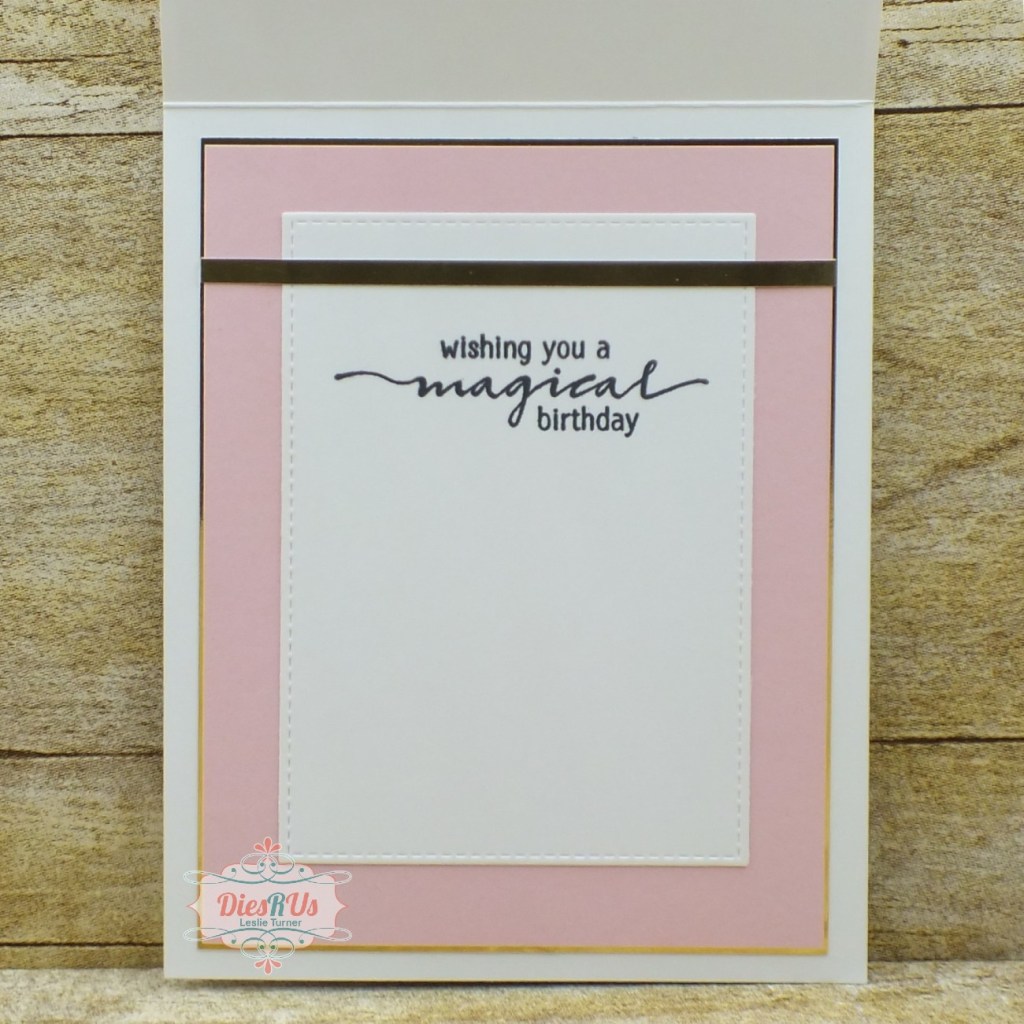
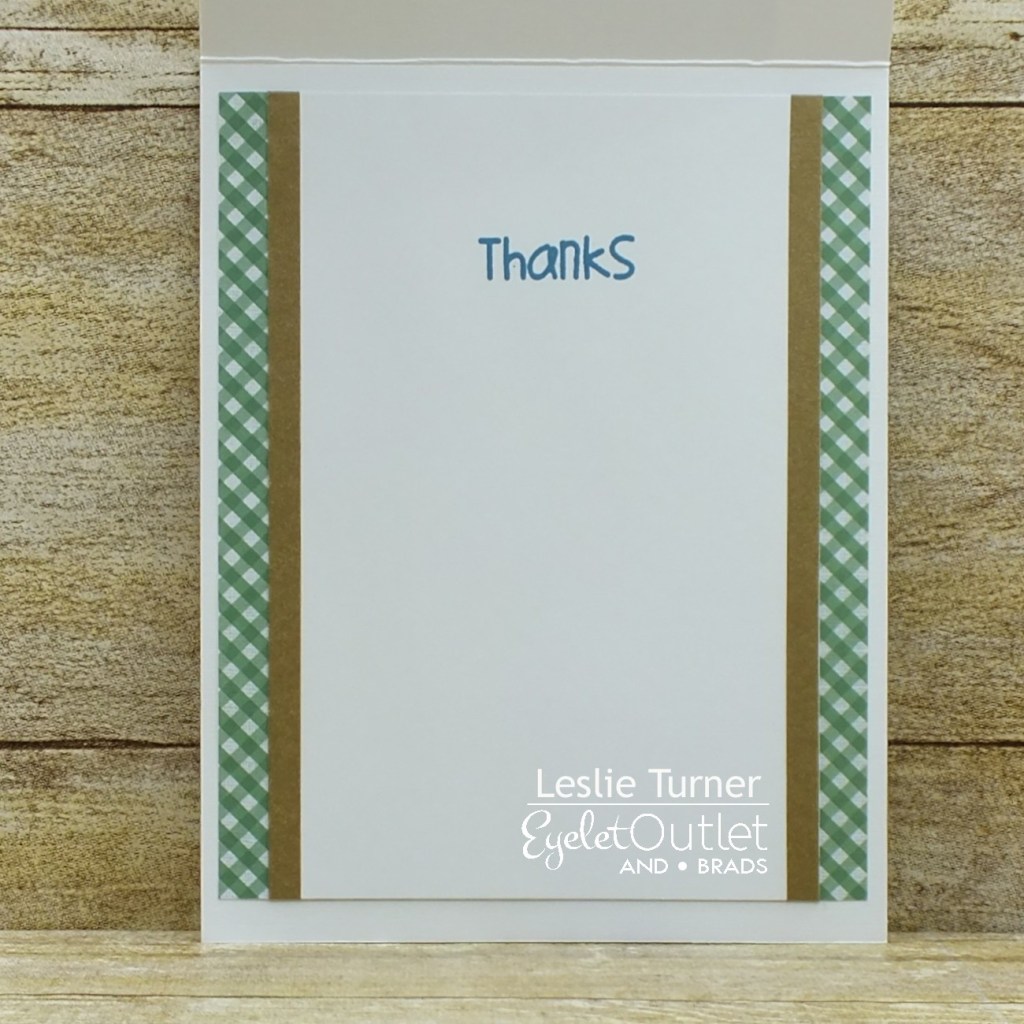
I cut the inside panel from Neenah Classic Crest 80# Solar White cardstock and embellished it with strips of patterned paper and strips of Skinny Gold Washi Tape, stamped the sentiment in teal ink, and adhered the panel to the inside of the card base.

And one more look… love, love, love how this turned out! These reptile brads are super adorable! ;)

Eyelet Outlet products used:
Reptile Brads
Skinny Gold Washi Tape
Green Enamel Dots

Other products used:
Cardstock/Paper: Neenah Classic Linen 100# Solar White cardstock, Neenah Classic Crest 80# Solar White cardstock The Paper Studio Four Seasons and Everything In Between -2- paper pad
Stamps: Lawn Fawn One in a Chameleon stamp set, Paper Smooches Natural Beauties stamp set
Ink: Memento Rich Cocoa, Pistachio and Teal Zeal ink; Nuvo alcohol marker- 465
Dies/Punches: Lawn Fawn One in a Chameleon die set
Accessories: Tombow Mono permanent adhesive, Bearly Art precision craft glue, MISTI stamp tool, Big Shot

I hope you’ve enjoyed today’s project! Be sure to check out all the fun goodies at Eyelet Outlet! I can already see you drooling, lol! Be sure to ‘like’ and ‘follow’ Eyelet Outlet Facebook Page to keep up with news and sales, and while you’re at it, join the Eyelet Outlet Fans Facebook group for lots of creative inspiration! Thanks so much for stopping by today – we’ll see you next time! ;)

Scrappy hugs,
lesliesig

Happy Father’s Day

5/3/21 Winner at Pammie’s Inky Pinkies Challenges!

Hi everyone! Hope you’ve had an amazing week! Hard to believe it’s the last day of April already! I’m delighted to be back on the Dies R Us Inspiration Blog today with another awesome DT inspiration project! Affiliate links are used in this post at no cost to you. I really appreciate your support! I created a super clean and simple Father’s Day card in a navy blue and white color combo. You know how guys are… the simpler, the better, lol!

I created a standard A2 size top-folding card base from Neenah Classic Crest Solar White 110# cardstock, along with narrow panels cut from Neenah Classic Linen Solar White 100# cardstock and CutCardStock Basis Navy cardstock, which I layered together and adhered to the left side of the card base. Using the Tutti Designs Fancy Tie die, I cut the tie twice from CutCardStock Basis Navy cardstock, layered them together for slight dimension and adhered them to the narrow panel. I stamped the sentiment in navy blue ink, which completed the card front.

For the inside, I also cut narrow panels from Neenah Classic Linen Solar White 100# cardstock and CutCardStock Basis Navy cardstock, layered them together and adhered them to the left side of the panel. I stamped the sentiment in navy blue ink and adhered the panel to the inside of the card base.

And one more peek… so loving how this turned out! This is the true definition of CAS!

Sharing in the following challenges:
1. Addicted To Stamps and More: #404 – Any Occasion (Father’s Day)
2. Crafty Catz: #549 – Anything Goes (no twist)
3. Cut It Up: #224 – Masculine Cards
4. International Art & Soul: #107 – Card or Gift for a Man
5. Pammie’s Inky Pinkies Challenge: #2117 – Anything Goes

Dies R Us products used:
Tutti Designs Fancy Tie die

Other products used:
Cardstock/Paper:  Neenah Classic Crest Solar White 110# cardstock, Neenah Classic Linen Solar White 100# cardstock, CutCardStock Basis Navy cardstock
Stamps: The Project Bin Classic Man stamp set
Ink: Memento Nautical Blue ink
Accessories: Tombow Mono permanent adhesive, Bearly Art precision craft glue, MISTI stamp tool, Big Shot

I hope you’ve enjoyed today’s project! Be sure to check out all the fun goodies at the Dies R Us store! They not only sell dies… they also carry stamps, embossing tools and supplies, all kinds of craft supplies, slimline products and even Yupo paper! Be sure to join in the fun going on over at the Dies R Us Challenge Blog – there’s a new challenge theme posted on the 1st and 15th of each month and one lucky random winner will receive a gift voucher prize to the Dies R Us store! And be sure to ‘like’ and ‘follow’ Dies R Us Facebook Page for lots of creative inspiration and to keep up with the latest news! Thanks so much for stopping by today – we’ll see you next time! ;)

Scrappy hugs,
lesliesig

MOM

5/3/21 Top Sprout at A Place To Start!

Hi everybody! Hope you’ve had a great weekend! I’m working on a few more commissioned Mother’s Day cards and have popped in this evening with another one to share! Affiliate links are used in this post at no cost to you. I really appreciate your support! This card features the ‘Mom’ stamps and dies from Pretty Pink Posh and I think I’m in love! I really enjoyed coloring these florals and designing this clean and simple card!

I stamped the floral MOM letters on Neenah Classic Crest Baronial Ivory cardstock, colored them with Bic Mark-Its and die cut them with the coordinating dies. I cut a standard A2 size top-folding landscape card base and layering panel from Neenah Classic Crest Baronial Ivory cardstock along with a slightly larger layering panel and another set of MOM letters from CutCardStock Basis Red cardstock. I die cut the word ‘happy’ from CutCardStock Raspberry Ice cardstock thinking ‘never in a million years would I have ever thought I would pair pink with red’ – but it totally worked on this design! I adhered the layering panels together, then adhered them to the card base. I adhered the floral letters to the red cardstock letters, off-setting them just a bit, and adhered them to the card front. I stamped the sentiment in black ink beneath the die cut letters, and the finishing touch was adding the pink die cut ‘happy’ just above the sentiment.

I cut the inside panel from Neenah Classic Crest Baronial Ivory 80# cardstock, stamped the sentiment and layered the panel on CutCardStock Basis Red cardstock.

And one more look… totally loving how this turned out! And yep, I like the pops of pink and red together! ;)

Sharing in the following challenges:
1. 613 Avenue Create: #4 – Anything goes w/ optional twist of In The Garden
2. A Perfect Time To Craft Open Challenge: #4-2021 – Anything Goes
3. A Place To Start: #4 – Anything Goes / Make It Elegant
4. Classic Design Challenge: #4 April Birthday Challenge – Anything Goes
5. Crafty Gals Corner: #218 – Easter/Spring
6. The Crafter’s Cafe Challenge Blog: #264 – Flowers
7. The Outlawz Sunday Songs & Rhymes Challenge: Daisy Time (flowers)

Products used:
Cardstock/Paper: Neenah Classic Crest Baronial Ivory 80# cardstock, CutCardStock Basis Red cardstock, CutCardStock Raspberry Ice cardstock
Stamps: Pretty Pink Posh Mom stamp set, Lawn Fawn Happy Happy Happy stamp set
Ink: Bic Mark-Its- Key Lime, Forest Green, Hot Aqua, Petal Pink, Fandango Pink, Yellow Blaze, Sunset Orange, Rambunctious Red
Dies/Punches: Pretty Pink Posh Mom die set, Lawn Fawn Happy Happy Happy die set
Accessories: Bearly Art precision craft glue, Scotch ATG, Big Shot, MISTI stamp tool

I hope you’ve enjoyed seeing this Mother’s Day card! Thanks so much for stopping by today – we’ll see you next time! ;)

Scrappy hugs,
lesliesig

You are amazingly amazing

4/24/21 Top Rocker at 613 Avenue Create!
8/15/22 CAS Weekly Favorite at Splitcoast Stampers!

Hi everyone! A very Happy Saturday to you – I hope you’ve had a great week! Affiliate links are used in this post at no cost to you. I really appreciate your support! I’m happy to be back on the Eyelet Outlet blog today with another awesome DT inspiration project! I created a pretty clean and simple thank you card using more of the new brads in the store along with my favorite enamel dots! This card came together really quickly!

I cut a standard A2 size top-folding landscape card base and a layering panel from Neenah Classic Crest Solar White 110# cardstock and rounded the bottom right corner. I stamped flower stems and leaves in green ink in the bottom right quadrant of the layering panel, and then stamped the sentiment in pink ink just to the left of the stems and leaves. I added five Colored Daisy Brads and adhered the panel to the card base. The final touch was adding several White Enamel Dots to complete the front panel.

I cut the inside panel from Neenah Classic Crest 80# Solar White cardstock and embellished it with a strip of pink striped paper, stamped the sentiment in green ink and adhered the panel directly to the inside of the card base.

And one more look… such a pretty CAS design to say thank you! Loving these new daisy brads!

Sharing in the following challenges:
1. 613 Avenue Create: #4 – Anything goes w/ optional twist of In The Garden
2. A Perfect Time To Craft Open Challenge: #4-2021 – Anything Goes
3. Classic Design Challenge: #4 April Birthday Challenge – Anything Goes
4. Creative Moments: #213 – Anything Goes
5. Lemon Shortbread Challenge Blog: #144 – Anything Goes
6. QKR Stampede: #418 – Anything Goes
7. Sparkles Monthly Challenges: #139 – April Showers Bring…
8. The Crafter’s Cafe Challenge Blog: #264 – Flowers
9. The Outlawz Sunday Songs & Rhymes Challenge: Daisy Time (flowers)
10. The Outlawz Twisted Thursday Challenge: Anything Goes w/ optional Twist of Signs of Spring

Eyelet Outlet products used:
Colored Daisy Brads
White Enamel Dots

Other products used:
Cardstock/Paper: Neenah Classic Crest 110# and 80# Solar White cardstock, Stampin’ Up Fruit Punch DSP
Stamps: Stampin’ Up Painted Petals stamp set
Ink: Memento Bamboo Leaves ink, Ranger picked raspberry archival ink
Dies/Punches: Kadomaru Pro corner rounder
Accessories: Tombow Mono permanent adhesive, MISTI stamp tool

I hope you’ve enjoyed today’s project! Be sure to check out all the fun goodies at Eyelet Outlet! I can already see you drooling, lol! Be sure to ‘like’ and ‘follow’ Eyelet Outlet Facebook Page to keep up with news and sales, and while you’re at it, join the Eyelet Outlet Fans Facebook group for lots of creative inspiration! Thanks so much for stopping by today – we’ll see you next time! ;)

Scrappy hugs,
lesliesig

unleash your inner sparkle

Hi everyone! Happy Fri-YAY – hope you’ve had a great week! I’m delighted to be back on the Dies R Us Inspiration Blog today with another awesome DT inspiration project! Affiliate links are used in this post at no cost to you. I really appreciate your support! I created an adorable CAS fairy birthday card featuring the most adorable fairy castle – complete with fairies! I apologize about the angle of the first photo… foil is SO hard to photograph so I thought I’d angle downward from above which did help a little bit.

I created a standard A2 size top-folding card base from Classic Crest Solar White 110# cardstock, along with a gold foil cardstock layer and a CutCardStock Basis Pink cardstock layer which I adhered together. Using the ScrapMan Fairy Castle die, I cut the fairy castle from gold foil cardstock and adhered it to the upper left portion of the front panel. I added one green fairy and two pink fairies, and some iridescent gemstones. I then added a gold foil strip across the bottom and stamped the sentiment in black ink just above the foil strip. You’ll probably laugh when you notice that I used a unicorn stamp set from my stash – but it yielded the same fantasy/magical result so I went with it! ;) The final touch was adhering three medium size iridescent gemstones to the strip.

The inside panel consists of a gold foil cardstock layer and a CutCardStock Basis Pink cardstock layer which I adhered together and embellished with a stitched rectangle die cut that I cut from Classic Crest Solar White 80# cardstock. I added a narrow strip of the gold foil cardstock horizontally across the top portion of the panel and stamped the sentiment in black ink.

And one more peek… I’m absolutely smitten with this fairy castle! Such an adorable card! ;)

Sharing in the following challenges:
1. A Perfect Time To Craft Open Challenge: #4-2021 – Anything Goes
2. Classic Design Challenge: #4 April Birthday Challenge – Anything Goes
3. The Outlawz Festive Fridays Challenge: Birthday

Dies R Us products used:
ScrapMan Fairy Castle

Other products used:
Cardstock/Paper:  Classic Crest Solar White 110# and 80# cardstock, CutCardStock Basis Pink cardstock, Hygloss Gold Foil cardstock
Stamps: Cas-ual Fridays Stamps Be A Unicorn stamp set
Ink: Memento StazOn Jet Black ink, Tuxedo Black ink
Accessories: Bearly Art precision craft glue, Tombow Mono permanent adhesive, Eyelet Outlet Fairy Brads, Darice iridescent gemstones

I hope you’ve enjoyed today’s project! Be sure to check out all the fun goodies at the Dies R Us store! They not only sell dies… they also carry stamps, embossing tools and supplies, all kinds of craft supplies, slimline products and even Yupo paper! Be sure to join in the fun going on over at the Dies R Us Challenge Blog – there’s a new challenge theme posted on the 1st and 15th of each month and one lucky random winner will receive a gift voucher prize to the Dies R Us store! And be sure to ‘like’ and ‘follow’ Dies R Us Facebook Page for lots of creative inspiration and to keep up with the latest news! Thanks so much for stopping by today – we’ll see you next time! ;)

Scrappy hugs,
lesliesig

Dad. The Man. The Myth. The Legend.

Hi everyone! Hope you’re all doing well and staying safe! Affiliate links are used in this post at no cost to you. I really appreciate your support! I’m happy to be back on the Eyelet Outlet blog today with another awesome DT inspiration project! I created a cool Father’s Day card featuring lots of manly brads and washi tape! Oh, so fun!

I cut a standard A2 size top-folding landscape card base from Neenah Classic Crest Solar White 110# cardstock. I then cut strips from Neenah Classic Crest Solar White 80# cardstock and CutCardStock Royal Sundance Linen Burgundy cardstock which I layered together and added a strip of Tool Washi Tape across the bottom. I adhered a very thin strip of the burgundy linen cardstock across the top edge of the washi tape for a little definition. I added Tool Box and Nail Brads, Tool Brads and Screw Brads to the panel before adhering it to the card base on foam pads. I stamped the sentiment in red ink, cut it with a stitched square die, and adhered it to the panel.

I cut inside layering panels from Neenah Classic Crest Solar White 80# cardstock and CutCardStock Royal Sundance Linen Burgundy cardstock, and embellished the white panel with a strip of Tool Washi Tape across the bottom along with a very narrow strip of the burgundy linen cardstock adhered across the top edge of the washi tape. I stamped the sentiment in red ink, layered the panels together and adhered them to the inside of the card base.

One more peek… such a fun design! And what man doesn’t love tools?!

Sharing in the following challenges:
1. A Perfect Time To Craft Open Challenge: #4-2021 – Anything Goes
2. Classic Design Challenge: #4 April Birthday Challenge – Anything Goes

Eyelet Outlet products used:
Tool Washi Tape
Tool Box and Nail Brads
Tool Brads
Screw Brads

Other products used:
Cardstock/Paper: Neenah Classic Crest Solar White cardstock, CutCardStock Royal Sundance Linen Burgundy cardstock
Stamps: The Project Bin Classic Man stamp set
Ink: Memento Rhubarb Stalk ink
Dies/Punches: My Favorite Things Die-namics Stitched Square STAX die
Accessories: Tombow Mono permanent adhesive, MISTI stamp tool

I hope you’ve enjoyed today’s project! Be sure to check out all the fun goodies at Eyelet Outlet! I can already see you drooling, lol! Be sure to ‘like’ and ‘follow’ Eyelet Outlet Facebook Page to keep up with news and sales, and while you’re at it, join the Eyelet Outlet Fans Facebook group for lots of creative inspiration! Thanks so much for stopping by today – we’ll see you next time! ;)

Scrappy hugs,
lesliesig

Happy Mother’s Day

Happy Thursday, friends! Have you any April Fool’s Jokes planned to play on anybody?! I can’t believe how fast this year is going by! Affiliate links are used in this post at no cost to you. I really appreciate your support! Our new challenge is live this morning over at Love To Scrap Challenge Blog and I’m thrilled to share my DT inspiration project for LTSCB #144 – Spring Forward! Yep, we want to see your Spring-themed projects! I’m sharing a pretty Mother’s Day card that I was commissioned to make which features a gorgeous heat embossed Clearly Besotted floral spray. Honestly, you can’t go wrong with a card like this! Mother’s Day is almost upon us so you’ll be seeing a few scattered about my blog! ;)

I cut a standard A2 sized top-folding card base from Neenah Classic Crest Solar White cardstock along with slightly smaller white and pink layering panels. I stamped the floral image in black ink on the white panel and then in Versamark (right over the top of the black ink), and heat embossed it with clear embossing powder. I’ve mentioned many times that this is a trick I discovered years and years ago to give virtually any color embossing. ;) I colored the image with alcohol markers and stamped the sentiment. I adhered the panel to the pink layer and then adhered the piece to the card base. The final touch was adding Crystal Drops.

I cut the inside panel from Neenah Classic Crest Solar White cardstock and kept it simple with just a stamped sentiment and layering the panel on the pink cardstock.

And one more look… totally loving how this turned out!

Sharing in the following challenges:
1. A Perfect Time To Craft Open Challenge: #4-2021 – Anything Goes
2. Classic Design Challenge: #4 April Birthday Challenge – Anything Goes
3. The Outlawz Monday Greetings: Flower Power
4. Your Scrapbook Place: April Anything Goes

Products used:
Cardstock/Paper: Neenah Classic Crest Solar White cardstock, Stampin’ Up Watermelon Wonder cardstock
Stamps: Clearly Besotted One In A Million stamp set, Dare 2B Artzy Flowers For Mom stamp set
Ink: Memento Tuxedo Black ink; Versamark, Nuvo alcohol markers- 413, 415, 417, 449, 451, 453, 473, 403, 405, 389, 391, 401
Accessories: Tombow Mono permanent adhesive, Tim Holtz Stamp Platform, Hero Arts Clear embossing powder, Milwaukee heat tool, Nuvo Ivory Seashell Crystal Drops

I hope you’ve enjoyed this card and will link up a Spring project with us this month! Thanks so much for stopping by today – we’ll see you again soon! ;)

Scrappy hugs,
lesliesig

Hey Chick!

Hi everyone! We are busting right through March – can you believe it?! Affiliate links are used in this post at no cost to you. I really appreciate your support! I’m excited to be back on the Eyelet Outlet blog today with another awesome DT inspiration project! I created a friendship card featuring some super fun brads and some pearls to doll it up!

First of all, aren’t these Chicken Brads just a hoot?! When I saw them, I knew I had to have them because I have the perfect stamp set to use with them! I created a top folding card base from Neenah Classic Crest Solar White cardstock and rounded the bottom right corner. I dug into my digital image stash and found a small chicken wire image that I duplicated multiple times and pieced together to make it large enough to go across the panel, keeping it proportional to the size of the chicken brads. I complimented the white cardstock with yellow cardstock, and stamped the sentiment in black ink. I added the Chicken Brads, a few scattered pearls from a White Pearl Bling Strip on the background and three slightly larger White Pearl Bling on the yellow cardstock strip. I colored all the pearls with a tan-colored alcohol marker prior to affixing them to the card front.

I cut the inside panel from Neenah Classic Crest Solar White cardstock and embellished it with a strip of the yellow cardstock used on the front, stamped the sentiment in black, and layered the panel on the yellow.

And here’s one more peek… I absolutely love how this turned out! Those chicken brads are so fun!

Sharing in the following challenges:
1. A Perfect Time To Craft Open Challenge: #3-2021 – Anything Goes
2. Alphabet Challenge Blog: Y is for Yellow
3. Classic Design Challenge: #3 – Anything Goes
4. Pammie’s Inky Pinkies Challenges: #2111 – Anything Goes
5. Penny’s Paper-Crafty Challenges: #492 – Anything Goes
6. QKR Stampede: #416 – Anything Goes
7. The Creative Crafters: #38 – Anything Goes
8. World Wide Open Design Team Challenge: #03 – Anything Goes

Eyelet Outlet products used:
Chicken Brads
White Pearl Bling Strip
White Pearl Bling

Other products used:
Cardstock/Paper: Neenah Classic Crest Solar White cardstock, Colorbok yellow cardstock
Stamps: Paper Pretties Cluck Part II stamp set, MHK Designs Chicken In digi set
Ink: Memento Tuxedo Black ink; Nuvo alcohol marker- 479 (to color the pearls)
Dies/Punches: Kadomaru Pro corner rounder
Accessories: Tombow Mono permanent adhesive, Bearly Art precision craft glue, MISTI stamp tool

I hope you’ve enjoyed today’s project! Be sure to check out all the fun goodies at Eyelet Outlet! I can already see you drooling, lol! Be sure to ‘like’ and ‘follow’ Eyelet Outlet Facebook Page to keep up with news and sales, and while you’re at it, join the Eyelet Outlet Fans Facebook group for lots of creative inspiration! Thanks so much for stopping by today – we’ll see you next time! ;)

Scrappy hugs,
lesliesig

happy Holidays

3/9/21 DT Favorite at Sweet Stampers Challenge Blog!

Hi everyone! I hope you had a great weekend! Affiliate links are used in this post at no cost to you. I really appreciate your support! It’s time for a new challenge over at Merry Little Challenge blog and I’m thrilled to share my DT inspiration project for MLCCB #32 – March Anything Christmas Goes! I created an adorable clean and simple Christmas card featuring a Lawn Fawn stamp set with coordinating die, along with a sentiment stamp from The Project Bin used on the inside.

I think this is one of the easiest cards I’ve ever created, lol! It worked up so fast – I stamped the penguin, colored him with alcohol markers and die cut him with the coordinating die, then adhered him to the front of the Neenah Classic Crest Solar White 110# cardstock card base. I stamped the sentiment in black ink, then stamped the snowflakes and his jump pattern in light aqua ink. The final touch was the addition of a tiny iridescent gemstone in the center of each snowflake.

I kept the inside CAS as well, with a single strip of light aqua cardstock down the left side and a sentiment stamped in black ink.

And one more look… totally happy with this CAS design!

Sharing in the following challenges:
1. 2 Crafty Critter Crazies: March Anything Goes
2. A Perfect Time To Craft Open Challenge: #03-2021 – Anything Goes
3. A Place To Start: #3 – Pick A Shape (Rectangle)
4. Classic Design Challenge: #3 – Anything Goes
5. QKR Stampede: #415 – Anything Goes
6. Sparkles Christmas Challenge: #122 – Clean and Simple
7. Sweet Stampers Challenge Blog: #53 – CAS
8. The Crafter’s Cafe: #261 – Anything Goes
9. Winter Wonderland Challenge Blog: Anything Christmas Goes

Products used:
Cardstock/Paper: Neenah Classic Crest Solar White 110# cardstock, Stampin’ Up Soft Sky cardstock
Stamps: Lawn Fawn Winter Penguin stamp set, The Project Bin Merriest Christmas stamp set
Ink: Memento Tuxedo Black ink; Nuvo alcohol markers- 379, 389, 489, 491; Stampin’ Up Soft Sky ink
Dies/Punches: Lawn Fawn Winter Penguin die
Accessories:  Bearly Art precision craft glue, Scotch ATG, MISTI stamp tool, Gemini Junior, Darice tiny iridescent gemstones

I hope you’ve enjoyed this card and will link up a Christmas project with us this month! We’d love to see what you create! Thanks so much for stopping by today – we’ll see you again soon! ;)

Scrappy hugs,
lesliesig

Many Thanks note card

3/15/21 Winner at QKR Stampede!

Hi everyone! Happy Monday to you! It’s the 1st, and you know what that means… lots of DT inspiration to feast your eyes upon! Affiliate links are used in this post at no cost to you. I really appreciate your support! Our new challenge over at Mix It Up Challenge Blog is live this morning and I’m excited to share my DT inspiration project for MIUCB #47 – Inlaid Die Cut! Remember that all our challenges are Anything Goes with an optional technique twist each month to inspire you, and this month the twist is an inlaid die cut. I have to admit that this is one of my many favorite techniques, and I was SO in ‘Fall mode’ when I created this note card! Both stamp sets and the die set are from Prickley Pear Stamps!

I cut a standard A2 size top-folding card base and a narrow front panel from Neenah Classic Crest Solar White cardstock. I die cut two maple leaves into the white front panel, layered it onto a slightly wider brown panel, and adhered the piece to the card base offsetting it to the left. I adhered small pieces of brown and orange foiled paper to a scrap of white cardstock, die cut a maple leaf from each color, and affixed them into the negative spaces on the front panel. I stamped the sentiment in the bottom right corner and added a few small red flat-back pearls.

I kept the inside clean as well, just adding a strip of leftover brown cardstock down the left side and a stamped maple leaf in the bottom left corner. As it is a note card, I left the inside blank with plenty of room to write a custom message.

And one more look… totally loving how this turned out! Just gorgeous!

Sharing in the following challenges:
1. A Perfect Time To Craft Open Challenge: #03-2021 – Anything Goes
2. A Place To Start: #3 – Pick A Shape (Rectangle)
3. Classic Design Challenge: #3 – Anything Goes
4. Crafts Galore Encore Challenge Blog: #85 – March Anything Goes
5. Jan’s Digi Stamps Challenge: March Anything Goes
6. Pammie’s Inky Pinkies Challenges: #2109 – Anything Goes
7. QKR Stampede: #415 – Anything Goes
8. The Crafter’s Cafe: #261 – Anything Goes
9. Your Scrapbook Place: March Anything Goes

Products used:
Cardstock/Paper: Neenah Classic Crest Solar White cardstock, Papertrey Ink Dark Chocolate cardstock, Rinea Autumn Variety Pack double-sided foiled paper
Stamps: Prickley Pear Stamps Oak & Maple Leaf and Oak & Maple Leaf 2 stamp sets
Ink: Memento Espresso Truffle ink
Dies/Punches: Prickley Pear Stamps Oak & Maple Leaf die set
Accessories: Gemini Junior, MISTI stamp tool, Flourish With A Bling red flat-back pearls

I hope you’ve enjoyed today’s project and will link up with us this month! We’re always happy to see ‘anything goes’ but we’re thrilled when you play the twist! Just remember – the twist is not mandatory to play! Thanks so much for stopping by today – we’ll see you again soon! ;)

Scrappy hugs,
lesliesig