Hey Girl Hey

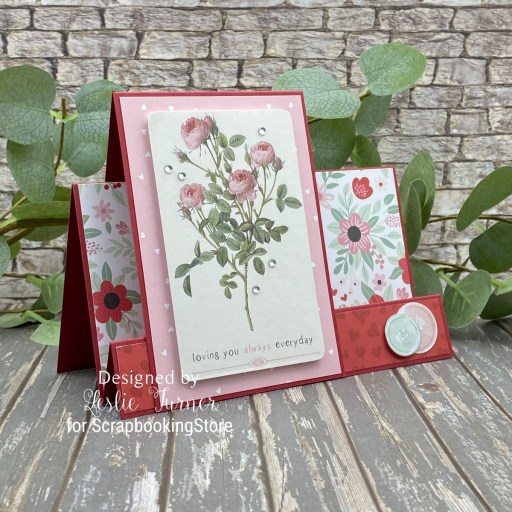
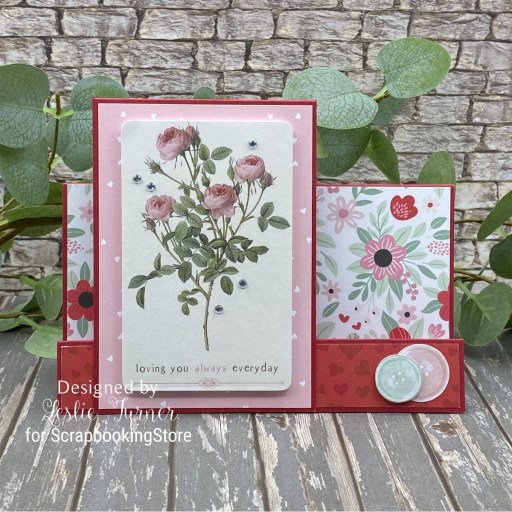
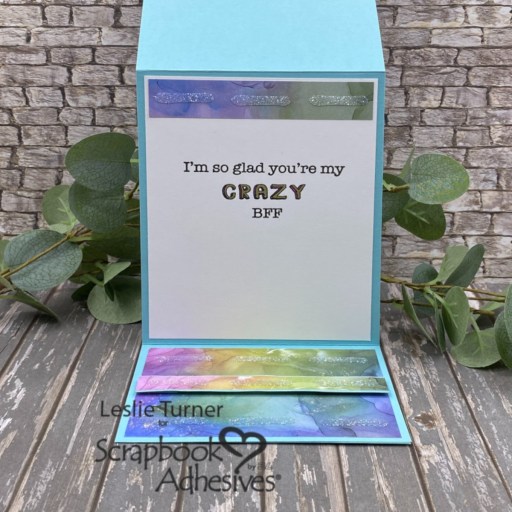
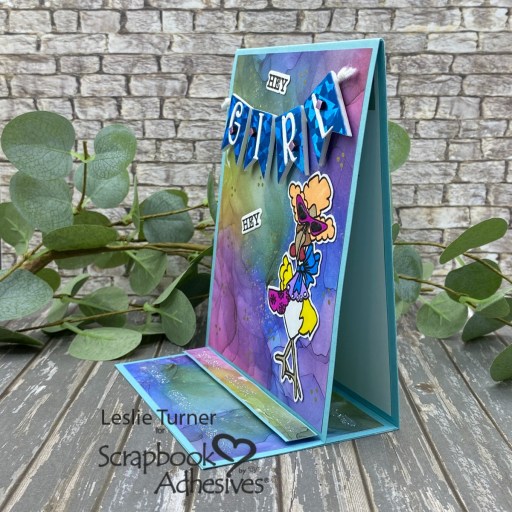
Hey everybody, I hope you’re having a great weekend and doing something fun! I’m up on the Scrapbook Adhesives By 3L blog today sharing a tutorial for making a tall tented easel card. I used some fun papers, stamps and dies in my stash for this delightful friendship card. I employed my new favorite ‘Wear Your Adhesive on the Outside’ technique for the banner and the glittery lines across the base, and of course, used some of the best adhesives in the land to put it all together!

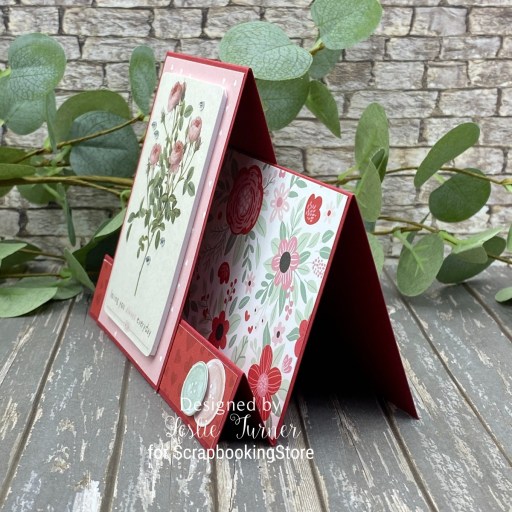
I’ve made quite a few tented easel cards over the years but this is the first tall one I’ve made. I had to tweak the measurements a bit to make it taller so the banner would fit above the bird. Be sure to see my tutorial on the Scrapbook Adhesives blog if you want to learn how to make this taller version. I used E-Z Runner® Permanent Strips Refillable Dispenser, Thin 3D Foam Squares White Mix, 3D Foam Squares White Mix and Dual Tip Glue Pen for the assembly.

The card base was cut from CutCardStock Basis 12×12 Aqua cardstock along with layering panels from a print in the Craft Consortium Ink Drops – Vivid Double-Sided 6×6 Paper Pad. The image and sentiments are from the Prickley Pear Stamps Hey Girl Hey stamps and dies, stamped in Versafine Onyx Black ink and colored with a variety of markers.

I employed the ‘Wear Your Adhesive on the Outside’ technique to create the banner using the 3D Foam Pennants and Metallic Transfer Foil Sheets Celebrate Colors, along with 3D Foam Micro Squares and Metallic Transfer Foil Sheets Pastel Colors for the tiny embellishments beside the letters on the pennants. I also used Adhesive Lines and diamond glitter in my stash for the lines across the base which are kind of hard to see in the photos but really add some pretty sparkle.

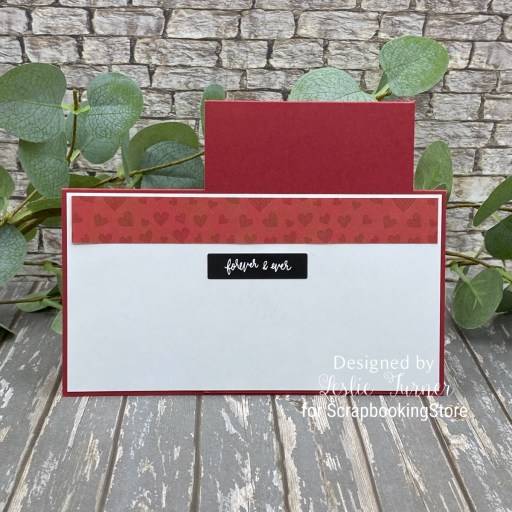
The inside sentiment panel was cut from Solar White cardstock and another sentiment from the Hey Girl Hey stamp set was stamped in Versafine Onyx Black ink. I added an embellishing strip with the glittered lines to the top of the panel to match the base. I’ve included one final side shot so you can see the cool construction. I love how this turned out!

Sharing in the following challenges:
1. https://avenue613.blogspot.com/2026/03/march-2026-anything-goes-w-optional.html
2. https://lovetocraftchallengeblog.blogspot.com/2026/03/ltccb-91-and-ltccb-90-winner-and-top.html
3. https://mmmchallengeblog.blogspot.com/2026/03/273-all-tied-up.html
4. https://cinspirations.blogspot.com/2026/03/march-challenge-cute-critters.html

Products used:
Scrapbook Adhesives by 3L®
E-Z Runner® Permanent Strips Refillable Dispenser
3D Foam Pennants
Metallic Transfer Foil Sheets Celebrate Colors
Adhesive Sheets 4 x 6in.
3D Foam Squares Micro Black
Metallic Transfer Foil Sheets Pastel Colors
Adhesive Lines
Thin 3D Foam Squares White Mix
3D Foam Squares White Mix

HomeHobby™ by 3L
Dual Tip Glue Pen

Affiliate links are used in this post at no cost to you – I really appreciate your support!

Other products used:
CARDSTOCK/PAPER: CutCardStock Basis 12×12 Aqua cardstock, Neenah Classic Crest 80# Solar White cardstock, Craft Consortium Ink Drops – Vivid Double-Sided 6×6 Paper Pad
STAMPS: Prickley Pear Stamps Hey Girl Hey Stamp Set (no longer available)
INK: Versafine Onyx Black Ink, Sharpie Paint Pen White; Bic Mark-It Fine Point Markers- Rambunctious Red, Hot Aqua, Polynesian Purple, Summer Melon, Fandango Pink, Yellow Blaze, Tiki Hut Tan, Honey Brown, and Tuxedo Black; EK Success Gold Dual Tip Pen
DIES/PUNCHES: KIS Cuts Melody Stories Font Dies, Prickley Pear Stamps Hey Girl Hey Die Set (no longer available)
ACCESSORIES: Fiskars 12″ ProCision Rotary Bypass Paper Trimmer, Mini MISTI, Big Shot, Ranger Glossy Accents, Doodlebug Design Lily White Doodle Twine, Stampin’ Up Dazzling Diamonds Glitter

I hope you’ve enjoyed this project and you’re inspired to get your crafty supplies out and play! Be sure to check out the awesome array of adhesives and other craft supplies Scrapbook Adhesives By 3L has to offer! And be sure to follow us on FacebookPinterestInstagram and Twitter for lots of crafty inspiration! And if you haven’t yet subscribed to our YouTube Channel, be sure to do that, too, for even more inspiration! Thanks so much for stopping by today – we’ll see you next time! 

Scrappy hugs,

Loving you always everyday

Hey everybody! I hope your Valentine week has started off nicely! I have a pretty ScrapbookingStore DT inspiration project to share with you today created with items in the February 2026 Scrapbook Kit with Upgrades. This month’s kit features a custom paper assortment from Echo Park and Carta Bella, with a Carta Bella sticker sheet, and Prima ephemera in the upgrades. So, so pretty! If you love a mix of pinks and reds, this kit is for you!

I cut the card base and faux panel from CutCardStock Lessebo Dawn Maroon cardstock along with layering panels from assorted prints in the kit. I used several pieces of ephemera from the upgrades, and finished off the front with a few clear gemstones.

I cut the back panel from white cardstock and embellished it with a strip of paper used on the front. I added a sentiment sticker from the sticker sheet in the collection which completed the card.

Sharing this card in the following challenges:
1. https://avenue613.blogspot.com/2026/02/february-2026-anything-goes-w-optional.html
2. https://cardsgalorechallenges.blogspot.com/2026/02/february-2026-crafts-galore-encore.html
3. https://secretstamper.com/2026/02/creative-creases-112-february-6th-through-march-5th/
4. https://cupcakeinspirations.blogspot.com/2026/02/634-february-cupcake-inspiration.html

5. https://pinspirationalchallenges.blogspot.com/2026/02/pinspirational-challenge-334-february.html

6. http://cinspirations.blogspot.com/2026/02/february-challenge-think-pink.html

Affiliate links are used in this post at no cost to you – I really appreciate your support!

ScrapbookingStore products:
February 2026 Scrapbook Kit with Upgrades
Custom paper assortment featuring Echo Park and Carta Bella papers with Carta Bella sticker sheet
Upgrades: Prima Ephemera

Other products used:
CARDSTOCK/PAPER: CutCardStock Lessebo Dawn Maroon cardstock, Neenah Classic Crest 80# Solar White cardstock
DIES/PUNCHES: Kadomaru Pro Corner Rounder
ACCESSORIES: Fiskars 12″ ProCision Rotary Bypass Paper Trimmer, Spellbinders 12×12 Scoring Board, TapeRunner Retractable Double-Sided Adhesive Tape, My Sweet Petunia Precision Glue Press, Bearly Art Precision Craft Glue, Keep It Simple Back To Basics Shaker Basics Adhesive Foam & Acetate Sheets, Scrapbook Adhesives Thin 3D Foam Squares, clear gemstones

I hope you’ve enjoyed today’s project and you’re thinking about all the fun you could have with this month’s kit… you really ought to think about joining the Subscription Club! Be sure to Follow us on Facebook, Instagram, Pinterest and YouTube for lots of crafty inspiration! And if you do decide to join the Subscription Club, join our ScrapbookingStore Club Member Group on Facebook for more inspiration and to share your projects! Thanks so much for stopping by today – we’ll see you next time!

Scrappy hugs,

Sending a happy hello

Hey everybody, Happy Wednesday! I hope you’re having a great week! I’m up on the Love From Lizi blog today with a tutorial for making a masculine faux center step card featuring papers, stamps, ephemera and sequins from our new ‘For Him’ release which I totally love! Our design team has been sharing lots of samples in case there’s anybody out there who gets stumped making masculine cards. This fun fold is right up there at the top of my list of favorites and I’ve made quite a few of them. ;)

I cut the card base and faux center panel from Neenah Classic Crest 80# Solar White cardstock along with layering panels from papers in our A Spot of Autumn and Neutrals 6×6 Paper Packs. I used stamps from the Heartfelt Hello Stamp Set for the sentiment and then added a hat from the Vintage Escapes Ephemera. The finishing touch was adding several gemstones from the For Him Sequin Mix.

I cut the inside panel from Solar White cardstock and embellished it with a leftover strip of the plaid paper used on the front and sunglasses from the Vintage Escapes Ephemera. I stamped a sentiment from the Summer Botany Stamp Set and then layered the panel on a panel cut from the Matte Mirror Pastel Cardstock Bundle. The finishing touch (and optional step) was adding a panel of paper from our A Spot of Autumn 6×6 Paper Pack. For more details, be sure to visit the Love From Lizi blog to see my tutorial. ;)

Affiliate links are used in this post at no cost to you – I really appreciate your support!

Love From Lizi products used:
A Spot of Autumn 6×6 Paper Pack
Neutrals 6×6 Paper Pack
Matte Mirror Pastel Cardstock Bundle
Heartfelt Hello Stamp Set
Summer Botany Stamp Set
Vintage Escapes Ephemera
For Him Sequin Mix

Other products used:
CARDSTOCK/PAPER: Neenah Classic Crest 80# Solar White cardstock
INK: Versafine Onyx Black ink, Memento Peanut Brittle ink
ACCESSORIES: Fiskars 12″ ProCision Rotary Bypass Paper Trimmer, Bearly Art precision craft glue, My Sweet Petunia Precision Glue Press, MISTI stamp tool, Spellbinders Detail Scissors, Scrapbook Adhesives Thin 3D Foam Squares, Trinity Pick Up Stick

I hope you’ve enjoyed seeing this project and you’re inspired to get crafty! Be sure to join our Facebook Group and Follow us on Instagram and YouTube for lots of crafty inspiration! Thanks so much for stopping by today – we’ll see you next time!

Scrappy hugs,

Spring Wishes

Hey everybody, happy Wednesday and happy Spring! It’s still a little chilly here but our temps are rising and I do believe Spring is in the air. I’m up on the Love From Lizi blog today with a tutorial for making a circular easel card with an acetate front. This card features our Rise and Shine Stamp Set, Floral Wellington Boot Cutting die, and Matte Silver Sway Peel-Off Stickers – all from our March release. I also used additional dies, papers and embellishments from the store. This card may look daunting but it’s really fairly simple, so be sure to check out my tutorial on the Love From Lizi blog if you’d like to learn how to make it.

I cut the card base, frames and a couple layers from CutCardStock Basis 80# White 12×12 cardstock. I also cut a layering panel from a red floral print in the Love You paper pack, as well as frames and a layering panel from a red print in the Linen Rainbow paper pack. Using the Floral Wellington Boot Cutting Die, I die cut two wellies from a coordinating print in the Love You paper pack, trimmed off the floral element and added a small strip of Matte Silver Sway Peel-Off Sticker to each.

I added a strip of white pearls to the front of each wellie, and also added a sole to each of the wellies by cutting the very bottom portion from a red linen scrap and trimming it down. I used the Winter Roses Cutting Dies to cut the white roses from white cardstock to embellish the background of the acetate panel, and then added the wellies. I layered circular die cuts to the inside and added a sentiment from the Rise and Shine stamp set, stamped in red ink, and popped up on adhesive foam which doubled as the stopper.

Here are a couple additional shots. As an optional step, I added a custom sentiment that I typed on my computer as well as a leftover frame to the bottom of the card to create an area to sign and/or write a short message.

Affiliate links are used in this post at no cost to you – I really appreciate your support!

Love From Lizi products used:
Rise and Shine Stamp Set
Floral Wellington Boot Cutting Die
Winter Rose Cutting Dies
Linen Rainbow 6×6 Patterned Paper Pack
Love You 6×6 Specialty Paper Pack
Stitched Circle Nested Cutting Dies
Matte Silver Sway Peel-Off Stickers
Mini Pearl Strips

Other products used:
CARDSTOCK/PAPER: CutCardStock Basis 80# White 12×12 cardstock
INK: Catherine Pooler Rouge ink
ACCESSORIES: Fiskars 12″ ProCision Rotary Bypass Paper Trimmer, Bearly Art precision craft glue, My Sweet Petunia Precision Glue Press, Mini MISTI, Big Shot, Grafix Crystal Clear Craft Plastic, Keep It Simple Back To Basics Shaker Basics 3mm Adhesive Foam Sheet, Scrapbook Adhesives Thin 3D Foam Squares

I hope you’ve enjoyed seeing this project and you’re inspired to get crafty! Be sure to join our Facebook Group and Follow us on Instagram and YouTube for lots of crafty inspiration! Thanks so much for stopping by today – we’ll see you next time!

Scrappy hugs,

EEK!

Hi friends! Happy Tuesday – the weeks sure are flying by! I have a fun ScrapbookingStore DT inspiration project to share with you today created with the awesome October 2024 Scrapbook Kit with Upgrades. The papers and coordinating spooky elements in this collection are some of the best! I’ve had handwritten instructions for a triple easel card in my arsenal for quite some time and decided it was (finally) time to make one. So fun, and I sure love how it turned out!

I cut the three easel card bases from CutCardStock Lessebo Amethyst along with layering panels from Lessebo Pitch Black and two purple coordinating prints in this month’s kit. I embellished each easel with papers and stickers from the collection, stickers from two of the upgrades, and gemstones from my stash. I created a ‘stopper’ on the front easel with a Keep It Simple Crafty Girls button and a tiny bow tied from Doodlebug Design Lily White Doodle Twine.

Here’s a shot of the card folded up flat, ready to mail. I love it!

Affiliate links are used in this post at no cost to you – I really appreciate your support!

ScrapbookingStore products used:
October 2024 Scrapbook Kit with Upgrades:
Echo Park Halloween Magic Collection Kit
Upgrades: Brianna Nicole Designz Spooky Realm Stickers
The Paper Studio Pumpkin Stick-A-Bilities
Recollections Black Alpha Stickers

Other products used:
CARDSTOCK/PAPER: CutCardStock Lessebo Amethyst and Lessebo Pitch Black cardstock
ACCESSORIES: Fiskars 12″ ProCision Rotary Bypass Paper Trimmer, My Sweet Petunia Precision Glue Press, Nuvo Deluxe Adhesive, Keep It Simple Crafty Girls Buttons, Doodlebug Design Lily White Doodle Twine, cordless glue gun, Darice orange and purple gemstones

I hope you’ve enjoyed today’s project and you’re thinking about all the fun you could have with this month’s kit… you really ought to think about joining the Subscription Club! Be sure to Follow us on Facebook, Instagram, Pinterest and YouTube for lots of crafty inspiration! And if you do decide to join the Subscription Club, join our ScrapbookingStore Club Member Group on Facebook for more inspiration and to share your projects! Thanks so much for stopping by today – we’ll see you next time!

Scrappy hugs,

I love clean

2/24/23 Top 3 Winner at Alphabet Challenge Blog!

Hey everybody! Happy Sunday! It’s almost the middle of February already – time sure is flying by! I’m stoked to be back with another Keep It Simple DT inspiration project to share with you today! I so love the Household Chore Gnomes Collection – these guys are so cool and you know how I love me some gnomes! ;) I created a center step card featuring items from the Die Cut Pieces and Gnome Collection Pack 6×6 Double Sided Cardstock, along with the Back to Basics Royal Collection Pack 6×6 Double-Sided Cardstock and Royal Enamel Dots.

I die cut the easel card base from Neenah Classic Crest 110# Solar White cardstock and the layering panels from the Gnome Collection Pack 6×6 Double-Sided Cardstock. I selected a light blue cardstock from the Royal Collection Pack 6×6 Double-Sided Cardstock which I tore to create a puddle of water. Then I added the gnome, cleaning supplies and sentiment from the Die Cut Pieces, and added some Royal Enamel Dots. I tied a blue twine bow on the sentiment which completed the card front.

For the back, I die cut layering panels from Neenah Classic Crest 80# Solar White cardstock and the Gnome Collection Pack, then fussy cut the sentiment from a card in the Die Cut Pieces. Isn’t that sentiment a hoot?! Love how this turned out!

Sharing in the following challenges:
1. 613 Avenue Create: February 2023 – Anything Goes w/ optional Use Red for Anything But a Heart 
2. A Place To Start: February 2023 – Anything Goes w/ optional Pick A Palette
3. Alphabet Challenge Blog: W is for Water
4. Classic Design Challenge: February 2023 #2 – Anything Goes
5. Creative Creases Challenges: #50 – Anything Goes with a Fun Fold
6. Jan’s Digi Challenges: February 2023 – Anything Goes
7. Lil Patch of Crafty Friends Challenge: #199 – Anything Goes
8. Simon Says Wednesday Challenge: Fun With Dies
9. Wednesday’s Creative Inspirations Challenge Blog: February Anything Goes

Keep It Simple products used:
Household Chore Gnome Collection Pack 6×6 Double Sided Cardstock
Back to Basics Royal Collection Pack 6×6 Double-Sided Cardstock
Household Chore Gnome Die Cut Pieces
Back to Basics Royal Enamel Dots

Affiliate links are used in this post at no cost to you – I really appreciate your support!

Other products used:
Cardstock/Paper: Neenah Classic Crest 110# and 80# Solar White cardstock
Dies/Punches: Creative Craft Products High Center Stepper Card die set
Accessories: Tonic Studios 12″ Guillotine Paper Trimmer, Bearly Art precision craft glue, Big Shot, Studios Blackbird blue twine, Darice Double-Sided Adhesive Foam Strips

I hope you’ve loved seeing this project as much as I loved creating it, and you’re inspired to get crafty! Be sure to check out ALL the fun goodies in the Keep It Simple store such as paper, stamps, die cuts, ephemera, washi tape and enamel dots to name just a few! You’ll go nuts! Be sure to Follow us on Facebook, Instagram, and Pinterest for lots of crafty inspiration! Thanks so much for stopping by today – we’ll see you next time!

Scrappy hugs,

Growing Up vs Growing Old

Hey y’all, I’m baaaack! Today is the day for entering projects into The Outlawz Challenges before several of them end! I think that refers to ‘the skin of my teeth’ lol! The projects have been made but I’ve had a lot going on and haven’t really been entering many challenges lately. I need to fix that! Affiliate links are used in this post at no cost to you. I really appreciate your support! I’m entering this adorable easel card into The Outlawz Monday Greetings Challenge where the theme is to Add Spots or Stripes. I think I’m covered with the spots! Well, I’m not covered with spots but my card is, lol! #insertcheesycornygrin

I cut all the required pieces from CutCardStock Basis Green cardstock, CutCardStock Pop-Tone Jellybean Green cardstock, CutCardStock Pop-Tone Gumdrop Green cardstock, American Crafts Key Lime cardstock, CutCardStock Basis Magenta cardstock, CutCardStock Granny Smith cardstock, CutCardStock Basis Pink cardstock, CutCardStock Basis Gold cardstock, Colorbok Pink cardstock, Neenah Classic Crest Solar White cardstock, Colorbok yellow and pink Seeing Dots cardstock.

I stamped the sentiment from The Cat’s Pajamas Sassy Birthday stamp set in Catherine Pooler Lime Rickey ink.

And one more look, closed and ready to mail… how fun is this?! I’m absolutely loving how this turned out!

Products used:
Cardstock/Paper: CutCardStock Basis Green cardstock, CutCardStock Pop-Tone Jellybean Green cardstock, CutCardStock Pop-Tone Gumdrop Green cardstock, American Crafts Key Lime cardstock, CutCardStock Basis Magenta cardstock, CutCardStock Granny Smith cardstock, CutCardStock Basis Pink cardstock, CutCardStock Basis Gold cardstock, Colorbok Pink cardstock, Neenah Classic Crest Solar White cardstock, Colorbok yellow and pink Seeing Dots cardstock
Stamps: The Cat’s Pajamas Sassy Birthday stamp set
Ink: Catherine Pooler Lime Rickey ink
Dies/Punches: My Scrap Chick Blooming Layers Easel Card
Accessories: Brother Scan N Cut, Bearly Art precision craft glue, Scotch 3M Foam Tape

I hope you’ve enjoyed this project and will come over and join in all the fun at The Outlawz Challenges! Lots of fun going on! Thanks so much for stopping by today – we’ll see you next time! ;)

Scrappy hugs,
lesliesig