Let’s Go Ghouls

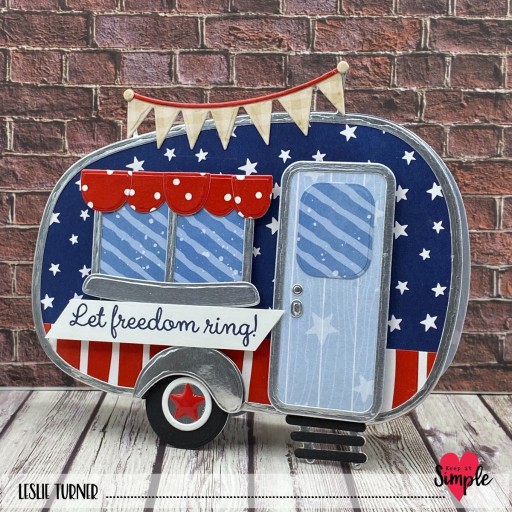
Hey everybody! I hope you’re having a great weekend! Our weather out here in southwestern Colorado has been absolutely beautiful over the past few weeks. We haven’t gotten the sweltering heat (knock wood) that lots of other areas have been getting. I have a wonderful Keep It Simple DT inspiration project to share today created with our new Haunted Halloween Collection! OMGoodness, if you’re a Halloween fan, you’re gonna love this one! The papers are amazing and you won’t believe the size of the pack of die cut pieces… it’s called a mega pack and they aren’t lying, lol! I created a haunted house shaped card featuring papers and die cut pieces from this new collection paired with our KIS Cuts Build-A-House die set! I love shaped cards and this was a lot of fun!

Using dies in the KIS Cuts Build-A-House die set, I cut the card base from Neenah Classic Crest 110# Solar White along with layering panels (and house pieces and parts) from patterns in the Haunted Halloween 12×12 Collection Pack and CutCardStock Lessebo Sunset Orange cardstock. The assembly is always the most fun, and I enjoyed picking out the die cuts and sentiments I wanted to use, popping some of the pieces up on adhesive foam.

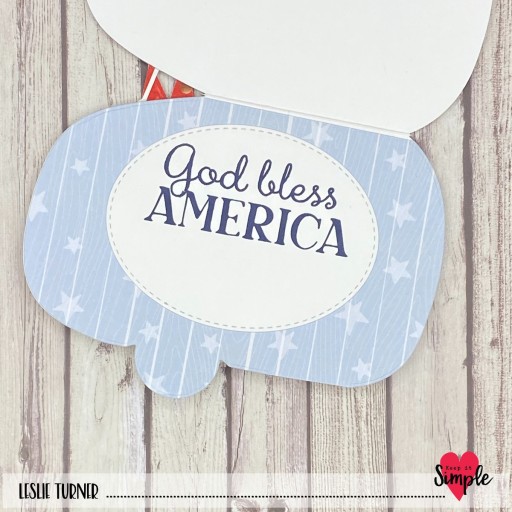
I embellished the top portion of the inside flap with the striped pattern paper used on the front and some die cuts. I added a sentiment from the die cut pack, which completed the card.

Keep It Simple products used:
KIS Cuts Build-A-House
Haunted Halloween 12×12 Collection Pack
Haunted Halloween Die Cut Pieces Mega Pack

Affiliate links are used in this post at no cost to you – I really appreciate your support!

Other products used:
CARDSTOCK/PAPER: Neenah Classic Crest 110# Solar White cardstock, CutCardStock Lessebo Sunset Orange cardstock
INK: American Crafts Metallic Gold marker
ACCESSORIES: Cricut Paper Trimmer, Bearly Art precision craft glue, Big Shot, EK Tools 3D Dots, 1″ adhesive foam squares, 1/2″ double-sided foam strips

I hope you’ve loved seeing this project as much as I loved creating it and you’re inspired to get crafty! Be sure to check out ALL the fun goodies in the Keep It Simple online store! Save 10% on your entire order when you shop online using code LoveToScrap2 at checkout! There is no minimum purchase requirement and no usage limits, AND it combines with product, order, and shipping discounts! Is that cool, or what?! Be sure to Follow us on Facebook, Instagram, and Pinterest for lots of crafty inspiration! Thanks so much for stopping by today – we’ll see you next time!

Scrappy hugs,

Love You A Latte

Hey everybody! Happy Sunday – I hope you’re having a great weekend! I have a fun shaped card to share with you today for Keep It Simple created with our new KIS Cuts Freshly Brewed die set! I used acetate for the entire front of the card to resemble a clear plastic cup. And how about those vellum ice cubes… do they look real, or what?!

Using the KIS Cuts Freshly Brewed dies, I cut the cup base from Neenah Classic Crest 110# Solar White cardstock, the whipped cream and background and hearts from cream and brown papers in the Farmhouse Fall 6×9 Cardstock Pack, the straw from papers in the Rose 12×12 Collection Pack, and the ice cubes from CutCardStock Glama Natural Vellum cardstock.

As with any project like this, the most fun is the assembly! I added some coffee-colored yummies to the whipped cream that I pulled out of the Polymer Clay Assorted Sprinkles. I embellished the lip of the cup with several Rose Enamel Dots. And finally, I stamped the sentiment from the Sent With Love Collection Stamps in Catherine Pooler Sand Castle ink and cut it with the Sent With Love Outline Dies.

I cut the inside panel from 80# Solar White cardstock using a die in the set, and added the sentiment cut from the brown paper used on the front using the KIS Cuts Ford Double Cut Font. This was definitely a fun one!

Keep It Simple products used:
KIS Cuts Freshly Brewed
Farmhouse Fall 6×9 Cardstock Pack
Back To Basics Rose 12×12 Collection Pack
Sent With Love Collection Stamps
Sent With Love Outline Dies
Back To Basics Rose Enamel Dots
Polymer Clay Assorted Sprinkles
KIS Cuts Ford Double Cut Font

Affiliate links are used in this post at no cost to you – I really appreciate your support!

Other products used:
CARDSTOCK/PAPER: Neenah Classic Crest 110# Solar White cardstock, CutCardStock Glama Natural Translucent Vellum
INK: Catherine Pooler Sand Castle ink
ACCESSORIES: Fiskars 12″ ProCision Rotary Bypass Paper Trimmer, Bearly Art precision craft glue, Grafix Crystal Clear Craft Plastic, MISTI stamp tool, Big Shot, Therm O Web small and medium Zots

I hope you’ve loved seeing this project as much as I loved creating it and you’re inspired to get crafty! Be sure to check out ALL the fun goodies in the Keep It Simple online store! Save 10% on your entire order when you shop online using code LoveToScrap2 at checkout! There is no minimum purchase requirement and no usage limits, AND it combines with product, order, and shipping discounts! Is that cool, or what?! Be sure to Follow us on Facebook, Instagram, and Pinterest for lots of crafty inspiration! Thanks so much for stopping by today – we’ll see you next time!

Scrappy hugs,

palm trees & 80 degrees

Hey everybody, Happy Wednesday – I hope you’re having a great week! I have an amazing ScrapbookingStore DT inspiration project to share with you today created with the July 2024 Scrapbook Kit with Upgrades. OMGoodness, this is an awesome Summer-themed collection. You know I love all the summer vibes but I just can’t take the heat, lol! I made several shirt cards for Father’s Day (for a friend to sell at her store) which I still need to share. This is truly one of the easiest shaped card designs ever.

The card base was cut from CutCardStock Lessebo Moss Green cardstock along with the shirt panel, placket and collar pieces from a tropical leaf print in the kit. I added Keep It Simple Jade Enamel Dots for the buttons and a piece of ephemera from the upgrades for the sentiment. The final step was cutting the card base across the shoulders and up the sides of the collar.

I cut the inside panel from Neenah Classic Crest 80# Solar White cardstock and embellished it with a leftover strip of the tropical leaf pattern used on the front. I added a sticker from the sticker sheet for the sentiment which completed the card.

Affiliate links are used in this post at no cost to you – I really appreciate your support!

ScrapbookingStore products used:
July 2024 Scrapbook Kit with Upgrades:
PhotoPlay Sweet Sunshine 12×12 Collection Kit
Upgrades: PhotoPlay Sweet Sunshine Ephemera
Echo Park Summertime Chipboard Phrases
The Paper Studio Stick-A-Bilities clear stickers

Other products used:
CARDSTOCK/PAPER: CutCardStock Lessebo Moss Green cardstock, Neenah Classic Crest 80# Solar White cardstock
ACCESSORIES: Fiskars 12″ ProCision Rotary Bypass Paper Trimmer, Cricut Paper Trimmer, Elmer’s Craft Bond Tape Runner, Bearly Art precision craft glue, Keep It Simple Back To Basics Jade Enamel Dots, 1/2″ double-sided foam strip, Scrapbook.com double-sided foam adhesive squares

I hope you’ve enjoyed today’s project and you’re thinking about all the fun you could have with this month’s kit… you really ought to think about joining the Subscription Club! Be sure to Follow us on Facebook, Instagram, Pinterest and YouTube for lots of crafty inspiration! And if you do decide to join the Subscription Club, join our ScrapbookingStore Club Member Group on Facebook for more inspiration and to share your projects! Thanks so much for stopping by today – we’ll see you next time!

Scrappy hugs,

Let freedom ring!

Hi friends! Dang, another week has blown by and it’s Friday again! The last Friday of June! I’m delighted to share a Keep It Simple DT inspiration project created with our NEW KIS Cuts Camper released today. For my debut project using this awesome die set, I used papers and enamel dots from the also new Stars & Stripes Collection. How stinkin’ cute is this?! This camper really tugged at my heart strings because Ed and I were full-time RV’ers for nearly five years when we moved out here to Colorado in our 40-foot fifth wheel. He became disabled and we decided not to travel anymore. But we sure had some fun times and met some amazing people! I LOVE shaped cards and this one is just in time for July 4th which is right around the corner!

I cut the camper shaped card base from Neenah Classic Crest 110# Solar White cardstock along with all the camper layers and pieces from coordinating papers in the Stars & Stripes 6×9 Collection Pack and CutCardStock Bright Silver Foil and Pop Tone Black Licorice cardstock. The assembly was the most fun – it’s always delightful watching these kinds of projects come to life! I used stars and striped papers for the camper body which I think turned out cute, and used a red star from the Stars & Stripes Enamel Dots to embellish the tire. I stamped the sentiment from the Stars & Stripes 4×8 Collection Stamp in Catherine Pooler Juniper Mist ink on a scrap piece of 110# Solar White and popped it up on a shaker strip for dimension.

I covered the inside with an additional patterned paper from the 6×9 Collection Pack and added an oval which I cut from 80# Solar White using a Back To Basics Stitched Ovals Nested Die. I stamped another sentiment from the same Stars & Stripes stamp set in blue ink which completed the project.

Keep It Simple products used:
KIS Cuts Camper
Stars & Stripes 6×9 Collection Pack
Stars & Stripes 4×8 Collection Stamps
Stars & Stripes Enamel Dots
Back To Basics Stitched Ovals Nested Dies

Affiliate links are used in this post at no cost to you – I really appreciate your support!

Other products used:
CARDSTOCK/PAPER: Neenah Classic Crest 110# and 80# Solar White cardstock, CutCardStock Bright Silver Foil and Pop Tone Black Licorice cardstock
INK: Catherine Pooler Juniper Mist ink
ACCESSORIES: Fiskars 12″ ProCision Rotary Bypass Paper Trimmer, Bearly Art precision craft glue, MISTI stamp tool, Big Shot, GKD Shaker Strips, Scrapbook Adhesives 3D Foam Squares (large black)

I hope you’ve loved seeing this project as much as I loved creating it and you’re inspired to get crafty! Be sure to check out ALL the fun goodies in the Keep It Simple online store! Save 10% on your entire order (excluding the bundled Stars & Stripes Collection) when you shop online using code LoveToScrap2 at checkout! There is no minimum purchase requirement and no usage limits, AND it combines with product, order, and shipping discounts! Is that cool, or what?! Be sure to Follow us on Facebook, Instagram, and Pinterest for lots of crafty inspiration! Thanks so much for stopping by today – we’ll see you next time!

Scrappy hugs,

Have a Ball

Hey everybody! Well, another weekend has come and gone – and can you believe we’re almost to the middle of May?! I’m stoked to be back with a Keep It Simple DT inspiration project created with the super awesome KIS Cuts Mason Jar and Mason Jar Sentiments which I paired with the Back To Basics Lilac 12×12 Collection Pack and Enamel Dots! And I also used a few pieces of the Polymer Clay-Hollow Circle Rainbow Mix from the new Sprinkles line as embellishments! I totally LOVE shaped cards and there are so many fun details in this mason jar die set!

Using the main die in the KIS Cuts Mason Jar set, I cut the shaped card base from CutCardStock Cougar 100# Smooth White cardstock. I cut the layers, shadow pieces and sentiment from coordinating papers in the Back To Basics Lilac 12×12 Collection Pack. I assembled the card, popping up the rim on 1-mm-thick foam squares and adding metallic silver thread with a bow and a Back To Basics Lilac Enamel Dot across the top. I stamped the small portion of the sentiment in Catherine Pooler Royal Treatment ink and added several pieces of the Polymer Clay-Hollow Circle Rainbow Mix Sprinkles as embellishments.

I stamped a sentiment from the Back To Basics Congratulations Sentiments stamp set in Catherine Pooler Royal Treatment ink on the inside, which completed the card.

Keep It Simple products used:
KIS Cuts Mason Jar
KIS Stamps Mason Jar Sentiments
Back To Basics Lilac 12×12 Collection Pack
Back To Basics Congratulations Sentiments stamp set
Sprinkles: Polymer Clay-Hollow Circle Rainbow Mix
Back To Basics Lilac Enamel Dots

Affiliate links are used in this post at no cost to you – I really appreciate your support!

Other products used:
CARDSTOCK/PAPER: CutCardStock Cougar Smooth 100# White cardstock
INK: Catherine Pooler Royal Treatment ink
ACCESSORIES: Fiskars 12″ ProCision Rotary Bypass Paper Trimmer, Bearly Art precision craft glue, MISTI stamp tool, Big Shot, Coats Metallic Silver Thread, 1-mm-thick foam squares

I hope you’ve loved seeing this project as much as I loved creating it and you’re inspired to get crafty! Be sure to check out ALL the fun goodies in the Keep It Simple online store! Save 10% on your entire order when you shop online using code LoveToScrap2 at checkout! There is no minimum purchase requirement and no usage limits, AND it combines with product, order, and shipping discounts! Is that cool, or what?! Be sure to Follow us on Facebook, Instagram, and Pinterest for lots of crafty inspiration! Thanks so much for stopping by today – we’ll see you next time!

Scrappy hugs,

Cute & Cuddly

Hey everybody! Today is turning out to be another busy day on my blog, lol! I’ve popped in once more this morning to share a baby boy version of the new Keep It Simple Romper Card created with items in the new Floral Baby Collection! I shared a darling baby girl card about a week ago for Keep It Simple using these products with the promise that I’d soon share a boy version. These products were released on April 5th and I’m so smitten, I can’t stand it! In addition to the Baby Romper Card dies, I used papers from the 12×12 Collection Pack, Die Cut Pieces, and sentiments from both the Land Babies and Water Babies Collection Stamps.

I really don’t have many baby-themed items in my stash so I’m going crazy with ideas! If you like these Keep It Simple products and think you might want to go shopping, be sure to use my discount code LoveToScrap2 at checkout to save 10% on your entire order! There is no minimum purchase requirement and no usage limits, plus the code combines with product, order, and shipping discounts!

Using the KIS Cuts Baby Romper Card dies, I cut the card base from CutCardStock Cougar Smooth White cardstock along with the romper card elements from coordinating papers in the Floral Baby 12×12 Collection Pack and 12×12 Cardstock Shop Blue-Gray Textured cardstock. I added an elephant from the Die Cut Pieces and used two small enamel dots from the Keep It Simple Back To Basics Royal Enamel Dots on the bottom flap. I curved the sentiment from the Land Babies Collection Stamps just a tad on my MISTI and stamped it in Memento Tuxedo Black ink on Cougar Smooth White, which completed the card front.

I embellished the inside with a stitched circle cut with a Keep It Simple Stitched Circles Nested Die on which I stamped a sentiment from the Water Babies Collection Stamps in black ink. This was definitely a fun one!

Affiliate links are used in this post at no cost to you – I really appreciate your support! 

Products used:
CARDSTOCK/PAPER: CutCardStock Cougar Smooth 80# White cardstock, 12×12 Cardstock Shop Blue-Gray Textured cardstock, Keep It Simple Floral Baby 12×12 Collection Pack
STAMPS: Keep It Simple Baby Floral Collection Stamps- Land Babies and Water Babies
INK: Memento Tuxedo Black ink
DIES/PUNCHES: KIS Cuts Baby Romper Card Dies, Keep It Simple Stitched Circles Nested Dies
ACCESSORIES: Fiskars 12″ ProCision Rotary Bypass Paper Trimmer, Bearly Art precision craft glue, MISTI stamp tool, Big Shot, Keep It Simple Back To Basics Royal Enamel Dots, Keep It Simple Floral Baby Die Cut Pieces, Scrapbook Adhesives 3D Foam Squares (small white)

I hope you’ve enjoyed seeing this sweet baby boy romper card! Thanks so much for stopping by today – we’ll see you next time! ;)

Scrappy hugs,

Precious Baby

Hey everybody, Happy Sunday – I hope you’re having a great weekend! I have THE most adorable inspiration project to share today for Keep It Simple! Our Romper Die and Floral Baby Collection debuted day before yesterday and talk about CUTE… I can’t even! There is a baby boy option for the romper along with papers in the collection that could easily be used for boy-themed projects, and I’ve whipped one up, so stay tuned! The Floral Baby Collection includes both Land Babies and Water Babies stamps, dies and die cut pieces, so be sure to check them all out. These are must-haves for your stash, for sure!

Using the KIS Cuts Baby Romper Card Dies, I cut the romper card base from CutCardStock Cougar 100# Smooth White cardstock along with layering panels from coordinating papers in the Floral Baby 12×12 Collection Pack. The most fun part of this kind of project is always the assembly… and this one has lots of fun details! I added a die cut flower just below the collar and hearts from the Die Cut Pieces to the pockets.

I stamped sentiments from both the Land Babies and Water Babies stamps which I cut with the coordinating outline dies, and added two Back To Basics Rose Enamel Dots to the bottom flap. To the inside, I added a die cut circle (using the Back To Basics Stitched Circles Nested Dies) embellished with a sentiment along with a heart and posies from the Die Cut Pieces.

Sharing in the following challenges:
1.https://aperfecttimetocraft.blogspot.com/2024/04/a-perfect-time-to-craft-open-challenge.html
2.https://avenue613.blogspot.com/2024/04/april-2024-anything-goes-w-optional.html
3.https://classicdesignchallenge.blogspot.com/2024/03/classic-design-challenge-03-2024-marapr.html
4.https://cardsgalorechallenges.blogspot.com/2024/04/april-2024-crafts-galore-encore.html
5.https://craftycatzweeklychallenge.blogspot.com/2024/04/crafty-catz-challenge-669-anything-goes.html
6.https://disdigidesignschallenge.blogspot.com/2024/03/lots-of-layers-challenge.html
7.https://dragonflydreamschallenges.blogspot.com/2024/04/april-challenge-use-die.html
8.https://hqcelebrationsoflovechallenges.blogspot.com/2024/04/hq-celebrations-of-love-4-main-themes.html
9.https://scrapping4funchallenges.blogspot.com/2024/04/april-234-anything-goes.html

Keep It Simple products used:
KIS Cuts Baby Romper Card Dies
Floral Baby 12×12 Collection Pack
Floral Baby Land Babies Collection Stamp
Floral Baby Land Babies Outline Dies
Floral Baby Water Babies Collection Stamp
Floral Baby Water Babies Outline Dies
Floral Baby Die Cut Pieces
Back To Basics Rose Enamel Dots
Back To Basics Stitched Circles Nested Dies

Affiliate links are used in this post at no cost to you – I really appreciate your support!

Other products used:
CARDSTOCK/PAPER: CutCardStock Cougar Smooth 100# White cardstock
INK: Memento Tuxedo Black ink; Spectrum Noir Tri-Blends- CR1/3/6
ACCESSORIES: Fiskars 12″ ProCision Rotary Bypass Paper Trimmer, Bearly Art precision craft glue, MISTI stamp tool, Big Shot

I hope you’ve loved seeing this project as much as I loved creating it and you’re inspired to get crafty! Be sure to check out ALL the fun goodies in the Keep It Simple online store! Save 10% on your entire order when you shop online using code LoveToScrap2 at checkout! There is no minimum purchase requirement and no usage limits, AND it combines with product, order, and shipping discounts! Is that cool, or what?! Be sure to Follow us on Facebook, Instagram, and Pinterest for lots of crafty inspiration! Thanks so much for stopping by today – we’ll see you next time!

Scrappy hugs,

sweet

Happy Tuesday, everybody! I hope you’re having a great week so far! Has the weather warmed up any where you are? It’s still chilly here but we’re expected to have temps in the 60s this week so just maybe spring has sprung! I’m up on the CutCardStock blog today with a tutorial for making a super cute watermelon thank you card featuring our new Lessebo cardstock along with my Cricut and a Dreaming Tree cut file. I used Lessebo Cherry Red, Pitch Black, Hunter Green and White cardstock, and also Cougar Smooth White cardstock for the envelope. This card is easy and works up fast, and would be adorable as a summer party invite! The sky is the limit! Be sure to visit the CutCardStock website this month for a variety of sales (one each week) on closeout and overstock items!

Using my Cricut and the Dreaming Tree Watermelon Card SVG cut file, I cut the card base and watermelon layer from Lessebo Cherry Red, the seed layer from Pitch Black, and the rind from Hunter Green and White. I stamped a sentiment from the Taylored Expressions One In A Melon stamp set in Memento Tuxedo Black ink.

The inside sentiment layer was cut from Lessebo White and I stamped another sentiment from the same Taylored Expressions stamp set.

Here’s a shot of the card with the envelope that I cut from Cougar Smooth White cardstock and the flap layer from Lessebo Hunter Green. So stinkin’ cute!

Sharing in the following challenges:
1.https://aperfecttimetocraft.blogspot.com/2024/04/a-perfect-time-to-craft-open-challenge.html
2.https://classicdesignchallenge.blogspot.com/2024/03/classic-design-challenge-03-2024-marapr.html
3.https://crafterscafeblogchallenge.blogspot.com/2024/03/306-food.html
4.https://pennyschallenges.blogspot.com/2024/03/pennys-challenge-568.html
5.https://scrapping4funchallenges.blogspot.com/2024/04/april-234-anything-goes.html
6.https://sparklesforumchallenges.blogspot.com/2024/03/174-sweet-treats.html

Affiliate links are used in this post at no cost to you – I really appreciate your support!

CutCardStock products used:
Lessebo Cherry Red cardstock
Lessebo Pitch Black cardstock
Lessebo Hunter Green cardstock
Lessebo White cardstock
Cougar Smooth 80# White cardstock

Other products used:
STAMPS: Taylored Expressions One In A Melon stamp set
INK: Memento Tuxedo Black ink
DIES/PUNCHES: Dreaming Tree Watermelon Card SVG cut file
ACCESSORIES: Cricut Explore Air 2, Bearly Art precision craft glue, MISTI stamp tool

I hope you’ve enjoyed today’s project and you’re inspired to get crafty! Be sure to check out all the awesome cardstock and other goodies at CutCardStock (adhesives, labels, stickers, pens, watercolors and ribbon to name a few). And head on over to the CutCardStock Facebook Page and for more inspiration! Also, be sure to join our Creating with Card Stock Facebook Group for even more crafty inspiration! Thanks so much for stopping by today – we’ll see you next time!

Scrappy hugs,

Here for the Shenanigans

Hey everybody! I hope your Monday is off to a great start! In the spirit of March being National Craft Month, I’ve popped in again this morning to share a fun St. Patrick’s Day card created with the Keep It Simple Vintage Truck Dies and papers and die cut pieces from the new Lucky Day Collection! The vintage truck dies are great for literally ANY holiday or occasion and they are always so fun to play with! And I love the Lucky Day Collection so much that I couldn’t resist making a truck card with these awesome products!

Just a reminder that you can always save 10% on your online Keep It Simple orders by using my code LoveToScrap2 at checkout if you like any of the Keep It Simple products I use and want to go shopping. There is no minimum purchase requirement and no usage limits, AND it combines with product, order, and shipping discounts!

Using the Vintage Truck Dies, I cut the card base from CutCardStock Cougar 100# Smooth White cardstock and all the truck pieces from coordinating prints in the Lucky Day 6×9 Collection Pack as well as CutCardStock Lessebo Pitch Black, Lessebo Cherry Red, Lessebo Granite Gray, and Bright Gold Foil cardstock. The assembly is always the most fun, and this truck was exceptionally fun adding all the Lucky Phrases Die Cut Pieces… because I AM Irish!

I cut an additional truck shape piece from the print used on the front to cover the inside panel. I added a circle cut from Cougar Smooth White using a Keep It Simple Stitched Circles Nested Die, and added several more die cut pieces. I really love how this turned out!

Sharing in the following challenges:
1.https://classicdesignchallenge.blogspot.com/2024/03/classic-design-challenge-03-2024-marapr.html

Affiliate links are used in this post at no cost to you – I really appreciate your support! 

Products used:
CARDSTOCK/PAPER: Keep It Simple Lucky Day 6×9 Collection Pack and Lucky Phrases Die Cut Pieces; CutCardStock Cougar 100# Smooth White, Lessebo Pitch Black, Lessebo Cherry Red, Lessebo Granite Gray, and Bright Gold Foil cardstock
DIES/PUNCHES: Keep It Simple Back To Basics Vintage Truck Dies and Stitched Circles Nested Dies
ACCESSORIES: Fiskars 12″ ProCision Rotary Bypass Paper Trimmer, Elmer’s Craft Bond Tape Runner, Bearly Art precision craft glue, Big Shot, 1/2″ double-sided foam strip, Scrapbook Adhesives 3D Foam Squares (small white)

I hope you’ve enjoyed seeing this fun St. Patrick’s Day shaped card! Thanks so much for stopping by today – we’ll see you next time! ;)

Scrappy hugs,

for you.

Hey everybody! Happy Tuesday – I hope you are having a great week! I’m delighted to be back today with another amazing ScrapbookingStore DT inspiration project created with the March Scrapbook Kit with Upgrades! I’m totally smitten with all the patterned papers, stickers and floral-themed upgrades in this month’s kit AND I have quite a few purse SVG cut files in my arsenal, so it didn’t take me long to decide what one of my projects was going to be, lol! This is the first time I’ve used this particular cut file and I love how it turned out. This fun shaped card was easy to assemble, and I definitely see a few more of these in my future. ;)

Using my Cricut Explore Air 2 and the SVG Cuts Luxury Handbags SVG cut file (specifically the Purse Card file), I cut the card base and front flap layer from two coordinating papers in the Carta Bella Flora No. 6 Collection Kit. I cut the handles, front flap and envelope from American Crafts Blush cardstock. I assembled the card and added a sentiment sticker from the sticker sheet as well as a flower from the Pink Paislee 5th & Monaco Embellishments in the upgrades.

The inside panel was cut from CutCardStock Cougar Smooth 80# White cardstock which I embellished with sentiment and floral stickers from the sticker sheet. I cut the envelope from the Blush cardstock.

Sharing in the following challenges:
1. https://aperfecttimetocraft.blogspot.com/2024/03/a-perfect-time-to-craft-open-challenge.html
2. https://avenue613.blogspot.com/2024/03/march-2024-anything-goes-w-optional.html
3. https://classicdesignchallenge.blogspot.com/2024/03/classic-design-challenge-03-2024-marapr.html
4. https://fabnfunkychallenges.blogspot.com/2024/03/challenge-591-spring.html
5. https://mmmchallengeblog.blogspot.com/2024/03/221-spring-flowers-weather-etc.html
6. https://pennyschallenges.blogspot.com/2024/03/pennys-challenge-567.html
7. https://scrapping4funchallenges.blogspot.com/2024/03/march-easter-spring.html
8. https://cinspirations.blogspot.com/2024/03/march-challenge-anything-goes.html

Affiliate links are used in this post at no cost to you – I really appreciate your support!

ScrapbookingStore products used:
March 2024 Scrapbook Kit with Upgrades:
Carta Bella Flora No. 6 12×12 Collection Kit with Element Sticker Sheet
Upgrades: Simple Stories St. Patrick’s Day Page Pieces
Pink Paislee 5th & Monaco Embellishments
Paige Evans Garden Shoppe Embellishments

Other products used:
CARDSTOCK/PAPER: American Crafts Blush cardstock, CutCardStock Cougar Smooth 80# White cardstock
DIES/PUNCHES: SVG Cuts Luxury Handbags SVG Cut File (specifically the Purse Card file)
ACCESSORIES: Cricut Explore Air 2, Elmer’s Craft Bond Tape Runner, 1″ double-sided foam strip, 1/4″ Scor-Tape

I hope you’ve enjoyed today’s project and you’re thinking about all the fun you could have with this month’s kit… you really ought to think about joining the Subscription Club! Be sure to Follow us on Facebook, Instagram, Pinterest and YouTube for lots of crafty inspiration! And if you do decide to join the Subscription Club, join our ScrapbookingStore Club Member Group on Facebook for more inspiration and to share your projects! Thanks so much for stopping by today – we’ll see you next time!

Scrappy hugs,