Clean and Simple Hello

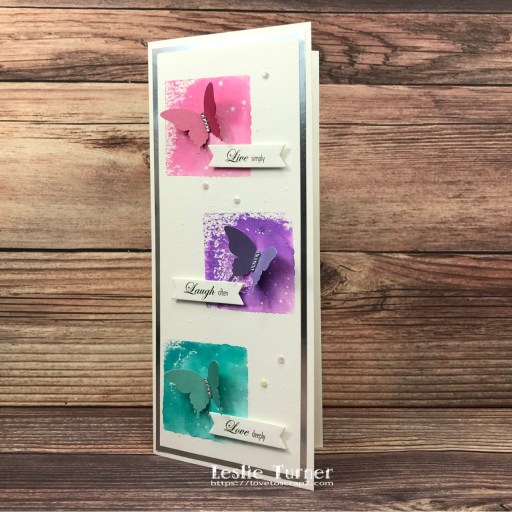
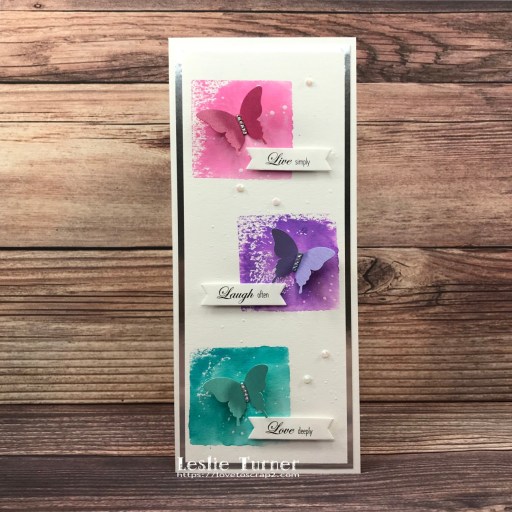
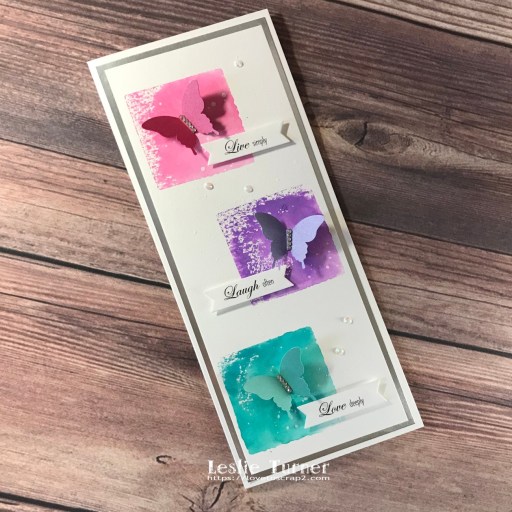
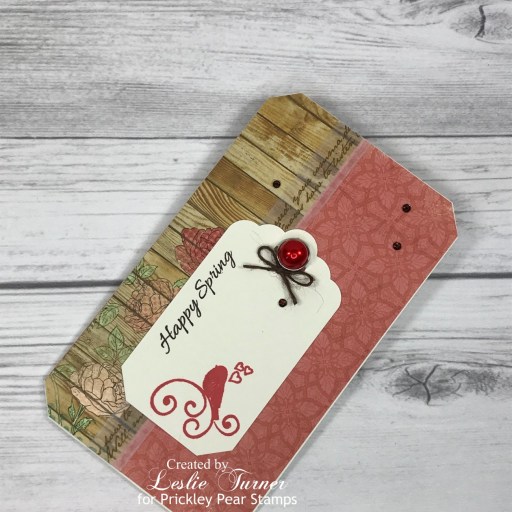
Hi everyone! Okay, we’ve zoomed through another month and I’ll say it again… where is the time going?! I’ve popped in this morning to share an awesome Tape Runner DT inspiration project! This pretty clean and simple mini slimline card features acrylic block stamping along with the Kat Scrappiness Mini Slimline Scalloped Edge dies, and of course, all panels were adhered with Tape Runner. I know I’ve mentioned (several times, lol) that I’m thrilled to have found mini slimline dies for my go-to size of 3-1/2″ x 6″ mini slim cards! Kat Scrappiness also carries pre-made envelopes (AND envelope dies!) for this size card which makes me really happy! This is the legal size to mail through the post office and the only size mini slim that I make. ;)

As mentioned above, all panels were adhered with Tape Runner. Wet glue was used only to adhere the pearls. I cut a top-folding mini slimline card base from two panels of 110# Solar White cardstock. Next, I die cut a scalloped panel from CutCardStock Stardream Metallic Azalea cardstock (using a Kat Scrappiness Mini Slimline Scalloped Edge die) and a layering panel from CutCardStock Stardream Metallic Eris cardstock. I inked a 2″ square acrylic block with Catherine Pooler It’s A Girl ink, spritzed it with my Tim Holtz distress sprayer and stamped it onto the Eris cardstock panel. Once dry, I stamped the bouquets and sentiment from the Scrapbook.com Friendly Bouquets stamp set in Memento Tuxedo Black ink and colored the flowers with a pink acrylic paint pen. The finishing touch was adding several gemstones from the Trinity Stamps Morganite Muse Embellishment Mix with my Trinity Pick Up Stick.

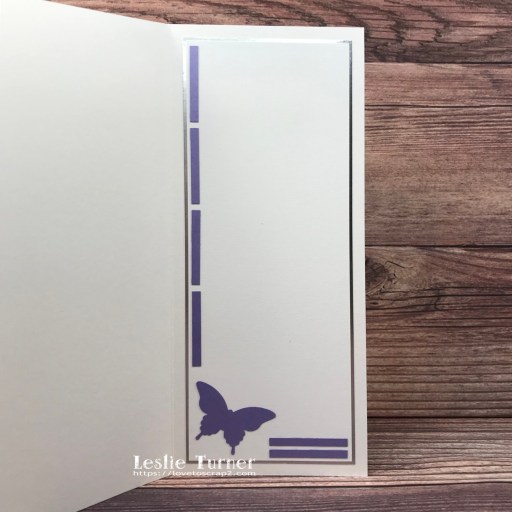
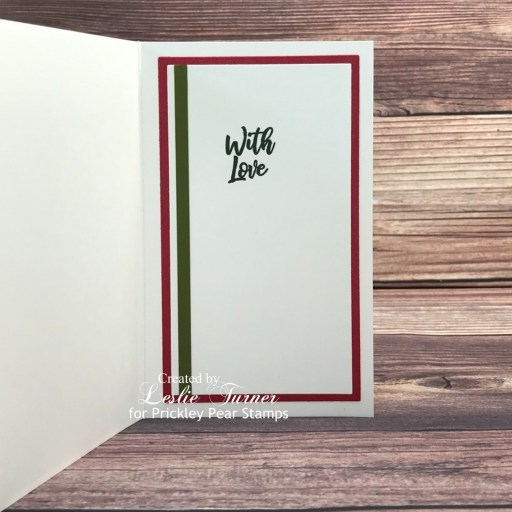
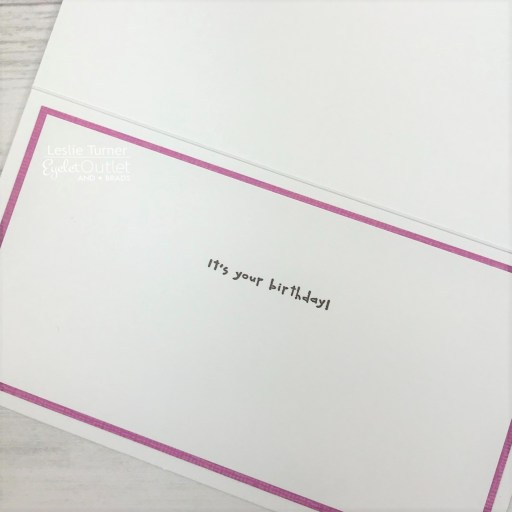
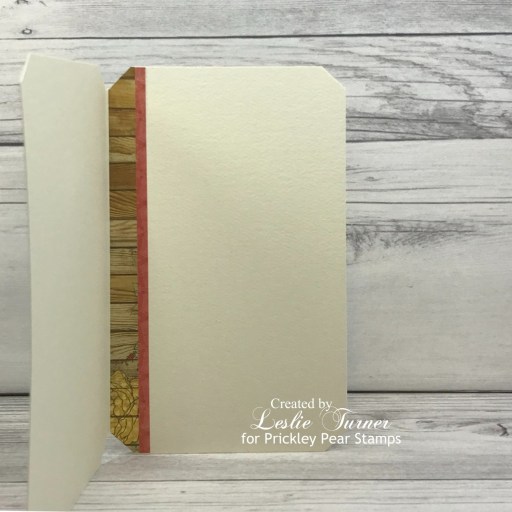
For the inside, I die cut another scalloped panel from CutCardStock Stardream Metallic Azalea cardstock using a Kat Scrappiness Mini Slimline Scalloped Edge die along with a layering panel from 80# Solar White cardstock, and adhered them together. I stamped the sentiment from the same stamp set in black ink and adhered the panel to the inside of the card base.

And one more look… totally loving how this card turned out! I love the simplicity of stamping with an acrylic block, and of course, the confidence that everything will hold together beautifully with Tape Runner! ;)

Sharing in the following challenges:
1. Cardz 4 Galz: Black & White + 1 Other Color
2. Classic Design Challenge: July #7 – Anything Goes
3. Lil Patch of Crafty Friends: #186 – Anything Goes
4. Little Red Wagon: #664 – Stitching Sensations
5. Paperbabe Stamps: #172 – Anything Goes
6. Stamping Sensations: Summer Flowers
7. Try It On Tuesday: Make It Feminine

Tape Runner products used:
Tape Runner

Affiliate links are used in this post at no cost to you – I really appreciate your support!

Other products used:
Cardstock/Paper: Neenah Classic Crest 110# and 80# Solar White cardstock, CutCardStock Stardream Metallic Azalea cardstock, CutCardStock Stardream Metallic Eris cardstock
Stamps: Scrapbook.com Friendly Bouquets stamp set
Ink: Catherine Pooler It’s A Girl ink, Memento Tuxedo Black ink, pink acrylic paint pen
Dies/Punches: Kat Scrappiness Mini Slimline Scalloped Edge Dies
Accessories: We R Memory Keepers Large Guillotine Paper Trimmer, Bearly Art precision craft glue, MISTI stamping tool, Big Shot, 2″ square acrylic block, Tim Holtz distress sprayer, Trinity Stamps Morganite Muse Embellishment Mix, Trinity Pick Up Stick

I hope you’ve enjoyed today’s project and you’re inspired to get your craft on! Be sure to check out the ah-mazing Tape Runner, Retractable Tape Runner and Highlight Tape Runner at TapeRunner.com! Be sure to Follow us on Facebook and Instagram! Thanks so much for stopping by today – we’ll see you next time!

Scrappy hugs,

Adventure Awaits

8/3/22 Top 3 at Through The Craft Room Door!

Hi everyone! Happy Thursday! I hope you’re having a great week! I’m stoked to be back on the Printable Cuttable Creatables blog today with another awesome DT inspiration project! I created a slimline card using the super adorable Pouncing Cat and Yarn Basket SVG files from the amazing Purrr-fect Pals Cat SVG Bundle. OMGoodness, there are a whopping 29 files in this bundle and if you are a fellow cat lover, then you’re sure to find some whimsical kitties and accessories that you just can’t live without! I had birthday in mind when I created this card but it really could be used for just about any celebratory event.

I cut a 3-3/4″ x 9″ slimline card base from CutCardStock Basis 110# White cardstock along with a layering panel from The Paper Studio Entirely Textures 2 paper pad which I adhered to the card base. I cut all the pieces from the Pouncing Cat and Yarn Basket SVG files (both from the Purrr-fect Pals Cat SVG Bundle) from CutCardStock Basis 80# White cardstock and colored them with alcohol markers. This was something a little different than cutting the pieces from colored cardstock which I typically do.

I used bright alcohol marker colors for the yarn balls which created great contrast against the neutral background. I colored black spots on the kitty to resemble our guy, Loki. I stamped a sentiment from the Stampin’ Up Let’s Set Sail stamp set in Memento Espresso Truffle ink which completed the card front.

I cut the inside panel from CutCardStock Basis 80# White cardstock, and embellished it with leftover patterned paper used on the front and a narrow strip of GKD Charcoal Brown cardstock. I stamped another sentiment (from the same stamp set) in brown ink and layered the panel on the charcoal brown cardstock.

And one more peek… this kitty is so stinkin’ cute I can’t stand it! And the yarn basket definitely adds to the cuteness factor! LOVE how this turned out!

Sharing in the following challenges:
1. A Perfect Time To Craft Open Challenge Blog: #07-2022 – Anything Goes
2. Classic Design Challenge: #7 – Anything Goes
3. Crafting Happiness Challenges: #125 – Anything Goes Always
4. Creative Moments: #236 – Cute
5. Critter Crazy Challenges: #64 – Anything Goes with a Featured Critter
6. Fab ‘n’ Funky Challenges: #556 – Anything Goes
7. FarmQuest Challenge Blog: #8 – Wagon and/or Animal
8. Paperbabe Stamps: #172 – Anything Goes
9. Penny’s Paper-Crafty Challenge Blog: #526 – Anything Goes with Paper
10. Through The Craft Room Door: July 19th Anything Goes
11. Use Your Stuff: #452 – Mood Board (colors and circles)

Affiliate links are used in this post at no cost to you – I really appreciate your support!

Printable Cuttable Creatables products used:
Purrr-fect Pals Cat SVG Bundle

Other products used:
Cardstock/Paper: CutCardStock Basis 110# White, Basis 80# White and Basis Black cardstock; GKD Charcoal Brown cardstock, The Paper Studio Entirely Textures 2 paper pad
Stamps: Stampin’ Up Let’s Set Sail stamp set
Ink: Arteza alcohol markers- RP09, BR86, Y02, YR33, YG14/17, BK00; Copic 0.3 Multi-Liner black pen, Memento Espresso Truffle ink
Accessories: Brother Scan N Cut, Tonic Studios 12″ Guillotine Paper Trimmer, Bearly Art precision craft glue, MISTI stamping tool

I hope you’ve enjoyed today’s project and you’re inspired to get out that electronic cutting machine! Be sure to check out all the fun goodies in the Printable Cuttable Creatables store – you’ll have a blast and there are tons of freebies to get started! Save 15% off your order at Printable Cuttable Creatables by using coupon code love2scrap15 at checkout! Be sure to Follow us on Facebook, Instagram, Pinterest, Twitter and YouTube for lots of crafty inspiration! And while you’re at it, join our Crafting with Printable Cuttable Creatables Facebook Group for more inspiration and to share your projects! Thanks so much for stopping by today – we’ll see you next time!

Scrappy hugs,

Get Well Soon

Howdy peeps! Hope you’re having a terrific Tuesday and not working too hard! I’ve been to the vet this morning to drop off our latest rescue for spaying. She’s the sweetheart who was sick when the neighbor brought her to us several weeks ago and had the six babies that didn’t survive. She’s getting along great with our other indoor cats and has quickly become one of the indoor kitty clan. ;) Okay, now for today’s share – a super cute get well card created with the new Nap Time stamp set in the latest Prickley Pear Stamps release. My goal was to make the bookshelf look like it was up against a wallpapered wall, and I think I made that happen! This is such a fun stamp set (and a large one) that’s fun to color!

I cut a mini slimline 3-1/2″ x 6″ card base from 110# Solar White cardstock along with a layering panel from the Jillibean Soup Blossom Soup 6×6 Mini Pad which I adhered to the card base. I stamped the image in Memento Tuxedo Black ink from the Nap Time stamp set on 80# Solar White cardstock and colored it with alcohol markers. I trimmed the image and adhered it to the card front. I stamped the sentiment on a scrap piece of Solar White cardstock, punched it with a 1″ circle punch and adhered it to the top center of the image. The finishing touch was adding three green Eyelet Outlet gemstones.

And one more peek… I’m really loving how this turned out! Being a crazy cat lady makes coloring this lazy cat in different color combinations the most fun!

Sharing in the following challenges:
1. Di’s Digi Challenges: Hand Colored Image Challenge
2. Inkspirational Challenges: #266 – Photo Challenge

3. Paperbabe Stamps: #168 – Anything Goes
4. Penny’s Paper-Crafty Challenge: #522 – Anything Goes with Paper
5. Shopping Our Stash: #471 – Make It A Tall One (mini slim)
6. The Creative Crafters: #52 – Anything Goes
7. Through The Craft Room Door: May 24th Anything Goes
8. Use Your Stuff: #449 – Anything Goes

Affiliate links are used in this post at no cost to you – I really appreciate your support!

Prickley Pear Stamps products used:
Nap Time stamp set

Other products used:
Cardstock/Paper: Neenah Classic Crest 110# and 80# Solar White cardstock, Jillibean Soup Blossom Soup 6×6 Mini Pad
Ink: Memento Tuxedo Black ink; Arteza alcohol markers- Y07, YG17/28, R21, G31, YR00, RP04/09, B03, PB03, BG01/54, NG00, CG06
Dies/Punches: Stampin’ Up 1″ circle punch
Accessories: We R Memory Keepers Large Guillotine Paper Trimmer, Bearly Art precision craft glue, Tape Runner, MISTI stamp tool, Big Shot, Eyelet Outlet green gemstones

I hope you’ve enjoyed this project! Be sure to check out all the awesome stamps and dies at Prickley Pear Stamps! If you’d like to save 10% on anything on the site when you shop at Prickley Pear Stamps, use the coupon code LESLIE10 at checkout! And be sure to ‘like’ and ‘follow’ the Prickley Pear Stamps Facebook page to keep up with news and sales, and join Prickley Pear Pals (the fan group) for lots of fun crafty ideas and to share your creativity! And finally, we’d love to see you visit the Prickley Pear Stamps blog that’s in the process of being revived and become a Follower! Hope to see you there! Thanks so much for stopping by today – we’ll see you next time! ;)

Scrappy hugs,

Colors Note Card

Howdy peeps! I hope you all are having a fabulous weekend… it sure is going by fast! I’m popping in again this morning with a fun mini slimline note card featuring the Kat Scrappiness Mini Slimline Fancy Scalloped Dies along with the Altenew Mini Delight: Mini Paintbox Stamp and Die Set. I’m sure I’ve mentioned how happy I am to have found a nice variety of mini slimline dies (and readymade envelopes) for my go-to size of 3-1/2″ x 6″ mini slim cards! This is the legal size to mail through the post office and the only size of these I make. ;)

I cut a mini slimline card base from 110# Solar White cardstock along with a die cut layering panel from 80# Solar White cardstock using the Kat Scrappiness Mini Slimline Fancy Scalloped Dies which I adhered to the card base. I then die cut several partial panels using CutCardStock Pop Tone Wild Cherry, Tangy Orange, Banana Split, Gumdrop Green, Blue Raspberry and Grape Jelly cardstock which I stacked together and adhered to the bottom of the card front. I stamped the sentiment in Memento Tuxedo Black ink, and then stamped the paint box on a scrap piece of 110# Solar White cardstock and cut it with the coordinating die. I LOVE this mini stamp and die set! I used a Stampin’ Up 1/4″ Circle Punch and punched small circles from the corner of several Sunny Studio Striped Silly 6×6 double-sided papers, adhered them to the paint box and then covered them with Glossy Accents. Once dry, I adhered the element to the card front and then added several Kat Scrappiness 3mm and 4mm Sparkling Clear Droplets which completed the card front.

I cut the inside panel from CutCardStock Pop Tone Grape Jelly cardstock using the Kat Scrappiness Mini Slimline Fancy Scalloped Dies, and adhered a plain layering panel cut from 80# Solar White cardstock. Since this is a note card, I left the panel blank with plenty of room to write a custom message.

And one more look… totally loving how this note card turned out! And I’m so smitten with these mini slimline dies from Kat Scrappiness. I searched and searched for a long time to find them, and I’ve been making my own mini slim envelopes which I won’t have to do anymore! ;)

Sharing in the following challenges:
1. AAA Cards: #216 – Color Scheme + option to make it a shaker card (no option)
2. Crafting Happiness Challenges: #123 – May Anything Goes Always
3. Crafty Catz: #597 – Anything Goes w/ optional twist of All About the Girls (playing twist)
4. Paperbabe Stamps: #168 – Anything Goes
5. Shopping Our Stash: #471 – Make Mine A Tall One (mini slimline)
6. Simon Says Stamp Wednesday Challenge: Anything Goes

Affiliate links are used in this post at no cost to you – I really appreciate your support! 

Products used:
Cardstock/Paper: Neenah Classic Crest 110# and 80# Solar White cardstock; CutCardStock Pop Tone Wild Cherry, Tangy Orange, Banana Split, Gumdrop Green, Blue Raspberry and Grape Jelly cardstock; Sunny Studio Striped Silly 6×6 Double-Sided Papers
Stamps: Altenew Mini Delight: Mini Paint Box stamp set
Ink: Memento Tuxedo Black ink
Dies/Punches: Kat Scrappiness Mini Slimline Fancy Scalloped Dies, Altenew Mini Delight: Mini Paint Box die set, Stampin’ Up 1/4″ Circle Punch
Accessories: We R Memory Keepers Large Guillotine Paper Trimmer, Bearly Art precision craft glue, MISTI stamp tool, Big Shot, Ranger Glossy Accents, Kat Scrappiness 3mm Sparkling Clear Droplets, Kat Scrappiness 4mm Sparkling Clear Droplets

I hope you’ve enjoyed seeing this adorable note card as much as I enjoyed making it! Thanks so much for stopping by – we’ll see you next time! ;)

Scrappy hugs,

Live-Laugh-Love Note Card

5/27/22 Top 3 at CAS on Friday!

Hey everybody! Happy Tuesday to you all! I’m happy to share that I was invited to guest design over at Try It On Tuesday after scoring a Top 5 spot last month, so here I am with my GD inspiration project! The challenge theme this fortnight is Butterflies and I created a slimline card featuring butterflies on acrylic block stamping. I’ve done this technique quite a few times over the years although it’s been nearly two years since the last time. It is apparently making a come-back because I’ve seen it again recently on two Instagram reels so it’s been on my mind. And the cool part is I didn’t even realize when I picked out the pink, purple and teal distress oxides that I had matching shades of Stardream Metallic cardstock in my stash to use for the butterflies! A definite ‘score’ there!

I cut a 3-3/4″ x 9″ slimline card base from Basis 110# White cardstock along with layering panels from Bright Silver Foil cardstock and Basis 80# White cardstock. I inked up a 2″ square acrylic block with picked raspberry distress oxide, lightly spritzed it with water in my distress sprayer, and stamped it on the white layering panel. I repeated the process with wilted violet and peacock feathers distress oxides and gave it a few minutes to dry, then splattered white gesso mixed with a tiny bit of water over the panel with a fan brush. I adhered the panel to the Silver Foil cardstock layer and then to the card base.

I printed the Live, Laugh and Love sentiments on Basis White cardstock, cut them with a fishtail sentiment strip die, and adhered them to the panel on foam squares. I punched the butterflies from Azalea, Amethyst and Lagoon Stardream Metallic cardstock, embellished them with tiny iridescent gemstones, and adhered one to each stamped block. The final touch was adding several slightly larger iridescent gemstones.

I cut the inside panel from Basis 80# White cardstock and embellished it with small leftover strips of Amethyst Stardream Metallic cardstock and an additional punched butterfly. Since this is a note card, I left the inside panel blank, leaving plenty of room to write a custom message, and adhered it to a Silver Foil cardstock panel.

And one more peek… really loving how this turned out! It’s so awesome when an idea comes together exactly as I’ve pictured it in my head!

Sharing in the following challenges:
1. A Perfect Time To Craft Open Challenge: #05-2022 – Anything Goes
2. Addicted To Stamps and More: #429 – Any Occasion
3. CAS on Friday: #231 – Butterflies
4. Classic Design Challenge: #5 May Anything Goes
5. Crafting Happiness Challenges: #123 – Anything Goes Always
6. Creative Moments: #234 – Summer’s Here (and so are the butterflies ;)
7. Incy Wincy Designs Challenge: May Challenge – Use a Die Cut or Punch
8. International Art & Soul: #133 – 3 of Something
9. Lil Patch of Crafty Friends: #182 – Anything Goes
10. Make My Monday: #174 – Springtime
11. World Wide Open Design Team Challenge: #05 – Anything Goes

Affiliate links are used in this post at no cost to you – I really appreciate your support! 

Products used:
Cardstock/Paper: CutCardStock Basis 110# White cardstock, Basis 80# White cardstock, Stardream Metallic Azalea cardstock, Stardream Metallic Amethyst cardstock, Stardream Metallic Lagoon cardstock, Bright Silver Foil cardstock
Stamps: Computer-generated Live, Laugh and Love sentiments
Ink: Ranger distress oxides- picked raspberry, wilted violet and peacock feathers
Dies/Punches: Stampin’ Up Elegant Butterfly punch, My Favorite Things Essential Fishtail Sentiment Strip dies
Accessories: We R Memory Keepers Large Guillotine Paper Trimmer, Bearly Art precision craft glue, 2″ square acrylic stamping block, Tim Holtz Distress Sprayer, Liquitex White Gesso, fan brush, Darice tiny iridescent gemstones, Taylored Expressions White Rhinestones, Trinity Pick Up Stick, Scrapbook Adhesives 3D Foam Squares Variety Pack (small white)

I hope you’ve enjoyed seeing this project and will link up with us this time! Thanks so much for stopping by today – we’ll see you next time! ;)

Scrappy hugs,

Lazy Days

Hi friends! Happy Sunday and I hope you’re having a fabulous weekend! They sure do come and go quickly these days, lol! I have an adorable mini slimline get well card to share with you today created with the new Nap Time stamp set from Prickley Pear Stamps! The awesome release includes this library stamp set, several very cool chicken stamp sets, a woodgrain background stamp, and a chicken wire background stamp! You just can’t go wrong with these!

I cut a 3-1/2″ x 6″ mini slimline card base from CutCardStock Basis 110# White cardstock along with a layering panel from CutCardStock Pop-Tone Wild Cherry cardstock which I adhered to the card base. I stamped the image on Basis White cardstock, colored it with alcohol markers, and trimmed it. I stamped the sentiment in Memento Tuxedo Black ink in a vertical fashion, adhered the image to the card front, and finished it off with three Darice iridescent gemstones.

One more look… super happy with how this turned out! Since we are Crazy Cat People, I fell in love immediately with this stamp set! Gotta love that guy snoozing on the shelf!

Sharing in the following challenges:
1. A Perfect Time To Craft Open Challenge: #05-2022 – Anything Goes
2. Addicted To Stamps and More: #429 – Any Occasion
3. Classic Design Challenge: #5 May Anything Goes
4. Crafting Happiness Challenges: #123 – Anything Goes Always
5. Crafty Catz: #595 – Anything Goes w/ optional Masculine (playing twist)
6. Inkspirational: Designers Choice – Free (Use Something Free or Gifted) — gifted for design team use

7. My Time To Craft: #481 – Around The House
8. Paperbabe Stamps: #167 – Anything Goes
9. Penny’s Paper-Crafty Challenge Blog: #521 – Anything Goes with Paper

Affiliate links are used in this post at no cost to you – I really appreciate your support!

Prickley Pear Stamps products used:
Nap Time stamp set

Other products used:
Cardstock/Paper: CutCardStock Basis 110# White cardstock, CutCardStock Pop-Tone Wild Cherry cardstock
Ink: Memento Tuxedo Black ink (pad and marker); Arteza alcohol markers- NG06, Y02/32, R31, BR82/84, YG15, P23, RP07, YR33, B22/29, BG00
Accessories: We R Memory Keepers Large Guillotine Paper Trimmer, Bearly Art precision craft glue, MISTI stamp tool, Darice iridescent gemstones

I hope you’ve enjoyed this project! Be sure to check out all the awesome stamps and dies at Prickley Pear Stamps! If you’d like to save 10% on anything on the site when you shop at Prickley Pear Stamps, use the coupon code LESLIE10 at checkout! And be sure to ‘like’ and ‘follow’ the Prickley Pear Stamps Facebook page to keep up with news and sales, and join Prickley Pear Pals (the fan group) for lots of fun crafty ideas and to share your creativity! And finally, we’d love to see you visit the Prickley Pear Stamps blog that’s in the process of being revived and become a Follower! Hope to see you there! Thanks so much for stopping by today – we’ll see you next time! ;)

Scrappy hugs,

Merry Christmas mini slimline

Hi friends! We’ve reached another Hump Day and the weeks are just buzzing by! I’ve popped in this morning with one final card sample created for Prickley Pear Stamps, and this one catches me completely up! For now, lol! I’m working behind the scenes on more samples which I’ll be sharing later. ;) This Merry Christmas mini slimline features one of the curvy stamps from the Scalloped Borders Fall stamp set that I used a repetitive fashion, leaving a slight break in the stamping for the sentiment.

I cut a mini slimline card base from 110# Solar White cardstock along with layering panels from CutCardStock Stardream Metallic Jupiter cardstock and 80# Solar White cardstock using the Waffle Flower Mini Slimline Layers die set. I stamped the bow and mistletoe from the Scalloped Borders Fall stamp set five times down the length of the white cardstock panel and colored the images with alcohol markers with Glossy Accents added to the berries. I stamped the sentiment (from the same stamp set) in Catherine Pooler Spruce ink and layered the panels together and then to the card base.

I cut the inside panel from 80# Solar White cardstock, again using the using the Waffle Flower Mini Slimline Layers die set, and embellished it with a single strip of CutCardStock Pop-Tone Jellybean Green cardstock. I stamped the sentiment from the Christmas Holiday Gift Tags stamp set in Catherine Pooler Spruce ink and layered the panel on the Metallic Jupiter cardstock.

And one more peek… this was a fun card to create. Repetitive stamping is challenging but yields a cool effect. I’m such a rebel… I never measure anything – I just eyeball it – and I think this turned out pretty well!

Affiliate links are used in this post at no cost to you – I really appreciate your support! 

Prickley Pear Stamps products used:
Scalloped Borders Fall stamp set
Christmas Holiday Gift Tags stamp set

Other products used:
Cardstock/Paper: Neenah Classic Crest 110# and 80# Solar White cardstock, CutCardStock Stardream Metallic Jupiter cardstock, CutCardStock Pop-Tone Jellybean Green cardstock
Ink: Catherine Pooler Midnight and Spruce inks; Arteza alcohol markers- YG02, R21
Dies/Punches: Waffle Flower Mini Slimline Layers die set
Accessories: Tonic Studios 12″ Guillotine Paper Trimmer, Bearly Art precision craft glue, MISTI stamp tool, Big Shot, Ranger Glossy Accents

I hope you’ve enjoyed this project! Be sure to check out all the awesome stamps and dies at Prickley Pear Stamps! If you’d like to save 10% on anything on the site when you shop at Prickley Pear Stamps, use the coupon code LESLIE10 at checkout! And be sure to ‘like’ and ‘follow’ the Prickley Pear Stamps Facebook page to keep up with news and sales, and join Prickley Pear Pals (the fan group) for lots of fun crafty ideas and to share your creativity! And finally, we’d love to see you visit the Prickley Pear Stamps blog that’s in the process of being revived and become a Follower! Hope to see you there! Thanks so much for stopping by today – we’ll see you next time! ;)

Scrappy hugs,

Happy Thanksgiving mini slimline

4/17/22 Rising Star at A Place To Start!

Hey everybody! How the heck are you?! Hopefully you’re having an awesome weekend! I have a card to share with you this morning that I created for Prickley Pear Stamps featuring our Scalloped Borders Fall stamp set along with the Stitched Scallop Border die set. LOVE these stamps and dies! And you know me… I am not a seasonal crafter – my mind is all over the place when I’m in my studio and I create whatever pops into my head. That was the case with this Thanksgiving card – I know it’s not Fall but I don’t care, lol!

I cut a mini slimline card base from Neenah Classic Crest Baronial Ivory cardstock along with layering panels from CutCardStock Basis Dark Orange cardstock, Stamp Anniething Autumn Life patterned paper, and the Baronial Ivory using the using the Waffle Flower Mini Slimline Layers die set. I adhered the dark orange panel to the card base and then stamped the leaf pattern from the Scalloped Borders Fall stamp set on the patterned paper panel and heat embossed it in copper. I colored the leaves with an alcohol marker and adhered the panel on top of the dark orange panel. I then cut away a portion of the ivory panel with one of the dies in the Stitched Scallop Border die set and popped the top piece up on craft foam on top of the patterned paper panel. I stamped the sentiment (from the same stamp set) in Memento Peanut Brittle ink and popped that piece up on craft foam as well.

I cut the inside panel from Baronial Ivory, again using the using the Waffle Flower Mini Slimline Layers die set, and embellished it with strips of the Stamp Anniething patterned paper and CutCardStock Dark Orange cardstock used on the front. I stamped the sentiment in Memento Peanut Brittle ink and layered the panel on the dark orange cardstock.

And one more look… really loving how this turned out! Such gorgeous stamps and dies! Love, love, love!

Sharing in the following challenges:
1. 613 Avenue Create: #202204 – Anything Goes w/ optional April Showers (no twist)
2. A Perfect Time To Craft Open Challenge: #4-2022 – Anything Goes
3. A Place To Start: #042022 – Anything Goes w/ optional Key It Simple (no twist)
4. Ally’s Angels: #57 – Anything Goes
5. Classic Design Challenge: April #4 – Anything Goes
6. Crafting Happiness Challenges: #122 – Anything Goes Always
7. Crafty Catz: #590 – Anything Goes
8. Jan’s Digi Stamps Challenges: April 2022 – Always Anything Goes
9. Paperbabe Stamps: #165 – Anything Goes

Affiliate links are used in this post at no cost to you – I really appreciate your support! 

Prickley Pear Stamps products used:
Scalloped Borders Fall stamp set
Stitched Scallop Border die set

Other products used:
Cardstock/Paper: Neenah Classic Crest Baronial Ivory cardstock, CutCardStock Basis Dark Orange cardstock, Stamp Anniething Autumn Life 6×6 double-sided papers
Ink: Versamark, Arteza BR41 alcohol marker, Memento Peanut Brittle ink
Dies/Punches: Waffle Flower Mini Slimline Layers die set
Accessories: Tonic Studios 12″ Guillotine Paper Trimmer, SweetStamps copper fine detail embossing powder, Bearly Art precision craft glue, MISTI stamp tool, Big Shot, dark orange craft foam

I hope you’ve enjoyed this project! Be sure to check out all the awesome stamps and dies at Prickley Pear Stamps! If you’d like to save 10% on anything on the site when you shop at Prickley Pear Stamps, use the coupon code LESLIE10 at checkout! And be sure to ‘like’ and ‘follow’ the Prickley Pear Stamps Facebook page to keep up with news and sales, and join Prickley Pear Pals (the fan group) for lots of fun crafty ideas and to share your creativity! And finally, we’d love to see you visit the Prickley Pear Stamps blog that’s in the process of being revived and become a Follower! Hope to see you there! Thanks so much for stopping by today – we’ll see you next time! ;)

Scrappy hugs,

A little birdie told me

Hi everyone! A very Happy Saturday to you – I hope you’ve had a great week! Affiliate links are used in this post at no cost to you – I really appreciate your support! I’m stoked to be back on the Eyelet Outlet blog today with another awesome DT inspiration project! I created a super cute birthday card featuring our Female Cardinal Brads, Bluebird & Robin Brads and Mini Butterfly Brads! I cut the cherry blossoms (from SVG Cuts) on my Scan N Cut and they fit perfectly on this mini slimline card with very little edge trimming needing to be done.

I started by cutting the cherry blossom pieces from CutCardStock Basis Brown cardstock, CutCardStock Pop-Tone Cotton Candy cardstock and CutCardStock Raspberry Ice cardstock, and assembling it. I cut a 3-1/2″ x 6″ mini slimline base from Neenah Classic Crest Solar White 110# cardstock along with a pink textured layering panel from the Core’dinations Vintage Collection 6×6 cardstock pad. I adhered the cherry blossoms to the textured layering panel and stamped the sentiment in brown ink in the lower left corner. I added the Female Cardinal Brads, a Bluebird & Robin Brad and a Mini Butterfly Brad, and adhered the panel to the card base.

I cut the inside panel from Neenah Classic Crest 80# Solar White cardstock, stamped the sentiment in brown ink and layered the panel on the Core’dinations textured cardstock used on the front.

And one more look… I really love these brads and I’m so happy with how this card turned out!

Sharing in the following challenges:
1. A Perfect Place To Craft Open Challenge: #3-2022 – Anything Goes
2. Classic Design Challenge: March #3 – Anything Goes
3. Creative Moments: #232 – For A Special Lady
4. Wednesday’s Creative Inspirations Challenge Blog: March Challenge – Spring Flowers

Eyelet Outlet products used:
Female Cardinal Brads
Bluebird & Robin Brads
Mini Butterfly Brads

Other products used:
Cardstock/Paper: Neenah Classic Crest 110# and 80# Solar White cardstock, CutCardStock Basis Brown cardstock, CutCardStock Pop-Tone Cotton Candy cardstock, CutCardStock Raspberry Ice cardstock, Core’dinations Vintage Collection 6×6 cardstock pad
Stamps: Stampin’ Up Hello Love stamp set
Ink: Catherine Pooler Icing on the Cake ink
Dies/Punches/Cut Files: SVG Cuts Cherry Blossoms cut file
Accessories: Brother Scan N Cut, Tonic Studios 12″ Guillotine Paper Trimmer, Bearly Art precision craft glue, Tombow Mono permanent adhesive, MISTI stamp tool

I hope you’ve enjoyed today’s project! Be sure to check out all the fun goodies at Eyelet Outlet! I can already see you drooling, lol! Be sure to ‘like’ and ‘follow’ Eyelet Outlet Facebook Page to keep up with news and sales, and while you’re at it, join the Eyelet Outlet Fans Facebook group for lots of creative inspiration! Thanks so much for stopping by today – we’ll see you next time! ;)

Scrappy hugs,

Happy Spring Note Card

Hey everybody! Hope you’re having a great week – we are rockin’ and rollin’ here, and Ed is getting better every day! He’ll get his stitches taken out on Thursday morning and hopefully we’ll get good news of clear margins on the melanoma excision, and that’ll be the end of that! ;) Affiliate links are used in this post at no cost to you – I really appreciate your support! I’ve popped in this morning to share the final sample I created in conjunction with the Prickley Pear Stamps new release of the Easter Cross stamp set. This pretty Spring note card is a super simple design and features stamps from the previously-released Crosses 2 stamp set.

I cut a mini slimline card base from CutCardStock Royal Sundance Felt 110# Natural cardstock and angled all four corners. I cut half layering panels from two coordinating prints from the My Mind’s Eye Howdy Doody 6×6 designer paper pad which I adhered together, and then added a strip of Eyelet Outlet Gold Script Washi Tape at the seam and adhered the panel to the card base. I cut a scrap piece of the felt cardstock into a tag, punched the top with a tag topper punch and angled the bottom corners. I stamped a vertical sentiment and a bird image on the tag with stamps from the Crosses 2 stamp set, added an Eyelet Outlet 12mm Red Pearl Brad and a brown twine bow, and adhered the tag to the card front. The finishing touch was adding several tiny clear gemstones that I colored with a brown alcohol marker.

For the inside, I cut embellishing strips from the My Mind’s Eye Howdy Doody patterned papers used on the front, which completed the card.

And one more look… such a pretty design with a tag, which I love!

Sharing in the following challenges:
1. A Perfect Time To Craft: #3-2022 – Anything Goes
2. Classic Design Challenge: March #3 – Anything Goes
3. Ellibelle’s Corner: March Challenge – Spring is in the Air
4. Jan’s Digi Stamps Challenges: March 2022 Always Anything Goes
5. Paperbabe Stamps: #162 – Anything Goes

Prickley Pear Stamps products used:
Crosses 2 stamp set

Other products used:
Cardstock/Paper: CutCardStock Royal Sundance Felt 110# Natural cardstock, My Mind’s Eye Howdy Doody 6×6 designer paper pad
Ink: Catherine Pooler Polished and Icing on the Cake inks; Arteza BR51 alcohol marker
Dies/Punches: Stampin’ Up Scalloped Tag Topper punch, Tonic corner punch
Accessories: We R Memory Keepers Large Guillotine Paper Trimmer, Bearly Art precision craft glue, Eyelet Outlet Gold Script Washi Tape, Studios Blackbird Brown Twine, Eyelet Outlet 12mm Red Pearl Brads, Darice Clear Gemstones

I hope you’ve enjoyed this project! Be sure to check out all the awesome stamps and dies at Prickley Pear Stamps! If you’d like to save 10% on anything on the site when you shop at Prickley Pear Stamps, use the coupon code LESLIE10 at checkout! And be sure to ‘like’ and ‘follow’ the Prickley Pear Stamps Facebook page to keep up with news and sales, and join Prickley Pear Pals (the fan group) for lots of fun crafty ideas and to share your creativity! And finally, we’d love to see you visit the Prickley Pear Stamps blog that’s in the process of being revived and become a Follower! Hope to see you there! Thanks so much for stopping by today – we’ll see you next time! ;)

Scrappy hugs,