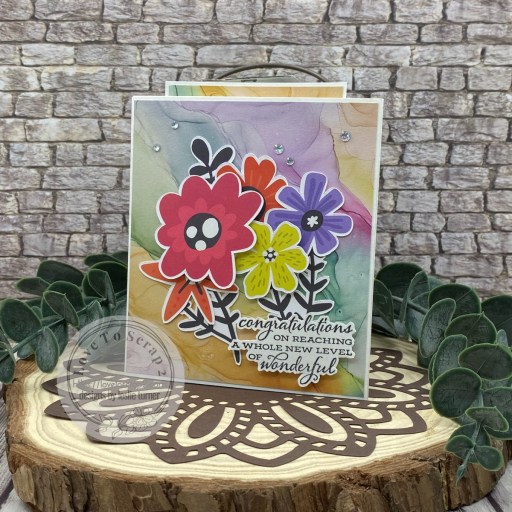
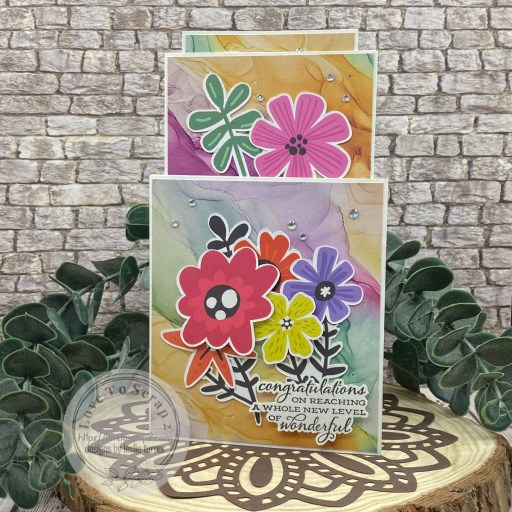
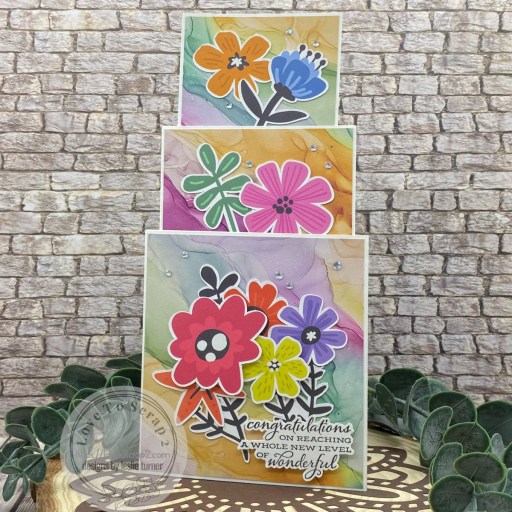
Hey everybody, Happy Friday! I hope you’re having an awesome week! Our new challenge is live this morning over at Creative Creases and I’m thrilled to share my DT inspiration project for Challenge #100. I created a 3-tier pull-up card featuring papers from Craft Consortium and ephemera from STAMPlorations, and I totally love how it turned out! This fold has been around for many years (and it has been some time since I made one) and I had forgotten how much fun it is! My inspiration came from an older video HERE (although there are others on YouTube) if you’d like to learn how to make it.
I cut the pieces from CutCardStock Basis 80# White 12×12 cardstock along with layering panels from Craft Consortium Ink Drops-Candy 6×6 papers. I assembled the card while watching Dawn’s video and then gathered an assortment of STAMPlorations Bloom Burst ephemera which I used to embellish the tiers.
I stamped a sentiment from the Stampin’ Up Celebrate Sunflowers stamp set on a scrap piece of Basis White in Memento Tuxedo Black ink, cut it with the coordinating Sunflowers die set, and popped it up on adhesive foam strips. The finishing touch was adding several iridescent gemstones.
Affiliate links are used in this post at no cost to you – I really appreciate your support!
Hey everybody! Happy first Tuesday in February… I hope you’re having a good week. My lovely friend, Jo, invited me to be her Guest Elf (yep, you read that right…ELF… lol!) for Christmas Kickstart Challenge #95 this month. The theme is ‘Fold It Fancy’ so obviously I couldn’t say no… you know how I love me some fun folds!
You may remember a couple months ago I posted a multi panel pop out card (HERE if you’d like to see it) that I had originally seen on Lisa Curcio’s blog. It was a 5×7 size, which is larger than I typically make, so I painstakingly reworked the measurements and came up with an A2 size. I’m happy to share the measurements for all the pieces below if you’d like to learn how to make one.
From solid cardstock, cut the following: — Card base: 5-1/2″ x 12″ scored at 4-1/4″, 6″ and 7-3/4″. — Large pillars (cut two): 4″ x 4-1/2″ scored at 1-1/8″, 2-1/4″ and 3-3/8″. — Side panels (cut two): 3″ x 3-3/4″ scored at 1/2″, 2-3/4″ and 3-1/4″. — Center panel: 2-1/2″ x 4-1/2″ scored at 3/4″, 2-1/4″ and 3-3/4″.
From your choice of patterned papers, cut the following: — Card base: front 4″ x 5-1/4″, inside panels (cut two) 4″ x 5-1/4″, inside M-sections (cut two) 1-1/2″ x 5-1/4″, back 4″ x 5-1/4″ from white or ivory cardstock for a signature panel. — Large pillars (cut four): 7/8″ x 3-3/4″. — Side panels (cut two): 2″ x 2-3/4″. — Center panel (cut two): 1-1/4″ x 2-1/4″.
It’s best to first adhere all the patterned paper pieces to the solid cardstock pieces, in order of how I listed them above. Embellish the card front, side panels, center panel, and back panel as desired. I used fussy cut ephemera from the Traci Vanover Designs Christmas Cocoa 6×6 paper pad I used. Feel free to visit my other post linked above for the link to Lisa’s video in case you want to watch it for the actual assembly. Even though my pieces are sized differently than those on her video, the assembly is the same. I promise it’s not as daunting as it looks! ;)
Here’s a shot of the back panel embellished with a patterned paper strip and layered piece of ephemera. I hope you enjoyed this as much as I did. I definitely love the smaller A2 size, and see more of these in my future, lol!
Affiliate links are used in this post at no cost to you – I really appreciate your support!
I hope you’ve enjoyed seeing this festive fancy fold card and will link up one with us this month! Thanks so much for stopping by today – we’ll see you next time! ;)
Hey everybody! Happy Thursday – can you believe we’re on the down-slide into the February already? Slow down, time! I’m delighted to share a Keep It Simple DT inspiration project created with our new Back To Basics Kraft 6×9 Collection Pack which is coming soon to the website (along with several other colors, wink-wink)! I created a 4-3/4″ square card featuring stacked squares. This is only the second one of these I’ve made and it’s hands-down one of the easiest designs ever! And with our Stitched Squares Nested Dies, you can make this card in record time!
I cut the top-folding 4-3/4″ square card base from CutCardStock Basis Natural 110# cardstock along with layering panels from CutCardStock Lessebo Coffee Bean cardstock. I cut four stitched squares from an assortment of prints in the Back To Basics Kraft 6×9 Collection Pack using various sizes of dies in the Back To Basics Stitched Squares Nested Dies.
I stamped the sentiment and image from the Simply Spring Collection Stamps in Memento Rich Cocoa ink, colored the image with alcohol markers, and cut both with the coordinating Simply Spring Outline Dies. I added a couple rhinestones from the Clementine collection (which are sold out) along with a clear gemstone from my stash and a few Back To Basics Mango Enamel Dots, which completed the card front.
I cut an additional stitched square from Basis Natural 80# cardstock using the Back To Basics Stitched Squares Nested Dies which I layered on a panel of Lessebo Coffee Bean cardstock. I stamped another sentiment and leaf image from the Simply Spring Collection Stamps which completed the card.
I hope you’ve loved seeing this project as much as I loved creating it and you’re inspired to get crafty! Be sure to check out ALL the fun goodies in the Keep It Simple online store! Save 10% on your entire order when you shop online using code LoveToScrap2 at checkout! There is no minimum purchase requirement and no usage limits, AND it combines with product, order, and shipping discounts! Is that cool, or what?! Be sure to Follow us on Facebook, Instagram, and Pinterest for lots of crafty inspiration! Thanks so much for stopping by today – we’ll see you next time!
Hey everybody, Happy Wednesday! I hope your week is going along nicely. I’m up on the Love From Lizi blog today with a tutorial for making a book cradle fold. This is my first attempt at this particular fold (which I saw on the Mixed Up Craft YouTube Channel) and it’s an interesting one. I used stamps and ephemera from our new So Lucky collection which I paired with several green prints from the Winter Warmers 6×6 Patterned Paper Pack and a couple Gold Mirror Peel-Off Stickers. This collection is a must-have for any coffee lovers out there!
I cut the card base pieces from Neenah Classic Crest 110# Solar White cardstock along with layering panels from assorted prints in the Winter Warmers 6×6 Patterned Paper Pack. Be sure to check out my tutorial on the Love From Lizi blog mentioned above for assembly instructions.
There are lots of areas on this card to embellish as desired. I used gold mirror peel-off stickers as well as ephemera and stamped sentiments from the new So Lucky collection. I did not have the dies in the bundle yet when I created this card, so I fussy cut the front sentiment. Here are shots of the back and a side angle so you can see the construction. Pretty cool, huh?!
Affiliate links are used in this post at no cost to you – I really appreciate your support!
I hope you’ve enjoyed seeing this project and you’re inspired to get crafty! Be sure to join our Facebook Group and Follow us on Instagram and YouTube for lots of crafty inspiration! Thanks so much for stopping by today – we’ll see you next time!
Hey everybody, I hope you’re having a great Thursday! I’m back with my second post today to share a Keep It Simple DT inspiration project created with our new Once Upon A Time: Jasmine Collection! OMGoodness, what a FABulous selection of papers, stamps, dies, and die cut pieces! It’s no secret that the faux center step card is one of my favorites (I’ve made quite a few of them) and it was the perfect way to showcase these adorable fairytale characters. And keeping a minimal list of supplies makes this a quick and easy card. And don’t forget the instructions for this fun fold are on the Freebies page of my blog HERE.
I cut the card base and center panel from CutCardStock Basis Teal cardstock, along with layering panels from coordinating prints in the Jasmine 6×9 Collection Pack. I grabbed a sentiment and a few images from the Jasmine Die Cut Pieces and built a little scene, popping a few of them up on foam squares.
I cut the inside panel from Neenah Classic Crest 80# Solar White and added another few pieces of ephemera from the Die Cut Pieces. I also cut a panel for the back to give it more of a finished look.
I hope you’ve loved seeing this project as much as I loved creating it and you’re inspired to get crafty! Be sure to check out ALL the fun goodies in the Keep It Simple online store! Save 10% on your entire order when you shop online using code LoveToScrap2 at checkout! There is no minimum purchase requirement and no usage limits, AND it combines with product, order, and shipping discounts! Is that cool, or what?! Be sure to Follow us on Facebook, Instagram, and Pinterest for lots of crafty inspiration! Thanks so much for stopping by today – we’ll see you next time!
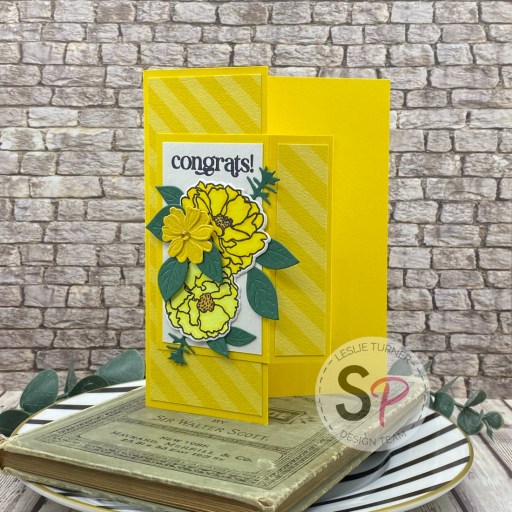
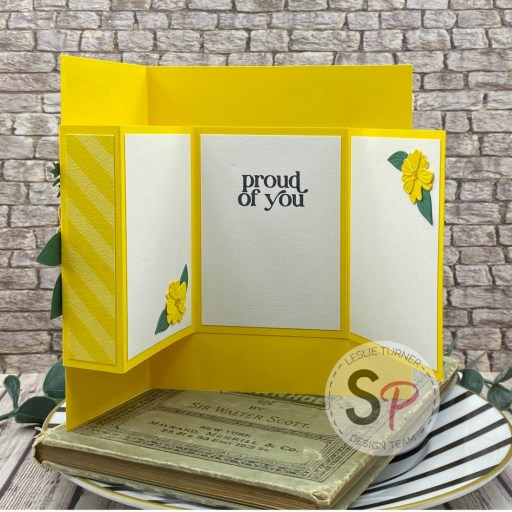
Hey everybody, happy Thursday! I hope you’re having a great week! I’m thrilled to share a Scrapbook Pal DT inspiration project with you today created with the Altenew Mini Delight: A Floral Congrats stamps and dies. I love florals and I love fun folds, so getting to share this tri-fold hidden door fun fold with you is definitely a win-win! All of the Altenew Mini Delight bundles are amazing and these stamps and dies are no exception. They sure make some beautiful projects! I saw this fun fold on Pinterest and it led me to several different videos so it’s an easy one to find.
I cut the card base and panel from CutCardStock Lessebo Sunflower Yellow cardstock, along with layering panels from CutCardStock Basis White and a diagonal striped print from the Keep It Simple Back To Basics Lemon 12×12 Collection Pack. I stamped the double floral image from the Altenew Mini Delight: A Floral Congrats stamp set twice on Neenah Classic Crest Solar White cardstock, colored them with Copic Ciao markers, and cut them with the coordinating die.
Using the floral and leaves dies in the Altenew Mini Delight: A Floral Congrats die set, I die cut several flowers and some greenery from papers in the KIS Lemon Collection Pack and CutCardStock Lessebo Hunter Green cardstock which I used to embellish several of the panels. I stamped sentiments from the same stamp set in black ink. The finishing touch was adding a small yellow gemstone to the center of each flower.
I stamped an additional sentiment from the same stamp set in black ink on the hidden panel inside, and embellished the panels on each side of that with die cut flowers.
Affiliate links are used in this post at no cost to you – I really appreciate your support!
I hope you’ve enjoyed this project and you’re inspired to get your craft on! Be sure to check out the awesome array of craft supplies in the Scrapbook Pal store… the selection is amazing! And head over to the Scrapbook Pal Facebook, Pinterest and Instagram pages for more design team inspiration! And if you haven’t yet subscribed to our YouTube Channel, be sure to do that, too, for tons of hands-on crafty inspiration! Thanks so much for stopping by today – we’ll see you next time!
Hey everybody, Happy Weekend! I hope you’re having a good one! My friend, Vicki, owner of the Stamped Smiles blog, posted a super cute card recently that she created for the January ‘Use Your Stash’ challenge over at Danni Bindel’s This & That With Danni’s Dreams Facebook Group. I totally LOVE the idea of not buying new craft supplies and simply using what we have, so I decided to join in this challenge. It’s been well over six months since I’ve entered any challenges with my projects and I’d really like to get back into it if I can find the time. The prompts for Danni’s January challenge include gnomes, embossing folders, border dies/punches, hearts, and 12×12 papers. I dug into my stash and came up with all the items, and I love how this turned out!
Using the Crafters Companion Die’sire Ruth Create-A-Card Dies, I cut the card base from CutCardStock Astrobright Lunar Blue along with a layering panel from CutCardStock Stardream Metallic Eris. I spritzed the layering panel with Ranger Adirondack Stream Color Wash. When the panel dried, I cut it with a smaller die from the Ruth Create-A-Card die set, lightly spritzed plain water in the Ranger Distress Sprayer, and ran it through the Big Shot in the Cuttlebug Argyle embossing folder. I lightly spritzed it with a homemade mix of Let’s Resin Teal Chameleon Powder and water in a Ranger Mini Mister. When that dried, I splattered Imagine Crafts Silver Pico Embellishment mixed with a little water over it with a fan brush.
I love Cottage Cutz dies because all the sets I have cut the pieces in one pass. Using the Flower Power Tomte Die, I cut the gnome and accessories from Neenah Classic Crest 110# Solar White cardstock and colored them with Copic Ciao alcohol markers. I used the Catherine Pooler Love Connections dies to cut the ring of hearts from dark turquoise Colorbok Bright Smooth 12×12 paper. I then assembled the gnome and accessories and adhered everything to the card front. I stamped the sentiment from the Keep It Simple Simply Spring Collection Stamps in Versafine Onyx Black ink on a Solar White scrap and cut it with the coordinating Simply Spring Outline Dies. The finishing touch was adding a few Freckled Fawn Enamel Dots.
I cut the inside panel from the same size Ruth Create-A-Card Die used for the front panel and embellished it with a floral print from the Doodlebug Design Floral-Graph Rainbow Petite Prints double-sided paper pad and a leftover strip of the dark turquoise Colorbok 12×12 paper. It’s hard to see in the photo but I used the My Favorite Things Homespun Stitched Lines Die (which is a border die) across the dark turquoise strip. I stamped another sentiment from the Keep It Simple Simply Spring Collection Stamps in black ink, which completed the card.
Affiliate links are used in this post at no cost to you – I really appreciate your support!
Products used: CARDSTOCK/PAPER: CutCardStock Astrobright Lunar Blue and Stardream Metallic Eris cardstock, Neenah Classic Crest 110# Solar White cardstock, Colorbok Bright Smooth 12×12 dark turquoise cardstock, Doodlebug Design Floral-Graph Rainbow Petite Prints double-sided paper pad STAMPS: Keep It Simple Simply Spring Collection Stamps INK: Ranger Adirondack Stream Color Wash; Copic Ciao alcohol markers- BG01, BG05, YR16, G02, G82, YG03, C-3, Y08, R14, R29, E02, E15, E21, E25; Versafine Onyx Black ink DIES/PUNCHES: Crafter’s Companion Die’sire Ruth Create-A-Card Dies, Cottage Cutz Flower Power Tomte Dies, Catherine Pooler Love Connection Dies, My Favorite Things Homespun Stitched Lines Die, Keep It Simple Simply Spring Outline Dies ACCESSORIES: Fiskars 12″ ProCision Rotary Bypass Paper Trimmer, Bearly Art precision craft glue, My Sweet Petunia Precision Glue Press, Ranger Distress Sprayer, fan brush, Imagine Crafts Silver Pico Embellisher, Ranger Mini Mister, Let’s Resin Teal Chameleon Powder, Mini MISTI, Big Shot, Cuttlebug Argyle Embossing Folder, Scrapbook Adhesives Thin 3D Foam Squares, Freckled Fawn Enamel Dots
I hope you’ve enjoyed seeing this project and you’ll consider joining Danni’s Facebook Group if you, too, like the idea of not buying craft supplies and using what you have in your stash! Thanks so much for stopping by today – we’ll see you next time! ;)
Hey everybody, Happy Saturday! I hope you have something fun planned this weekend that doesn’t involve snow… or maybe it does?! We got more snow earlier this week and they were some of the biggest snowflakes I’ve ever seen! I’m stoked to share another Keep It Simple DT inspiration project with you today, created with our new Once Upon A Time: Jasmine Collection. I created another hidden pocket pop up card. I totally LOVE this fold; made my first one just about a year ago and it quickly rose to the top of my list of favorites. I originally found it on Lisa Curcio’s blog. It looks like a regular A2 card from the front but I always say the magic is on the inside!
I cut the card base and inside panels from CutCardStock Amazon Dark Teal along with layering panels from assorted prints in the Jasmine 6×9 Collection Pack. I stamped a variety of sentiments and images from the Collection Stamps, colored them with alcohol markers, and cut them with the coordinating Outline Dies. I created the scene on the front, popping Jasmine and the sentiment up on foam squares.
As I said above, the magic is on the inside! I added additional stamped images and another sentiment to the hidden pocket flap, and a trimmed and layered piece of ephemera (from the cut-apart sheet in the 12×12 Collection Pack) on the inside signature panel.
I hope you’ve loved seeing this project as much as I loved creating it and you’re inspired to get crafty! Be sure to check out ALL the fun goodies in the Keep It Simple online store! Save 10% on your entire order when you shop online using code LoveToScrap2 at checkout! There is no minimum purchase requirement and no usage limits, AND it combines with product, order, and shipping discounts! Is that cool, or what?! Be sure to Follow us on Facebook, Instagram, and Pinterest for lots of crafty inspiration! Thanks so much for stopping by today – we’ll see you next time!
Hey everybody, happy Friday! I hope you’ve had a great week! I’m up on the CutCardStock blog today with a tutorial for making a a postage floral silhouette card. Yep, I’ve jumped on the postage collage bandwagon and have collected a few sets. For this card, I used our Savoy Brilliant White Cotton cardstock for the postage collage panel which takes ink blending very well. Then I added some Yellow Jacket and Beetle Black Canvas Textured cardstock to the mix. And, of course, I used some Neenah Classic Crest Solar White cardstock for the inside panel. I totally love how this turned out!
Using the Waffle Flower Postage Collage Die, I die cut the focal panel from Savoy Brilliant White Cotton cardstock and inked it using the coordinating Waffle Flower Postage Collage Coloring Stencil, a few blending brushes, and Ranger mermaid lagoon, twisted citron, cracked pistachio and fossilized amber distress inks. Then, using the Waffle Flower Wild Flower Silhouettes stamp set, I stamped images in each section in Versafine Onyx Black ink.
Next, I cut a standard A2 size side-folding card base from Yellow Jacket Canvas Textured cardstock and adhered a die cut postage edge panel (cut from Beetle Black Canvas Textured cardstock using the Pinkfresh Studio Postage Edge Nested Rectangles). I stamped a sentiment from the Honey Bee Fall Swags stamp set on a scrap piece of Solar White in Versafine Onyx Black ink and cut it with the coordinating Honey Bee die. The finishing touch was adding several gold pearls from the Kat Scrappiness Gold Pearl Mix.
I cut the inside panel from Neenah Classic Crest Solar White and embellished it with a strip of the Yellow Jacket cardstock. I stamped another sentiment from the Honey Bee stamp set in Onyx Black ink as well as an additional floral silhouette image, and layered the panel on another Beetle Black postage edge panel like I cut for the front.
Affiliate links are used in this post at no cost to you – I really appreciate your support!
I hope you’ve enjoyed today’s project and you’re inspired to get crafty! Be sure to check out all the awesome cardstock and other goodies at CutCardStock (adhesives, labels, stickers, pens, watercolors and ribbon to name a few). And head on over to the CutCardStock Facebook Page and for more inspiration! Also, be sure to join our Creating with CutCardStock Facebook Group for even more crafty inspiration! Thanks so much for stopping by today – we’ll see you next time!
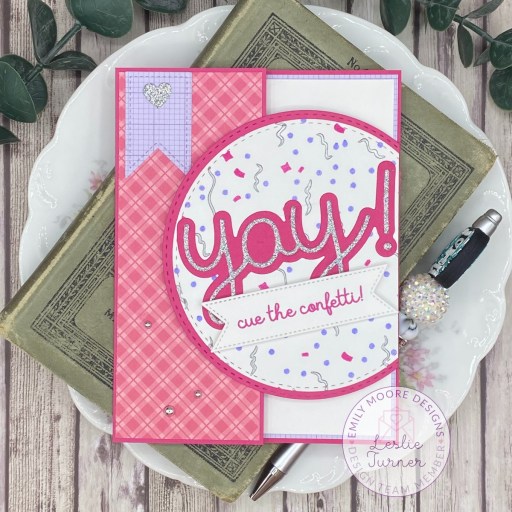
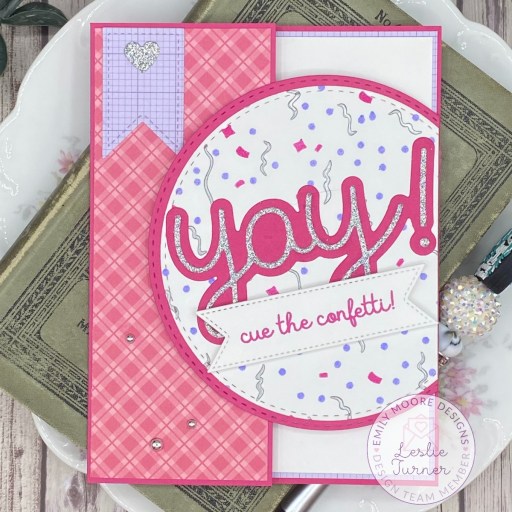
Hey everybody, Happy Friday! I hope the first half of the first month of 2025 is going well for you. I’m delighted to share a DT inspiration project for Emily Moore Designs featuring the NEW Decorative Sentiment Dies and All The Happy Things stamp set. If you haven’t yet checked out these new products released on January 1st, you are in for a surprise… fun stuff, for sure! And to save you a few bucks, these two are available in the Decorative and Happy Bundle! And if you’re a new customer, don’t forget to use my code LESLIE10 for 10% off your order!
I started by creating the background on CutCardStock Savoy Brilliant White Cotton cardstock using the Confetti Layered Stencils, Ranger picked raspberry and shaded lilac distress inks and a couple blending brushes, and Simon Hurley Silver Lining Lunar Paste and a spatula. While it was drying, I cut a flag, small heart and sentiment banner from Doodlebug Design Floral-Graph Rainbow Petite Prints, CutCardStock Silk Glitter Silvermist cardstock and a Solar White cardstock scrap, all using the Decorative Sentiment Dies, and set them aside.
I cut the card base, a stitched circle die cut (using the Love From Lizi Stitched Circle Nested Cutting Dies), and the focal using the (Yay! Layered Word Die) from American Crafts Taffy cardstock. I cut layering panels from Doodlebug Design Plaid-Polka Dot and Floral-Graph Rainbow Petite Prints. The confetti background was dry at this point so I cut a stitched circle using a slightly smaller die from the Love From Lizi Stitched Circle Nested Cutting Dies. I assembled the card, and the final step was stamping a sentiment from the All The Happy Things stamp set on the banner in the picked raspberry distress ink and popping it up on 3D Foam Squares.
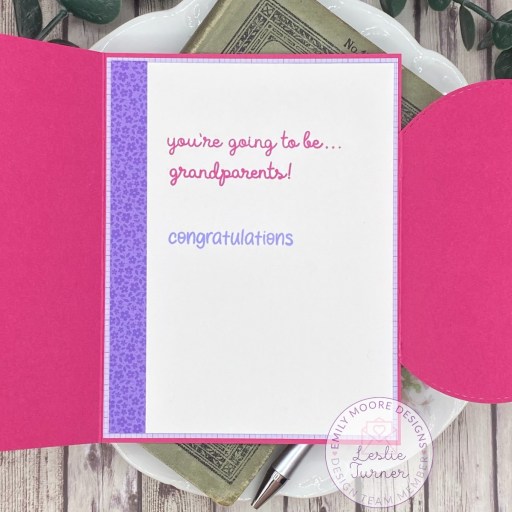
I cut the inside panel from Solar White cardstock and embellished it with a leftover strip of paper from the Floral-Graph Rainbow Petite Prints. I stamped two sentiments (one from the All The Happy Things stamp set and the other from the Graduation & Retirement stamp set) in the picked raspberry and shaded lilac distress inks. LOVE how this turned out!
I hope you’ve enjoyed seeing this project and you’re inspired to get crafty! New customers – use code LESLIE10 for 10% off your order! Be sure to Follow us on Facebook, Instagram and YouTube for crafty inspiration! Emily shares videos on all the social media platforms, and they are awesome and on point! Thanks so much for stopping by today – we’ll see you next time!