Witchy Woman

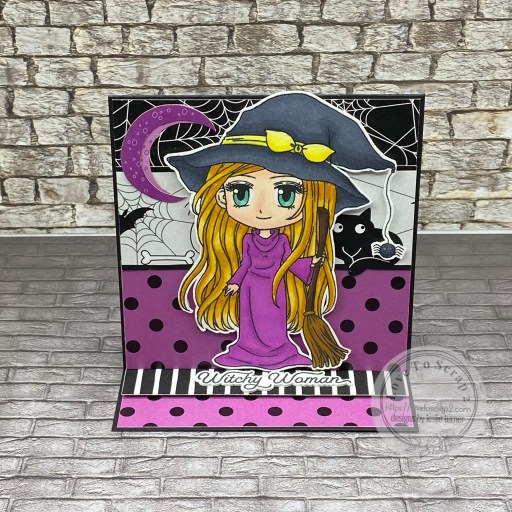
Hey everybody, happy Friday! I hope you have something fun planned this weekend! Our new challenge went live this morning over at Creative Creases, and my contribution for Challenge #108 is a Halloween-themed tented easel card. I used papers and die cut pieces from the Keep It Simple A Wee Bit Wicked collection, Keep It Simple Halloqueen Sentiments stamps and dies, and the Witch Hazel stamp set from Art by Mi Ran (sold by Keep It Simple). I love how this turned out! Come on over and play with us – anything goes with a fun fold!

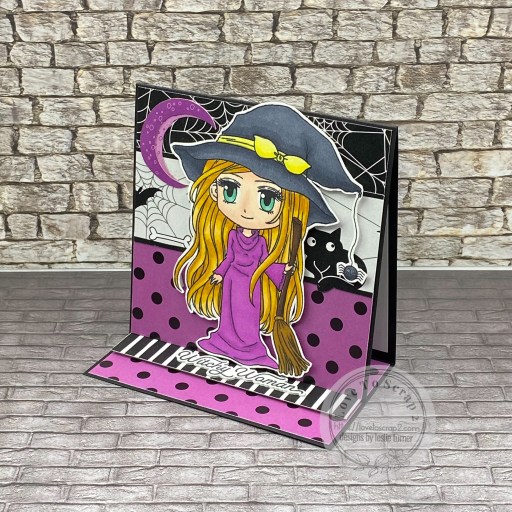
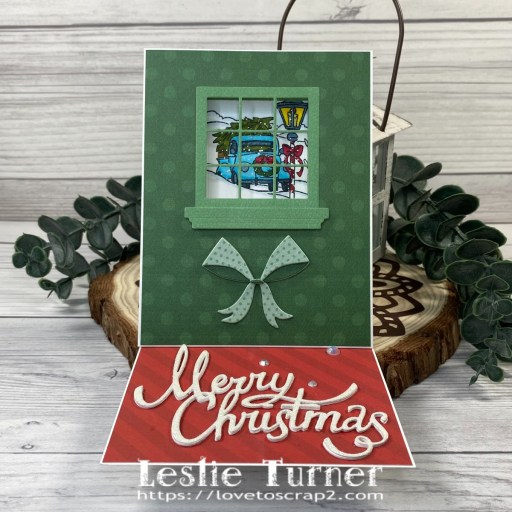
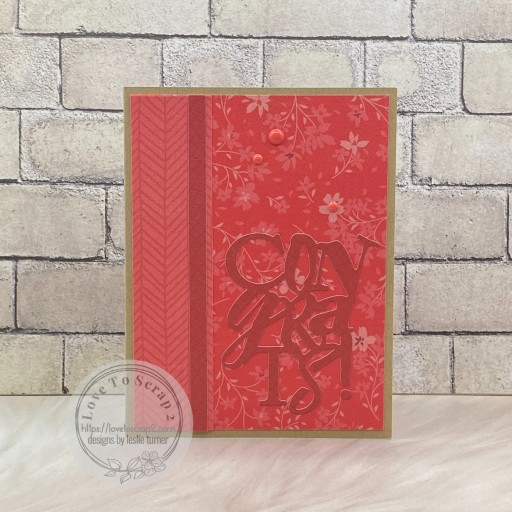
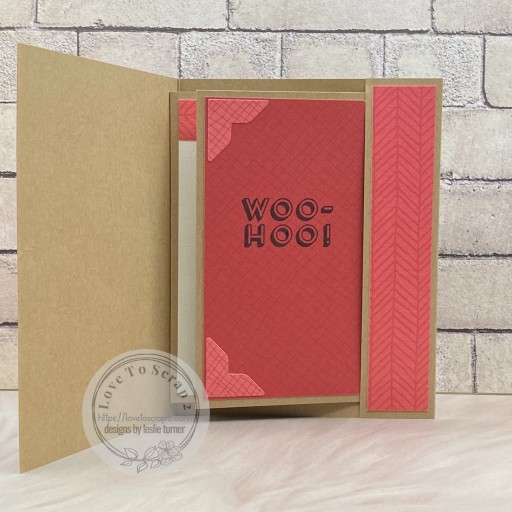
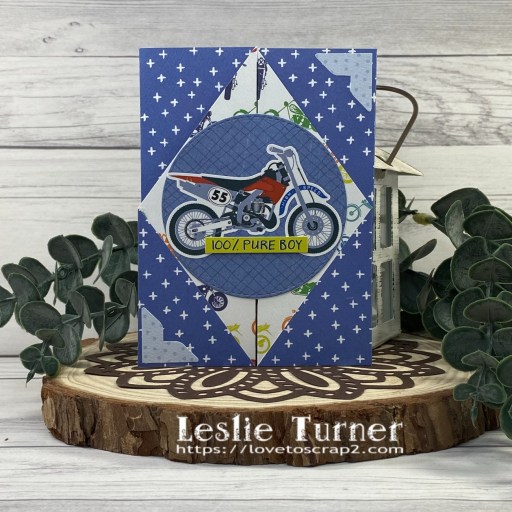
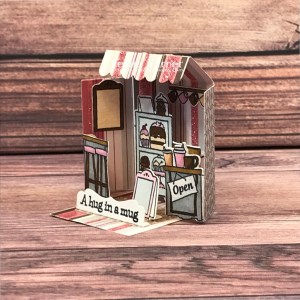
The measurements to make this card are super simple – card base is 4-1/4″ x 11″, scored at 4-1/4″ and 8-1/2″, making the folded card 4-1/4″ square. Front layering panel is 4″ x 4″ and bottom layering panel is 2-1/4″ x 4″ with a white layering panel for the inside cut at 4″ x 4″.

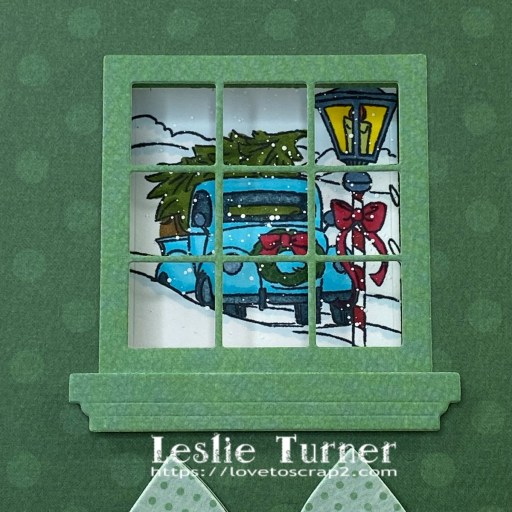
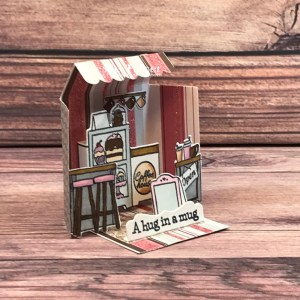
I cut the card base from CutCardStock Lessebo Pitch Black cardstock along with layering panels and a strip ‘stopper’ cut from coordinating papers in the Keep It Simple A Wee Bit Wicked 6×9 Collection Pack. I stamped the Witch Hazel image on Neenah Classic Crest Solar White cardstock, colored her with alcohol markers, and then fussy cut her. I popped her up on foam strips and added her to the card front along with a couple layered moons from the Keep It Simple A Wee Bit Wicked Wee Bits Die Cut Pieces and a sentiment stamped in black ink from the A Wee Bit Wicked Halloqueen Sentiments stamp set and cut with the coordinating outline die.

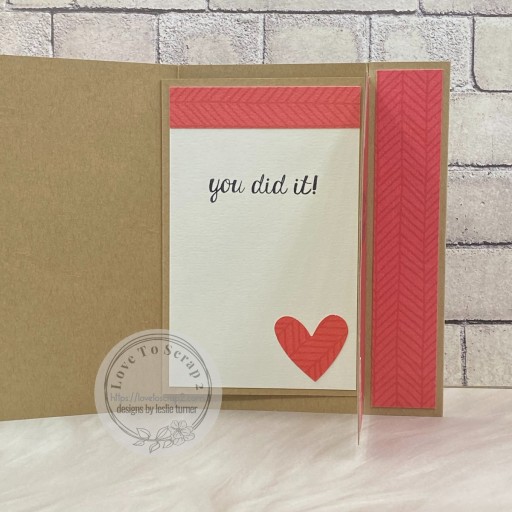
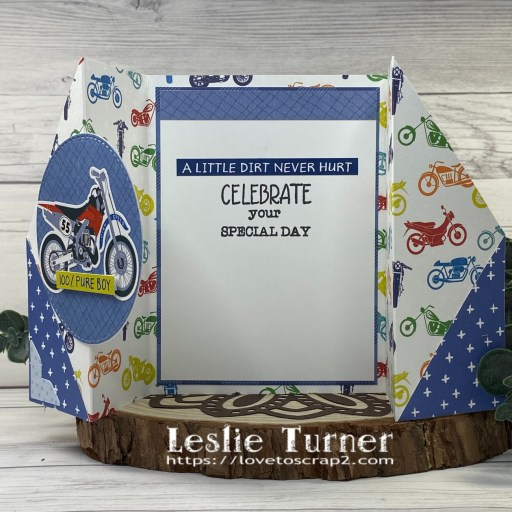
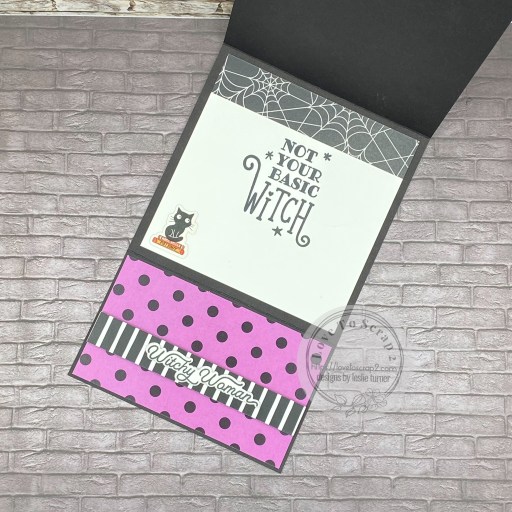
I cut the inside panel from Solar White cardstock and embellished it with a leftover strip of cobweb paper used on the front. I stamped a sentiment from the Keep It Simple A Wee Bit Wicked Halloqueen Sentiments stamp set in black ink and added an additional piece of ephemera from the A Wee Bit Wicked Wee Bits Die Cut Pieces.

Affiliate links are used in this post at no cost to you – I really appreciate your support! 

Products used:
CARDSTOCK/PAPER: CutCardStock Lessebo Pitch Black cardstock, Neenah Classic Crest 80# Solar White cardstock, Keep It Simple A Wee Bit Wicked 6×9 Collection Pack
STAMPS: Keep It Simple Art by Mi Ran Witch Hazel stamp set and A Wee Bit Wicked Halloqueen Sentiments stamp set
INK: Memento Tuxedo Black ink; Spectrum Noir Tri-Blends- FS6/7/8, EB5/6/7, GB6/7/10, IG6/8/9, CT1/2/3, JG1/2/3, GY2/3/5, HB1/2/3
DIES/PUNCHES: Keep It Simple A Wee Bit Wicked Halloqueen outline dies
ACCESSORIES: Fiskars 12″ ProCision Rotary Bypass Paper Trimmer, Elmer’s Craft Bond Tape Runner, Bearly Art precision craft glue, MISTI stamp tool, Big Shot, Keep It Simple A Wee Bit Wicked Wee Bits Die Cut Pieces, Scotch 3M foam strip

I hope you’ve enjoyed seeing this project and will link up with us this time! Thanks so much for stopping by today – we’ll see you next time! ;)

Scrappy hugs,

Merry Christmas window easel card

Hi friends, a big ol’ Happy Friday to you all! I hope you have something fun planned this weekend. I’ve been invited once again to design for Creative Creases, and you know how much I love fun folds, so it didn’t take more than a couple seconds to say yes! Creative Creases Challenge #98 is live this morning and I’m delighted to share my window easel card featuring a stamp and dies from Art Impressions and patterned paper from Keep It Simple, two of my favorite companies.

I cut the card base from CutCardStock Basis White cardstock along with layering panels from Keep It Simple Back To Basics Jade and Back To Basics Ruby 12×12 Collection Packs. I stamped the image from the Art Impressions Christmas Drive Window Stamp on Basis White cardstock and colored it with alcohol markers. I cut the image with a die in the Art Impressions Shadow Box Window Die set, splattered some Dr. Ph. Martin’s Bleed Proof White Paint spritzed with water over it with a fan brush, and set it aside.

Using additional dies in the Shadow Box Window Die set, I die cut the window in the easel flap and then added the die cut window frame, 3D window backing and stamped image. I then die cut the bow and sentiment multiple times (using the Sizzix Ribbon Thinlits) and stacked them for dimension. The finishing touch was adding a few Taylored Expressions Bits & Pieces Iridescent Rhinestones.

And here’s one final shot of the card closed and ready for mailing. I have to say that 3D cards folding flat for mailing is pretty awesome!

Affiliate links are used in this post at no cost to you – I really appreciate your support! 

Products used:
CARDSTOCK/PAPER: CutCardStock Basis White 12×12 and Silk Glitter Opulent Opal 12×12 cardstock, Keep It Simple Back To Basics Jade and Back To Basics Ruby 12×12 Collection Packs
STAMPS: Art Impressions Christmas Drive Window Stamp
INK: Memento Tuxedo Black ink; Arteza alcohol markers- Y02, BR62, G01, B07, YG17/22, YR32, R21/43, GS02/04/08; Dr. Ph. Martin’s Bleed Proof White Paint
DIES/PUNCHES: Art Impressions Shadow Box Window Die, Sizzix Ribbon Thinlits
ACCESSORIES: Tonic Studios 12″ Guillotine Paper Trimmer, Bearly Art precision craft glue, MISTI stamp tool, Big Shot, Ranger Distress Sprayer, fan brush, Taylored Expressions Bits & Pieces Iridescent Rhinestones, 1/4″ double-sided foam strip

I hope you’ve enjoyed seeing this project and will link up a fun fold with us this time! Thanks so much for stopping by today – we’ll see you again soon! ;)

Scrappy hugs,

Bank of Good Wishes

Hey everybody! Wow. Just wow. November 8th already. The days just seem to fly by. My Mom always said ‘the older you get, the faster time flies’ and I can think of no truer words. I’m sharing another guest design project for Creative Creases Challenge and this one is for Challenge #95, so come on over and play with us! Anything goes with a fun fold, so if you’re a fellow fun fold fanatic, this challenge is for you! I created a tall center step card which is a tad larger than the normal A2 size cards I typically make, and I love how it turned out. My inspiration for this card came from THIS tutorial at Beccy’s Place. I prefer handwritten instructions over videos and Beccy’s instructions are great. She included a diagram of the cut and score lines for the piece of cardstock which is super helpful.

I cut the step card base from CutCardStock 12×12 Twine cardstock along with layering panels from CutCardStock Lessebo Amazon Dark Teal cardstock and Hot Off The Press Magnolia Blossoms 6×6 double-sided papers. I stamped the Stampendous Mini Birdhouse Bank image in Catherine Pooler Daydream ink on the large front layering panel and colored it with alcohol markers. I had a leftover Happy Birthday sentiment on my desk that I had created with the draw function on my Cricut which I cut with a My Favorite Things Essential Fishtail Sentiment Strip die. The finishing touch was adding several Eyelet Outlet 5mm blue pearls.

I cut the back panel from CutCardStock Lessebo Ivory cardstock and embellished it with leftover strips of paper and cardstock used on the front. I left it blank to write a custom message.

Affiliate links are used in this post at no cost to you – I really appreciate your support! 

Products used:
CARDSTOCK/PAPER: CutCardStock 12×12 Twine, Lessebo Amazon Dark Teal and Lessebo Ivory cardstock; Hot Off The Press Magnolia Blossoms 6×6 double-sided papers
STAMPS: Stampendous Mini Birdhouse Bank stamp
INK: Catherine Pooler Daydream ink; Spectrum Noir Tri-Blends- TB4, BT4/8, GB1/3/5, YG2, FS6; Cricut 0.4 black pen
DIES/PUNCHES: My Favorite Things Essential Fishtail Sentiment Strips
ACCESSORIES: Cricut Paper Trimmer, Elmer’s Craft Bond Tape Runner, Bearly Art precision craft glue, MISTI stamp tool, Big Shot, foam adhesive squares, Eyelet Outlet 5mm blue pearls

I hope you’ve enjoyed seeing this project and will link up with us this time! Thanks so much for stopping by today – we’ll see you next time! ;)

Scrappy hugs,

A little birdie told me…

Hey everybody! Happy Friday – I hope you’re having a great week! I have some wonderful news to share this morning – I’ve been invited to guest design again for Creative Creases Challenge! Debbie knows how much I love fun folds, so of course, my answer was a big YES! I used the Birdhouse Box Card SVG cut file from My Scrap Chick to make this adorable ‘bird-day’ card for Challenge #92. Box cards definitely fall under the fun fold category and this one was way fun! Be sure to come over and play with us – you know you love some fun folds!

Cyndy G is my favorite MSC designer (I have quite a few of her cut files) and her assembly video for this card is HERE. I wanted to mention that My Scrap Chick often includes a PDF to use to print on cardstock or patterned paper and then fussy cut the pieces. This is a nice option for those who don’t use a cutting machine or for those crafting with children.

Using my Cricut Explore Air 2 and the My Scrap Chick Birdhouse Box Card SVG cut file, I cut all the pieces with a variety of cardstock from CutCardStock. I used Amazon Dark Teal, Sunflower Yellow, Coffee Bean, Pitch Black, Moss Green, Bubble Gum Pink, Cherry Red, Granite Gray and White, all from the Lessebo line. I used the Keep It Simple Build-A-Birdhouse stamp set for the sentiment. The final touch was adding Eyelet Outlet yellow enamel dots to the flower centers.

I stamped another sentiment from the KIS Stamps Build-A-Birdhouse on the back, which completed the project. How stinkin’ cute is this?!

Affiliate links are used in this post at no cost to you – I really appreciate your support! 

Products used:
CARDSTOCK/PAPER: CutCardStock Lessebo Amazon Dark Teal, Lessebo Sunflower Yellow, Lessebo Coffee Bean, Lessebo Pitch Black, Lessebo Moss Green, Lessebo Bubble Gum Pink, Lessebo Cherry Red, Lessebo Granite Gray and Lessebo White cardstock
STAMPS: Keep It Simple Build-A-Birdhouse stamp set
INK: Memento Tuxedo Black ink
DIES/PUNCHES: My Scrap Chick Birdhouse Box Card SVG Cut File
ACCESSORIES: Cricut Explore Air 2, Bearly Art precision craft glue, MISTI stamp tool, Scrapbook Adhesives 3D Foam Squares, Eyelet Outlet Yellow Enamel Dots

I hope you’ve enjoyed seeing this project and will link up with us this time! Thanks so much for stopping by today – we’ll see you next time! ;)

Scrappy hugs,

Congrats!

Hey everybody! Happy Fri-YAY! I’m doing the happy dance because I’m once again guesting for Creative Creases Challenge! One of my fun folds was a winner back in December and I was invited by the lovely Debbie to guest for an upcoming challenge, so here I am, just in time for Challenge #82! The Creative Creases Challenges are always ‘anything goes with a fun fold’ (preferably with stamping), so come on over and play! I created a fun hidden pocket pop up card using some favorite items in my stash! My inspiration came from Lisa Curcio’s blog – she loves fun folds as much as I do and shares quite a few of them! This one looks like a regular A2 card from the front but the magic is on the inside! ;)

I cut the fun fold card base from CutCardStock Twine 80# 12×12 cardstock and layering panels from several prints in the Keep it Simple Ruby 12×12 Collection Pack. The die cut on the front is from STAMPlorations and is one of my favorites. I finished the front with a few Keep It Simple Ruby enamel dots.

As I said above, the magic is on the inside! There is a hidden pocket with two panels, which means room for two stamped sentiments, and both of them are from the Stampin’ Up Bravo stamp set. I added ephemera from the same Ruby Collection Pack to both panels, which completed the card.

Affiliate links are used in this post at no cost to you – I really appreciate your support! 

Products used:
CARDSTOCK/PAPER: CutCardStock Twine 80# 12×12 cardstock and Basis 80# Natural cardstock, Keep It Simple Ruby 12×12 Collection Pack (paper and ephemera)
STAMPS: Stampin’ Up Bravo stamp set
INK: Memento Tuxedo Black ink
DIES/PUNCHES: STAMPlorations Congrats Word Die
ACCESSORIES: Fiskars 12″ ProCision Rotary Bypass Paper Trimmer, Elmer’s Craft Bond Tape Runner, Bearly Art precision craft glue, MISTI stamp tool, Big Shot, Keep It Simple Ruby Enamel Dots

I hope you’ve enjoyed seeing this project and will link up with us this time! Thanks so much for stopping by today – we’ll see you next time! ;)

Scrappy hugs,

100% Pure Boy

Hi friends! Happy Friday to you all! I’ve been invited by the lovely Debbie to guest design once again for Creative Creases Challenges! As always, the challenge is ‘anything goes with a fun fold’ and I’m super stoked to share my GD inspiration project for Challenge #66! You know how much I love fun folds, so these challenges are always right up my alley! I created a super cute double gatefold card using items in the Keep It Simple Boys Boys Boys collection! I totally love this fold!

I cut the card base from a double-sided paper in the Keep It Simple Boys Boys Boys 12×12 Collection Pack. I die cut a stitched circle (for the focal image) from a patterned paper in the Keep It Simple Royal 12×12 Collection Pack using the Keep It Simple Stitched Circles Nested Dies. I adhered a dirt bike sticker from the die cut sticker sheet in the Keep It Simple Boys Boys Boys 12×12 Collection Pack along with a sentiment sticker that I popped up on a double-sided foam strip. The finishing touch was adding two corners from the ephemera sheet in the Royal 12×12 Collection Pack.

I cut the inside panel from Neenah Classic Crest 80# Solar White cardstock and embellished it with a leftover strip of the patterned paper used for the die cut circle on the front. I added a sentiment sticker from the Boys Boys Boys 12×12 Collection Pack and then stamped an additional sentiment from the Keep It Simple Birthday Sentiments stamp set in Memento Tuxedo Black ink.

Sharing in the following challenges:
1. 613 Avenue Create: September 2023 – Purely Anything Goes
2. A Perfect Time To Craft Open Challenge: September #9-2023 – Anything Goes
3. Classic Design Challenge: September #9 – Anything Goes
4. Crafty Catz: Anything Goes w/ optional twist of Dies

Affiliate links are used in this post at no cost to you – I really appreciate your support! 

Products used:
CARDSTOCK/PAPER: Neenah Classic Crest 80# Solar White cardstock, Keep It Simple Boys Boys Boys 12×12 Collection Pack with Die Cut Stickers, Keep It Simple Royal 12×12 Collection Pack with Die Cut Ephemera
STAMPS: Keep It Simple Birthday Sentiments stamp set
INK: Memento Tuxedo Black ink
DIES/PUNCHES: Keep It Simple Stitched Circles Nested Dies
ACCESSORIES: Tonic Studios 12″ Guillotine Paper Trimmer, Tombow Mono Dots adhesive, Bearly Art precision craft glue, MISTI stamp tool, Big Shot, 1/4″ double-sided foam strip

I hope you’ve enjoyed seeing this project and will link up with us this time! We’d love to see your fun fold! Thanks so much for stopping by today – we’ll see you next time! ;)

Scrappy hugs,

‘A hug in a mug’ Matchbook

5/27/23 Top Pick at Inkspirational Challenges!
6/1/23 Top 5 Creation at Scrapping4fun Challenges!

Hi friends! Happy Friday to everyone – I hope you’re having a great week! I received an email a while back from the lovely Debbie, owner of the Creative Creases blog, asking if I’d like to guest design in 2023. Of course I couldn’t say no, so here I am with a fun GD inspiration project for Creative Creases Challenge #57! You know how much I love the Art Impressions Matchbooks, so I have the Coffee Shop to share with you today! I used the Coffee Shop stamps and dies along with the Matchbook Template Die and Matchbook Envelope Dies, and it turned out so stinkin’ cute I can’t stand it!

I cut the base from Polly’s Paper Studio patterned paper using the Matchbook Template Die. I stamped all the elements from the Coffee Stop stamps in Memento Tuxedo Black ink on Neenah Classic Crest 80# Solar White cardstock, colored them with alcohol markers, and cut them with the coordinating Coffee Shop dies.

I always enjoy the assembly the most. Here’s a shot of the Matchbook with the tiny envelope. I used the Matchbook Envelope Dies and the back side of the striped paper for the envelope.

And here are some angled shots. Love, love, love!

Sharing in the following challenges:
1. 613 Avenue Create: May 2023 – Anything Goes w/ optional Flowers
2. A Perfect Time To Craft Open Challenge: May #4-2023 – Anything Goes
3. Classic Design Challenge: May #4 – Anything Goes
4. Inkspirational: #289 – Word Prompt Mini (Matchbook, real mini!)

5. Scrapping4fun Challenges: #223 – Alphabet Letter M (Matchbook)

Affiliate links are used in this post at no cost to you – I really appreciate your support! 

Products used:
Cardstock/Paper: Polly’s Paper Studio patterned paper, Neenah Classic Crest 80# Solar White cardstock
Stamps: Art Impressions Matchbook Coffee Shop Stamps
Ink: Memento Tuxedo Black ink; Arteza alcohol markers- BR28/34/40/52/62, R31/56, RP09, NG06/08
Dies/Punches: Art Impressions Matchbook Template Die, Matchbook Coffee Shop Dies and Matchbook Envelope Dies
Accessories: Tonic Studios 12″ Guillotine Paper Trimmer, Bearly Art precision craft glue, MISTI stamp tool, Big Shot

I hope you’ve enjoyed seeing my guest design project and will link up your fun fold with us! Thanks so much for stopping by today – we’ll see you next time! ;)

Scrappy hugs,

Christmas wallet

12/29/21 Rising Star at A Place To Start!
12/31/21 Top Pick at Cut It Up!
1/1/22 Top Pick at Crafting Happiness Challenges!
1/7/22 Top 3 at International Art & Soul!

Hi friends! It’s Christmas Eve and I hope you’ve had an awesome week and you’re ready for jolly St. Nick to arrive! I’m still shaking my head at how fast this year has flown by! Affiliate links are used in this post at no cost to you – I really appreciate your support! I won a challenge over at Creative Creases Challenge a couple weeks ago and the lovely Debbie invited me to guest design, so I’ve created a pretty fun fold Christmas wallet as my GD project for Creative Creases Challenge #22 that launched this morning. This is my own design and it’s super easy to create, and the sky is the limit as far as theme and decoration! I chose Christmas because I had Concord & 9th stamps and dies I’ve been wanting to use since I bought them a couple months ago… you know how that goes, lol! ;)

I cut the wallet base from CutCardStock Basis Dark Red cardstock using my template HERE and rounded the bottom corners. Using the Concord & 9th Home for the Holidays Stacks dies, I cut all the tiny houses, trees and elements for the front from CutCardStock Basis Red, Basis Dark Red, Basis Gold, Basis Green, Pop-Tone Gumdrop Green, Pop-Tone Jellybean Green cardstock, Neenah Classic Crest Baronial Ivory cardstock, Hygloss Gold Metallic Foil cardstock and Christmas Print 6×6 Cardstock Pad, and then assembled the houses. I adhered a ground layer, the houses, trees and lamp posts to the front of the wallet, and added a stamped sentiment from the Concord & 9th Home for the Holidays stamp set which I cut with a banner die from the same die set. The finishing touch was adding iridescent gemstones in the sky.

I cut layering panels from Stampin’ Up This Christmas Specialty DSP along with narrow embellishing strips from CutCardStock Pop-Tone Gumdrop Green cardstock and adhered them to the inside of the wallet. I cut a 6-1/8″ x 2-5/8″ card (which I left blank to hand-write a sentiment) that I tucked into one of the pockets.

And one more look… this is such a fun project that I really enjoyed making! If you use my template to create a wallet, I sure would love to see pics!

Sharing in the following challenges:
1. A Bit More Time To Craft Challenge: December/January Anything Goes
2. A Bit More Time To Craft Extra Challenge: December Anything Goes
3. A Place To Start: #12 – Anything Goes w/ optional Blue Christmas (no twist)
4. Classic Design Challenge: #12 – Anything Goes
5. Crafting Happiness Challenges: #118 – Anything Goes
6. Crafty Calendar Challenge: December challenge – Christmas
7. Crafty Gals Corner: #226 – Merry & Bright
8. Creative Inspirations: December challenge – Christmas Time
9. Creative Moments: #229 – Anything Goes
10. Cut It Up: #241 – Holiday Gift Giving
11. Dragonfly Dreams: December challenge – Anything Goes
12. International Art & Soul: #123 – Use Dies or Punches
13. Jan’s Digi Stamps Challenge: December Anything Goes
14. Lil Patch of Crafty Friends: #172: Anything Goes
15. River of Creativity: #8 – Celebrate (Christmas)

16. Sweet Stampers Challenge: #63 – Anything Goes
17. Winter Wonderland Challenge Blog: End of Year Anything Christmas Goes Challenge

Products used:
Cardstock/Paper: CutCardStock Basis Dark Red, Basis Red, Basis Gold, Basis Green, Pop-Tone Gumdrop Green and Pop-Tone Jellybean Green cardstock, Neenah Classic Crest Baronial Ivory cardstock, Stampin’ Up This Christmas Specialty DSP, Hygloss Gold Metallic Foil cardstock, Christmas Print 6×6 Cardstock Pad
Stamps: Concord & 9th Home for the Holidays stamp set
Ink: Catherine Pooler Eucalyptus ink
Dies/Punches: Kadomaru Pro corner rounder, Concord & 9th Home for the Holidays Stacks dies
Accessories: Tonic Studios 12″ Guillotine Paper Trimmer, Bearly Art precision craft glue, Big Shot, MISTI stamp tool, ScraPerfect iridescent gemstones

I hope you’ve enjoyed seeing my Christmas wallet and you’ll link up a fun fold with Debbie this fortnight over at Creative Creases Challenge! Thanks so much for stopping by today – we’ll see you next time! ;)

Scrappy hugs,