
Hey everybody, happy Saturday – I hope you have something fun planned this weekend! I have another gorgeous ScrapbookingStore DT inspiration project to share with you today created with items in the January 2026 Scrapbook Kit with Upgrades. This is another version of the tri-fold which is made in a vertical orientation versus the usual one we see in a horizontal orientation. And the cool thing about this one is the bottom flap can be adhered on both sides and a gift card (or mini card) tucked in. I’ve made several of these over the past few months and I always love how they turn out! And, of course, it always helps to have gorgeous papers and elements to bring them to life!
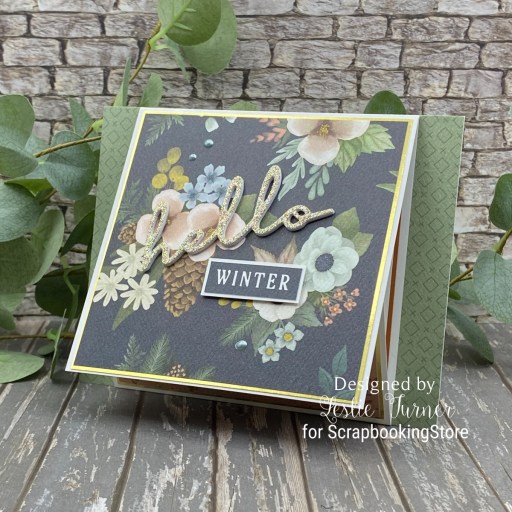
I cut the flat card base from Neenah Classic Crest 110# Solar White cardstock and covered it with a patterned paper panel cut from a print in the Carta Bella Winter Wonderland Collection Kit. I cut the tri-fold portion of the card from 80# Solar White along with layering panels cut from CutCardStock Bright Gold Foil and a pretty floral print in the collection. I added a ‘hello’ sentiment taken from the Rosie’s Studio Glitter Foam Stickers (in the upgrades) and included the trimmed and layered ‘winter’ word from a journaling card in the collection. I finished off the front with several dots of Neptune Nuvo Crystal Drops.
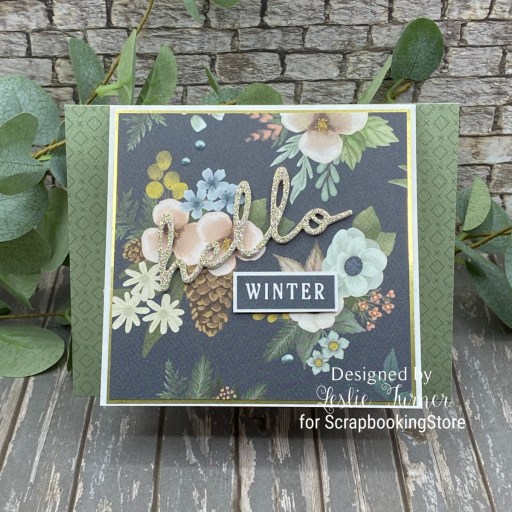
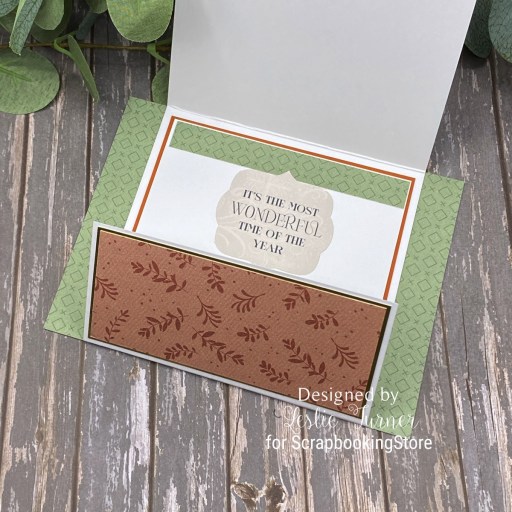
I layered another print from the collection and another panel of the gold foil cardstock on the smaller flap at the bottom. That’s the one I mentioned above that could be adhered on both sides with a gift card or mini card tucked inside. I cut the sentiment panel from 80# Solar White and layered it on CutCardStock Basis Dark Orange. I added an embellishing strip and a sentiment from the Carta Bella Winter Wonderland Frames & Tags in the upgrades.
Affiliate links are used in this post at no cost to you – I really appreciate your support!
ScrapbookingStore products:
January 2026 Scrapbook Kit with Upgrades
Carta Bella Winter Wonderland Collection Kit
Upgrades: Carta Bella Winter Wonderland Frames & Tags
Rosie’s Studio Glitter Foam Stickers
Little Birdie Scroll Border Frames
Other products used:
CARDSTOCK/PAPER: Neenah Classic Crest 110# and 80# Solar White cardstock, CutCardStock Bright Gold Foil and Basis Dark Orange cardstock
ACCESSORIES: Fiskars 12″ ProCision Rotary Bypass Paper Trimmer, Spellbinders 12×12 Scoring Board, TapeRunner Double-Sided Adhesive Tape, Scrapbook Adhesives Thin 3D Foam Squares, Nuvo Neptune Crystal Drops
I hope you’ve enjoyed today’s project and you’re thinking about all the fun you could have with this month’s kit… you really ought to think about joining the Subscription Club! Be sure to Follow us on Facebook, Instagram, Pinterest and YouTube for lots of crafty inspiration! And if you do decide to join the Subscription Club, join our ScrapbookingStore Club Member Group on Facebook for more inspiration and to share your projects! Thanks so much for stopping by today – we’ll see you next time!
Scrappy hugs,


