Have a Magical holiday season

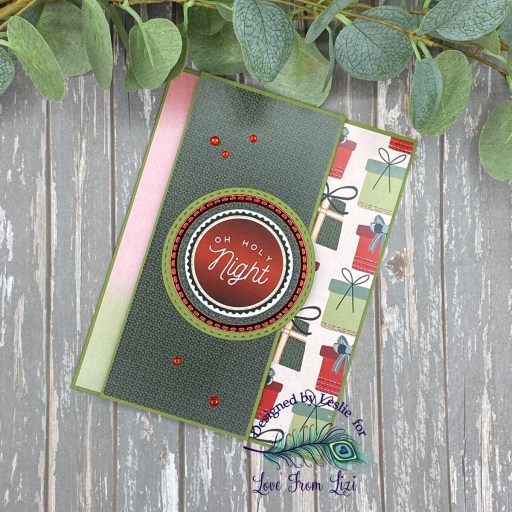
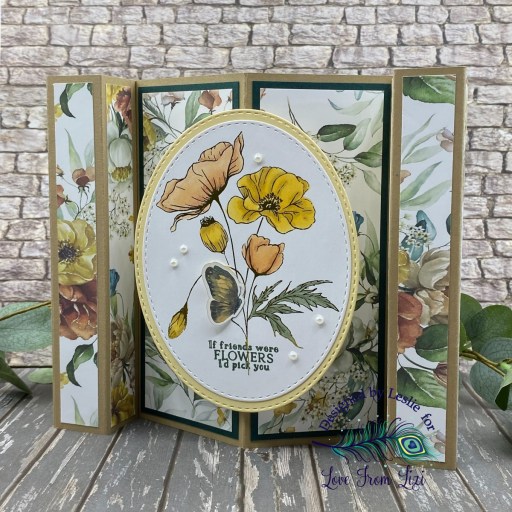
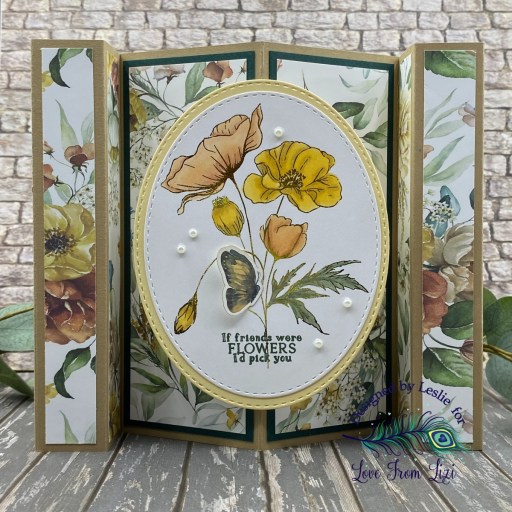
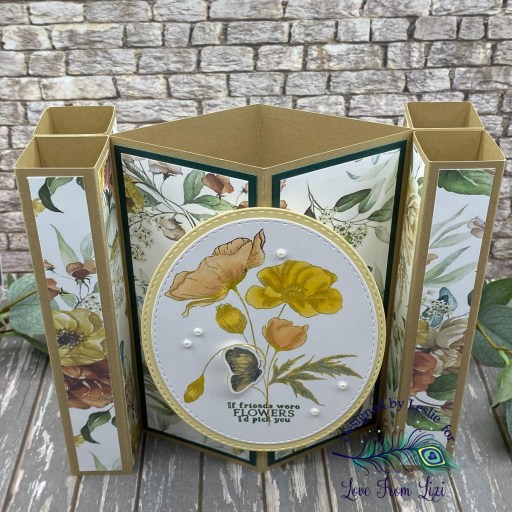
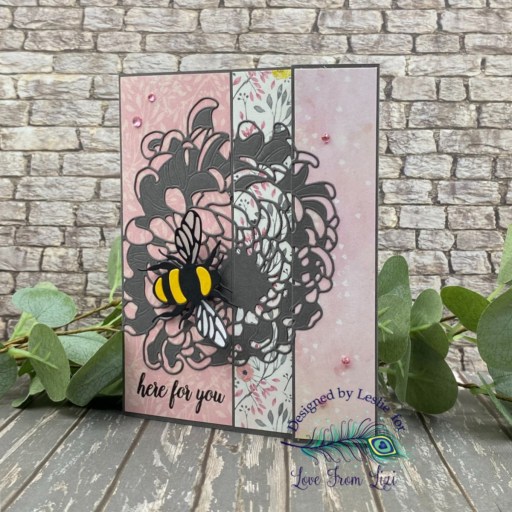
Hey everybody, happy Wednesday – I hope you’re having a great week! I’m up on the Love From Lizi blog today with a tutorial for making a circle pop-out card featuring papers, stamps and gold foil cardstock from the November Festive Tales release. I say all the time that Christmas is my favorite season and the products in this release are just wonderful! I made one of these circle pop-out cards for another design team and posted it just about a month ago, so I hope you don’t mind seeing another one! It really is easy and sure packs a punch, so be sure to check out my tutorial if you’d like to learn how to make it!

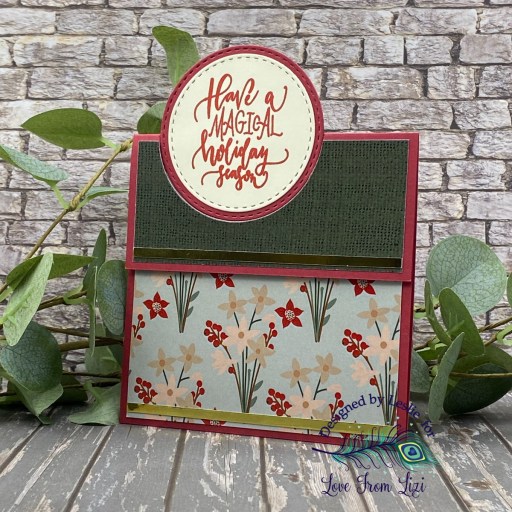
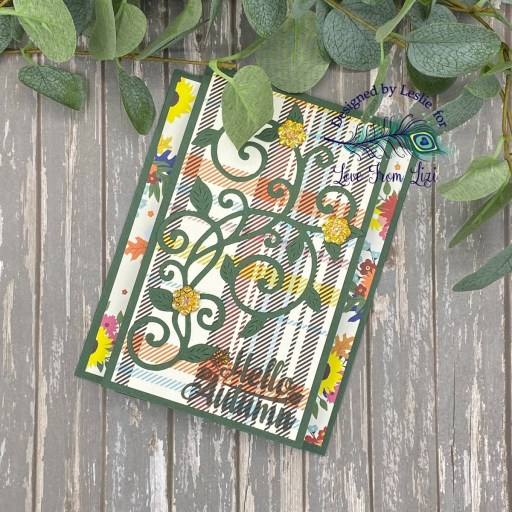
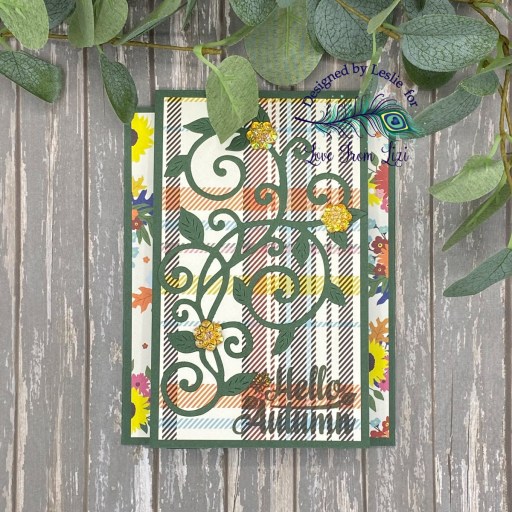
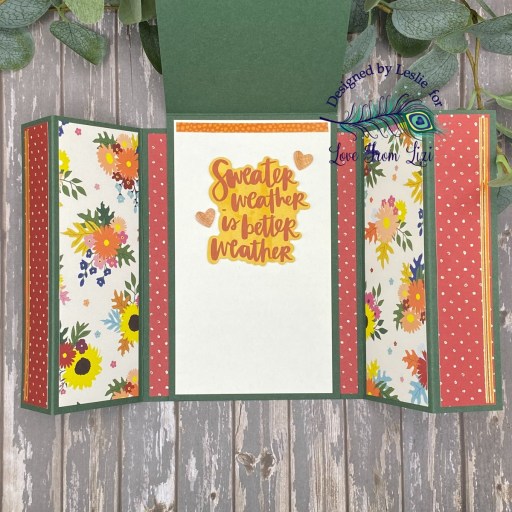
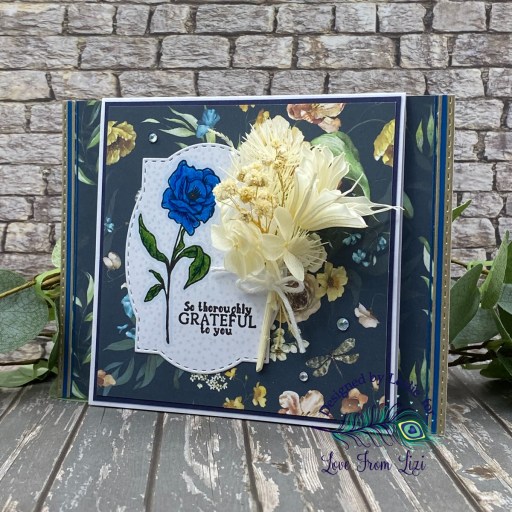
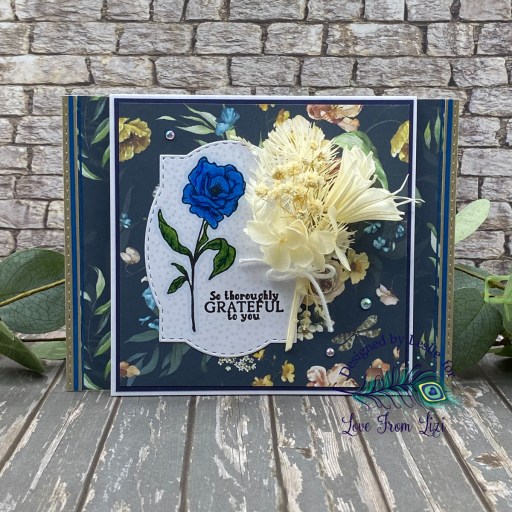
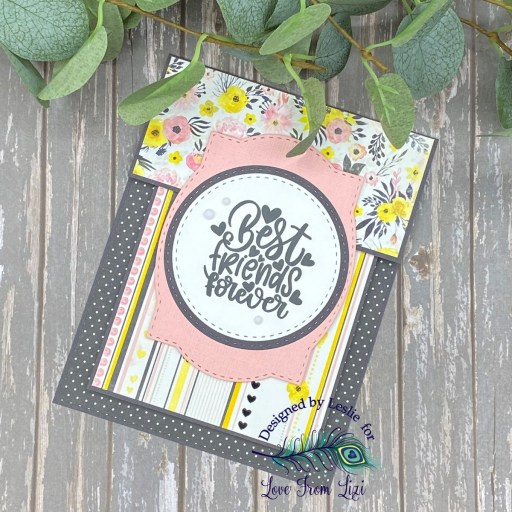
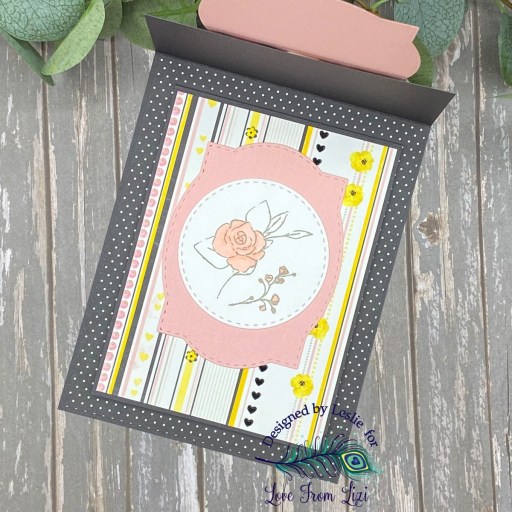
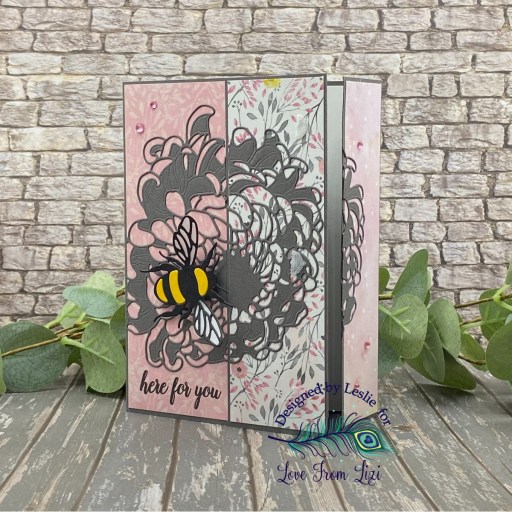
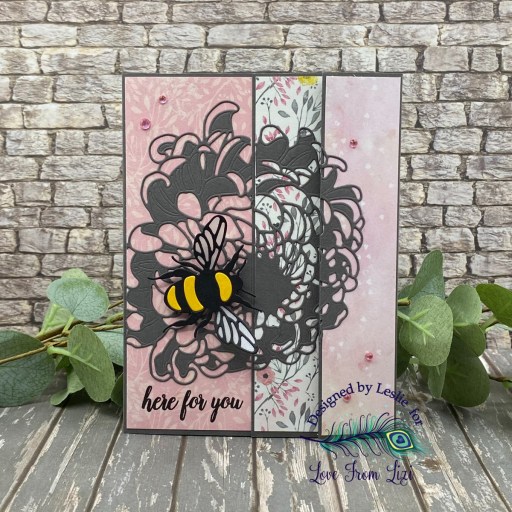
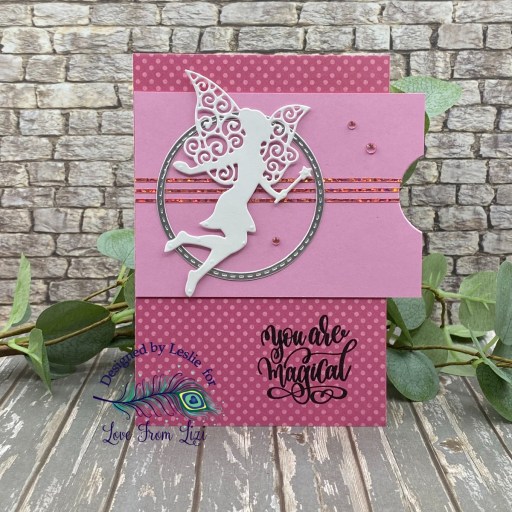
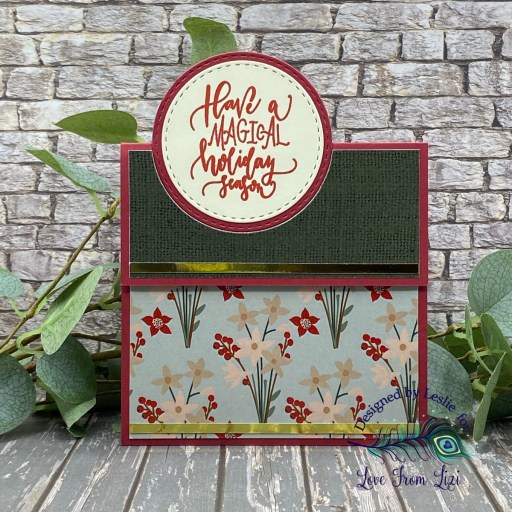
The card base and circles were cut from CutCardStock Lessebo Dawn Maroon cardstock. I chose a couple coordinating prints for the front layering panels and cut a couple narrow strips from gold foil cardstock. The sentiment circle was cut from Neenah Classic Crest Baronial Ivory cardstock, and I stamped a sentiment from the Merry Little Christmas stamp set on it in Catherine Pooler Rockin’ Red ink.

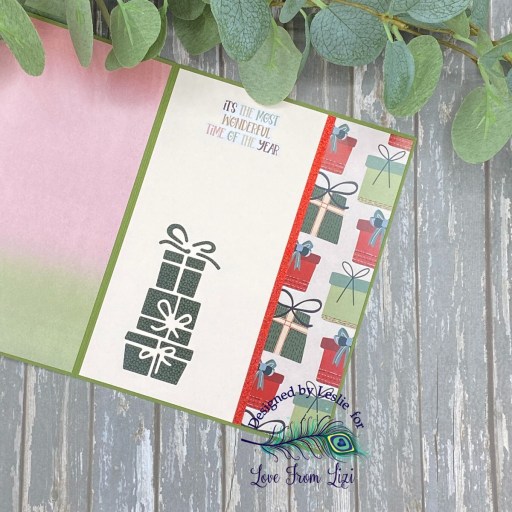
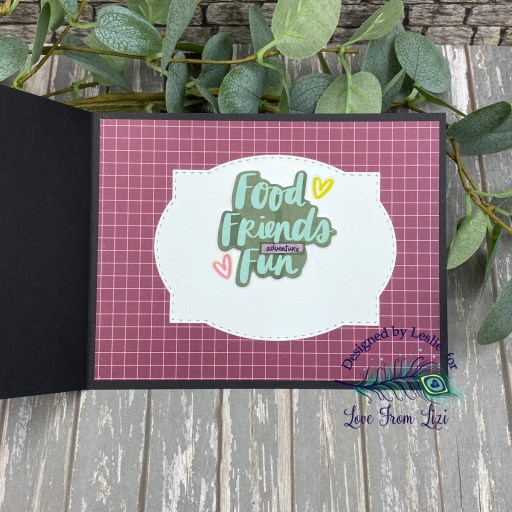
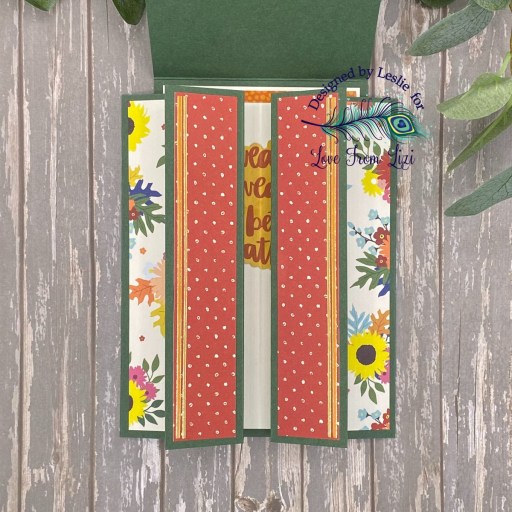
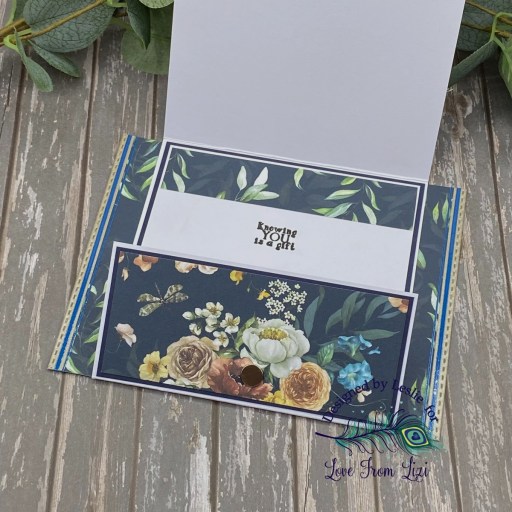
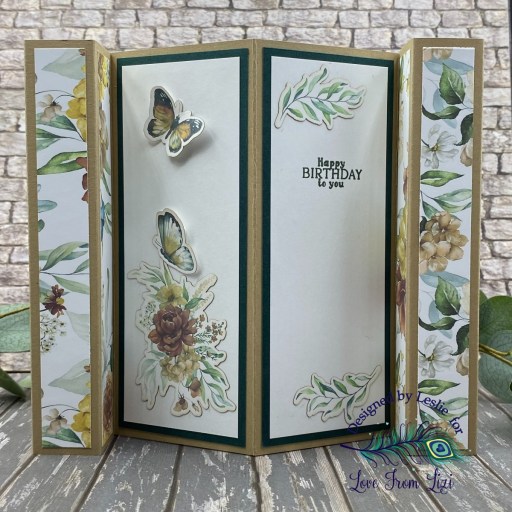
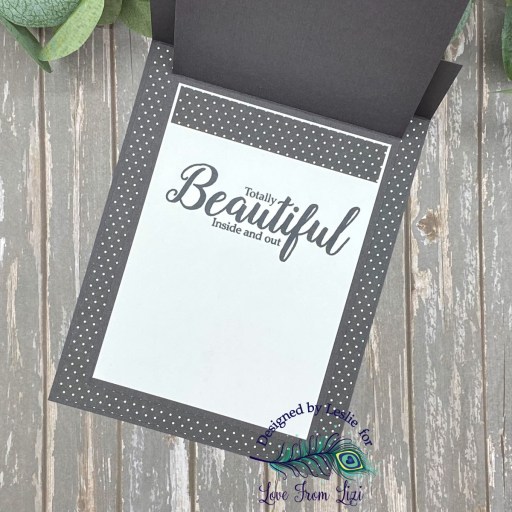
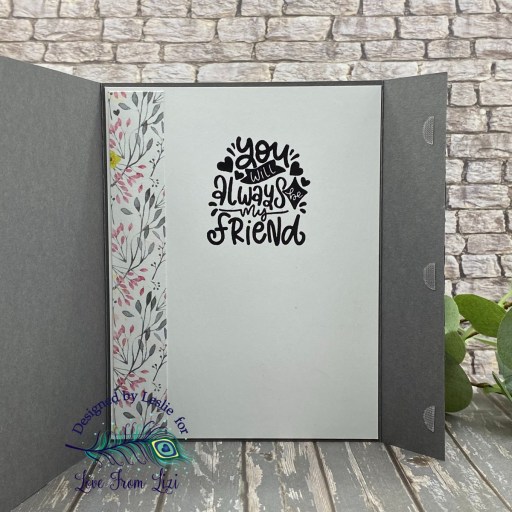
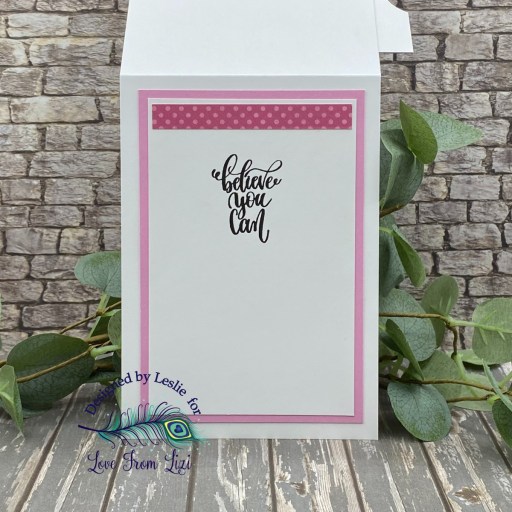
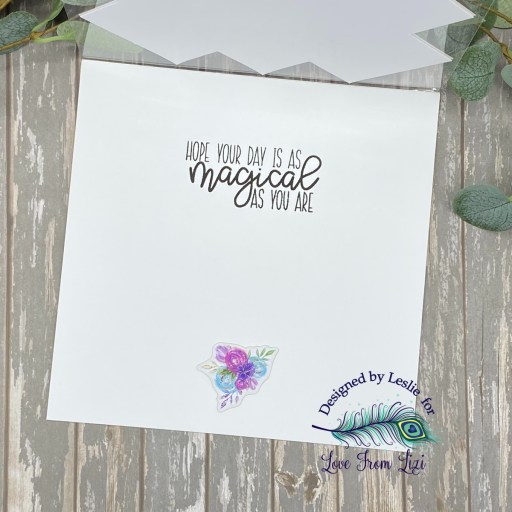
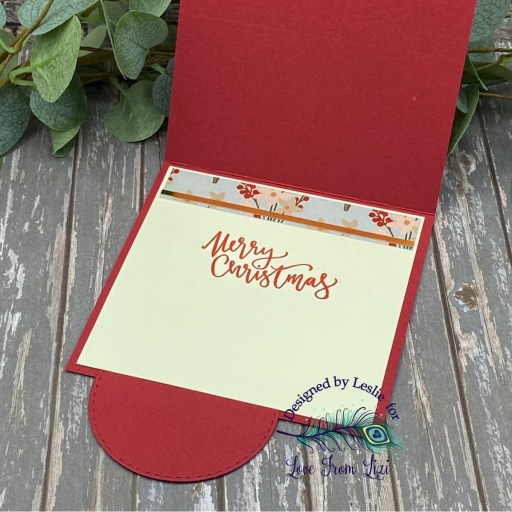
I cut the inside panel from Neenah Classic Crest Baronial Ivory cardstock and embellished it with strips of the floral paper and gold foil cardstock used on the front. I stamped another sentiment from the same stamp set, which completed the card. Easy peasy! This is my last post for the Love From Lizi team and I sure have enjoyed the past year! Thanks to Lizi and Linh for having me along!

Love From Lizi products used:
Cozy Christmas 6×6 Paper Pack
Merry Little Christmas Stamp Set
Festive Tales Cardstock Bundle (gold foil)
Stitched Circle Nested Cutting Dies (9th and 8th smallest)

Affiliate links are used in this post at no cost to you – I really appreciate your support!

Other products used:
CARDSTOCK/PAPER: CutCardStock Lessebo Dawn Maroon cardstock, Neenah Classic Crest Baronial Ivory
INK: Catherine Pooler Rockin’ Red Ink
ACCESSORIES: Fiskars 12″ ProCision Rotary Bypass Paper Trimmer, Spellbinders 12×12 Scoring Board, My Sweet Petunia Precision Glue Press, Bearly Art Precision Craft Glue, Mini MISTI, Big Shot, TapeRunner Retractable Tape Runner, Scrapbook Adhesives E-Z Runner Micro Permanent Strips

I hope you’ve enjoyed seeing this project and you’re inspired to get crafty! Be sure to join our Facebook Group and Follow us on Instagram and YouTube for lots of crafty inspiration! Thanks so much for stopping by today – we’ll see you next time!

Scrappy hugs,

Oh Holy Night

Hey everybody, a very happy Wednesday to you! I hope you’re having a great week! I’m up on the Love From Lizi blog today with a tutorial for making a simple Z-fold that shows off three different patterned papers. Not sure if there are any other Z-folds out there quite like this one – I was fiddling with a piece of cardstock one afternoon and thought the uneven margins on both sides of the off-center panel would be a good way to show off three different patterned papers. That said, I’m saying this is my own design and it features papers, cardstock, stickers and dies from the November Festive Tales release. Love, love, love this release – Christmas is my favorite season and I always enjoy creating festive cards and projects!

I cut the card base from CutCardStock Jellybean Green cardstock along with layering panels from three different prints in the Cozy Christmas 6×6 paper pack. I created the focal sentiment piece with several sized stitched circle die cuts (using dies from the Stitched Circle Nested Cutting Dies) which I cut from different papers and cardstock and topped with a sticker from the Cozy Christmas Sticker Sheet. The finishing touch on the front was adding a few red gemstones.

The inside panel was cut from CutCardStock Basis Soft Pink cardstock and I die cut the Tower of Gifts directly into the panel and back it with the dark green print used on the front. I added a sentiment using a sticker from the Cozy Christmas Sticker Sheet.

Here’s an overhead shot of this fun fold. I sure do like the way it turned out and love how it showcases all those pretty patterned papers! I see more of these in my future, for sure!

Love From Lizi products used:
Cozy Christmas 6×6 paper pack
Festive Tales Specialty Cardstock Bundle (red foil and red glitter)
Cozy Christmas Sticker Sheet
Tower of Gifts die
Stitched Circle Nested Cutting Dies

Affiliate links are used in this post at no cost to you – I really appreciate your support!

Other products used:
CARDSTOCK/PAPER: CutCardStock Pop Tone Jellybean Green and Basis Soft Pink cardstock
ACCESSORIES: Fiskars 12″ ProCision Rotary Bypass Paper Trimmer, Spellbinders 12×12 Scoring Board, My Sweet Petunia Precision Glue Press, Bearly Art precision craft glue, Big Shot, TapeRunner retractable tape runner, Scrapbook Adhesives E-Z Runner Micro Permanent Strips, red gemstones

I hope you’ve enjoyed seeing this project and you’re inspired to get crafty! Be sure to join our Facebook Group and Follow us on Instagram and YouTube for lots of crafty inspiration! Thanks so much for stopping by today – we’ll see you next time!

Scrappy hugs,

Celebrate

Hey everybody, happy Wednesday – how is it that we are a week into October already?! Has it cooled off any where you are? It’s absolutely gorgeous here and definitely my favorite time of year! I’m up on the Love From Lizi blog today with a tutorial for making yet another version of the double flap fun fold. I used papers and embellishments from the October Autumn Breeze release along with some already in the store. It’s an amazing release, and even though it’s Autumn/Fall themed, I thought ‘outside the box’ and created a fun friendship card that could be used for a variety of occasions. I have to tell you that I’ve made a lot of fun folds over the years – and there have been quite a few that I said were the ‘easiest ever’ – but this one really IS the easiest ever to make!

Card base and label die cut for the second flap were cut from CutCardStock Lessebo Pitch Black cardstock, using the Stitched Label Nested Cutting Dies for the labels. I cut the patterned paper layers from coordinating prints in the A Spot of Autumn 6×6 paper pack. The sentiments and embellishments are from the A Spot of Autumn Thicker Stickers and Mini Stickers. The finishing touch on the front was adding a few gemstones from the Tropical Escapes Mixed Size Gems.

I die cut an additional label from Neenah Classic Crest 80# Solar White cardstock for the inside and added another sentiment and embellishments from the A Spot of Autumn Thicker Stickers and Mini Stickers. See how easy this was?! Check out my tutorial on the Love From Lizi blog if you’d like more detailed instructions. I’d love to know if you make one!

Love From Lizi products used:
A Spot of Autumn 6×6 Paper Pack
A Spot of Autumn Thicker Stickers
A Spot of Autumn Mini Stickers
Stitched Label Nested Cutting Dies
Tropical Escapes Mixed Size Gems

Affiliate links are used in this post at no cost to you – I really appreciate your support!

Other products used:
CARDSTOCK/PAPER: CutCardStock Lessebo Pitch Black cardstock, Neenah Classic Crest 80# Solar White cardstock
ACCESSORIES: Fiskars 12″ ProCision Rotary Bypass Paper Trimmer, Spellbinders 12×12 Scoring Board, My Sweet Petunia Precision Glue Press, Bearly Art precision craft glue, Big Shot, Scrapbook Adhesives E-Z Runner Permanent Strips

I hope you’ve enjoyed seeing this project and you’re inspired to get crafty! Be sure to join our Facebook Group and Follow us on Instagram and YouTube for lots of crafty inspiration! Thanks so much for stopping by today – we’ll see you next time!

Scrappy hugs,

Hello Autumn

Hey everybody, a very happy Wednesday to you – I hope you’re having a great week! Have you ever heard of a hidden gate fold card? I hadn’t heard of this one until recently, so (of course) I had to make it! I’m up on the Love From Lizi blog with a tutorial for this fun fold featuring papers, dies, stamps and an assortment of embellishments from our October release (and some already in the store). I think you’re really going to like this card!

I cut the card base and top-folding element from CutCardStock Lessebo Moss Green cardstock along with layering panels from assorted papers in the A Spot of Autumn 6×6 Paper Pack. I stamped a sentiment from the Hello Autumn/Fall Stamp Set in Memento Northern Pine ink, and added a vine/leaf die cut embellished with Sunkissed Aurora Blooms from September 2025 Super Kit.

Here is a shot of the card opening up. I added some Orange with Gold Trim Peel-Offs to the narrow flaps.

And here is a shot of the card completely open. I cut the inside sentiment panel from Neenah Classic Crest Solar White cardstock and embellished it with a strip from the Clear Vinyl Sentiments Pack and a sentiment and hearts from the Puffy Sentiments. I totally enjoyed making this card and see more of them in my future, lol!

Love From Lizi products used:
A Spot of Autumn 6×6 Paper Pack
Autumn Breeze Flourish Steel Cutting Die
A Spot of Autumn Stamp and Stencil
A Spot of Autumn Thicker Stickers
A Spot of Autumn Mini Stickers
Pin Stripe Tangerine Orange with Gold Finish Peel-Off Stickers
Sunkissed Aurora Blooms (from September 2025 Super Kit)

Affiliate links are used in this post at no cost to you – I really appreciate your support!

Other products used:
CARDSTOCK/PAPER: CutCardStock Lessebo Moss Green cardstock, Neenah Classic Crest 80# Solar White cardstock
INK: Memento Northern Pine ink; Copic Ciao YR23 Yellow Ochre Alcohol Marker
ACCESSORIES: Fiskars 12″ ProCision Rotary Bypass Paper Trimmer, Spellbinders 12×12 Scoring Board, My Sweet Petunia Precision Glue Press, Bearly Art precision craft glue, MISTI stamp tool, Big Shot, Scrapbook Adhesives E-Z Runner Permanent Strips

I hope you’ve enjoyed seeing this project and you’re inspired to get crafty! Be sure to join our Facebook Group and Follow us on Instagram and YouTube for lots of crafty inspiration! Thanks so much for stopping by today – we’ll see you next time!

Scrappy hugs,

Thoroughly Grateful For You

Hey everybody, happy Wednesday! Here we are headed toward the middle of September already. You better get crackin’ on your Christmas projects and cards because it’ll be here in the blink of an eye, lol! I’m up on the Love From Lizi blog today with a tutorial for making a different version of the tri-fold card. This one has a vertical orientation versus the usual ones we see with a horizontal orientation, and I really like this. This card is the second project I’ve made with items in the amazing September 2025 Super Kit. There are so many fun products in this kit and it was curated for the current Love From Lizi kit subscribers as a thank you for supporting Lizi’s business. She puts out a super kit like this one every year and the price is that of the regular monthly kit despite the fact that it’s almost double the value. And they sell out quick, so if you want one, be sure to grab it before it sells out!

I used white cardstock from the super kit for the folded card base, inside layering panel and the die cut label for the focal image. I also used CutCardStock Lessebo Navy Blue cardstock for the flat card base and layering panels along with patterned papers from the Garden Grace paper pack in the super kit.

I stamped an image from the Garden Grace stamp set in the super kit and colored it with colored pencils. I embellished the outer edges of the flat card base with Mink Pearlescent cardstock and pin stripe peel-offs from the super kit. There are also dried flowers in the super kit, so I fashioned a bouquet and adhered it to the card front along with a few white gemstones from the Tropical Escapes Mixed Size Gems from the store.

Here’s a shot of the inside which shows another panel and another sentiment stamped from the Garden Grace stamp set. Love, love, love how this turned out! Be sure to visit the Love From Lizi blog to see my tutorial if you want to learn how to make this!

Affiliate links are used in this post at no cost to you – I really appreciate your support!

Love From Lizi products used:
Garden Grace September 2025 Super Kit:
Garden Grace 6×6 patterned papers
White cardstock
Specialty Cardstock Bundle (Mink Pearlescent)
Garden Grace Pin Stripe Bundle (Ocean Blue)
Garden Grace Stamp Set
Dried Flowers
Stitched Label Nested Cutting Dies (8th largest)
Stitched Rectangle Nested Cutting Dies (largest)
Tropical Escapes Mixed Size Gems

Other products used:
CARDSTOCK/PAPER: CutCardStock Lessebo Navy Blue cardstock
INK: Versafine Onyx Black ink; Arteza GB08 alcohol marker
ACCESSORIES: Fiskars 12″ ProCision Rotary Bypass Paper Trimmer, Spellbinders 12×12 Scoring Board, My Sweet Petunia Precision Glue Press, Bearly Art precision craft glue, Mini MISTI, Big Shot; Prismacolor Pencils- Peacock Blue, Indigo Blue, Olive Green and Dark Green; Doodlebug Design Lily White Doodle Twine, Ranger Distress Collage Medium, small disc magnet

I hope you’ve enjoyed seeing this project and you’re inspired to get crafty! Be sure to join our Facebook Group and Follow us on Instagram and YouTube for lots of crafty inspiration! Thanks so much for stopping by today – we’ll see you next time!

Scrappy hugs,

If friends were Flowers

Hey everybody, happy Wednesday – I hope you’re having a good week and you’re finding some time to craft. By now you all know that love making fun folds. In all honesty, I’d rather make fun folds than regular cards, lol! I think I may have already said that a time or two! I’m up on the Love From Lizi blog sharing a tutorial for making a diamond column pop up card. This fun fold is new to me and I really enjoyed making it.

I’ve used items from our September super kit that is jam-packed with all kinds of amazing products. The super kit is put out once a year for the Love From Lizi kit subscribers as a way of saying thanks for their support. The cost of the super kit is that of a regular monthly kit despite it being nearly double the value. It is available, however, as a one-off purchase for non-subscribers but at a slightly higher cost. It does sell out quickly every year so be sure to grab yours while it’s in stock!  

Be sure to visit the Love From Lizi blog to see my tutorial if you’d like to learn how to make this awesome fun fold. In a nutshell, the base and pillars were cut from CutCardStock Royal Sundance Kraft Fiber cardstock, and the layering panels and die cut ovals were cut from papers and cardstock in the September Super Kit. I foiled the focal image with a gold foil sheet and a floral image in the Super Kit as well. The sentiment is from the Garden Grace stamp set in the Super Kit, stamped in Catherine Pooler Spruce ink, and the white pearls are from the Mini Pearl Strips on the website. I’ve included front and angled shots below.

I cut the back panels from Solar White cardstock and embellished them with ephemera from the Super Kit. I stamped an additional sentiment from the Garden Grace stamp set in the Super Kit in green ink, and layered the panels on cardstock from the Super Kit.

Affiliate links are used in this post at no cost to you – I really appreciate your support!

Love From Lizi products used:
Garden Grace September 2025 Super Kit:  
Forest Green cardstock
Marzipan cardstock
     Garden Grace 6×6 patterned papers
     Garden Grace stamp set
     Foilable image
     Gold foil sheet
     Garden Grace ephemera
     Garden Grace wreath ephemera
     Glue pen
Stitched oval nested cutting dies (3rd and 4th largest)
Mini pearl strips

Other products used:
CARDSTOCK/PAPER: CutCardStock Royal Sundance Kraft Fiber cardstock, Neenah Classic Crest 80# Solar White cardstock
INK: Copic Ciao alcohol markers- E11 Barley Beige, E15 Earthenware, E21 Soft Sun, Y21 Buttercup Yellow, Y28 Lionet Gold, YR23 Yellow Ochre, BG93 Green Gray, BG96 Bush; Catherine Pooler Spruce ink
DIES/PUNCHES: Stampin’ Up 1-3/4″ Scallop Circle Punch
ACCESSORIES: Fiskars 12″ ProCision Rotary Bypass Paper Trimmer, Spellbinders 12×12 Scoring Board, My Sweet Petunia Precision Glue Press, Bearly Art precision craft glue, MISTI stamp tool, Big Shot, Scrapbook Adhesives 3D Foam Squares

I hope you’ve enjoyed seeing this project and you’re inspired to get crafty! Be sure to join our Facebook Group and Follow us on Instagram and YouTube for lots of crafty inspiration! Thanks so much for stopping by today – we’ll see you next time!

Scrappy hugs,

Best Friends Forever

Hey everybody, Happy Hump Day! I hope you’re having a good week. I’m up on the Love From Lizi blog today with a tutorial for making a double flap fun fold featuring our Happy Days papers, Best Friends Forever stamps, and yellow pinstripe and black mini heart peel-offs – all from our July release. I also used an additional stamp set, a couple die sets and some gemstones from the store to make this card come to life. There seem to be quite a few versions of the double flap fun fold out there but this one is my favorite.

I cut the card base and second flap element from 12×12 Cardstock Shop Lead Encore Textured cardstock along with layering panels from coordinating prints in the Happy Days 6×6 Patterned Paper Pack. I also cut two labels (using the Stitched Label Nested Cutting Dies) from 12×12 Cardstock Shop Pink Champagne Encore Textured cardstock. Next I cut two circles (using the Stitched Circle Nested Cutting Dies) from 80# Solar White and one from the Lead cardstock. I added several white gemstones from the Tropical Escapes Mix Size Gems.

I stamped a sentiment and images from the Best Friends Forever stamp set in Catherine Pooler Black Jack and Twilight inks, and partially colored the images with a Blush Copic Ciao alcohol marker. I embellished the striped panel on the front of the second flap with Yellow Pinstripe and Black Mini Heart Peel-Offs.

I cut the inside panel from 80# Solar White cardstock and embellished it with a leftover strip of the dotted patterned paper from the Happy Days paper pack. I stamped a sentiment from the Simply Amazing stamp set and layered the panel inside the second flap. If you want more details, be sure to see my tutorial on the Love From Lizi blog! ;)

Affiliate links are used in this post at no cost to you – I really appreciate your support!

Love From Lizi products used:
Happy Days 6×6 Patterned Paper Pack
Best Friends Forever Stamp Set
Yellow Pinstripe Peel-Off Stickers
Black Mini Heart Peel-Off Stickers
Stitched Label Nested Cutting Dies
Stitched Circle Nested Cutting Dies
Simply Amazing Stamp Set
Tropical Escapes Mix Size Gems

Other products used:
CARDSTOCK/PAPER: 12×12 Cardstock Shop Lead and Pink Champagne Encore Textured cardstock, Neenah Classic Crest 80# Solar White cardstock
INK: Catherine Pooler Black Jack and Twilight inks; Copic Ciao R20 Blush alcohol marker
ACCESSORIES: Fiskars 12″ ProCision Rotary Bypass Paper Trimmer, Bearly Art precision craft glue, My Sweet Petunia Precision Glue Press, MISTI stamp tool, Big Shot, Scrapbook Adhesives Thin 3D Foam Squares

I hope you’ve enjoyed seeing this project and you’re inspired to get crafty! Be sure to join our Facebook Group and Follow us on Instagram and YouTube for lots of crafty inspiration! Thanks so much for stopping by today – we’ll see you next time!

Scrappy hugs,

here for you

Hey everybody, happy hump day – I hope you’re having a good week. I’m up on the Love From Lizi blog today with a tutorial for making a faux triple fold card featuring our Happy Days paper, Chrysanthemum die, Bumble Bee die, and Friends Forever stamps, all from our July release, along with an additional stamp set and gemstones from the store. I’ve made several triple folds of this variety over the past few years and got the notion a while back to start gluing down the center panel to give it the illusion of a triple fold when there are actually only two flaps. Easy peasy!

I cut the card base from CutCardStock Basis Gray cardstock along with layering panels from assorted prints in the Happy Days 6×6 Patterned Paper Pack. As noted above, I adhered the left flap flat to the card base to give the illusion of two flaps on the left side when there’s really only one. Using the Chrysanthemum Steel Cutting Die, I die cut the chrysanthemum from the Basis Gray, and the bumble bee (using the Bumble Bee Steel Cutting Die) from CutCardStock Basis Black and Basis Gold cardstock with vellum wings which I popped up on a thin foam square.

I cut the main flower die cut in two pieces so it would lay flat on the flap. Then I ended up cutting another flower die cut (just the right side) and adhering it to the right flap so the flower appears to be whole when the card is closed. I added half-circles of Velcro to keep the card closed. I stamped a sentiment from the We Are stamp set in Versafine Onyx Black ink and added a few pink gemstones from the Tropical Escapes Mix Size Gems.

I cut the inside panel from Neenah Classic Crest 80# Solar White cardstock and embellished it with a strip cut from the patterned paper used on the center flap on the front. I stamped a sentiment from the Friends Forever stamps in black ink. For more details instructions, be sure to see my tutorial on the Love From Lizi blog!

Affiliate links are used in this post at no cost to you – I really appreciate your support!

Love From Lizi products used:
Happy Days 6×6 Patterned Paper Pack
Chrysanthemum Steel Cutting Die
Bumble Bee Steel Cutting Die
Friends Forever Stamp Set
We Are Stamp Set
Tropical Escapes Mix Size Gems

Other products used:
CARDSTOCK/PAPER: CutCardStock Basis Gray, Basis Black and Basis Gold cardstock, Neenah Classic Crest 80# Solar White cardstock, 12×12 Cardstock Shop Encore Translucent Vellum
INK: Versafine Onyx Black ink
ACCESSORIES: Fiskars 12″ ProCision Rotary Bypass Paper Trimmer, Bearly Art precision craft glue, My Sweet Petunia Precision Glue Press, MISTI stamp tool, Big Shot, InkyStamper Papercrafting Velcro

I hope you’ve enjoyed seeing this project and you’re inspired to get crafty! Be sure to join our Facebook Group and Follow us on Instagram and YouTube for lots of crafty inspiration! Thanks so much for stopping by today – we’ll see you next time!

Scrappy hugs,

Magical Faux Pull-Tab Card

Hi friends, Happy Hump Day! I hope you’re having a great week. I’m up on the Love From Lizi blog today with a tutorial for making a faux pull-tab card featuring our new Make A Wish Cutting Dies and A Little Bit of Magic Stamp Set from our June release. I also used pink polka dot paper, some mirror cardstock, stitched circle nested dies, pink pinstripe peel-offs and gemstones. It is definitely a fun design but not a fun fold which is my most favorite kind of card to share. It has a unique panel on the front that resembles a pull-tab. I’ve made several of these and they are fun!

I cut the card base and layering panels from CutCardStock Cougar Smooth 100# cardstock along with layering panels from Papertrey Ink Lovely Lady cardstock and pink polka dot paper from our Polka Dot 6×6 Paper Pack. Using the Make A Wish Cutting Dies, I cut the fairy from the Cougar cardstock along with a circular frame (using our Stitched Circle Nested Cutting Dies) from silver foil cardstock in our Matte Mirror A5 Pastel Cardstock Bundle. I added three strips of our Pin Stripe Pink Holographic Peel-Off Stickers a some pink gemstones from our Tropical Escapes Mix Size Gems. The sentiment is from A Little Bit of Magic Stamp Set, stamped in Versafine Onyx Black ink.

I cut the inside panel from the Cougar cardstock and embellished it with a leftover strip of the pink polka dot paper used on the front. I stamped another sentiment from the A Little Bit of Magic Stamp Set in black ink, which completed the card.

Affiliate links are used in this post at no cost to you – I really appreciate your support!

Love From Lizi products used:
Make A Wish Steel Cutting Dies
Stitched Circle Nested Cutting Dies
A Little Bit of Magic Stamp Set
Polka Dot 6×6 Patterned Paper Pack
Matte Mirror A5 Pastel Cardstock Bundle
Pin Stripe Pink Holographic Peel-Off Stickers
Tropical Escapes Mix Size Gems

Other products used:
CARDSTOCK/PAPER: Papertrey Ink Lovely Lady cardstock, CutCardStock Cougar Smooth 100# White cardstock
INK: Versafine Onyx Black ink
ACCESSORIES: Fiskars 12″ ProCision Rotary Bypass Paper Trimmer, Bearly Art precision craft glue, My Sweet Petunia Precision Glue Press, MISTI stamp tool, Big Shot, Spellbinders 1/4″ Best Ever Craft Tape, Scrapbook Adhesives Thin 3D Foam Squares

I hope you’ve enjoyed seeing this project and you’re inspired to get crafty! Be sure to join our Facebook Group and Follow us on Instagram and YouTube for lots of crafty inspiration! Thanks so much for stopping by today – we’ll see you next time!

Scrappy hugs,

Make A Wish

Hey everybody, happy Wednesday! Time sure is flying by and I can’t believe it’s nearly the end of May – and nearly the middle of the year! I’m up on the Love From Lizi blog today with a tutorial for making a diamond panel card with an acetate front that features papers, stamps, ephemera, and a few other embellishments from our June release. I’ve made a couple of these now – this design is beautiful in any color combo and really packs a punch!

I’ll start by apologizing for the beads of light glare on my photos… acetate is so hard to photograph. I don’t know why I’m so drawn to using it on my projects, lol! So this card is 6″ square with a Grafix Crystal Clear Craft Plastic front panel adhered to a CutCardStock 100# Cougar Smooth White back panel. I cut one 3″ square and eight 2″ squares from 80# Cougar Smooth White along with one 2-3/4″ square of yellow polka dot paper, four 1-3/4″ pink polka dot and four more 1-3/4″ green polka dot paper (all from Love From Lizi).

I added a sweet Fairy from the Make A Wish Ephemera, popping her up on foam squares. I stamped part of the sentiment from the Make A Wish Stamp set and created the other part of the sentiment using Pastel Puffy Alphabet 3D Stickers. I completed the front with several Mini Twinkle Pink Holographic Peel-Off Stickers for a little bling.

I stamped an additional sentiment from the Make A Wish Stamp Set and added another piece of ephemera. I totally love how this turned out!

Affiliate links are used in this post at no cost to you – I really appreciate your support!

Love From Lizi products used:
Polka Dot 6×6 Paper Pack
Make A Wish Stamp Set
Make A Wish Ephemera
Pastel Puffy Alphabet 3D Stickers
Mini Twinkle Pink Holographic Peel-Off Stickers

Other products used:
CARDSTOCK/PAPER: Cougar Smooth 100# White cardstock, Cougar Smooth 80# White cardstock
INK: Versafine Onyx Black ink
ACCESSORIES: Fiskars 12″ ProCision Rotary Bypass Paper Trimmer, Bearly Art precision craft glue, My Sweet Petunia Precision Glue Press, MISTI stamp tool, Grafix Crystal Clear Craft Plastic, Spellbinders 5/8″ Best Ever Craft Tape, Scrapbook Adhesives 3D Foam Squares and E-Z Runner Permanent Strips

I hope you’ve enjoyed seeing this project and you’re inspired to get crafty! Be sure to join our Facebook Group and Follow us on Instagram and YouTube for lots of crafty inspiration! Thanks so much for stopping by today – we’ll see you next time!

Scrappy hugs,