Collab with Pear Blossom Press!

Hey everybody, happy Monday! I hope you had a great weekend and enjoyed some beautiful Spring weather. I am absolutely delighted to share that the Love From Lizi design team is collaborating with Pear Blossom Press for an IG Hop! Be sure to hop along with us (starting on the Pear Blossom Press IG page) to get in on the chance to win a prize! Both companies are giving away $25 prizes! I was ecstatic when we were told about this opportunity because I had never made a light-up card… and now I have two under my belt, lol! The Love From Lizi June release is SO fun and when you add Pear Blossom Press lights, the fun quadruples!

I debated for a couple days whether to just showcase one card for the hop and then pop in with the second one later in the week, and my final decision was to showcase both of them for the hop because they were so stinkin’ fun! I listed the supplies I used for card #1 (green frog) and card #2 (purple dragon) separately down below.

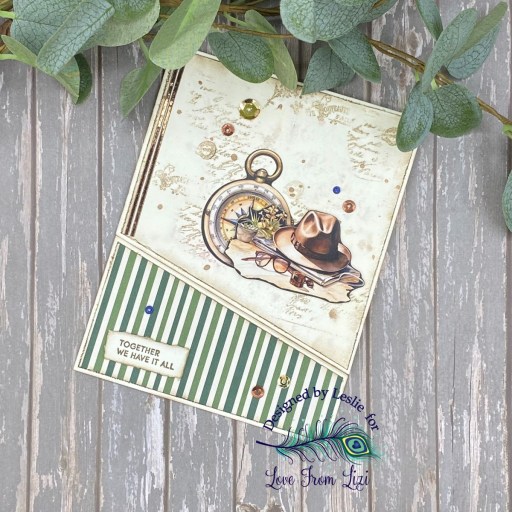
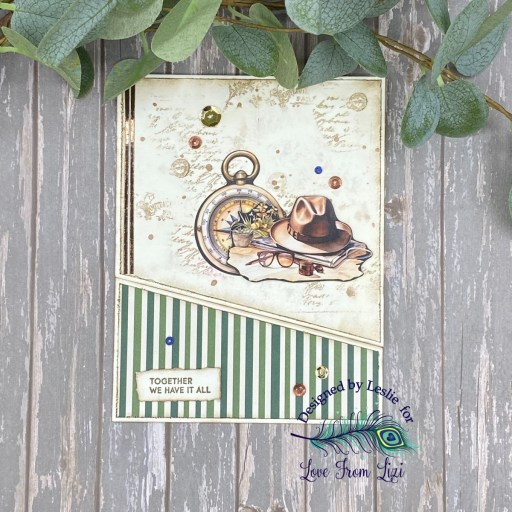
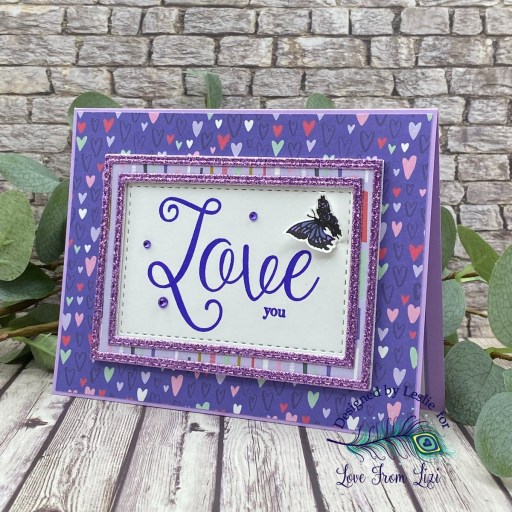
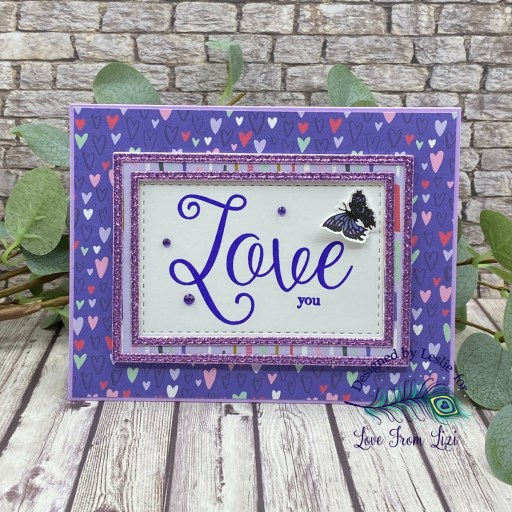
Although the cards are fairly similar, they do have differences. I stamped background stars, sentiments and focal image (which I fussy cut) on card #1 – while I used ephemera for the focal images on card #2 with stamped sentiments and clouds (also fussy cut).

I used a Pear Blossom Press EZ-Light on card #1 and a Pear Blossom Press Halo Light on card #2.

I used the Love From Lizi Background Builder One die set for the background on card #1 and Love From Lizi Stitched Rectangle Nested Cutting Dies for the background on card #2.

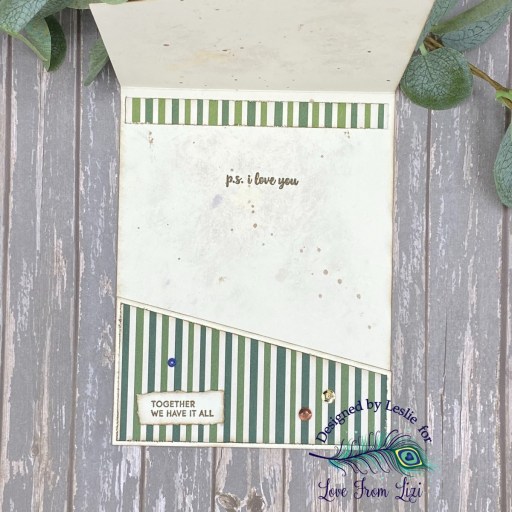
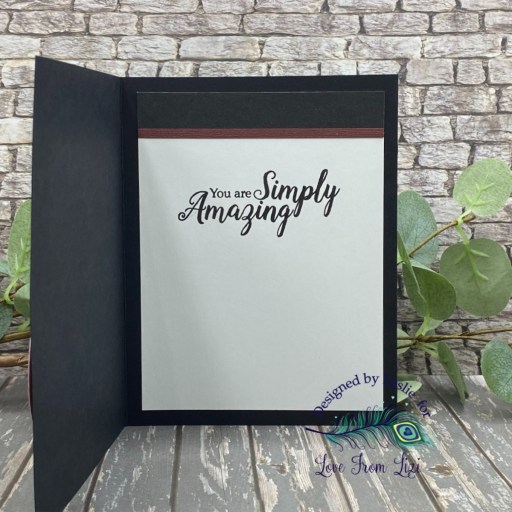
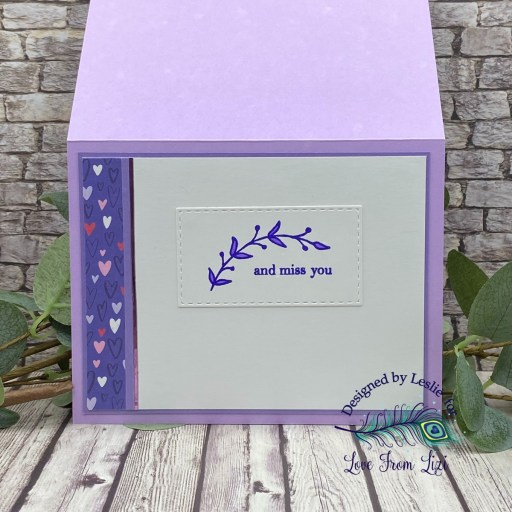
Both cards have layered panels inside with stamped sentiments. Once again, be sure to hop along with us for your chance to win a prize! You have until 11:59 PM EST on May 31st to leave your comments at each stop on the hop, and then the winner announcement will be on June 2nd at 9:0o AM EST on both the Pear Blossom Press and Love From Lizi Instagram pages.

Affiliate links are used in this post at no cost to you – I really appreciate your support!

Pear Blossom Press products used for card #1:
EZ-Light
PB Press Stamp & Die Bundle

Love From Lizi products used for card #1:
Polka Dot 6×6 Patterned Paper Pack
Background Builder One Steel Cutting Dies
A Little Bit of Magic Stamp Set
Olive Green Mirror Peel-Off Stickers
Tropical Escapes Mix Size Gems

Other products used:
CARDSTOCK/PAPER: Premium Classic Crest 110# Solar White Folded Card Base, CutCardStock Green Curry Canvas Pearl Textured cardstock, Neenah Classic Crest 80# Solar White cardstock
INK: Versafine Onyx Black ink; Copic Ciao Alcohol Markers- G21 Lime Green and G82 Spring Dim Green; American Craft Gold Metallic Marker
ACCESSORIES: Fiskars 12″ ProCision Rotary Bypass Paper Trimmer, Bearly Art precision craft glue, My Sweet Petunia Precision Glue Press, Fun Stampers Journey awl and cutting mat, Mini MISTI, Big Shot, iCraft 1/8″ SuperTape, Spellbinders Detail Scissors, Scrapbook Adhesives E-Z Runner Permanent Strips

= = = = = = = = = = = = = =

Pear Blossom Press products used for card #2:
Halo Light Combo
PB Press Stamp & Die Bundle

Love From Lizi products used for card #2:
Moondust 6×6 Specialty Cardstock Bundle
Linen Rainbow 6×6 Patterned Paper Pack
Stitched Rectangles Nested Cutting Dies
Make A Wish Stamp Set
Make A Wish Ephemera
Rainbow Wishes Stamp Set
Mini Pearl Strips

Other products used:
CARDSTOCK/PAPER: Premium Classic Crest 110# Solar White Folded Card Base, Neenah Classic Crest 80# Solar White cardstock
INK: Versafine Onyx Black ink, Delicata Silvery Shimmer ink
ACCESSORIES: Fiskars 12″ ProCision Rotary Bypass Paper Trimmer, Bearly Art precision craft glue, My Sweet Petunia Precision Glue Press, Mini MISTI, Big Shot, iCraft 1/8″ SuperTape, Spellbinders Detail Scissors, Scrapbook Adhesives Thin 3D Foam Squares, Scrapbook Adhesives Crafty Foam Tape

I hope you’ve enjoyed seeing these light-up cards and you’re inspired to get crafty! Be sure to join our Facebook Group and Follow us on Instagram and YouTube for lots of crafty inspiration! Thanks so much for stopping by today – we’ll see you next time!

Scrappy hugs,

Sending a happy hello

Hey everybody, Happy Wednesday! I hope you’re having a great week! I’m up on the Love From Lizi blog today with a tutorial for making a masculine faux center step card featuring papers, stamps, ephemera and sequins from our new ‘For Him’ release which I totally love! Our design team has been sharing lots of samples in case there’s anybody out there who gets stumped making masculine cards. This fun fold is right up there at the top of my list of favorites and I’ve made quite a few of them. ;)

I cut the card base and faux center panel from Neenah Classic Crest 80# Solar White cardstock along with layering panels from papers in our A Spot of Autumn and Neutrals 6×6 Paper Packs. I used stamps from the Heartfelt Hello Stamp Set for the sentiment and then added a hat from the Vintage Escapes Ephemera. The finishing touch was adding several gemstones from the For Him Sequin Mix.

I cut the inside panel from Solar White cardstock and embellished it with a leftover strip of the plaid paper used on the front and sunglasses from the Vintage Escapes Ephemera. I stamped a sentiment from the Summer Botany Stamp Set and then layered the panel on a panel cut from the Matte Mirror Pastel Cardstock Bundle. The finishing touch (and optional step) was adding a panel of paper from our A Spot of Autumn 6×6 Paper Pack. For more details, be sure to visit the Love From Lizi blog to see my tutorial. ;)

Affiliate links are used in this post at no cost to you – I really appreciate your support!

Love From Lizi products used:
A Spot of Autumn 6×6 Paper Pack
Neutrals 6×6 Paper Pack
Matte Mirror Pastel Cardstock Bundle
Heartfelt Hello Stamp Set
Summer Botany Stamp Set
Vintage Escapes Ephemera
For Him Sequin Mix

Other products used:
CARDSTOCK/PAPER: Neenah Classic Crest 80# Solar White cardstock
INK: Versafine Onyx Black ink, Memento Peanut Brittle ink
ACCESSORIES: Fiskars 12″ ProCision Rotary Bypass Paper Trimmer, Bearly Art precision craft glue, My Sweet Petunia Precision Glue Press, MISTI stamp tool, Spellbinders Detail Scissors, Scrapbook Adhesives Thin 3D Foam Squares, Trinity Pick Up Stick

I hope you’ve enjoyed seeing this project and you’re inspired to get crafty! Be sure to join our Facebook Group and Follow us on Instagram and YouTube for lots of crafty inspiration! Thanks so much for stopping by today – we’ll see you next time!

Scrappy hugs,

Together We Have It All

Hey everybody, happy Wednesday! The weeks sure seem to be rolling around pretty quickly these days. I’m up on the Love From Lizi blog today with a tutorial for making a masculine ‘love you just because’ card with a slanted flap. I sure do love me some fun folds and next in line come the fancy cuts which really make a statement! I used paper, stamps, ephemera, pin stripe peel-offs and sequins – all from our ‘For Him’ May release – and I love how it turned out. This release is packed full of wonderful products to get your masculine project mojo going! And our team is having an IG Hop to celebrate this awesome release, so be sure to visit the Love From Lizi Instagram page to hop with us and get in on the chance to win a $30CAD gift card to shop on the site!

I used CutCardStock Basis 110# Natural cardstock for the card base and cut off the front flap at an angle, saving the piece that was cut off. Next, I cut the front layering panel from Basis 80# Natural cardstock, angled the bottom edge, and did a little mixed media work on it. I used Memento Rich Cocoa and Espresso Truffle dye inks, Ranger Antique Linen and Vintage Photo Distress Spritz (sprayed and splattered) along with hand stamping using stamps from the Summer Botany Stamp Set. I used Ranger Walnut Stain Distress Ink around the edges which I had also distressed with the Tim Holtz Distress Tool.

I lightly distressed the inside of the card base also (using the same products sans the stamping) and inked the outside edges with Walnut Stain distress ink. I adhered the leftover piece cut off the front flap along with a patterned paper layer cut from a striped paper in the A Spot of Autumn 6×6 Paper Pack. I adhered a couple pieces of Vintage Escapes Ephemera, then added a couple Brown Mirror Pinstripe Peel-Off Stickers and several sequins from the For Him Sequin Mix to the card front. I stamped a sentiment from the same Summer Botany Stamp Set in Memento Rich Cocoa ink and tore it on all four sides. I lightly inked the edges and popped it up on thin 3D foam squares.

I embellished the inside with a 1/2″ x 4-1/8″ strip of the patterned paper which I distressed with the Walnut Stain distress ink, and then stamped a sentiment from the same stamp set in Rich Cocoa ink. For more details, be sure to visit the Love From Lizi blog to see my tutorial. ;)

Affiliate links are used in this post at no cost to you – I really appreciate your support!

A Spot of Autumn 6×6 Paper Pack
Summer Botany Stamp Set
Vintage Escapes Ephemera 
Brown Mirror Pinstripe Peel-Off Stickers
For Him Sequin Mix

Other products used:
CARDSTOCK/PAPER: CutCardStock Basis 110# Natural and Basis 80# Natural cardstock
INK: Memento Rich Cocoa and Espresso Truffle inks; Ranger Antique Linen and Vintage Photo Distress Spritz; Ranger Walnut Stain distress ink
ACCESSORIES: Fiskars 12″ ProCision Rotary Bypass Paper Trimmer, Bearly Art precision craft glue, My Sweet Petunia Precision Glue Press, MISTI stamp tool, Tim Holtz Distress Tool, Ranger Tiny Blending Tool and Tiny Blending Foam, Scrapbook Adhesives Thin 3D Foam Squares, Trinity Pick Up Stick

I hope you’ve enjoyed seeing this project and you’re inspired to get crafty! Be sure to join our Facebook Group and Follow us on Instagram and YouTube for lots of crafty inspiration! Thanks so much for stopping by today – we’ll see you next time!

Scrappy hugs,

Hello You!

Hey everybody! I hope you’re having a fantastic week with wonderful Spring weather! I’m up on the Love From Lizi blog today with a tutorial for making a hinge card. This card features our Rise and Shine Stamp Set, Floral Watering Can Cutting Die, and Matte Silver Sway Peel-Off Stickers from our March release. I also used papers from a variety of our paper packs, some of our nested cutting dies, peel-off stickers and pearls from the store.

I made one of these with a narrow vertical hinge about a month ago and really enjoyed the process. This fold is very similar (but slightly different) than a double flap fun fold and I’ve made lots of them over the years. There are several different ways to fashion the hinge to make this card really fun! Be sure to check out my tutorial on the Love From Lizi blog if you’d like to learn how to make a hinge card.

I cut the flat card base from Neenah Classic Crest 110# Solar White cardstock and the folded card panel from 80# Solar White. I cut layering panels and stitched rectangle and oval die cuts from assorted prints in the Love You, Winter Warmers, Linen Rainbow and Neutrals 6×6 paper Packs as well as white cardstock. I used the Floral Watering Can Cutting Die to cut an embellishment for the panel beneath the hinge flap. The sentiments and flower on the front of the hinge are stamped from the Rise and Shine Stamp Set. The finishing touch on the front was adding some peel-off stickers and a few small white pearls.

I embellished the inside of the folded card with strips cut from the green papers used on the front, and added a sentiment on a die cut stitched oval.

Affiliate links are used in this post at no cost to you – I really appreciate your support!

Love From Lizi products used:
Love You 6×6 Specialty Paper Pack
Winter Warmers 6×6 Paper Pack
Linen Rainbow 6×6 Patterned Paper Pack
Neutrals 6×6 paper Pack
Rise and Shine Stamp Set
Floral Watering Can Cutting Die
Stitched Rectangle Nested Cutting Dies
Stitched Oval Nested Cutting Dies
Matte Silver Sway Peel-Off Stickers
Pin Stripe Mauve Mirror Peel-Off Stickers
Mini Pearl Strips

Other products used:
CARDSTOCK/PAPER: Neenah Classic Crest 110# and 80# Solar White cardstock
INK: Catherine Pooler Queen For A Day and It’s A Girl inks
ACCESSORIES: Fiskars 12″ ProCision Rotary Bypass Paper Trimmer, Bearly Art precision craft glue, My Sweet Petunia Precision Glue Press, MISTI stamp tool, Big Shot, Spellbinders Detail Scissors, Scrapbook Adhesives E-Z Runner Permanent Strips, Keep It Simple Clear Enamel Dots

I hope you’ve enjoyed seeing this project and you’re inspired to get crafty! Be sure to join our Facebook Group and Follow us on Instagram and YouTube for lots of crafty inspiration! Thanks so much for stopping by today – we’ll see you next time!

Scrappy hugs,

Hello

Hey everybody! Happy April Fool’s Day – are pranking anybody today? LOL, I’ve been good… I’ve popped in this afternoon to share a card I created for Lizi’s Layout Challenge #1 featuring our Background Builder One die set. In case you haven’t heard, Love From Lizi has started up a brand new layout challenge, and because this month marks Lizi’s 100th monthly kit, we are celebrating with a milestone giveaway… a $100CAD gift card to the Love From Lizi store! How cool is that?! Read on for more details!

All that’s required to participate in this challenge is to make a card using the following layout. You can enter as many different cards as you’d like. You’ll earn points for using the layout, for using a majority of Love From Lizi products, and for using the Background Builder One die set. There are additional guidelines, so be sure to read the post prior to entering your cards.

I actually combined the Love From Lizi layout challenge with a personal challenge. I’ve had both volumes of the Color Cubes for nearly a year now and have not used the first card out of either box. So my friend, Danni, issued me a challenge on March 17th to use at least one card within the next two weeks. The card was finished on March 30th which was one day before the two-week mark, but I’m late posting it, lol. Hey, at least I FINALLY used a Color Cube card, lol!

I cut the card base from CutCardStock Astrobrights Eclipse Black cardstock. Using our Background Builder One die set, I cut the pieces from our Neutrals paper pack, Linen Rainbow paper pack, and Silver Mirror cardstock, along with some rust colored cardstock from my stash. I used our Sitting Cat die for the focal image along with an embossed sentiment from our Just Because stamp set. The finishing touch was adding a couple strips of our Silver Sway peel-offs.

I cut the inside panel from Neenah Classic Crest Solar White cardstock and embellished it with strips of the dark gray and rust papers used on the front. I stamped a sentiment from our Simply Amazing stamp set in Versafine Onyx Black ink, which completed the card.

Affiliate links are used in this post at no cost to you – I really appreciate your support!

Love From Lizi products used:
Background Builder One Cutting Dies
Linen Rainbow 6×6 Paper Pack
Neutrals 6×6 Paper Pack
Matte Mirror Pastel Cardstock Bundle
Sitting Cat Cutting Die
Just Because Stamp Set
Simply Amazing Stamp Set
Matte Silver Sway Peel-Off Stickers

Other products used:
CARDSTOCK/PAPER: CutCardStock Astrobrights Eclipse Black and Lessebo Dawn Maroon cardstock, Darice Rust Premium Cardstock, Neenah Classic Crest 80# Solar White cardstock
INK: Versafine Onyx Black ink
ACCESSORIES: Fiskars 12″ ProCision Rotary Bypass Paper Trimmer, Bearly Art precision craft glue, My Sweet Petunia Precision Glue Press, Mini MISTI, Big Shot, Hero Arts Clear Embossing Powder, Scrapbook Adhesives 3D Foam Squares

I hope you’ve enjoyed seeing this project and you’re inspired to get crafty! Be sure to join the Love From Lizi Facebook Group and Follow us on Instagram and YouTube for lots of crafty inspiration! Thanks so much for stopping by today – we’ll see you next time!

Scrappy hugs,

Spring Wishes

Hey everybody, happy Wednesday and happy Spring! It’s still a little chilly here but our temps are rising and I do believe Spring is in the air. I’m up on the Love From Lizi blog today with a tutorial for making a circular easel card with an acetate front. This card features our Rise and Shine Stamp Set, Floral Wellington Boot Cutting die, and Matte Silver Sway Peel-Off Stickers – all from our March release. I also used additional dies, papers and embellishments from the store. This card may look daunting but it’s really fairly simple, so be sure to check out my tutorial on the Love From Lizi blog if you’d like to learn how to make it.

I cut the card base, frames and a couple layers from CutCardStock Basis 80# White 12×12 cardstock. I also cut a layering panel from a red floral print in the Love You paper pack, as well as frames and a layering panel from a red print in the Linen Rainbow paper pack. Using the Floral Wellington Boot Cutting Die, I die cut two wellies from a coordinating print in the Love You paper pack, trimmed off the floral element and added a small strip of Matte Silver Sway Peel-Off Sticker to each.

I added a strip of white pearls to the front of each wellie, and also added a sole to each of the wellies by cutting the very bottom portion from a red linen scrap and trimming it down. I used the Winter Roses Cutting Dies to cut the white roses from white cardstock to embellish the background of the acetate panel, and then added the wellies. I layered circular die cuts to the inside and added a sentiment from the Rise and Shine stamp set, stamped in red ink, and popped up on adhesive foam which doubled as the stopper.

Here are a couple additional shots. As an optional step, I added a custom sentiment that I typed on my computer as well as a leftover frame to the bottom of the card to create an area to sign and/or write a short message.

Affiliate links are used in this post at no cost to you – I really appreciate your support!

Love From Lizi products used:
Rise and Shine Stamp Set
Floral Wellington Boot Cutting Die
Winter Rose Cutting Dies
Linen Rainbow 6×6 Patterned Paper Pack
Love You 6×6 Specialty Paper Pack
Stitched Circle Nested Cutting Dies
Matte Silver Sway Peel-Off Stickers
Mini Pearl Strips

Other products used:
CARDSTOCK/PAPER: CutCardStock Basis 80# White 12×12 cardstock
INK: Catherine Pooler Rouge ink
ACCESSORIES: Fiskars 12″ ProCision Rotary Bypass Paper Trimmer, Bearly Art precision craft glue, My Sweet Petunia Precision Glue Press, Mini MISTI, Big Shot, Grafix Crystal Clear Craft Plastic, Keep It Simple Back To Basics Shaker Basics 3mm Adhesive Foam Sheet, Scrapbook Adhesives Thin 3D Foam Squares

I hope you’ve enjoyed seeing this project and you’re inspired to get crafty! Be sure to join our Facebook Group and Follow us on Instagram and YouTube for lots of crafty inspiration! Thanks so much for stopping by today – we’ll see you next time!

Scrappy hugs,

Love You

Hey everybody, happy Wednesday! I hope you’re having an awesome week and it’s getting a little warmer where you are. But if you’re not seeing warmer weather just yet, don’t despair… chilly weather is perfect weather to stay in and craft! I’m up on the Love From Lizi blog today with a tutorial for making a pretty friendship card with a raised frame that features our Butterfly Wings stamp set and Love You paper pack, both from our new release. I also used some of our glitter cardstock, an additional stamp set, stitched rectangle dies, and pin stripe peel-off stickers. The raised frame sure packs a punch and I love how this turned out!

I cut the card base from CutCardStock Lessebo Amethyst cardstock along with a layering panel and frame from coordinating prints in the Love You 6×6 Specialty Paper Pack. I used the Stitched Rectangle Nested Cutting Dies for the frames, building the base frame up with four layers of Neenah Classic Crest 110# Solar White cardstock for the raised dimension. I also cut two thin frames from purple glitter cardstock in the Pastel Glitter A5 Specialty Cardstock Bundle.

I stamped the sentiment from the Making Memories stamp set in Catherine Pooler Drive In ink, and added a fussy cut butterfly stamped from the Butterfly Wishes Stamp set. The finishing touch was adding several purple gemstones.

I cut the inside panel from 80# Solar White cardstock and embellished it with a leftover strip of the patterned paper used on the front, a very thin strip of CutCardStock Stardream Metallic Amethyst cardstock. I stamped the sentiment, also from the Making Memories stamp set, in the purple ink and cut it with a Stitched Rectangle Nested Cutting Die.

Affiliate links are used in this post at no cost to you – I really appreciate your support!

Love From Lizi products used:
Butterfly Wings Stamp Set
Love You 6×6 Specialty Paper Pack
Pastel Glitter A5 Specialty Cardstock Bundle
Making Memories Stamp Set
Stitched Rectangle Nested Cutting Dies
Pin Stripe Mauve Mirror Peel-Off Stickers

Other products used:
CARDSTOCK/PAPER: CutCardStock Lessebo Amethyst and Stardream Metallic Amethyst cardstock, Neenah Classic Crest 110# and 80# Solar White cardstock
INK: Catherine Pooler Drive In ink, Versafine Onyx Black ink; Sharpie Ultra Fine Point Marker- Purple; Bic Mark-It Fine Point Marker- Polynesian Purple
ACCESSORIES: Fiskars 12″ ProCision Rotary Bypass Paper Trimmer, Bearly Art precision craft glue, My Sweet Petunia Precision Glue Press, Mini MISTI, Big Shot, Spellbinders Detail Scissors

I hope you’ve enjoyed seeing this project and you’re inspired to get crafty! Be sure to join our Facebook Group and Follow us on Instagram and YouTube for lots of crafty inspiration! Thanks so much for stopping by today – we’ll see you next time!

Scrappy hugs,

Sending Love on Butterfly Wings

Hey everybody! Happy Wednesday evening – I’m here with my second post today. I hope you’re having a beautiful week and it’s warming up a bit where you are, with Spring on the way! I’m up on the Love From Lizi blog today with a tutorial for making a tented easel card featuring the Butterfly Wings Stamp Set from our newest release – and you may recognize this card from our new release blog hop on Instagram last week. Yep, I’m double-dipping, lol! I also used some of our mirror cardstock, an additional stamp set, some nested cutting dies, and the centers from the purple butterfly border peel-off stickers. And you’ve probably also noticed that this is one of my favorite fun folds and I’m posting another one within the course of a week!

The measurements for this card are as follows:
1. Card base is 4-1/4″ x 11″, scored at 4-1/4″ and 8-1/2″, making the folded card 4-1/4″ square.
2. Front layering panel is 4″ x 4″.
3. Bottom layering panel is 2-1/4″ x 4″.
4. White layering panel for the inside cut at 4″ x 4″. 

The card base and the stopper/bottom sentiment layering panel were cut from CutCardStock Amaranth cardstock and patterned paper layering panels from the Love You 6×6 Specialty Paper Pack. I used the Stitched Label Nested Cutting Dies to cut the background for the butterfly from Amaranth and Neenah Classic Crest 80# Solar White cardstock. I used a strip of purple butterfly border peel-off stickers across the bottom of the easel portion, keeping just the inside tiny butterflies and removing the border strip.

I stamped the large butterfly from the Butterfly Wings stamp set, colored it with Copics and fussy cut it. I adhered the body flat to the label shaped background and popped the wings up on adhesive foam squares. I adhered a piece of purple mirror cardstock from the Matte Mirror Pastel Specialty Cardstock Bundle beneath the Amaranth piece, stamped a sentiment from the Butterfly Wings stamp set in Versafine Onyx Black ink and then popped the stopper up on a 1″ adhesive foam strip.

The inside panel was cut from 80# Solar White cardstock and embellished with a strip from the Love You paper pack. I stamped a sentiment from the Simply Amazing Stamp Set in black ink and adhered the panel to the inside of the card base, which completed the card. If you’re interested in more details, be sure to see my tutorial post on the Love From Lizi blog.

Affiliate links are used in this post at no cost to you – I really appreciate your support!

Love From Lizi products used:
Love You 6×6 Specialty Paper Pack
Matte Mirror Pastel Specialty Cardstock Bundle
Butterfly Wings Stamp Set
Simply Amazing Stamp Set
Stitched Label Nested Cutting Dies
Stitched Rectangle Nested Cutting Dies
Butterfly Border Purple Mirror Peel-Off Stickers

Other products used:
CARDSTOCK/PAPER: CutCardStock Amaranth cardstock, Neenah Classic Crest 80# Solar White cardstock
INK: Memento Tuxedo Black ink, Versafine Onyx Black ink; Copic Ciao- R14 Light Rouge, R22 Light Prawn, G21 Lime Green, C-5 Cool Gray; Spectrum Noir Tri-Blends BP4
ACCESSORIES: Fiskars 12″ ProCision Rotary Bypass Paper Trimmer, Bearly Art precision craft glue, My Sweet Petunia Precision Glue Press, Mini MISTI, Big Shot, EK Tools 3D Dots, 1″ double-sided adhesive foam strip

I hope you’ve enjoyed seeing this project and you’re inspired to get crafty! Be sure to join our Facebook Group and Follow us on Instagram and YouTube for lots of crafty inspiration! Thanks so much for stopping by today – we’ll see you next time!

Scrappy hugs,

Fancy Cut Hello

Hey everybody! Another Wednesday has rolled around and I hope you’re having a good week! Has it warmed up any where you are? We’re in SW Colorado and have been seeing temps in the 40s and 50s, so that’s definitely a positive vibe! I’m up on the Love From Lizi blog today with a tutorial for making a collar fold card featuring our Just Because stamp set. I also used a variety of papers, an oval cutting die, and some peel-offs. This isn’t a fun fold like I typically share, but it features a fancy cut that really packs a punch!

I cut the card base from Neenah Classic Crest 110# Solar white cardstock along with layering panels from papers in the Love From Lizi Winter Warmers 6×6 Patterned Paper Pack, Matte Mirror Pastel Specialty Cardstock Bundle and Moondust Specialty Cardstock Bundle. Be sure to see my tutorial on the Love From Lizi blog for the assembly.

I stamped the flowers and vase image from the Just Because stamp set on 80# Solar White and again on a pink paper in the Winter Warmers paper pack. I colored just the blooms and greenery with alcohol markers on the white cardstock and then fussy cut the full image. I then colored just the vase on the pink paper, fussy cut it, and paper pieced it onto the full image which I then adhered to the card front on foam strips.

I stamped the sentiment on a pink checkered print in the Winter Warmers paper pack and cut it with a Stitched Oval Nested Cutting Die, then adhered it to the center of the fancy cut area. The final step was adding a few green circle peel-offs from the Indigoletta peel-off variety pack to the center of several blooms on the patterned paper.

I cut the inside panel from 80# Solar White cardstock and embellished it with leftover strips of the floral and teal foil papers used on the front. I stamped a sentiment from the Just Because stamp set in black ink, which completed the card.

Affiliate links are used in this post at no cost to you – I really appreciate your support!

Love From Lizi products used:
Just Because stamp set
Winter Warmers 6×6 Patterned Paper Pack
Matte Mirror Pastel Specialty Cardstock Bundle
Moondust Specialty Cardstock Bundle
Stitched Oval Nested Cutting Dies
Indigoletta Variety Peel-Off 4-Pack

Other products used:
CARDSTOCK/PAPER: Neenah Classic Crest 110# and 80# Solar White cardstock
INK: Memento Tuxedo Black ink (pad and marker); Copic Ciao R20, R21, G00, G02, G17
ACCESSORIES: Fiskars 12″ ProCision Rotary Bypass Paper Trimmer, Cricut Paper Trimmer, Bearly Art precision craft glue, My Sweet Petunia Precision Glue Press, MISTI stamp tool, Big Shot, Spellbinders Detail Scissors, Scrapbook Adhesives Crafty Foam Tape White 54 ft

I hope you’ve enjoyed seeing this project and you’re inspired to get crafty! Be sure to join our Facebook Group and Follow us on Instagram and YouTube for lots of crafty inspiration! Thanks so much for stopping by today – we’ll see you next time!

Scrappy hugs,

So Lucky

Hey everybody, Happy Wednesday! I hope your week is going along nicely. I’m up on the Love From Lizi blog today with a tutorial for making a book cradle fold. This is my first attempt at this particular fold (which I saw on the Mixed Up Craft YouTube Channel) and it’s an interesting one. I used stamps and ephemera from our new So Lucky collection which I paired with several green prints from the Winter Warmers 6×6 Patterned Paper Pack and a couple Gold Mirror Peel-Off Stickers. This collection is a must-have for any coffee lovers out there!

I cut the card base pieces from Neenah Classic Crest 110# Solar White cardstock along with layering panels from assorted prints in the Winter Warmers 6×6 Patterned Paper Pack. Be sure to check out my tutorial on the Love From Lizi blog mentioned above for assembly instructions.

There are lots of areas on this card to embellish as desired. I used gold mirror peel-off stickers as well as ephemera and stamped sentiments from the new So Lucky collection. I did not have the dies in the bundle yet when I created this card, so I fussy cut the front sentiment. Here are shots of the back and a side angle so you can see the construction. Pretty cool, huh?!

Affiliate links are used in this post at no cost to you – I really appreciate your support!

Love From Lizi products used:
So Lucky Stamp & Die Bundle
So Lucky Ephemera Pack
Winter Warmers 6×6 Patterned Paper Pack
Straight Gold Mirror Peel-Off Stickers

Other products used:
CARDSTOCK/PAPER: Neenah Classic Crest 110# and 80# Solar White cardstock
INK: Memento Cottage Ivy ink
ACCESSORIES: Fiskars 12″ ProCision Rotary Bypass Paper Trimmer, Bearly Art precision craft glue, My Sweet Petunia Precision Glue Press, MISTI stamp tool, Ranger Glossy Accents, Spellbinders Detail Scissors, Scrapbook Adhesives Thin 3D Foam Squares

I hope you’ve enjoyed seeing this project and you’re inspired to get crafty! Be sure to join our Facebook Group and Follow us on Instagram and YouTube for lots of crafty inspiration! Thanks so much for stopping by today – we’ll see you next time!

Scrappy hugs,