We Still Do!

Hey everybody! Can you believe we’re near the end of April already?! I’m thoroughly enjoying sharing all these Pajama Crafter Stamps projects with y’all! I love to work ahead on my design teams and had created quite a few cards prior to stepping down from the Pajama Crafter Stamps DT at the end of February that had not been showcased on my blog or social media platforms. This side accordion panel card features the new Just Married stamp set which I paired with an older Stampin’ Up paper pad. I love the color palette and thought it was perfect for an anniversary card! I’ve seen this fun fold on Pinterest, Sharon Armstrong has a video on her blog, and Lisa Curcio has a version on her blog that she calls an expanding accordion fun fold. So there are a few resources (and different names) out there for this one.

Here are the mini instructions: Cut the 5-1/2″ x 11″ card base from CutCardStock Lessebo White cardstock, score at 1-3/4″, 3-1/2″, 5-1/4″ and 7″, and fold on all the score lines. Cut a smaller folded piece from White at 3″ x 6″ and score at 3″. From coordinating prints in the Stampin’ Up Stacked With Love designer series paper stack, cut three 1-1/2″ x 5-1/4″ panels for the left side, a 3-3/4″ x 5-1/4″ panel for the right side, and two 2-3/4″ square panels for the smaller folded piece. Cut one additional 2-3/4″ square panel from white cardstock for a sentiment. Embellish as desired.

I stamped the car from the Just Married stamp set in Memento Tuxedo Black ink on a light print in the paper stack, and colored the trunk release, bumper, license plate and tires with alcohol markers. I paper-pieced the back window with a white cardstock scrap and added Eyelet Outlet white glitter enamel dots to the back lights. I stamped sentiments from the same stamp set which completed the card.

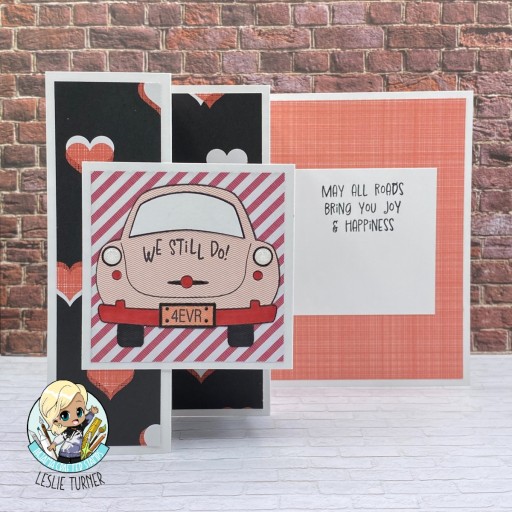
Here’s an overhead shot so you can see the construction. Super easy fold that really packs a punch!

Affiliate links are used in this post at no cost to you – I really appreciate your support!

Pajama Crafter Stamps products used:
Just Married stamp set

Other products used:
CARDSTOCK/PAPER: CutCardStock Lessebo White cardstock, Stampin’ Up Stacked With Love designer series paper stack
INK: Memento Tuxedo Black ink (pad and marker); Spectrum Noir Tri-Blends- CR3/6/10; black Copic Sketch, Sakura Pigma 08 Micron pen
ACCESSORIES: Fiskars 12″ ProCision Rotary Bypass Paper Trimmer, Elmer’s Craft Bond Tape Runner, Bearly Art precision craft glue, MISTI stamp tool, Eyelet Outlet White Glitter Enamel Dots

I hope you’ve enjoyed this project! Be sure to check out all the awesome stamps, dies and other goodies at Pajama Crafter Stamps which is the new home of the Prickley Pear Stamps brand and the Pajama Crafter Stamps line! Keep up with news and sales by following Pajama Crafter Stamps on Facebook, Instagram and Pinterest, and join Pajama Crafter Stamps & Friends for lots of fun crafty ideas and to share your creativity! And finally, be sure to visit the Pajama Crafter Stamps blog and sign up for the newsletter to stay in touch! Thanks so much for stopping by today – we’ll see you next time! ;)

Scrappy hugs,

You Are A T-Riffic Pal

Howdy peeps! It’s Friday and I hope your week has gone well! I have a super cute Pajama Crafter Stamps project to share today created with the adorable Prickley Pear Stamps Dinosaur Pals stamps and dies. This is another one of the (many) projects I created prior to leaving the design team at the end of February and hadn’t yet showcased. These stamps and dies are so stinkin’ cute I can’t even stand it, and add a wobble element and it becomes cuteness overload! This is a clean and simple design that would be easy to mass produce for party invites, and wouldn’t they be adorable?!

I cut the card base and layering panel from Neenah Classic Crest Solar White cardstock. I stamped the dinosaur, tree and bush from the Dinosaur Pals stamps in Memento Tuxedo Black ink on Solar White scraps, colored them with alcohol markers and cut them with the coordinating Dinosaur Pals dies. I added Eyelet Outlet grass washi tape to the bottom of the layering panel and stamped the sentiment in the top left corner.

I adhered the panel to the card base and added the dinosaur, tree and bush to complete the scene. Here’s that super cute dino on the wobble!

Affiliate links are used in this post at no cost to you – I really appreciate your support!

Pajama Crafter Stamps products used:
Prickley Pear Stamps Dinosaur Pals stamps
Prickley Pear Stamps Dinosaur Pals dies

Other products used:
Cardstock/Paper: Neenah Classic Crest 110# Solar White cardstock
Ink: Memento Tuxedo Black ink; Arteza alcohol markers- BR92, RP09, YG14/26/42
Accessories: Tonic Studios 12″ Guillotine Paper Trimmer, Art Glitter Dries Clear adhesive, MISTI stamp tool, Big Shot, Hampton Art Action Wobbles, Eyelet Outlet Grass Washi Tape

I hope you’ve enjoyed this project! Be sure to check out all the awesome stamps, dies and other goodies at Pajama Crafter Stamps which is the new home of the Prickley Pear Stamps brand and the Pajama Crafter Stamps line! Keep up with news and sales by following Pajama Crafter Stamps on Facebook, Instagram and Pinterest, and join Pajama Crafter Stamps & Friends for lots of fun crafty ideas and to share your creativity! And finally, be sure to visit the Pajama Crafter Stamps blog and sign up for the newsletter to stay in touch! Thanks so much for stopping by today – we’ll see you next time! ;)

Scrappy hugs,

Paris in the Spring

Hey everybody! Happy Tuesday – I hope your week has started off nicely! I’ve popped in this morning with a Pajama Crafter Stamps project to share that I created with the beautiful Prickley Pear Stamps Flourished Oval Sentiments stamp set and Flourished Oval die. This is another one of the (many) projects I created prior to leaving the team at the end of February and hadn’t yet showcased. I had my eye on the Paris stamp in this stamp set and remembered an Eiffel Tower die in my stash so that’s the direction I went. I actually had the card base and layering panel already made on my desk that I had planned for another project but didn’t use, so using them for this card made it a snap to put together!

The card base and layering panel were cut from CutCardStock Cougar Smooth White cardstock and the upper left and lower right corners rounded. The patterned paper layers were cut from coordinating papers in the Asuka Studio Dusty Rose 6×6 paper pack and the corners rounded. I stamped the Paris image from the Prickley Pear Stamps Flourished Oval Sentiments stamps in Catherine Pooler Twilight ink, cut it with the coordinating Flourished Oval die and popped it up on foam strips on the card front. Using the Hero Arts Paper Layering Eiffel Tower die, I cut several towers from CutCardStock Basis Soft Pink, adhered them together for dimension and slid the piece under the left side of the focal image. The finishing touch was adding several Keep It Simple Back To Basics Rose Enamel Dots.

I cut the inside panel from Cougar Smooth White and rounded the upper left and lower right corners. I stamped a sentiment from the same Flourished Oval Sentiments stamp set in Catherine Pooler Twilight ink and layered the panel on Basis Soft Pink cardstock.

Affiliate links are used in this post at no cost to you – I really appreciate your support!

Pajama Crafter Stamps products used:
Prickley Pear Stamps Flourished Oval Sentiments
Prickley Pear Stamps Flourished Oval Die

Other products used:
CARDSTOCK/PAPER: CutCardStock Cougar Smooth 80# White and Basis Soft Pink, Asuka Studio Dusty Rose 6×6 paper pack
INK: Catherine Pooler Twilight ink
DIES/PUNCHES: Kadomaru Pro Corner Rounder, Hero Arts Paper Layering Eiffel Tower Die
ACCESSORIES: Fiskars 12″ ProCision Rotary Bypass Paper Trimmer, Elmer’s Craft Bond Tape Runner, Bearly Art precision craft glue, MISTI stamp tool, Big Shot, 1″ double-sided foam strips, Keep It Simple Back To Basics Rose Enamel Dots

I hope you’ve enjoyed this project! Be sure to check out all the awesome stamps, dies and other goodies at Pajama Crafter Stamps which is the new home of the Prickley Pear Stamps brand and the Pajama Crafter Stamps line! Keep up with news and sales by following Pajama Crafter Stamps on Facebook, Instagram and Pinterest, and join Pajama Crafter Stamps & Friends for lots of fun crafty ideas and to share your creativity! And finally, be sure to visit the Pajama Crafter Stamps blog and sign up for the newsletter to stay in touch! Thanks so much for stopping by today – we’ll see you next time! ;)

Scrappy hugs,

One Nation Under God

Hi friends! I hope you’re having a fabulous weekend and the weather is warming up a bit where you are! I have a Pajama Crafter Stamps project to share with you today created with the beautiful Some Gave All stamp set. This is another one of the projects I created prior to leaving the PCS team at the end of February and hadn’t yet showcased. I’ve got a few more, lol, so stay tuned… I’m just getting started! This note card features the American flag on a hand-cut flag pole and a scored and inked background. It has been a while since I employed this wood-look technique and I like how it turned out!

I cut the note card base and a layering panel from CutCardStock Basis Natural cardstock. I scored the layering panel in even increments and swiped Catherine Pooler Sand Castle, Over Coffee, and Icing on the Cake inks across it. Finally, I lightly swiped some Ranger walnut stain distress ink across the panel and then inked the edges.

I stamped the flag from the Some Gave All stamp set in Memento Espresso Truffle ink on Basis Natural, colored it with alcohol markers, and fussy cut it. I hand-cut a flag pole from CutCardStock Stardream Metallic Silver cardstock and adhered the pole and flag to the layering panel and then to the card front. The finishing touch was stamping the sentiment (from the same stamp set) in Memento Espresso Truffle ink.

Affiliate links are used in this post at no cost to you – I really appreciate your support!

Pajama Crafter Stamps products used:
Some Gave All stamp set

Other products used:
CARDSTOCK/PAPER: CutCardStock Basis 80# Natural and Stardream Metallic Silver cardstock
INK: Catherine Pooler Sand Castle, Over Coffee, and Icing on the Cake inks; Ranger walnut stain distress ink, Memento Espresso Truffle ink; Spectrum Noir Tri-Blends- DR3/4, TB6, BG2
ACCESSORIES: Fiskars 12″ ProCision Rotary Bypass Paper Trimmer, Elmer’s Craft Bond Tape Runner, Bearly Art precision craft glue, MISTI stamp tool

I hope you’ve enjoyed this project! Be sure to check out all the awesome stamps, dies and other goodies at Pajama Crafter Stamps which is the new home of the Prickley Pear Stamps brand and the Pajama Crafter Stamps line! Keep up with news and sales by following Pajama Crafter Stamps on Facebook, Instagram and Pinterest, and join Pajama Crafter Stamps & Friends for lots of fun crafty ideas and to share your creativity! And finally, be sure to visit the Pajama Crafter Stamps blog and sign up for the newsletter to stay in touch! Thanks so much for stopping by today – we’ll see you next time! ;)

Scrappy hugs,

You’re The Flippin’ Best

Hey everybody! I’ve popped in again this morning to share a Pajama Crafter Stamps project created with the super adorable Flippin’ Best stamp set. All I can say is… cuteness overload! This is another one of the (many) projects I created prior to leaving the team at the end of February and hadn’t yet showcased. This design is an oldie but goodie ‘layered squares’ on a square card base and it’s been years since I’ve made one like this. It sure packs a punch!

I cut the square card base from CutCardStock Cougar Smooth White cardstock along with layering panels from CutCardStock Lessebo Amazon Dark Teal cardstock and Hot Off The Press Magnolia Blossoms 6×6 double-sided cardstock. I stamped the sentiment in Memento Tuxedo Black ink in the lower right corner and then stamped the penguin on Cougar Smooth White cardstock, colored him with alcohol markers, and fussy cut him to fit the center square. I arranged the squares on the card front with foam strips and added a couple dark teal gemstones.

I cut the inside panel from Cougar Smooth White cardstock and embellished it with strips cut from a coordinating Hot Off The Press Magnolia Blossoms print and the dark teal cardstock used on the front. I stamped another sentiment from the Flippin’ Best stamp set and layered the panel on dark teal cardstock.

Affiliate links are used in this post at no cost to you – I really appreciate your support!

Pajama Crafter Stamps products used:
Flippin’ Best stamp set

Other products used:
CARDSTOCK/PAPER: CutCardStock Cougar Smooth 100# White, Cougar Smooth 80# White and Lessebo Amazon Dark Teal cardstock, Hot Off The Press Magnolia Blossoms 6×6 double-sided cardstock
INK: Memento Tuxedo Black ink (pad and marker); Arteza alcohol markers- BG11/19, NG04, YR32, BR86; Sakura Clear Star Gelly Roll pen
ACCESSORIES: Fiskars 12″ ProCision Rotary Bypass Paper Trimmer, Elmer’s Craft Bond Tape Runner, Bearly Art precision craft glue, MISTI stamp tool, Big Shot, 1″ double-sided foam strip, dark teal gemstones

I hope you’ve enjoyed this project! Be sure to check out all the awesome stamps, dies and other goodies at Pajama Crafter Stamps which is the new home of the Prickley Pear Stamps brand and the Pajama Crafter Stamps line! Keep up with news and sales by following Pajama Crafter Stamps on Facebook, Instagram and Pinterest, and join Pajama Crafter Stamps & Friends for lots of fun crafty ideas and to share your creativity! And finally, be sure to visit the Pajama Crafter Stamps blog and sign up for the newsletter to stay in touch! Thanks so much for stopping by today – we’ll see you next time! ;)

Scrappy hugs,

Home Sweet Home

Hey everybody! Happy Sunday – I hope you’re having a great weekend! I’ve popped in with a Pajama Crafter Stamps project to share today created with the awesome Prickley Pear Stamps Ham Camper Summer stamps and Ham Camper die. OMGoodness, these are definitely some of my favorites because Ed and I were full-time RV’ers for several years and we sure have some good memories! This is another one of the (many) projects I created prior to leaving the PCS team at the end of February and hadn’t yet showcased. It’s a super easy design with a washi tape background, a few stamped images, and a couple brads. I totally love it!

I cut the card base and a layering panel from CutCardStock Cougar Smooth White cardstock. I added strips of Eyelet Outlet grass and wide sky washi tape to the layering panel and stamped the sentiment from the Ham Camper Summer stamps at the top. The camper, flag and flower pot (also from the Ham Camper Summer stamp set) were stamped in Memento Tuxedo Black ink on Cougar Smooth White cardstock and colored with alcohol markers. I cut the camper with the coordinating Ham Camper die and popped it up on foam strips. I fussy cut the flag and flower pot and added them to the scene along with an Eyelet Outlet sun and kitty brad. I popped up the panel on foam strips which completed the card sample.

Affiliate links are used in this post at no cost to you – I really appreciate your support!

Pajama Crafter Stamps products used:
Prickley Pear Stamps Ham Camper Summer stamps
Prickley Pear Stamps Ham Camper dies

Other products used:
Cardstock/Paper: CutCardStock Cougar Smooth 100# White cardstock
Ink: Memento Tuxedo Black ink; Arteza alcohol markers- R43, RP15, Y02, YG22, B10, GS05/09; Sakura White Gelly Roll pen
Accessories: Tonic Studios 12″ Guillotine Paper Trimmer, CutCardStock Plus High Capacity adhesive, Art Glitter Dries Clear adhesive, MISTI stamp tool, Big Shot; Eyelet Outlet Wide Sky and Grass washi tape, Sun/Cloud and Kitty Brads; 1″ double-sided foam strip

I hope you’ve enjoyed this project! Be sure to check out all the awesome stamps, dies and other goodies at Pajama Crafter Stamps which is the new home of the Prickley Pear Stamps brand and the Pajama Crafter Stamps line! Keep up with news and sales by following Pajama Crafter Stamps on Facebook, Instagram and Pinterest, and join Pajama Crafter Stamps & Friends for lots of fun crafty ideas and to share your creativity! And finally, be sure to visit the Pajama Crafter Stamps blog and sign up for the newsletter to stay in touch! Thanks so much for stopping by today – we’ll see you next time! ;)

Scrappy hugs,

Been Missing You

Hey everybody, Happy Thursday! I can’t believe how fast the weeks are flying by… we’re almost half-way through April already! I’ve popped in this afternoon with a super cute faux pull tab card to share for Pajama Crafter Stamps featuring the new Best Friends stamp set. I work ahead on my design team projects whenever possible and have quite a few for Pajama Crafter Stamps that I had created prior to leaving the team at the end of February and hadn’t showcased yet, so you’ll be seeing those coming up.

I saw this fold on Pinterest a while back and thought it would be a fun one to try, and I love how it turned out especially with this adorable pup! I don’t have any instructions for this – I just ‘guesstimated’ and made the horizontal pull tab panel about 3″ x 4-1/4″ and the card base about 3-3/4″ x 5-1/2″ so the whole card is an A2 size.

I cut the card base from CutCardStock Cougar Smooth White cardstock along with layering panels from coordinating papers in the Keep It Simple Snow Day 6×9 and 12×12 Collection Packs. I used a Stampin’ Up 1-1/4″ circle punch to punch a thumb notch in the horizontal panel. Using Spellbinders Standard Circles Large and Small dies, I cut a narrow ring from CutCardStock Kraft Chipboard which I adhered on top of some knotted jute ribbon. I stamped the sentiment and pup in Memento Tuxedo Black ink on Cougar Smooth White cardstock and colored him with alcohol markers. I fussy cut the pup and trimmed the sentiment, and added them to the card front. The finishing touch was adding a Keep It Simple Enamel Heart.

I cut the inside panel from Cougar Smooth White and embellished it with strips of the paper and chipboard used on the front. I added a stamped and trimmed sentiment and layered the panel on red paper.

Affiliate links are used in this post at no cost to you – I really appreciate your support!

Pajama Crafter Stamps products used:
My Best Friend stamp set

Other products used:
CARDSTOCK/PAPER: CutCardStock Cougar Smooth 100# White, Cougar Smooth 80# White and Kraft Chipboard; Keep It Simple Snow Day 6×9 and 12×12 Collection Packs
INK: Memento Tuxedo Black ink; Arteza alcohol markers- BR62/66
DIES/PUNCHES: Spellbinders Standard Circles Large and Small, Stampin Up 1-1/4″ Circle Punch
ACCESSORIES: Fiskars 12″ ProCision Rotary Bypass Paper Trimmer, Elmer’s Craft Bond Tape Runner, Bearly Art precision craft glue, MISTI stamp tool, Big Shot, jute ribbon from stash, Keep It Simple Crafty Girls Enamel Shapes, Scrapbook Adhesives 3D Foam Squares (small white)

I hope you’ve enjoyed this project! Be sure to check out all the awesome stamps, dies and other goodies at Pajama Crafter Stamps which is the new home of the Prickley Pear Stamps brand and the Pajama Crafter Stamps line! Keep up with news and sales by following Pajama Crafter Stamps on Facebook, Instagram and Pinterest, and join Pajama Crafter Stamps & Friends for lots of fun crafty ideas and to share your creativity! And finally, be sure to visit the Pajama Crafter Stamps blog and sign up for the newsletter to stay in touch! Thanks so much for stopping by today – we’ll see you next time! ;)

Scrappy hugs,

Mother’s Day I love you

Hey everybody! Okay, the weeks are just disappearing and this is the last Monday in February! What the heck?! I’m up on the Pajama Crafter Stamps blog today with my last inspiration project as a PCS designer. I’ve been on the Prickley Pear Stamps (now Pajama Crafter Stamps) team for almost four years and I feel like it’s time to step down and let the team of new designers shine. Since I always work ahead, I have a ton of PPS/PCS projects that were made while I was still on the team but not yet showcased on their blog, so I plan to share all of them on my blog over the next few months. It’s been a great run and I so appreciate Sharon, and now Joy, for having me along all these years! This split panel card features the gorgeous new Lovely Bouquet stamp set – I love this image and have really enjoyed creating with it. I went with a coral and green color palette and totally love how it turned out! I’ve made many split panel cards in a horizontal orientation over the years and I created this one in a vertical orientation with gatefold flaps scored and folded backwards rather than actually cutting a chunk out of the panel. I’ll be making this version of the split panel fold again for sure!

I cut a gatefold card base from Neenah Classic Crest 80# Solar White cardstock along with layering panels from coordinating papers in the Keep It Simple Ruby 12×12 Collection Pack. As mentioned above, rather than cutting a chunk out of the front flap to create the split panel, I scored each half of the gatefold and folded the flaps backwards which left a vertical split.

I stamped the front and inside sentiments and the large rose image on Solar White cardstock and colored the image with alcohol markers. I fussy cut it, adhered it to a second panel of Solar White and fussy cut it again, which yielded some nice dimension.

I trimmed the sentiment and popped it up on a foam strip. Then I added a small magnet closure (another option would be a belly band) and some gemstones from the Buttons Galore & More Pitter Patter Doo Dadz Embellishments. I added the sentiment to the inside panel along with a heart from the ephemera sheet in the Ruby Collection Pack, which completed the card.

Sharing in the following challenges:
1. https://classicdesignchallenge.blogspot.com/2024/02/classic-design-challenge-02-2024-febmar.html
2. https://craftycatzweeklychallenge.blogspot.com/2024/02/crafty-catz-challenge-666.html
3. https://inkspirationalchallenges.blogspot.com/2024/02/inkspirational-challenge-310-mood-board.html

4. https://lilredwagon.blogspot.com/2024/02/challenge-744-off-edge.html
5. https://mmmchallengeblog.blogspot.com/2024/02/220-fun-folds-any-theme.html

Affiliate links are used in this post at no cost to you – I really appreciate your support!

Pajama Crafter Stamps products used:
Lovely Bouquet stamp set

Other products used:
CARDSTOCK/PAPER: Neenah Classic Crest 80# Solar White cardstock, Keep It Simple Ruby 12×12 Collection Pack
INK: Memento Tuxedo Black ink; Arteza alcohol markers- YG14/17/54, YR37, R03/05/12/24
ACCESSORIES: Fiskars 12″ ProCision Rotary Bypass Paper Trimmer, Elmer’s Craft Bond Tape Runner, Ranger Adhesive Strips, Bearly Art precision craft glue, MISTI stamp tool, small disc magnet, Ranger Distress Collage Medium, Buttons Galore & More Pitter Patter Doo Dadz Embellishments, 1/4″ double-sided foam strip

I hope you’ve enjoyed this project! Be sure to check out all the awesome stamps, dies and other goodies at Pajama Crafter Stamps which is the new home of the Prickley Pear Stamps brand and the Pajama Crafter Stamps line! Be sure to keep up with news and sales by following us on Facebook, Instagram and Pinterest, and join Pajama Crafter Stamps & Friends for lots of fun crafty ideas and to share your creativity! And finally, we’d love for you to visit the Pajama Crafter Stamps blog and sign up for our newsletter to stay in touch! Thanks so much for stopping by today – we’ll see you next time! ;)

Scrappy hugs,

fly with me

Hey everybody! Happy Monday! I hope you were able to do something fun this past weekend! I’m up on the Pajama Crafter Stamps blog today with a vintage-inspired project featuring the Prickley Pear Stamps Hot Air Balloons stamp set and coordinating Hot Air Balloon die! I stenciled a cloud background on the front panel using antique linen distress ink for the hot air balloon and biplane to soar!

The card base and a layering panel were cut from CutCardStock Basis 80# Natural cardstock. Using the My Favorite Things Mini Cloud Edges Stencil, a blending brush and Ranger antique linen distress ink, I inked the entire layering panel. I gave it good cloud coverage, making it lighter and darker in random areas, and then adhered it to the card base.

I stamped the balloon from the Hot Air Balloons stamp set in Memento Espresso Truffle ink on two papers in the Keep It Simple Scandinavian Christmas Cardstock Pack and cut them both with the coordinating Hot Air Balloon die. I cut the basket off the blue one and adhered it to the red plaid balloon and adhered it to the card front. I stamped the sentiment and biplane in Memento Espresso Truffle ink on scrap pieces of Basis Natural and colored the image with alcohol markers. I fussy cut them both and adhered them to the card front, which completed the project.

Sharing in the following challenges:
1. https://aperfecttimetocraft.blogspot.com/2024/02/a-perfect-time-to-craft-open-challenge.html

Affiliate links are used in this post at no cost to you – I really appreciate your support!

Pajama Crafter Stamps products used:
Prickley Pear Stamps Hot Air Balloons stamps
Prickley Pear Stamps Hot Air Balloon die

Other products used:
Cardstock/Paper: CutCardStock Basis 80# Natural cardstock, Keep It Simple Scandinavian Christmas Cardstock Pack
Ink: Ranger antique linen distress ink, Memento Espresso Truffle ink; Arteza alcohol markers- R20, B32, BR62
Accessories: Tonic Studios 12″ Guillotine Paper Trimmer, My Favorite Things Mini Cloud Edges Stencil, blending brush, Tombow Mono permanent adhesive, Art Glitter Dries Clear adhesive, MISTI stamp tool, Big Shot

I hope you’ve enjoyed this project! Be sure to check out all the awesome stamps, dies and other goodies at Pajama Crafter Stamps which is the new home of the Prickley Pear Stamps brand and the Pajama Crafter Stamps line! Be sure to keep up with news and sales by following us on Facebook, Instagram and Pinterest, and join Pajama Crafter Stamps & Friends for lots of fun crafty ideas and to share your creativity! And finally, we’d love for you to visit the Pajama Crafter Stamps blog and sign up for our newsletter to stay in touch! Thanks so much for stopping by today – we’ll see you next time! ;)

Scrappy hugs,

Happy Mother’s Day fun fold

Hey everybody! Happy Thursday – I hope you’re having a great week! The weekend is almost here and I hope you are tolerating the cold weather coming from this arctic blast for the second year in a row! Dang it, Mother Nature! I’d like to invite you to join Pajama Crafter Stamps for our “Sunny Days Ahead” Insta-Hop! Our team has created some amazing projects featuring sunny skies and spring delights. The hop starts today on the Pajama Crafter Stamps Instagram page where you’ll find the complete hop list. By following and leaving comments or likes at all the stops on the hop, you’ll be in the running for one of two $10 gift cards from Pajama Crafter Stamps! Two random winners will be chosen from all comments and likes left by 11:59 PM EST on February 15th and announced on the Pajama Crafter Stamps Instagram and Facebook pages on February 17th.

I created a pretty Mother’s Day pop out gatefold featuring the gorgeous Lovely Bouquet stamp set from our new release! OMGoodness, this stamp set is beyond wonderful and is a delight to create with! My inspiration for this fun fold came from Sandie on the Stampingbella blog. I made one of these several months ago in a 5″ x 7″ size per Sandie’s tutorial HERE, so I reworked the measurements and made this one in an A2 size. It’s definitely a fun one!

I cut the card base from CutCardStock Cougar Smooth White cardstock along with coordinating papers in the Keep It Simple Rose 12×12 Collection Pack. I stamped the front and inside sentiments, the large rose image, and two single roses and leaves on Cougar Smooth and colored the images with alcohol markers. I fussy cut the images and leaves, and trimmed the sentiments and layered them on scrap papers from the Rose Collection Pack.

As with all fun fold projects, the assembly is always the most fun! I popped the two single roses and leaves up on foam strips on the card front on each side of the sentiment. I added a tiny disc magnet under the right side of the sentiment to keep the card closed. Another option would be to create a belly band which I might do the next time. I cut a portion of the large image off and lined it up on the right side of the center panel on the inside. I added another sentiment which completed the project.

Sharing in the following challenges:
1. https://avenue613.blogspot.com/2024/02/february-2024-anything-goes-w-optional.html
2. https://aperfecttimetocraft.blogspot.com/2024/02/a-perfect-time-to-craft-open-challenge.html
3. https://cardsgalorechallenges.blogspot.com/2024/02/february-2024-crafts-galore-encore.html
4. https://secretstamper.com/2024/02/anything-goes-with-a-fun-fold-for-creative-creases-75/
5. https://scrapping4funchallenges.blogspot.com/2024/02/february-2024-anything-goes.html
6. https://cinspirations.blogspot.com/2024/02/february-challenge-for-someone-you-love.html

Affiliate links are used in this post at no cost to you – I really appreciate your support!

Pajama Crafter Stamps products used:
Lovely Bouquet stamp set

Other products used:
CARDSTOCK/PAPER: CutCardStock Cougar 80# Smooth White cardstock, Keep It Simple Rose 12×12 Collection Pack
INK: Memento Tuxedo Black ink; Arteza alcohol markers- YG04/10/12/46/48, RP16, R24/25, BG57, P27
ACCESSORIES: Fiskars 12″ ProCision Rotary Bypass Paper Trimmer, Fiskars 12″ SureCut Paper Trimmer, Elmer’s Craft Bond Tape Runner, Ranger Distress Collage Medium, Bearly Art precision craft glue, MISTI stamp tool, Eyelet Outlet 5mm pink pearls, tiny disc magnet, 1″ double-sided foam strip

I hope you’ve enjoyed this project! Be sure to check out all the awesome stamps, dies and other goodies at Pajama Crafter Stamps which is the new home of the Prickley Pear Stamps brand and the Pajama Crafter Stamps line! Be sure to keep up with news and sales by following us on Facebook, Instagram and Pinterest, and join Pajama Crafter Stamps & Friends for lots of fun crafty ideas and to share your creativity! And finally, we’d love for you to visit the Pajama Crafter Stamps blog and sign up for our newsletter to stay in touch! Thanks so much for stopping by today – we’ll see you next time! ;)

Scrappy hugs,