Congrats fun fold

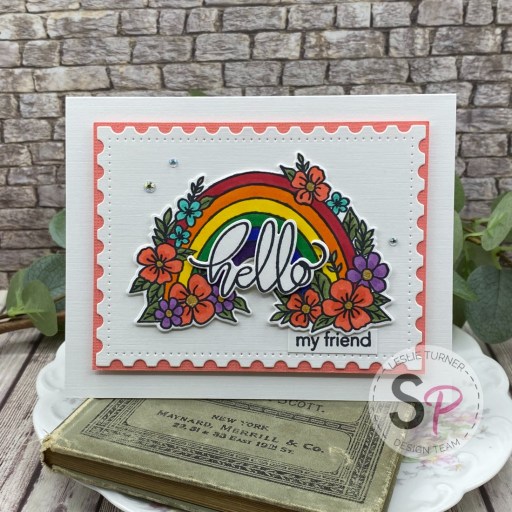
Hey everybody, happy Thursday! I hope you’re having a great week! I’m thrilled to share a Scrapbook Pal DT inspiration project with you today created with the Altenew Mini Delight: A Floral Congrats stamps and dies. I love florals and I love fun folds, so getting to share this tri-fold hidden door fun fold with you is definitely a win-win! All of the Altenew Mini Delight bundles are amazing and these stamps and dies are no exception. They sure make some beautiful projects! I saw this fun fold on Pinterest and it led me to several different videos so it’s an easy one to find.

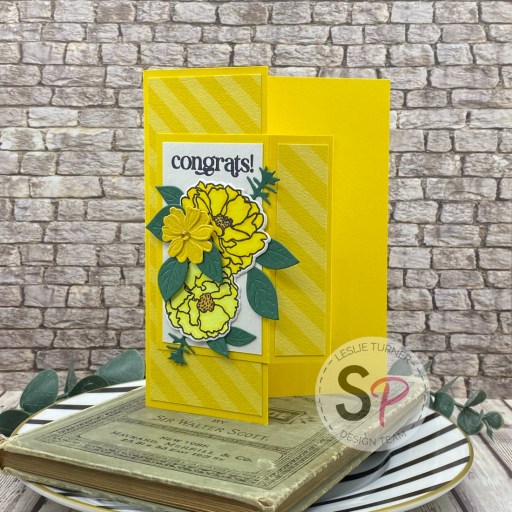
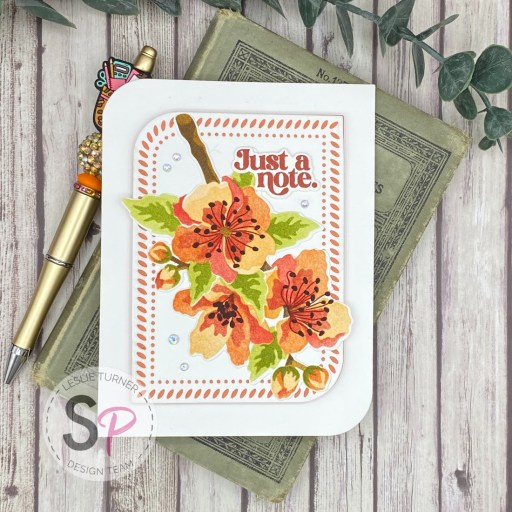
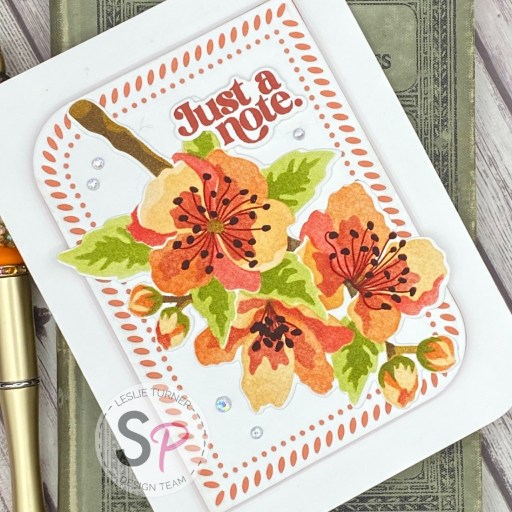
I cut the card base and panel from CutCardStock Lessebo Sunflower Yellow cardstock, along with layering panels from CutCardStock Basis White and a diagonal striped print from the Keep It Simple Back To Basics Lemon 12×12 Collection Pack. I stamped the double floral image from the Altenew Mini Delight: A Floral Congrats stamp set twice on Neenah Classic Crest Solar White cardstock, colored them with Copic Ciao markers, and cut them with the coordinating die.

Using the floral and leaves dies in the Altenew Mini Delight: A Floral Congrats die set, I die cut several flowers and some greenery from papers in the KIS Lemon Collection Pack and CutCardStock Lessebo Hunter Green cardstock which I used to embellish several of the panels. I stamped sentiments from the same stamp set in black ink. The finishing touch was adding a small yellow gemstone to the center of each flower.

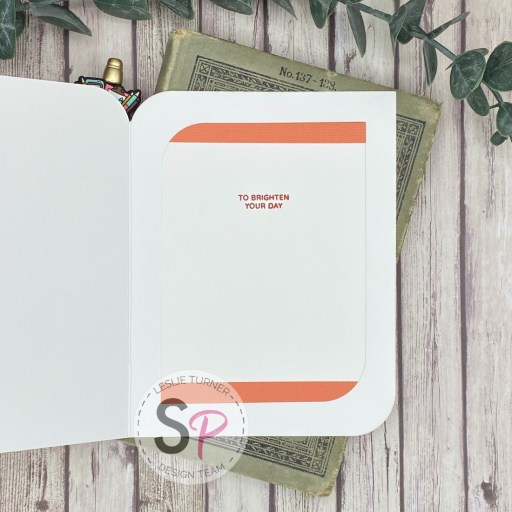
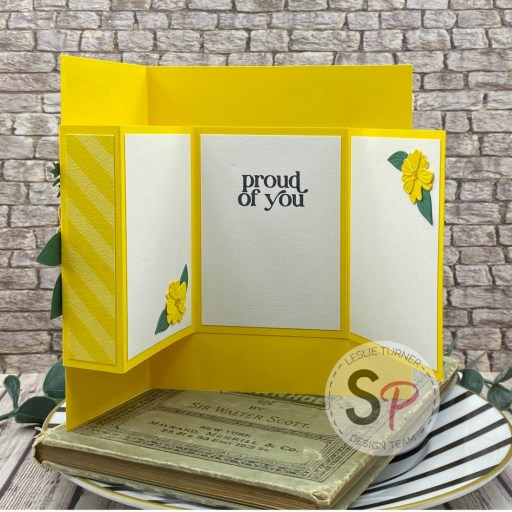
I stamped an additional sentiment from the same stamp set in black ink on the hidden panel inside, and embellished the panels on each side of that with die cut flowers.

Affiliate links are used in this post at no cost to you – I really appreciate your support!

Scrapbook Pal products used:
Altenew Mini Delight: A Floral Congrats stamps and dies
Memento Tuxedo Black ink
Mini MISTI
Copic Ciao Pale Lemon Y000
Copic Ciao Canary Yellow Y02
Copic Ciao Acid Yellow Y08
Copic Ciao Yellow Ochre YR23
My Sweet Petunia Glue Press
Bearly Art precision craft glue
Scrapbook Adhesives Thin 3D Foam Squares White

Other products used:
CARDSTOCK/PAPER: CutCardStock Lessebo Sunflower Yellow, Lessebo Hunter Green and Basis 80# White cardstock, Neenah Classic Crest 110# Solar White cardstock, Keep It Simple Back To Basics Lemon 12×12 Collection Pack
ACCESSORIES: Fiskars 12″ ProCision Rotary Bypass Paper Trimmer, Big Shot, yellow gemstones

I hope you’ve enjoyed this project and you’re inspired to get your craft on! Be sure to check out the awesome array of craft supplies in the Scrapbook Pal store… the selection is amazing! And head over to the Scrapbook Pal FacebookPinterest and Instagram pages for more design team inspiration! And if you haven’t yet subscribed to our YouTube Channel, be sure to do that, too, for tons of hands-on crafty inspiration! Thanks so much for stopping by today – we’ll see you next time! 

Scrappy hugs,

hello my friend

Hey everybody, happy Wednesday! Can you believe we’re already to the middle of January?! I hope it’s not too cold where you are – it’ll be a minute before Spring arrives! I’m up on the Scrapbook Pal blog today sharing a tutorial for making a clean and simple friendship card featuring the Hero Arts Floral Rainbow and Clouds Clear Stamps & Dies. I totally love color. I am all about rainbows and pretty rainbow colors, and the brighter the colors are, the better I love them! So you can imagine how much I enjoyed using these products. Hero Arts never disappoints!

I started by stamping the focal image from the Hero Arts Floral Rainbow and Clouds Clear Stamps on Neenah Classic Crest Solar White cardstock in Memento Tuxedo Black ink. I colored it with a variety of Copic Ciao alcohol markers and then cut it with the coordinating die. Next, I cut the card base from Neenah Classic Linen 100# Solar White cardstock along with a layering panel which I cut with a Pinkfresh Studio Postage Edge Nested Rectangle die. I cut a slightly larger panel from CutCardStock Wild Salmon which I adhered beneath the postage edge panel and then adhered the panel to the card front on foam strips. I adhered the focal image along with sentiments (from the same stamp set) to the layered panel with foam squares. The finishing touch was adding a few iridescent gemstones.

I cut the inside panel from Solar White cardstock, stamped the sentiment and flower in black ink, and layered the panel on the salmon cardstock.

Affiliate links are used in this post at no cost to you – I really appreciate your support!

Scrapbook Pal products used:
Hero Arts Floral Rainbow and Clouds Clear Stamps & Dies
Memento Tuxedo Black ink
Mini MISTI
Copic Ciao B18 Lapis Lauzuli
Copic Ciao BG23 Coral Sea
Copic Ciao G05 Emerald Green
Copic Ciao G94 Grayish Olive
Copic Ciao R14 Light Rouge
Copic Ciao R29 Lipstick Red
Copic Ciao Y08 Acid Yellow
Copic Ciao YR23 Yellow Ochre
Copic Ciao YR68 Orange
Copic Ciao V09 Violet
Copic Ciao V15 Mallow
Pinkfresh Studio Postage Edge Nested Dies
My Sweet Petunia Glue Press
Bearly Art precision craft glue
Scrapbook Adhesives Thin 3D Foam Squares White
Scrapbook Adhesives Crafty Foam Tape 54 ft

Other products used:
CARDSTOCK/PAPER: Neenah Classic Linen 100# Solar White cardstock, Neenah Classic Crest 80# Solar White cardstock, CutCardStock Wild Salmon cardstock
INK: Sakura Clear Star Gelly Roll pen
ACCESSORIES: Fiskars 12″ ProCision Rotary Bypass Paper Trimmer, Big Shot, iridescent gemstones

I hope you’ve enjoyed this project and you’re inspired to get your craft on! Be sure to check out the awesome array of craft supplies in the Scrapbook Pal store… the selection is amazing! And head over to the Scrapbook Pal FacebookPinterest and Instagram pages for more design team inspiration! And if you haven’t yet subscribed to our YouTube Channel, be sure to do that, too, for tons of hands-on crafty inspiration! Thanks so much for stopping by today – we’ll see you next time! 

Scrappy hugs,

Wishing You A Very Merry Christmas

Hey everybody, I hope you’re having a great day! I’m delighted to share a Scrapbook Pal DT inspiration project created with some super fun Lawn Fawn products which are all available on the Scrapbook Pal website. I used the Shutter Card dies, Shutter Card Add-On dies, Scalloped Circle Gift Tag dies, and White Hemp Twine. Now how’s that for one-stop shopping, lol?! I’ve made several shutter cards over the years, all with hand-cut pieces, and when I discovered these Lawn Fawn dies, I knew those days of hand-cutting the shutter card pieces were over. Dang, what a game-changer!

Using the Lawn Fawn Shutter Card dies, Shutter Card Add-On dies and Scalloped Circle Gift Tag dies, I cut the card and belly band pieces from CutCardStock Basis White and Pop Tone Red Hot Cardstock. Then I cut the layering pieces from coordinating prints in the Traci Vanover Designs Peppermint Christmas 6×6 paper pad.

This awesome paper pad also has sheets of ephemera so I fussy cut some for the front and inside. I also added a white twine bow (created from Lawn Fawn Trimmings White Hemp Twin) and some red gemstones to the element on the belly band which completed the project. Here is a shot of the shutter opening…

And here is the shutter completely open to see that fun sentiment cut from the ephemera sheet in the paper pad! ;)

Affiliate links are used in this post at no cost to you – I really appreciate your support!

Scrapbook Pal products used:
Lawn Fawn Shutter Card dies
Lawn Fawn Shutter Card Add-On dies
Lawn Fawn Scalloped Circle Gift Tag dies
Lawn Fawn Trimmings White Hemp Twine
My Sweet Petunia Glue Press
Bearly Art precision craft glue
Scrapbook Adhesives Thin 3D Foam Squares White

Other products used:
CARDSTOCK/PAPER: CutCardStock Basis White and Pop Tone Red Hot cardstock, Traci Vanover Designs Peppermint Christmas 6×6 paper pad
ACCESSORIES: Fiskars 12″ ProCision Rotary Bypass Paper Trimmer, Big Shot, small wooden bow maker, iridescent gemstones

I hope you’ve enjoyed this project and you’re inspired to get your craft on! Be sure to check out the awesome array of craft supplies in the Scrapbook Pal store… the selection is amazing! And head over to the Scrapbook Pal FacebookPinterest and Instagram pages for more design team inspiration! And if you haven’t yet subscribed to our YouTube Channel, be sure to do that, too, for tons of hands-on crafty inspiration! Thanks so much for stopping by today – we’ll see you next time! 

Scrappy hugs,

Just a Note

Hey everybody! Well, we’re almost to the middle of December already and you know what that means… Christmas will be here in the blink of an eye! I hope you’re not too busy to enjoy this beautiful season. I’m up on the Scrapbook Pal blog today sharing a tutorial for making a pretty friendship card using the amazing Altenew Dynamic Duo: Blooming Branch & Add-On Die Bundle. OMGoodness, these stencils, stamps and dies are so awesome and make THE most beautiful projects!

I started by creating the focal image on Savoy Cotton Brilliant White cardstock using the stencils in the Altenew Blooming Branch Bundle, my MISTI, a MISTI Sticky Sheet and a variety of Ranger distress inks. I stamped the details on the blooms and then cut the image using the add-on dies in the bundle. Using dies in the Pinkfresh Studio Rounded & Braided Rectangles dies, I cut the card base from Neenah Classic Linen 100# Solar White along with layering panels from 80# Solar White Linen and CutCardStock Peach cardstock.

I popped the smaller panel up on the card base with Scrapbook Adhesives Crafty Foam Tape and adhered the focal image. I stamped the sentiment from the same stamp set on a scrap piece of Neenah Classic Crest Solar White using my Mini MISTI, cut it with the coordinating die in the bundle and popped it up with a couple Scrapbook Adhesives Thin 3D Foam Squares. The finishing touch was adding a few iridescent gemstones to the card front.

Using the same Pinkfresh Studio Rounded & Braided Rectangles die set, I cut an inside panel from 80# Solar White cardstock and embellished it with two strips cut from Peach cardstock scraps. I stamped another sentiment from the bundle on the Mini MISTI which completed the card.

Affiliate links are used in this post at no cost to you – I really appreciate your support!

Scrapbook Pal products used:
Altenew Dynamic Duo: Blooming Branch & Add-On Die Bundle
MISTI sticky mats
MISTI original
Ranger tiny blending tools
Ranger tiny blending foams
Ranger dried marigold distress ink
Ranger rusty hinge distress ink
Ranger crackling campfire distress ink
Ranger barn door distress ink
Ranger fired brick distress ink
Ranger shabby shutters distress ink
Ranger peeled paint distress ink
Ranger brushed corduroy distress ink
Ranger walnut stain distress ink
Ranger ground espresso distress ink
Pinkfresh Studio Rounded & Braided Rectangles dies
Spellbinders 5/8” Best Ever Craft Tape
My Sweet Petunia Glue Press
Bearly Art precision craft glue
Scrapbook Adhesives Crafty Foam Tape 54 ft
Mini MISTI
Scrapbook Adhesives Thin 3D Foam Squares White

Other products used:
CARDSTOCK/PAPER: Savoy Cotton Brilliant White cardstock, Neenah Classic Linen 100# Solar White cardstock, CutCardStock Peach cardstock, Neenah Classic Crest 80# Solar White cardstock
ACCESSORIES: Fiskars 12″ ProCision Rotary Bypass Paper Trimmer, Big Shot, iridescent gemstones

I hope you’ve enjoyed this project and you’re inspired to get your craft on! Be sure to check out the awesome array of craft supplies in the Scrapbook Pal store… the selection is amazing! And head over to the Scrapbook Pal FacebookPinterest and Instagram pages for more design team inspiration! And if you haven’t yet subscribed to our YouTube Channel, be sure to do that, too, for tons of hands-on crafty inspiration! Thanks so much for stopping by today – we’ll see you next time! 

Scrappy hugs,

Your kindness makes a difference

Hey everybody, happy Wednesday! I hope your week is going along nicely. I’m up on the Scrapbook Pal blog today sharing a tutorial for creating a side accordion panel card. It’s only fitting that I’m featuring one of my all-time favorite fun folds as my debut project for this new design team! I couldn’t be more excited about this opportunity – it’s definitely a dream come true! I used the absolutely gorgeous Pinkfresh Studio Kindness in Bloom stamps, stencils and dies, and love how this card turned out. What a stunning suite of products, and I know you’re going to love them, too!

I started by stamping all the images in the Pinkfresh Studio Kindness in Bloom stamp set in Memento Tuxedo Black ink on Solar White cardstock. I used Ranger speckled egg and antique linen distress inks along with Ranger vintage photo distress spritz with the Kindness in Bloom stencils to give the images some color. I cut them with the coordinating Kindness in Bloom dies and set them aside.

I cut the card base and folded panel from CutCardStock Basis Aqua cardstock along with layering panels from Neenah Classic Linen Gold Pearl cardstock and Doodlebug Design Buffalo Check-Wood Grain and Swiss Dot Rainbow Petite Prints 6×6 double-sided papers.

I adhered the layers together and assembled the card.

Next, I added the stamped images and front and inside sentiments. The finishing touch was adding a few white pearls to the card front.

Affiliate links are used in this post at no cost to you – I really appreciate your support!

Scrapbook Pal products used:
Pinkfresh Studio Kindness in Bloom stamp set
Pinkfresh Studio Kindness in Bloom stencils
Pinkfresh Studio Kindness in Bloom die set
Memento Tuxedo Black ink
MISTI stamp tool
Ranger-Wendy Vecchi Make Art Stay-tion 7”
Ranger distress tiny blending tools
Ranger distress tiny blending foams
Ranger speckled egg distress ink
Ranger antique linen distress ink
Ranger vintage photo distress spritz
My Sweet Petunia Glue Press
Bearly Art precision craft glue
Scrapbook Adhesives Thin 3D Foam Squares White

Other products used:
CARDSTOCK/PAPER: CutCardStock Basis Aqua cardstock, Neenah Classic Linen Gold Pearl cardstock, Neenah Classic Crest 80# Solar White cardstock, Doodlebug Design Buffalo Check-Wood Grain and Swiss Dot Rainbow Petite Prints 6×6 double-sided papers
ACCESSORIES: Fiskars 12″ ProCision Rotary Bypass Paper, Big Shot, Darice small white pearls

I hope you’ve enjoyed this project and you’re inspired to get your craft on! Be sure to check out the awesome array of craft supplies in the Scrapbook Pal store… the selection is amazing! And head over to the Scrapbook Pal FacebookPinterest and Instagram pages for more design team inspiration! And if you haven’t yet subscribed to our YouTube Channel, be sure to do that, too, for tons of hands-on crafty inspiration! Thanks so much for stopping by today – we’ll see you next time! 

Scrappy hugs,