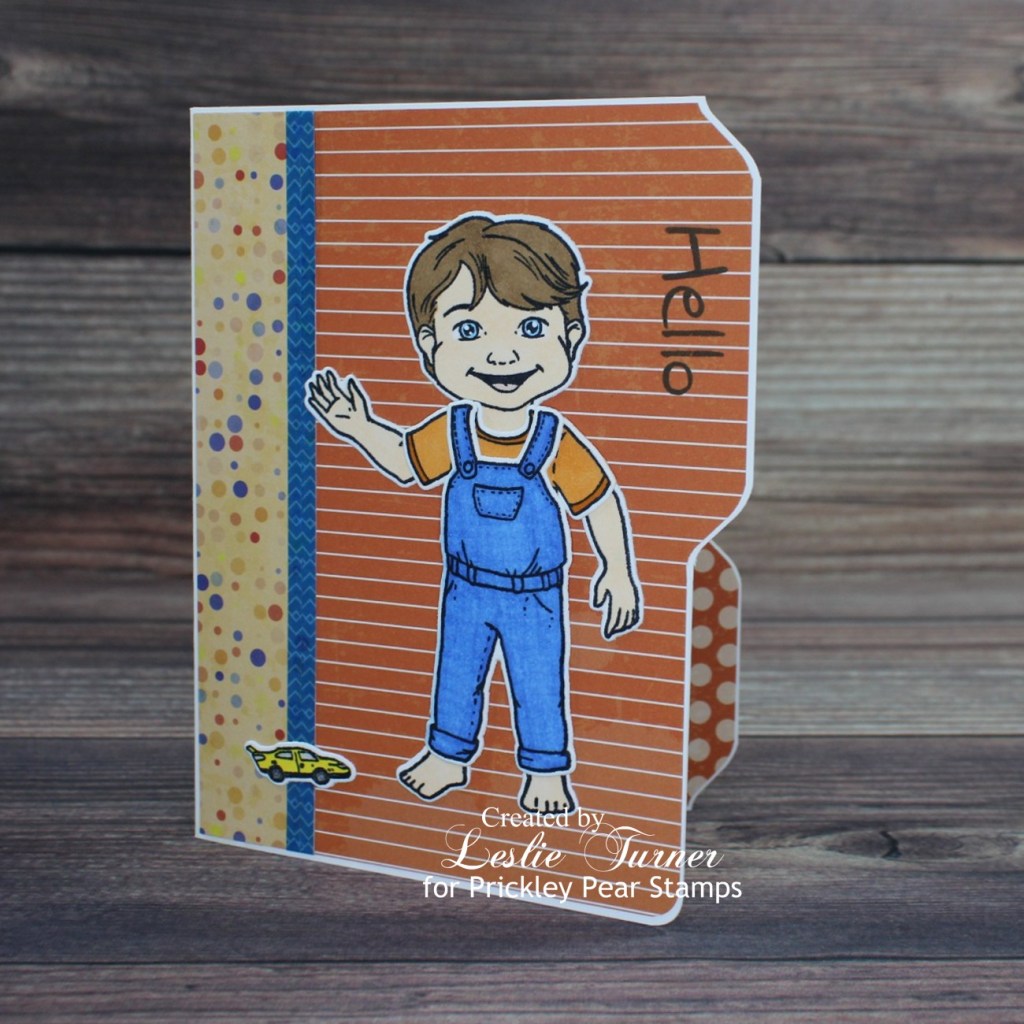
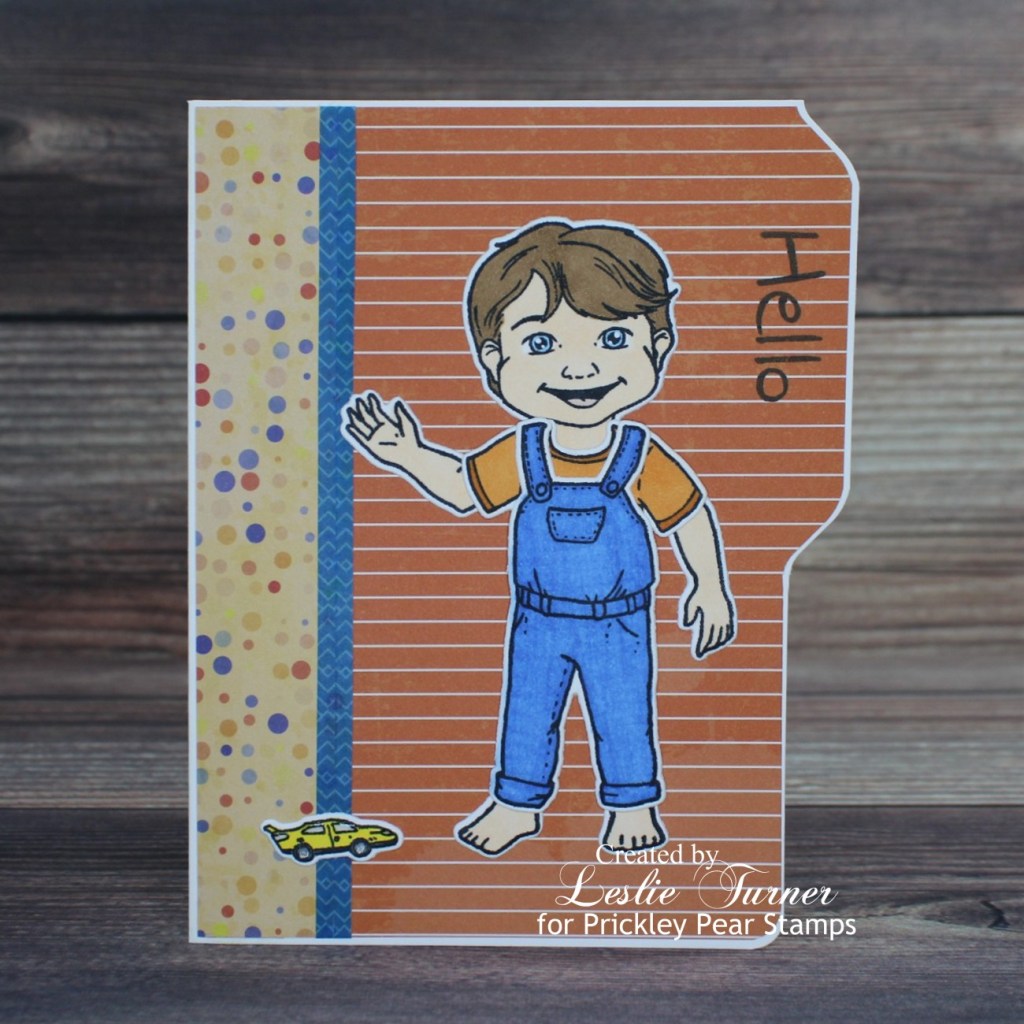
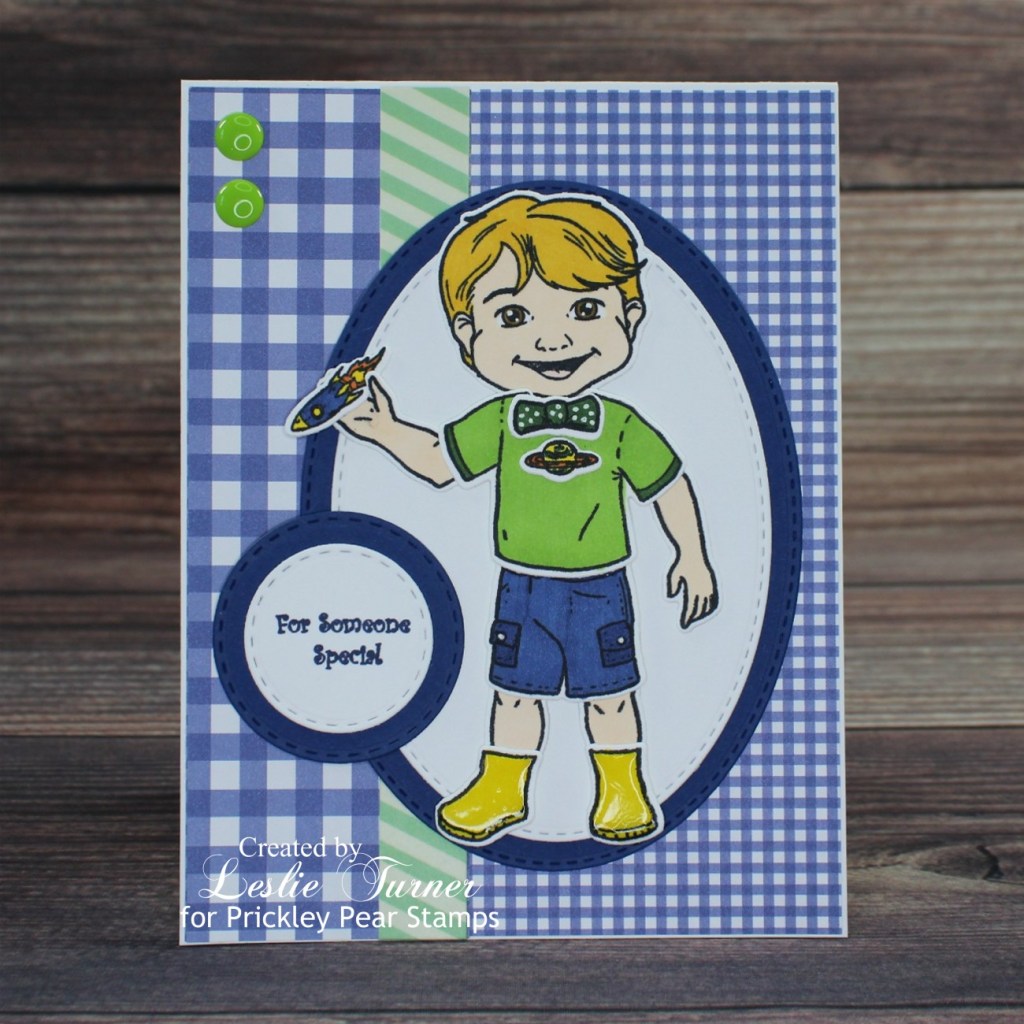
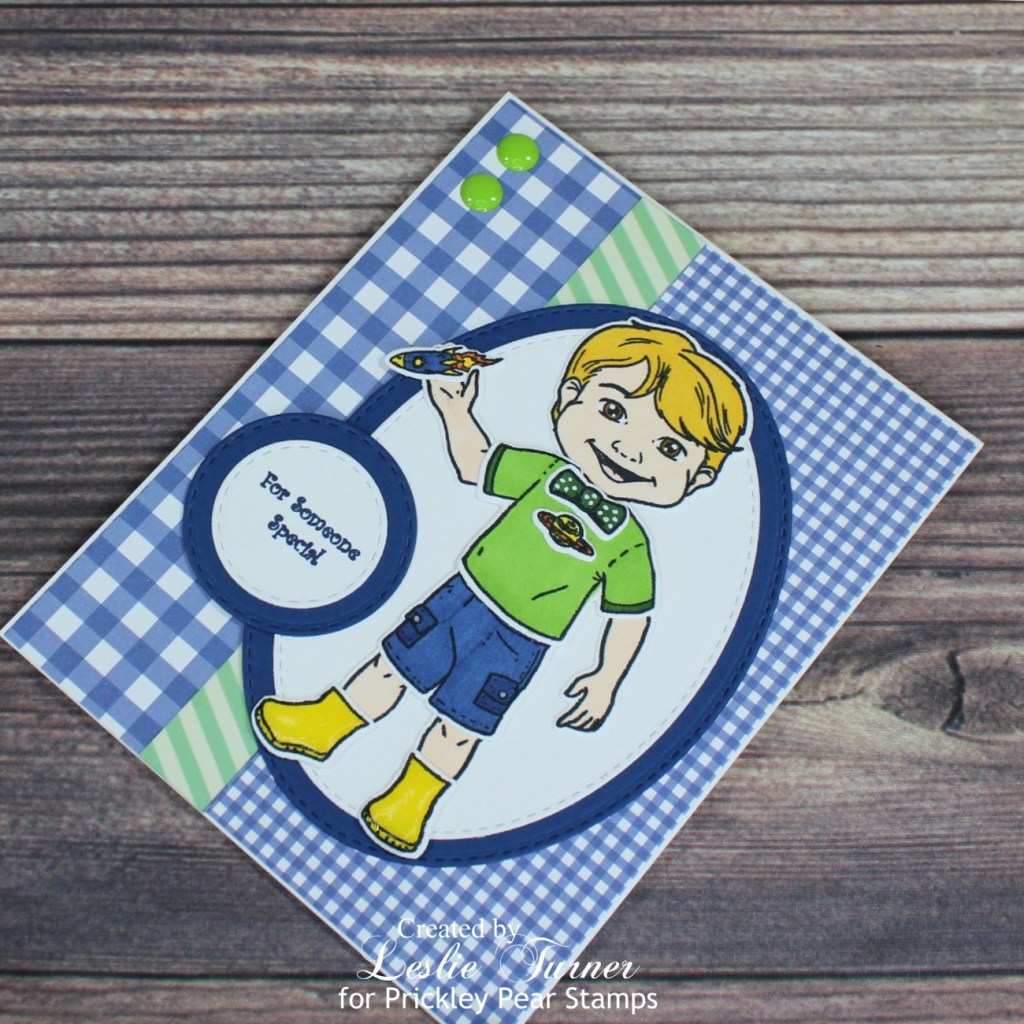
Hi fun fold

Howdy peeps! I hope your week is off to a great start! I have a kitten update which I’ll keep short: We took our little guy, Fogg, to the vet yesterday where he’ll likely stay for a couple days. The vet feels like overall he has a slightly better chance of survival than his sister (Stormie) had, so all we can do is continue to pray. We sure would appreciate some prayers from you all if you are the praying type. <3 Affiliate links are used in this post at no cost to you – I really appreciate your support! I have another card to share this morning that I created from the Jack and Lily Collection, which is the newest release over at Prickley Pear Stamps! Isn’t Lily adorable?! The Jack and Lily characters were created in the likeness of the owers’ real-life grandkids. And you know me and fun folds… I can’t get enough of them! I thought this teepee card showcased Lily perfectly with the pastel colors!

I cut the teepee card base from Neenah Classic Crest Solar White 110# cardstock along with layering panels from Papertrey Ink Green Parakeet cardstock and My Favorite Things Sweet Celebration and Hot Off The Press Sweet Pea patterned papers. I assembled the card base, adhered the cardstock and patterned paper layers, and added a magnet closure. Using the Hello Lily stamp set, I stamped Lily and her clothing and other elements on Neenah Classic Crest Solar White 80# cardstock, colored them with alcohol markers (and added Ranger Glossy Accents to her rain boots), and cut them with the coordinating Hello Lily die set. I created a rosette with the Tim Holtz Alterations Mini Paper Rosettes die and stamped the Hi sentiment on the center circle. I created the birthday sentiment on the computer and printed it on white cardstock, trimmed it and adhered it to the back panel. I adhered Lily to a plain die cut and then adhered her and the rosette to the front of the card. I added gemstones from the Trinity Stamps Andradite Sparkle Embellishment Mix and Trinity Stamps Morganite Muse Embellishment Mix using the Trinity Pick-Up Stick to complete the card.

Here’s one more look at the card folded flat for mailing. I so love how this turned out! I can only imagine how adorable this child is in real life!

Sharing in the following challenges:
1. A Bit More Time To Craft Challenge: November/December – Anything Goes
2. Addicted To Stamps & More: #418 – Birthdays
3. Alphabet Challenge Blog: P is for Patterned Paper
4. Crafty Catz: #572 – Anything Goes with optional Sparkle and Shine
5. Creative Creases: #19 – Anything Goes with a Fun Fold
6. Lemon Shortbread Challenge Blog: #158 – Anything Goes
7. Pammie’s Inky Pinkies Challenges: #2146 – Anything Goes
8. QKR Stampede: #432 – Anything Goes
9. The Creative Crafters: #46 – Anything Goes
10. World Wide Open Design Team Monthly Challenge: #11 – Anything Goes

Prickley Pear Stamps products used:
Hello Lily stamp set
Hello Lily die set

Other products used:
Cardstock/Paper: Neenah Classic Crest 110# and 80# Solar White cardstock, Papertrey Ink Green Parakeet cardstock, My Favorite Things Sweet Celebration 6×6 paper pack, Hot Off The Press Sweet Pea double-sided 6×6 papers
Ink: Memento Tuxedo Black ink; Arteza alcohol markers- RP15/16, YG06, B17, BR08/28/84; Spectrum Noir Crystal Clear Sparkle overlay marker, Sakura White Gelly Roll pen
Dies/Punches: Tim Holtz Alterations Mini Paper Rosettes die, Stampin’ Up 1/2″ Circle Punch
Accessories: Tonic Studios 12″ Guillotine Paper Trimmer, MISTI stamp tool, Big Shot, Bearly Art precision craft glue, round magnet, Ranger Glossy Accents, Darice Double-Sided Adhesive Foam Circles, Trinity Stamps Andradite Sparkle Embellishment Mix, Trinity Stamps Morganite Muse Embellishment Mix, Trinity Pick-Up Stick, Ranger Distress Collage Medium

I hope you’ve enjoyed this project! Be sure to check out all the awesome stamps and dies at Prickley Pear Stamps! If you’d like to save 10% on anything on the site when you shop at Prickley Pear Stamps, use the coupon code LESLIE10 at checkout! And be sure to ‘like’ and ‘follow’ the Prickley Pear Stamps Facebook page to keep up with news and sales, and join Prickley Pear Pals (the fan group) for lots of fun crafty ideas and to share your creativity! And finally, we’d love to see you visit the Prickley Pear Stamps blog that’s in the process of being revived and become a Follower! Hope to see you there! Thanks so much for stopping by today – we’ll see you next time! ;)

Scrappy hugs,
lesliesig

Do I really need more shoes?!

Hey, everybody! Well, another weekend has come and gone, and here we are facing Monday again! But that’s okay as far as I’m concerned… a crafty day is a good day, and it doesn’t matter what day of the week it is! I’m thrilled to be back on the Clear Scraps blog today with another awesome DT inspiration project! Those who know me know that I am passionate about two things: (1) fun folds and (2) shoes! ;) Well, actually three things: (1) cats – we rescue, (2) fun folds and (3) shoes! When I married my kids’ dad many moons ago, I had nearly 60 pairs and he just couldn’t understand it, lol! I don’t have nearly that many now but I still reminisce about the good ol’ days when I had a pair in every color imaginable to coordinate with every outfit. So out came the Acrylic Tag Album to document those memories! This was a fun project!

I cut different colors and patterns of paper for every page, hand-cut in a whimsical fashion, leaving just a tad bit of the clear acrylic showing on all edges. I die cut labels and stitched ovals for each page and layered the white stitched ovals on the label die cuts. I stamped different shoes (including boots and flip flops) with sentiments on the ovals and colored them with alcohol markers to coordinate with the patterned paper on that page. I created hole reinforcements with two circle punches and tied the pages together with purple wrinkled ribbon embellished with a shoe charm from my stash. I added tiny iridescent gemstones to each page to finish the album.

One more look… so loving how this turned out! Great selection of shoes, boots and flip flops – had to cover all bases, lol!

Sharing in the following challenges:
1. 613 Avenue Create: #11 – Anything Goes with optional twist of Thanks/Thankfulness
2. A Bit More Time To Craft Challenge: November/December – Anything Goes
3. A Place To Start: #11 – Craft A Favorite Memory (having lots of shoes back in the day!)
4. Classic Design Challenge Blog: #11 November – Anything Goes
5. Jan’s Digi Stamps Challenges: November – Anything Goes
6. Lemon Shortbread Challenge Blog: #158 – Anything Goes
7. Pammie’s Inky Pinkies Challenges: #2146 – Anything Goes
8. QKR Stampede: #432 – Anything Goes
9. The Creative Crafters: #46 – Anything Goes
10. World Wide Open Design Team Monthly Challenge: #11 – Anything Goes

Clear Scraps products used:
Acrylic Tag Album

Other products used:
Cardstock/Paper: CutCardStock Basis Dark Purple, Basis Magenta, Basis Gold, Basis Teal, Basis Blue, Basis Green, Pop-Tone Tangy Orange, Pop-Tone Gumdrop Green cardstock, Neenah Classic Crest Solar White cardstock, K & Co. Essentials Dark Designer Paper Pad
Stamps: STAMPlorations A Girl and Her Shoes stamp set, Paper Pretties Sassy Shoes stamp set, Great Impressions Hanging Flip Flops and Right Flip Flop rubber stamps
Ink: Memento Tuxedo Black ink (pad and marker), Versamark Dazzle; Arteza alcohol markers- YG25, G36/38, B17, BR68, Y03/22/25/33, YR00, R21, BG23/29
Dies/Punches: Spellbinders Labels Twenty-Five, Memory Box Stitched Oval Layers, Stampin’ Up 1/4″ and 1/2″ Circle Punches
Accessories: MISTI stamp tool, Big Shot, Bearly Art precision craft glue, Ranger Sticky Embossing Powder, Stampin’ Up Dazzling Diamonds Glitter, Prairie Bird Boutique wrinkled purple ribbon, shoe charm and rings from stash, Stampin’ Up Mini Dimensionals, ScraPerfect iridescent gemstones, Trinity Pick-Up Stick

I hope you’ve enjoyed today’s project and you’re inspired to get those craft supplies out to play! Be sure to check out all the amazing acrylic, wood and chipboard goodies at Clear Scraps… OMGoodness, you won’t be disappointed! And head on over to the Clear Scraps Facebook Page for lots of inspiration! And while you’re at it, join the Clear Scraps Facebook Creative Group to connect with other Clear Scraps fans! Thanks so much for stopping by today – we’ll see you next time!

Scrappy hugs,
lesliesig

Wish Big

Hi friends! I hope you’re having a great weekend. We are having issues with our two latest 10-week-old kitten rescues – we lost our baby girl night before last and then last night our baby boy stopped eating/drinking and started wheezing. We’re praying that it’s just a respiratory thing that will go away with an antibiotic. I typically don’t post sad stuff but I am having a really hard time with this. If you are the praying type, we’d appreciate some prayers for our little guy now. Please and thank you. <3 Affiliate links are used in this post at no cost to you – I really appreciate your support! I’ve popped in to share another sample I created for the Prickley Pear Stamps new release called the Jack and Lily Collection which was created after the owners’ grandkids. I used the Hello Lily stamp set and coordinating Hello Lily die set to create this adorable birthday card in a fun file folder style. File folder cards are super easy to create with a WRMK Envelope Punch Board, Fiskars 12″ SureCut Paper Trimmer and a corner rounder.

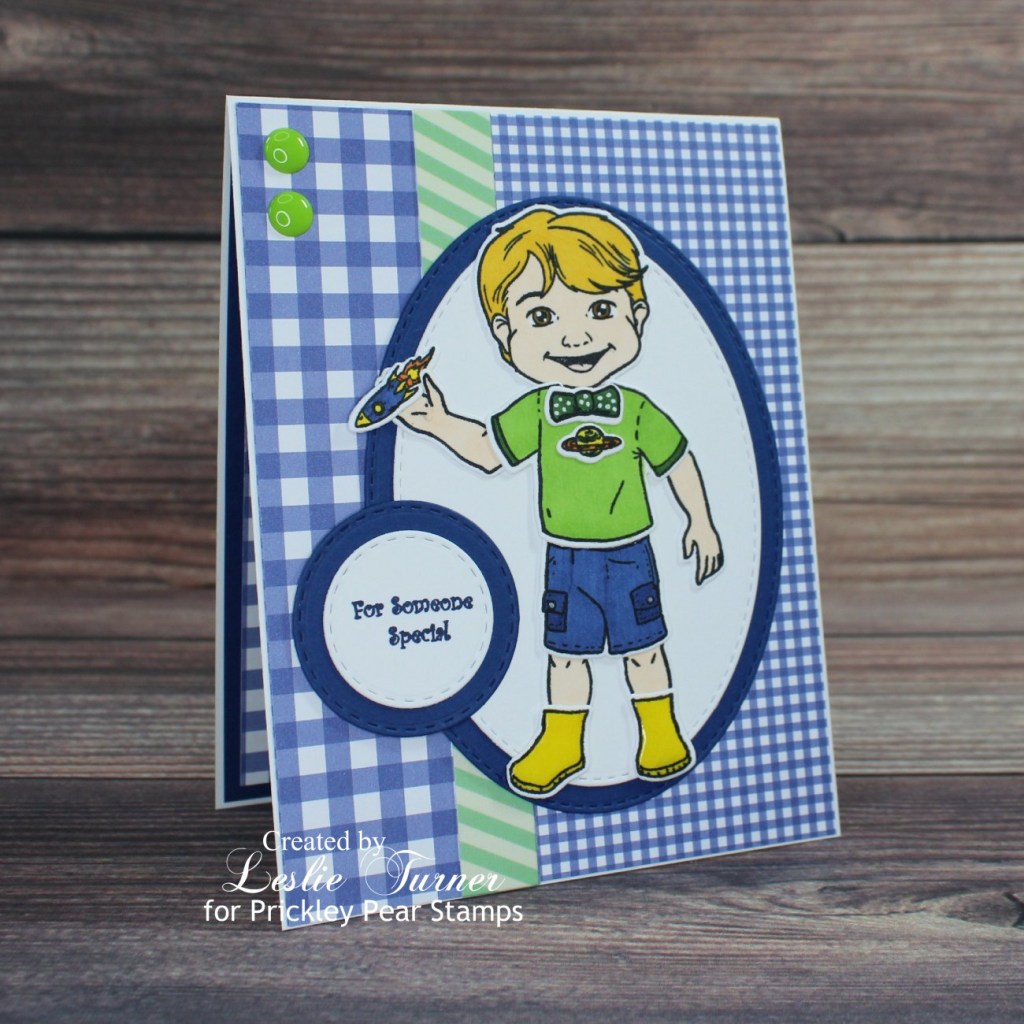
I cut a standard A2 size top-folding card base from Neenah Classic Crest Solar White 110# cardstock along with a layering panel and embellishing strip cut from patterned paper which I layered together. I added two strips of washi tape for a little interest and then adhered the patterned paper panel to the card base. I stamped Lily and her clothing and other elements from the Hello Lily stamp set on Neenah Classic Crest Solar White cardstock, colored them with alcohol markers (and added Ranger Glossy Accents to her rain boots), and cut them with the coordinating Hello Lily die set. I adhered them to the card front along with a die cut sentiment from CUTplorations Skinny Sentiments. The final touch was adding several gemstones from the Trinity Stamps Aquamarine Ripple Embellishment Mix using the Trinity Pick-Up Stick.

I cut the inside panel from the patterned paper and adhered it to the inside of the card base. I cut a panel from Neenah Classic Crest 80# Solar White cardstock and embellished it with a coordinating patterned paper strip and two strips of washi tape, and adhered it to the card base. The final touch was adding a STAMPlorations Happy Happy Clear Sticker for the sentiment.

And one more look… really loving how this turned out! There’s nothing more fun than these adorable images on a file folder style card!

Sharing in the following challenges:
1. A Perfect Time To Craft Challenge: #11 November – Anything Goes
2. Addicted To Stamps & More: #418 – Birthdays
3. Alphabet Challenge Blog: P is for Patterned Paper
4. Crafty Catz: #572 – Anything Goes with optional Sparkle and Shine
5. Lemon Shortbread Challenge Blog: #158 – Anything Goes
6. Penny’s Paper Crafty Challenge Blog: #509 – Anything Goes

Prickley Pear Stamps products used:
Hello Lily stamp set
Hello Lily die set

Other products used:
Cardstock/Paper: Neenah Classic Crest 110# and 80# Solar White cardstock, CutCardStock Basis Teal cardstock, Stampin’ Up Moonlight DSP Stack
Ink: Memento Tuxedo Black ink; Arteza alcohol markers- R18, BR20/28, Y12/33/36, BG12/19/25; Sakura White Gelly Roll pen
Dies/Punches: Kadomaru Pro Corner Rounder, CUTplorations Skinny Sentiments
Accessories: Tonic Studios 12″ Guillotine Paper Trimmer, Fiskars 12″ SureCut Paper Trimmer, WRMK Envelope Punch Board, MISTI stamp tool, Big Shot, Bearly Art precision craft glue, Me & My Big Ideas skinny washi tape, Ranger Glossy Accents, STAMPlorations Happy Happy Clear Stickers, Trinity Stamps Aquamarine Ripple Embellishment Mix, Trinity Pick-Up Stick

I hope you’ve enjoyed this project! Be sure to check out all the awesome stamps and dies at Prickley Pear Stamps! If you’d like to save 10% on anything on the site when you shop at Prickley Pear Stamps, use the coupon code LESLIE10 at checkout! And be sure to ‘like’ and ‘follow’ the Prickley Pear Stamps Facebook page to keep up with news and sales, and join Prickley Pear Pals (the fan group) for lots of fun crafty ideas and to share your creativity! And finally, we’d love to see you visit the Prickley Pear Stamps blog that’s in the process of being revived and become a Follower! Hope to see you there! Thanks so much for stopping by today – we’ll see you next time! ;)

Scrappy hugs,
lesliesig

bee happy

11/26/21 Top Rocker at 613 Avenue Create!
11/30/21 Honorable Mention at A Perfect Time To Craft Open Challenge!
12/5/21 Winner at 613 Avenue Create!

Hi everyone! A very Happy Saturday to you – I hope you’ve had a great week! Affiliate links are used in this post at no cost to you – I really appreciate your support! I’m stoked to be back on the Eyelet Outlet blog today with another awesome DT inspiration project! I created a super fun Envelope Box Card featuring our Bumble Bee Brads and Pink Jewel Bling! I love my Scan N Cut and I always cut several projects when I take it out of the cabinet for a crafty session, and this card was one from the latest batch. I really enjoyed this!

I cut the base from CutCardStock Basis Navy cardstock, and the rest of the pieces from CutCardStock Basis White cardstock, CutCardStock Basis Gold cardstock, CutCardStock Basis Magenta cardstock CutCardStock Basis Black cardstock, CutCardStock Dolphin cardstock and Colorbok Seeing Dots cardstock. Then the fun began of assembling the card! I added the sentiment using die cut letters and some Pink Jewel Bling. I added several Bumble Bee Brads and then added more Pink Jewel Bling to the flowers.

Here’s a shot from another angle.

And one more peek… so loving how this turned out! I can’t say enough about all the fun products at Eyelet Outlet! They really bring a project to life!

Sharing in the following challenges:
1. Critter Crazy Challenges: #56 – Anything Goes with a Featured Critter
2. 613 Avenue Create: #11 – Anything Goes with optional twist of Thanks/Thankfulness
3. A Perfect Time To Craft Challenge: #11 November – Anything Goes
4. Crafts Galore Encore Challenge Blog: #93 – Anything Goes
5. Crafty Calendar Challenge: November – Anything Goes
6. Crafty Catz: #572 – Anything Goes with optional Sparkle and Shine
7. Creative Moments: #226 – Anything Goes
8. Di’s Digi Challenge: Lots of Layers
9. Lil Patch of Crafty Friends: #169 – Anything Goes
10. Penny’s Paper Crafty Challenge Blog: #509 – Anything Goes
11. Through The Purple Haze: #186 – Anything Goes with optional For Him

Eyelet Outlet products used:
Bumble Bee Brads
Pink Jewel Bling

Other products used:
Cardstock/Paper: CutCardStock Basis Navy cardstock, CutCardStock Basis White cardstock, CutCardStock Basis Gold cardstock, CutCardStock Basis Magenta cardstock and CutCardStock Basis Black cardstock, CutCardStock Dolphin cardstock, Colorbok Seeing Dots cardstock
Dies/Punches: My Scrap Chick Beehive Envelope Box Card cut file, Sizzix Alphanumeric Tiny Type Lower Thinlits
Accessories: Brother Scan N Cut, Bearly Art precision craft glue, Trinity Stamps Pick-Up Stick, Big Shot

I hope you’ve enjoyed today’s project! Be sure to check out all the fun goodies at Eyelet Outlet! I can already see you drooling, lol! Be sure to ‘like’ and ‘follow’ Eyelet Outlet Facebook Page to keep up with news and sales, and while you’re at it, join the Eyelet Outlet Fans Facebook group for lots of creative inspiration! Thanks so much for stopping by today – we’ll see you next time! ;)

Scrappy hugs,
lesliesig

welcome fall mini album

11/19/21 Top 4 at Alphabet Challenge Blog!
11/26/21 Top Rocker at 613 Avenue Create!
12/3/21 Top 3 at Crafty Calendar Challenge!

Hi friends! Happy Hump Day! We’ve had several vet visits over the past week and one of our most recently rescued 10-week-old kittens has been at the vet since Monday morning. We’re praying for a good outcome, and if you’re the praying type, we’d appreciate some prayers. Please and thank you. <3 Affiliate links are used in this post at no cost to you – I really appreciate your support! We’re still loving our Fall weather out here (even though it gets pretty darn chilly at night) and I thought it only appropriate to share a super cute little mini album with you today, documenting a trip to Silverton, CO, several years ago in October, not long after we moved out here in May. The changing of the leaves in Colorado is just breath-taking!

I’ve had this adorable set of Sizzix Mini Album Thinlits in my stash for a while and had never used it, so I thought it would be a good time to play! I cut the mini album base from Cardstock Warehouse Brown Box Kraft cardstock and all the layering panels for the pages from Nikki Sivils Tree Love 6×6 Mini Pad (an oldie in my paper stash). I printed the photos from my phone onto glossy photo paper, cut them with My Favorite Things Stitched Square STAX Die-namics and set them aside. Using the same set of Mini Album Thinlits, I cut the elements for each page from CutCardStock Basis Dark Red cardstock, CutCardStock Pop-Tone Hot Fudge cardstock, and Nikki Sivils Tree Love 6×6 Mini Pad. I added a leaf charm on a piece of jute cord tied in a bow to hold the album together, added the title on the front (cut from the Brown Box Kraft with the Sizzix Alphanumeric Tiny Type Lower Thinlits), and then finished it up with some gold flat-back pearls. As you can imagine, the most fun was putting it together… I’m so smitten! I absolutely love how it turned out!

Sharing in the following challenges:
1. 613 Avenue Create: #11 – Anything Goes with optional twist of Thanks/Thankfulness
2. A Place To Start: #11 – Craft A Favorite Memory (documented trip)
3. Alphabet Challenge Blog: P is for Patterned Paper
4. Classic Design Challenge Blog: #11 November – Anything Goes
5. Crafty Calendar Challenge: November – Anything Goes
6. Creative Moments: #226 – Anything Goes
7. Lil Patch of Crafty Friends: #169 – Anything Goes
8. Moving Along With The Times: #136 – Anything But A Card
9. Penny’s Paper Crafty Challenge Blog: #509 – Anything Goes
10. The Crafting Challenge: November – Stitching (Real or Faux) (photos cut with stitched square dies)
11. Through The Purple Haze: #186 – Anything Goes with optional For Him

Products used:
Cardstock/Paper: Cardstock Warehouse Brown Box Kraft cardstock, CutCardStock Basis Dark Red cardstock, CutCardStock Pop-Tone Hot Fudge cardstock, Nikki Sivils Tree Love 6×6 Mini Pad
Dies/Punches: Sizzix Mini Album Thinlits, My Favorite Things Stitched Square STAX Die-namics, Sizzix Alphanumeric Tiny Type Lower Thinlits
Accessories: Tonic Studios 12″ Guillotine Paper Trimmer, Big Shot, Tim Holtz Tiny Attacher, Canvas Corp Jute Cord, Leaf Charm from stash, Bearly Art precision craft glue, Flourish With A Bling Gold Flat-Back Pearls

I hope you’ve enjoyed seeing this adorable little mini album – I sure enjoyed making it! I’m hoping to play in some challenges this month… it’s been a little while since I’ve entered any challenges and I’m really missing it! Thanks so much for stopping by today – we’ll see you next time! ;)

Scrappy hugs,
lesliesig

Friends we will always be

Hi friends! I hope you’re having a beautiful weekend! Our weather couldn’t be any nicer considering we’ve already had our first snowfall several weeks ago! The temps have been glorious over the past several days! Affiliate links are used in this post at no cost to you – I really appreciate your support! I have another sample to share that I created for the new release over at Prickley Pear Stamps! I’ve already mentioned in previous posts that the owners’ son and daughter-in-law have kids named Jack and Lily, and the new Jack and Lily Collection is all about them, but this friendship card depicts them as friends rather than siblings. I used the Hello Lily stamp set and Hello Jack stamp set along with the coordinating Hello Lily die set and Hello Jack die set. Not only are they adorable individually, but they are super cute when paired together! And aren’t they just as cute as can be barefoot in the grass with Jack flying his kite?!

I cut a square top-folding card base from Neenah Classic Crest Solar White 110# cardstock along with a panel cut from a digital cloud background that I printed on my computer which I adhered to the card base. Using the Stitched Scalloped Border die set, I cut a hill in the distance from CutCardStock Pop-Tone Jellybean Green cardstock as well as some die cut grass from CutCardStock Pop-Tone Gumdrop Green cardstock to add to the scene. Using the Hello Lily stamp set and Hello Jack stamp set as well as the coordinating Hello Lily die set and Hello Jack die set, I stamped, colored and die cut the characters and elements, and adhered them to the card front. I stamped the sun from the Noah’s Ark stamp set on CutCardStock Basis Gold cardstock and adhered it to the upper left corner. I drew a kite and tails, colored them and fussy cut them. I adhered them to the card front along with a piece of silver thread as the kite string. I added a couple epoxy flowers and a sentiment from the Blobby Flowers stamp set stamped in black ink to complete the card front.

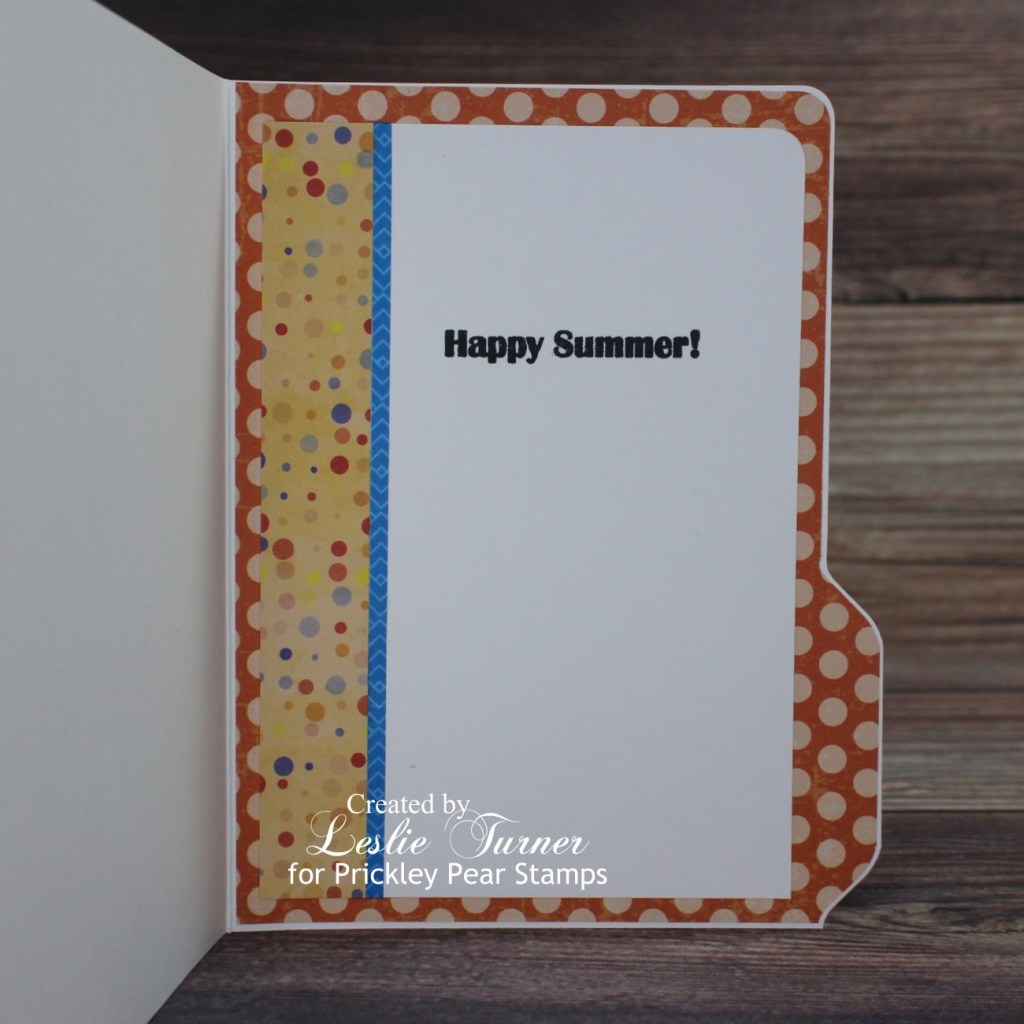
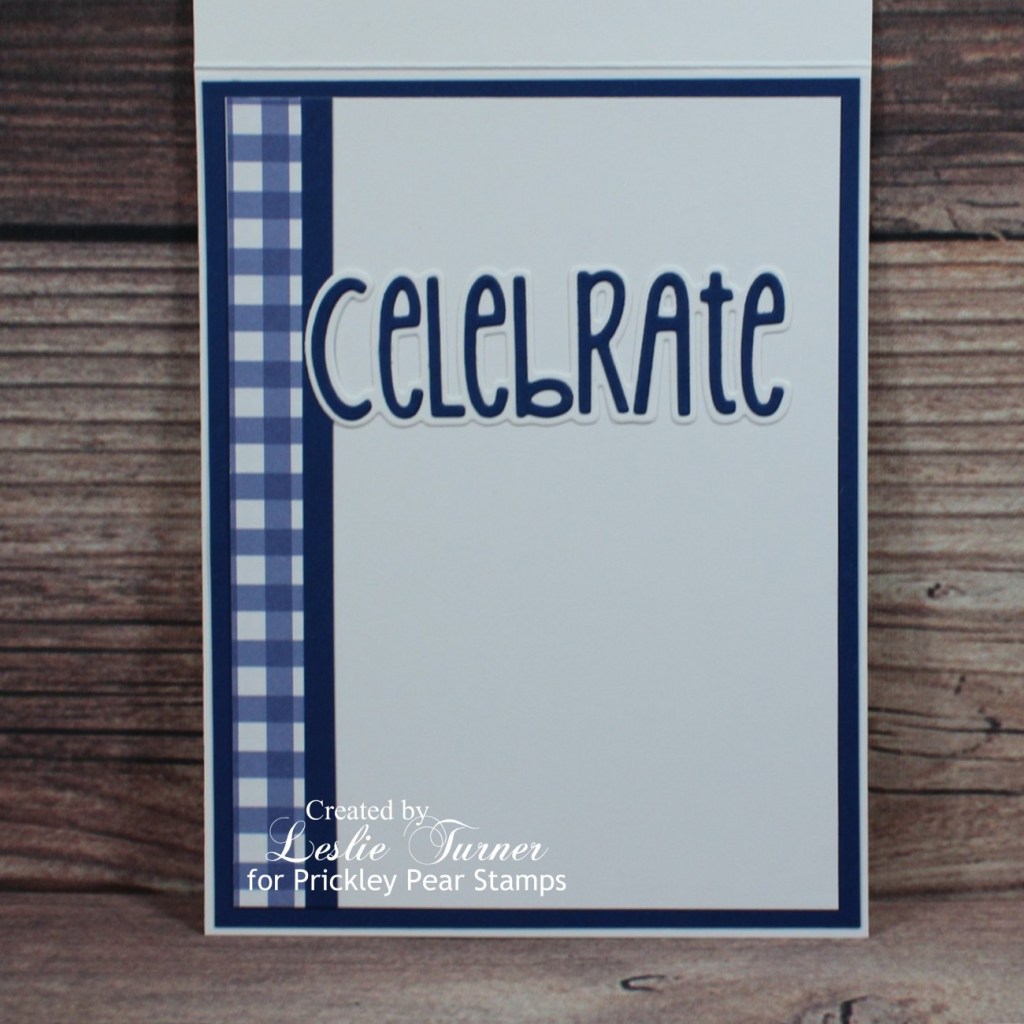
I cut the inside panel from Neenah Classic Crest 80# Solar White cardstock and embellished it with a strip of green gingham patterned paper and narrow strip of CutCardStock Pop-Tone Jellybean Green cardstock. I stamped the sentiment from the Blobby Flowers 2 stamp set in black ink and layered the panel on green cardstock.

And one more look… I’m so smitten! This card turned out so cute! I’ve always been intimidated with the creation of scenes but it’s not really that hard to do when you have the right stamps and dies!

Sharing in the following challenges:
1. 613 Avenue Create: #11 – Anything Goes with optional twist of Thanks/Thankfulness
2. Classic Design Challenge Blog: #11 November – Anything Goes
3. Creative Moments: #226 – Anything Goes
4. Jan’s Digi Stamps Challenges: November – Anything Goes
5. Lil Patch of Crafty Friends: #169 – Anything Goes

Prickley Pear Stamps products used:
Hello Lily stamp set
Hello Jack stamp set
Noah’s Ark stamp set
Blobby Flowers stamp set
Blobby Flowers 2 stamp set
Hello Lily die set
Hello Jack die set
Stitched Scalloped Border die set

Other products used:
Cardstock/Paper: Neenah Classic Crest 110# and 80# Solar White cardstock, CutCardStock Pop-Tone Jellybean Green cardstock, CutCardStock Pop-Tone Gumdrop Green cardstock, CutCardStock Basis Gold cardstock, Background Labs digital Cloud Background, Hot Off The Press Gingham #1 Double-Sided 6×6 Papers
Ink: Memento Tuxedo Black ink; Arteza alcohol markers- PB14/16/25, R25/31, BK00, BR28/51/77/82/84, Y22, B32, YR12; Catherine Pooler Sauna ink, Pentel Slicci Gold Pen, Sakura White Gelly Roll Pen
Dies/Punches: The Cat’s Pajamas Grassy Patches die set
Accessories: Tonic Studios 12″ Guillotine Paper Trimmer, Big Shot, MISTI stamp tool, Bearly Art precision craft glue, Coats Metallic Silver Thread, Eyelet Outlet Epoxy Flowers

I hope you’ve enjoyed this project! Be sure to check out all the awesome stamps and dies at Prickley Pear Stamps! If you’d like to save 10% on anything on the site when you shop at Prickley Pear Stamps, use the coupon code LESLIE10 at checkout! And be sure to ‘like’ and ‘follow’ the Prickley Pear Stamps Facebook page to keep up with news and sales, and join Prickley Pear Pals (the fan group) for lots of fun crafty ideas and to share your creativity! And finally, we’d love to see you visit the Prickley Pear Stamps blog that’s in the process of being revived and become a Follower! Hope to see you there! Thanks so much for stopping by today – we’ll see you next time! ;)

Scrappy hugs,
lesliesig

hello lovely

Hi everyone! I hope you’ve had a great week and you’re looking forward to relaxing this weekend! Affiliate links are used in this post at no cost to you – I really appreciate your support! I’m thrilled to be back on the Eyelet Outlet blog today with another awesome DT inspiration project! I created a pretty birthday card featuring our new Female Cardinal Brads which I paired with our Glitter Brown Washi Tape, Valentine Washi Tape and White Enamel Dots! Nothing like girls hanging out jabbering to one another, lol!

I cut a standard A2 size top-folding card base from Neenah Classic Crest 110# Solar White cardstock along with layering panels from Neenah Classic Crest 80# Solar White cardstock and CutCardStock Pop-Tone Hot Fudge cardstock, and rounded the top left and bottom right corners. Using the Hero Arts Color Layering Birds & Blossoms stamp set, I stamped the branch in Memento Espresso Truffle ink and the flowers in Hero Arts Soft Pink ink and Hero Arts Bubble Gum ink on the white panel, added three Female Cardinal Brads on the limbs, and added strips of Glitter Brown Washi Tape and Valentine Washi Tape across the bottom. I stamped the sentiment (from the same stamp set) in brown ink, cut it with a stitched oval die and adhered it to the bottom right portion of the washi tape. I adhered the layering panels together and then to card base, and added several White Enamel Dots to complete the front.

I cut the inside panel from Neenah Classic Crest 80# Solar White cardstock and embellished it with strips of the Glitter Brown Washi Tape and Valentine Washi Tape. I stamped the sentiment from the Hero Arts Color Layering Birds & Blossoms stamp set in brown ink and layered the panel on CutCardStock Pop-Tone Hot Fudge cardstock after rounding the upper left and bottom right corners.

And one more look… I really do love a pink and brown color combo! And aren’t these brads gorgeous?!

Sharing in the following challenges:
1. Critter Crazy Challenges: #56 – Anything Goes with a Featured Critter
2. Classic Design Challenge Blog: #11 November – Anything Goes
3. Crafter’s Castle: #47 – Anything Goes
4. Crafts Galore Encore Challenge Blog: #93 – Anything Goes
5. Crafty Calendar Challenge: November – Anything Goes
6. Jan’s Digi Stamps Challenges: November – Anything Goes
7. The Crafting Challenge: November – Stitching (Real or Faux) (stitched oval die cut)

Eyelet Outlet products used:
Female Cardinal Brads
Glitter Brown Washi Tape
Valentine Washi Tape
White Enamel Dots

Other products used:
Cardstock/Paper: Neenah Classic Crest 110# and 80# Solar White cardstock, CutCardStock Pop-Tone Hot Fudge cardstock
Stamps: Hero Arts Color Layering Birds & Blossoms stamp set
Ink: Hero Arts Soft Pink ink, Hero Arts Bubble Gum ink, Memento Espresso Truffle ink
Dies/Punches: Kadomaru Pro corner rounder, Memory Box Stitched Oval Layers die
Accessories: Tonic Studios 12″ Guillotine Paper Trimmer, Tombow Mono permanent adhesive, Bearly Art precision craft glue, Big Shot, MISTI stamp tool

I hope you’ve enjoyed today’s project! Be sure to check out all the fun goodies at Eyelet Outlet! I can already see you drooling, lol! Be sure to ‘like’ and ‘follow’ Eyelet Outlet Facebook Page to keep up with news and sales, and while you’re at it, join the Eyelet Outlet Fans Facebook group for lots of creative inspiration! Thanks so much for stopping by today – we’ll see you next time! ;)

Scrappy hugs,
lesliesig

the GOOD life

11/30/21 November Rising Star at A Place To Start!

Hey, everybody! It’s Friday and I hope you have something fun – and safe – planned for this weekend! You know where I’ll be… I can’t be any safer than I am in my studio, lol! ;) I’m thrilled to be back on the Clear Scraps blog today with another awesome DT inspiration project! I created a retro home decor piece featuring the Medium Circle DIY Pallet Shape decorated with paint, the 12″ Funky Boxes Mascils Mask/Stencil and markers, along with a Mini Shaker Retro TV with Sprinkles Groovy Flowers and Sprinkles Lime Confetti as the shaker filler! This was beyond fun and brought back so many memories! I distinctly remember the groovy green and orange color palette so many people had in their homes (and clothing) in the 70s! Yep, those were the good ol’ days!

I started by painting the front and back of the Medium Circle DIY Pallet Shape a super pale green by mixing Adirondack White with a tiny bit of Spanish Moss chalk paint. When that was dry, I laid the 12″ Funky Boxes Mascils Mask/Stencil on the pallet and pounced Spanish Moss chalk paint all over it with a dauber. The paint ended up sparse and spotty in some areas and thicker in other areas but I left it that way to add to the retro/vintage feel. Once dry, I outlined all the stenciled areas with a dark green alcohol marker for contrast and interest.

Next, I painted the front chip form of the Mini Shaker Retro TV with Liquitex Yellow Oxide mixed with Cadmium Orange acrylic paint. Once that was dry, I ran a black alcohol marker around the outside edges and the TV screen cut-out and set it aside. I also ran the black marker around the outside edges of the rest of the chip forms so they’d all be uniform. I adhered a piece of orange patterned paper to the inside of the chip back and then adhered the next two chip forms to it. I added the shaker filler consisting of green and orange pieces of Sprinkles Groovy Flowers and Sprinkles Lime Confetti, added the acrylic divider, and then adhered the painted front chip form to close it up. I cut a rabbit ears antenna from metallic silver foil cardstock and adhered it to the TV. I adhered the TV to the bottom front of the pallet and added retro thrift shop word stickers to complete the piece.

And one more look… I couldn’t be more happy with how this turned out! All of the absolutely awesome Clear Scraps products made this project come to life! I LOVE it!

Sharing in the following challenges:
1. A Perfect Time To Craft Challenge: #11 November – Anything Goes
2. A Place To Start: #11 – Craft A Favorite Memory (teenage years!)
3. Classic Design Challenge Blog: #11 November – Anything Goes
4. Moving Along With The Times: #136 – Anything But A Card
5. Through The Purple Haze: #186 – Anything Goes with optional For Him

Clear Scraps products used:
Medium Circle DIY Pallet Shape
12″ Funky Boxes Mascils Mask/Stencil
Mini Shaker Retro TV
Sprinkles Groovy Flowers
Sprinkles Lime Confetti

Other products used:
Cardstock/Paper: Polly’s Paper Studio orange patterned paper, Hygloss Metallic Silver Foil cardstock
Ink: Copic alcohol marker- 100 Black; Arteza alcohol marker- YG10 Jasper Green
Accessories: Folkart Adirondack White and Spanish Moss chalk paint, Liquitex Yellow Oxide and Cadmium Orange acrylic paint, Bearly Art precision craft glue, Ranger Distress Collage Medium, October Afternoon Thrift Shop Word Stickers

I hope you’ve enjoyed today’s project and you’re inspired to get those craft supplies out to play! Be sure to check out all the amazing acrylic, wood and chipboard goodies at Clear Scraps… OMGoodness, you won’t be disappointed! And head on over to the Clear Scraps Facebook Page for lots of inspiration! And while you’re at it, join the Clear Scraps Facebook Creative Group to connect with other Clear Scraps fans! Thanks so much for stopping by today – we’ll see you next time!

Scrappy hugs,
lesliesig

Season’s Greetings To You & Yours

12/5/21 Top 5 at Jan’s Digi Stamps Challenges!

Happy Hump Day, y’all! I hope you’re having a wonderful week! I’m thrilled to be back on the CutCardStock blog today with an awesome DT inspiration project featuring red, white and green cardstock which is all on sale this month so be sure to stock up for your holiday crafting! Affiliate links are used in this post at no cost to you – I really appreciate your support! I have one of the easiest card designs ever to share with you today using Stardream Metallic Jupiter cardstock, Basis Red cardstock, Silk Glitter Opulent Opal cardstock, Neenah Classic Crest Solar White 80# cardstock, Basis Green cardstock and Pop-Tone Jellybean Green cardstock! While I used a die set with a different name for this design team project, I found handwritten measurements for an ‘open box card’ (with angled sides) in my tutorial arsenal and typed up a tutorial that I’ll share. The only differences between the die set and my handwritten instructions are the shape and the width of the box layer strips. And, of course, the sky is the limit with regard to occasion, embellishments and sentiments. ;)

I die cut the card base and box layer strips from Silk Glitter Opulent Opal cardstock and assembled the card. This is where the lightbulb came on… this assembled piece looked familiar so I sat down with my tutorial files (about 6″ worth) and looked through most of the files until I found measurements I had written down (who knows how long ago) for the open box card. If you’re interested, I’ve added the open box card tutorial HERE. Bear in mind that the box layer strips on this project using the die set are slightly narrower but achieve the same result, and the shape is different. I die cut the three poinsettia flowers from Stardream Metallic Jupiter cardstock, the poinsettia leaves from Pop-Tone Jellybean Green cardstock, the greenery and berries from Basis Red cardstock and Basis Green cardstock, and the flower centers from Basis Gold cardstock. I assembled the poinsettias and set them aside. I die cut the sentiment from Stardream Metallic Jupiter cardstock and again from Basis Green cardstock and layered them together with just a tad bit of the dark green showing beneath the red. I stamped the sentiment in green ink on a Neenah Classic Crest Solar White 80# cardstock scrap and die cut it with a stitched rectangle die, and layered it on a slightly larger stitched rectangle die cut from Pop-Tone Jellybean Green cardstock. I adhered one of the poinsettias on the top of the sentiment and adhered the piece to the left side, the second poinsettia to the right side and the third poinsettia in the middle.

Here is a shot from overhead so you can see the construction (which, as mentioned above, is the same as the typical box card but with an open front), and another shot of the card folded flat for mailing in a standard A2 size envelope.

And a few more peeks of the finished project… so loving how this turned out! Let me know if you end up making an open box card using my measurements! This is definitely a fun one! I’ve made several over the years but didn’t use any of them as design team projects so they didn’t get posted on my blog. This design makes beautiful sympathy, birthday, anniversary, and of course Christmas cards!

Sharing in the following challenges:
1. A Perfect Time To Craft Challenge: #11 November – Anything Goes
2. Christmas Crafts All Year ‘Round: November – Something that starts with U, V and/or W (Winter)
3. Classic Design Challenge Blog: #11 November – Anything Goes
4. Crafts Galore Encore Challenge Blog: #93 – Anything Goes
5. Creative Inspirations Challenge Blog: November – Wonderful Winter/Feeling Festive
6. Jan’s Digi Stamps Challenges: November – Anything Goes
7. Your Scrapbook Place: November – Anything Goes

CutCardStock products used:
Silk Glitter Opulent Opal cardstock
Stardream Metallic Jupiter cardstock
Basis Red cardstock
Basis Green cardstock
Pop-Tone Jellybean Green cardstock
Basis Gold cardstock
Neenah Classic Crest Solar White 80# cardstock

Other products used:
Stamps: Concord & 9th Poinsettia Fill-In stamp set
Ink: Catherine Pooler Eucalyptus ink
Dies/Punches: Concord & 9th Card Stacks base dies, Concord & 9th Poinsettia Fill-In dies, Memory Box Stitched Rectangle Layers
Accessories: Tonic Studios 12″ Guillotine Paper Trimmer, Big Shot, MISTI stamp tool, Bearly Art precision craft glue, Ranger Distress Collage Medium, Nuvo Bottle Green Crystal Drops

I hope you’ve enjoyed today’s project and you’re inspired to get crafty! Be sure to check out all the awesome cardstock and other goodies at CutCardStock (adhesives, labels, stickers, pens, watercolors and ribbon to name a few). And head on over to the CutCardStock Facebook Page for more inspiration! Thanks so much for stopping by today – we’ll see you next time!

Scrappy hugs,
lesliesig

Hi from Jack!

Hi friends! A very Happy Tuesday to you! I hope you’re having an awesome day! It has been a beautiful one here! Affiliate links are used in this post at no cost to you – I really appreciate your support! I’m back with another card to share that I created for the new release over at Prickley Pear Stamps! I mentioned a few days ago that the owners’ son and daughter-in-law have kids named Jack and Lily, and the new Jack and Lily Collection is all about them! I created an adorable friendship card featuring the Hello Jack stamp set with coordinating Hello Jack die set! This card is a side fold (you know how love fun folds), and I did something with this stamped image that I’ve never done before… I scored the flat two-dimensional image and creased his legs so he could sit on a brick wall! LOL, I absolutely love how this turned out!

I cut the side fold card base from Neenah Classic Crest Baronial Ivory cardstock along with layering panels from CutCardStock Basis Gray cardstock and coordinating papers from Crafter’s Companion Just For Men Urban Collection. I adhered the panels together and adhered them to the card base, added some twine tied in a bow, and then fashioned the sitting part of the brick wall.

Using the Hello Jack stamp set, I stamped Jack, his clothing and toy airplane on Neenah Classic Crest Solar White cardstock, colored them with alcohol markers and cut them with the coordinating Hello Jack die set. I scored Jack’s legs in two places, folded on the score lines, and adhered him to the card front sitting on the brick wall. I adhered his toy airplane and stamped the sentiment to complete the card front.

I typed the sentiment on the laptop and printed it on Neenah Classic Crest Baronial Ivory cardstock, then trimmed the panel and embellished it with strips cut from the patterned paper and CutCardStock Basis Gray cardstock, and finally layered it on gray cardstock.

And one more peek… this is such a fun fold and I sure do love it with this adorable little guy gracing the front of it!

Sharing in the following challenges:
1. A Bit More Time To Craft Extra Challenge: November Anything Goes
2. A Perfect Time To Craft Challenge: #11 November – Anything Goes
3. Classic Design Challenge Blog: #11 November – Anything Goes

Prickley Pear Stamps products used:
Hello Jack stamp set
Hello Jack die set

Other products used:
Cardstock/Paper: Neenah Classic Crest Baronial Ivory cardstock, CutCardStock Basis Gray cardstock, Neenah Classic Crest Solar White cardstock, Crafter’s Companion Just For Men Urban Collection 6×6 paper pad
Stamps: Computer-generated inside sentiment
Ink: Memento Tuxedo Black ink; Arteza alcohol markers- R25, BG54, B25, GB06, YR12, BR28/63/92
Accessories: Tonic Studios 12″ Guillotine Paper Trimmer, MISTI stamp tool, Big Shot, Bearly Art precision craft glue, twine, Darice Double-Sided Adhesive Foam Circles

I hope you’ve enjoyed this project! Be sure to check out all the awesome stamps and dies at Prickley Pear Stamps! If you’d like to save 10% on anything on the site when you shop at Prickley Pear Stamps, use the coupon code LESLIE10 at checkout! And be sure to ‘like’ and ‘follow’ the Prickley Pear Stamps Facebook page to keep up with news and sales, and join Prickley Pear Pals (the fan group) for lots of fun crafty ideas and to share your creativity! And finally, we’d love to see you visit the Prickley Pear Stamps blog that’s in the process of being revived and become a Follower! Hope to see you there! Thanks so much for stopping by today – we’ll see you next time! ;)

Scrappy hugs,
lesliesig