hello

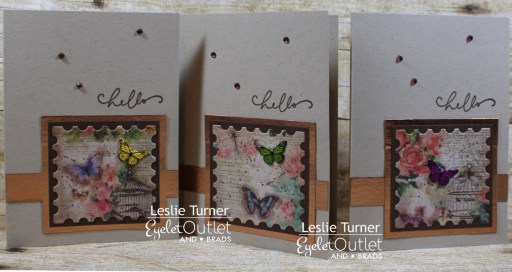
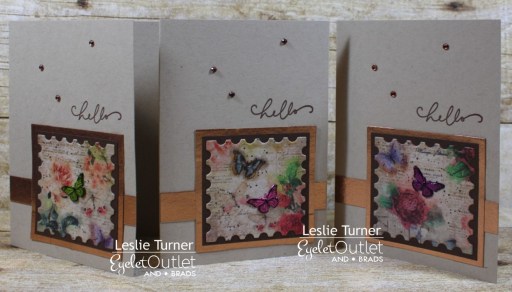
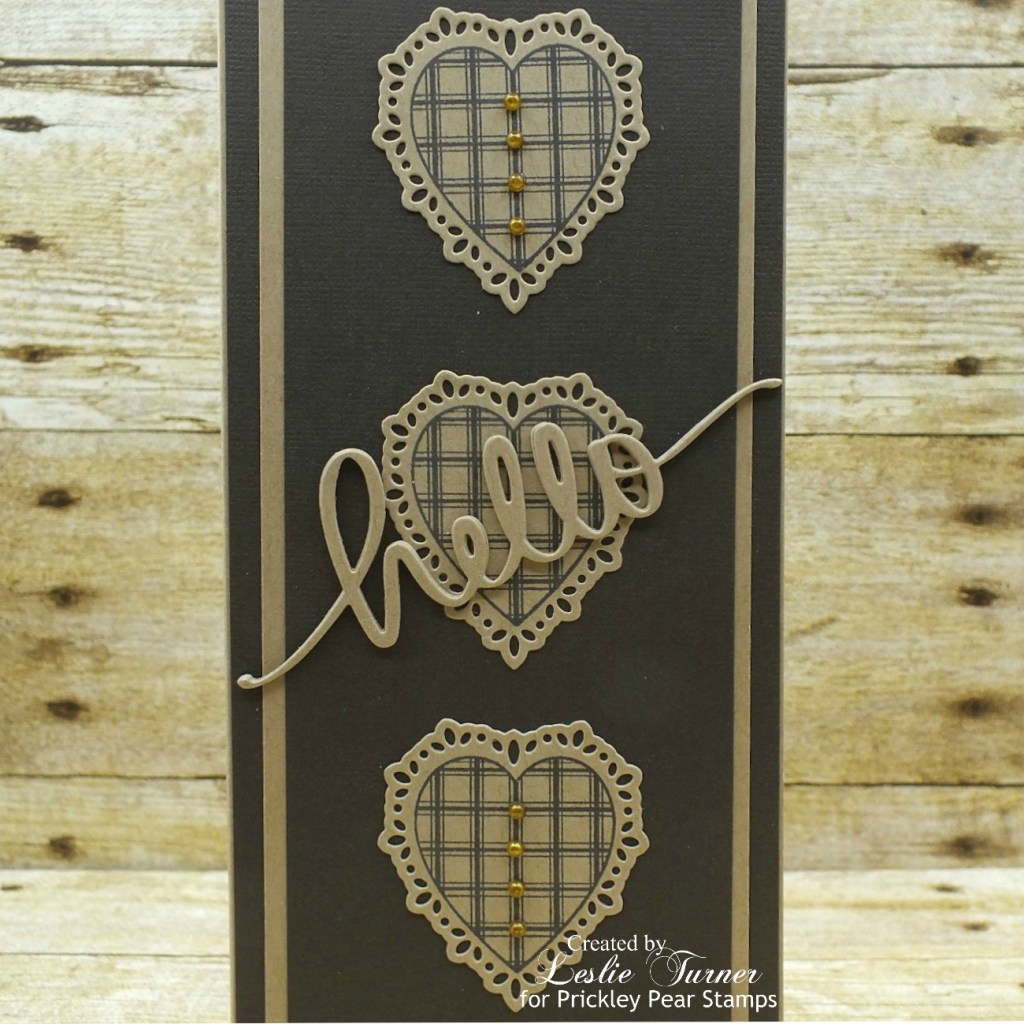
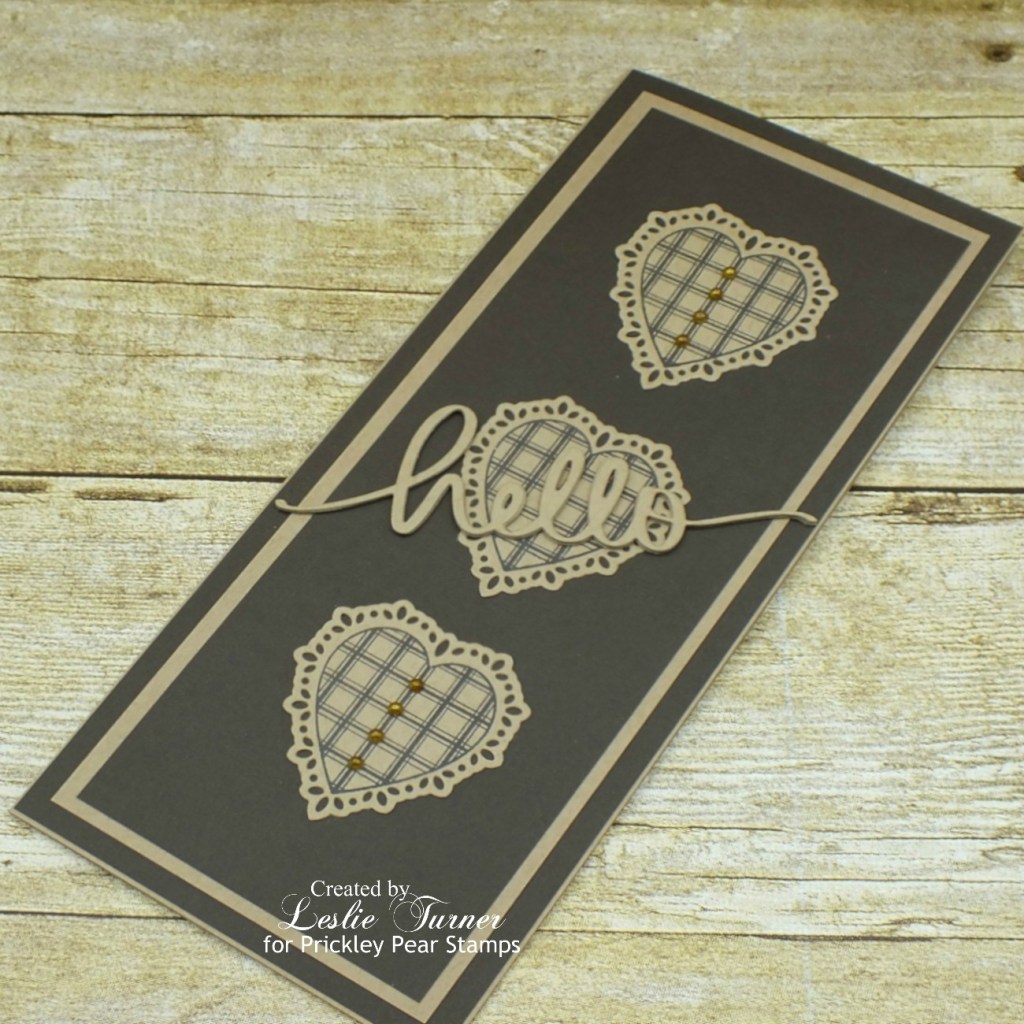
Hi everyone! Happy Hump Day – I hope you’re having a great week with some lovely weather where you are! Affiliate links are used in this post at no cost to you. I really appreciate your support! It’s time for a new challenge over at Mix It Up Challenge Blog and I’m thrilled to share my DT inspiration project with you for MIUCB #53 – Anything Goes + Monochrome! Our challenges are always ‘anything goes’ and we offer a technique twist each month to inspire you! This month the twist is monochrome – but the twist is never required to play! I created a pretty ‘thinking of you’ slimline card in brown and tan using Prickley Pear Stamps Heart Key Crown stamp set and Hearts 2 stamp set and coordinating Heart Key Crown die set, along with an all-time favorite hello script die from Mama Elephant.

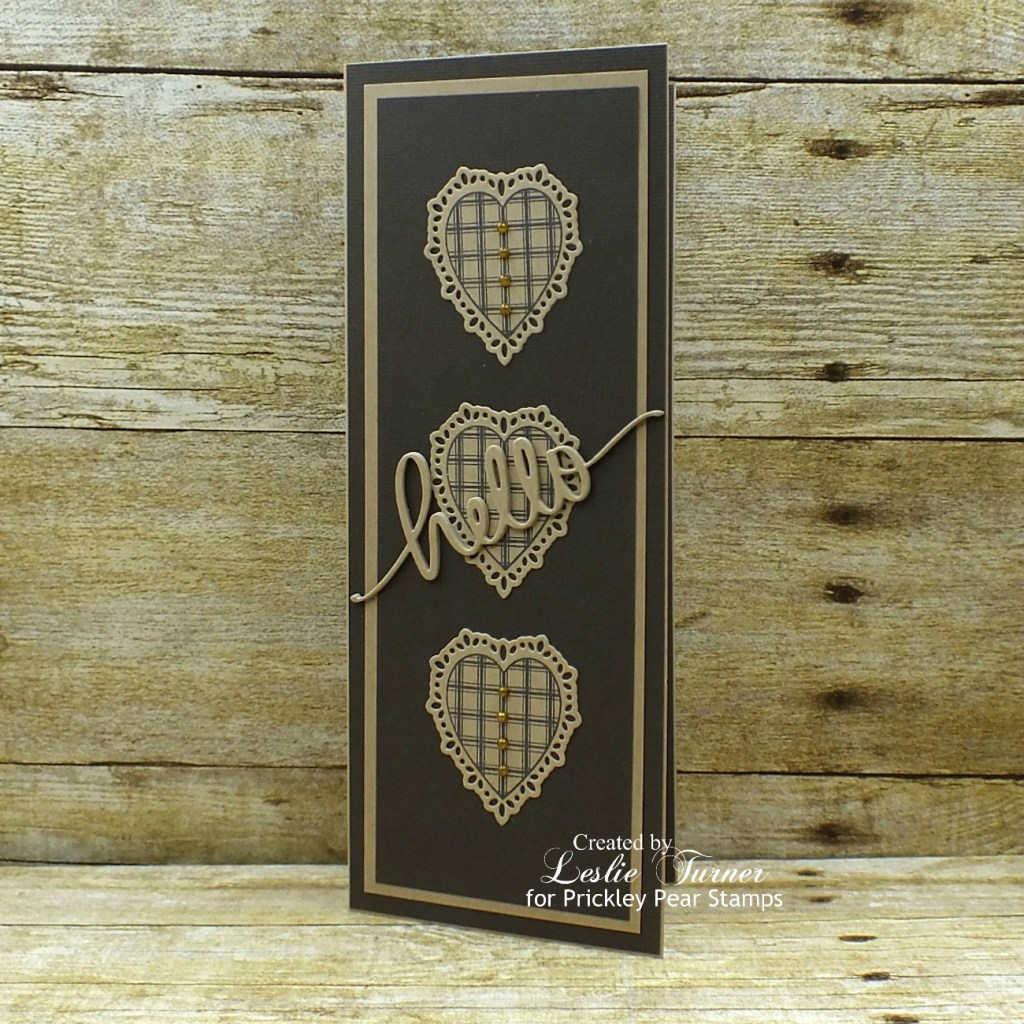
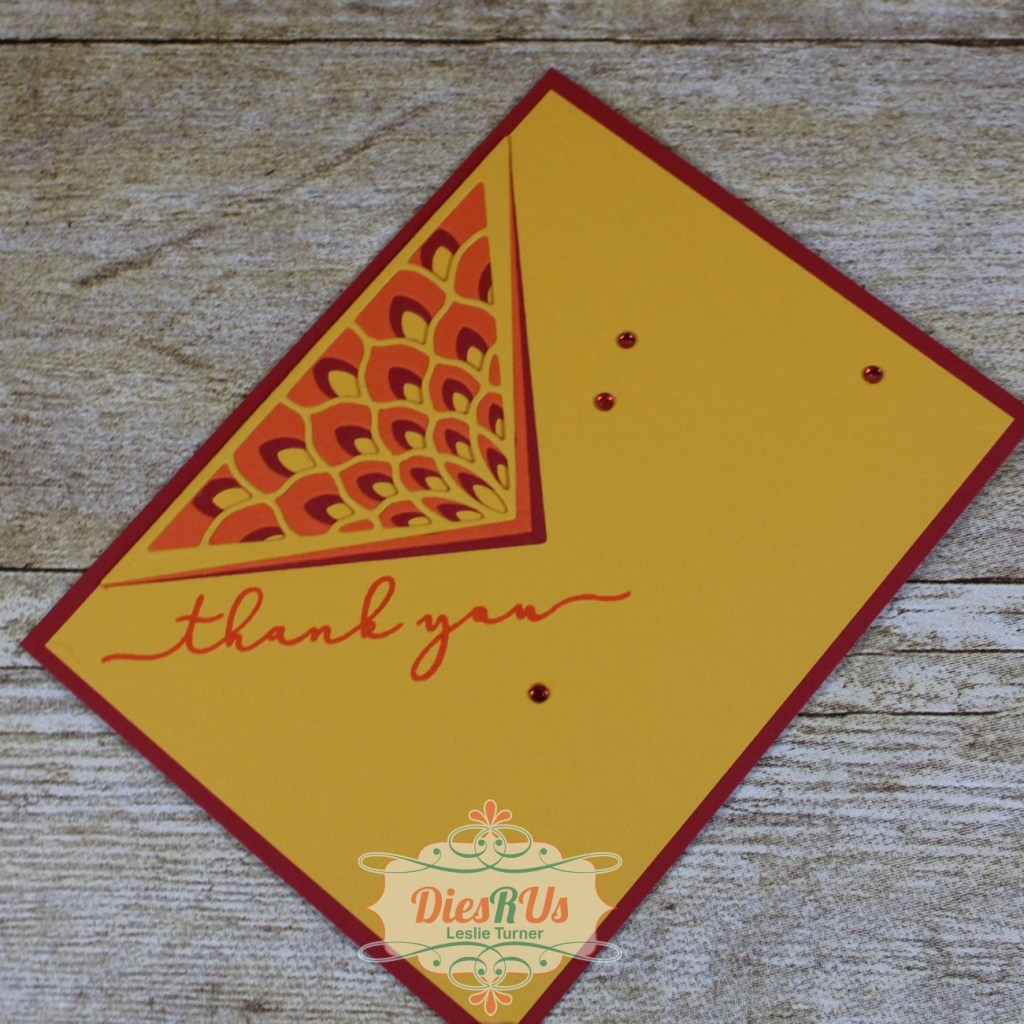
I jumped on the slimline wagon last Summer but I’ll admit that I am a bit of a rebel when it comes to size, lol! I always create a 9″ x 3-3/4″ card base because I think it fits better in a #10 business envelope. I created a side-folding portrait card base from CutCardStock Twine cardstock along with several additional layering panels from Darice textured brown cardstock and CutCardStock Twine cardstock. Using the Prickley Pear Stamps Heart Key Crown stamp set, I stamped the hearts in brown ink on the twine cardstock and used the coordinating Heart Key Crown die set to cut them.

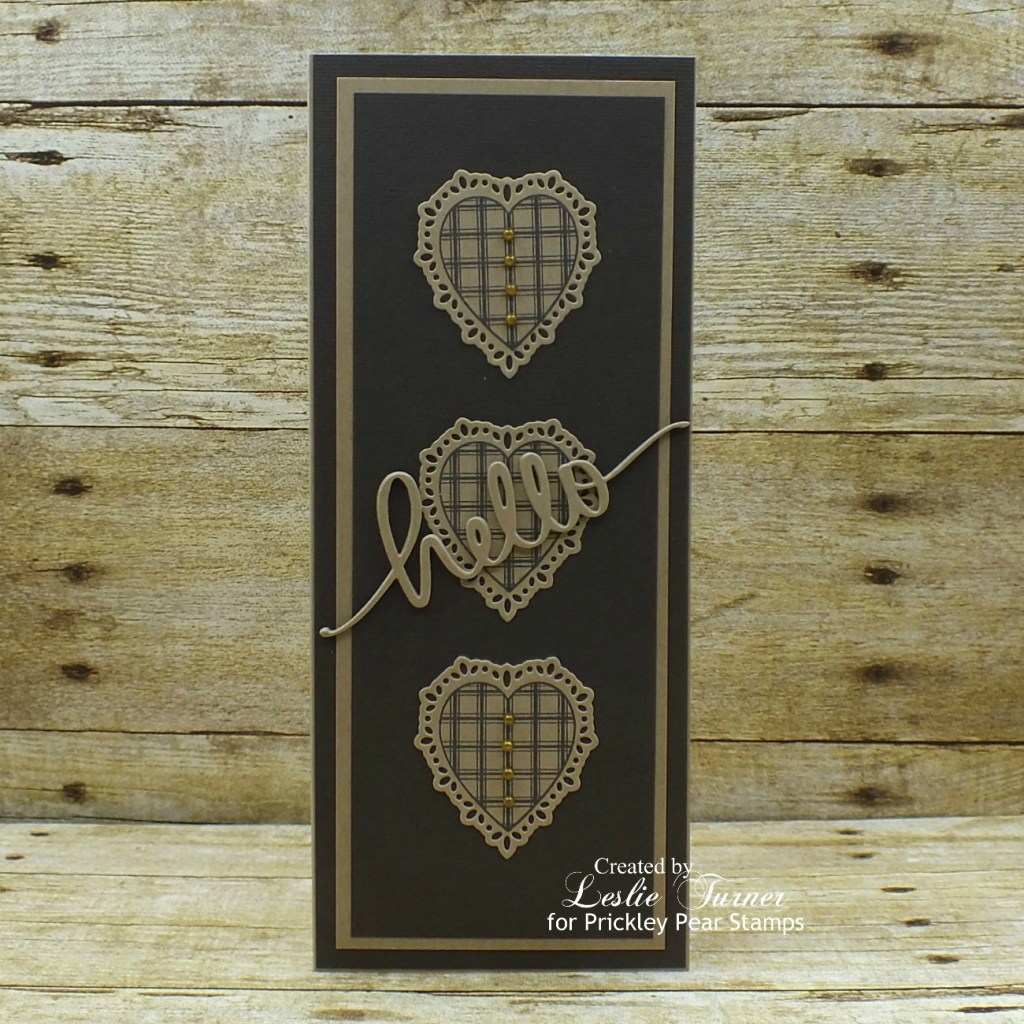
I arranged the three stamped and die cut hearts on the front and added the die cut sentiment to the front of the middle heart at an angle. I colored several white flat-back pearls with an alcohol marker (did you know you could do that?!) to match the monochrome scheme.

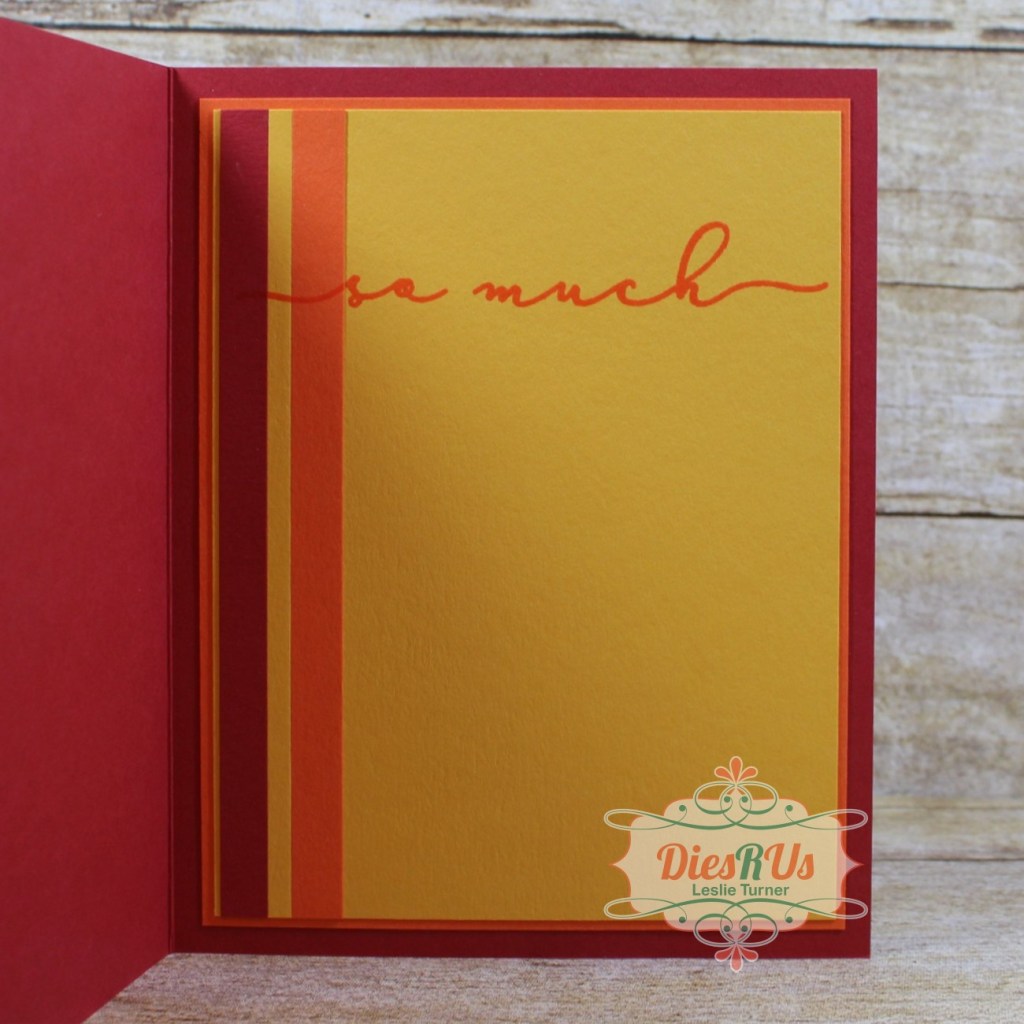
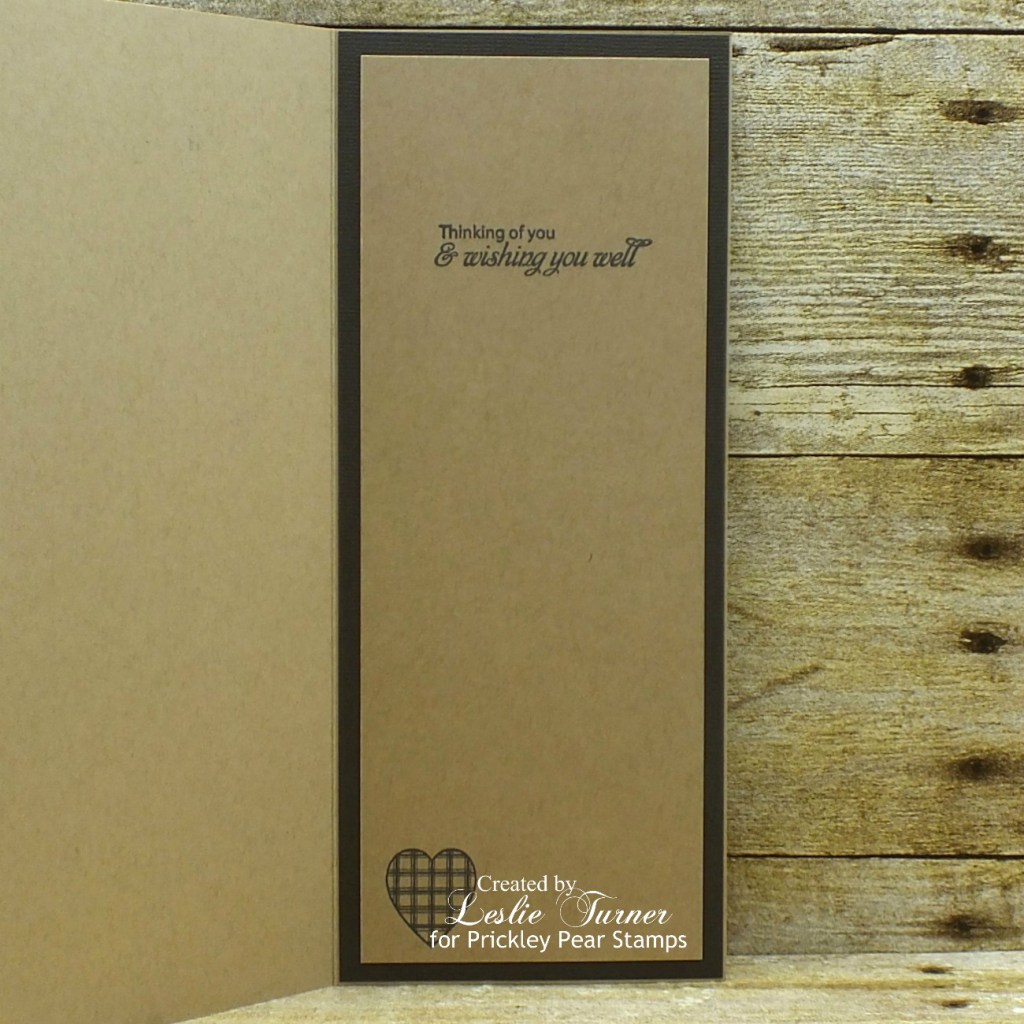
I cut the inside panel from CutCardStock Twine cardstock and kept it fairly simple by just stamping a heart and the sentiment from the Hearts 2 stamp set on the panel in brown ink and layering the panel on brown cardstock, leaving a wide border.

And one more look… I really like how this slimline turned out! Always loving a monochrome color scheme, too!

Cardstock/Paper: CutCardStock Twine cardstock, Darice brown textured cardstock
Stamps: Prickley Pear Stamps Heart Key Crown stamp set and Hearts 2 stamp set
Ink: Memento Espresso Truffle ink; Nuvo alcohol marker- 466 (Honey Amber Collection) used to color the pearls
Dies/Punches: Prickley Pear Stamps Heart Key Crown die set, Mama Elephant hello script die
Accessories: Tonic Studios 12″ Guillotine Paper Trimmer, Tombow Mono permanent adhesive, Bearly Art precision craft glue, MISTI stamp tool, Gemini Junior, Darice small white flat-back pearls

I hope you’ve enjoyed this project and will link up with us this month! All of our challenges are ‘anything goes’ and we offer a technique twist each month to inspire you! We’d love to see either ‘anything goes’ or a monochrome project… you choose! Thanks so much for stopping by today – we’ll see you next time! ;)

Scrappy hugs,
lesliesig

Meowy Christmas slimline

Howdy, everybody! I’m having the hardest time wrapping my head around the fact that we’re three-quarters of the way through 2021 already! Affiliate links are used in this post at no cost to you. I really appreciate your support! Our newest challenge is live over at Merry Little Christmas Challenge Blog and I’m stoked to share my DT inspiration project for MLCCB #38 – September Anything Christmas Goes! I used the Prickley Pear Stamps Build A Cat 2 clear stamp set and coordinating Build A Cat die set to create an adorable CAS Christmas card featuring a festive kitty and several flat-back Christmas bulbs on gold cord.

I’ve had these bulbs in my Christmas craft stash for years and when I came across them while digging, I decided I needed to use them! NBUS (never before used schtuff) for sure, lol! I created a 9″ x 3-3/4″ slimline card base along with a white panel for the front from Neenah Classic Crest 110# Solar White cardstock which I embellished with a strip of Canvas Corp red and white striped paper and layered on American Crafts Crimson cardstock. I stamped the sentiment on the panel and the cat on a scrap of Neenah Classic Crest 80# Solar White cardstock. I colored the cat and tail with alcohol markers, cut them with the coordinating dies and adhered them together. I adhered the cat to the panel, then the bulbs and gold cord to complete the card front.

I cut the inside panel from Neenah Classic Crest 80# Solar White cardstock, embellished it with a strip of the red and white paper and a red glitter die cut sentiment, and layered the panel on red cardstock.

And one more peek… this was such a fun card to create! So happy I ‘found’ the Christmas bulbs in the Christmas craft stash!

Products used:
Cardstock/Paper: Neenah Classic Crest 110# and 80# Solar White cardstock, American Crafts Crimson cardstock, The Paper Studio Four Seasons and Everything In Between -2- paper pad, Stampin’ Up Red Glimmer paper
Stamps: Prickley Pear Stamps Build A Cat 2 clear stamp set
Ink: Memento Tuxedo Black ink; Nuvo alcohol markers- Aquamarine Collection, Rich Reds Collection, Fragrant Oranges Collection, Woodland Greens Collection, Indigo Ink Collection, Royal Purples Collection, Flamingo Pinks Collection, Natural Browns Collection; Pentel Slicci Gold pen, POSCA white paint marker
Dies/Punches: Prickley Pear Stamps Build A Cat die set, Tim Holtz Holiday Words: Script die
Accessories: Tonic Studios 12″ Guillotine Paper Trimmer, Tombow Mono permanent adhesive, Bearly Art precision craft glue, Darice mini flat-back Christmas bulbs

I hope you’ve enjoyed seeing this slimline card and will link up a Christmas project with us this month! We can’t wait to see what you create! Thanks so much for stopping by today – we’ll see you again soon! ;)

Scrappy hugs,
lesliesig

No one’s butter than YOU!

Hi everyone! A very Happy Saturday to you – I hope you’ve had a great week! Things are status quo here. The hubs had a pinched ulnar nerve released in his left arm several days ago and is doing well. I have to keep reminding him to take it easy and not over use his arm… you know how men are! ;) Affiliate links are used in this post at no cost to you. I really appreciate your support! I’m thrilled to be back on the Eyelet Outlet blog today with another awesome DT inspiration project! I created a fun birthday popcorn machine box card featuring our Popcorn & Ticket Brads and Red Jewel Bling! This was definitely a fun one! My Scan N Cut lives in a cabinet to keep it from getting dusty, and when I bring it out, I typically cut multiple files which keep me busy assembling for weeks to come. ;)

I cut the box card base from CutCardStock Basis Gold cardstock, and all the elements from CutCardStock Basis Red cardstock, Neenah Classic Crest 80# Solar White cardstock, Hygloss Silver Foil cardstock, and K & Co. Essentials Dark designer paper. I assembled the card and added a stamped sentiment, a Ticket Brad and Red Jewel Bling.

Here’s a shot of the back showing an additional sentiment and a Popcorn Brad on the signature panel.

And one more peek… what a super fun card! As you well know, I absolutely LOVE box cards and I really enjoyed creating this one, and these brads were just the ‘ticket!’

Eyelet Outlet products used:
Popcorn & Ticket Brads
Red Jewel Bling

Other products used:
Cardstock/Paper: CutCardStock Basis Gold cardstock, CutCardStock Basis Red cardstock, Neenah Classic Crest 80# Solar White cardstock, Hygloss Silver Foil cardstock, K & Co. Essentials Dark designer paper pad
Stamps: Avery Elle Loads of Wishes stamp set, The Project Bin Just Poppin’ stamp set
Ink: Yellow Paper Mate Flair pen, Memento Rhubarb Stalk ink
Dies/Punches: My Scrap Chick Popcorn Box Card cut file
Accessories: Brother Scan N Cut, Bearly Art precision craft glue, MISTI stamp tool

I hope you’ve enjoyed today’s project! Be sure to check out all the fun goodies at Eyelet Outlet! I can already see you drooling, lol! Be sure to ‘like’ and ‘follow’ Eyelet Outlet Facebook Page to keep up with news and sales, and while you’re at it, join the Eyelet Outlet Fans Facebook group for lots of creative inspiration! Thanks so much for stopping by today – we’ll see you next time! ;)

Scrappy hugs,
lesliesig

Documented Road Trip

Happy Friday, everybody! I hope you’ve had a wonderful week – it sure went by fast! I’m thrilled to be back on the Clear Scraps blog today with another awesome DT inspiration project! I created a project documenting a motorcycle road trip to Deals Gap Motorcycle Resort with a group of friends back in July 2010. Hubby and I rode the Tail of the Dragon twice on two different motorcycles. We rode the Harley on our road trip with our friends and my best friend from high school and college trailered our Honda VTX so we could ride it on the Tail also. What fun we had! I used the Scallop Circle Printer Tray which I painted with green chalk paint, and it is perfect to document our amazing trip!

I painted the top layer of the Scallop Circle Printer Tray with green chalk paint. The nice thing about chalk paint is that it dries fairly quickly. I stamped texture all over the layer in brown ink, let it dry and then applied another coat of the Spanish Moss. When it dried there was just a tad bit of the texture stamping showing which I thought looked cool. I cut some striped patterned paper for the center area of the frame and printed a little summary of our trip on white cardstock, and adhered them to the back. 

I printed the six photos I wanted to use, trimmed them and adhered them to the back so they’d show through the apertures. Working from the bottom up, I glued the second and third layers together and glued them to the back. I removed the protective film from the back side of the acrylic piece and glued it down. I removed the protective film from the front side of the acrylic piece and glued the painted top layer down.

I added punched elements, stamping, bling, die cuts and my St. Christopher pendant (the one I wore on all of our rides over the years) to the outside of the frame for interest. 

Clear Scraps products used:
Scallop Circle Printer Tray

Other products used:
Cardstock/Paper: Neenah Classic Crest Solar White cardstock, CutCardStock Basis Brown, CutCardStock Pop-Tone Gumdrop Green cardstock, The Paper Studio Tattered and Worn 12×12 paper pad
Stamps: Stampin’ Up Timeless Textures stamp set, Tim Holtz Idea-ology Type Lower cling foam stamp set, The Project Bin Wild Thing stamp set
Ink: Catherine Poole Icing on the Cake ink
Dies/Punches: Sizzix Primitive Stars dies, Stampin’ Up Banner Triple Punch, Stampin’ Up Itty Bitty Heart Punch, Sizzix Alphanumeric Tiny Type Lower Thinlits
Accessories: Plaid Folkart Spanish Moss chalk paint, Bearly Art precision craft glue, Darice black glitter alpha stickers, clear acrylic stamp block, Trinity Stamps Andradite Sparkle Embellishment Mix, Ranger distress collage medium

I hope you’ve enjoyed today’s project and you’re inspired to get those craft supplies out to play! Be sure to check out all the amazing acrylic, wood and chipboard goodies at Clear Scraps… OMGoodness, you won’t be disappointed! And head on over to the Clear Scraps Facebook Page for lots of inspiration! And while you’re at it, join the Clear Scraps Facebook Creative Group to connect with other Clear Scraps fans! Thanks so much for stopping by today – we’ll see you next time!

Scrappy hugs,
lesliesig

merry Christmas

Hi everyone! Happy Friday! August has almost bit the dust and we’ll soon be into September. Just shaking my head at how fast the time is flying! Affiliate links are used in this post at no cost to you. I really appreciate your support! I’m stoked to be back on the Dies R Us Inspiration Blog today with another awesome DT inspiration project! I created a pretty Christmas card in non-traditional colors featuring the gorgeous Tutti Designs Ornament Circle! I love a pink Christmas card and I really love these new Sparkling Sheets which are so shimmery and iridescent!

I cut the Tutti Designs Ornament Circle from the pink sparkling sheet and set it aside. I cut a square top-folding card base from Neenah Classic Crest Solar White 110# cardstock along with a layering panel just a tad smaller from CutCardStock Basis Magenta cardstock. I stamped the sentiment in white ink, scored diagonal lines every half-inch in both directions on the layering panel, and adhered the panel to the card base. I adhered the die cut with spray adhesive, and added tiny iridescent gemstones inside the circular part of the die cut and several larger ones in the upper right and lower left corners to complete the front.

I cut the inside panel from Neenah Classic Crest Solar White 80# cardstock and embellished it with a strip cut from the pink sparkling sheet and a narrow strip of the CutCardStock Basis Magenta cardstock. I stamped the sentiment in pink ink and layered the panel on the magenta cardstock.

And one more peek… this die is amazing and I see more Christmas cards made with it in my future! LOVE how this turned out!

Dies R Us products used:
Tutti Designs Ornament Circle

Other products used:
Cardstock/Paper: Neenah Classic Crest 110# and 80# Solar White cardstock, CutCardStock Basis Magenta cardstock, PaperWishes Sparkling Sheets
Stamps: Lawn Fawn Happy Happy Happy stamp set, Lawn Fawn Happy Happy Happy Add-On stamp set
Ink: Memento Luxe Wedding Dress ink
Dies/Punches: Catherine Pooler Pucker Up ink
Accessories: Tonic Studios 12″ Guillotine Paper Trimmer, Bearly Art precision craft glue, , Elmer’s Craft Bond Spray Adhesive, Big Shot, MISTI stamp tool, Darice iridescent gemstones

I hope you’ve enjoyed today’s project! Be sure to check out all the fun goodies at the Dies R Us store! They not only sell dies… they also carry stamps, embossing tools and supplies, all kinds of craft supplies, slimline products and even Yupo paper! Be sure to join in the fun going on over at the Dies R Us Challenge Blog – there’s a new challenge theme posted on the 1st and 15th of each month and one lucky random winner will receive a gift voucher prize to the Dies R Us store! And be sure to ‘like’ and ‘follow’ Dies R Us Facebook Page for lots of creative inspiration and to keep up with the latest news! Thanks so much for stopping by today – we’ll see you next time! ;)

Scrappy hugs,
lesliesig

Set of 6 hello notelets

Hi everyone! A very Happy Saturday to you – I hope you’ve had a great week! Affiliate links are used in this post at no cost to you. I really appreciate your support! I’m stoked to be back on the Eyelet Outlet blog today with another awesome DT inspiration project! I created a pretty set of six ‘hello’ notelets featuring our oh-so-gorgeous Butterfly & Bird Cage Wide Washi Tape and Butterfly Brads, along with our Copper Foil Washi Tape and Clear Jewel Bling. These were super easy and look so elegant!

I used Stampin’ Up Crumb Cake 3-1/2″ x 5″ Note Cards and Envelopes. I covered six small squares with Butterfly & Bird Cage Wide Washi Tape, cut them with a Spellbinders Postage Stamps die, then layered each one on a slightly larger CutCardStock Basis Brown cardstock square. I cut six more squares from CutCardStock Basis Light Brown cardstock, covered the edges with Copper Foil Washi Tape, and adhered a layered square to each one. I cut six strips from the light brown cardstock, added the copper washi tape, and adhered one strip to each card base. I added a Butterfly Brad to each square and then adhered them to the card bases. I stamped ‘hello’ in brown ink on each card and added Clear Jewel Bling that I colored with a brown alcohol marker. I left the inside of each blank, as these are notelets.

Eyelet Outlet products used:
Butterfly & Bird Cage Wide Washi Tape
Butterfly Brads
Copper Foil Washi Tape
Clear Jewel Bling

Other products used:
Cardstock/Paper: Stampin’ Up Crumb Cake 3-1/2″ x 5″ Note Cards and Envelopes, CutCardStock Basis Light Brown cardstock, CutCardStock Basis Brown cardstock
Stamps: Brutus Monroe Super Sentimental stamp set
Ink: Memento Rich Cocoa ink; Nuvo alcohol marker- 465 Natural Browns Collection
Dies/Punches: Spellbinders Postage Stamps die
Accessories: Tonic Studios 12″ Guillotine Paper Trimmer, Bearly Art precision craft glue, Gemini Junior, MISTI stamp tool

I hope you’ve enjoyed today’s project! Be sure to check out all the fun goodies at Eyelet Outlet! I can already see you drooling, lol! Be sure to ‘like’ and ‘follow’ Eyelet Outlet Facebook Page to keep up with news and sales, and while you’re at it, join the Eyelet Outlet Fans Facebook group for lots of creative inspiration! Thanks so much for stopping by today – we’ll see you next time! ;)

Scrappy hugs,
lesliesig

thank you so much

Hi everyone! A big ole’ Happy Friday to you all! I hope you’ve had a great week and have something fun planned this weekend! Affiliate links are used in this post at no cost to you. I really appreciate your support! I’m delighted to be back on the Dies R Us Inspiration Blog today with another awesome DT inspiration project! I created a clean and simple thank you card featuring the Birch Press Design Petal Triangle Layer Set that I used in a very bright and bold fashion with a red, orange and yellow color combo! I love me some color but I have to admit that I wasn’t sure about this when I started it, but the longer I looked at the finished card the more I like it! It’s extremely rare that I don’t have some white in my cards and this has absolutely no white whatsoever!

I cut a standard A2 size side-folding card base from CutCardStock Basis Red cardstock along with a layering panel from CutCardStock Basis Gold cardstock which I adhered to the card base. Using the Birch Press Design Petal Triangle Layer Set, I cut the three pieces from CutCardStock Basis Red cardstock, CutCardStock Basis Orange cardstock, CutCardStock Basis Gold cardstock, adhered them together, and adhered the piece to the card front. I stamped the sentiment in orange ink and added some gemstones to complete the front.

I cut the inside panel from CutCardStock Basis Gold cardstock and embellished it with strips cut from CutCardStock Basis Red cardstock, CutCardStock Basis Orange cardstock, CutCardStock Basis Gold cardstock. I stamped the sentiment in orange ink and layered the panel on the orange cardstock.

And one more peek… such a simple design that really packs a powerful punch with the bright colors! This Petal Triangle Layer Set is amazing and I highly recommend any of the Birch Press Design layer sets!

Dies R Us products used:
Birch Press Design Petal Triangle Layer Set

Other products used:
Cardstock/Paper: CutCardStock Basis Red cardstock, CutCardStock Basis Orange cardstock, CutCardStock Basis Gold cardstock [Update: CutCardStock no longer carries the Basis Orange cardstock but these other orange cardstock options are available – Pop-Tone Tangy Orange, Pop-Tone Orange Fizz and Basis Dark Orange. I have all three of these in my stash so I can personally vouch for the wonderful orange colors that would be good substitutions!]
Stamps: Waffle Flower Sentiment Additions stamp set
Ink: Catherine Pooler Orange Twist ink
Accessories: Tonic Studios 12″ Guillotine Paper Trimmer, Big Shot, Bearly Art precision craft glue, MISTI stamp tool, Eyelet Outlet red jewel bling

I hope you’ve enjoyed today’s project! Be sure to check out all the fun goodies at the Dies R Us store! They not only sell dies… they also carry stamps, embossing tools and supplies, all kinds of craft supplies, slimline products and even Yupo paper! Be sure to join in the fun going on over at the Dies R Us Challenge Blog – there’s a new challenge theme posted on the 1st and 15th of each month and one lucky random winner will receive a gift voucher prize to the Dies R Us store! And be sure to ‘like’ and ‘follow’ Dies R Us Facebook Page for lots of creative inspiration and to keep up with the latest news! Thanks so much for stopping by today – we’ll see you next time! ;)

Scrappy hugs,
lesliesig

Happy Summer Days

Hi everyone! Happy Thursday – I hope you’re having a wonderful week! Hard to believe we’ve surpassed the middle of August already but I have to admit that I’m so ready for Fall and Winter to get here! I’m stoked to be back on the CutCardStock blog today with an awesome DT inspiration project featuring white cardstock, which is on sale this month (along with ivory – so be sure to stock up!) that I paired with red and green cardstock and a little bit of washi tape. Affiliate links are used in this post at no cost to you. I really appreciate your support! I created a super fun CAS Summer card boasting a picnic table with some handmade watermelon slices. I have several watermelon slice dies but they were too small for this card so I created my own with circle dies and a black marker… and what picnic is complete without little ants?!

I cut a standard A2 size top-folding card base from Neenah Classic Crest Solar White 110# cardstock along with a strip for the bottom from Neenah Classic Crest Solar White 80# cardstock which I covered in some red heart washi tape and made into a picnic table. I did my ‘thing’ of rounding the bottom right corner. I die cut green and red circles from CutCardStock Basis Red cardstock and CutCardStock Bonsai Green cardstock and layered them together, then cut them in half and cut one of the halves in half to make three slices of watermelon. I think I’ve forgotten to mention that I had to replace my Big Shot about six weeks ago because I wore the old one slam out! Have you ever heard of wearing out a Big Shot?! I guess after 11 years I got my money’s worth out of it, lol! The new one cuts like a dream. I had gotten several Magic Mats a while back and they make such a difference in cutting, plus they save a ton in cutting plates! Okay, back to the card… I added watermelon seeds with a black Flair marker, added ant brads to each slice, and adhered two of them to the picnic table. I stamped the sentiment in black ink, and the finishing touch was adding several red gemstones.

I cut the inside panel from Neenah Classic Crest Solar White 80# cardstock and embellished it with the red heart washi tape and a narrow strip of CutCardStock Basis Red cardstock, stamped the sentiment and added the remaining slice of watermelon, and layered the panel on the red cardstock.

And one more look… super happy with how this turned out! What a great Summer card created with amazing cardstock, and it was so easy to put together!

CutCardStock products used:
Neenah Classic Crest Solar White 110# and 80# cardstock
CutCardStock Basis Red cardstock
CutCardStock Bonsai Green cardstock

Other products used:
Stamps: Great Impressions Happy Summer Days sentiment stamp, Waffle Flower Sentiment Additions stamp set
Ink: PaperMate Flair Black medium point pen, Memento Tuxedo Black ink
Dies/Punches: Kadomaru Pro corner rounder, Spellbinders Standard Circles dies
Accessories: Tonic Studios 12″ Guillotine Paper Trimmer, MISTI stamp tool, Gemini Junior, Bearly Arts precision craft glue, Eyelet Outlet Mini Ant Brads, Eyelet Outlet Heart Washi Tape, Eyelet Outlet red jewel bling

I hope you’ve enjoyed today’s project and you’re inspired to get crafty! Be sure to check out all the awesome cardstock and other goodies at CutCardStock (adhesives, labels, stickers, pens, watercolors and ribbon to name a few). And head on over to the CutCardStock Facebook Page for more inspiration! Thanks so much for stopping by today – we’ll see you next time!

Scrappy hugs,
lesliesig

‘You are the sweetest’ refrigerator magnet

Hey, everybody! Well, another Hump Day has rolled around… they sure are coming and going fast these days! I’m thrilled to be back on the Clear Scraps blog today with another awesome DT inspiration project! I created a fun project that could be done with kids or grandkids – a refrigerator magnet! Who doesn’t LOVE refrigerator magnets?! And especially one that’s a shaker?! And it could even be a fun addition for a file cabinet in your crafty friend’s studio – doesn’t have to be just for kids! ;) I used the Ice Cream Mini Shaker with Sprinkles Baby Confetti as the shaker filler, and painted it in vanilla, strawberry and chocolate flavors with ivory, pink and brown chalk paint!

I started with the Ice Cream Mini Shaker and painted the top layer with ivory, pink and brown chalk paint to resemble vanilla, strawberry and chocolate ice cream flavors. I mixed some acrylic paint to get just the right color for the cone, and while it was drying I cut ivory, pink and brown patterned paper pieces and glued them into the back to show through the apertures. 

Working from the bottom up, I glued the second and third layers together and glued them to the back. I added the Sprinkles Baby Confetti to all three compartments, and removed the protective film from the back side of the acrylic piece and glued it down, trapping the shaker filler inside. I removed the protective film from the front side of the acrylic piece and glued the painted top layer down. I stamped the ‘sweet’ sentiment in black solvent ink and added several iridescent gemstones.

The final step was adding three disc magnets to the back with distress collage medium.

Clear Scraps products used:
Ice Cream Mini Shaker
Sprinkles Baby Confetti

Other products used:
Cardstock/Paper: Polly’s Paper Studio patterned paper, Hot Off The Press Sweet Pea patterned paper, P13 Always and Forever patterned paper
Stamps: Prickley Pear Stamps Berry Sweet Fruit Treats stamp set
Ink: Jet Black StazOn ink
Accessories: Plaid Folkart Sheepskin, Prominent Pink and Java chalk paint; Liquitex Burnt Umber and Raw Sienna acrylic paint, Bearly Art precision craft glue, Trinity Stamps Morganite Muse Embellishment Mix, small disc magnets

I hope you’ve enjoyed today’s project and you’re inspired to get those craft supplies out to play! Be sure to check out all the amazing acrylic, wood and chipboard goodies at Clear Scraps… OMGoodness, you won’t be disappointed! And head on over to the Clear Scraps Facebook Page for lots of inspiration! And while you’re at it, join the Clear Scraps Facebook Creative Group to connect with other Clear Scraps fans! Thanks so much for stopping by today – we’ll see you next time!

Scrappy hugs,
lesliesig

Thinking about you

8/14/22 CAS Weekly Favorite at Splitcoast Stampers!

Hi everybody! Hope you’re having a great day! We’ve been out of town today toolin’ around with a good friend and just got home a little bit ago, so thought I’d pop on to share a pretty inspiration project for Trinity Stamps that I made yesterday. Affiliate links are used in this post at no cost to you. I really appreciate your support! Trinity Stamps just released their Summer Blooms Floral Papercrafting Kit which is their first-ever kit, and the First Bloom stamp set and First Bloom die set are available as a discounted add-on bundle (20% off) if purchased with the kit. I already have the First Bloom stamps and dies in my stash, so while I’m waiting for my kit arrive, I went ahead and created a CAS friendship card with vibrant orange florals. I also used Topaz Twinkle Embellishing Mix, and the front and inside sentiments are from the Succulent Banner stamp set. Oh, and I used Arteza alcohol markers for the first time to color this image. I had three other brands of alcohol markers taking up space in my studio that I wasn’t completely happy with (colors and/or quality), so I bought a large Arteza set and donated the other three. So far, so good! ;)

I cut a standard A2 size landscape top-folding card base from Neenah Classic Crest 110# Solar White cardstock along with layering panels from CutCardStock Basis Black cardstock and CutCardStock Basis Orange cardstock which I layered together and then adhered to the card base. I stamped the image from the First Bloom stamp set in Catherine Pooler Midnight ink, colored it with alcohol markers, and cut it with the coordinating First Bloom die set. I then layered the die cut image on three more plain die cuts for some dimension, and adhered the piece to the card base. I stamped the sentiment from the Succulent Banner stamp set and added several small gemstones from Topaz Twinkle Embellishing Mix.

I cut the inside panel from Neenah Classic Crest 80# Solar White cardstock and embellished it with a wide strip of CutCardStock Basis Black cardstock and a strip of skinny black pattern washi tape. I stamped the sentiment from the Succulent Banner stamp set in black ink and layered the panel on CutCardStock Basis Orange cardstock.

And one more peek… I’m so in love with this stamp set! Now I can’t wait to get my hands on the new papercrafting kit because I know the stamps, dies, ink cubes, papers, storage pocket and rhinestones are going to be just as amazing! Woo-hoo!

Trinity Stamps products used:
First Bloom stamp set
First Bloom die set
Succulent Banner stamp set
Topaz Twinkle Embellishing Mix

Other products used:
Cardstock/Paper: Neenah Classic Crest 110# and 80# Solar White cardstock, CutCardStock Basis Black cardstock, CutCardStock Basis Orange cardstock
Ink: Catherine Pooler Midnight ink; Arteza YG13/15/17, YG01/04/05, R12/14, Y31; Versamark
Accessories: Tonic Studios 12″ Guillotine Paper Trimmer, MISTI, Big Shot, Hero Arts clear embossing powder, Me & My Big Ideas skinny black pattern washi tape

I hope you’ve enjoyed today’s project and you’re inspired to get those craft supplies out to play! Be sure to check out all the amazing stamps, dies and other goodies at Trinity Stamps! And head on over to the Trinity Stamps Facebook Page for loads of inspiration! And while you’re at it, join the Trinity Stamps Facebook community group to connect with other Trinity Stamps fans! Thanks so much for stopping by today – we’ll see you next time!

Scrappy hugs,
lesliesig