Gold Glitz and Glam Weekender Handbag

4/30/21 Best Technique Winner at Classic Design Challenge Blog!

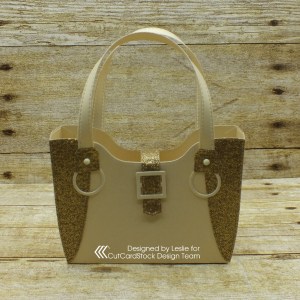
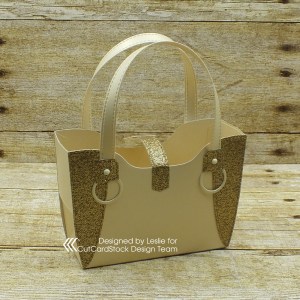
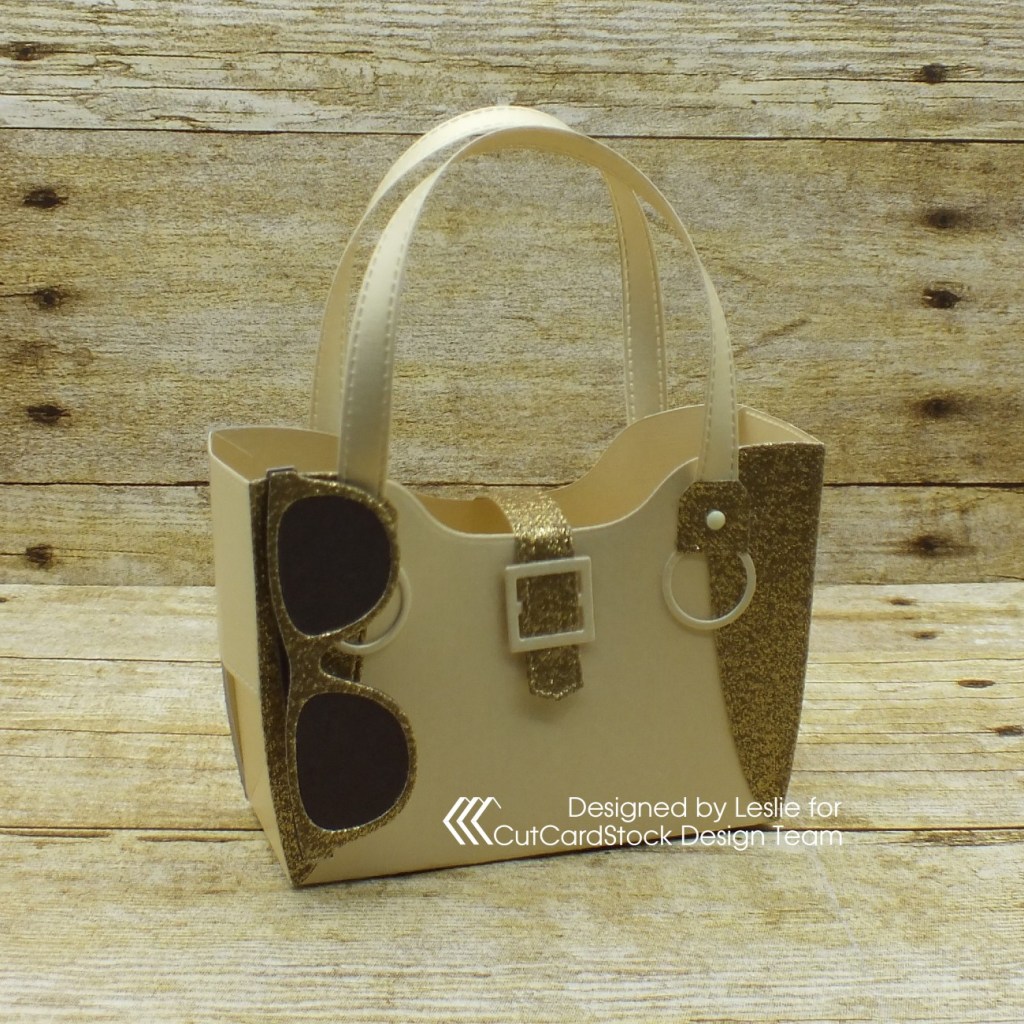
Hi everyone! I hope you’re having an awesome week! I’m stoked to be back on the CutCardStock blog today with an awesome DT inspiration project featuring some gorgeous Glitter cardstock which happens to be on sale this month so be sure to get some! Affiliate links are used in this post at no cost to you. I really appreciate your support! I created a pretty weekender handbag (for my ongoing Paper Purse series) using CCS Gold Glitter cardstock that I paired with Neenah Classic Linen Gold Pearl cardstock – which will hold a gift card, cash, chocolates or maybe some jewelry! And dig this… this handbag has a matching set of sunglasses, also made from CCS Gold Glitter cardstock, that I paired with Pop-Tone Hot Fudge cardstock! I’m so smitten with this ‘glitterlicious’ set I can hardly stand it!

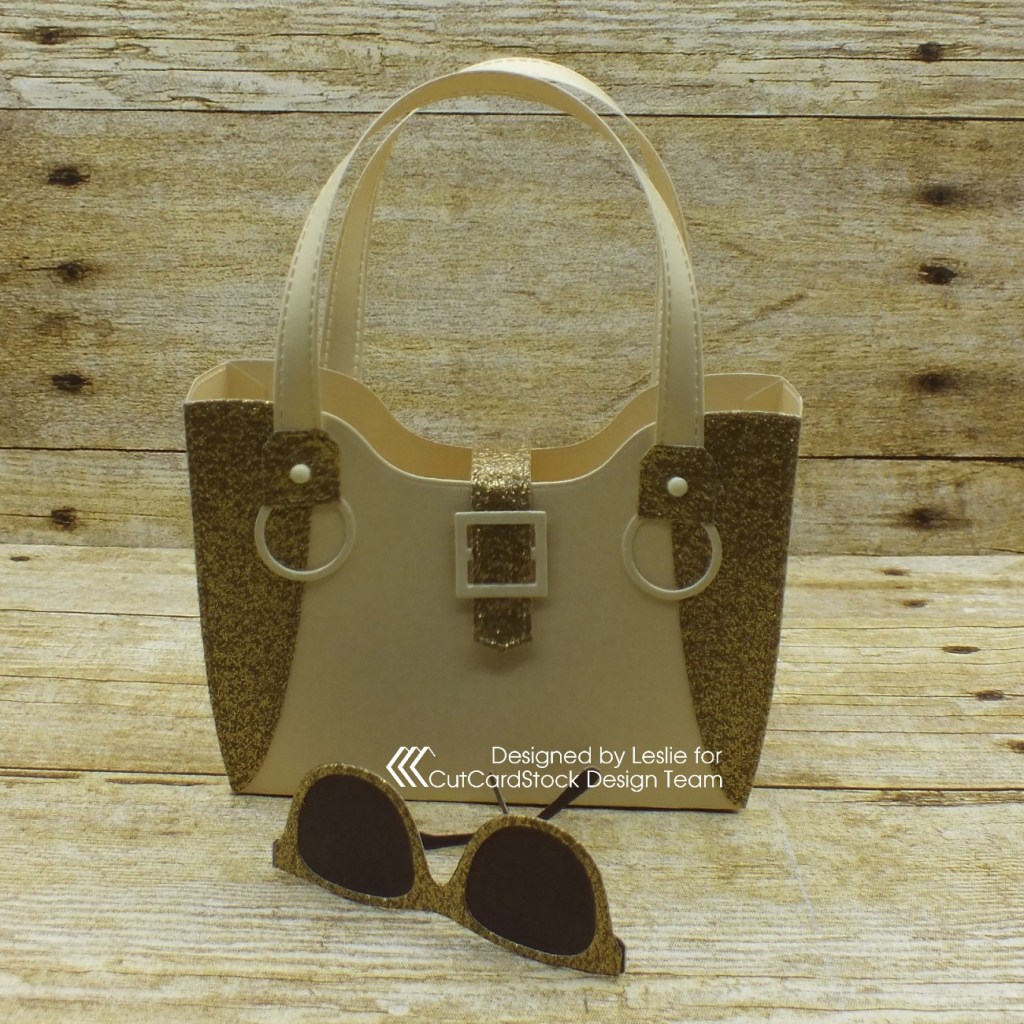
As soon as I found out about this weekender handbag die set, I had to have it! Not to mention the sunglasses die set… I had to have that set too, lol! Both die sets have coordinating stamp sets but I couldn’t work either one of those into this project… but will definitely use them in the foreseeable future, so stay tuned! I cut the purse body pieces from Neenah Classic Linen Gold Pearl cardstock, and the purse accent pieces and sunglasses pieces from CCS Gold Glitter cardstock. I cut the sunglasses lenses and another set of sunglasses pieces from Pop-Tone Hot Fudge cardstock for added stability. I assembled the sunglasses first because they are so stinkin’ cute! I adhered the gold glitter cardstock pieces to the brown cardstock pieces, sandwiching the lenses between the open eye pieces. I did this just to make the sunglasses a little sturdier. I then assembled the purse with the gold glitter accents. I added half of a Velcro circle as the closure under the center flap, and ivory enamel dots to the accent pieces just above the rings. Here are angled and full frontals and a back shot.

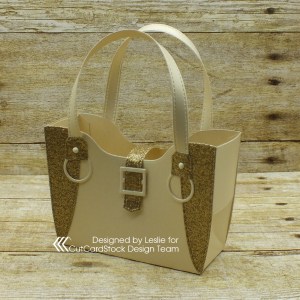
And one more peek… so loving how this turned out! I have already made some other weekender handbags using bright patterned papers and they turned out just as adorable as this one did! ;)

Sharing in the following challenges:
1. A Perfect Time To Craft Open Challenge: #4-2021 – Anything Goes
2. A Place To Start: #4 – Anything Goes / Make It Elegant
3. Classic Design Challenge: #4 April Birthday Challenge – Anything Goes
4. Crafts Galore Encore Challenge Blog: #86 – April Anything Goes
5. Jan’s Digi Stamps Challenge: April Anything Goes

CutCardStock products used:
CCS Gold Glitter 74# cardstock
Neenah Classic Linen Gold Pearl 84# cardstock
Pop-Tone Hot Fudge 65# cardstock

Other products used:
Dies/Punches: Concord & 9th Weekender Handbag Dies and Bright Eyes Dies
Accessories: Bearly Art precision craft glue, Big Shot, 5/8″ Velcro circle, Eyelet Outlet Ivory Enamel Dots

I hope you’ve enjoyed today’s project and you’re inspired to get crafty! Be sure to check out all the awesome cardstock and other goodies at CutCardStock (adhesives, labels, stickers, pens, watercolors and ribbon to name a few). And head on over to the CutCardStock Facebook Page for more inspiration! Thanks so much for stopping by today – we’ll see you next time!

Scrappy hugs,
lesliesig

sending sympathy and prayers…

Hi friends! Happy Tuesday! A new Tic Tac Toe challenge has started today over at The Outlawz Tuesday Color Challenge and our sponsor is Beccy’s Place so be sure to come on over and play! Affiliate links are used in this post at no cost to you. I really appreciate your support! I was gifted a beautiful tulips image from Beccy’s Spring Tulips digital image set and created a sympathy card. I know I’ve shared that sympathy cards don’t come easy for me and I typically don’t have many in my stash at any given time, but this design just came together like it was meant to be!

For the Tic Tac Toe challenge this fortnight, we are to use items on our project inspired from those featured in any column or row in the photo below. I was inspired by the green, teacups and tulips in the center column.

I cut a standard A2 size top-folding card base from Neenah Classic Crest Solar White 110# cardstock. Since green is my favorite color and part of the tic tac toe inspiration, I went for two green Graphic 45 coordinating papers for the background, then cut the embroidery hoop from a My Mind’s Eye wood-look paper and gave it a solid green center (another Graphic 45 paper from the same 6×6 pad). I stamped, colored and die cut a Prickley Pear Stamps coffee cup and then arranged the tulips digital image in the cup. This was a little tricky because the digi was in a water can, so I printed the image twice, colored both of them with alcohol markers and fussy cut both. Then I did some overlaying of leaves to cover the water can handle. I stamped the sentiment from the Stampin’ Up Petite Pairs stamp set ink in the upper right corner. The finishing touch was the addition of some green enamel dots.

I cut inside layering panels from Neenah Classic Crest 80# Solar White cardstock and the solid green Graphic 45 paper. I embellished the white panel with leftover strips of the striped and solid green papers used on the front, and stamped the sentiment in black ink. I layered the panels together and adhered them to the inside of the card base.

And one more look… very happy with how this turned out! I absolutely love Beccy’s tulips image and I know I’ll be creating with it again soon!

Sharing in these additional challenges:
1. 613 Avenue Create: #4 – Anything Goes w/ optional In The Garden
2. A Perfect Time To Craft Open Challenge: #4-2021 – Anything Goes
3. Classic Design Challenge: #4 April Birthday Challenge – Anything Goes
4. Jan’s Digi Stamps Challenge: April Anything Goes
5. Let’s Craft and Create: #170 – Anything Goes + Add Flowers
6. The Outlawz Monday Greetings: Flower Power
7. The Outlawz Saturday Paper a la Mode Challenge: Spring or Easter
8. The Outlawz Sunday Songs and Rhymes Challenge: Spring’s Vivid Carnival

Products used:
Cardstock/Paper: Neenah Classic Crest Solar White cardstock, Graphic 45 Botanical Tea 6×6 paper pad, My Mind’s Eye Howdy Doodie 6×6 paper pad
Stamps: Beccy’s Place Tulips digital image, Prickley Pear Stamps Coffee Cup stamp set, Stampin’ Up Petite Pairs stamp set
Ink: Nuvo alcohol markers- 381, 379, 417, 413, 405, 403, 393, 391; Pentel Slicci Gold pen, Memento Tuxedo Black ink (pad and marker)
Dies/Punches: Sizzix Embroidery die set, Coffee Cup die set
Accessories: Bearly Art precision craft glue, Tombow Mono permanent adhesive, MISTI stamp tool, Big Shot, Eyelet Outlet Green Enamel Dots

I hope you’ve enjoyed this project and will come over and join in all the fun at The Outlawz Challenges! I hope you’ll link up a project this fortnight – we’d love to see what you do with this color challenge! And be sure to check out all the fun images at Beccy’s Place! Thanks so much for stopping by – we’ll see you next time! ;)

Scrappy hugs,
lesliesig

Dad. The Man. The Myth. The Legend.

Hi everyone! Hope you’re all doing well and staying safe! Affiliate links are used in this post at no cost to you. I really appreciate your support! I’m happy to be back on the Eyelet Outlet blog today with another awesome DT inspiration project! I created a cool Father’s Day card featuring lots of manly brads and washi tape! Oh, so fun!

I cut a standard A2 size top-folding landscape card base from Neenah Classic Crest Solar White 110# cardstock. I then cut strips from Neenah Classic Crest Solar White 80# cardstock and CutCardStock Royal Sundance Linen Burgundy cardstock which I layered together and added a strip of Tool Washi Tape across the bottom. I adhered a very thin strip of the burgundy linen cardstock across the top edge of the washi tape for a little definition. I added Tool Box and Nail Brads, Tool Brads and Screw Brads to the panel before adhering it to the card base on foam pads. I stamped the sentiment in red ink, cut it with a stitched square die, and adhered it to the panel.

I cut inside layering panels from Neenah Classic Crest Solar White 80# cardstock and CutCardStock Royal Sundance Linen Burgundy cardstock, and embellished the white panel with a strip of Tool Washi Tape across the bottom along with a very narrow strip of the burgundy linen cardstock adhered across the top edge of the washi tape. I stamped the sentiment in red ink, layered the panels together and adhered them to the inside of the card base.

One more peek… such a fun design! And what man doesn’t love tools?!

Sharing in the following challenges:
1. A Perfect Time To Craft Open Challenge: #4-2021 – Anything Goes
2. Classic Design Challenge: #4 April Birthday Challenge – Anything Goes

Eyelet Outlet products used:
Tool Washi Tape
Tool Box and Nail Brads
Tool Brads
Screw Brads

Other products used:
Cardstock/Paper: Neenah Classic Crest Solar White cardstock, CutCardStock Royal Sundance Linen Burgundy cardstock
Stamps: The Project Bin Classic Man stamp set
Ink: Memento Rhubarb Stalk ink
Dies/Punches: My Favorite Things Die-namics Stitched Square STAX die
Accessories: Tombow Mono permanent adhesive, MISTI stamp tool

I hope you’ve enjoyed today’s project! Be sure to check out all the fun goodies at Eyelet Outlet! I can already see you drooling, lol! Be sure to ‘like’ and ‘follow’ Eyelet Outlet Facebook Page to keep up with news and sales, and while you’re at it, join the Eyelet Outlet Fans Facebook group for lots of creative inspiration! Thanks so much for stopping by today – we’ll see you next time! ;)

Scrappy hugs,
lesliesig

merry & bright

Hi friends! Happy Fri-YAY! It’s definitely a YAY day for me because I’m finally able to announce that I’ve joined the Dies R Us Design Team! Woo-hoo! Affiliate links are used in this post at no cost to you. I really appreciate your support! I’m delighted to be on the Dies R Us Inspiration Blog today with my debut DT inspiration project! I created a pair of Christmas cards featuring the absolutely gorgeous Birch Press Design Mini Snowflake Frame Layer Set! I am so in love with this entire line!

These two cards are very similar but slightly different. I die cut two sets of snowflake frame layers from CutCardStock Stardream Metallic Aquamarine cardstock, CutCardStock Stardream Metallic Lagoon cardstock and CutCardStock Silk Glitter Silvermist cardstock, assembled them, and set them aside. I reversed the top and middle layer colors – the top layer of the snowflake on the left is the slightly darker teal color whereas the one on the right is light teal.

I cut a standard A2 size card base from Neenah Classic Crest 110# Solar White cardstock for each card along with front layering panels from CutCardStock Basis Teal cardstock and teal double-sided patterned paper which I layered together (reversing the sides of the paper for each card) and adhered to the card base. I then adhered a snowflake frame to each card front. I stamped the sentiment twice in Versamark on CutCardStock Basis Teal cardstock and heat embossed them in white. I cut them in strips and adhered them with Scotch 3M foam tape.

I cut inside layering panels for each card from CutCardStock Basis Teal cardstock and Neenah Classic Crest 80# Solar White cardstock, and adhered them together. I embellished each panel with a strip of teal double-sided patterned paper and narrow strip of teal cardstock used on the front, stamped the sentiment in teal ink on each, and adhered a panel to the inside of each card base.

And one more peek… I can’t even begin to tell you how much I love these cards! This die set is amazingly gorgeous and I was extremely lucky to have the patterned paper to match the light and dark teal Stardream Metallic cardstock!

Sharing in the following challenges:
1. A Perfect Time To Craft Open Challenge: #4-2021 – Anything Goes
2. Classic Design Challenge: #4 April Birthday Challenge – Anything Goes
3. Crafts Galore Encore Challenge Blog: #86 – April Anything Goes
4. The Outlawz Festive Fridays Challenge: Christmas
5. Your Scrapbook Place: April Anything Goes

Dies R Us products used:
Birch Press Design Mini Snowflake Frame die set
Versamark

Other products used:
Cardstock/Paper: Neenah Classic Crest 110# and 80# Solar White cardstock, CutCardStock Stardream Metallic Aquamarine cardstock, CutCardStock Stardream Metallic Lagoon cardstock, CutCardStock Silk Glitter Silvermist cardstock, CutCardStock Basis Teal cardstock, Sunny Studio Polka-dot Parade 6×6 double-sided papers
Stamps: Paper Smooches Holiday Cheer stamp set
Ink: Memento Teal Zeal ink
Accessories: Bearly Art precision craft glue, Tombow Mono permanent adhesive, Big Shot, MISTI stamp tool, Hero Arts White embossing powder, Milwaukee heat tool, ScraPerfect Perfect Crafting Pouch and Perfect Cleaning Cloth, Scotch 3M foam tape

I hope you’ve enjoyed today’s project! Be sure to check out all the fun goodies at the Dies R Us store! They not only sell dies… they also carry stamps, embossing tools and supplies, all kinds of craft supplies, slimline products and even Yupo paper! Be sure to join in the fun going on over at the Dies R Us Challenge Blog – there’s a new challenge theme posted on the 1st and 15th of each month and one lucky random winner will receive a gift voucher prize to the Dies R Us store! And be sure to ‘like’ and ‘follow’ Dies R Us Facebook Page for lots of creative inspiration and to keep up with the latest news! Thanks so much for stopping by today – we’ll see you next time! ;)

Scrappy hugs,
lesliesig

cat hair note card

Hi everyone! Lots of posts to see today on my blog – this always happens on the first day of the month! Affiliate links are used in this post at no cost to you. I really appreciate your support! Our new challenge is live over at Love To Craft Challenge Blog this morning and I’m stoked to share my DT inspiration project for LTCCB #57 – April Anything Goes! I downloaded a cool app on my phone several months ago and transformed a photo of our guy, Loki, into a watercolor image. I’ve had this awesome pic in my photos waiting to do something with it, so I worked up a fun note card!

LOL, did the title of this post make you giggle?! Anybody who owns cats knows all about cat hair! This sentiment just cracked me up because it’s so true! I created my go-to A2 size top-folding card base from Neenah Classic Crest Solar White cardstock. I printed the image on glossy photo paper and cut it with a stitched square die. I used the JustRite Stitched A2 Banners and Rectangles die set to create the background, stamped the sentiment in black ink at the bottom and added a few tiny black gemstones.

I cut the inside panel from Neenah Classic Crest Solar White cardstock and embellished it with a single strip of green cardstock, stamped the paw prints in the lower left corner, and layered the panel on black cardstock. Since it’s a note card, I left plenty of room to write a custom message.

And another peek… totally loving how this turned out! Super simple design that could easily be mass produced for a fun gift set!

Sharing in the following challenges:
1. 2 Crafty Critter Crazies: #49 – Anything Goes
2. A Perfect Time To Craft Open Challenge: #4-2021 – Anything Goes
3. Classic Design Challenge: #4 April Birthday Challenge – Anything Goes
4. Moving Along With The Times: #129 – Animals/Birds

Products used:
Cardstock/Paper: Neenah Classic Crest Solar White cardstock, GKD Grass Green cardstock, American Crafts Black cardstock
Stamps: Frantic Stamper Cat Happiness stamp set
Ink: Memento Tuxedo Black ink
Dies/Punches: My Favorite things Die-namics Stitched Square STAX die, JustRite Stitched A2 Banners and Rectangles die set
Accessories: Bearly Art precision craft glue, Tombow Mono permanent adhesive, Gemini Junior, MISTI stamp tool, Darice tiny black gemstones

I hope you’ve enjoyed today’s project and will link up with us this month! We’d love to see what you’re working on! Thanks so much for stopping by today – we’ll see you again soon! ;)

Scrappy hugs,
lesliesig

Happy Mother’s Day

Happy Thursday, friends! Have you any April Fool’s Jokes planned to play on anybody?! I can’t believe how fast this year is going by! Affiliate links are used in this post at no cost to you. I really appreciate your support! Our new challenge is live this morning over at Love To Scrap Challenge Blog and I’m thrilled to share my DT inspiration project for LTSCB #144 – Spring Forward! Yep, we want to see your Spring-themed projects! I’m sharing a pretty Mother’s Day card that I was commissioned to make which features a gorgeous heat embossed Clearly Besotted floral spray. Honestly, you can’t go wrong with a card like this! Mother’s Day is almost upon us so you’ll be seeing a few scattered about my blog! ;)

I cut a standard A2 sized top-folding card base from Neenah Classic Crest Solar White cardstock along with slightly smaller white and pink layering panels. I stamped the floral image in black ink on the white panel and then in Versamark (right over the top of the black ink), and heat embossed it with clear embossing powder. I’ve mentioned many times that this is a trick I discovered years and years ago to give virtually any color embossing. ;) I colored the image with alcohol markers and stamped the sentiment. I adhered the panel to the pink layer and then adhered the piece to the card base. The final touch was adding Crystal Drops.

I cut the inside panel from Neenah Classic Crest Solar White cardstock and kept it simple with just a stamped sentiment and layering the panel on the pink cardstock.

And one more look… totally loving how this turned out!

Sharing in the following challenges:
1. A Perfect Time To Craft Open Challenge: #4-2021 – Anything Goes
2. Classic Design Challenge: #4 April Birthday Challenge – Anything Goes
3. The Outlawz Monday Greetings: Flower Power
4. Your Scrapbook Place: April Anything Goes

Products used:
Cardstock/Paper: Neenah Classic Crest Solar White cardstock, Stampin’ Up Watermelon Wonder cardstock
Stamps: Clearly Besotted One In A Million stamp set, Dare 2B Artzy Flowers For Mom stamp set
Ink: Memento Tuxedo Black ink; Versamark, Nuvo alcohol markers- 413, 415, 417, 449, 451, 453, 473, 403, 405, 389, 391, 401
Accessories: Tombow Mono permanent adhesive, Tim Holtz Stamp Platform, Hero Arts Clear embossing powder, Milwaukee heat tool, Nuvo Ivory Seashell Crystal Drops

I hope you’ve enjoyed this card and will link up a Spring project with us this month! Thanks so much for stopping by today – we’ll see you again soon! ;)

Scrappy hugs,
lesliesig

Christmas Gift Card Holder

Hi friends! Well, the first quarter of 2021 is history as they say! Wow! Affiliate links are used in this post at no cost to you. I really appreciate your support! Our new challenge launched this morning over at Merry Little Christmas Challenge Blog and I’m excited to share my DT inspiration project for MLCCB #33 – April Anything Christmas Goes! I have an adorable Christmas gift card holder to share today, created with the Prickley Pear Stamps Build A Cat stamps and dies. OMG, can you say a-DOR-able?! I love playing with these cat stamps and dies!

This gift card holder is one of my most favorite fun folds because it’s so versatile and can be used for any occasion that you could possibly think of! In addition to a gift card, you could tuck cash or handmade coupons or whatever you want in this – think outside the box!

I used a Christmas patterned paper which I paired with red textured cardstock to embellish the Neenah Classic Crest Solar White cardstock base. I stamped a sentiment for the inside, trimmed it and layered it on red cardstock. I stamped the cat in black ink on a white cardstock scrap, colored him with alcohol markers and cut him with the coordinating dies. I cut a stitched mini scallop circle on which I adhered the cat to use as the front closure.

And one more look… love, love, love this! This fold is probably one of the most-used in my tutorial arsenal!

Sharing in the following challenges:
1. A Perfect Time To Craft Open Challenge: #4-2021 – Anything Goes
2. Classic Design Challenge: #4 April Birthday Challenge – Anything Goes

Products used:
Cardstock/Paper: Neenah Classic Crest Solar White cardstock, Darice red textured cardstock, American Crafts Christmas 6×6 paper pad
Stamps: Prickley Pear Stamps Build A Cat clear stamp set
Ink: Memento Tuxedo Black ink; Nuvo alcohol markers- 416, 379; Spectrum Noir alcohol markers- TN5, TN6
Dies/Punches: Prickley Pear Stamps Build A Cat die set, Kadomaru Pro corner rounder, My Favorite Things Die-namics Stitched Mini Scallop Circle STAX die
Accessories: Tombow Mono permanent adhesive, Bearly Art precision craft glue, MISTI stamp tool, Gemini Junior

I hope you’ve enjoyed seeing this little gift card holder and will link up a Christmas project with us this month! We’d love to see what you create! Thanks so much for stopping by today – we’ll see you soon! ;)

Scrappy hugs,
lesliesig

Christmas Memories Accordion Album

Howdy, peeps! I hope you have an awesome April Fools Day today! Our April challenge is live over at Mix It Up Challenge Blog and I’m stoked to share my DT inspiration project for MIUCB #48 – Anything Goes + No Stamping! All of our challenges are ‘anything goes’ and we offer a technique twist each month just to inspire you. Our twist this month is ‘no stamping’ and the twist is not required to play! I created a fun Christmas Memories accordion album which has no stamping and is decorated entirely with PhotoPlay elements and die cuts. I love creating mini albums and since Christmas is on it’s way again, I thought it would be fun to create one with a Christmas theme! Yep, I’m always in Christmas mode even if it is only April, lol!

I created a 4-1/2″ square accordion album base from vanilla cardstock with eight pages. I cut eight panels from Christmas patterned paper which I layered on slightly larger green cardstock panels and adhered one to each page. I die cut squares and circles from the vanilla cardstock and adhered them to several of the pages. I decorated the front, back, the inside panels and belly band with PhotoPlay Christmas elements.

And one more look… Totally loving how this turned out!

Sharing in the following challenges:
1. A Perfect Time To Craft Open Challenge: #4-2021 – Anything Goes
2. Classic Design Challenge: #4 April Birthday Challenge – Anything Goes
3. Your Scrapbook Place: April Anything Goes

Products used:
Cardstock/Paper: American Crafts Vanilla cardstock, GKD Fresh Asparagus cardstock, PhotoPlay Holiday Cheer Collection Pack
Dies/Punches: Memory Box Stitched Circle Layers die, My Favorite Things Die-namics Stitched Square STAX die
Accessories:  ScraPerfect Best Glue Ever, Gemini Junior

I hope you’ve enjoyed this project and will link up with us this month! We always love seeing your ‘anything goes’ projects – and we absolutely love it when you play the twist, but just remember, the twist is not required to play! Thanks so much for stopping by today – we’ll see you next time! ;)

Scrappy hugs,
lesliesig

wish you were here

Hi everyone! The last several days are a blur and the weekend is here already! I’m retired and it seems that I’m busier now than I’ve ever been – even when I was raising kids and working full-time outside the home! Affiliate links are used in this post at no cost to you. I really appreciate your support! I’m thrilled to be back on the Eyelet Outlet blog today with another awesome DT inspiration project! I created a fun ‘missing you’ card featuring a very cool assortment of washi tape and brads!

I created a top-folding A2 size landscape card base and a slightly smaller panel from Neenah Classic Crest Solar White cardstock and built my country road scene from Sky Washi Tape – Wide, Grass Washi Tape and Road Washi Tape. I added the little Red Truck Brad and some Summer Tree Brads, and then stamped the birds and sentiment in Jet Black ink.

I cut the inside panel from Neenah Classic Crest Solar White cardstock and embellished it with a strip of the grass washi tape, stamped the sentiment in black ink and layered the panel on green cardstock.

One more look… such an adorable card and I love the way it turned out! I grew up in a rural area and this sure does remind me of being the only vehicle on a country road sometimes for miles and miles!

Eyelet Outlet products used:
Sky Washi Tape – Wide
Grass Washi Tape
Road Washi Tape
Red Truck Brads
Summer Tree Brads

Other products used:
Cardstock/Paper: Neenah Classic Crest Solar White cardstock, CutCardStock Gumdrop Green cardstock
Stamps: Paper Smooches Sweet Escape stamp set, Inspired by Stamping Seaside stamp set
Ink: StazOn Jet Black ink, Memento Tuxedo Black ink
Accessories: Tombow Mono permanent adhesive, MISTI stamp tool

I hope you’ve enjoyed today’s project! Be sure to check out all the fun goodies at Eyelet Outlet! I can already see you drooling, lol! Be sure to ‘like’ and ‘follow’ Eyelet Outlet Facebook Page to keep up with news and sales, and while you’re at it, join the Eyelet Outlet Fans Facebook group for lots of creative inspiration! Thanks so much for stopping by today – we’ll see you next time! ;)

Scrappy hugs,
lesliesig

BOO!

Hi friends! I hope your week has started off with a fabulous note! Affiliate links are used in this post at no cost to you. I really appreciate your support! A new ‘1 Color Pick 2 Plus Twist’ challenge has started today over at The Outlawz Tuesday Color Challenge and our sponsor is Fabrika Fantasy so be sure to come on over and play! I’m still (always? LOL) in a fun fold mode, so I created a hybrid front flap card featuring the adorable Fabrika Fantasy Halloween Cat digital image from my stash.

It sounds complicated but it’s really not. For the ‘1 Color Pick 2 Plus Twist’ challenge this fortnight, one color (white) is already given and we must pick two additional colors from the photo below and name our twist. I used purple and green with the white and my twist is Critters.

I printed the precolored image on 60# Hammermill copy paper, cut it with a stitched circle die, and layered it on a slightly larger stitched circle die cut cut from CutCardStock Granny Smith cardstock. I created the card base from purple cardstock and covered the front flap and background with coordinating Halloween patterned papers, and adhered the focal image to the flap.

I die cut the ‘BOO!’ sentiment from the purple cardstock, layering three die cuts together for a little dimension, and adhered it to the front flap, and then added three tiny iridescent gemstones.

I cut the panel under the front flap from Neenah Classic Crest Solar White cardstock and embellished it with a strip of patterned paper and narrow strip of CutCardStock Granny Smith cardstock, and stamped a large sentiment in purple ink. This is an extra-added peek-a-boo type of element. ;)

I cut the back panel from Neenah Classic Crest Solar White cardstock and embellished it with a wide strip of the Halloween patterned paper and a narrow strip of CutCardStock Granny Smith cardstock, and stamped another sentiment. This panel is for a signature.

And one more look… totally smitten with this Halloween Cat! Such an adorable image! And I LOVE this card fold!

Sharing in the following challenges:
1. A Perfect Time To Craft Open Challenge: #03-2021 – Anything Goes
2. Classic Design Challenge: #3 – Anything Goes
3. Crafty Catz: #543 – Anything Goes w/ optional Fantasy-Make It Magical (playing twist)
4. Crafty Gals Corner: #217 – Make It Green
5. Creative Memories: #211 – Anything Goes
6. Cut It Up Challenge Blog: #221 – Just For Kids
7. Inkspirational Challenges: #235 – Fur/Feathers
8. Lil Patch of Crafty friends: #154
9. Pammie’s Inky Pinkies Challenges: #2112
10. The Crafter’s Cafe: #262 – Seasons (Fall/Halloween)

Products used:
Cardstock/Paper: Papertrey Ink Amethyst Allure cardstock, Neenah Classic Crest Solar White cardstock, CutCardStock Granny Smith cardstock, The Paper Studio Four Seasons and Everything In Between -2- paper pad, 60# Hammermill copy paper
Stamps: Stampin’ Up Howl-o-ween Treat stamp set, The Project Bin Haunt It stamp set
Ink: Memento Grape Jelly ink
Dies/Punches: Stampin’ Up Boo To You Framelits, Memory Box Stitched Circle Layers dies
Accessories: Bearly Art precision craft glue, Tombow Mono permanent adhesive, MISTI stamp tool, Big Shot, Darice tiny iridescent gemstones

I hope you’ve enjoyed this project and will come over and join in all the fun at The Outlawz Challenges! I hope you’ll link up a project this fortnight – we’d love to see what you do with this color challenge! And be sure to check out all the fun images at Fabrika Fantasy! Thanks so much for stopping by – we’ll see you next time! ;)

Scrappy hugs,
lesliesig