Meowy Christmas

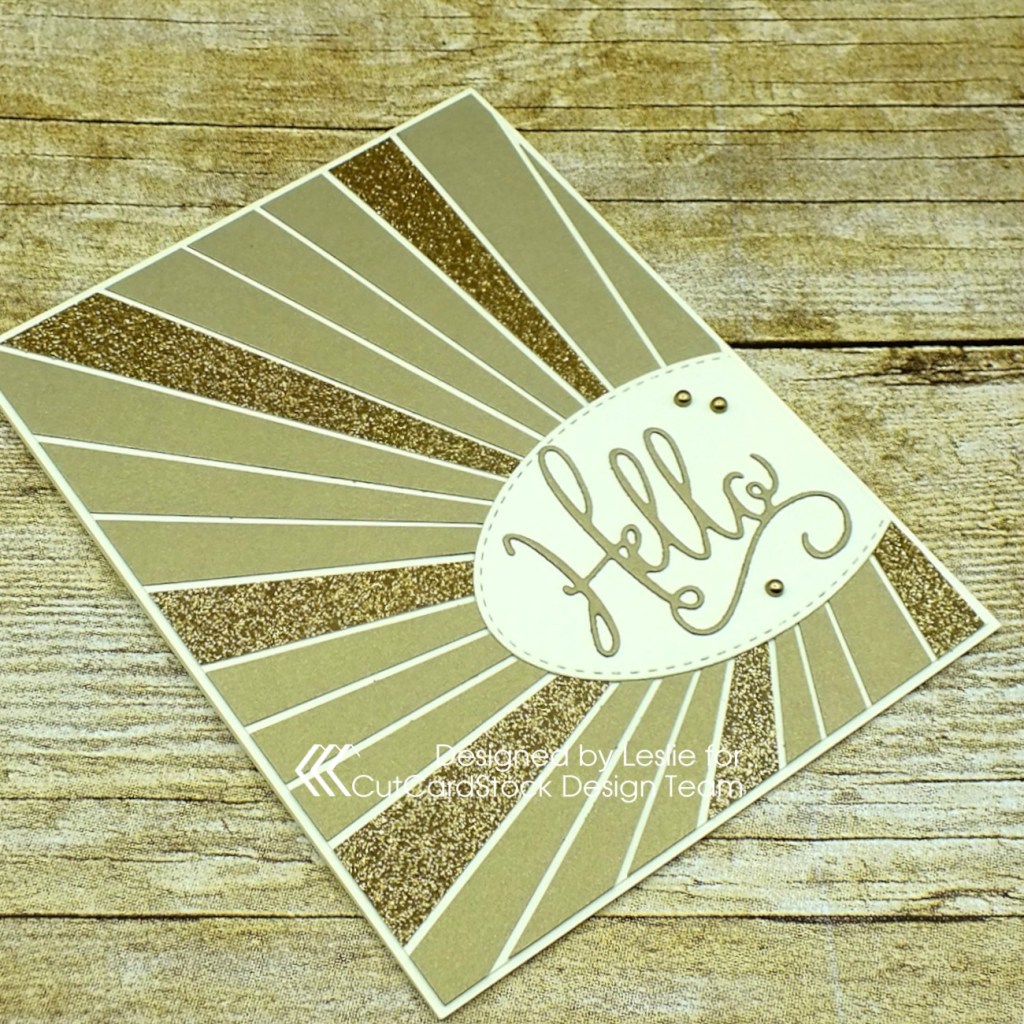
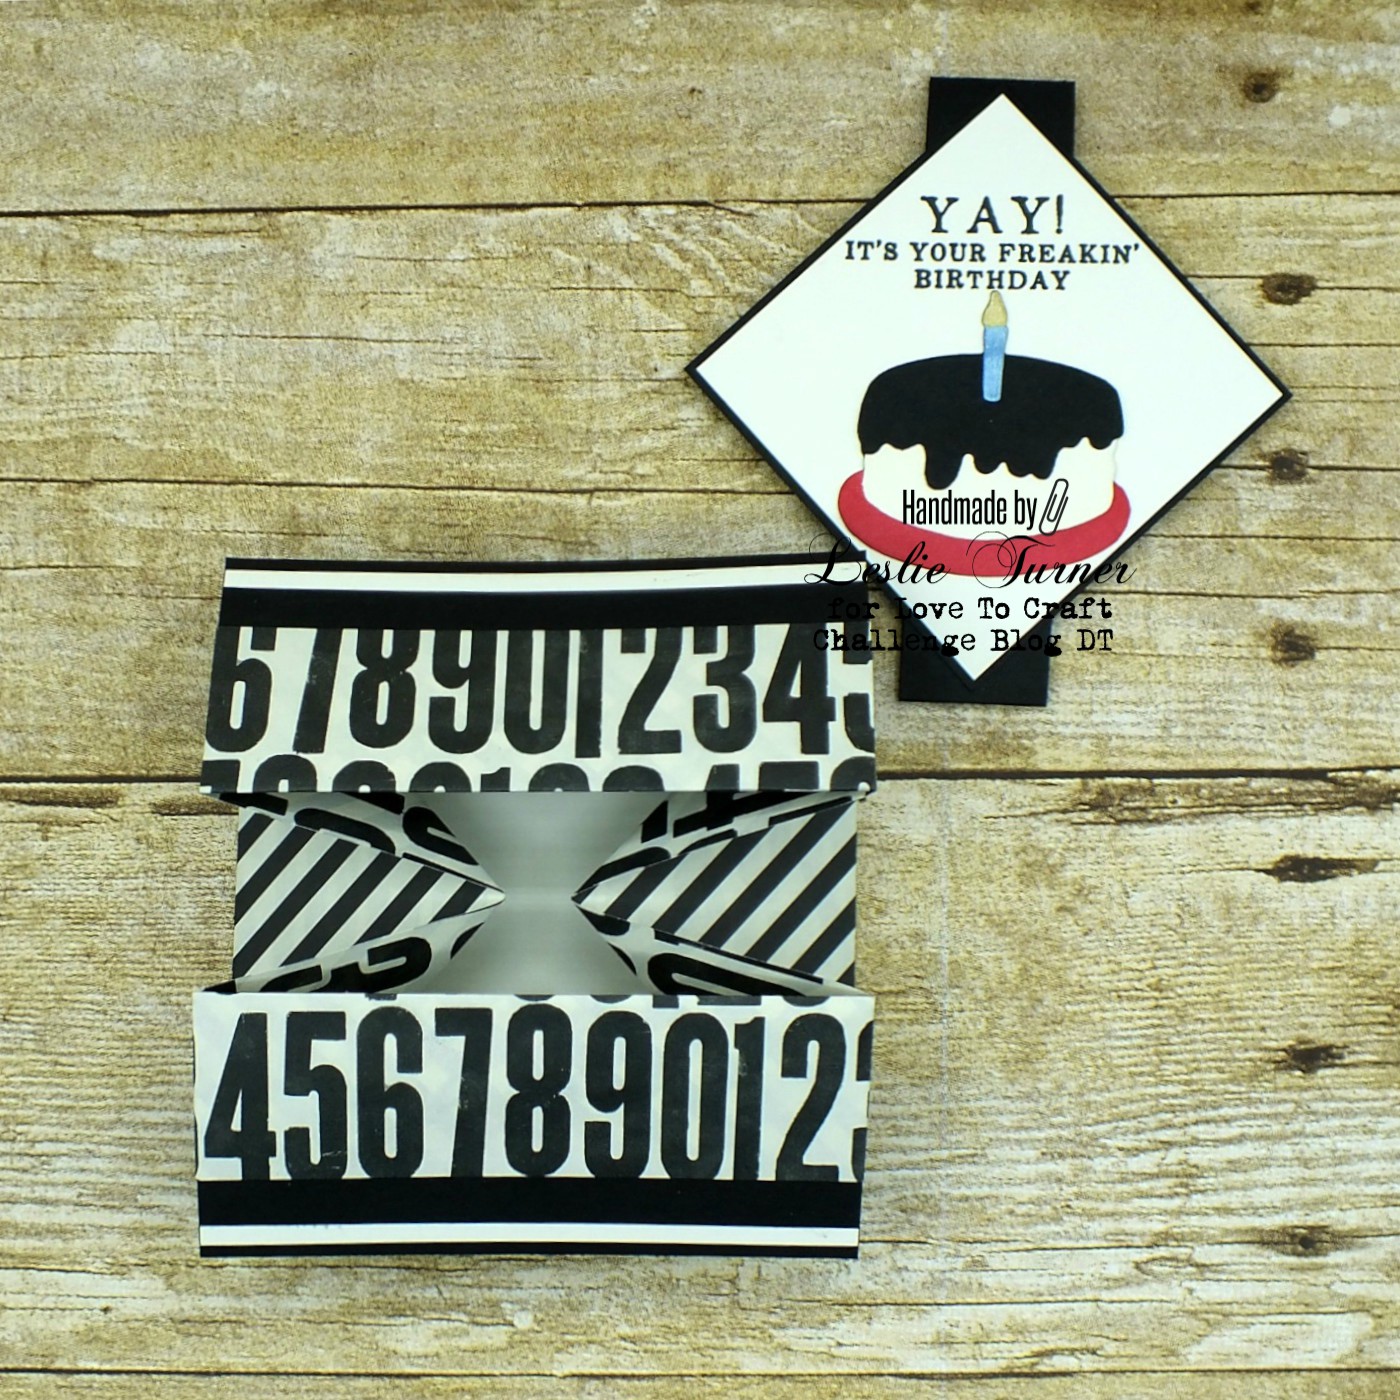
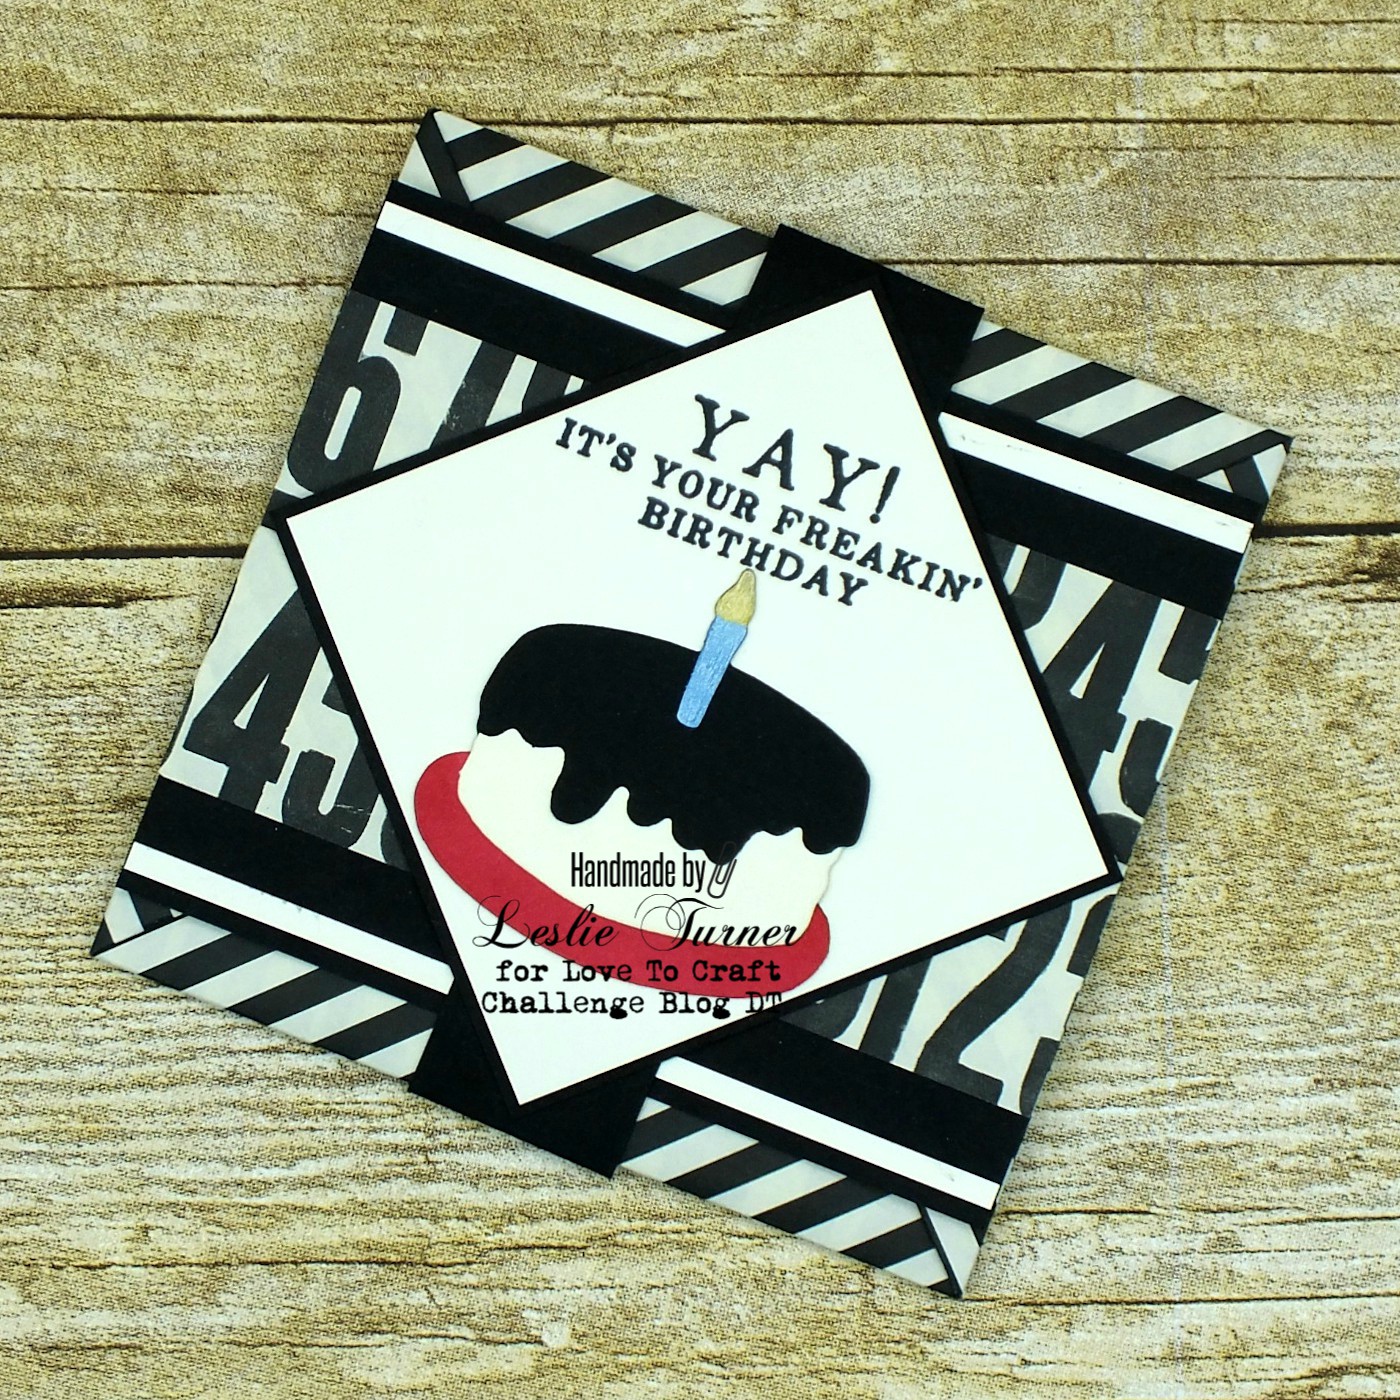
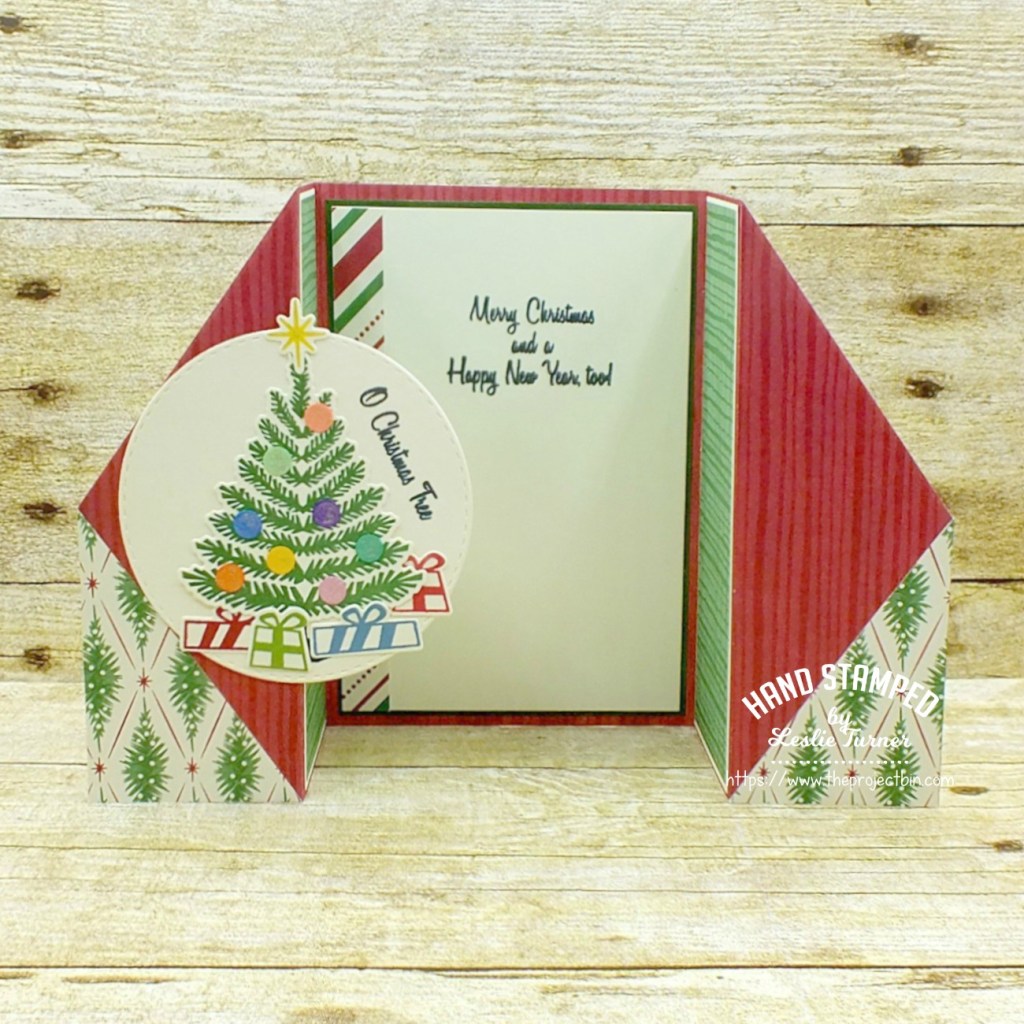
Hi friends! I’ve popped in to share another sample I created for Prickley Pear Stamps! I’m having the best time playing with these amazing stamps and dies, and I have several samples to share in between the Hochanda samples. This is an adorable center panel easel card featuring the Build A Cat 2 clear stamp set and the coordinating Build A Cat die set. We are ‘crazy cat people’ so any opportunity I get to create a cat card, especially a Christmas cat card, I’m on it!

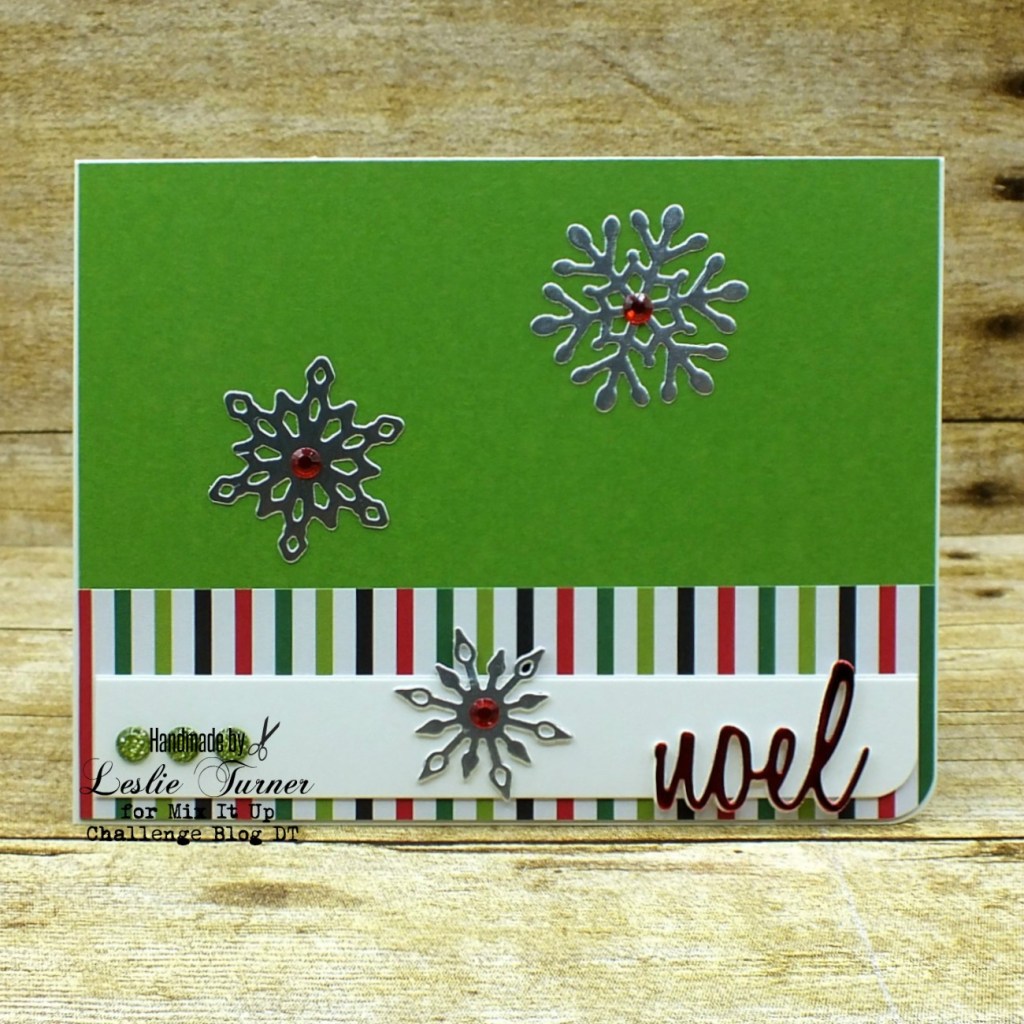
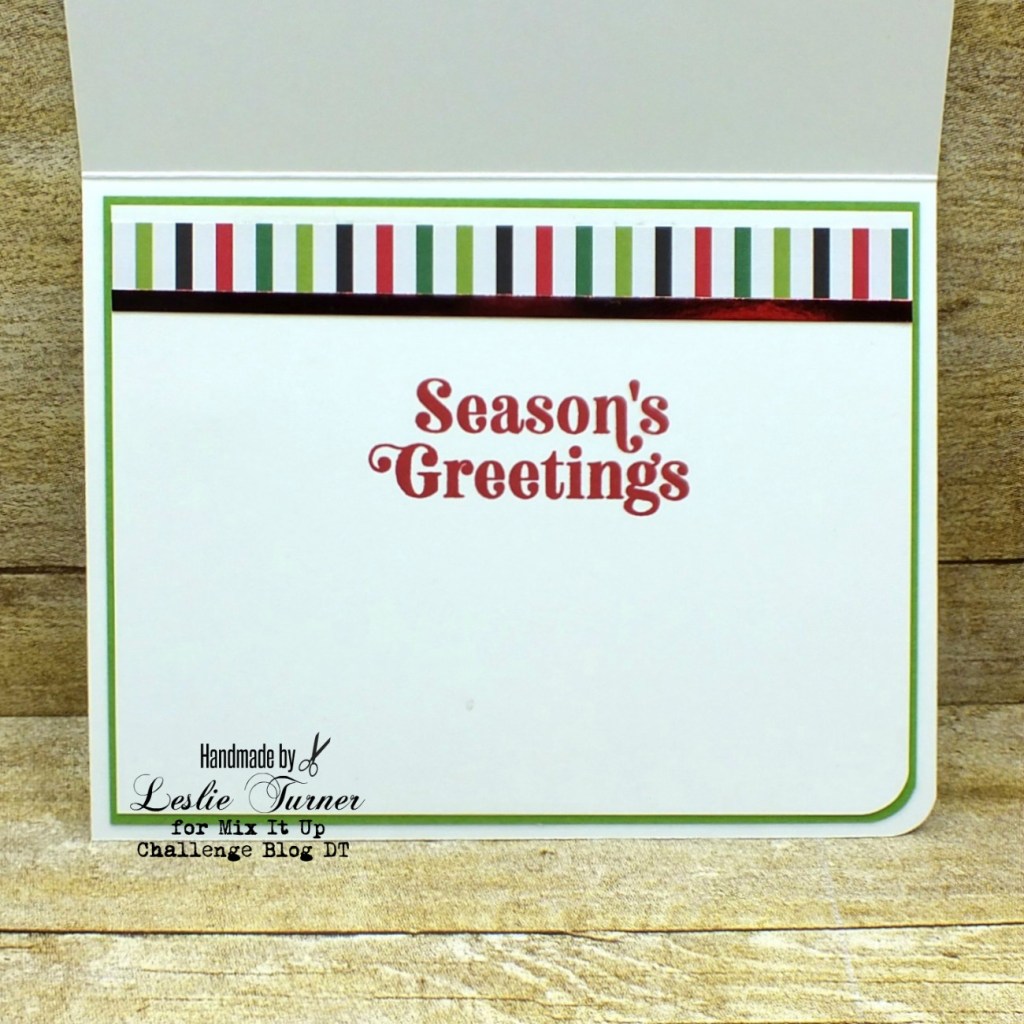
I’ve had the instructions for this center panel easel card in my tutorial folder for quite some time and I’ve made a few of them over the years. I paired plaid and glitter papers from a fun 6×6 Christmas paper pad with some matching green cardstock. I colored the kitty’s bows green to match the card and I used a rather lonely border die in my stash that doesn’t get much use to create the glittery rick-rack die cuts on the sides, and a couple circle punches for the stamped sentiment.

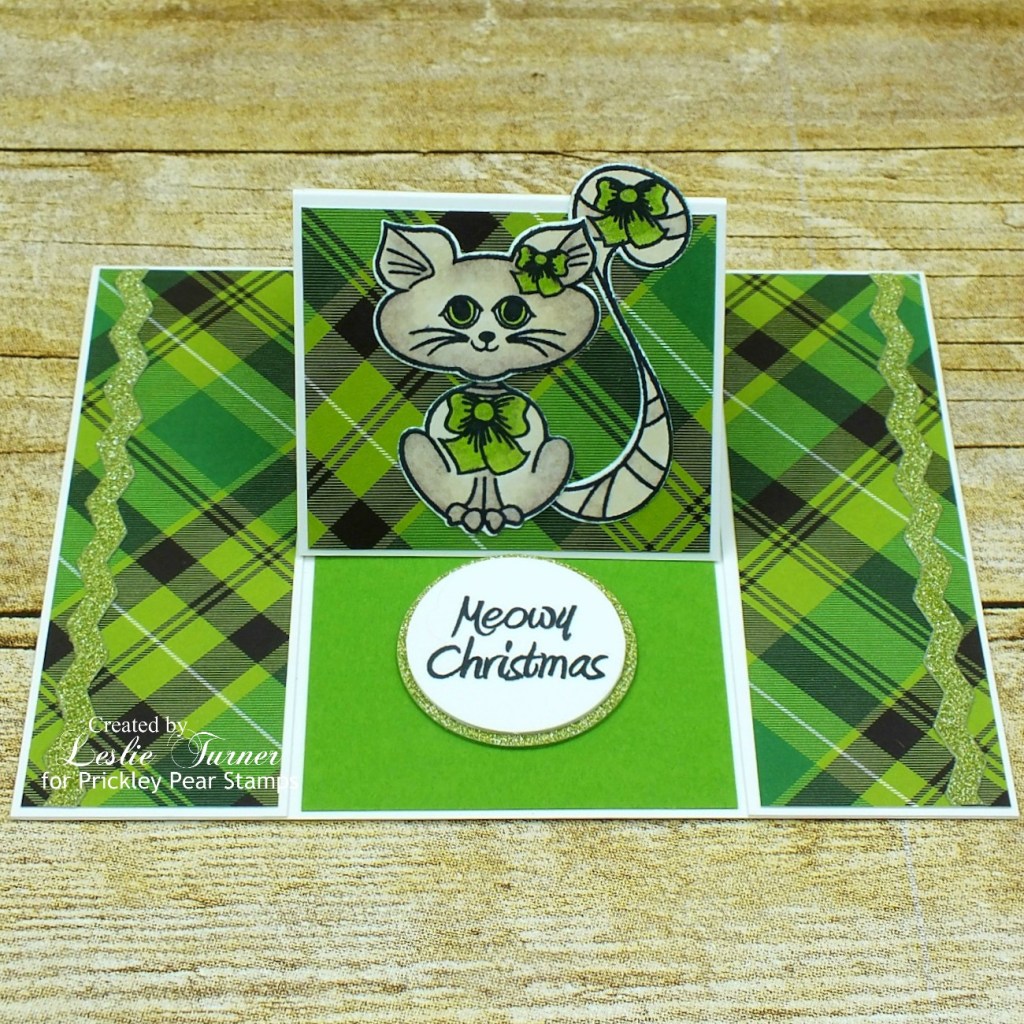
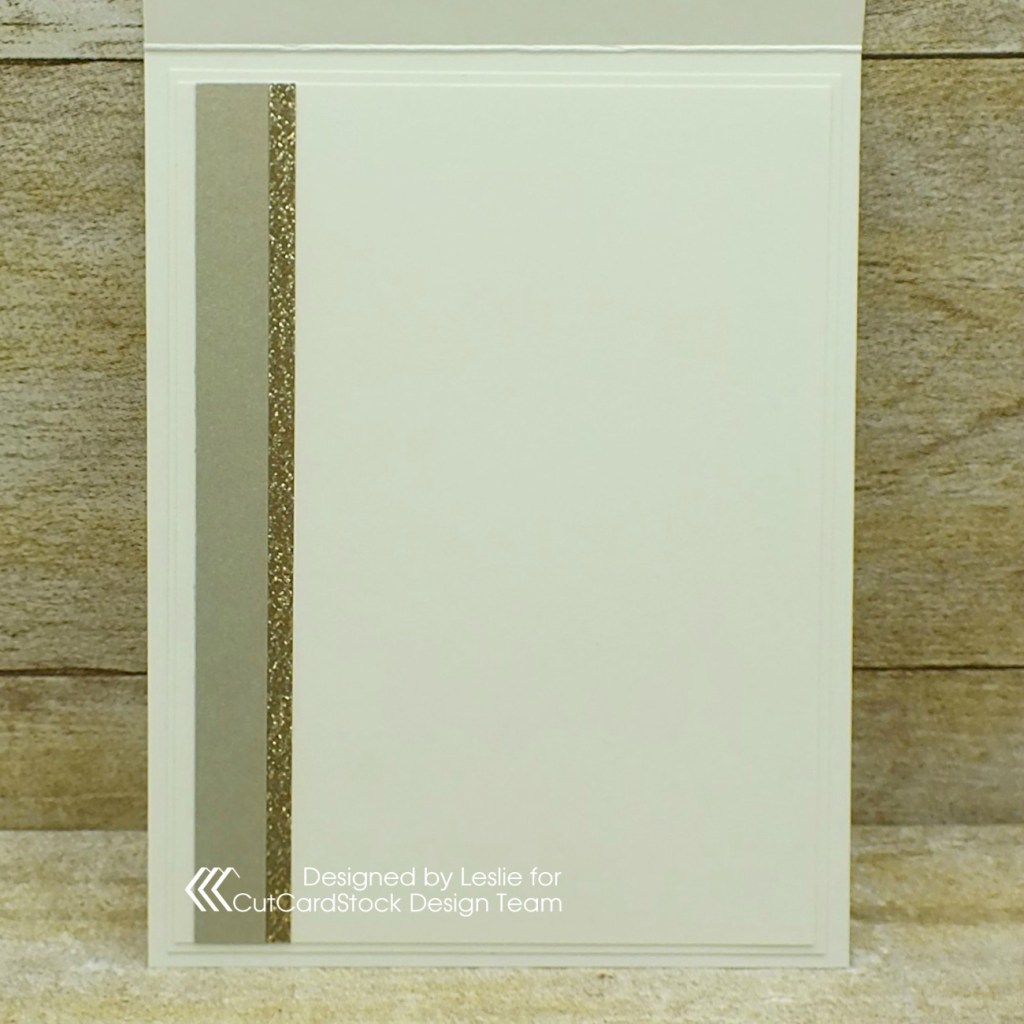
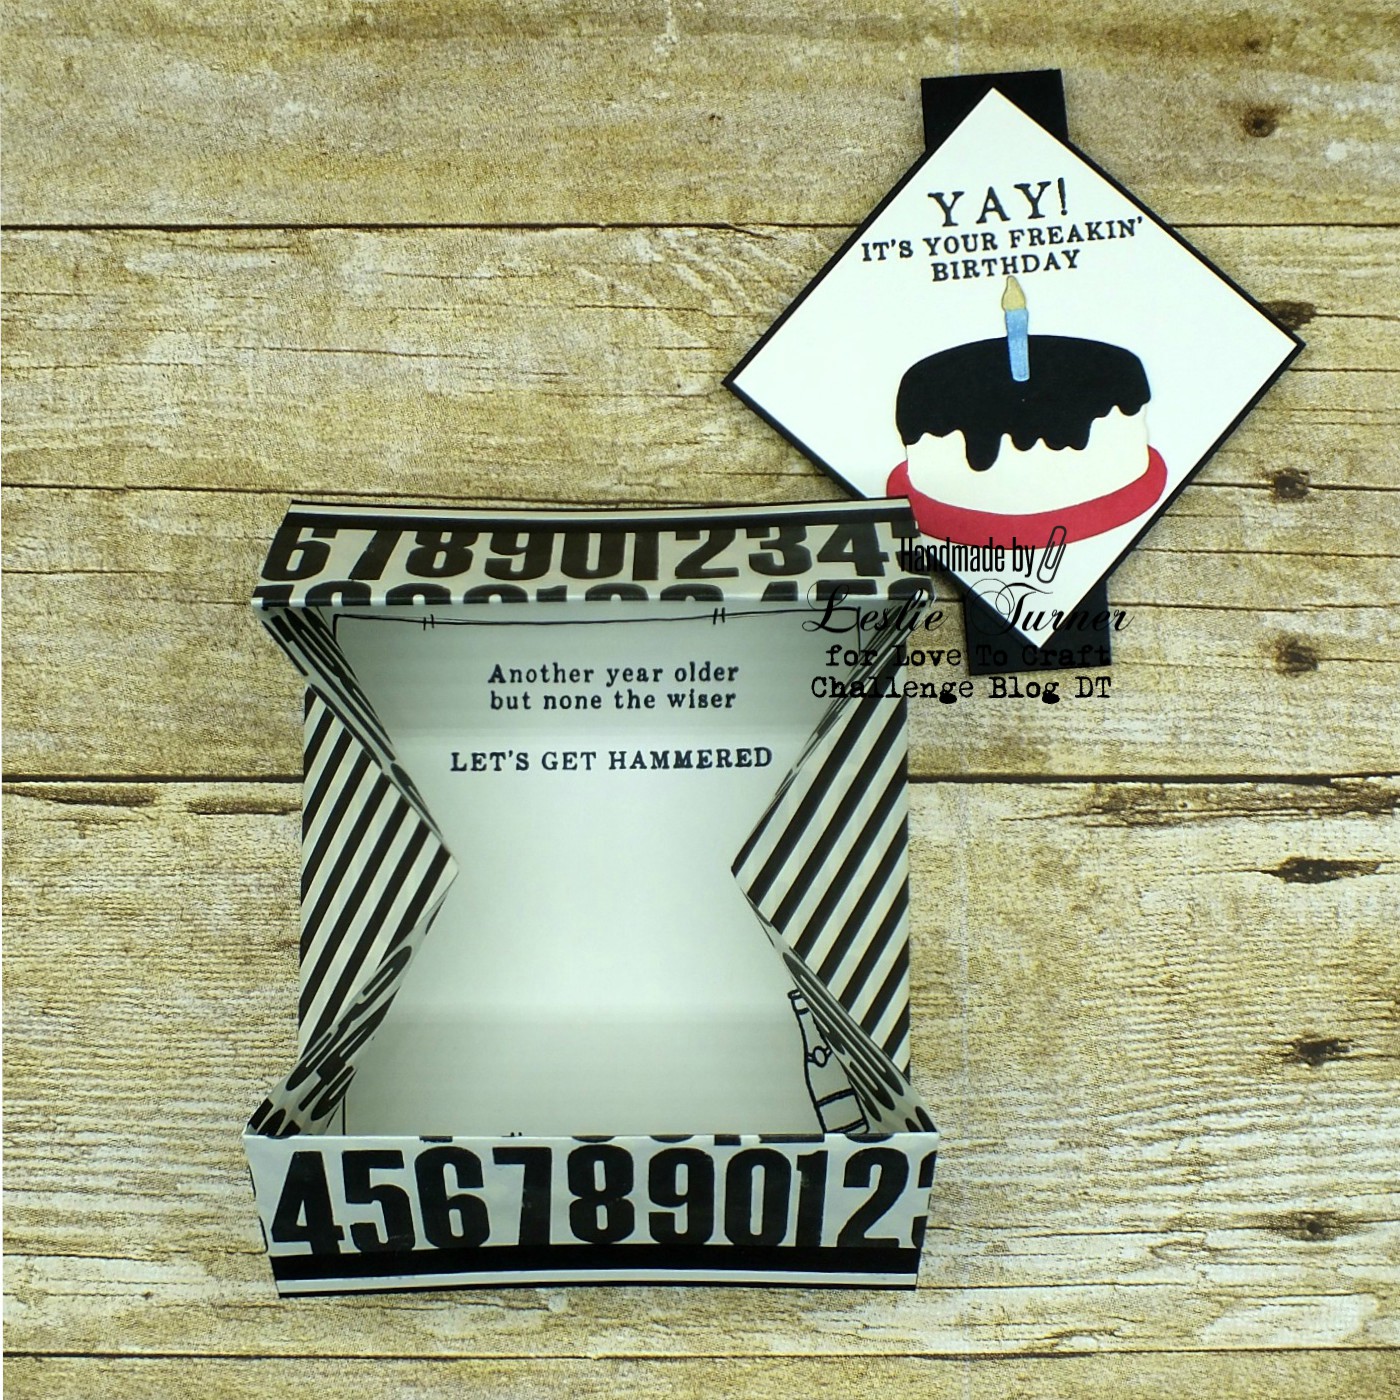
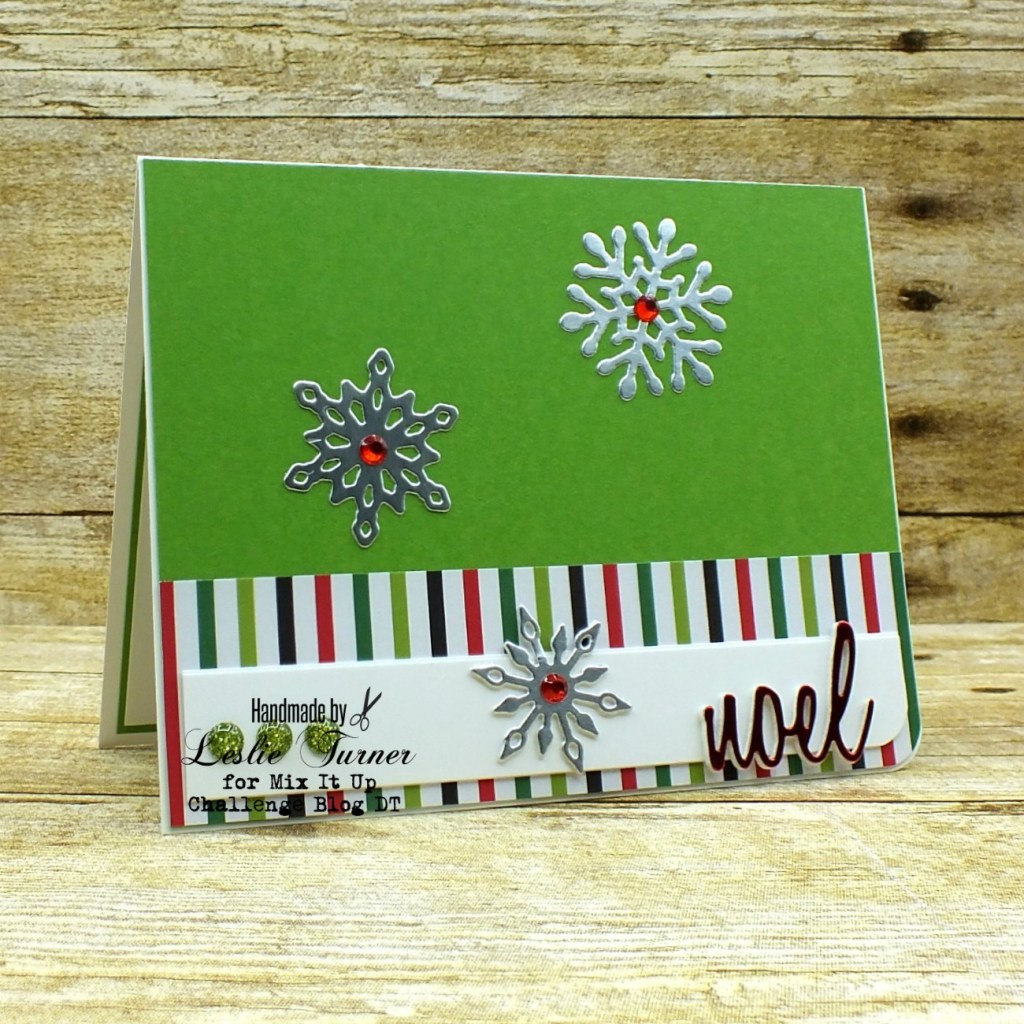
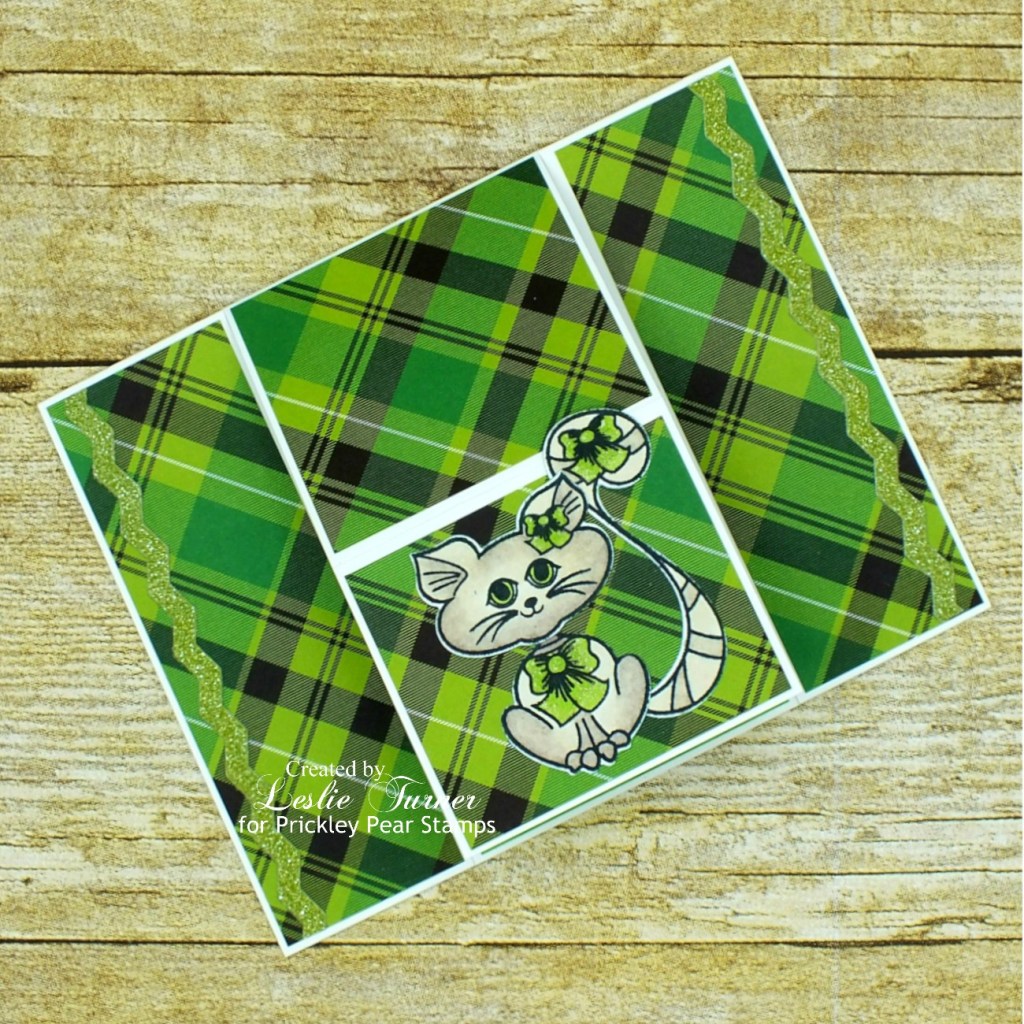
Here’s an angled view so you can see the simple but cool construction. ;)

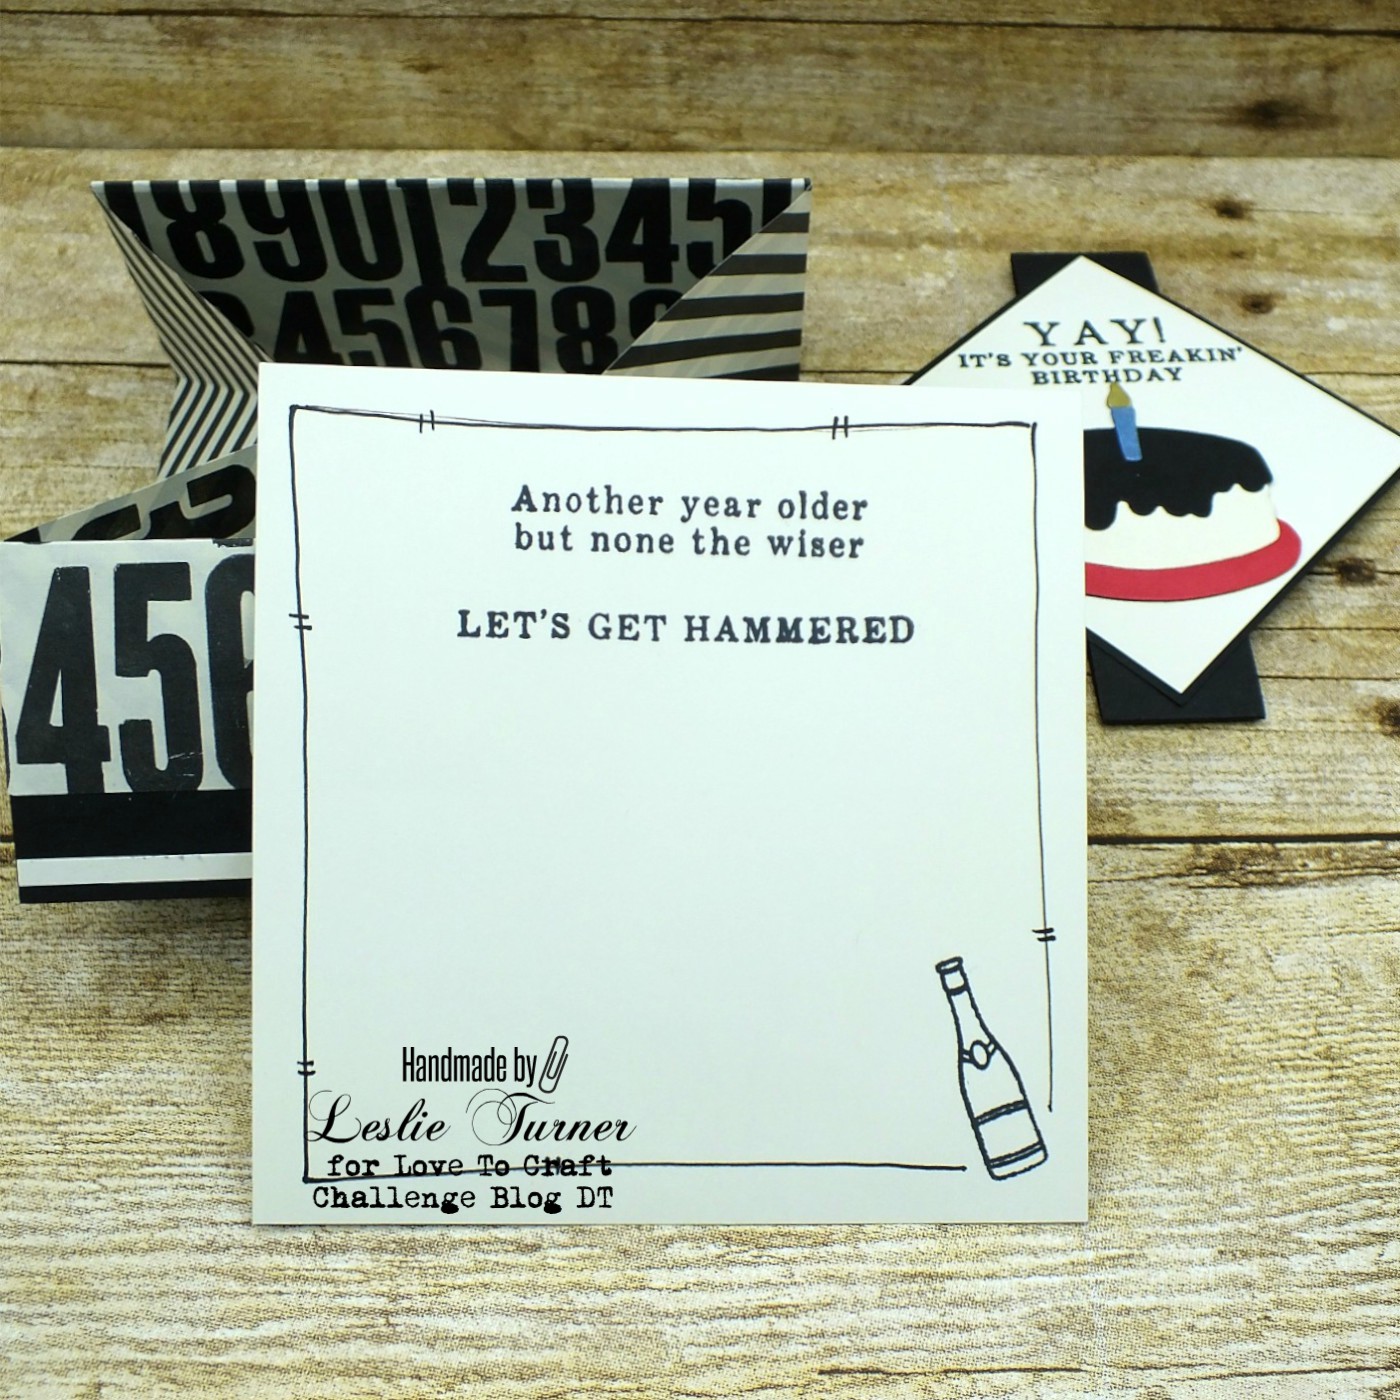
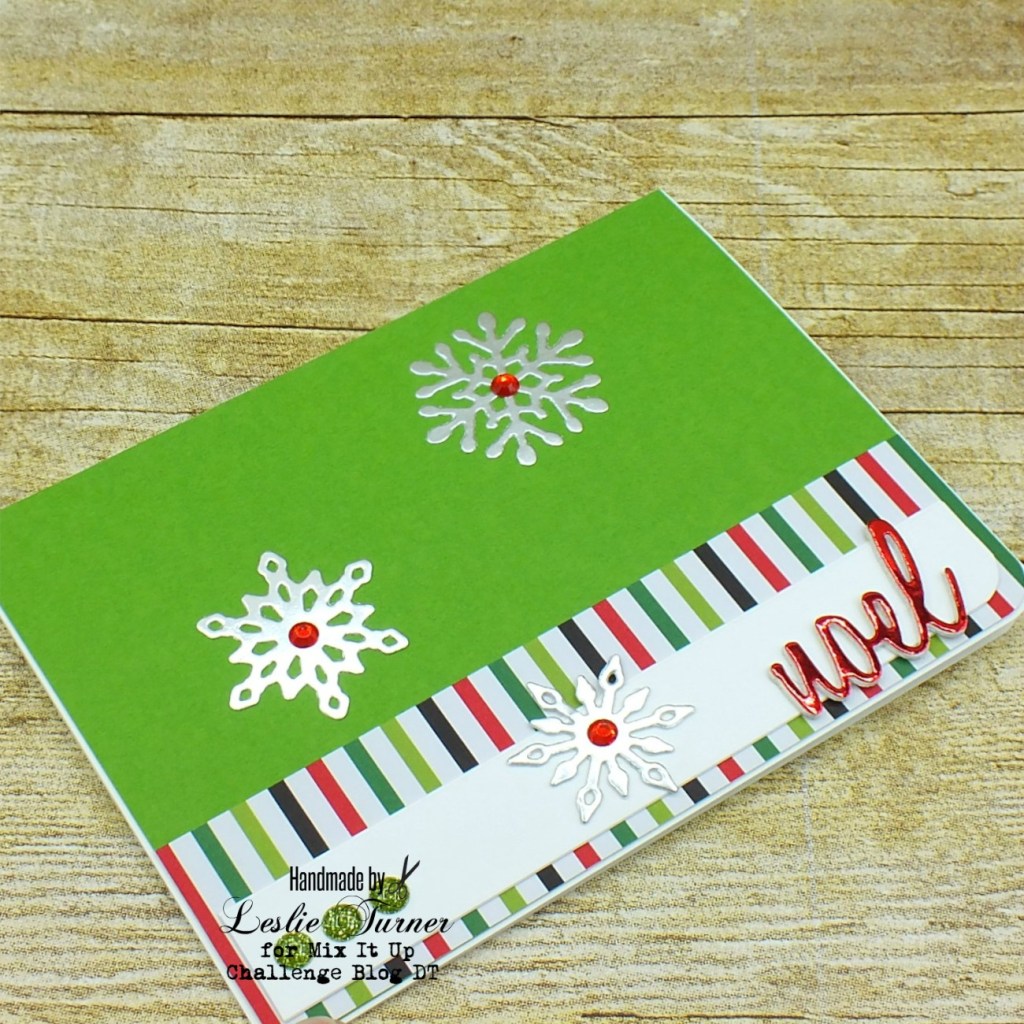
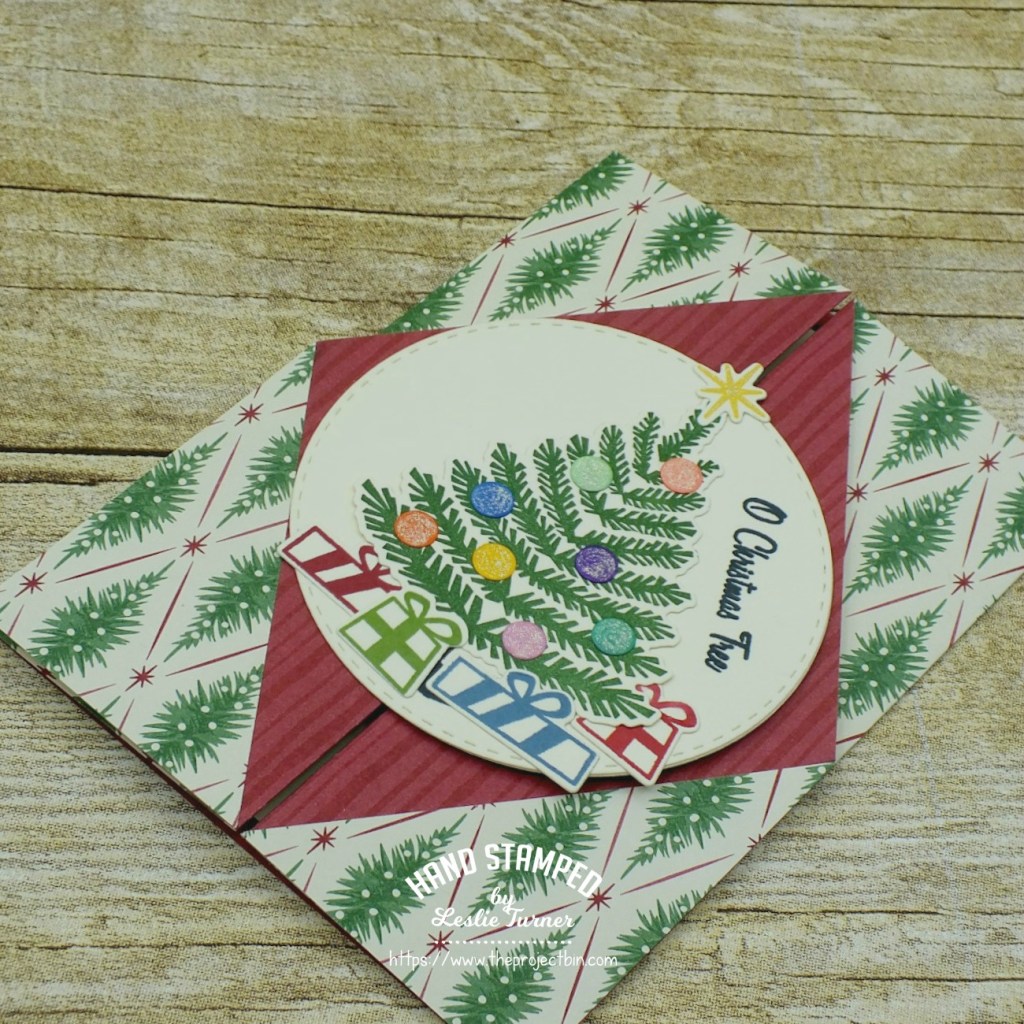
And one more peek… lying flat and ready to stuff into an envelope. Loving how this turned out!

Sharing in the following challenges:
1. 2 Crafty Critter Crazies: #42 – Anything Goes
2. Classic Design Challenge: #9 – Anything Goes
3. Creative Moments; #198 – Anything Goes
4. Lil Patch of Crafty Friends: #141 – Anything Goes

Products used:
Cardstock/Paper: CutCardStock Granny Smith cardstock, American Crafts Christmas 6×6 paper pad, American Crafts Cricket glitter paper
Stamps: Prickley Pear Stamps Build A Cat 2 clear stamp set
Ink: Memento Tuxedo Black ink; Nuvo alcohol markers- 412, 495, 497, 400; Sakura Clear Star Gelly Roll pen
Dies/Punches: Prickley Pear Stamps Build A Cat die set, Sizzix Borders die, Stmapin’ Up 1-1/4″ and 1-3/8″ circle punches
Accessories:  Bearly Art precision craft glue, Tombow Mono permanent adhesive, MISTI stamp tool, Gemini Junior

I hope you’ve enjoyed this project! Be sure to check out all the awesome stamps and dies at Prickley Pear Stamps! If you’d like to save 10% on anything on the site when you shop at Prickley Pear Stamps, use the coupon code LESLIE10 at checkout! And be sure to ‘like’ and ‘follow’ the Prickley Pear Stamps Facebook page to keep up with news and sales, and join Prickley Pear Pals (the fan group) for lots of fun crafty ideas and to share your creativity! Hope to see you there! Thanks so much for stopping by today – we’ll see you next time! ;)

Scrappy hugs,
lesliesig

home tweet home

9/19/20 Top Rocker at 613 Avenue Create!

Hi friends! A very Happy Tuesday to you! The Prickley Pear Stamps showcase on Hochanda was last week so I’m ready to start sharing some of the samples I created for the show! There are a few so I plan to spread them out over the next couple weeks. Hochanda is a UK-based crafts, hobbies and arts TV channel which frequently showcases products made and sold in the USA, so this is truly an honor! As I was watching the show, I took a screenshot of each project while Alex was holding them up for the viewers to see, and thought I’d share the corresponding screenshot with each post. ;)

I used the Birdcage clear stamp set along with the Birdcage die set for this new home card which features a layered gold foil birdcage with a stamped bird inside and a pretty pink bow.

I created a standard A2 top-folding white card base. I love to round one bottom corner to add interest to my cards. I chose two pretty coordinating patterned papers to create the background panel and added a gold foil strip at the line where the papers meet. I die cut three birdcages from white cardstock and one from gold foil, and layered them on top of one another to create a dimensional element. I stamped and die cut the bird which I affixed behind the birdcage just prior to adhering it to a light pink stitched oval die cut. I stamped the sentiment and trimmed it to fit the area at the base of the birdcage, then added a pink and white dotted bow and some Sprinkles in the lower left and upper right corners.

I embellished the inside panel with scraps of the patterned paper used on the front along with a narrow strip of gold foil cardstock, added a layered die cut sentiment, and layered the panel on the light pink cardstock.

And one more peek… so loving how this turned out!

Sharing in the following challenges:
1. 613 Avenue Create: September Anything Goes w/ optional Charm
2. Classic Design Challenge: #9 – Anything Goes
3. Creative Moments; #198 – Anything Goes
4. Lil Patch of Crafty Friends: #141 – Anything Goes

Cardstock/Paper: Neenah Classic Crest Solar White cardstock, Hygloss gold foil cardstock, Stampin’ Up Powder Pink cardstock, Colorbok Mint Julep designer paper
Stamps: Prickley Pear Stamps Birdcage stamp set
Ink: Memento Tuxedo Black ink
Dies/Punches: Prickley Pear Stamps Birdcage die set, Memory Box Stitched Oval Layers die, Sizzix Celebration Words: Script die
Accessories: Tombow Mono permanent adhesive, Bearly Art precision craft glue, MISTI stamping tool, Gemini Junior, pink dotted ribbon scrap, Doodlebug Design Sprinkles- Tangerine Assortment

I hope you’ve enjoyed this project! Be sure to check out all the awesome stamps and dies at Prickley Pear Stamps! If you’d like to save 10% on anything on the site when you shop at Prickley Pear Stamps, use the coupon code LESLIE10 at checkout! And be sure to ‘like’ and ‘follow’ the Prickley Pear Stamps Facebook page to keep up with news and sales, and join Prickley Pear Pals (the fan group) for lots of fun crafty ideas and to share your creativity! Hope to see you there! Thanks so much for stopping by today – we’ll see you next time! ;)

Scrappy hugs,
lesliesig

Funky Birds Handbag

9/30/20 Best Technique Winner at Classic Design Challenge Blog!
9/30/20 Spotlight Winner at A Perfect Time To Craft Open Challenge!

Hi everyone! It’s Saturday and I’m thrilled to be back on the Eyelet Outlet blog today with another awesome DT inspiration project! I’ve been playing with my purse die set again and this time created a gift bag featuring some very fun washi tape, bling and a large paper flower from Eyelet Outlet – just in time for a summer or beach wedding or an anniversary! How fun would it be to tuck a gift card or cash into this little purse?!

For the front and back of the purse base, I covered the cardstock with Funky Birds Washi Tape and die cut the pieces. I then cut all the rest of the purse pieces from tweed cardstock and the rings from gold foil cardstock, and assembled the handles. I assembled the purse base and added White Pearl Bling Strips across the washi tape seams on the front and back, then attached the handles and the other purse pieces. I attached the three Paper Flower layers with an Amber 6mm Jewel Brad w/Gold Edge and affixed the flower to the front of the purse.

Here’s a shot of the back of the purse. I’m so loving how this turned out! I think it’s time to admit that I’ve become a paper purse addict, lol!

Sharing in the following challenges:
1. A Perfect Time To Craft Open Challenge: #9-2020 – Anything Goes
2. Classic Design Challenge: #9 – Anything Goes
3. Crafty Calendar Challenge: September Anything Goes
4. Crafty Catz Challenge: #517 – Anything Goes w/ optional Not A Square
5. Crafty Gals Corner: #210 – Summer Fun
6. Let’s Craft and Create: #163 – Anything Goes w/ optional Best Friends
7. Time Out Challenges: #169 – Season (Summer)
8. Try it on Tuesday: Neat and Tidy
9. Tuesday Throwdown: #465 – Anything Goes
10. Word Art Wednesday: Weeks #454/455 – Anything Goes
11. Your Scrapbook Place: September Anything Goes

Eyelet Outlet products used:
Funky Birds Washi Tape
Pearl Bling Strips- White
6mm Jewel Brads w/Gold Edge- Amber
Paper Flowers

Other products used:
Cardstock/Paper: Neenah Classic Crest Solar White cardstock, Canvas Corp Tweed cardstock, Hygloss Gold Foil cardstock, Yupo paper
Dies/Punches: Concord & 9th Everyday Purse die set
Accessories:  Bearly Art precision craft glue, Gemini Junior

I hope you’ve enjoyed today’s project! Be sure to check out all the fun goodies at Eyelet Outlet! I can already see you drooling, lol! Be sure to ‘like’ and ‘follow’ Eyelet Outlet Facebook Page to keep up with news and sales! Thanks so much for stopping by today – we’ll see you next time! ;)

Scrappy hugs,
lesliesig

Hello

9/10/20 Top 3 at Cardz 4 Galz!
9/22/20 Top 5 at Try It On Tuesday!

Hi everyone! Can you believe we’re headed into September already?! I keep saying it’ll be Christmas before we know it… and you know I’m right! Our new CutCardStock DT term starts today and I’m stoked to be back on the CutCardStock blog with an awesome DT inspiration project featuring Curious Metallic Gold Leaf and CCS Gold Glitter cardstock! Affiliate links are used in this post at no cost to you. I really appreciate your support! I created a note card – and this is not your ordinary note card! This note card features a gold starburst background!

I sure had fun with this! I created an A2 size top-folding card base from Classic Crest Baronial Ivory cardstock along with an extra panel for the front and two panels for the inside. I cut strips between 3″ and 5″ long from CCS Gold Glitter cardstock and Curious Metallic Gold Leaf cardstock. The width of the strips for this background can be 1/2″, 3/4″ or 1″ depending on the size of your card. I used 3/4″ wide strips for this note card. I cut each strip in half diagonally, from top right down to bottom left.

Adhering the strips to the panel is absolutely the most fun part of this card! I started at about 10 o’clock and worked my way around the panel in a counter-clockwise fashion, leaving a very thin border between the strips. I then die cut a stitched oval to cover the ends, adhered a die cut sentiment to the oval, and trimmed the right side of the oval even with the right side of the panel. I adhered the panel to the card base and added a few tiny gold flat-back pearls.

I embellished the inside panel with leftover strips of the gold glitter and the gold leaf cardstock, then layered the panel onto another ivory panel for some tone-on-tone interest. I adhered the panel to the inside of the card base and left it blank to write a custom message.

And one more peek… sure am loving how this turned out! So elegant!

Sharing in the following challenges:
1. A Perfect Time To Craft Open Challenge: #9-2020 – Anything Goes
2. Cardz 4 Galz: #129 – Just Saying Hello
3. Classic Design Challenge: #9 – Anything Goes
4. The Crafter’s Cafe: #250 – Anything Goes
5. Try it on Tuesday: Neat and Tidy
6. Word Art Wednesday: Weeks #454/455 – Anything Goes
7. Your Scrapbook Place: September Anything Goes

CutCardStock products used:
Classic Crest Baronial Ivory 80# cardstock
CCS Gold Glitter 74# cardstock
Curious Metallic Gold Leaf 92# cardstock

Other products used:
Dies/Punches: Memory Box Stitched Oval Layers die, Gemini Opulent Swirls die set
Accessories:  Tombow Mono permanent adhesive, Bearly Art precision craft glue, Gemini Junior, Flourish with a Bling Antique Gold flat-back pearls

I hope you’ve enjoyed today’s project and you’re inspired to get crafty! Be sure to check out all the awesome cardstock and other goodies at CutCardStock (adhesives, labels, stickers, pens, watercolors and ribbon to name a few). And head on over to the CutCardStock Facebook Page for more inspiration! Thanks so much for stopping by today – we’ll see you next time!

Scrappy hugs,
lesliesig

Your unicorn has arrived

Hi friends! Happy Tuesday – I hope your week has started off right! Our new challenge over at Love To Scrap Challenge Blog launched this morning and I’m excited to share my DT inspiration project for LTSCB #137 – Anything Goes! Come on over and play – we know you love ‘anything goes!’ I used a CAS-ual Fridays Stamps stamp set for this magical birthday card featuring a unicorn and lots of glitzy shimmer!

2019_1227001a

I created the card base from white cardstock and rounded the bottom right corner. I added diagonal strips of pastel glitter paper to the background panel, stamped the unicorn in StazOn Jet Black ink and layered the panel on black cardstock. I stamped the unicorn again on white cardstock, fussy cut it and paper pieced it over the unicorn on the background panel. I stamped the sentiment on the bottom right and added some Crystal Drops to finish the front panel.

2019_1227002a

I embellished the inside panel with leftover strips of pastel glitter paper used on the front, layered the panel on black cardstock and then stamped the sentiment.

2019_1227003a

And one more peek… what a sweet card! I love it!

2019_1227004a

Sharing in the following challenges:
1. 2 Crafty Critter Crazies: #42 – Anything Goes
2. Classic Design Challenge: #9 – Anything Goes
3. International Art & Soul: #91 – Include An Animal
4. Lemon Shortbread Challenge Blog: #127 – Anything Goes
5. QKR Stampede: #403 – Anything Goes
6. The Crafter’s Cafe: #250 – Anything Goes
7. Try it on Tuesday: Neat and Tidy

Products used:
Cardstock/Paper: Cardstock Warehouse sweet tooth cardstock, American Crafts black cardstock, DCWV Glitzy Pastels Stack and Glitzy Glitter Stack
Stamps: CAS-ual Fridays Be A Unicorn stamp set
Ink: StazOn Jet Black ink
Dies/Punches: Kadomaru Pro corner rounder
Accessories:  ScraPerfect Best Glue Ever, MISTI stamp tool, Nuvo Ivory Seashell Crystal Drops

I hope you’ve enjoyed this card and will link up an ‘anything goes’ project with us this month! We can’t wait to see what you create! Thanks so much for stopping by today – we’ll see you again soon! ;)

Scrappy hugs,
lesliesig

Season’s Greetings

Hi friends! Top of the morning to you – hope your week is off to a great start! It’s time for a new challenge at Merry Little Christmas Challenge Blog and I’m thrilled to share my DT inspiration project for MLCCB #26 – September Anything Christmas Goes! I created a fun snowglobe card featuring the most adorable Power Poppy digital stamp set. What fun this was to create!

2019_1222021a

I colored the image in bright colors with gold accents. I used Vanilla cardstock so the white paint marker would show up. I also tried to make the base look worn and antique-like. I rounded the two bottom corners of the panel, layered the image on striped paper and then again on red cardstock.

2019_1222022a

I embellished the inside panel with leftover striped paper and cardstock used on the front, and stamped the sentiment in red ink.

2019_1222023a

One more peek… really loving how this turned out! Another Christmas card down for my stash! ;)

2019_1222024a

Sharing in the following challenges:
1. A Perfect Time To Craft Open Challenge: #9-2020 – Anything Goes
2. Classic Design Challenge: #9 – Anything Goes
3. Crafts Galore Encore Challenge Blog: #79 – September Anything Goes
4. Poppystamps Challenge: #72 – Cards for Kids
5. QKR Stampede: #403 – Anything Goes
6. The Crafter’s Cafe: #250 – Anything Goes
7. Time Out Challenges: #169 – Season
8. Try it on Tuesday: Neat and Tidy
9. Word Art Wednesday: Weeks #454/455 – Anything Goes

Products used:
Cardstock/Paper: Stampin’ Up thick and regular Very Vanilla cardstock, Stampin’ Up Cherry Cobbler cardstock, Stampin’ Up This Christmas Specialty DSP
Stamps: Power Poppy Snowglobe Greetings digital stamp set, CAS-ual Fridays Stamps Snowy Sayings stamp set
Ink: Bic Mark-It markers- Tiki Hut Tan, Honey Brown, Woodsy Brown, Tuxedo Black, Yellow Blaze, Forest Green, Pink Flamingo, Rambunctious Red, Blue Skies Blue, Cloud Nine Grey; Pentel Slicci Gold pen, Memento Tuxedo Black and Rich Cocoa markers; Studio 71 C5, Stampin’ Up Cherry Cobbler ink
Dies/Punches: Kadomaru Pro corner rounder
Accessories:  ScraPerfect Best Glue Ever, White Sharpie paint marker, YNS red Glitter Gumdrops

I hope you’ve enjoyed this Christmas card and will link up a holiday project with us this month! It’s never too early to start on those Christmas cards and projects… Christmas will be here before we know it! Thanks so much for stopping by today – we’ll see you again soon! ;)

Scrappy hugs,
lesliesig

YAY! It’s your freakin’ birthday

Hi everyone! Happy Tuesday – hope you have a great week coming up! Our new challenge is live over at Love To Craft Challenge Blog and I’m super stoked to share my DT inspiration project for LTCCB #50 – September Anything Goes! I created a different kind of box card to showcase this month. I found this tutorial several months ago at Splitcoast Stampers HERE and created one in a Christmas theme at that time, so I thought a birthday box card was in order using the super funny Hero Arts Irreverent Birthday Messages stamp set!

2020_01250017a

I stayed with an ivory and black color scheme with just a pop of color. The next three photos are shots of the belly band off the card and the box opening up…

2020_01250018a
2020_01250019a
2020_01250020a

The card in the bottom of the box comes out to make it easy for the recipient to sign. Isn’t the sentiment just a hoot?! I think it’s more funny to me because I don’t drink anymore, lol!

2020_01250021a

Here’s one more look… super happy with how this turned out! This Hero Arts stamp set is one of my all-time favorites! You just can’t go wrong if you’re trying to make somebody laugh!

2020_01250022a

Sharing in the following challenges:
1. A Perfect Time To Craft Open Challenge: #9-2020 – Anything Goes
2. Classic Design Challenge: #9 – Anything Goes
3. Crafts Galore Encore Challenge Blog: #79 – September Anything Goes
4. QKR Stampede: #403 – Anything Goes
5. The Crafter’s Cafe: #250 – Anything Goes
6. Your Scrapbook Place: September Anything Goes

Products used:
Cardstock/Paper: Stampin’ Up Very Vanilla and Basic Black cardstock, Stampin’ Up typeset Specialty DSP
Stamps/Dies: Spellbinders Happy Birthday Cake rubber stamp and dies set; Hero Arts Irreverent Birthday Messages stamp set
Ink: Memento Tuxedo Black ink; Spectrum Noir- DR2; Pentel Slicci Metallic Blue and Gold pens
Accessories:  ScraPerfect Best Glue Ever, MISTI stamp tool, Gemini Junior die cutting machine

I hope you’ve enjoyed this card and will link up with us this month! Whatever you’re working on, we want to see it! Thanks so much for stopping by today – we’ll see you again soon! ;)

Scrappy hugs,
lesliesig

noel

Hi everyone! Hope your week is off to a great start! It’s time for another fun challenge over at Mix It Up Challenge Blog and I’m thrilled to share my DT inspiration project for MIUCB #41 – Anything Goes + Foiling! Remember, all of our challenges are ‘anything goes’ and we offer an optional technique twist each month to inspire you. The twist is not mandatory to play. This month the twist is foiling – so if you are inclined to play the twist, think Minc machine or laminator with foil, foiled cardstock or even aluminum foil!

I rounded the bottom right corner… I like rounding one corner for some reason, lol! It definitely adds interest! I used red foil cardstock for the sentiment and silver foil cardstock for the snowflakes on this card. I added a red gemstone to the center of each snowflake and several green glitter Gumdrops in the lower left corner. This was an easy design and could easily be mass-produced to send to a list of Christmas card recipients!

I embellished the inside panel with leftover strips of the striped paper and red foil cardstock used on the front. I stamped the inside sentiment in red ink and layered the panel on the green cardstock used on the front.

And one more look… totally loving how this turned out! Foil sure is fun to work with but it’s hard to photograph, lol!

Sharing in the following challenges:
1. A Perfect Time To Craft Open Challenge: #9-2020 – Anything Goes
2. Crafts Galore Encore Challenge Blog: #79 – September Anything Goes
3. Lemon Shortbread Challenge Blog: #127 – Anything Goes
4. The Crafter’s Cafe: #250 – Anything Goes
5. Time Out Challenges: #169 – Season
6. Try it on Tuesday: Neat and Tidy
7. Word Art Wednesday: Weeks #454/455 – Anything Goes

Products used:
Cardstock/Paper: Neenah Classic Crest Solar White cardstock, CutCardStock Granny Smith cardstock, Hygloss Silver Foil cardstock, American Crafts Christmas 6×6 paper pad
Stamps: The Project Bin North Pole stamp set
Ink: Stampin’ Up Real Red ink
Dies/Punches: Kadomaru Pro corner rounder, Tim Holtz Alterations Holiday Words: Script die, Sizzix Calendar Months die set
Accessories:  Tombow Mono permanent adhesive, Bearly Art precision craft glue, YNS green glitter Gumdrops

I hope you’ve enjoyed today’s project and will link up with us this month! We always enjoy seeing your ‘anything goes’ projects but we really love it when your inspired to play the twist! Just remember, the twist is not mandatory to play! Thanks so much for stopping by today – we’ll see you next time! ;)

Scrappy hugs,
lesliesig

O Christmas Tree

9/15/20 Top 3 Winner at Sparkles Monthly Challenges!

Hi friends! Happy Monday and last day of August! I’m thrilled to be on the blog today over at The Project Bin with a pretty Christmas card! I was provided the amazing Mid Century Christmas stamp set and the Mid Century Christmas die set, and created a double gate fold card. If you know me, you know that I absolutely love fun folds!

Before I share the details of my card, allow me to show off our youngest fur baby, Loki, who is my most frequent light box visitor! If you follow my blog, you’ve undoubtedly seen photos of him. But if you haven’t, he’s the guy we rescued from our neighbor’s carport in freezing weather back in late October, so we think he’ll be a year old this month. Handsome boy!

Okay, back to my project! I used pretty double-sided papers for this fold. I stamped the tree, star and presents on ivory cardstock, cut them with the coordinating dies, and arranged them on a stitched circle die cut. I used a 1/4″ circle punch to create the ornaments, colored them with alcohol markers and added some clear star shimmer pen. I stamped the front sentiment in black ink at an angle along the line of the Christmas tree for a little interest.

I used four different patterns from the paper pack. I stamped the inside sentiment in black ink.

Here’s a shot of the card completely opened up.

And one more peek… absolutely loving how this turned out! Such a unique fold!

Sharing in the following challenges:
1. Lemon Shortbread Challenge Blog: #127 – Anything Goes
2. Pammie’s Inky Pinkies Challenges: #2035 – Orange (one orange Christmas ball)
3. Sparkles Monthly Challenges: #131 – Use at Least 3 Patterned Papers (I used four)
4. Time Out Challenges: #169 – Season
5. Word Art Wednesday: Weeks #454/455 – Anything Goes

Products used:
Cardstock/Paper: Neenah Classic Crest Baronial Ivory cardstock, Stampin’ Up Garden Green cardstock, Stampin’ Up This Christmas Specialty DSP
Stamps: The Project Bin Mid Century Christmas stamp set
Ink: Stampin’ Up Garden Green, Wild Wasabi, Daffodil Delight, Cherry Cobbler, Strawbery Slush and Marina Mist ink; Memento Tuxedo Black ink; Nuvo alcohol markers- 434, 441, 405, 359, 363, 393, 428, 451; Sakura Clear Star Gelly Roll pen
Dies/Punches: The Project Bin Mid Century Christmas die set, Memory Box Stitched Circle Layers die, Stampin’ Up 1/4″ circle punch
Accessories:  Tombow Mono permanent adhesive, Bearly Art precision craft glue, MISTI stamp tool, Gemini Junior

I sure hope you’ve enjoyed this project! Be sure to check out all the awesome stamps and dies at The Project Bin, and while you’re at it, head on over to The Project Bin Facebook Page for more inspiration! Thanks so much for stopping by today – we’ll see you next time!

Scrappy hugs,
lesliesig

More Christmas ATCs

Hi everyone! It’s the last Saturday in August – can you believe it?! I’m happy to be back on the Eyelet Outlet blog today with another awesome DT inspiration project! I created a set of sparkly ATCs for your viewing pleasure that feature some amazing Eyelet Outlet products! As you already know, I’m an ATC addict and I love creating both cards and coins!

I created one coin and two cards. My standard practice is to always punch two circles or cut two rectangles so that I can decorate one and adhere another one behind it for stability. To create the ‘Joy’ coin, I placed a strip of Glitter Tall Tree Washi Tape horizontally across the coin base and added three Penguin Brads and the sentiment die cut from silver foil cardstock. Then I adhered a second punched circle behind it. 

To create the ‘peace’ card, I covered the card base with Wood Washi Tape and then die cut the sentiment into the covered card base, saving those tiny negative space pieces to add back in later. I added three Prancing Deer Brads and just prior to adhering the second rectangle behind it, I added two small strips of Glitter Brown Washi Tape to the front of the extra card so the sparkle would show through the die cut sentiment. Once I adhered the second rectangle, I glued in the negative space pieces to the p, e, a and the second e. 

To create the ‘merry’ card, I covered the card base with Glitter Gold Dots Washi Tape and added the sentiment die cut from red cardstock along with a thin red cardstock strip across the bottom. I adhered the stamped word Christmas and then added one Cardinal Brad and two Cardinal Profile Brads. Then I adhered a second rectangle behind it. 

And one more look at the set… I’m SO loving these! I have to say that I’m in HOG HEAVEN creating with all these awesome Eyelet Outlet products!

Sharing in the following challenges:
1. 613 Avenue Create: August Anything Goes w/ optional Washi Tape (no twist)
2. ATC Around the World: #68 – Christmas in Summer
3. Aud Sentiments Challenge Blog: #258 – Anything Goes + A Sentiment
4. Pammie’s Inky Pinkies Challenges: #2034 – Anything Goes
5. Paperbabe Stamps: #126 – Anything Goes
6. Simon Says Stamp: Wednesday Challenge – Anything Goes
7. Word Art Wednesday: Weeks #454/455 – Anything Goes

Eyelet Outlet products used:
Glitter Tall Tree Washi Tape
Penguin Brads
Wood Washi Tape
Glitter Brown Washi Tape
Prancing Deer Brads
Glitter Gold Dots Washi Tape
Cardinal Brads
Cardinal Profile Brads

Other products used:
Cardstock/Paper: Neenah Classic Crest Solar White cardstock, Hygloss Silver Foil cardstock, American Crafts Rouge cardstock
Stamps: The Project Bin Merriest Christmas stamp set
Ink: Memento Tuxedo Black ink
Dies/Punches: Fiskars 2-1/2″ circle punch, Tim Holtz Holiday Words: Script dies, Hero Arts Merry Stamp & Cut (die only)
Accessories:  Bearly Art precision craft glue, Tombow Mono permanent adhesive, MISTI stamp tool, Gemini Junior

I hope you’ve enjoyed today’s project! Be sure to check out all the fun goodies at Eyelet Outlet! I can already see you drooling, lol! Be sure to ‘like’ and ‘follow’ Eyelet Outlet Facebook Page to keep up with news and sales! Thanks so much for stopping by today – we’ll see you next time! ;)

Scrappy hugs,
lesliesig