Little Love Bug

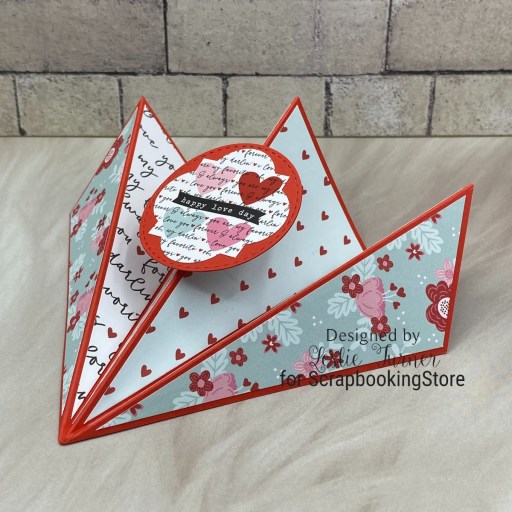
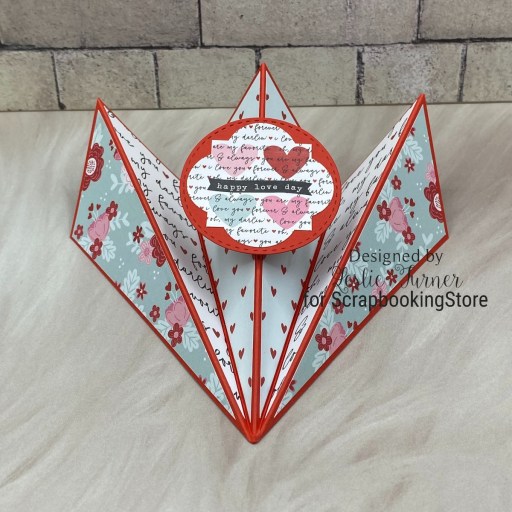
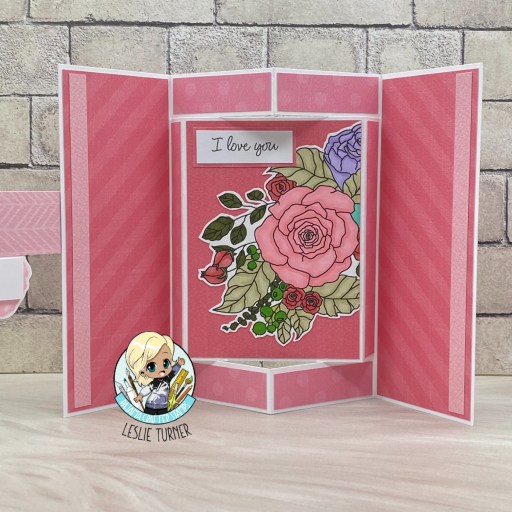
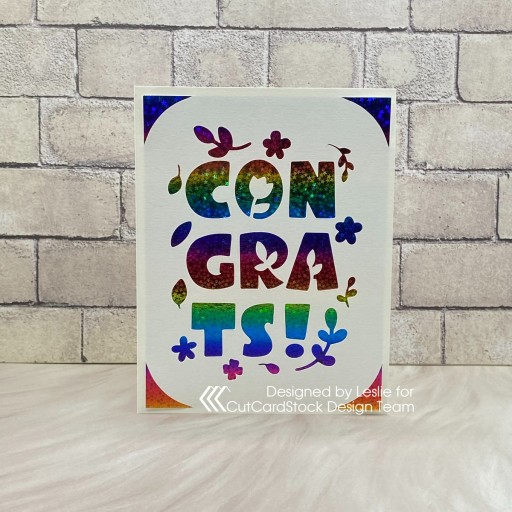
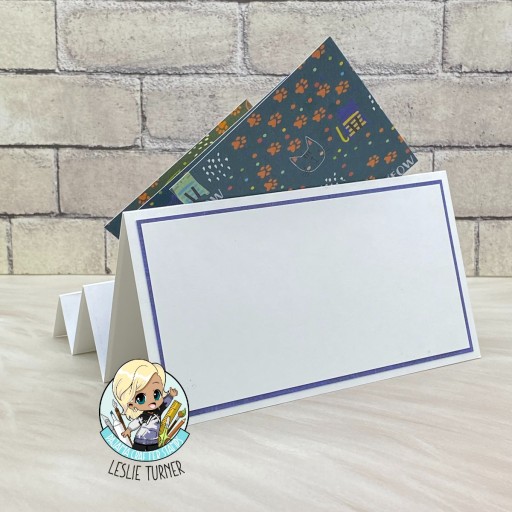
Howdy friends! I hope you’re having a great weekend and it’s not too cold where you are! It has been snowing for a few days here and we still have lots of snow on the ground from the last time it snowed, but it’s all good! I have a very cool ScrapbookingStore DT inspiration project to share with you today, created with the awesome February 2024 Scrapbook Kit with Upgrades! I created an all-time favorite hidden message slider card featuring papers and stickers from the kit along with tags and frames and stickers from the upgrades. I’ve had handwritten instructions for this fold in my arsenal for many years and then late last year I found a ‘slider surprise’ die set at My Favorite Things… what a game-changer! But if you’re interested in making one of these without the die set, you can find my instructions HERE.

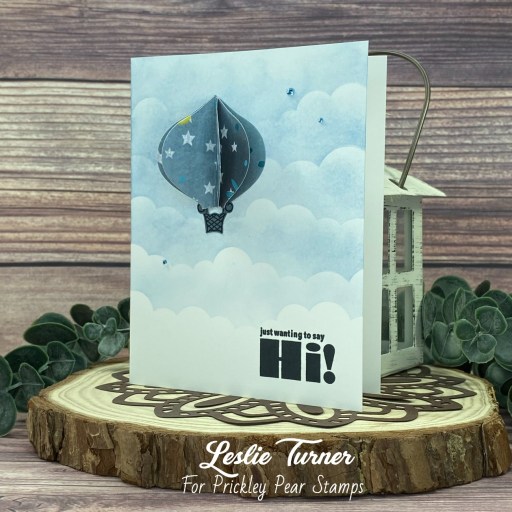
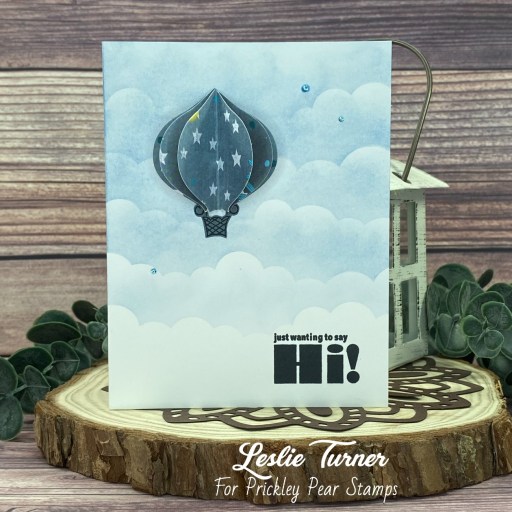
Using the My Favorite Things Slider Surprise Die-namics, I die cut the base and pull element from CutCardStock Cougar Smooth 100# White cardstock along with layering panels for the base and pull element (using the dies a second time) from coordinating papers in the kit. I used an element from the frames and tags in the upgrades for the focal on the front and fashioned the loop for the pull element from Doodlebug Design Lily White Doodle Twine.

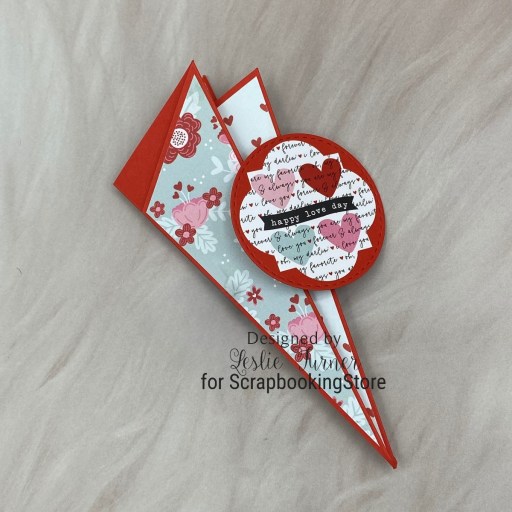
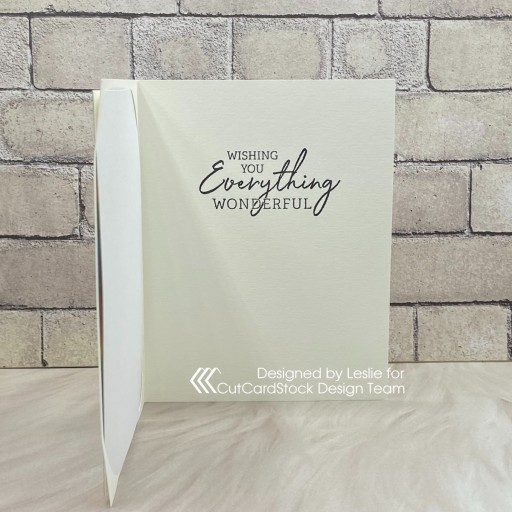
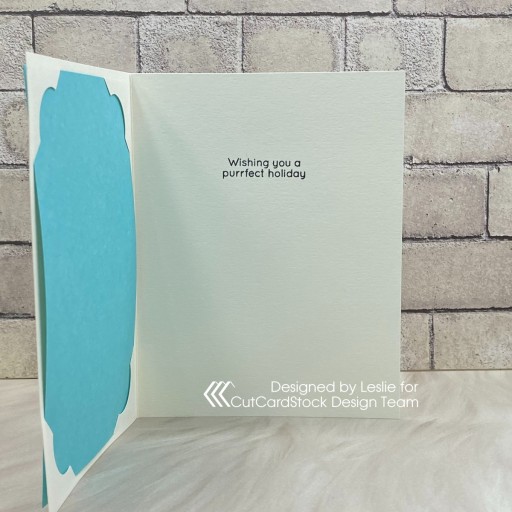
To create the surprise message, I adhered a sticker from the sticker sheet to a scrap of Cougar White cardstock, trimmed it and rounded the corners. I trimmed an additional patterned paper from the kit and adhered it to the inside bottom of the card base along with the surprise message and two red holographic hearts from the upgrades. Such a fun project!

Sharing in the following challenges:
1. https://avenue613.blogspot.com/2024/02/february-2024-anything-goes-w-optional.html
2. https://aperfecttimetocraft.blogspot.com/2024/02/a-perfect-time-to-craft-open-challenge.html
3. https://craftycalendarchallenge.blogspot.com/2024/02/february-challenge-add-heart.html
4. https://cutitupchallenges.blogspot.com/2024/02/cut-it-up-challenge-297-have-heart.html
5. https://disdigidesignschallenge.blogspot.com/2024/02/3-colors-1-must-be-red-or-pink-challenge.html
6. https://dragonflydreamschallenges.blogspot.com/2024/02/february-challenge-hearts.html
7. https://inkspirationalchallenges.blogspot.com/2024/02/inkspirational-challenge-309-word.html

8. https://tuesdaytaggers.blogspot.com/2024/02/hearts-andor-flowers.html
9. https://cinspirations.blogspot.com/2024/02/february-challenge-for-someone-you-love.html

Affiliate links are used in this post at no cost to you – I really appreciate your support!

ScrapbookingStore products used:
February 2024 Scrapbook Kit with Upgrades:
Echo Park Love Notes 12×12 Collection Kit
Upgrades: Echo Park Love Notes Frames & Tags
      Recollections Valentine’s Day Stickers
      Greenbrier Painted Wood Hearts

Other products used:
CARDSTOCK/PAPER: Cougar Smooth 100# White cardstock,
DIES/PUNCHES: My Favorite Things Slider Surprise Die-namics, Kadomaru Pro Corner Rounder
ACCESSORIES: Fiskars 12″ ProCision Rotary Bypass Paper Trimmer, Bearly Art precision craft glue, Big Shot, We R Memory Keepers Crop-A-Dile Big Bite, Doodlebug Design Lily White Doodle Twine, 1/2″ double-sided foam strip

I hope you’ve enjoyed today’s project and you’re thinking about all the fun you could have with this month’s kit… you really ought to think about joining the Subscription Club! Be sure to Follow us on Facebook, Instagram, Pinterest and YouTube for lots of crafty inspiration! And if you do decide to join the Subscription Club, join our ScrapbookingStore Club Member Group on Facebook for more inspiration and to share your projects! Thanks so much for stopping by today – we’ll see you next time!

Scrappy hugs,

I LOVE U carousel card

Hey everybody! It’s Saturday and we’re a little more than a week into February already! I hope you have something fun planned for the weekend! I have a super fun ScrapbookingStore DT inspiration project to share with you today, created with the awesome February 2024 Scrapbook Kit with Upgrades! I created a carousel card featuring coordinating papers and stickers from the kit along with frames and tags, stickers, and a pink wooden heart from the upgrades. I shared a carousel card on my blog a couple weeks ago for another design team and everyone seemed to love it, so that was my inspiration for creating another one! The idea originally came from an older tutorial by Sandie HERE on the Stamping Bella blog.

The card base was cut from CutCardStock Pop Tone Sno Cone cardstock along with layering panels from coordinating papers in the kit. Each of the four sections has a sentiment and an additional element either from the sticker sheet in the kit or the frames and tags and stickers from the upgrades. The card is kept closed with a belly band embellished with a pink wooden heart and stickers from the upgrades, and I added a heart-shaped paper clip to keep it open. My late sister gave me a bunch of shaped paper clips many years ago and using them in my projects makes my heart happy! Here are shots of the belly band removed and all four sections.

Sharing in the following challenges:
1. https://avenue613.blogspot.com/2024/02/february-2024-anything-goes-w-optional.html
2. https://aperfecttimetocraft.blogspot.com/2024/02/a-perfect-time-to-craft-open-challenge.html
3. https://craftycalendarchallenge.blogspot.com/2024/02/february-challenge-add-heart.html
4. https://craftygalscornerchallenges.blogspot.com/2024/02/challenge-252-add-heart.html
5. https://cupcakeinspirations.blogspot.com/2024/02/cupcake-inspiration-challenge-587.html
6. https://disdigidesignschallenge.blogspot.com/2024/02/3-colors-1-must-be-red-or-pink-challenge.html
7. https://dragonflydreamschallenges.blogspot.com/2024/02/february-challenge-hearts.html
8. https://inkspirationalchallenges.blogspot.com/2024/02/inkspirational-challenge-309-word.html

9. https://tuesdaytaggers.blogspot.com/2024/02/hearts-andor-flowers.html
10. https://cinspirations.blogspot.com/2024/02/february-challenge-for-someone-you-love.html

Affiliate links are used in this post at no cost to you – I really appreciate your support!

ScrapbookingStore products used:
February 2024 Scrapbook Kit with Upgrades:
Echo Park Love Notes 12×12 Collection Kit
Upgrades: Echo Park Love Notes Frames & Tags
      Recollections Valentine’s Day Stickers
      Greenbrier Painted Wood Hearts

Other products used:
CARDSTOCK/PAPER: CutCardStock Pop Tone Sno Cone and Lessebo Dawn Maroon cardstock
ACCESSORIES: Cricut Paper Trimmer, Elmer’s Craft Bond Tape Runner, Bearly Art precision craft glue

I hope you’ve enjoyed today’s project and you’re thinking about all the fun you could have with this month’s kit… you really ought to think about joining the Subscription Club! Be sure to Follow us on Facebook, Instagram, Pinterest and YouTube for lots of crafty inspiration! And if you do decide to join the Subscription Club, join our ScrapbookingStore Club Member Group on Facebook for more inspiration and to share your projects! Thanks so much for stopping by today – we’ll see you next time!

Scrappy hugs,

There’s No Place Like Home

Hi friends! Happy Thursday! While I always seem to remain busy, my posts have slowed down a tiny bit over the past few weeks which I guess is a good thing! Gives me some blog breathing room, lol! Our new challenge is live this morning over at Ally’s Angels and I’m thrilled to share my DT inspiration project for Challenge #79! Come on over and play – our challenges are always anything goes! I created a pretty side fold card using items in the Keep It Simple Namaste Home Collection. This is one of the easiest-ever fun folds! And I believe the Namaste Home Collection is being discontinued and has been deeply discounted, so if you’re inclined to shop, be sure to use my discount code LoveToScrap2 to receive 10% off your entire order! There is no minimum purchase requirement or use limits, and the code can be combined with product, order, and shipping discounts!

I cut the side fold card base from Neenah Classic Crest 80# Solar white cardstock and layering panels from coordinating papers in the Keep It Simple Namaste Collection. I added a journaling card and sticker (also from the collection) to the front along with a Doodlebug Design Lily White Doodle Twine bow.

I embellished the inside with stickers from the collection, using a 1″ square punch to flag the sentiments, and layering the panel on CutCardStock Basis Teal cardstock.

Sharing in the following challenges:
1. https://aperfecttimetocraft.blogspot.com/2024/02/a-perfect-time-to-craft-open-challenge.html
2. https://hereisaplacetostart.blogspot.com/2024/02/february-2024-monochrom-you-pick-palette.html

Affiliate links are used in this post at no cost to you – I really appreciate your support! 

Products used:
CARDSTOCK/PAPER: Neenah Classic Crest 80# Solar White cardstock, CutCardStock Basis Teal cardstock, Keep It Simple Namaste Home Collection Pack
DIES/PUNCHES: Tonic Corner Punch, EK Success 1″ Square Punch
ACCESSORIES: Tonic Studios 12″ Guillotine Paper Trimmer, Tombow Mono Dots Adhesive, Bearly Art precision craft glue, Doodlebug Design Lily White Doodle Twine

I hope you’ve enjoyed seeing this project and will link up with us this time! Thanks so much for stopping by today – we’ll see you next time! ;)

Scrappy hugs,

happy love day

Hi everyone! Happy Friday – I hope you’ve had a great week! I have an amazing ScrapbookingStore DT inspiration project to share with you today, created with the awesome February 2024 Scrapbook Kit with Upgrades! This 3 peak arrow fold features coordinating papers and stickers from the kit, and is the first one of these I’ve ever made. My inspiration came from Sam Calcott’s video over on Mixed Up Craft HERE but her version is larger (I was aiming for an A2 size) so I reworked the measurements and cut down the sides. I have shared my instructions for this in the Freebies section of my blog HERE. I think the next time I make one like this, I will try making the center peak a tad bit taller to make the fold look a bit more dramatic. But I do like how this one turned out!

I cut the card base from CutCardStock Lessebo Cherry Red cardstock along with layering panels from coordinating papers in the kit. I laid the folded base down, traced each section and trimmed the pieces (mirroring the three on the left to the three on the right) to layer into the peak sections. I then die cut a stitched circle from the Cherry Red cardstock using a Keep It Simple Stitched Circles Nested Die and affixed a sentiment sticker from the sticker sheet to it for the focal.

Here is a shot of the card fold flat for mailing – it fits in an A2 envelope!

Sharing in the following challenges:
1. https://avenue613.blogspot.com/2024/02/february-2024-anything-goes-w-optional.html
2. https://aperfecttimetocraft.blogspot.com/2024/02/a-perfect-time-to-craft-open-challenge.html
3. https://hereisaplacetostart.blogspot.com/2024/02/february-2024-monochrom-you-pick-palette.html
4. https://craftycalendarchallenge.blogspot.com/2024/02/february-challenge-add-heart.html
5. https://craftygalscornerchallenges.blogspot.com/2024/02/challenge-252-add-heart.html
6. https://cupcakeinspirations.blogspot.com/2024/02/cupcake-inspiration-challenge-587.html
7. https://disdigidesignschallenge.blogspot.com/2024/02/3-colors-1-must-be-red-or-pink-challenge.html
8. https://dragonflydreamschallenges.blogspot.com/2024/02/february-challenge-hearts.html
9. https://mytimetocraftchallenge.blogspot.com/2024/02/mttc-527-theme-is-cupids-and-or-arrows.html
10. https://tuesdaytaggers.blogspot.com/2024/02/hearts-andor-flowers.html
11. https://cinspirations.blogspot.com/2024/02/february-challenge-for-someone-you-love.html

Affiliate links are used in this post at no cost to you – I really appreciate your support!

ScrapbookingStore products used:
February 2024 Scrapbook Kit with Upgrades:
Echo Park Love Notes 12×12 Collection Kit
Upgrades: Echo Park Love Notes Frames & Tags
      Recollections Valentine’s Day Stickers
      Greenbrier Painted Wood Hearts

Other products used:
CARDSTOCK/PAPER: CutCardStock Lessebo Cherry Red cardstock
DIES/PUNCHES: Keep It Simple Stitched Circles Nested Dies
ACCESSORIES: Fiskars 12″ ProCision Rotary Bypass Paper Trimmer, Bearly Art precision craft glue, Big Shot

I hope you’ve enjoyed today’s project and you’re thinking about all the fun you could have with this month’s kit… you really ought to think about joining the Subscription Club! Be sure to Follow us on Facebook, Instagram, Pinterest and YouTube for lots of crafty inspiration! And if you do decide to join the Subscription Club, join our ScrapbookingStore Club Member Group on Facebook for more inspiration and to share your projects! Thanks so much for stopping by today – we’ll see you next time!

Scrappy hugs,

Happy Mother’s Day fun fold

Hey everybody! Happy Thursday – I hope you’re having a great week! The weekend is almost here and I hope you are tolerating the cold weather coming from this arctic blast for the second year in a row! Dang it, Mother Nature! I’d like to invite you to join Pajama Crafter Stamps for our “Sunny Days Ahead” Insta-Hop! Our team has created some amazing projects featuring sunny skies and spring delights. The hop starts today on the Pajama Crafter Stamps Instagram page where you’ll find the complete hop list. By following and leaving comments or likes at all the stops on the hop, you’ll be in the running for one of two $10 gift cards from Pajama Crafter Stamps! Two random winners will be chosen from all comments and likes left by 11:59 PM EST on February 15th and announced on the Pajama Crafter Stamps Instagram and Facebook pages on February 17th.

I created a pretty Mother’s Day pop out gatefold featuring the gorgeous Lovely Bouquet stamp set from our new release! OMGoodness, this stamp set is beyond wonderful and is a delight to create with! My inspiration for this fun fold came from Sandie on the Stampingbella blog. I made one of these several months ago in a 5″ x 7″ size per Sandie’s tutorial HERE, so I reworked the measurements and made this one in an A2 size. It’s definitely a fun one!

I cut the card base from CutCardStock Cougar Smooth White cardstock along with coordinating papers in the Keep It Simple Rose 12×12 Collection Pack. I stamped the front and inside sentiments, the large rose image, and two single roses and leaves on Cougar Smooth and colored the images with alcohol markers. I fussy cut the images and leaves, and trimmed the sentiments and layered them on scrap papers from the Rose Collection Pack.

As with all fun fold projects, the assembly is always the most fun! I popped the two single roses and leaves up on foam strips on the card front on each side of the sentiment. I added a tiny disc magnet under the right side of the sentiment to keep the card closed. Another option would be to create a belly band which I might do the next time. I cut a portion of the large image off and lined it up on the right side of the center panel on the inside. I added another sentiment which completed the project.

Sharing in the following challenges:
1. https://avenue613.blogspot.com/2024/02/february-2024-anything-goes-w-optional.html
2. https://aperfecttimetocraft.blogspot.com/2024/02/a-perfect-time-to-craft-open-challenge.html
3. https://cardsgalorechallenges.blogspot.com/2024/02/february-2024-crafts-galore-encore.html
4. https://secretstamper.com/2024/02/anything-goes-with-a-fun-fold-for-creative-creases-75/
5. https://scrapping4funchallenges.blogspot.com/2024/02/february-2024-anything-goes.html
6. https://cinspirations.blogspot.com/2024/02/february-challenge-for-someone-you-love.html

Affiliate links are used in this post at no cost to you – I really appreciate your support!

Pajama Crafter Stamps products used:
Lovely Bouquet stamp set

Other products used:
CARDSTOCK/PAPER: CutCardStock Cougar 80# Smooth White cardstock, Keep It Simple Rose 12×12 Collection Pack
INK: Memento Tuxedo Black ink; Arteza alcohol markers- YG04/10/12/46/48, RP16, R24/25, BG57, P27
ACCESSORIES: Fiskars 12″ ProCision Rotary Bypass Paper Trimmer, Fiskars 12″ SureCut Paper Trimmer, Elmer’s Craft Bond Tape Runner, Ranger Distress Collage Medium, Bearly Art precision craft glue, MISTI stamp tool, Eyelet Outlet 5mm pink pearls, tiny disc magnet, 1″ double-sided foam strip

I hope you’ve enjoyed this project! Be sure to check out all the awesome stamps, dies and other goodies at Pajama Crafter Stamps which is the new home of the Prickley Pear Stamps brand and the Pajama Crafter Stamps line! Be sure to keep up with news and sales by following us on Facebook, Instagram and Pinterest, and join Pajama Crafter Stamps & Friends for lots of fun crafty ideas and to share your creativity! And finally, we’d love for you to visit the Pajama Crafter Stamps blog and sign up for our newsletter to stay in touch! Thanks so much for stopping by today – we’ll see you next time! ;)

Scrappy hugs,

All Occasion Insert Cards (set of 4)

Hey everybody! Happy Wednesday! I’m up on the CutCardStock blog today with a tutorial for making a set of four all occasion insert cards. Have you ever heard of an insert card? I hadn’t until recently, and they are super easy and fast to make with an electronic cutting machine. I was recently gifted a Cricut Joy (the little sister to my Cricut Explore Air 2) which I used to make these cards. Two are Christmas cards, one is a congrats card, and one is a friendship card. I used Cougar Smooth White and Basis Natural for the card bases (two of each), and Blue Raspberry, Sweet Tooth, Lemon Drop and Wild Cherry from the Pop Tone line were used for the inserts. Each card has a stamped sentiment inside.

I used Cougar Smooth White and Pop Tone Wild Cherry cardstock for the ‘Peace and Joy’ card. Inside sentiment is from the Taylored Expressions In & Out Christmas stamp set.

For the ‘Congrats’ card, I used Basis Natural and Pop Tone Sweet Tooth. I went one step further running a Therm O Web iCraft Deco Foil Rainglow Transfer Sheet through my laminator on a Peel N Stick Toner Sheet for some awesome color. Inside sentiment is from the Stampin’ Up Charming Sentiments stamp set.

For the friendship card, I used Cougar Smooth White and Pop Tone Lemon Drop cardstock. Inside sentiment is from the Stampin’ Up Charming Sentiments stamp set.

And finally, I used Basis Natural and Pop Tone Blue Raspberry cardstock for the kitty Christmas card. Inside sentiment is from the Simon Says Stamp Christmas Cats stamp set.

Seems like I spend a small fortune every year mailing thick/dimensional Christmas cards with foam, gemstones, brads, bows, etc. After I made these cards I told my husband that this is the style Christmas card we are mailing from now on! Flat cards with regular postage! Yessss!

Sharing in the following challenges:
1. https://aperfecttimetocraft.blogspot.com/2024/02/a-perfect-time-to-craft-open-challenge.html
2. https://hereisaplacetostart.blogspot.com/2024/02/february-2024-monochrom-you-pick-palette.html
3. https://scrapping4funchallenges.blogspot.com/2024/02/february-2024-anything-goes.html

Affiliate links are used in this post at no cost to you – I really appreciate your support!

CutCardStock products used:
Cougar Smooth 80# White cardstock
Basis 80# Natural cardstock
Pop Tone Blue Raspberry
Pop Tone Sweet Tooth
Pop Tone Lemon Drop
Pop Tone Wild Cherry

Other products used:
STAMPS: Taylored Expressions In & Out Christmas stamp set, Stampin’ Up Charming Sentiments stamp set, Simon Says Stamp Christmas Cats stamp set
INK: Cricut Joy Black Pen, Memento Tuxedo Black ink
DIES/PUNCHES: Cricut Design Space Insert Card Files
ACCESSORIES: Cricut Joy electronic cutting machine, Fiskars 12″ ProCision Rotary Bypass Paper Trimmer, Therm O Web iCraft Deco Foil Rainglow Transfer Sheets and Peel N Stick Toner Sheets, MISTI stamp tool

I hope you’ve enjoyed today’s project and you’re inspired to get crafty! Be sure to check out all the awesome cardstock and other goodies at CutCardStock (adhesives, labels, stickers, pens, watercolors and ribbon to name a few). And head on over to the CutCardStock Facebook Page and for more inspiration! Also, be sure to join our Creating with Card Stock Facebook Group for even more crafty inspiration! Thanks so much for stopping by today – we’ll see you next time!

Scrappy hugs,

Kiss Me, I’m Irish

Hey everybody, Happy Hump Day! I hope you’re having a great week! I’m delighted to share a Keep It Simple DT inspiration project created with items in the new Lucky Day Collection! OMGoodness, this collection is so fun! And having Irish roots makes it even more so! I created another side panel pillar card (the first one hasn’t been showcased yet) that my friend, Debbie, over at Secrets To Stamping shared on her blog HERE a while back. It’s a fun one – the construction is basically the same as a front step card but in a horizontal orientation rather than vertical. I sure do love it! If you like the Keep It Simple products I’ve used and are inclined to shop, be sure to use my discount code LoveToScrap2 at checkout to save 10% on your entire order! There is no minimum purchase requirement and no usage limits, plus the code combines with product, order, and shipping discounts!

I cut the card base from CutCardStock Scottish Highlands Green cardstock and the layering panels from coordinating papers in the Lucky Day 12×12 Collection Pack. I used die cuts from the Lucky Day and Lucky Phrases Die Cut Pieces. The sentiment is popped up on a foam strip and I added some iridescent gemstones to the clover strip.

I cut the back panel from Neenah Classic Crest Solar White cardstock and embellished it with strips of the papers used on the front. I added a couple more die cuts, which completed the card.

Sharing in the following challenges:
1. https://avenue613.blogspot.com/2024/02/february-2024-anything-goes-w-optional.html
2. https://aperfecttimetocraft.blogspot.com/2024/02/a-perfect-time-to-craft-open-challenge.html
3. https://cardsgalorechallenges.blogspot.com/2024/02/february-2024-crafts-galore-encore.html
4. https://scrapping4funchallenges.blogspot.com/2024/02/february-2024-anything-goes.html
5. https://cinspirations.blogspot.com/2024/02/february-challenge-for-someone-you-love.html

Keep It Simple products used:
Lucky Day 12 x 12 Collection Pack
Lucky Day Die Cut Pieces
Lucky Day Lucky Phrases Die Cut Pieces
Back To Basics Clear Enamel Dots

Affiliate links are used in this post at no cost to you – I really appreciate your support!

Other products used:
CARDSTOCK/PAPER: CutCardStock Scottish Highlands Green cardstock, Neenah Classic Crest 80# Solar White
ACCESSORIES: Tonic Studios 12″ Guillotine Paper Trimmer, Bearly Art precision craft glue, iridescent gemstones, 1/4″ double-sided foam strip

I hope you’ve loved seeing this project as much as I loved creating it and you’re inspired to get crafty! Be sure to check out ALL the fun goodies in the Keep It Simple online store! Save 10% on your entire order when you shop online using code LoveToScrap2 at checkout! There is no minimum purchase requirement and no usage limits, AND it combines with product, order, and shipping discounts! Is that cool, or what?! Be sure to Follow us on Facebook, Instagram, and Pinterest for lots of crafty inspiration! Thanks so much for stopping by today – we’ll see you next time!

Scrappy hugs,

just wanting to say Hi!

Hey everybody! Happy Monday – can you believe we’re almost a week into February already?! Christmas will be here before you know it! Bahahaha (just kidding)! I’m up on the Pajama Crafter Stamps blog today with an inspiration project featuring the Prickley Pear Stamps Hot Air Balloons stamp set and coordinating Hot Air Balloon die! I stenciled a nice cloud background in stormy sky distress ink for this 3D hot air balloon that I created with several balloon die cuts!

The card base was cut from Neenah Classic Crest 110# Solar White cardstock along with five hot air balloon die cuts (using the Hot Air Balloon die) from KNC Essentials Showering Nature 12×12 paper. Using the My Favorite Things Mini Cloud Edges Stencil, a blending brush and Ranger stormy sky distress ink, I stenciled the entire card front. I gave it good cloud coverage, lighter at the bottom and darker at the top.

I stamped the balloon and sentiment from the Hot Air Balloons stamp set in Memento Tuxedo Black ink. I cut the bottom off of each balloon die cut and scored them down the middle. I adhered the right side of one to the left side of the next until all five were attached to each other and then affixed them to the card front over top of the stamped balloon. The finishing touch was adding several blue gemstones.

Sharing in the following challenges:
1. https://aperfecttimetocraft.blogspot.com/2024/02/a-perfect-time-to-craft-open-challenge.html
2. https://hereisaplacetostart.blogspot.com/2024/02/february-2024-monochrom-you-pick-palette.html
3. https://cardsgalorechallenges.blogspot.com/2024/02/february-2024-crafts-galore-encore.html

Affiliate links are used in this post at no cost to you – I really appreciate your support!

Pajama Crafter Stamps products used:
Prickley Pear Stamps Hot Air Balloons stamps
Prickley Pear Stamps Hot Air Balloon die

Other products used:
Cardstock/Paper: Neenah Classic Crest 110# Solar White cardstock, KNC Essentials Showering Nature 12×12 paper
Ink: Ranger stormy sky distress ink, Memento Tuxedo Black ink
Accessories: Tonic Studios 12″ Guillotine Paper Trimmer, My Favorite Things Mini Cloud Edges Stencil, blending brush, Art Glitter Dries Clear adhesive, MISTI stamp tool, Big Shot, Darice blue gemstones

I hope you’ve enjoyed this project! Be sure to check out all the awesome stamps, dies and other goodies at Pajama Crafter Stamps which is the new home of the Prickley Pear Stamps brand and the Pajama Crafter Stamps line! Be sure to keep up with news and sales by following us on Facebook, Instagram and Pinterest, and join Pajama Crafter Stamps & Friends for lots of fun crafty ideas and to share your creativity! And finally, we’d love for you to visit the Pajama Crafter Stamps blog and sign up for our newsletter to stay in touch! Thanks so much for stopping by today – we’ll see you next time! ;)

Scrappy hugs,

take time to chase the snowflakes

Hey everybody! Dang, another weekend is behind us and we’re staring at the end of January! I’m delighted to share another Keep It Simple DT inspiration project created with the amazing new Ski Resort Collection! Talk about some FUN products! I created my first-ever carousel card featuring papers and tons of die cut pieces from this collection along with Royal ribbon and white enamel dots already in the store! My inspiration for this fun fold came from an older tutorial by Sandie HERE on the Stamping Bella blog. It’s a fun one, for sure! If you like the Keep It Simple products I’ve used and are inclined to shop, be sure to use my discount code LoveToScrap2 at checkout to save 10% on your entire order! There is no minimum purchase requirement and no usage limits, plus the code combines with product, order, and shipping discounts!

The card base was cut from CutCardStock Basis 80# White cardstock along with layering panels from coordinating patterned papers in the Ski Resort 12×12 Collection Pack. Each of the four sections has a sentiment and a little scene (created with Skiers & Snowboarders, Sentiments, and Scenery Die Cut Pieces) to keep your eyes moving!

It ties closed with a piece of Back To Basics Royal Ribbon, and there are small disc magnets to keep it open. I see another one of these in my immediate future! Here are shots of all four sections and the back!

Keep It Simple products used:
Ski Resort 12×12 Collection Pack
Ski Resort Skiers & Snowboarders Die Cut Pieces
Ski Resort Sentiments Die Cut Pieces
Ski Resort Scenery Die Cut Pieces
Back To Basics Royal Ribbon Pack
Back To Basics White Enamel Dots

Affiliate links are used in this post at no cost to you – I really appreciate your support!

Other products used:
CARDSTOCK/PAPER: CutCardStock Basis 80# White cardstock
DIES/PUNCHES: Kadomaru Pro Corner Rounder
ACCESSORIES: Tonic Studios 12″ Guillotine Paper Trimmer, Bearly Art precision craft glue, MISTI stamp tool, Big Shot, small disc magnets, Ranger Distress Collage Medium, Scrapbook Adhesives 3D Foam Squares (small white)

I hope you’ve loved seeing this project as much as I loved creating it and you’re inspired to get crafty! Be sure to check out ALL the fun goodies in the Keep It Simple online store! Save 10% on your entire order when you shop online using code LoveToScrap2 at checkout! There is no minimum purchase requirement and no usage limits, AND it combines with product, order, and shipping discounts! Is that cool, or what?! Be sure to Follow us on Facebook, Instagram, and Pinterest for lots of crafty inspiration! Thanks so much for stopping by today – we’ll see you next time!

Scrappy hugs,

High Five!

Hey everybody! Happy Monday – it’s the last Monday in January already! Can you believe it?! I’m up on the Pajama Crafter Stamps blog today with an inspiration project featuring the amazing High Five stamp set from our new release! I mentioned in my last post featuring this adorable stamp set that (PCS owner) Joy’s cats do the ‘high five’ while they are watching their Sunday worship service, and I just love that! I created a diamond stair step card featuring a kitty and a couple sentiment stamps from this set, and I love how it turned out! My inspiration for this fun fold once again came from Lisa Curcio’s blog.

The card base was cut from Neenah Classic Crest 110# Solar White cardstock along with layering panels from the Keep It Simple Max & Daisy Flip Sides Pack. I stamped the sentiment on first diamond in Memento Tuxedo Black ink. Next, I stamped the kitty in black on a Solar White scrap and colored him with alcohol markers. I fussy cut the kitty and popped him up on a foam strip. I then added a couple enamel hearts from the Keep It Simple max & Daisy Enamel Shapes.

Another sentiment and paw prints (from the same stamp set) were stamped on the second diamond.

I loved the hearts on the third diamond so I didn’t stamp on that one. Yellow gemstones were added to complete the card front.

I added a plain panel on the back to write a custom message and signature.

Affiliate links are used in this post at no cost to you – I really appreciate your support!

Pajama Crafter Stamps products used:
High Five stamp set

Other products used:
CARDSTOCK/PAPER: Neenah Classic Crest 80# Solar White cardstock, Keep It Simple Max & Daisy Flip Sides Pack
INK: Memento Tuxedo Black ink; Arteza alcohol markers- NG04/06/08, RP09
ACCESSORIES: Fiskars 12″ ProCision Rotary Bypass Paper Trimmer, Elmer’s Craft Bond Tape Runner, Bearly Art precision craft glue, MISTI stamp tool, Keep It Simple Max & Daisy Enamel Shapes, yellow gemstones, 1/2″ double-sided foam strip

I hope you’ve enjoyed this project! Be sure to check out all the awesome stamps, dies and other goodies at Pajama Crafter Stamps which is the new home of the Prickley Pear Stamps brand and the Pajama Crafter Stamps line! Be sure to keep up with news and sales by following us on Facebook, Instagram and Pinterest, and join Pajama Crafter Stamps & Friends for lots of fun crafty ideas and to share your creativity! And finally, we’d love for you to visit the Pajama Crafter Stamps blog and sign up for our newsletter to stay in touch! Thanks so much for stopping by today – we’ll see you next time! ;)

Scrappy hugs,