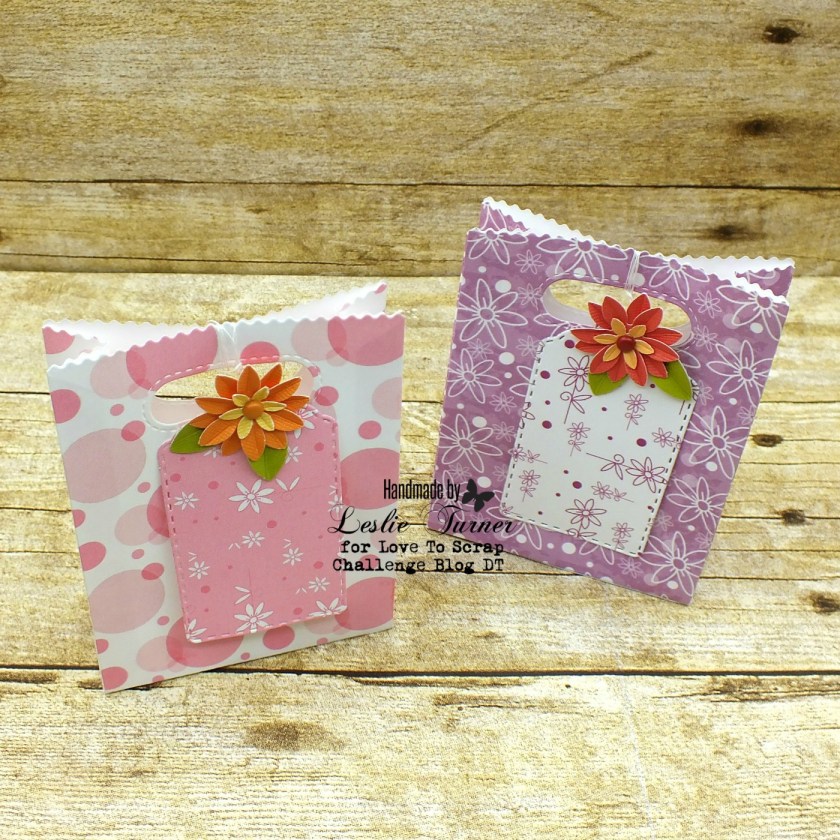
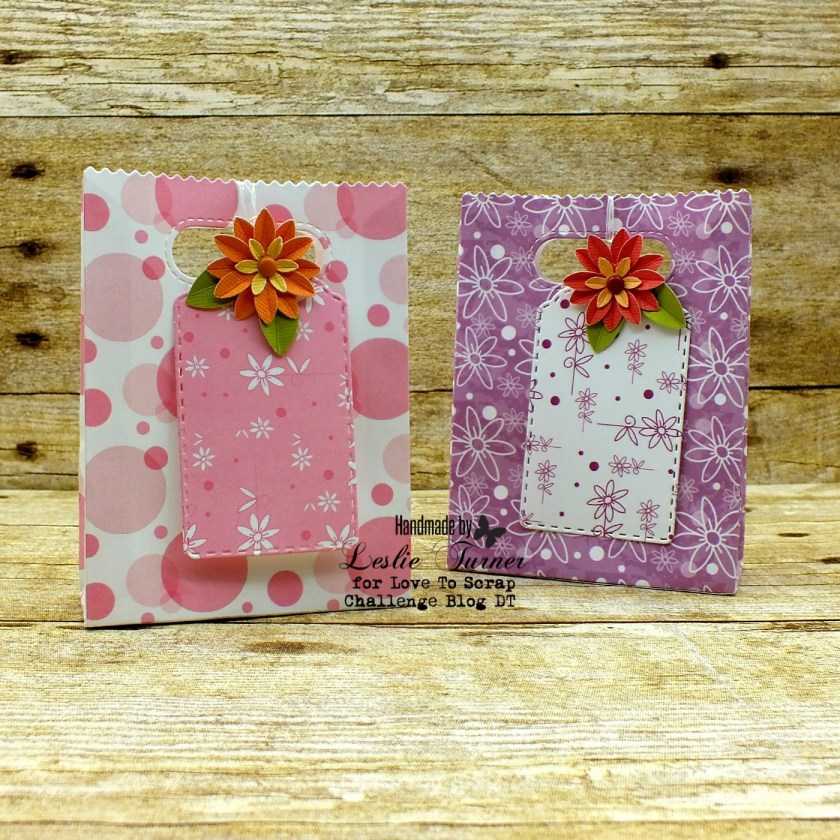
Hi, friends! Happy Tuesday – hope your week is off to a tremendously fabulous start! Our October challenge is live this morning over at Love To Scrap Challenge Blog and I’m super stoked to share my DT inspiration project for LTSCB #126 – No Cards Allowed! This month we’d love to see your project that is NOT a card! We are being sponsored this month by Bugaboo Digi Stamps so be sure to come over and play for a chance to win a prize! I created a pair of super cute little gift bags using several papers in Bugaboo’s polkadot flowers digi papers collection.
I cut tags from coordinating papers and tied a length of quilting thread to each in order to wrap around the handle to close the bag. I also adhered a flower to each tag.
I’m absolutely tickled with how these little gift bags turned out and can’t wait to ‘find’ something to tuck inside so I can gift them!
Products used:
Cardstock/Paper: Bugaboo Digi Stamps polkadot flowers digi papers
Dies/Punches: Lawn Fawn Goodie Bag die
Accessories: Gemini Junior die cutting machine, white quilting thread, paper flowers from stash
I hope you’ve enjoyed today’s project and will link up with us this month! Be sure to check out all the fun digital images over at Bugaboo Digi Stamps – I know you’ll find something you just can’t live without! Thanks so much for stopping by today – we’ll see you soon! ;)
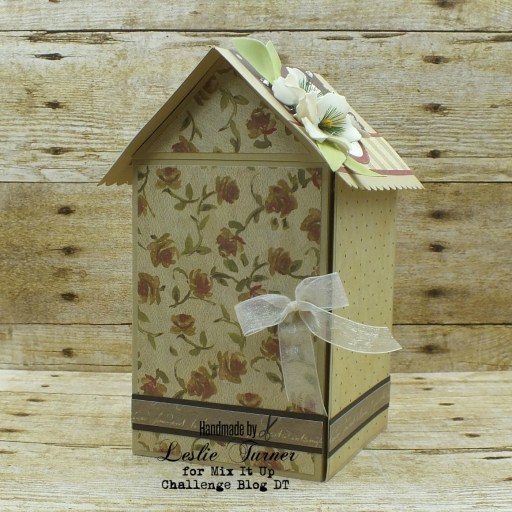
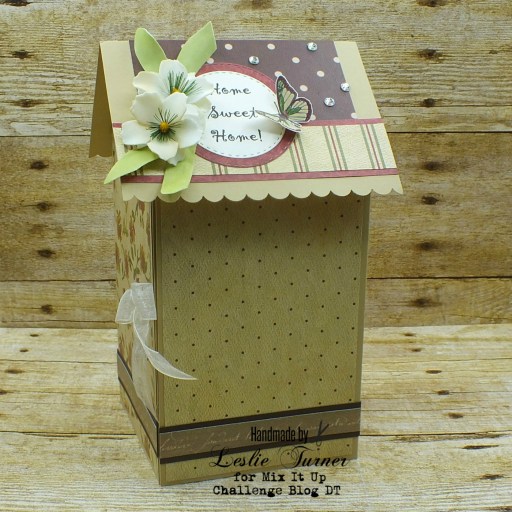
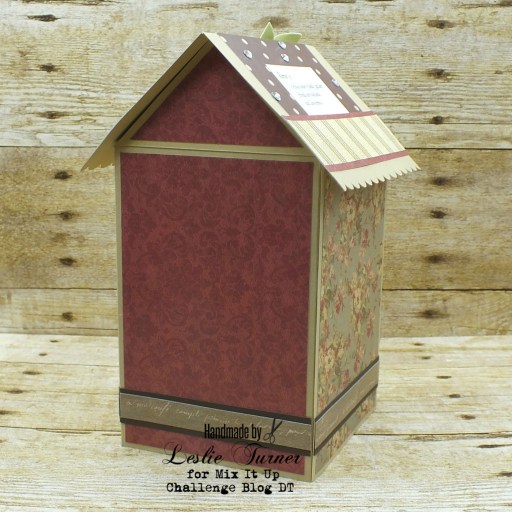
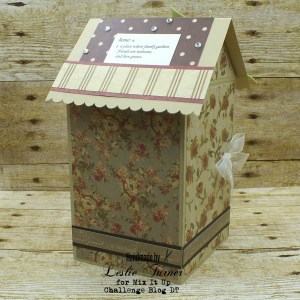
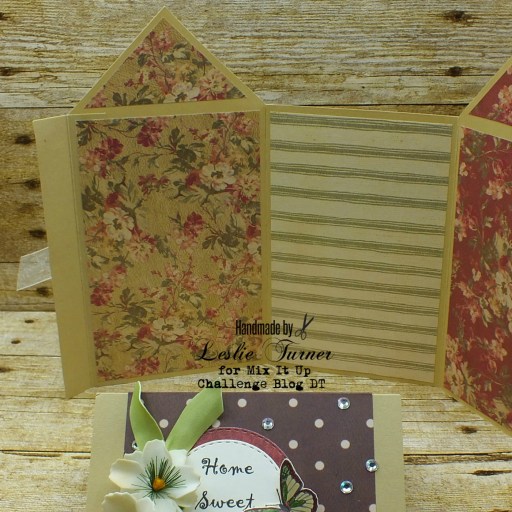
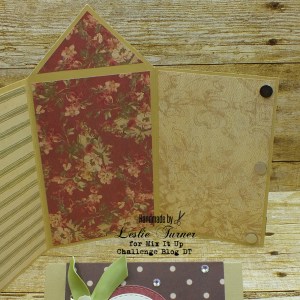
Hi everyone! Happy Tuesday – I hope the week has started off on a great note for you! It’s time for another fun challenge over at Mix It Up Challenge Blog and I’m super stoked to share my DT inspiration project for MIUCB #30 – Anything Goes + Open Technique! All of our challenges are ‘anything goes’ and we offer a technique twist each month to inspire you and it’s not required to play. This month the twist is an open technique and all we ask is that you mention in your blog post which technique you chose to use on your project. I chose the 3-D technique to create my project for this challenge, in the form of the most adorable mini album shaped like a little house! I used The Paper Studio Mirabelle cardstock on all the panels and roof, using a different pattern on each, and I embellished the front with a sheer ribbon bow. Here are shots of all the angles going around the outside of the house.
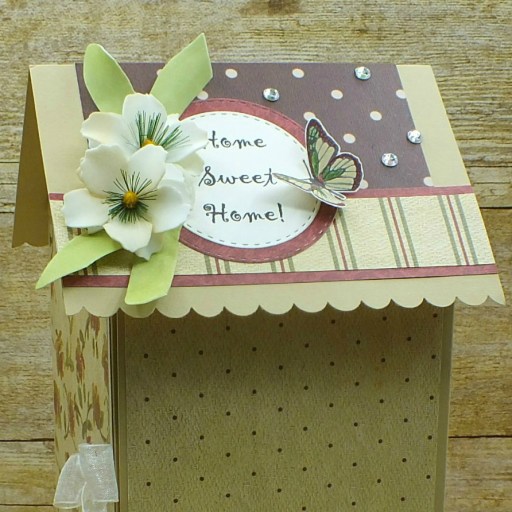
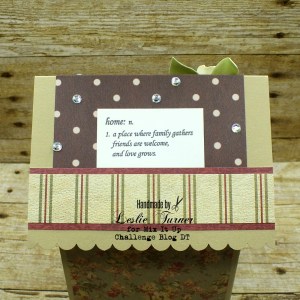
My inspiration for this adorable mini album came from a Splitcoast Stampers newsletter a few months back that you can find HERE. I immediately fell in love and couldn’t wait for the prime opportunity to make one, putting my own spin on the design! I created the ‘Home Sweet Home’ sentiment on the computer which I cut with a stitched circle die and layered on a slightly larger stitched circle die cut. I embellished this sentiment with flowers and a stamped butterfly that I colored with Prismacolor pencils. I stamped the home definition on the other side of the roof in dark brown ink.
I used magnets to close in the house shape, and when opened, reveals panels on the inside to display photos and/or journaling. OMG, cuteness overload!
Products used: Cardstock/Paper: American Crafts brown sugar and coffee cardstock, The Paper Studio Mirabelle cardstock Stamps: Paper Pretties Every Day Miracles stamp set, Inspired By Stamping Butterflies stamp set Ink: Memento Espresso Truffle ink Dies/Punches: Memory Box Stitched Circle Layers dies Accessories: Michaels ivory sheer ribbon, Prismacolor pencils- Olive Green, Ginger Root, Tuscan Red; tiny round magnets from stash, Tim Holtz stamp platform, Darice clear rhinestones, Hobby Lobby flowers
I hope you’ve enjoyed seeing this mini album and will link up a project with us this month! If you use any special technique to create your project, remember to mention it in your blog post. Thanks so much for stopping by – and we’ll see you again soon!
Hi everyone! Hope you’re having a great week so far! Today is not my posting day on the Simply Crafty SVGs Blog but I’ve popped in to share an extra DT inspiration project with you, a sweet little hanging lantern created with the free (ySimply Crafty SVGs Mini Hanging Lantern cut file. How cute would it be to create several of these and hang them around the deck or patio for a birthday party or a summer get-together?!
The sky is the limit for choosing papers for these! I chose a heavy kraft cardstock for the base and then a pretty floral print for the panels.
The finishing touches were a few pink gemstones to give this lantern a little pizzazz and some pink and white Baker’s twine. Love how this turned out!
Products used:
Cardstock/Paper: Cardstock Warehouse Brown Box kraft cardstock, Colorbok Delilah designer paper
Dies/Punches: Simply Crafty SVGs Mini Hanging Lantern cut file
Accessories: Pink and white Baker’s twine, pink gemstones
I hope you’ve enjoyed today’s project! Be sure to check out all the fun cut files in the Simply Crafty SVGs store – you’ll have so much fun! And there are tons of freebies to get started! Thanks so much for stopping by today – we’ll see you next time! ;)
9/30/19 3rd Prize Winner at A Perfect Time To Craft Open Challenge! 10/4/19 Top 3 at Crafty Calendar Challenge! 10/5/19 Winner at Let’s Craft and Create! 10/14/19 Best Technique Winner at World Wide Open Design Team Monthly Challenge!
Hi friends! I hope you’re having an awesome weekend! I’m super stoked to share another Ephemoire inspiration project with you this month. If you haven’t already done so, be sure to head over to the Ephemoire Etsy Shop to check out all the amazing digital printables… there are collage sheets, digital papers, journal kits, clip art and mixed media printables, and the print quality is awesome!
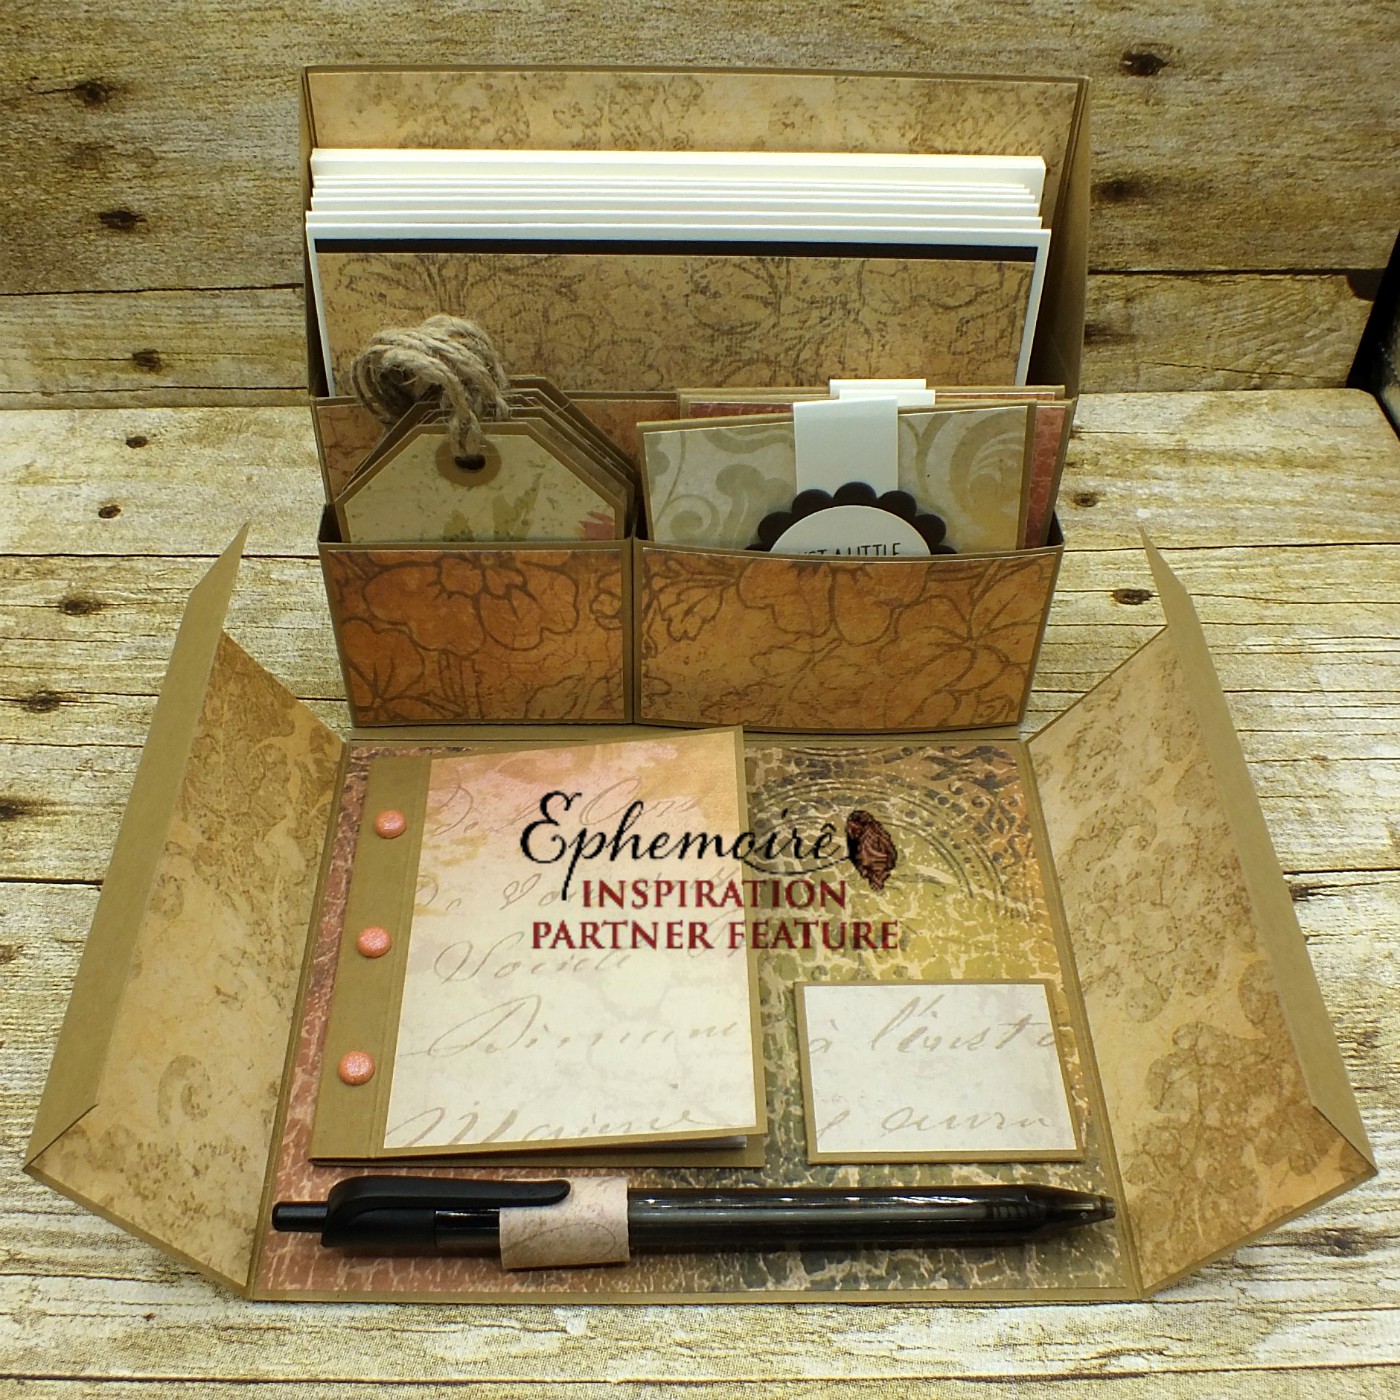
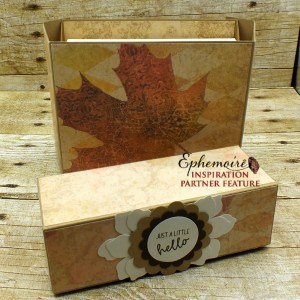
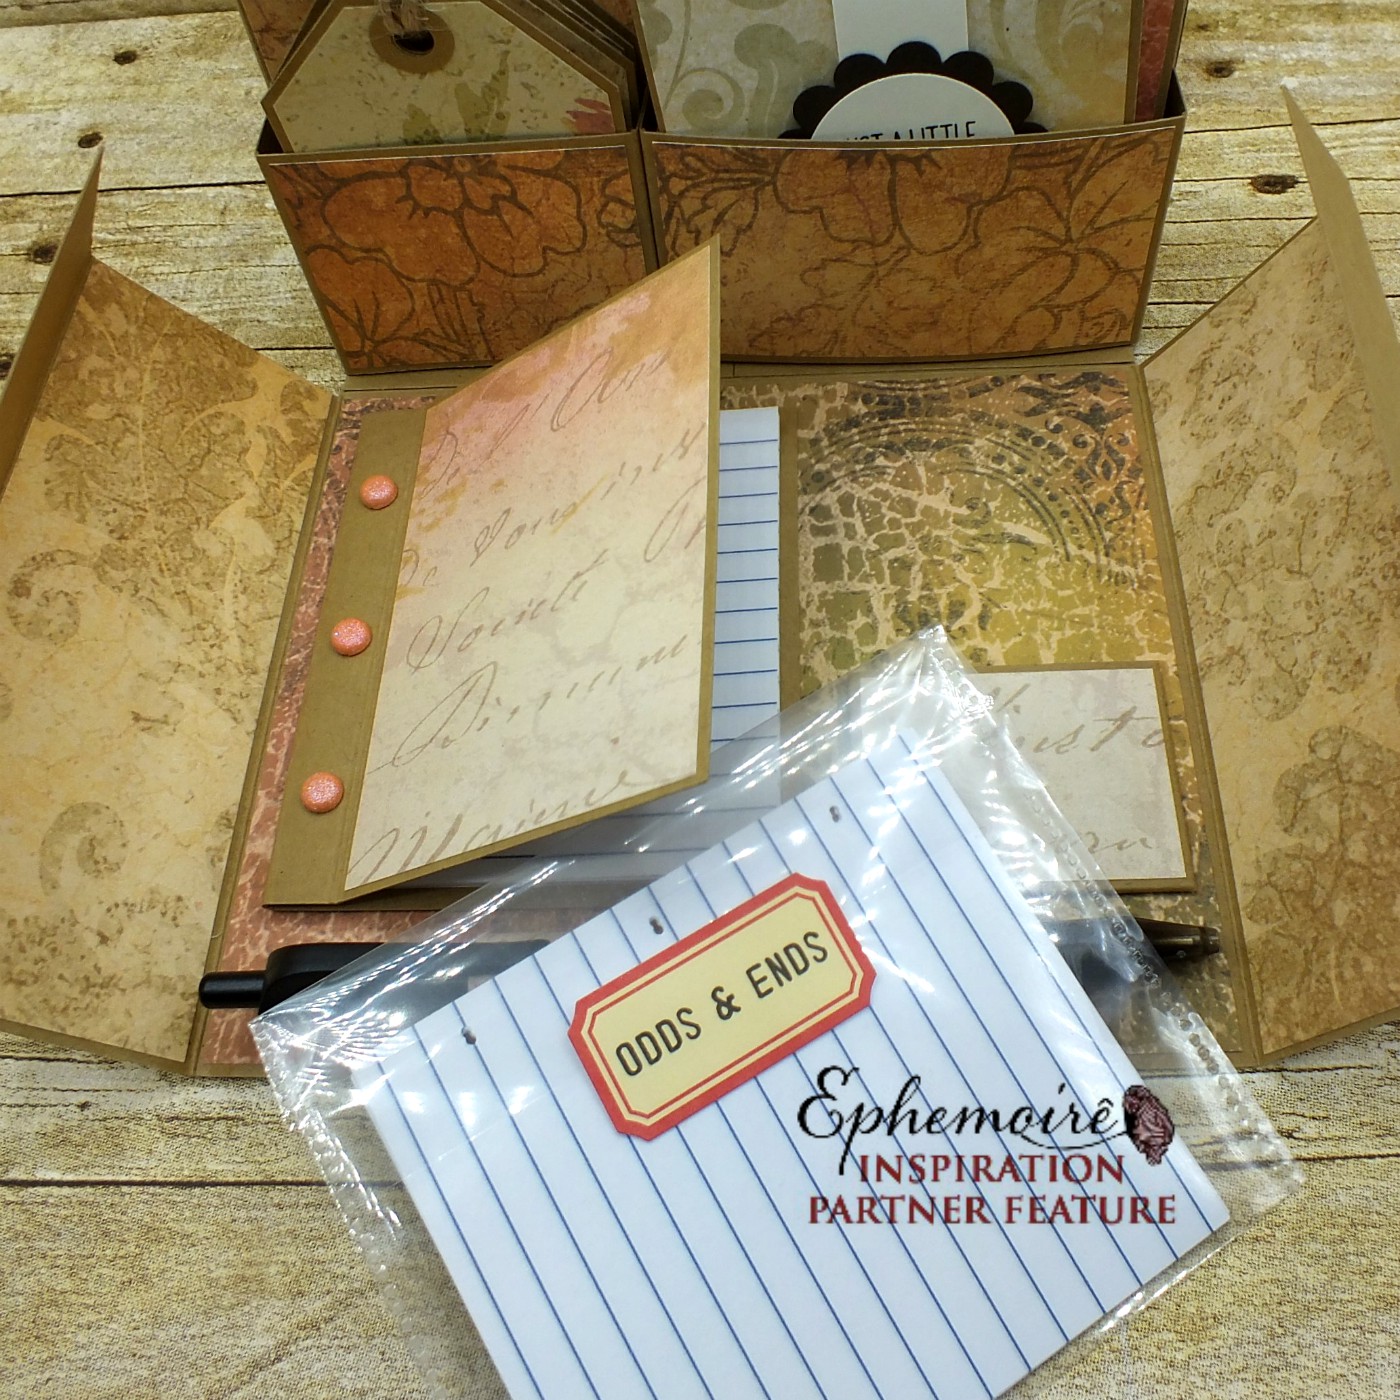
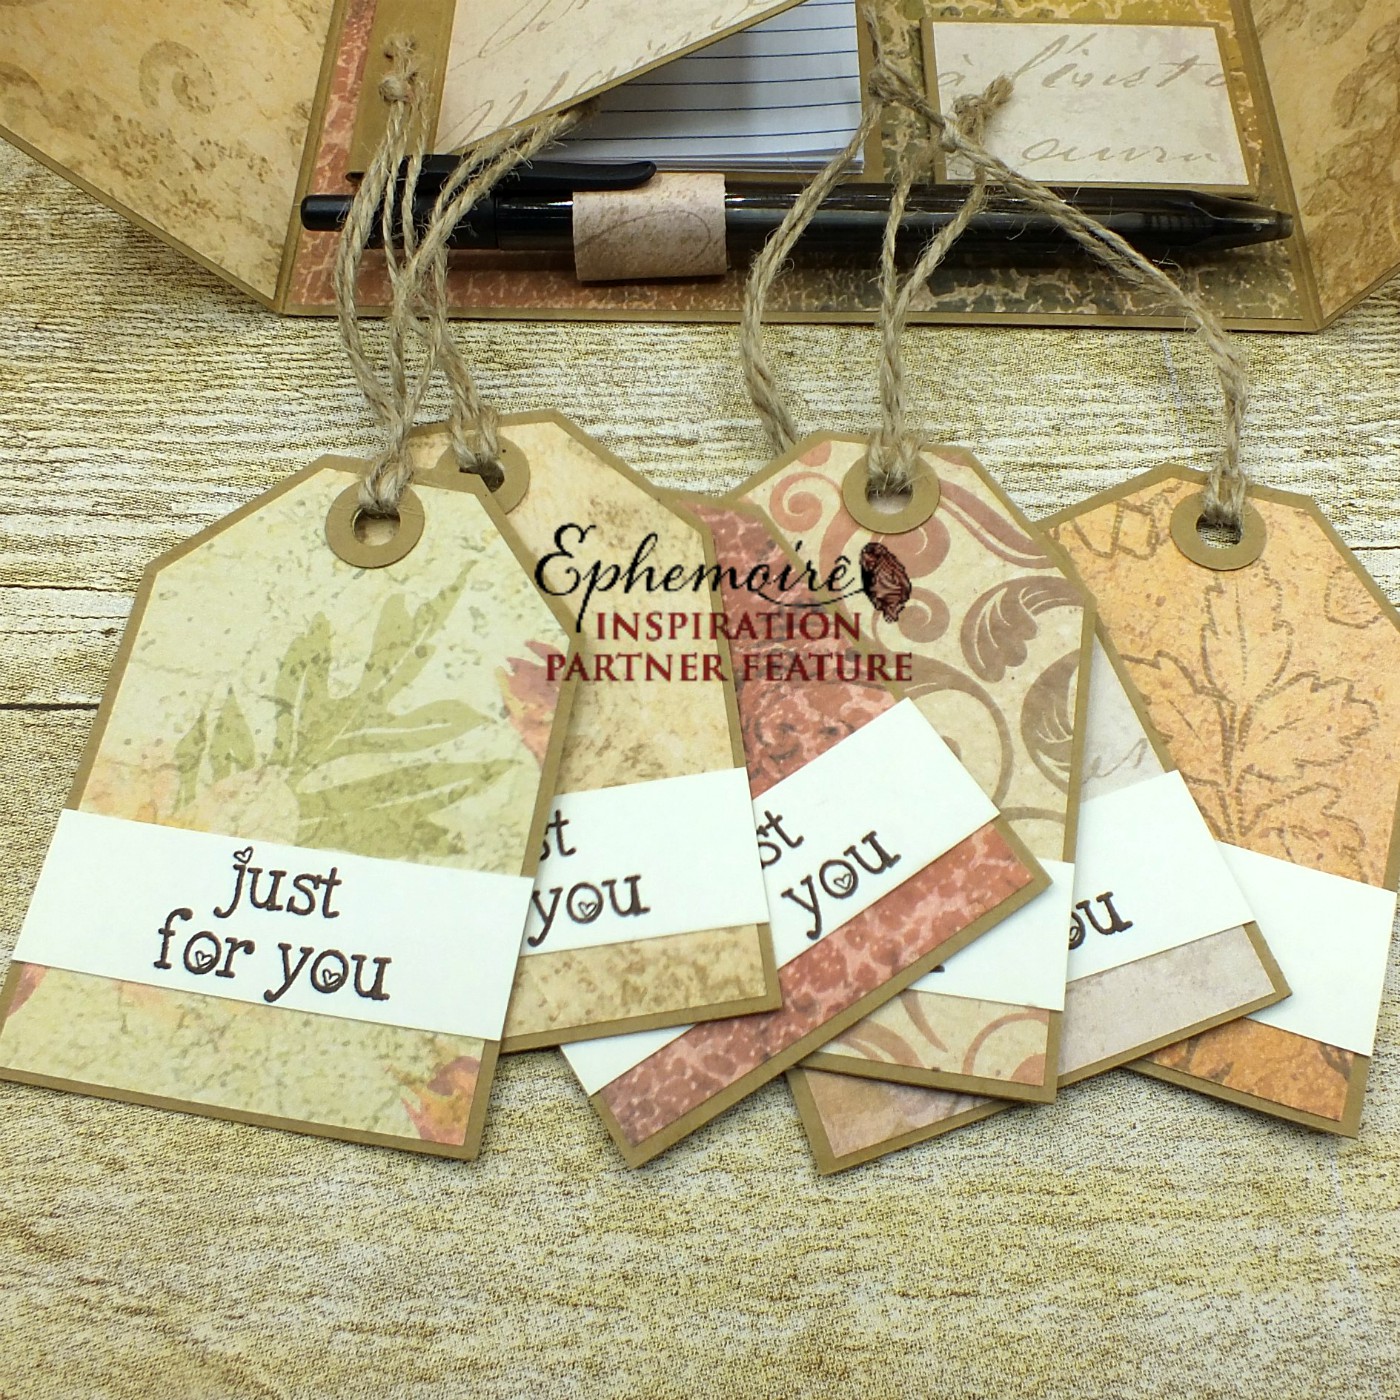
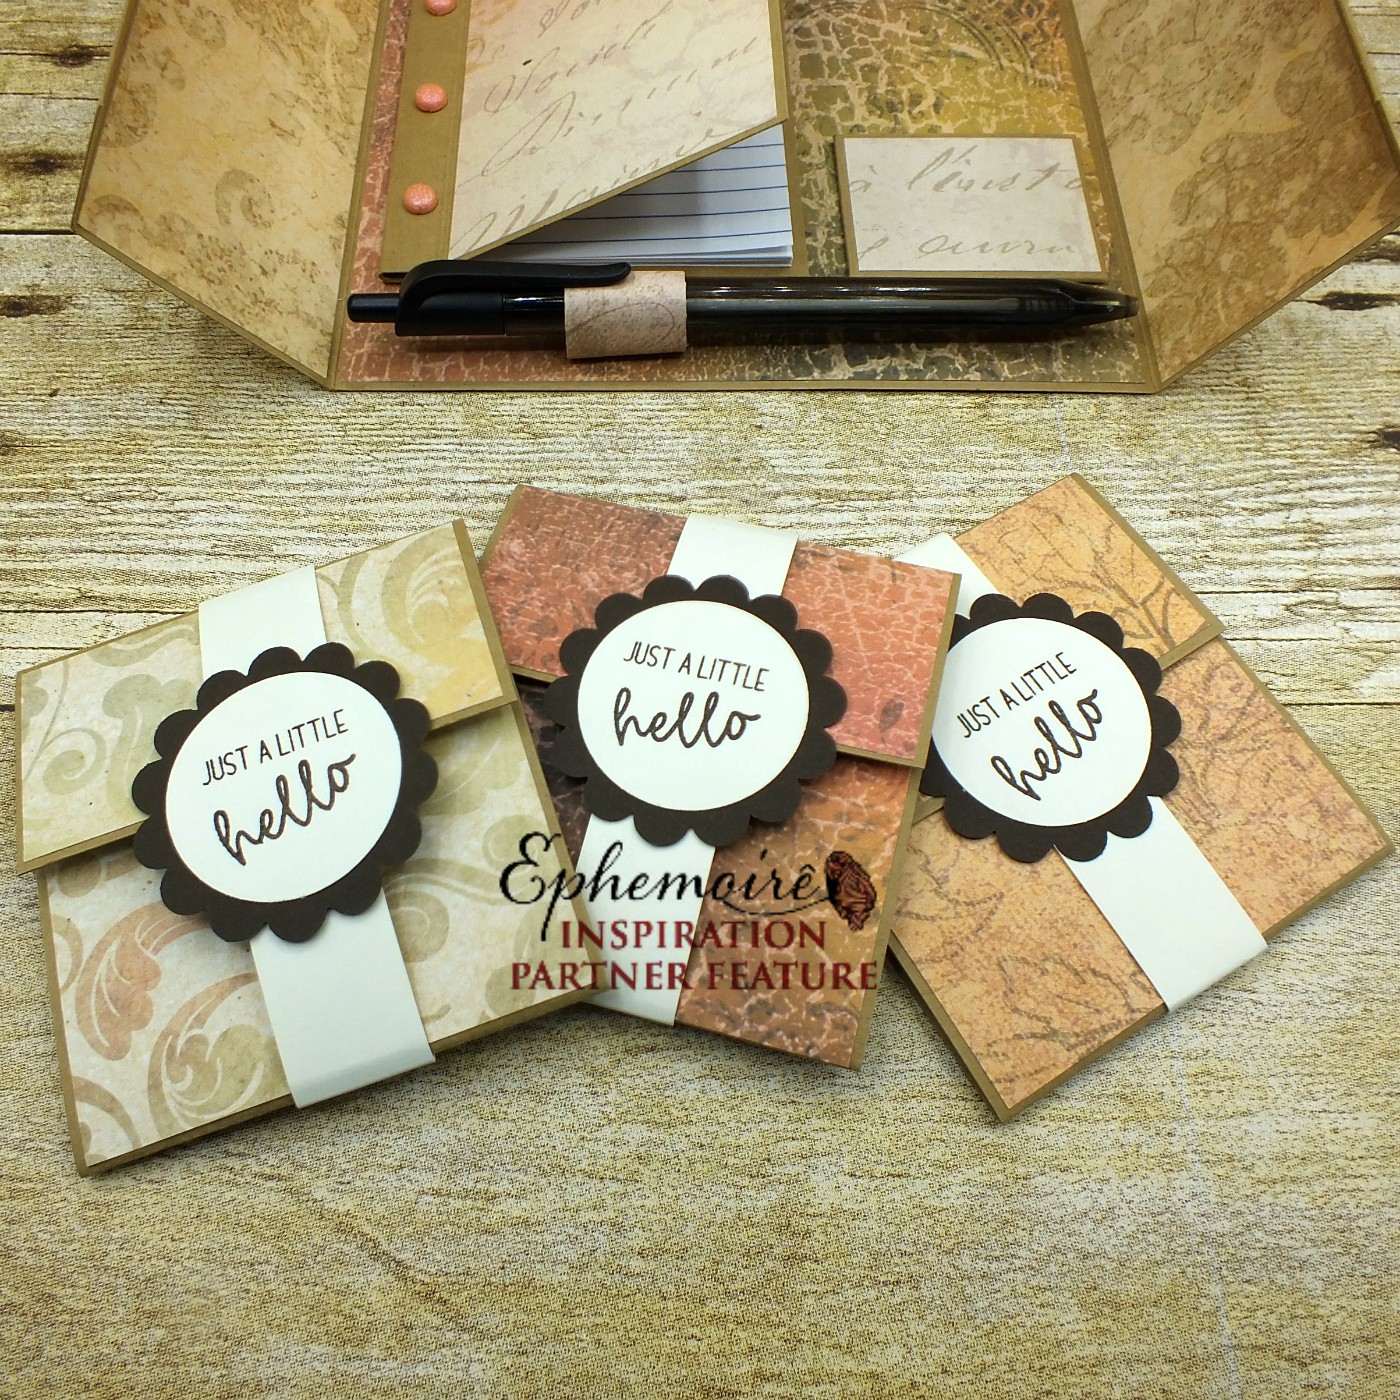
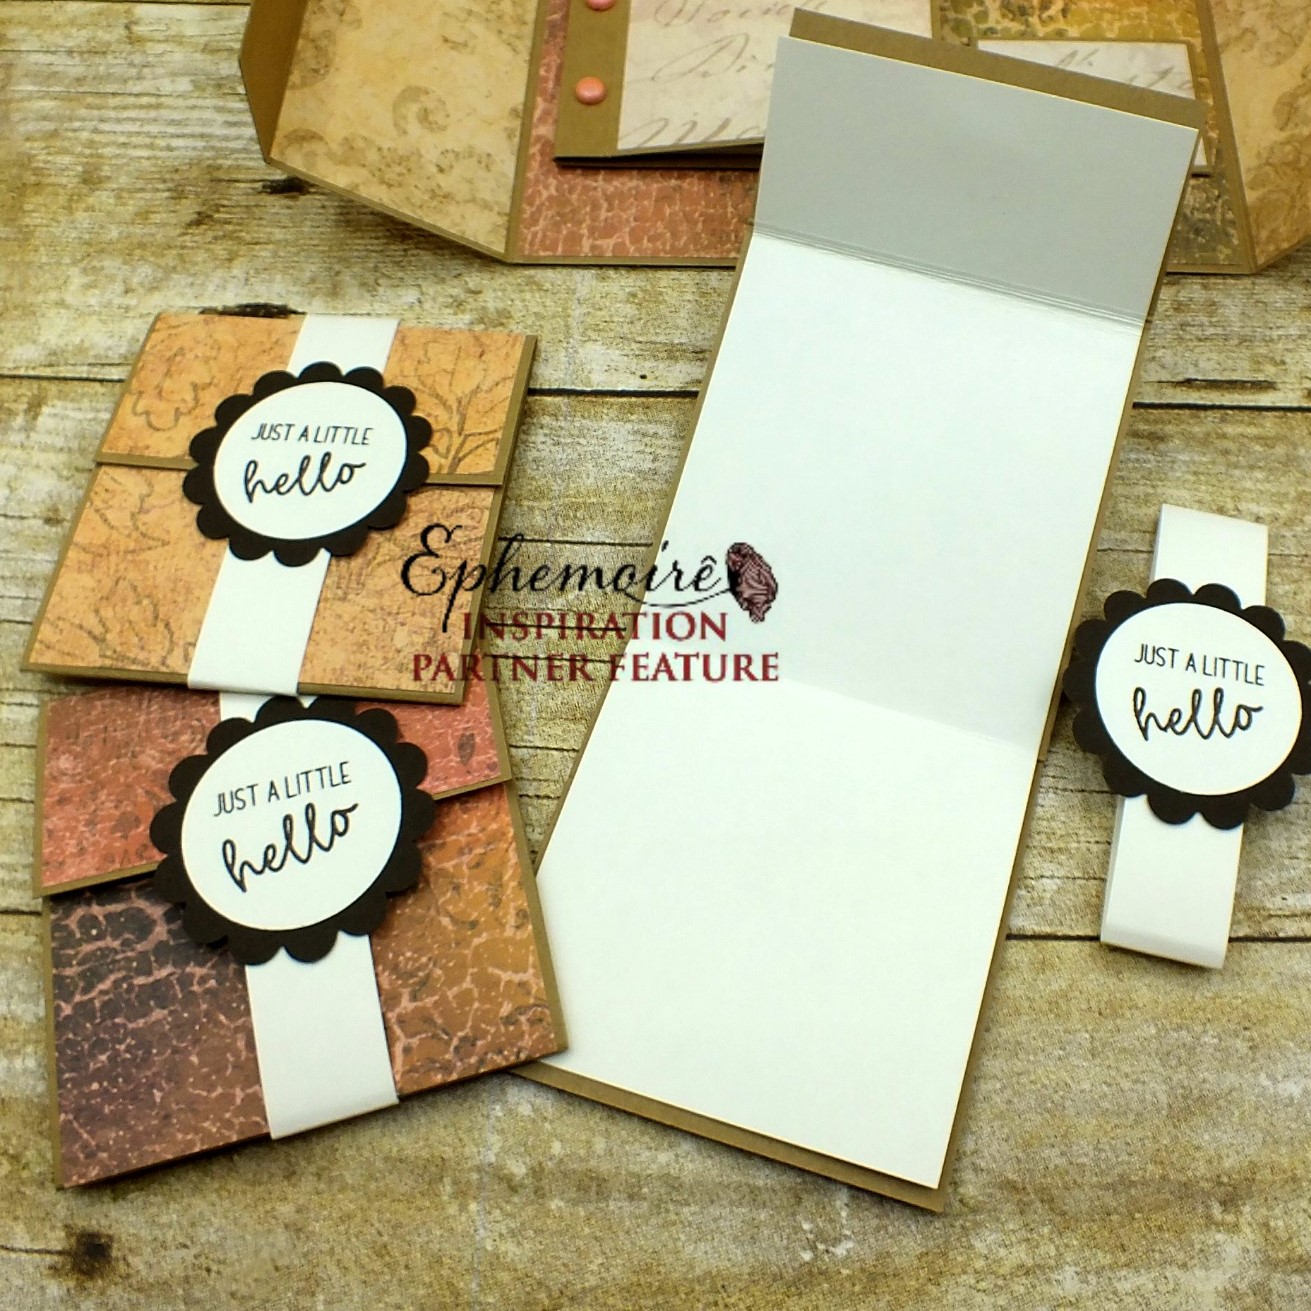
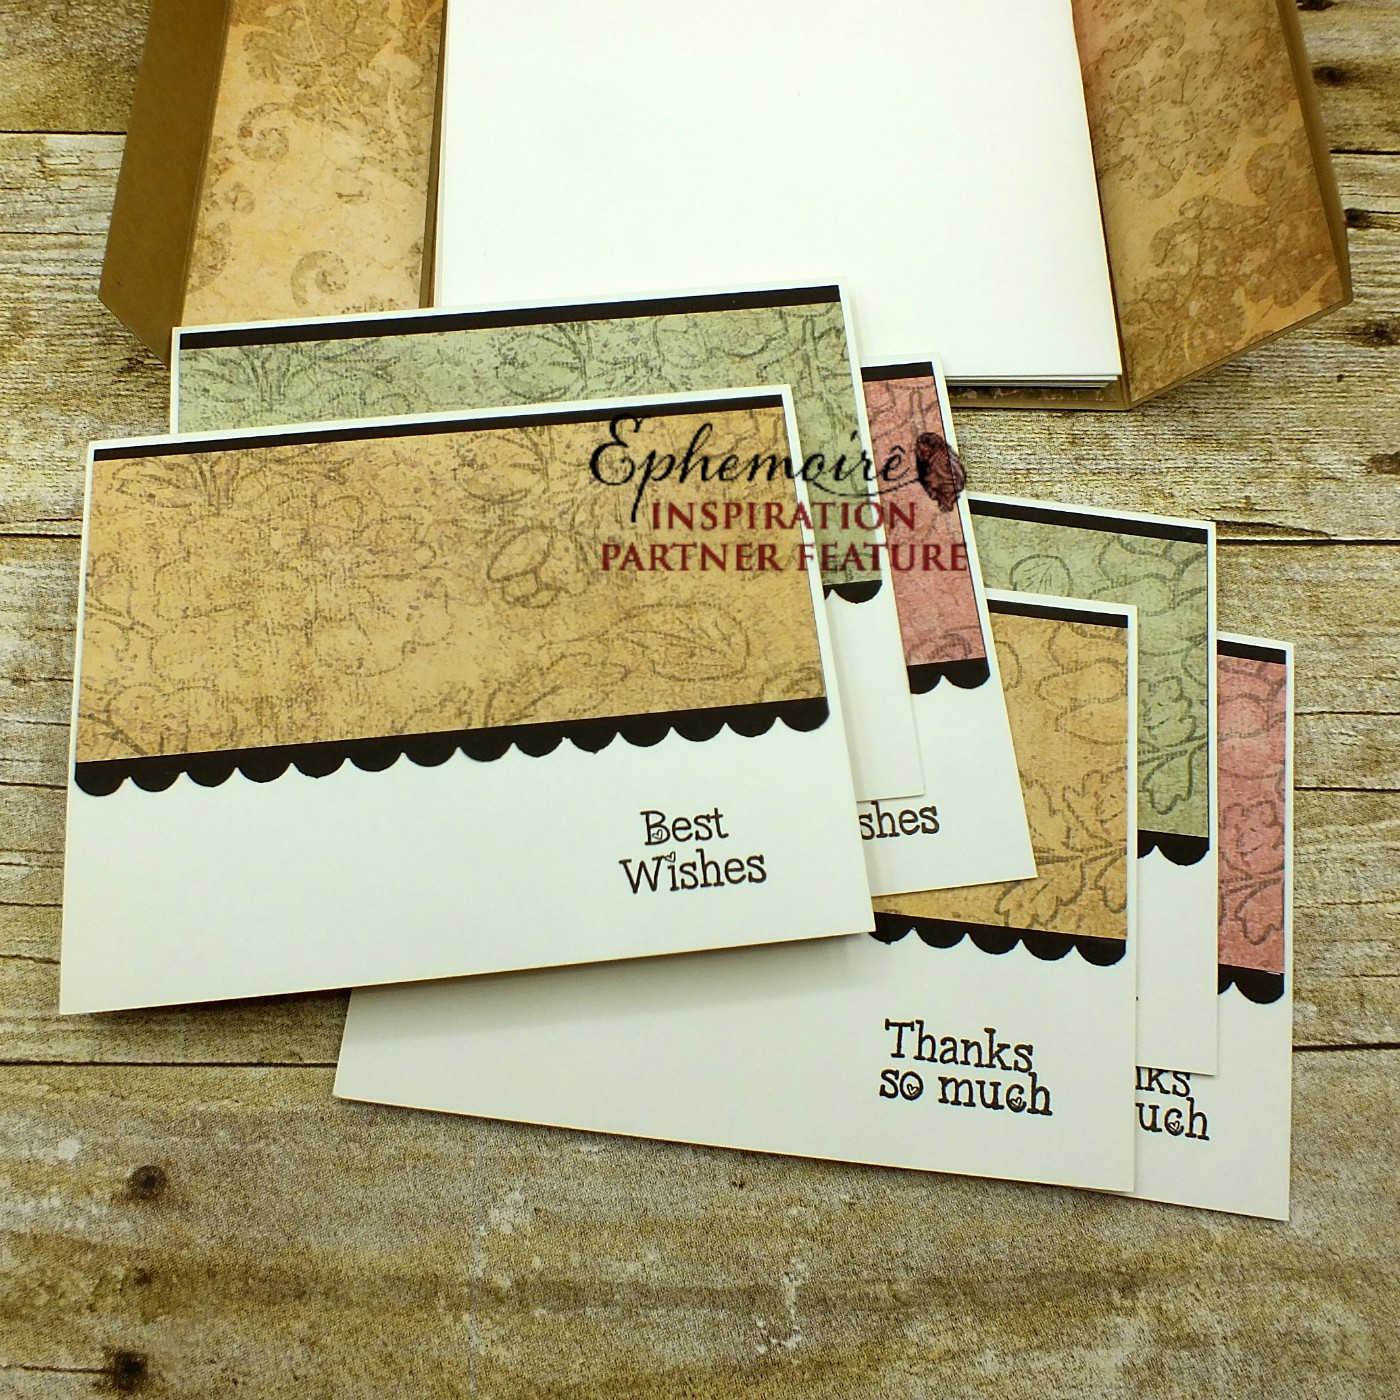
As mentioned in my post earlier this morning, I was provided Is It Autumn Yet #1 to play with this month. Well, I was also provided Is It Autumn Yet #2, Is It Autumn Yet #3 and Is It Autumn Yet #4 letter size digi papers, and using all four collections, I created an Autumn-themed stationery box that holds six cards and envelopes, six tags, three trifold notelets with belly bands, a lined book, a postage stamp pocket and a pen. This is the second stationery box I’ve made and I thoroughly enjoyed it! This version was highlighted in a Splitcoast Stampers newsletter a couple years ago HERE and I’m so glad I bookmarked it!
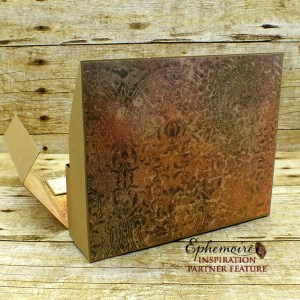
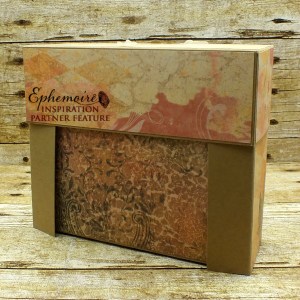
Before I show you the contents, here are some shots of the outside of the box. It’s amazing to me how much fits in this box! ;)
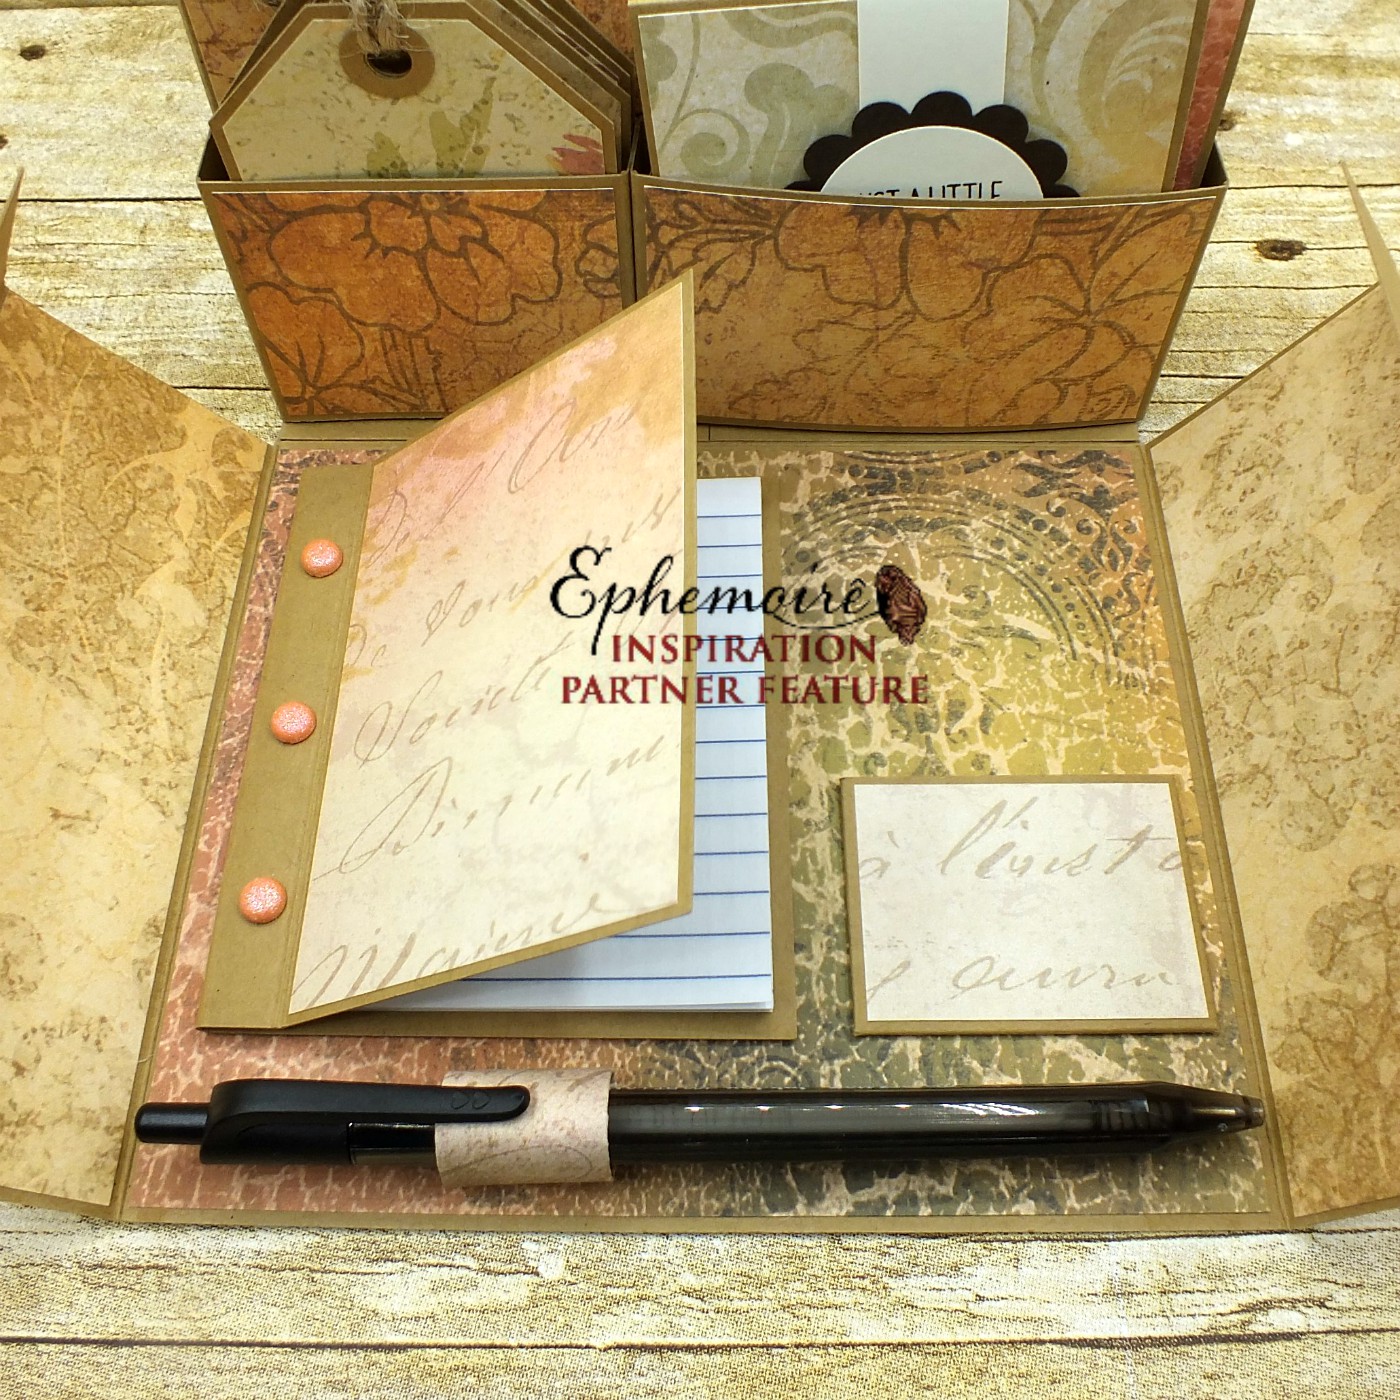
Now for the fun stuff! Here is the lined book that can be used to record birthdays, addresses or whatever your heart desires, a pocket for postage stamps, and a handy-dandy pen! I attached the book with two small velcro circles on the back side so it can be removed to add extra pages when necessary, and the next pic shows the extra pages I included. ;)
Here are the six tags, each with a different paper pattern.
Here are the three 3″ x 3″ trifold notes, each with a belly band, and the next pic shows one of them opened up.
Here are the six cards with envelopes, three birthday and three thank you.
And another shot of the set. I’m super happy with how this turned out! The digital papers in these four sets are just amazing and would do ANY project justice! Swoon and drool! LOL!
Products used: Cardstock/Paper: Ephemoire Is It Autumn Yet #1, Is It Autumn Yet #2, Is It Autumn Yet #3 and Is It Autumn Yet #4 letter size digi papers; Cardstock Warehouse Brown Box kraft cardstock, American Craft coffee cardstock, The Paper Studio Cream cardstock Stamps: CAS-ual Fridays Stamps Heartfelt Sayings stamp set, Trinity Stamps Hello Sweet Friend stamp set Ink: Stampin’ Up Early Espresso ink Dies/Punches: Stampin’ Up 1/4″, 1/2″ and 1-3/8″ circle punches, 1-3/4″ scallop circle punch, Fun Flower punch, and scallop edge punch; EK Success 2-1/4″ scallop circle punch Accessories: Canvas Corp jute cord, copy paper, pink glitter brads, MISTI stamp positioner
I hope you’ve enjoyed today’s project! Be sure to check out all the awesome printables at the Ephemoire Etsy Shop, and while you’re at it, head on over to the Ephemoire Facebook Page for tons of inspiration! Thanks so much for stopping by today – we’ll see you next time!
9/30/19 Best Technique Winner at Classic Design Team Challenge Blog!
10/11/19 Top 3 at Not Just Cards Challenges!
Hello, my crafty friends! I hope you’re having a great weekend! I’m really excited to share my Ephemoire inspiration project with you this morning. If you haven’t already done so, be sure to head over to the Ephemoire Etsy Shop to check out all the amazing digital printables… there are collage sheets, digital papers, journal kits, clip art and mixed media printables, and the print quality is awesome!
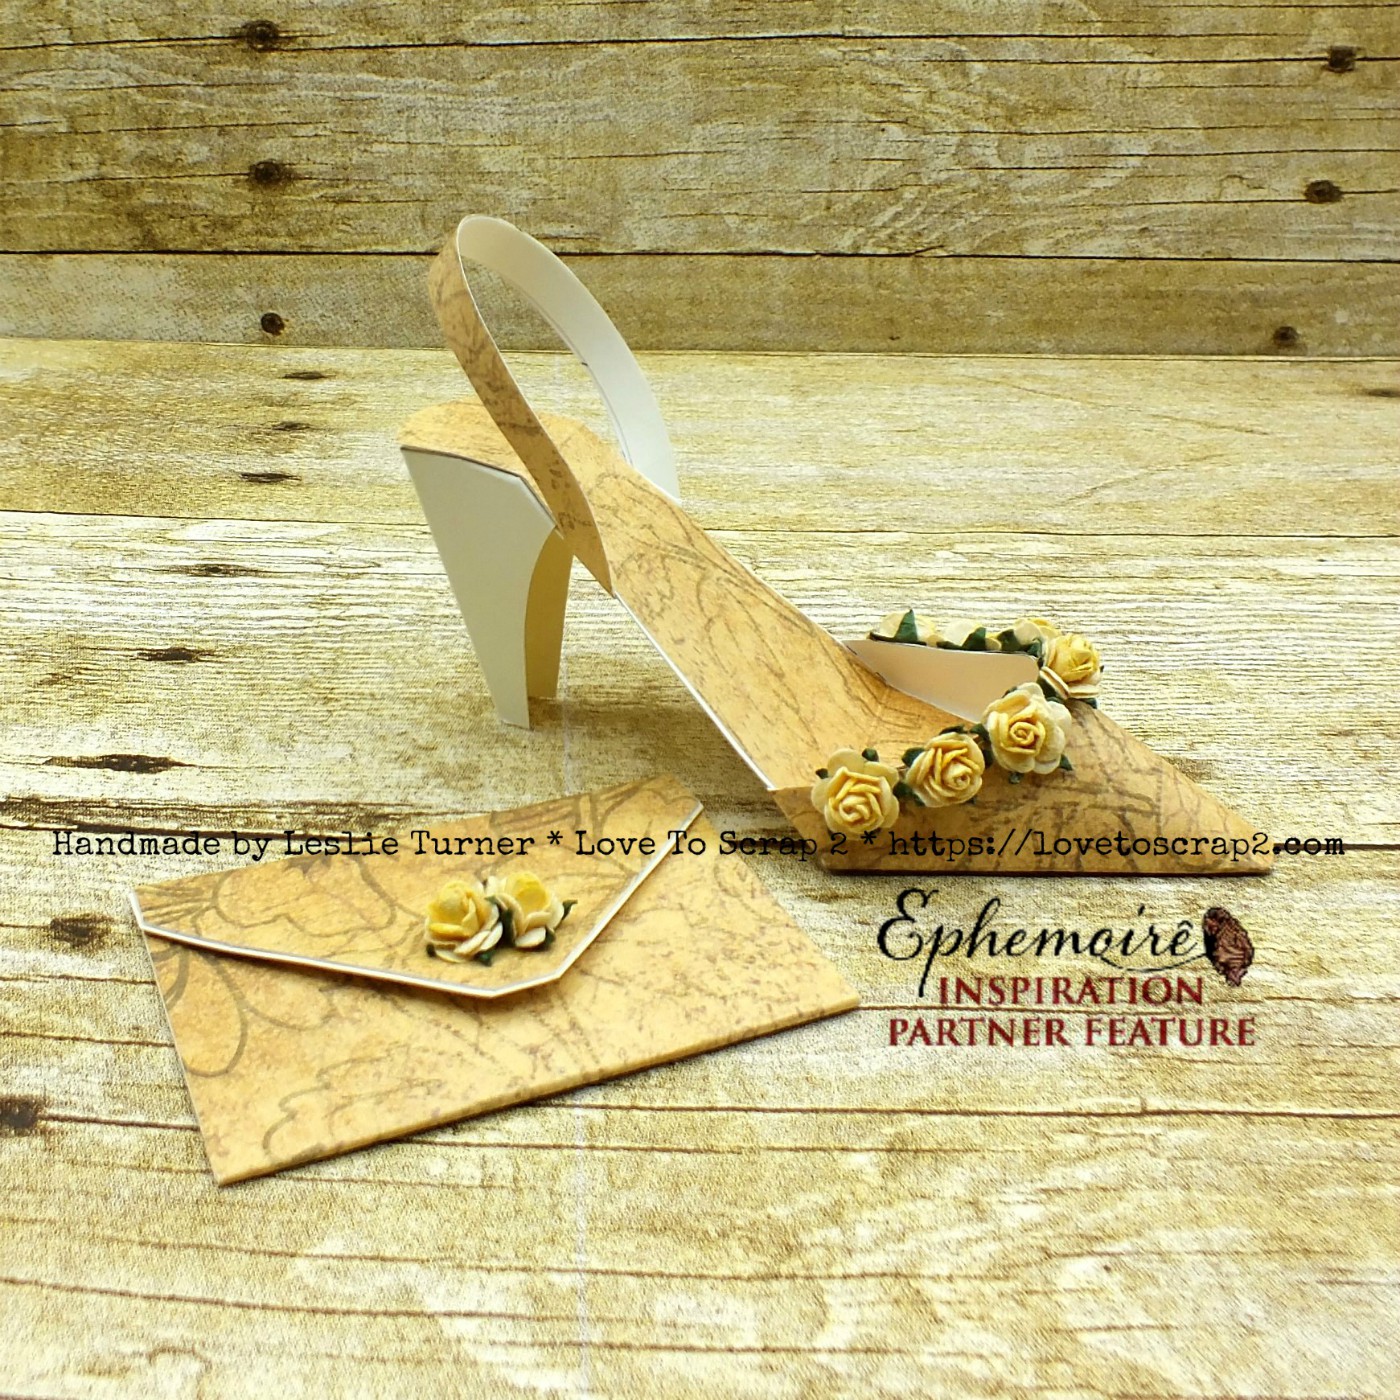
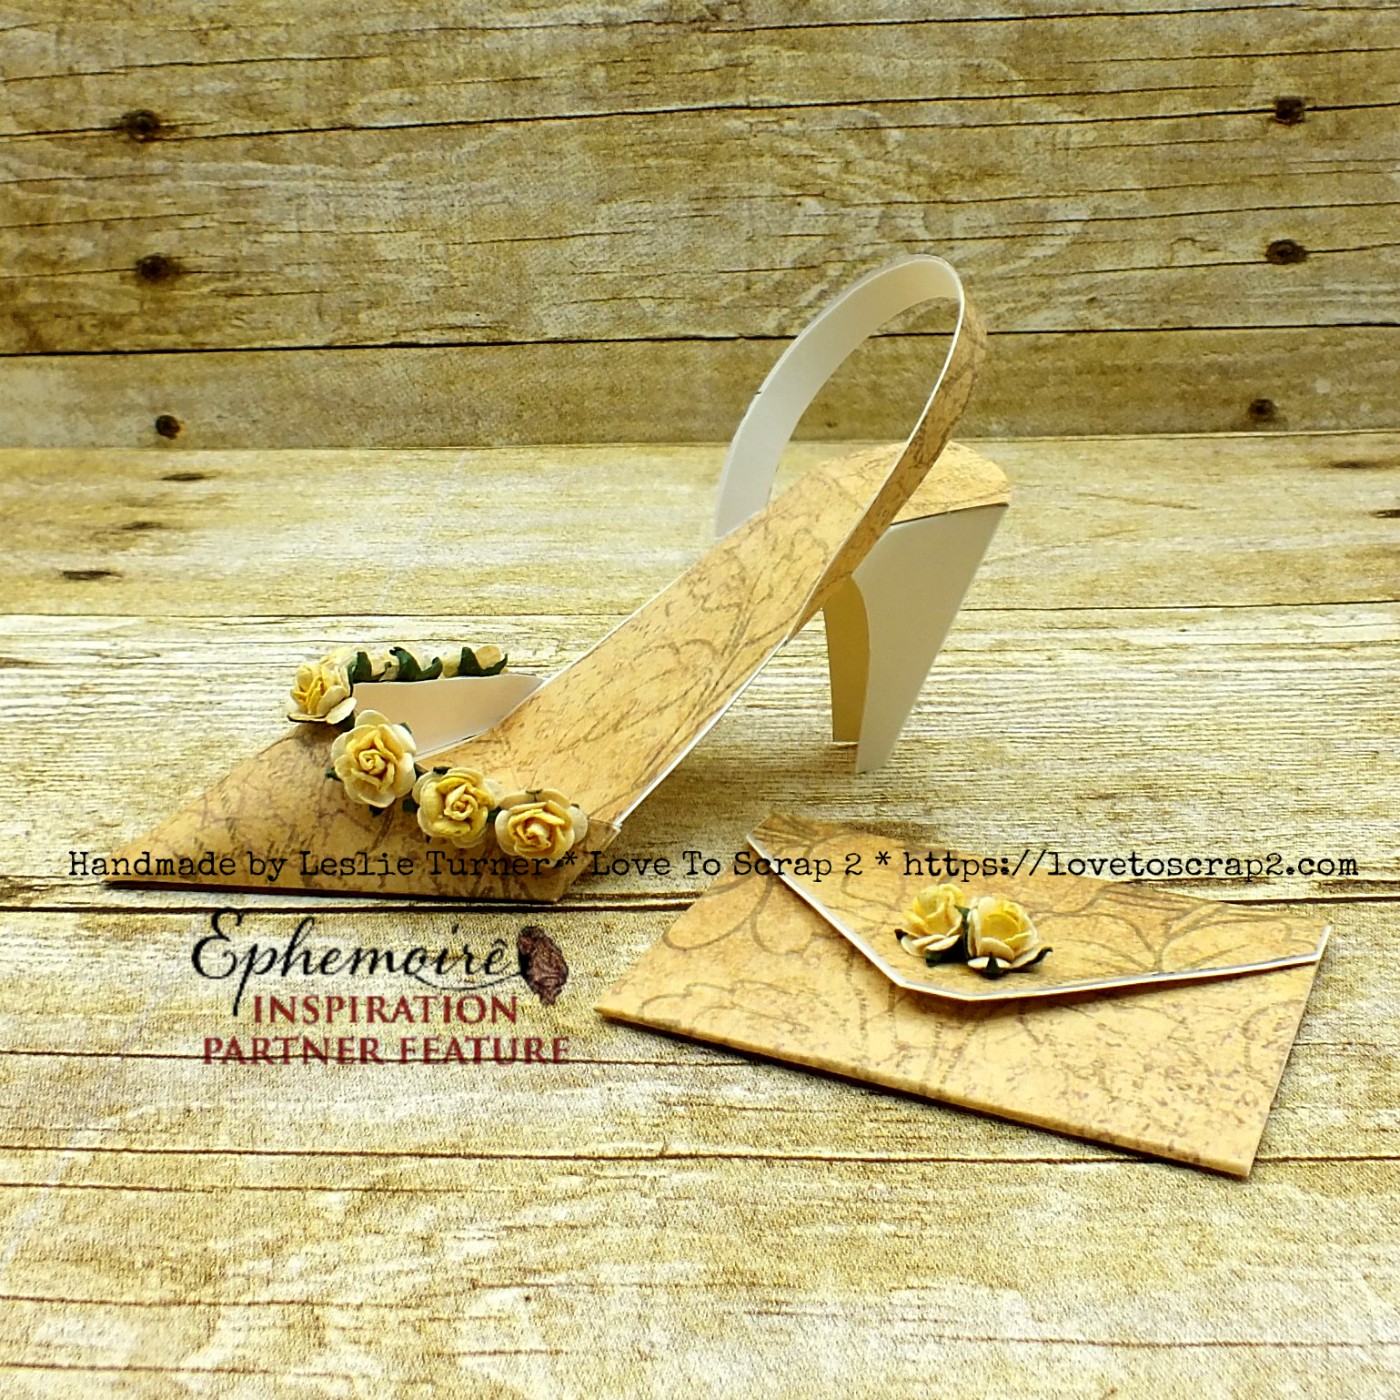
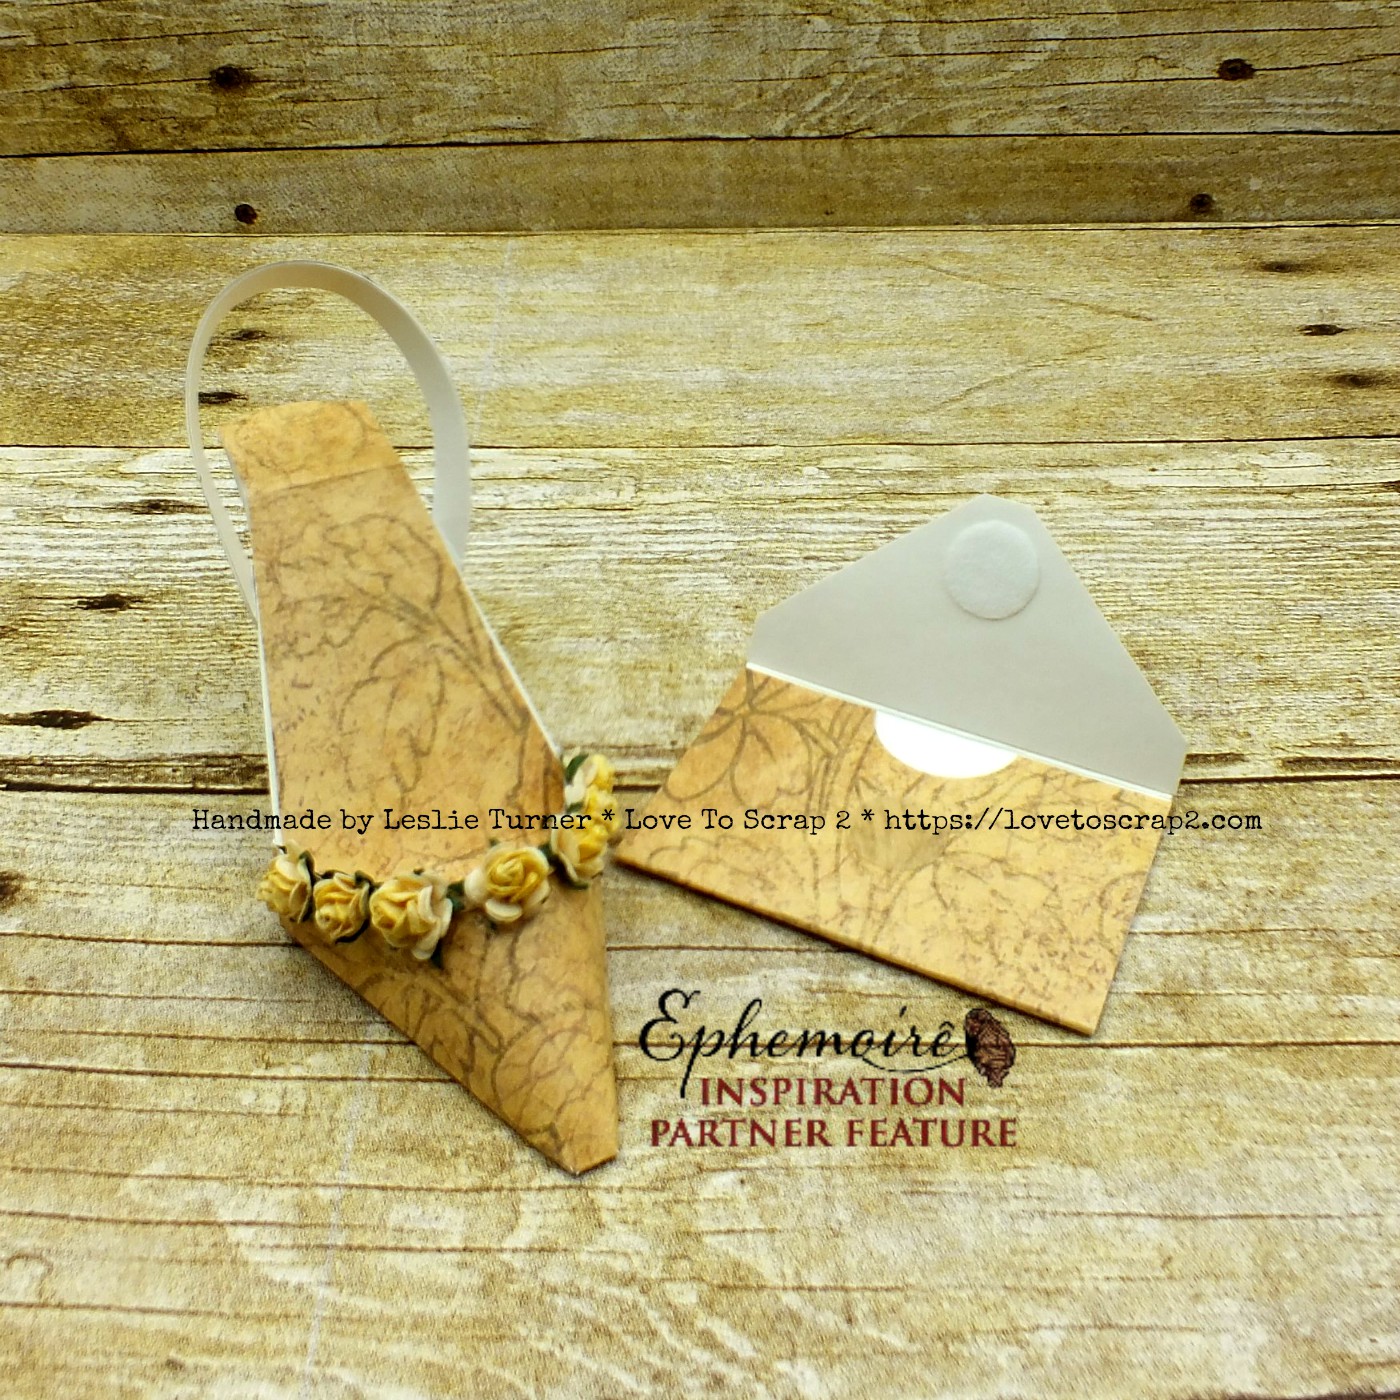
I was provided Is It Autumn Yet #1 letter size digi papers to play with this month and created an awesome high heel with matching clutch. Of course, these will hold a place of honor in my paper shoe collection! I’ve had this high heel shoe template in my stash for a number of years. I really love the shoe’s elegance and had a hard time picking just one paper from this collection to make it. I settled on the golden color print and so glad I did. I had small paper flowers in my stash that match perfectly! ;)
I designed the clutch myself from cardstock, covered it in the golden print paper, and added a couple flowers. It’s not quite big enough for a gift card (would have been too large in comparison to the shoe), but a folded check or money will easily fit into the pouch. It has a small velcro closure.
One more look… super happy with how this project turned out! Love, love, love ALL the digital papers in this collection – they are absolutely gorgeous!
Products used:
Cardstock/Paper: Ephemoire Is It Autumn Yet #1 letter size digi papers, The Paper Studio Cream cardstock
Accessories: Adella Rossol Elegant Sole shoe template, paper flowers from stash, small velcro circle
I hope you’ve enjoyed today’s project! Be sure to check out all the awesome printables at the Ephemoire Etsy Shop, and while you’re at it, head on over to the Ephemoire Facebook Page for tons of inspiration! Thanks so much for stopping by today – we’ll see you next time!
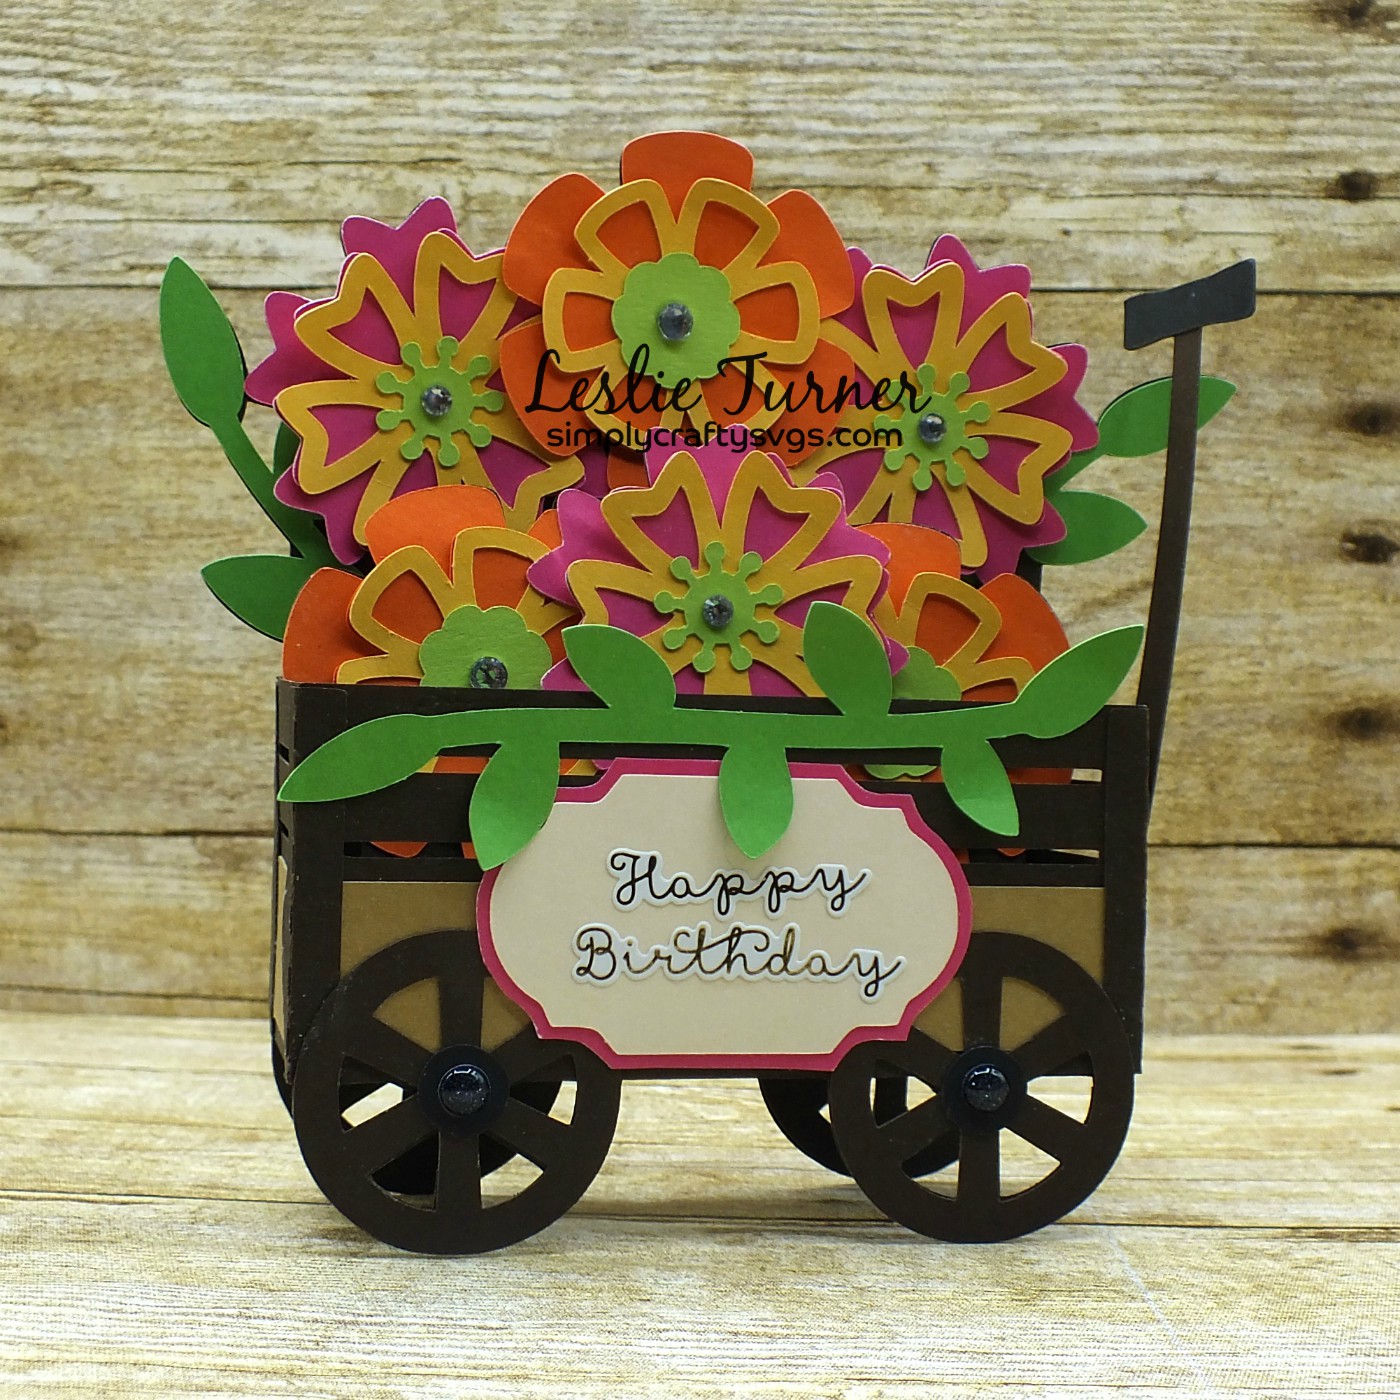
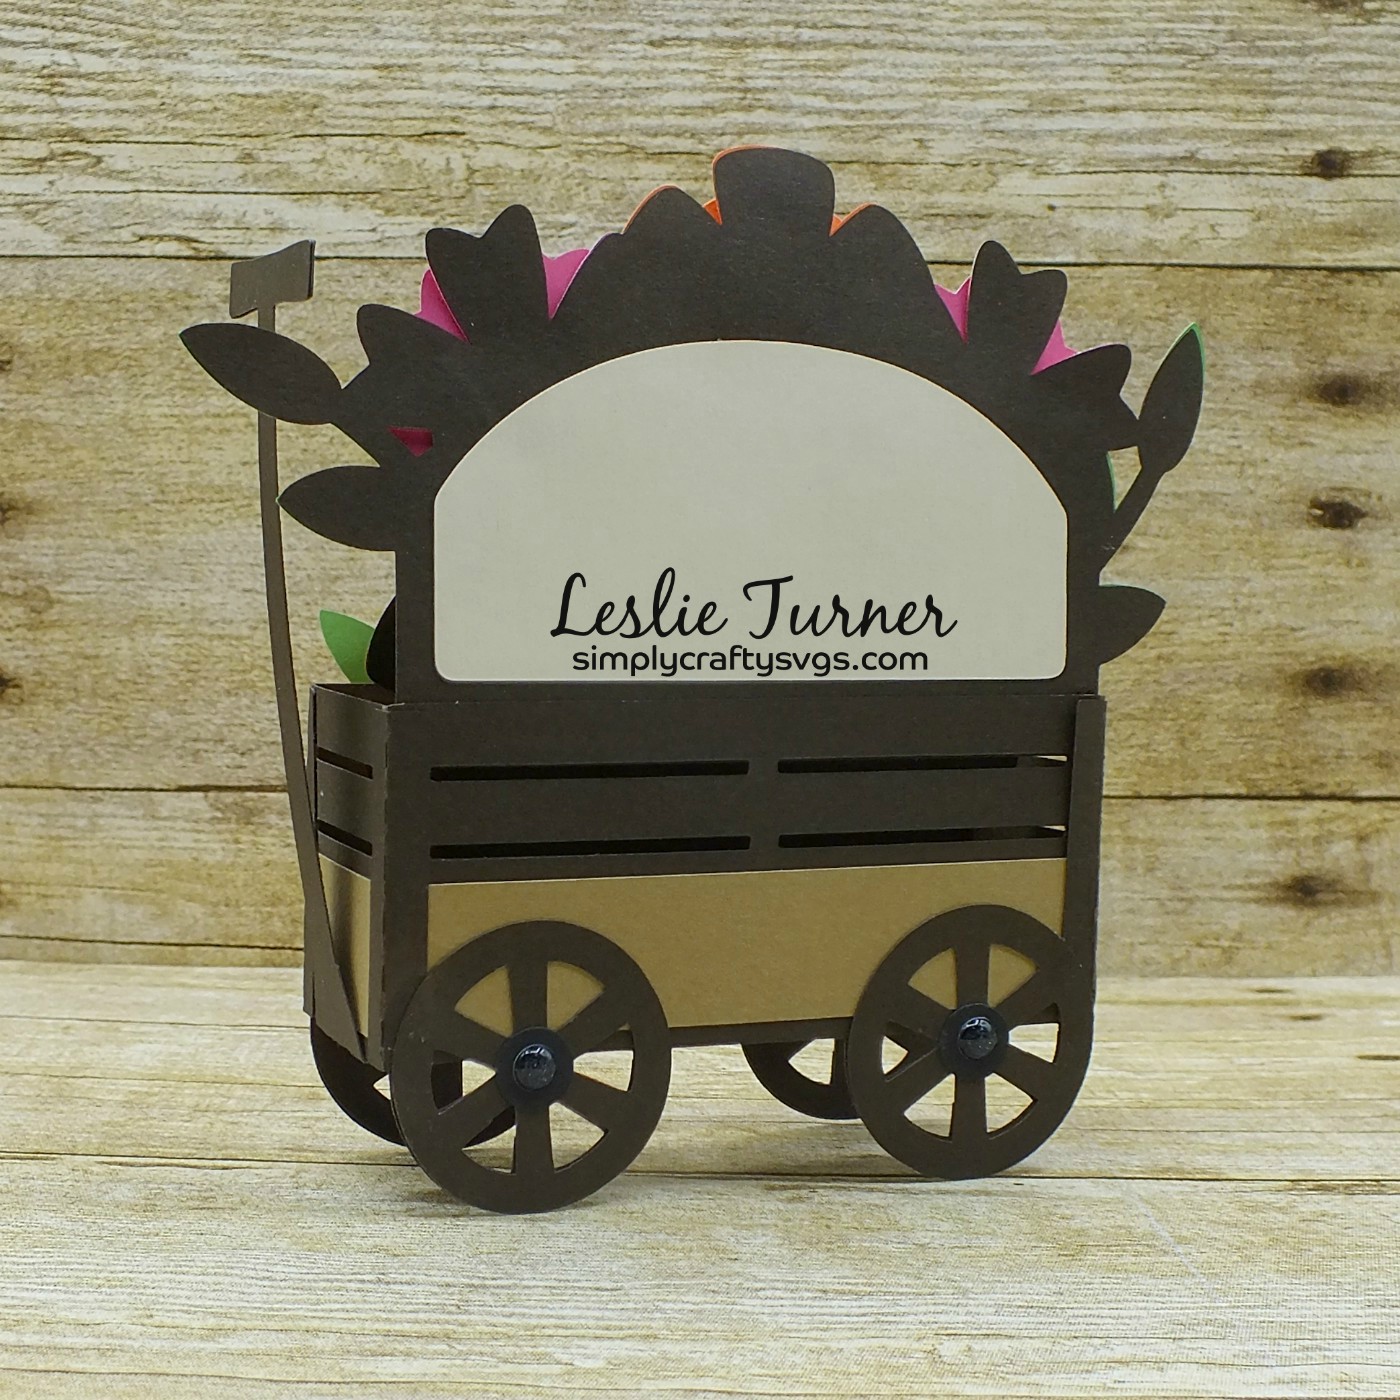
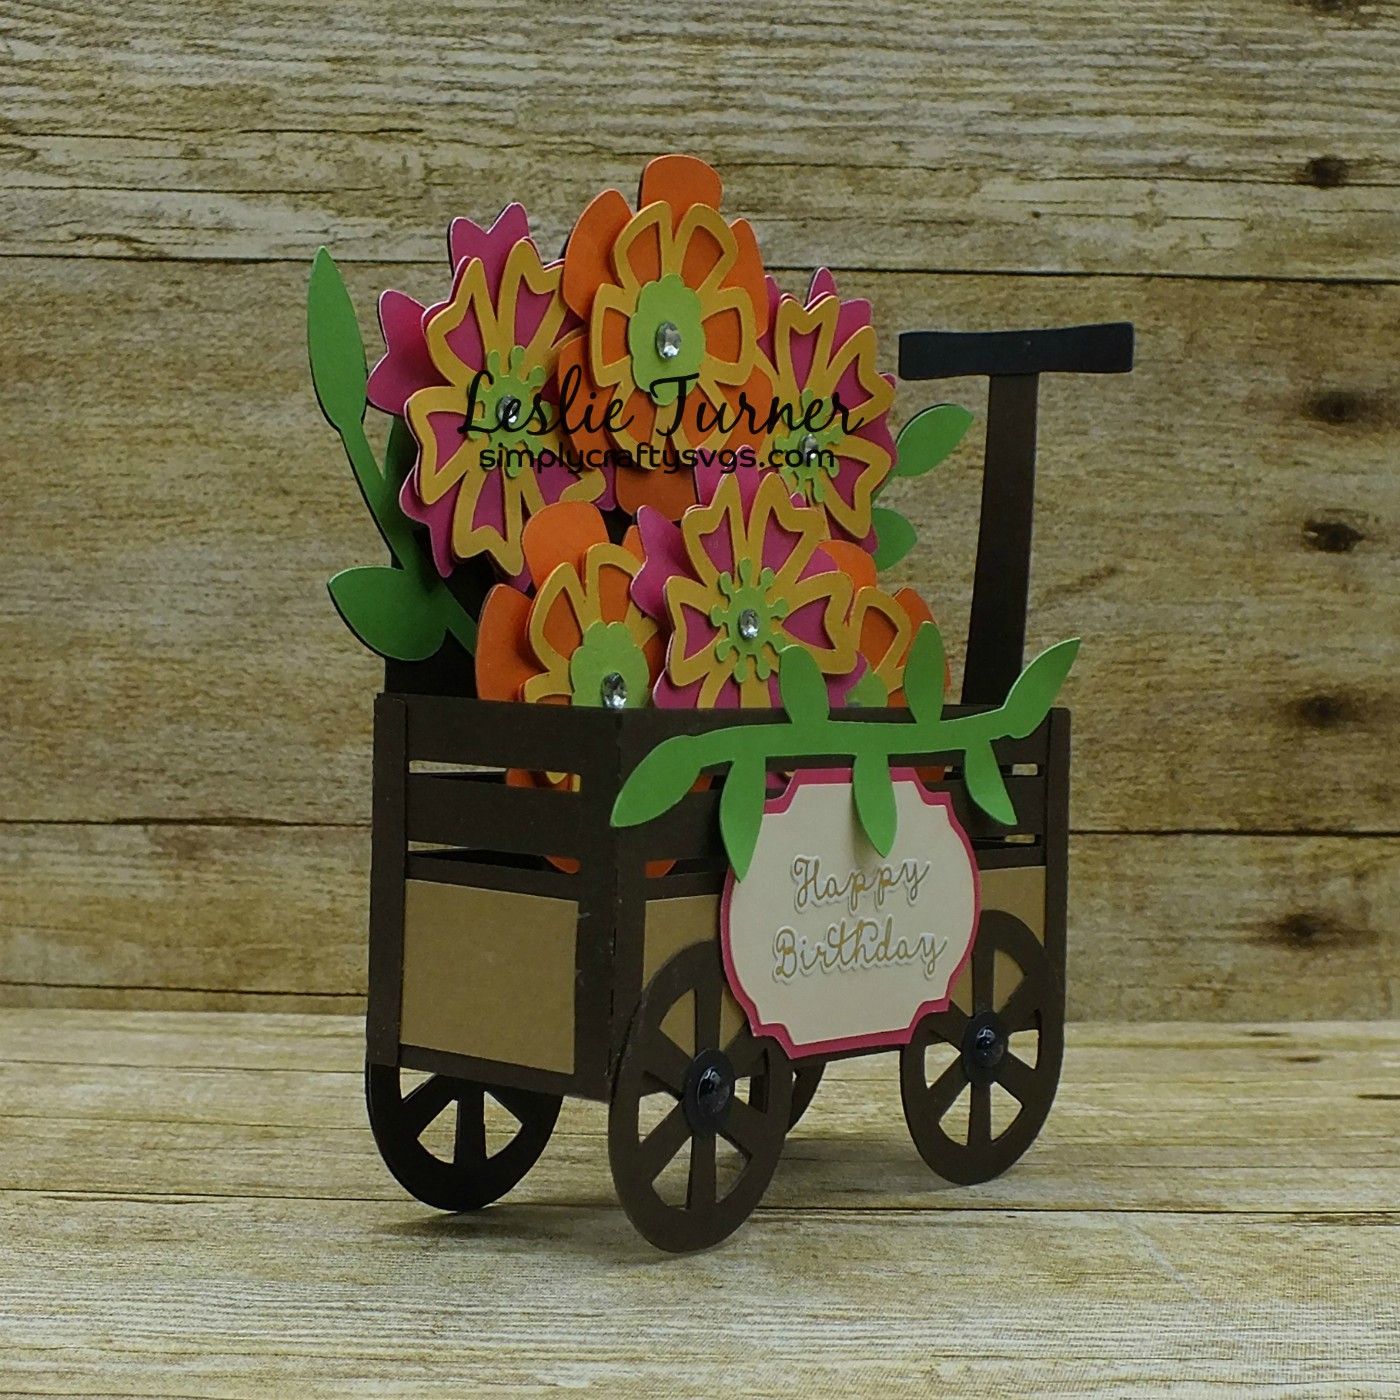
Hi everyone! Happy Hump Day! Today is my post day on the Simply Crafty SVGs Blog and I’m excited to share my DT inspiration project with you, an adorable birthday wagon full of posies, created with the Simply Crafty SVGs Wagon of Flowers Box Card cut file. Super cute and loads of fun!
Sandy created this as a box card which folds flat for mailing, however, I took it one step further and made it into a fixed piece of decor for a mantle or shelf. ;) I love how this turned out! I do apologize for how the ‘Happy Birthday’ sentiment photographed in this pic – foil is so darn hard to photograph!
Here’s a shot of the back of the wagon which features a plain panel for writing a custom message and signature.
I used a gold foil sentiment sticker rather than stamping on this one, and it could be used for just about any occasion. I think is this one of my favorite cut files so far and I have several favorites… lots of fun picking out the bright colors and putting this together! ;)
Products used: Cardstock/Paper: American Crafts smooth black, chocolate, grass, key lime, caramel, vanilla and dandelion cardstock; Colorbok orange and pink cardstock Dies/Punches: Simply Crafty SVGs Wagon of Flowers Box Card cut file Accessories: Darice gold foil sentiment sticker, Stampin’ Up clear rhinestones, YNS black Glittered Gumdrops
I hope you’ve enjoyed today’s project! Be sure to check out all the fun cut files in the Simply Crafty SVGs store – you’ll have so much fun! And there are tons of freebies to get started! Thanks so much for stopping by today – we’ll see you next time! ;)
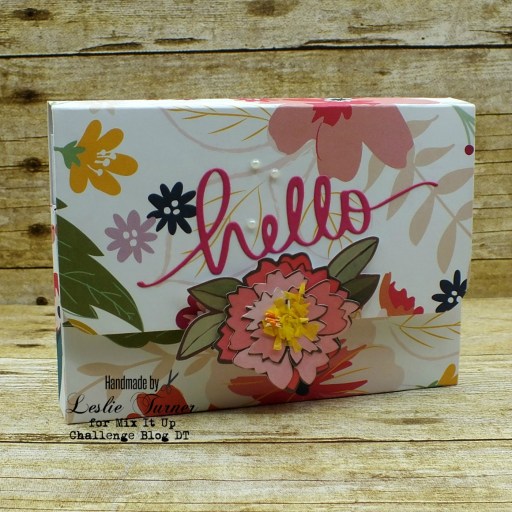
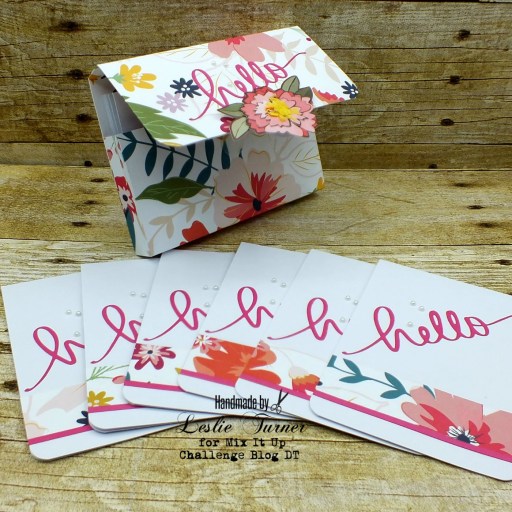
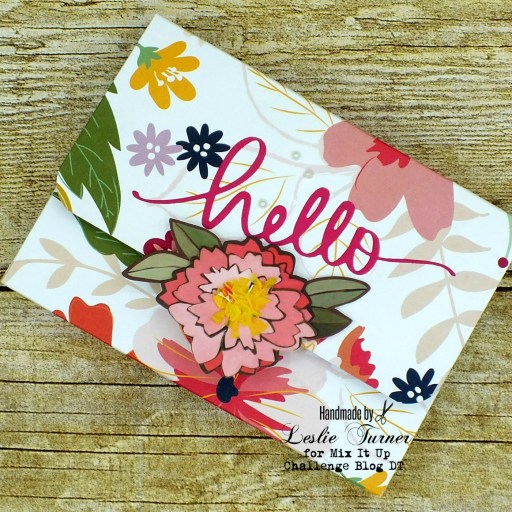
Hi everyone! We are busting through the months… it’s September 1st already! It’s time for another fun challenge over at Mix It Up Challenge Blog and I’m stoked to share my DT inspiration project for MIUCB #29 – Anything Goes + 3-D Project! Remember, all of our challenges are ‘anything goes’ and we offer a different technique twist each month for inspiration but the twist is not required to play! This month the twist is to create a 3-D project – which could be something like jewelry, gift box, canvas, gift bag, home decor, etc. I created a clutch containing a set of six notelets.
I created the clutch with a sheet of double-sided 12×12 paper. I got my inspiration from a tutorial in a recent Splitcoast Stampers newsletter HERE. I added a hot pink ‘hello’ die cut, some tiny flat-back pearls and a layered sticker over the closure. Then I created a set of six notelets featuring a hot pink ‘hello’ die cut, tiny flat-back pearls, a wide strip of the floral paper and a narrow strip of the hoy pink cardstock. I included A1 sized envelopes that I ordered from Amazon.
One more look – a close-up of the closed clutch. LOVE how this turned out! What fun!
Products used: Cardstock/Paper: American Crafts Pink Paislee Whimsical 12×12 paper, American Crafts White and Taffy cardstock Dies/Punches: Mama Elephant hello script die, Stampin’ Up 1-1/4″ circle punch Accessories: Gemini Junior die cutting machine, Fiskars corner rounder, Kadomaru Pro corner rounder, Saturday Afternoon One Canoe Two layered stickers, small velcro circle, tiny white flat-back pearls, A1 envelopes from Amazon
I hope you’ve enjoyed today’s project and will link up an ‘anything goes’ project with us this month! Of course, we’d love it if you’d play the technique twist and create a 3-D project! Thanks so much for stopping by today – we’ll see you soon! ;)
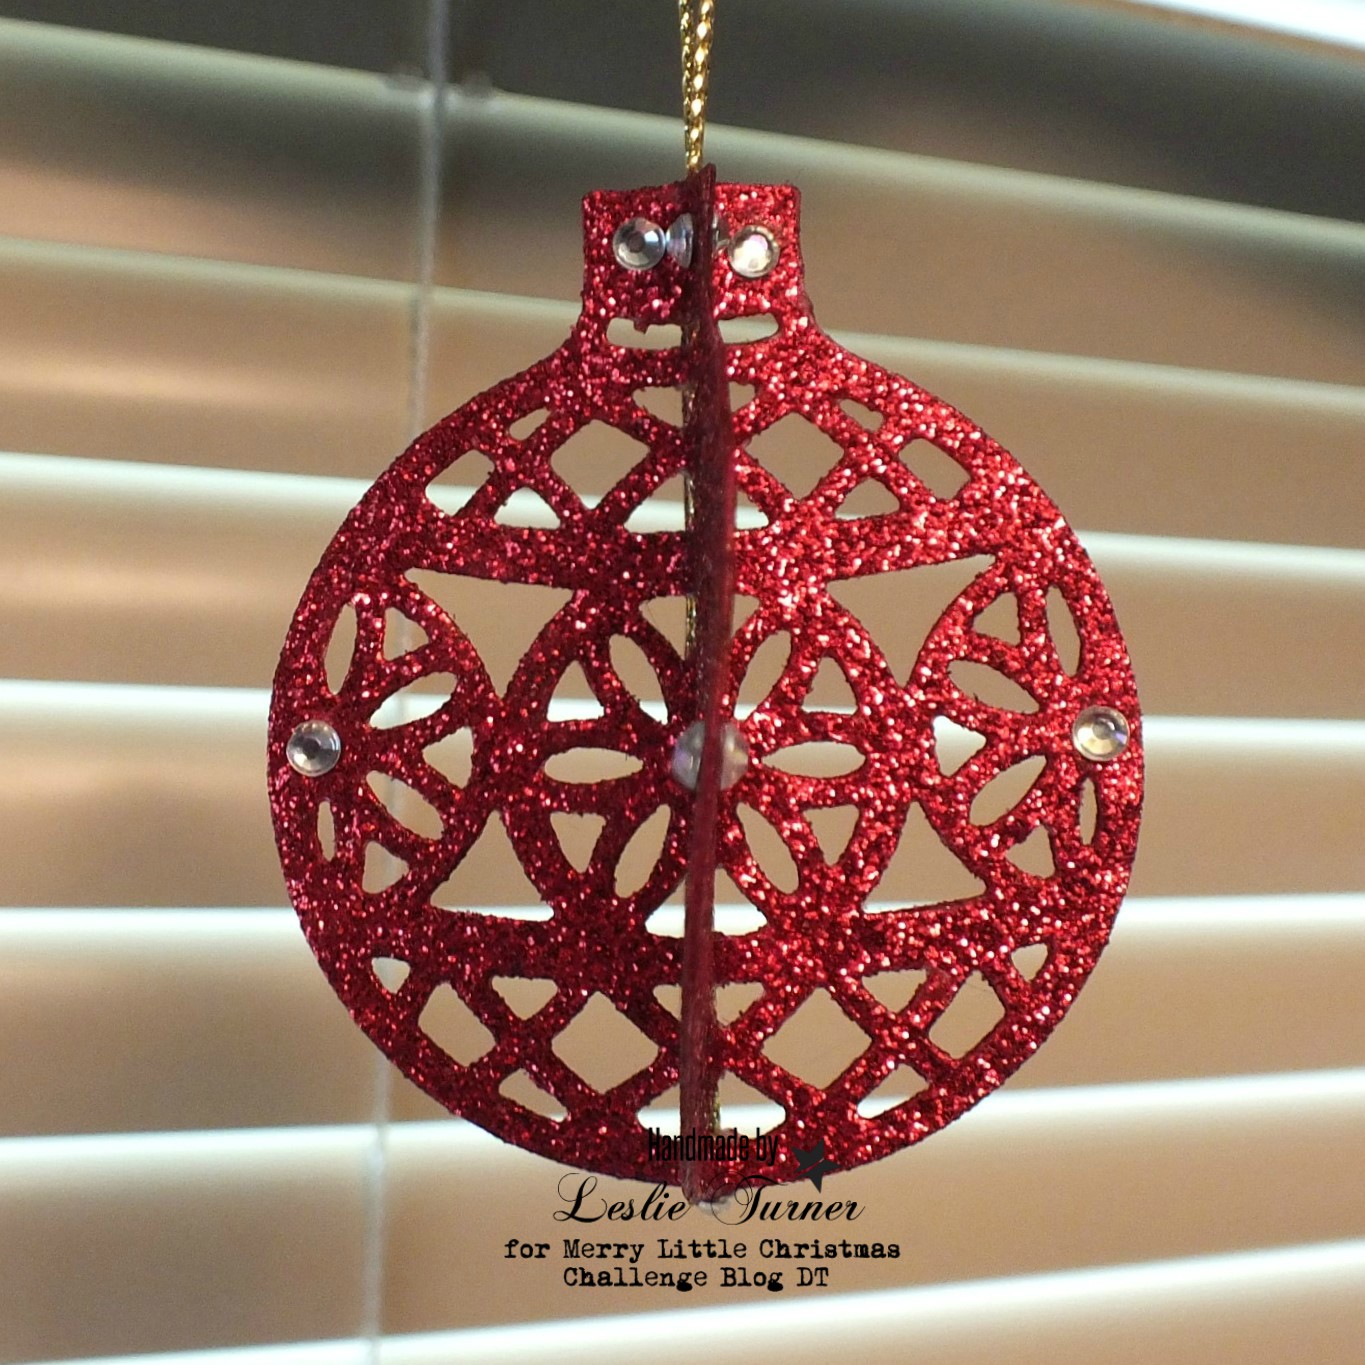
Hi friends! I hope you’re having a wonderful crafty weekend! This month’s challenge is live over at Merry Little Christmas Challenge Blog and I’m thrilled to share my DT inspiration project with you for MLCCB #14 – September Anything Christmas Goes! I created a beautiful red glitter ornament which I plan to gift because with eight cats, we won’t be putting up a tree again this year, lol! We love our fur babies, but boy-oh-boy they sure can wreak havoc on a Christmas tree! Bwahahaha!
Ornaments are really easy to create with intricate dies, as long as the design is the same on both sides. I cut four die cuts of this pretty round ornament from red glitter paper.
I folded each of them down the middle and adhered the right side of one to the left side of the next until all four were adhered. Just prior to adhering the third one to the fourth one, I sandwiched a loop of metallic string between the layers. I added a few clear rhinestones for a little extra added bling.
And here’s one more close-up look. Super happy with how this turned out!
Products used: Cardstock/Paper: Stampin’ Up Red Glimmer Paper Ink: Studio 71 alcohol marker- R20 Dies/Punches: Stampin’ Up Delicate Ornaments Thinlits Accessories: Gemini Junior die cutting machine, Really Reasonable Ribbon Gold Metallic String
I hope you’ve enjoyed this Christmas ornament and will link up a Christmas project with us this month! It’s never too early to get started! Thanks so much for stopping by – we’ll see you again soon! ;)
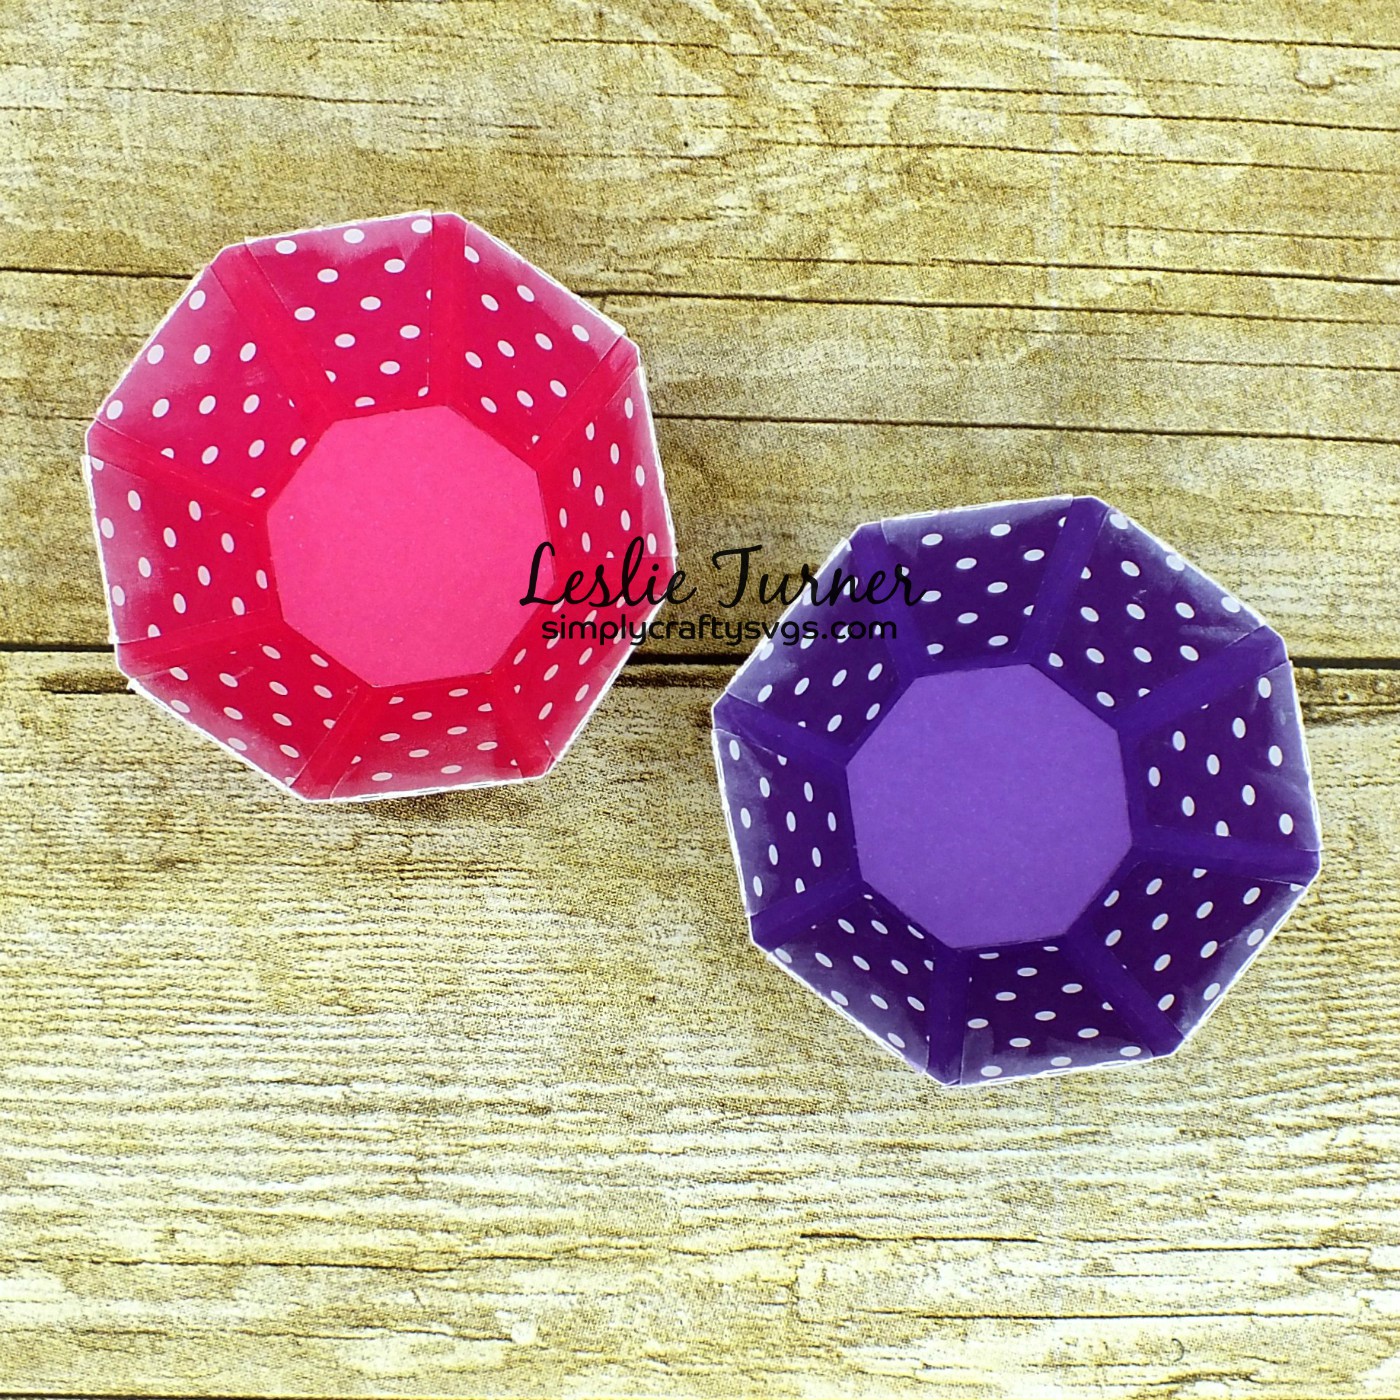
Hi everyone! Happy Wednesday – I hope you’re having a great week! I’m not posting on the Simply Crafty SVGs Blog today but have popped in this morning to share an extra DT inspiration project with you, a pair of dotted bowls created with the free Simply Crafty SVGs Embellishment Bowl cut file. Yes, I said free, so be sure to check it out! ;)
I inked the upper and lower edges of these bowls with white chalk ink to disguise the white core of the dotted papers I chose.
Sandy hit the ball home when she created this file… these bowls are an amazing addition to any crafter’s studio and went together seamlessly. I just had to have a couple of these on my table to put small embellishments in so I wouldn’t lose them. Can’t tell you how many times I’ve lost small things that I had set aside for projects I was working on! Love how these turned out and I’m thoroughly enjoying using them! ;)
Products used:
Cardstock/Paper: Colorbok pink and purple cardstock, Colorbok pink and purple Seeing Dots paper stack
Ink: White chalk ink
Dies/Punches: Free Simply Crafty SVGs Embellishment Bowl cut file
I hope you’ve enjoyed today’s project! Be sure to check out all the fun cut files in the Simply Crafty SVGs store – you’ll have so much fun! And there are tons of freebies (like this one I used) to get started! Thanks so much for stopping by today – we’ll see you next time! ;)
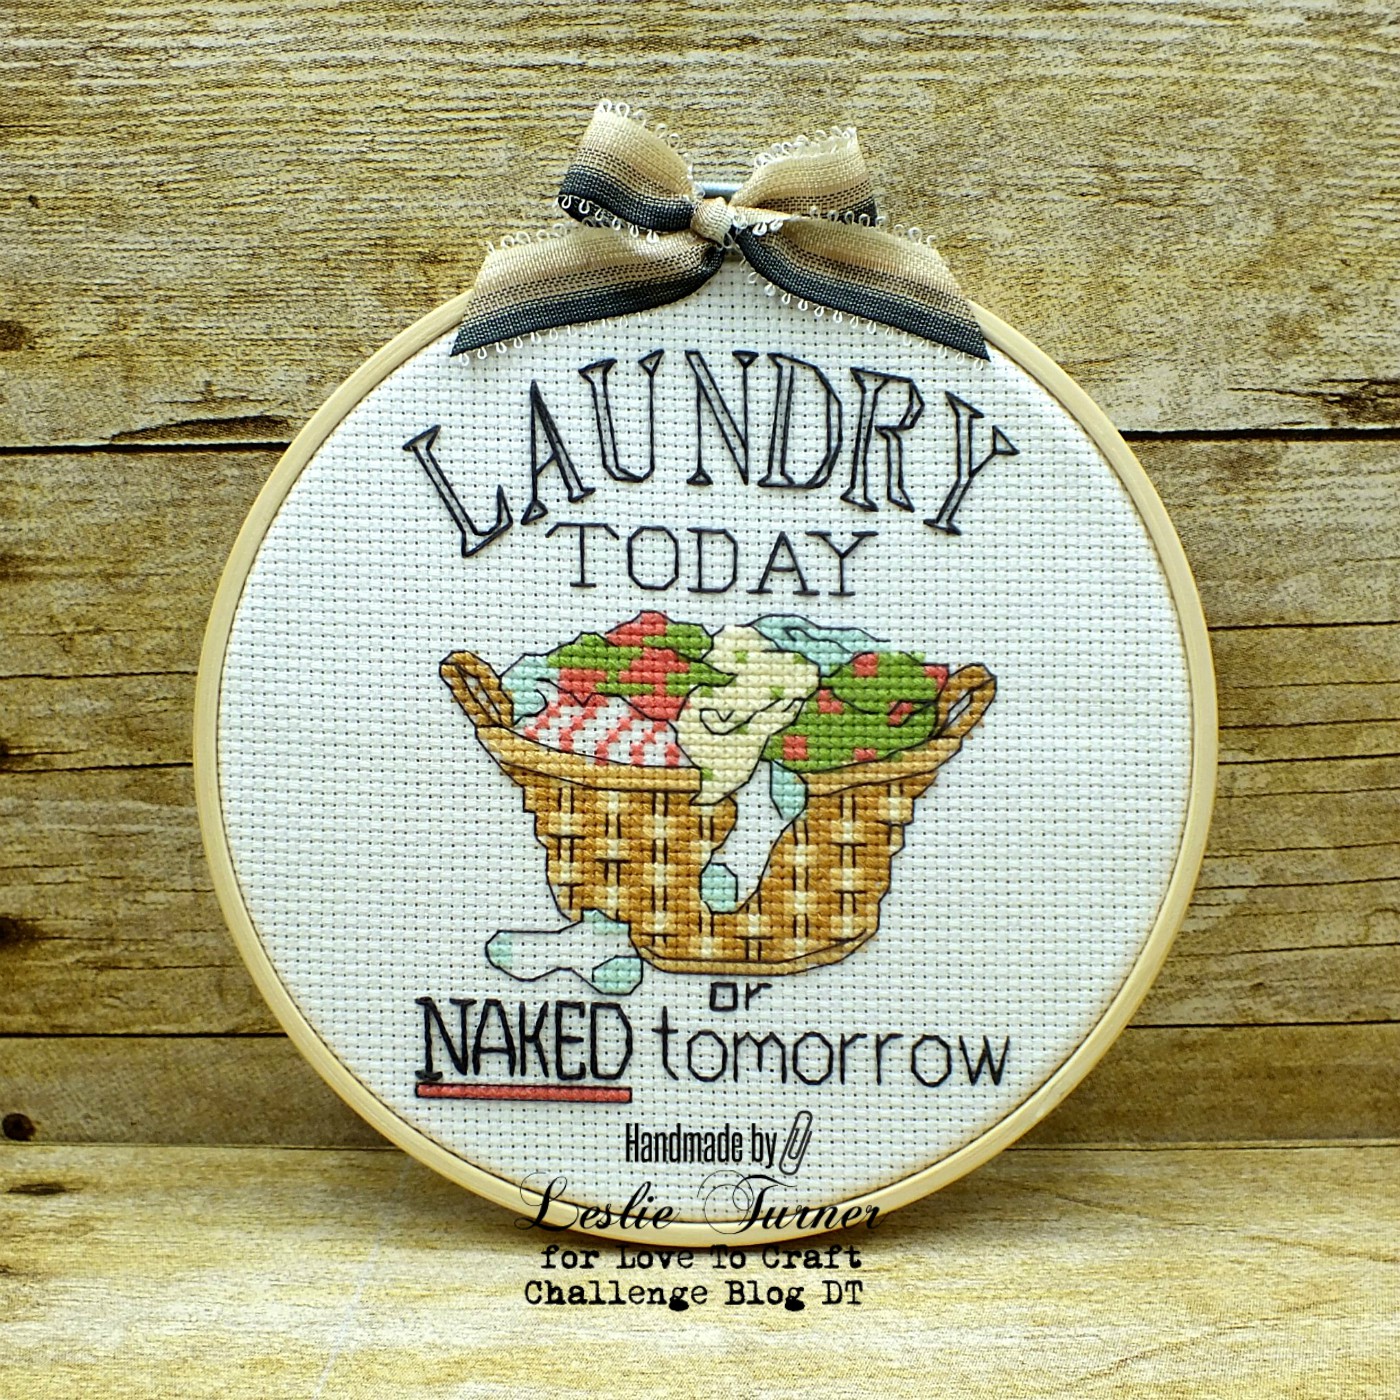
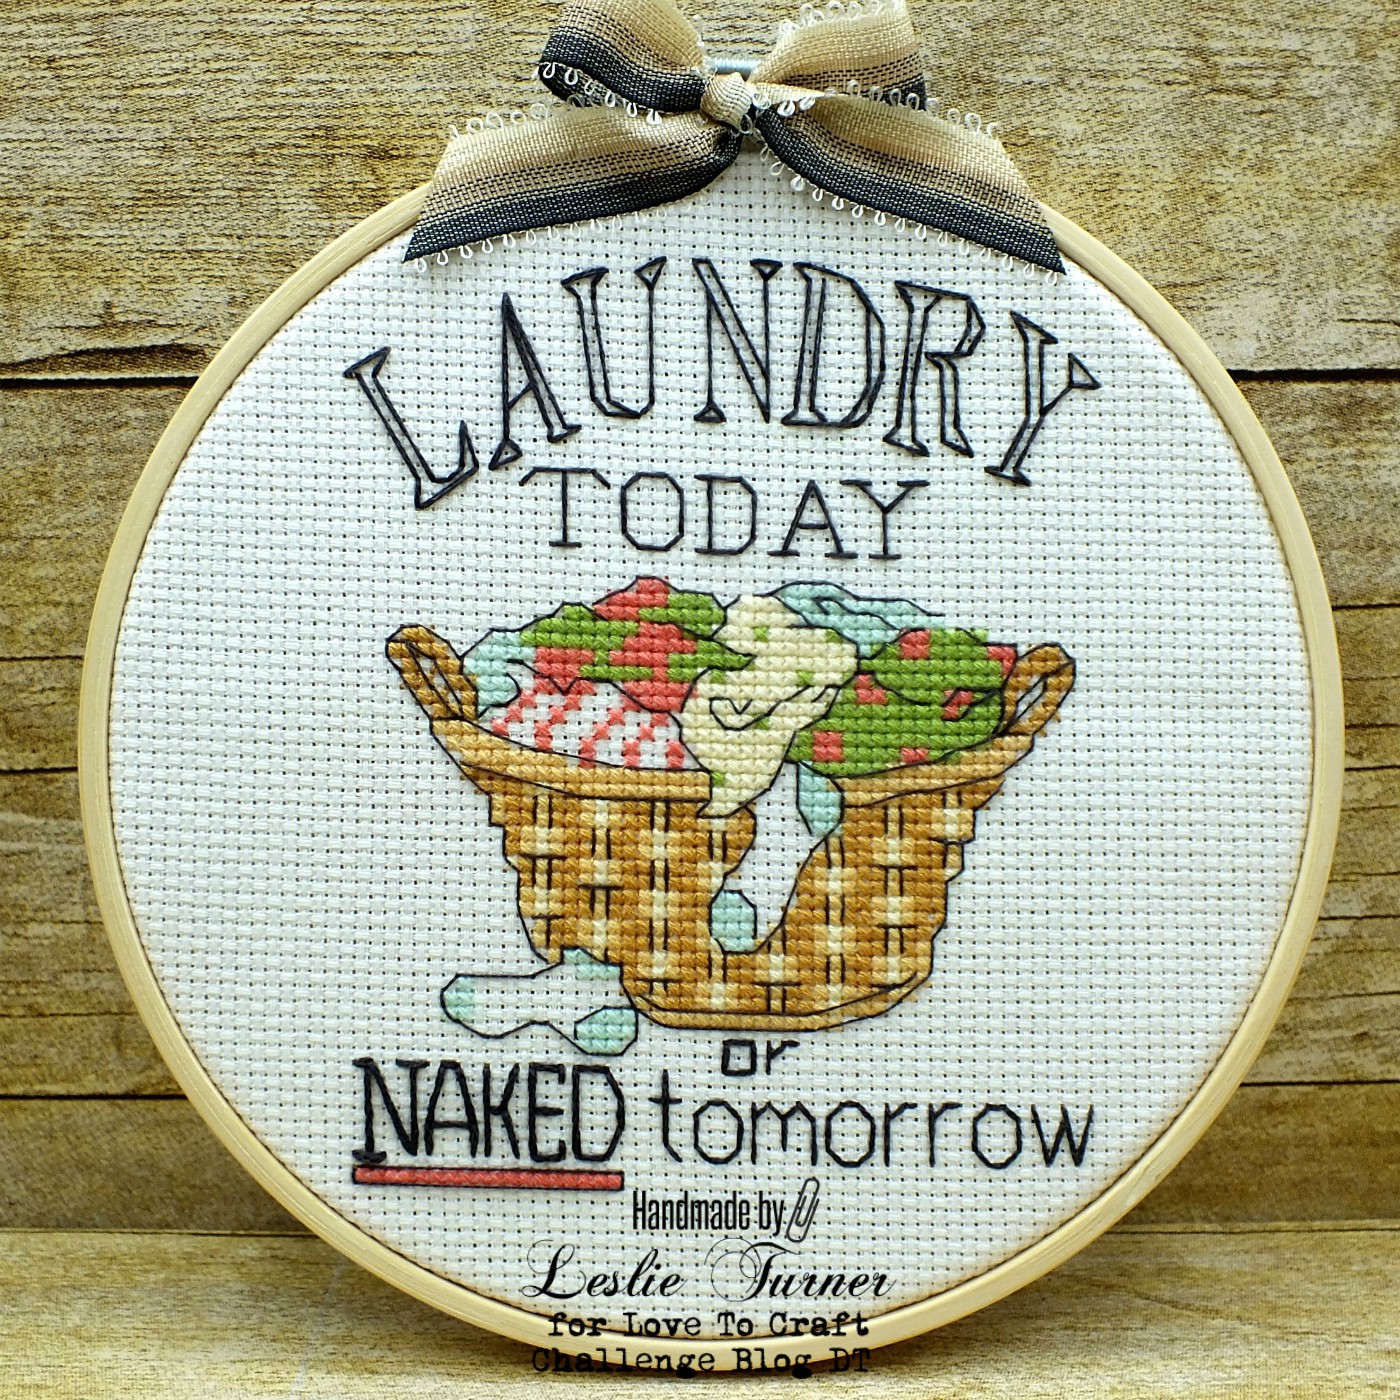
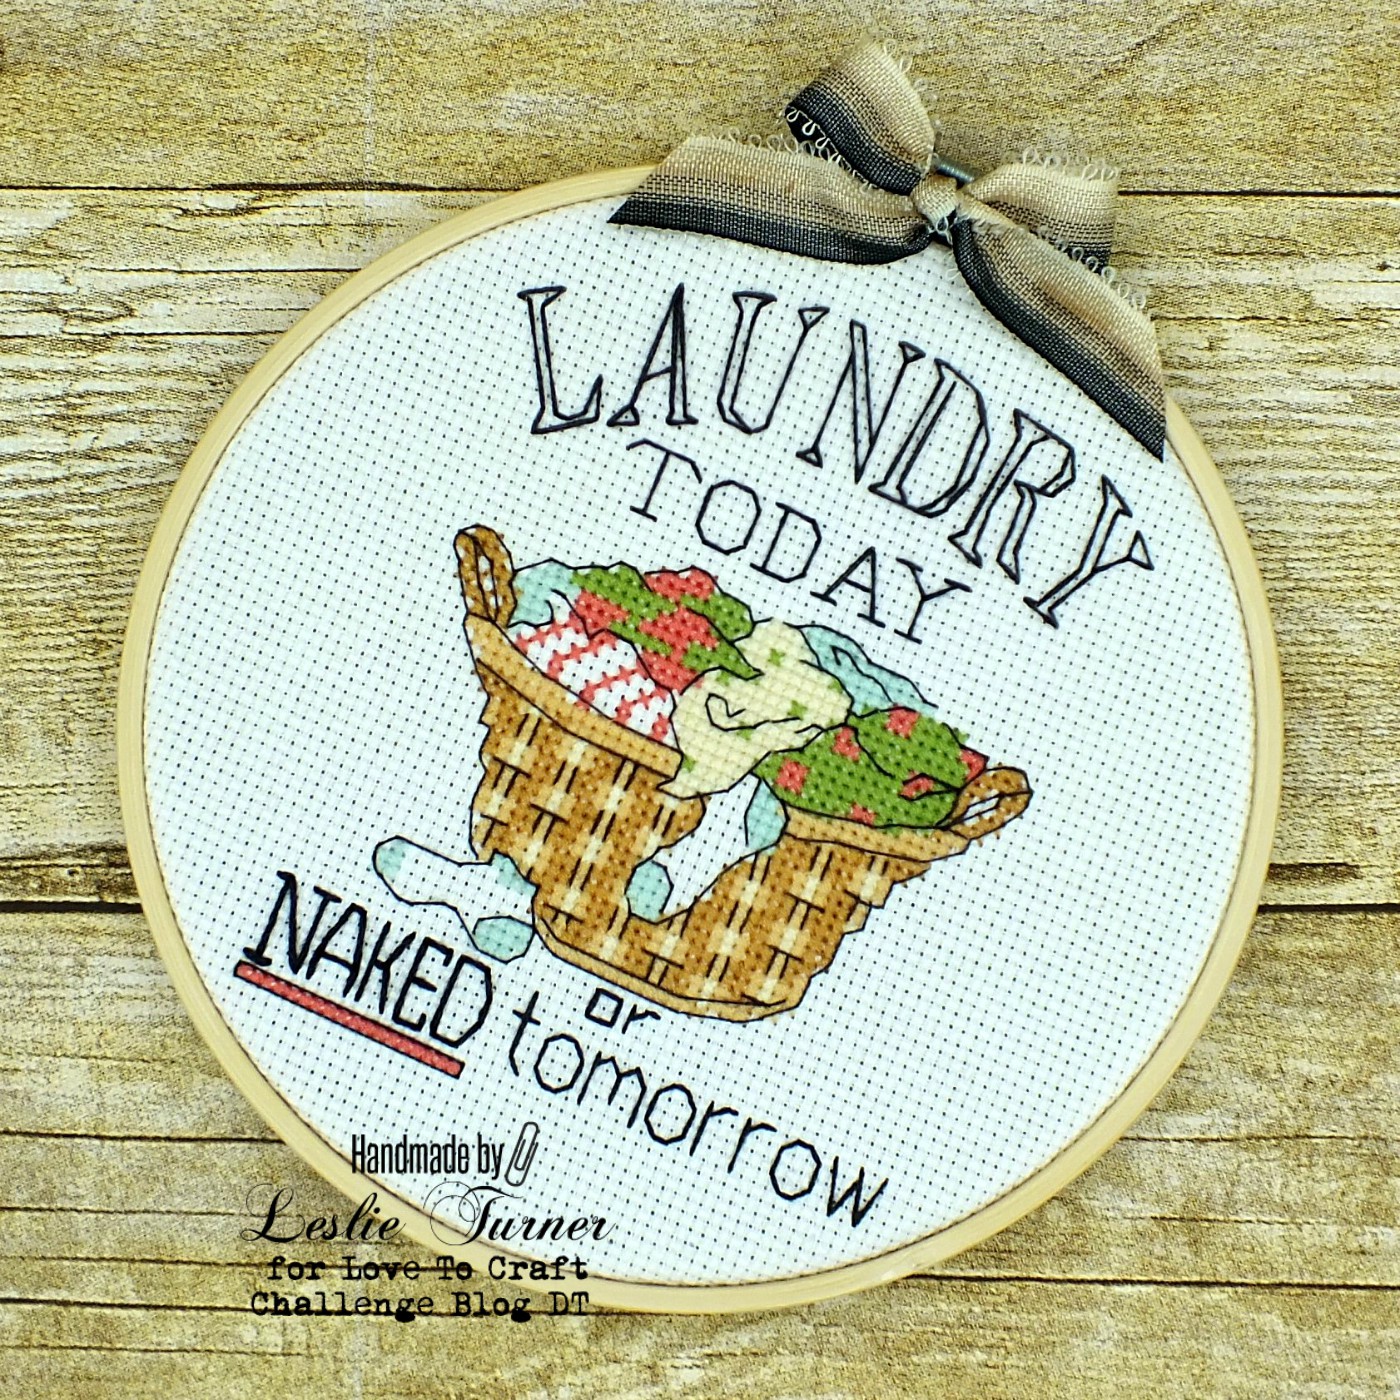
Hi everyone! Happy August 1st – it should be about time for the weather to start cooling off! It’s time for another fun challenge over at Love To Craft Challenge Blog, and I’m stoked to share my DT inspiration project for LTCCB #37 – August Anything Goes! I created the most adorable laundry room wall hanging! OMG!
I picked up this counted cross-stitch kit almost a year and a half ago, and it had been laying in my studio, so I decided to make it. It had been a very (very) long time since I did any counted cross-stitch, but I remembered how easy it was to do. The kit contained the cloth, all the colors of thread and the hoop, and I added the bow at the top.
One more look… so glad I finally got around to making this! I just love it!
Products used: Dimensions counted cross-stitch kit Ribbon from stash
I hope you’ve enjoyed today’s project and will link up an ‘anything goes’ project with us this month! Thanks so much for stopping by – we’ll see you again soon! ;)