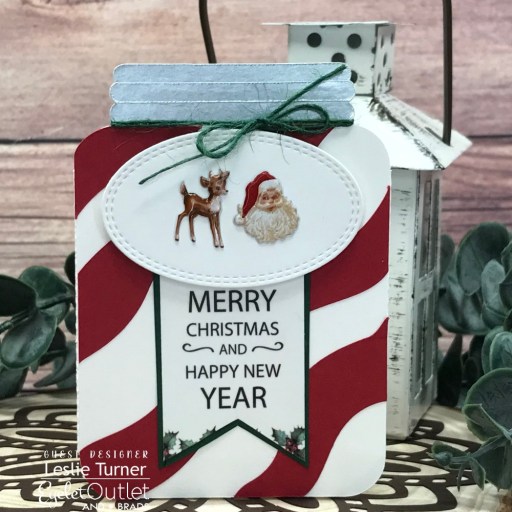
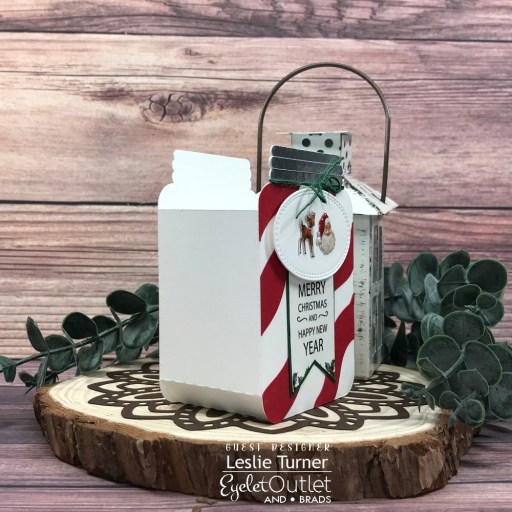
Mason Jar Treat Box

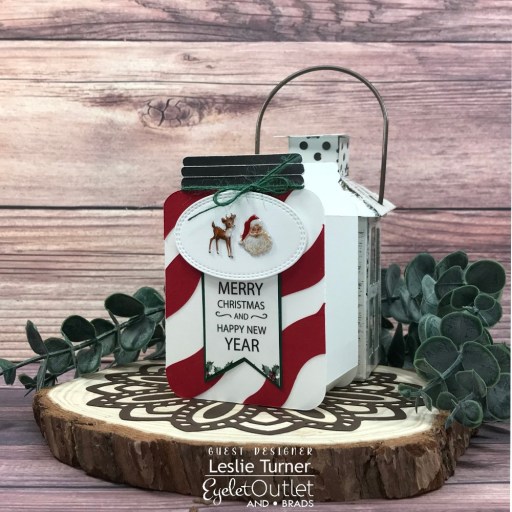
Hey everybody! A very Happy Saturday to you! I’m stoked to be back on the Eyelet Outlet blog today as a guest designer with another fun inspiration project! I had a large time playing with my Scan N Cut (as I always did) before the touch screen malfunctioned, and created a mason jar treat box featuring the Santa & Deer Brads along with a sentiment flag created from the Christmas Holly Washi Tape! OMGoodness, I’m so smitten – I LOVE treat boxes!

I cut the pieces from Neenah Classic Linen 100# Solar White, CutCardStock Pop Tone Wild Cherry, and CutCardStock Bright Silver Foil cardstock, assembled the mason jar, and tied green twine around the top.

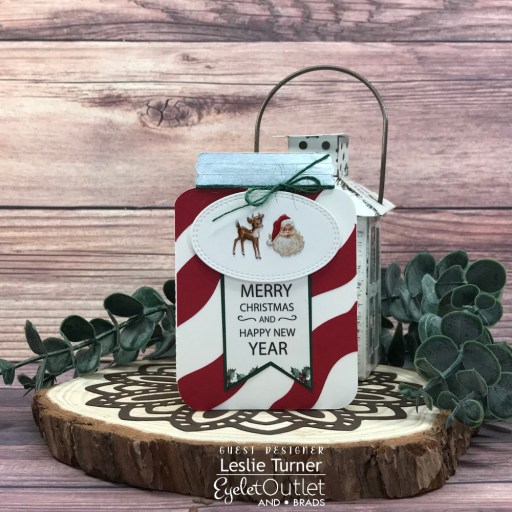
I applied a strip of Christmas Holly Washi Tape to a scrap piece of 80# Solar White Linen, cut it into a flag, and adhered it to the front of the mason jar. I decided it needed some green, so I adhered very narrow strips of Basis Green around the edges of the flag. I then die cut an oval from 100# Solar White Linen cardstock using the Cottage Cutz Double-Stitched Oval die, added Santa & Deer Brads, and adhered it to the top of the flag with Scrapbook Adhesive 3D Foam Squares.

Here’s one more angled shot. So cute! Wouldn’t it be fun to make several of these for a Christmas dinner table filled with treats?!

Sharing in the following challenges:
1. Crafty Catz: #612 – Anything Goes w/ optional Kraft (no twist)
2. Penny’s Paper-Crafty Challenge Blog: #533 – Anything Goes with Paper

Eyelet Outlet products used:
Santa & Deer Brads
Christmas Holly Washi Tape

Affiliate links are used in this post at no cost to you – I really appreciate your support!

Other products used:
Cardstock/Paper: Neenah Classic Linen 100# Solar White and Neenah Classic Linen 80# Solar White cardstock, CutCardStock Pop Tone Wild Cherry, Bright Silver Foil, and Basis Green cardstock
Dies/Punches/Cut Files: My Scrap Chick Peppermint Jar Box cut file, Cottage Cutz Double-Sided Oval Dies
Accessories: Brother Scan N Cut, Bearly Art precision craft glue, Big Shot, Studios Blackbird green twine, Scrapbook Adhesives 3D Foam Squares Variety Pack

I hope you’ve enjoyed today’s project! Be sure to check out all the fun goodies at Eyelet Outlet! Their products are so much fun! Be sure to ‘like’ and ‘follow’ Eyelet Outlet Facebook Page to keep up with news and sales, and while you’re at it, join the Eyelet Outlet Fans Facebook group for lots of creative inspiration! Thanks so much for stopping by today – we’ll see you next time! ;)

Scrappy hugs,

DIY Stamp Pressure Tool

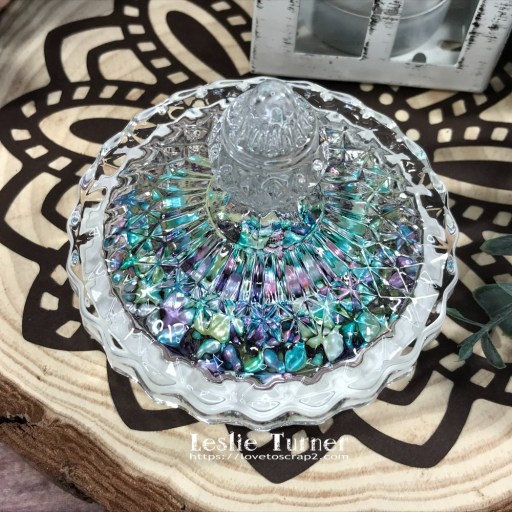
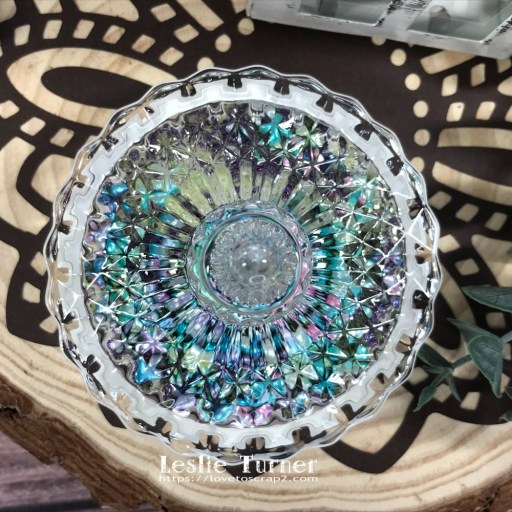
Hey everybody! I hope you’re having a FABulous weekend! How’s the weather where you are? It’s gorgeous out here in southwestern Colorado – fairly chilly mornings and cool days with lots of sun! I have a super awesome project to share with you today. When stamp pressure tools swept the craft world earlier this year, I thought they were one of the silliest things ever thought of because a brayer works just as well. But… when I saw one used in a YouTube video that was hollow and filled with colorful beads and sequins, the lightbulb came on and I decided to make one for myself to see what the hype was all about.

I used the lid from a crystal candy jar that has a handle and is hollow. I turned it upside down with the handle inside the jar and filled it with Renea Bouquets Mermaid Tails, Citrus Breeze and Dark Purple Glass Micro Beads Beautiful Beads, and Fine Diamond and Lime Green German Glitter Glass. I had these in my stash so I didn’t have to buy anything extra. Score! ;)

Using a Spellbinders Standard Circles die, I die cut six circles from Neenah Classic Crest Double Thick 165# Solar White cardstock and adhered them together in a stack with Bearly Arts precision craft glue. Using the same die, I cut a circle from a piece of Taylored Expressions craft leather and adhered it to the bottom of the stack, felt side down, with Ranger Distress Collage Medium. I put a weight on top of the stack for several hours, and then adhered the stack to the upside down lid filled with the Renea Bouquets goodies. I put a weight on top of this for 24 hours to be sure everything adhered well. I ran one last line of Ranger Distress Collage Medium around the lid at the seam where the stack of die cut circles was adhered to the glass and left it for another 24 hours.

It was super easy and turned out beautiful, and it works like a charm! And it was relatively inexpensive since I already had all the supplies!

Affiliate links are used in this post at no cost to you – I really appreciate your support! 

Products used:
Cardstock/Paper: Neenah Classic Crest Double Thick 165# Solar White cardstock
Dies/Punches: Spellbinders Standard Circles Small die
Accessories: Crystal Candy Jar, Bearly Art precision craft glue, Big Shot, Ranger Distress Collage Medium; Renea Bouquets Mermaid Tails, Citrus Breeze and Dark Purple Glass Micro Beads Beautiful Beads, and Fine Diamond and Lime Green German Glitter Glass; Taylored Expressions Craft Leather (felt side)

I hope you’ve enjoyed seeing this DIY project! If you decide to make one, I’d love to see pics! Thanks so much for stopping by today – we’ll see you next time! ;)

Scrappy hugs,

Summer Memories Envelope Mini Album

Hey everybody! Happy Thursday to you – I hope you’re having an awesome week! I’m thrilled to be back on the Printable Cuttable Creatables blog today with another awesome DT inspiration project! If you know me, you know I love to make mini albums and gift them so others can document those wonderful memories! My project today is a mini album featuring the Busy Bee Digital Paper Pack and Sweet Sunflowers SVG Cut File made with envelopes. Yep, you read that right – an envelope mini album! So fun!

I started by making the mini album base from four A2 size heavyweight kraft envelopes. You can use as many envelopes as you want and any size you want. If you’ve never made one, here’s how to do it: Lay the first envelope down in front of you with the flap up and pointed toward the right. Bend the flaps on the remaining three envelopes backwards and set two of them aside. With the flap now up, insert the flap of the second envelope into the opening of the first envelope, then fold the envelope toward the left. Repeat the process with the third and fourth envelopes. You’ll be left with the flap from the first envelope pointing toward the right. Score it (measuring the thickness of the rest of the envelopes), fold it over, and adhere it.

Now, to decorate it… I printed eight different patterns from the Busy Bee Digital Paper Pack, trimmed the panels and adhered one to each side of the pages. I created six sunflower elements from the Sweet Sunflowers SVG Cut File using the print and cut function on my Scan N Cut, which I used to embellish each page along with some other elements. There are round, oval, rectangular, flip-up, flip-out, and tag elements with plenty of room for photos and journaling. And there’s a little bit of bling on each page. I decorated the front and back with curved die cut panels, and added washi tape, a brad, some bling, and die cut alphas to the front, which completed the project.

Sharing in the following challenges:
1. Shopping Our Stash: #480 – Leaf Me Alone

Affiliate links are used in this post at no cost to you – I really appreciate your support!

Printable Cuttable Creatables products used:
Busy Bee Digital Paper Pack 
Sweet Sunflowers SVG Cut File

Other products used:
Cardstock/Paper: CutCardStock Pop Tone Hot Fudge cardstock, Neenah Classic Crest 110# and 80# Solar White cardstock, American Crafts A2 Brown Kraft Envelopes
Dies/Punches: My Favorite Things Stitched Scallop Basic Edges and Stitched Scallop Basic Edges 2; My Favorite Things Wonky Stitched Circle STAX and Wonky Stitched Square STAX; Cottage Cutz Double-Stitched Rectangles and Double-Stitched Ovals; Sizzix Alphanumeric Tiny Type Lower Thinlits
Accessories: Brother Scan N Cut, Tonic Studios 12″ Guillotine Paper Trimmer, Bearly Art precision craft glue, Big Shot, Ranger Distress Collage Medium; Eyelet Outlet Gold Film Strip washi tape, Daisy brads, 3mm brown pearls and 5mm brown gemstones

I hope you’ve enjoyed today’s project and you’re inspired to get out that electronic cutting machine! Be sure to check out all the fun goodies in the Printable Cuttable Creatables store – you’ll have a blast and there are tons of freebies to get started! Save 15% off your order at Printable Cuttable Creatables by using coupon code love2scrap15 at checkout! Be sure to Follow us on Facebook, Instagram, Pinterest, Twitter and YouTube for lots of crafty inspiration! And while you’re at it, join our Crafting with Printable Cuttable Creatables Facebook Group for more inspiration and to share your projects! Thanks so much for stopping by today – we’ll see you next time!

Scrappy hugs,

Leaves Shadowbox

9/10/22 Top Rocker at 613 Avenue Create!
10/1/22 Top 5 at Moving Along With The Times!
10/2/22 Front Porch Winner at 613 Avenue Create!

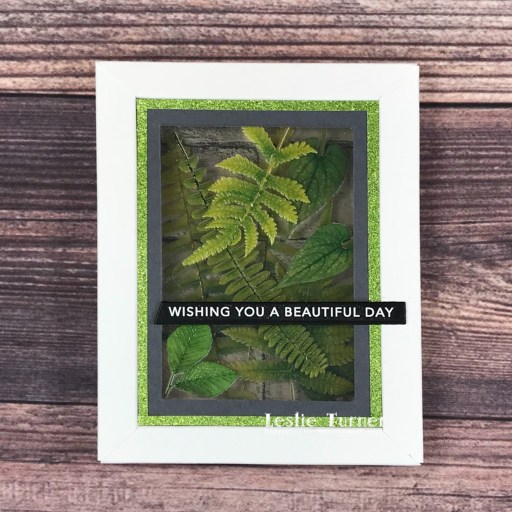
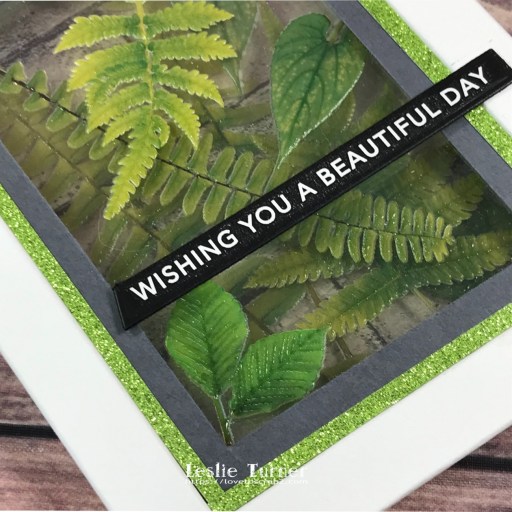
Hi friends! Happy Saturday – I hope you’re doing something fun this weekend! You know where I am… in my favorite place fairly close to my favorite guy! Our new challenge is live this morning over at Ally’s Angels and I’m super stoked to share my DT inspiration project for Challenge #62! Our challenges are always Anything Goes, so come on over and play! I created a shadowbox using leaves stickers for glassware which I adhered to layers of acetate. My inspiration came from a botanical multi-layer project I saw in the Brother CanvasWorkspace Project Collection which had an assortment of leaves cut from vinyl.

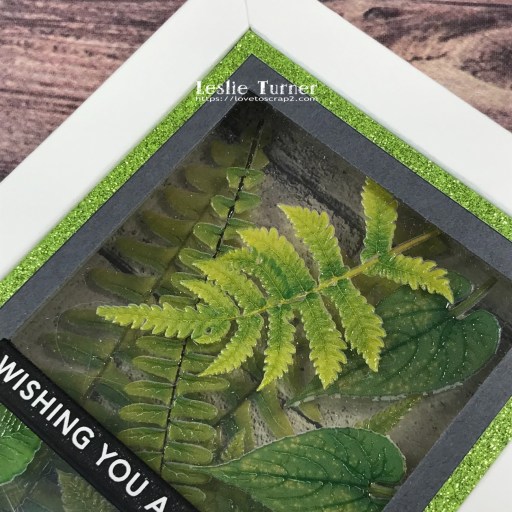
I created the shadowbox from CutCardStock Basis 110# White cardstock and adhered a brick-look panel cut from The Paper Studio Entirely Textures 2 paper pad to the back. I adhered leaves stickers to three acetate panels which I adhered to the inside of the shadowbox on top of each other and separated by double-sided adhesive foam strips.

I then added two frames cut from CutCardStock Shadow Gray cardstock and green glitter cardstock (from the American Crafts American Crafts Christmas Print 6×6 Cardstock Pad) which I adhered together and placed on double-sided adhesive foam strips. The finishing touch was adding a sentiment from Taylored Expressions Simple Strips in Reverse – Everyday Occasions.

And one more peek… I really love how this turned out! These leaves have such a realistic look to them! And they were a surprise find at a Dollar Tree store that I visited while our cat, Loki, was at the vet getting a lion shave!

Sharing in the following challenges:
1. 613 Avenue Create: #202209 – Anything Goes w/optional Leaves (playing twist)
2. A Perfect Time To Craft Open Challenge: #9-2022 – Anything Goes
3. Alphabet Challenge Blog: L is for Leaves
4. Classic Design Challenge: September #9 – Anything Goes
5. Crafting Happiness: #131 – Not a card: Anything Goes
6. Crafty Catz: #605 – Anything Goes w/optional Use a Stencil (no twist)
7. Jan’s Digi Stamps Challenge: September Anything Goes
8. Moving Along With The Times: #146 – Trees and/or Leaves

Affiliate links are used in this post at no cost to you – I really appreciate your support! 

Products used:
Cardstock/Paper: CutCardStock Basis 110# White cardstock, CutCardStock Shadow Gray cardstock, American Crafts Christmas Print 6×6 Cardstock Pad, The Paper Studio Entirely Textures 2 12×12 paper pad
Dies/Punches: Taylored Expressions Simple Strips – Asymmetrical Die
Accessories: We R Memory Keepers Large Guillotine Paper Trimmer, Fiskars 12″ SureCut Trimmer, Bearly Art precision craft glue, Grafix Craft Plastic, Glassware Leaves Stickers, Taylored Expressions Simple Strips in Reverse – Everyday Occasions, Darice Double-Sided Adhesive Foam Strips

I hope you’ve enjoyed seeing this project and will link up with us this time! Thanks so much for stopping by today – we’ll see you next time! ;)

Scrappy hugs,

Herringbone Mini Notebook

Hi everyone! I hope you’re having a totally terrific Tuesday! Say that fast three times, lol! I’m delighted to be back again this morning to share another ScrapbookingStore DT inspiration project with you that I created with the amazing September 2022 Scrapbook Kit! Even though this is a birthday-themed kit, I like that the papers and coordinating stickers in this month’s kit are versatile and can be used for other types of projects. I love making and giving practical gifts, so I created a fun 6×6 mini notebook with a herringbone background panel. This is only the second herringbone background I’ve made and they are fun! The first one from 2020 is HERE if you’re interested in looking.

I cut 6×6 front and back covers from heavyweight cardstock, and punched six holes across the top with my Zutter Bind-It-All. I created the herringbone pattern on a white cardstock panel using 1/2″ strips cut from a variety of papers in the collection, and adhered the panel to a pink cardstock panel and then to the front cover. I adhered die cut alphas and two flower stickers from the sticker sheet to complete the front panel.

I trimmed a stack of notebook paper to fit the inside of the notebook, punched holes across the top, and assembled the notebook with a white Zutter wire.

Sharing in the following challenges:
1. A Perfect Time To Craft Open Challenge: #9-2022 – Anything Goes
2. Classic Design Challenge: September #9 – Anything Goes
3. Crafting Happiness: #131 – Not a card: Anything Goes
4. Inkspirational: #273 – Designer’s Choice – Repetition (stripes, patterned paper)

5. Jan’s Digi Stamps Challenge: September Anything Goes
6. Wednesday’s Creative Inspirations Challenge Blog: Spots or Stripes

Affiliate links are used in this post at no cost to you – I really appreciate your support!

ScrapbookingStore products used:
September 2022 Scrapbook Kit

Other products used:
Cardstock/Paper: Neenah Classic Crest 80# Solar White cardstock, CutCardStock Flamingo cardstock
Dies/Punches: Waffle Flower Wide Alpha Dies
Accessories: Tonic Studios 12″ Guillotine Paper Trimmer, Bearly Art precision craft glue, Big Shot, notebook paper, Zutter Bind-It-All and white wire

I hope you’ve enjoyed today’s project and you’re thinking about all the fun you could have with this month’s kit… you really ought to think about joining the Subscription Club! Be sure to Follow us on Facebook, Instagram, Pinterest and YouTube for lots of crafty inspiration! And if you do decide to join the Subscription Club, join our ScrapbookingStore Club Member Group on Facebook for more inspiration and to share your projects! Thanks so much for stopping by today – we’ll see you next time!

Scrappy hugs,

3-D High Heel

10/28/22 Design Team Favorite Winner at A Perfect Time To Craft Open Challenge!

Hey everybody! Happy Monday – I hope you’re having a great long Labor Day weekend enjoying festivities while honoring working people! The September 2022 Scrapbook Kit has arrived in the ScrapbookingStore and I’m excited to share the first of this month’s DT inspiration projects! You know how I love me some paper shoes and since I don’t have any high heels in my collection, I created a 3-D high heel using a pretty dotted pattern paper in this month’s kit. And I’m playing around with some staging for my projects and have decided on this tree trunk slice and mini lantern along with a die cut doily and some eucalyptus. Let me know what you think!

Using my Scan N Cut, I cut the shoe base, insole and interior pieces from light pink cardstock, and the panels from a dotted pattern paper in the kit. I adhered a flower sticker from the sticker sheet to a scrap piece of white cardstock and fussy cut around it. I assembled the high heel and adhered the flower embellishment with a thick double-sided foam circle.

Here are a couple angled shots. The dotted pattern paper and flower embellishment in this collection made a casual but elegant high heel which would be a welcome addition to any paper shoe collection!

Sharing in the following challenges:
1. A Perfect Time To Craft Open Challenge: #9-2022 – Anything Goes
2. Classic Design Challenge: September #9 – Anything Goes
3. Crafting Happiness: #131 – Not a card: Anything Goes
4. Crafty Calendar: September Anything Goes
5. Inkspirational: #273 – Designer’s Choice – Repetition (dots on paper)

6. Jan’s Digi Stamps Challenge: September Anything Goes

Affiliate links are used in this post at no cost to you – I really appreciate your support!

ScrapbookingStore products used:
September 2022 Scrapbook Kit

Other products used:
Cardstock/Paper: American Crafts Blush cardstock
Dies/Punches/SVG Files: SVGCuts 3-D High Heel Shoe cut file (from the Love Always bundle)
Accessories: Brother Scan N Cut, Bearly Art precision craft glue, EK Tools 3-D Foam Dots

I hope you’ve enjoyed today’s project and you’re thinking about all the fun you could have with this month’s kit… you really ought to think about joining the Subscription Club! Be sure to Follow us on Facebook, Instagram, Pinterest and YouTube for lots of crafty inspiration! And if you do decide to join the Subscription Club, join our ScrapbookingStore Club Member Group on Facebook for more inspiration and to share your projects! Thanks so much for stopping by today – we’ll see you next time!

Scrappy hugs,

Under the Sea Aquarium

9/15/22 Top 3 at Sparkles Monthly Challenge Blog!

Hi everyone! Happy Thursday – I hope you’re having a great week! I’m stoked to be back on the Printable Cuttable Creatables blog today with another awesome DT inspiration project! Have you ever seen a paper aquarium?! I never have so I made one featuring the Under the Sea Cutting File Scrapbook Title, Cute Mermaid SVG File and Seaweed SVG File! It’s a lot like a box card but 8″ square when standing, has acetate across the front, and it folds flat for mailing if desired!

I started by constructing the aquarium (with two inside strips) from Neenah Classic Crest 110# Solar White cardstock. I cut layering panels for the inside and outside along with die cut waves (using the My Favorite Things Slimline Ocean Motion Die-namics) from The Paper Cut Blue Crinkle Paper, and adhered them in place.

I cut the pieces in the Under the Sea title, assembled it, and adhered it to the back wall of the aquarium. I moved the small seaweed down to the middle wave panel. I then cut the pieces in the Cute Mermaid SVG file after flipping the file, assembled her, and adhered her on the bottom wave panel. I embellished her with pearls and gemstones. Then finally I cut the pieces for one of the options in the Seaweed SVG file, assembled it and adhered it on the bottom wave panel. The final step was adhering a panel of acetate across the front. Acetate is very hard to photograph but this close-up photo actually came out pretty cool-looking because it yields a rippled effect which is somewhat realistic of an underwater scene! I can assure you that all the elements are actually flat! ;)

Here is an overhead shot so you can see the simple box card type construction, and a shot of it folding flat for mailing if desired.

Sharing in the following challenges:
1. 613 Avenue Create: #202208 – August Anything Goes
2. A Perfect Time To Craft Open Challenge: August #8 2022 – Anything Goes
3. A Place To Start: #082022 – Anything Goes w/optional By The Book (The Little Mermaid)
4. Classic Design Challenge: August #8 – Anything Goes
5. Crafting Happiness Challenges: #129 – Fun Folds
6. Creative Creases: #39 – Anything Goes with a Fun Fold
7. Little Red Wagon: #668 – A Day at the Beach
8. Penny’s Paper-Crafty Challenges: #528 – Anything Goes with Paper
9. QKR Stampede: #450 – Anything Goes
10. Sparkles Monthly Challenges: #155 – At the Beach
11. The Creative Crafters: #55 – Anything Goes
12. Wednesday’s Creative Inspirations Challenge Blog: August Challenge – Anything Goes

Affiliate links are used in this post at no cost to you – I really appreciate your support!

Printable Cuttable Creatables products used:
Under the Sea Cutting File Scrapbook Title
Cute Mermaid SVG File
Seaweed SVG File

Other products used:
Cardstock/Paper: Neenah Classic Crest 110# Solar White cardstock, CutCardStock Stardream Metallic Eris, Stardream Metallic Lagoon, Stardream Metallic Flame, Stardream Metallic Fairway, Stardream Metallic Amethyst, Basis Teal, Basis Coral, Basis Dark Orange, Basis Green, Basis Light Lime, Basis Dark Purple, Pop Tone Tangy Orange, Pop Tone Orange Fizz, Pop Tone Hot Fudge, Royal Sundance Fiber Kraft, Sandcastle; The Paper Cut Blue Crinkle Paper
Dies/Punches: My Favorite Things Slimline Ocean Motion Die-namics
Accessories: Brother Scan N Cut, Tonic Studios 12″ Guillotine Paper Trimmer, Bearly Art precision craft glue, Tape Runner, Big Shot, Grafix Crystal Clear Craft Plastic, 1/2″ Scor-Tape, Eyelet Outlet 3mm white pearl bling strip and 3mm purple jewel bling strip

I hope you’ve enjoyed today’s project and you’re inspired to get out that electronic cutting machine! Be sure to check out all the fun goodies in the Printable Cuttable Creatables store – you’ll have a blast and there are tons of freebies to get started! Save 15% off your order at Printable Cuttable Creatables by using coupon code love2scrap15 at checkout! Be sure to Follow us on Facebook, Instagram, Pinterest, Twitter and YouTube for lots of crafty inspiration! And while you’re at it, join our Crafting with Printable Cuttable Creatables Facebook Group for more inspiration and to share your projects! Thanks so much for stopping by today – we’ll see you next time!

Scrappy hugs,

School Art Fridge Magnets (set of 6)

Hi everyone! I hope you’re having a wonderful week so far! Still shaking my head at how fast these months are flying by! I’m stoked to be back on the Printable Cuttable Creatables blog today with another awesome DT inspiration project! Every parent needs refrigerator magnets to attach their kids’ art work from school, so that was my inspiration for this project using the Back To School SVG Scrap Kit! I typically use the separated SVG files, cut the pieces with my Scan N Cut, and assemble the projects. I did something a little different this time and used the PNG clipart files to print and cut!

I went through the PNG clipart files in the Back To School Scrap Kit and picked out the six images I wanted to use for the magnets. Following my machine’s instructions for Print To Cut projects, I printed the images on Neenah Classic Crest 80# Solar White cardstock and cut the outlines. I cut just the outlines four more times from 110# Solar White cardstock, and then adhered the cuts one on top of each other to make each magnet base thick and strong. The finishing touch was adding two disc magnets to the back of each one.

And one more look at the set… I absolutely LOVE how these turned out!

Sharing in the following challenges:
1. 613 Avenue Create: #202208 – August Anything Goes
2. A Place To Start: #082022 – Anything Goes w/optional By The Book (stretching the twist… back to school :)
3. A Perfect Time To Craft Open Challenge: August #8 2022 – Anything Goes
4. Classic Design Challenge: August #8 – Anything Goes
5. Crafty Calendar Challenge: August Anything Goes
6. Wednesday’s Creative Inspirations Challenge Blog: August Challenge – Anything Goes

Affiliate links are used in this post at no cost to you – I really appreciate your support!

Printable Cuttable Creatables products used:
Back To School Scrap Kit

Other products used:
Cardstock/Paper: Neenah Classic Crest 110# and 80# Solar White cardstock
Accessories: Brother Scan N Cut, Bearly Art precision craft glue, 8mm disc magnets

I hope you’ve enjoyed today’s project and you’re inspired to get out that electronic cutting machine! Be sure to check out all the fun goodies in the Printable Cuttable Creatables store – you’ll have a blast and there are tons of freebies to get started! Save 15% off your order at Printable Cuttable Creatables by using coupon code love2scrap15 at checkout! Be sure to Follow us on Facebook, Instagram, Pinterest, Twitter and YouTube for lots of crafty inspiration! And while you’re at it, join our Crafting with Printable Cuttable Creatables Facebook Group for more inspiration and to share your projects! Thanks so much for stopping by today – we’ll see you next time!

Scrappy hugs,

Birthday Gift Bag with ATCs

8/21/22 Rising Star at A Place To Start!

Hey everybody! Happy Friday to you all! My new DT gig with the ScrapbookingStore is in full swing and I’m so loving the versatility of the papers and the embellishment upgrades in this month’s scrapbook kit! While the collection is beach-themed, I created a fun gift bag with a striped paper from the kit which will be used for a birthday. That’s what I mean by versatile! I’m wrapping up August’s shares with this gift bag along with three artist trading coins embellished with stickers from the upgrade sticker sheet to tuck into the gift bag!

Using the Lawn Fawn Goody Bag die from my stash, I cut the front and back pieces of the gift bag from a red and white striped pattern paper in the kit and assembled it.

I embellished the front of the gift bag with a stitched banner (cut from CutCardStock Stardream Metallic Eris cardstock using the JustRite Stitched A2 Banners and Rectangles die set) and quite a few stickers, a clothespin, and a yellow sun clip from the embellishment upgrades. I also added some gemstones which completed the front.

Here are few more shots of the gift bag from different angles.

To make the artist trading coins that I tucked into the gift bag, I punched 2-1/2” circles from Neenah Classic Crest 110# Solar White cardstock and embellished them with CutCardStock Pop Tone Sweet Tooth and Cotton Candy cardstock, American Crafts POW Rouge Glitter Paper, bling, and stickers from the upgrade sticker sheet.

Sharing in the following challenges:
1. A Perfect Time To Craft Open Challenge: August #8 2022 – Anything Goes
2. A Place To Start: #082022 – Anything Goes w/optional By The Book (no twist)
3. Classic Design Challenge: August #8 – Anything Goes
4. Country View Challenges: August 2022 – Happy Birthday
5. Jan’s Digi Stamps Challenge: August Anything Goes
6. Wednesday’s Creative Inspirations Challenge Blog: August Challenge – Anything Goes

Affiliate links are used in this post at no cost to you – I really appreciate your support!

ScrapbookingStore products used:
August 2022 Scrapbook Kit with Upgrades

Other products used:
Cardstock/Paper: Neenah Classic Crest 110# Solar White cardstock, CutCardStock Pop Tone Cotton Candy, Pop Tone Sweet Tooth and Stardream Metallic Eris cardstock, American Crafts POW Rouge Glitter Paper
Dies/Punches: Fiskars 2-1/2″ Circle Punch, Lawn Fawn Goody Bag die, JustRite Stitched A2 Banners and Rectangles die set
Accessories: We R Memory Keepers Mini Guillotine Paper Trimmer, Bearly Art precision craft glue, Big Shot, cordless glue gun, Stampin’ Up Dimensionals, Eyelet Outlet 3mm pearl bling and 3mm and 4mm jewel bling

I hope you’ve enjoyed today’s project and you’re thinking about all the fun you could have with this month’s kit… you really ought to think about joining the Subscription Club! Be sure to Follow us on Facebook, Instagram, Pinterest and YouTube for lots of crafty inspiration! And if you do decide to join the Subscription Club, join our ScrapbookingStore Club Member Group on Facebook for more inspiration and to share your projects! Thanks so much for stopping by today – we’ll see you next time!

Scrappy hugs,

Summer Sandal

8/15/22 Top 5 at QKR Stampede!

Hi everyone! I hope you’re having a great week and you’re surviving this heat… I sure am ready for some cooler weather! I’m delighted to share that I’ve been invited to join the design team for the ScrapbookingStore which boasts a monthly scrapbook kit subscription club, and I’m thrilled beyond words! I love kits and there are so many different kinds of projects that can be created with these collections. This month’s kit is beach-themed and features papers in pretty summery colors and patterns along with coordinating stickers and optional upgraded embellishments. I’m excited to share a summer sandal, one of several debut DT inspiration projects!

Using my flip flop template, I cut the midsole from Neenah Classic Crest 110# Solar White cardstock, the insole and straps from striped paper, and the sole and another set of straps (adhered to the underside of the striped paper straps) from beach ball paper in the kit. I used a Darice Chevron embossing folder and ran the sole through my Big Shot for a little texture like a real shoe sole. I adhered the pieces together and added a beach ball embellishment created with 1”, 1-1/4” and 1-1/2” circle punches along with two strips of Eyelet Outlet white pearl bling on each strap.

Here are a couple more shots. I’m SO smitten… these papers made an adorable little sandal!

Sharing in the following challenges:
1. A Perfect Time To Craft Open Challenge: August #8 2022 – Anything Goes
2. Classic Design Challenge: August #8 – Anything Goes
3. Crafts Galore Encore Challenge Blog: #102 – August 2022 Anything Goes
4. Di’s Digi Challenges: Anything But A Card Challenge
5. Inkspirational: #270 – Photo Challenge

6. Jan’s Digi Stamps Challenge: August Anything Goes
7. Moving Along With The Times: #145 – Anything Goes
8. {PIN}spirational Challenge: #292 – August Photo Inspiration

9. QKR Stampede: #449 – Anything Goes
10. Your Scrapbook Place: August Anything Goes

Affiliate links are used in this post at no cost to you – I really appreciate your support!

ScrapbookingStore products used:
August 2022 Scrapbook Kit

Other products used:
Cardstock/Paper: Neenah Classic Crest 110# Solar White cardstock
Dies/Punches: Stampin’ Up 1″ and 1-1/4″ circle punches, Fiskars 1-1/2″ circle punch
Accessories: My flip flop template, Bearly Art precision craft glue, Darice Chevron embossing folder, Big Shot, Eyelet Outlet 3mm white pearl bling strip
I hope you’ve enjoyed today’s project and you’re thinking about all the fun you could have with this month’s kit… you really ought to think about joining the Subscription Club! Be sure to Follow us on Facebook, Instagram, Pinterest and YouTube for lots of crafty inspiration! And if you do decide to join the Subscription Club, join our ScrapbookingStore Club Member Group on Facebook for more inspiration and to share your projects! Thanks so much for stopping by today – we’ll see you next time!

Scrappy hugs,