Simply Perfect

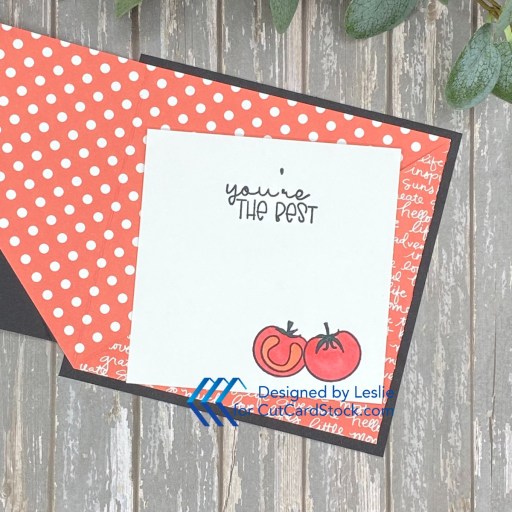
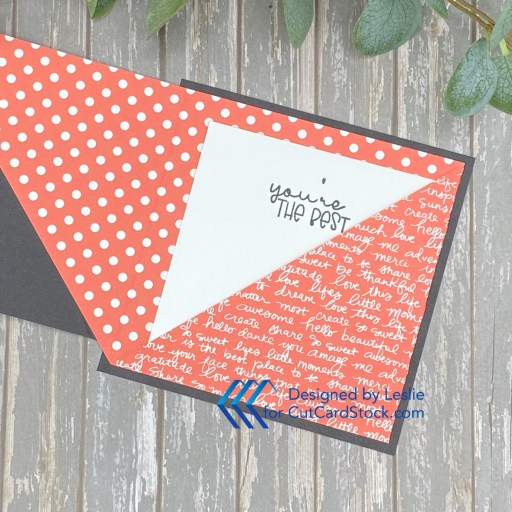
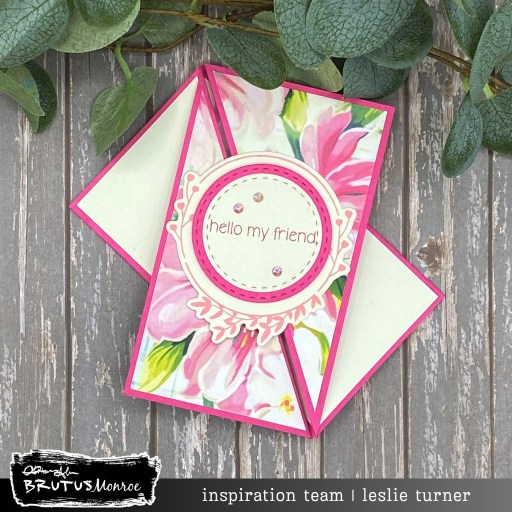
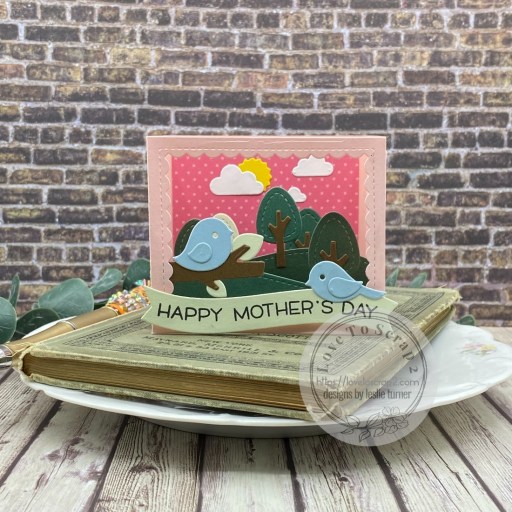
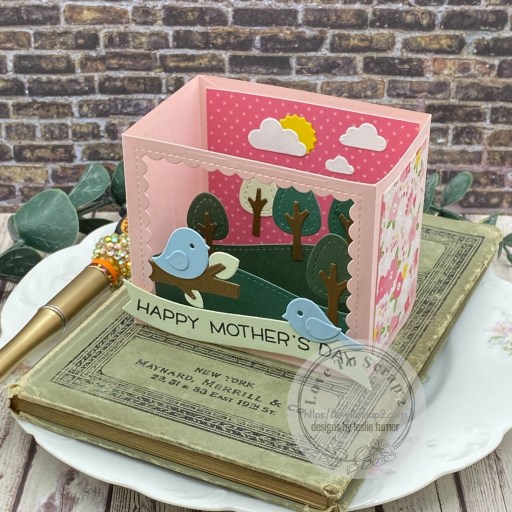
Hey everybody! Happy Tuesday – I hope you’re having a great week. National Scrapbooking Day was May 3rd and I totally missed sharing this project for Keep It Simple. Better to share late than not at all, right?! I created a pop out tunnel card using our Floral Baby Collection and I love how it turned out. It’s definitely an oldie but goodie. It’s been a few years since I made one like this and I had forgotten how fun it is!

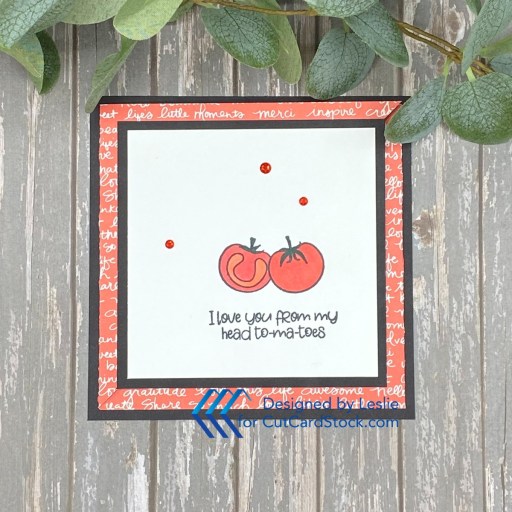
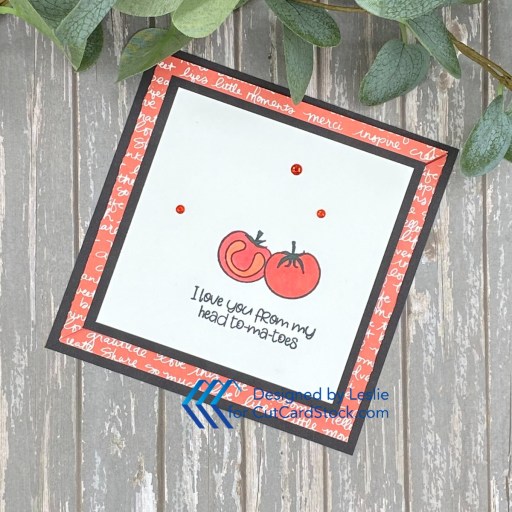
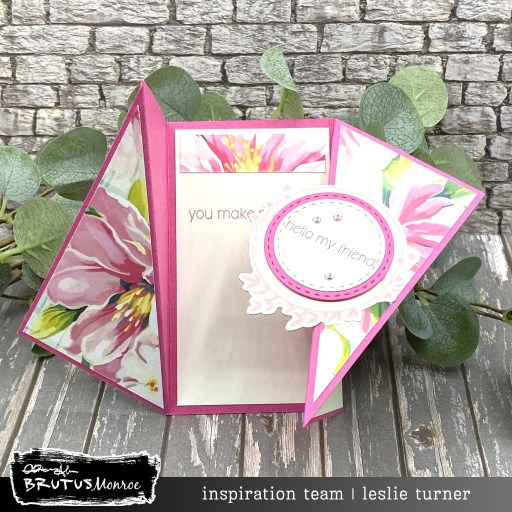
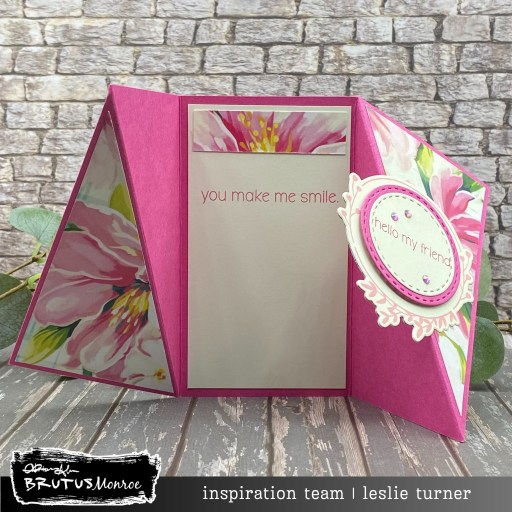
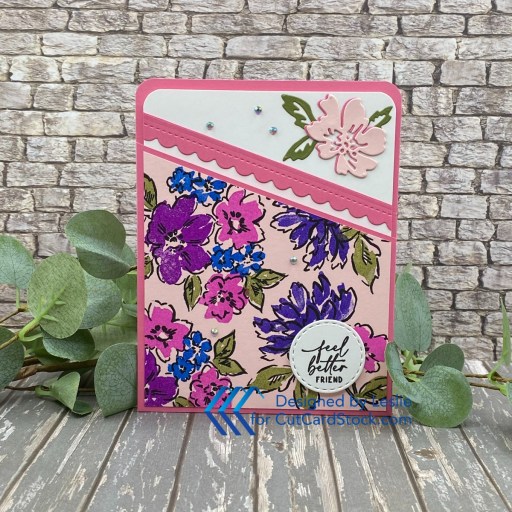
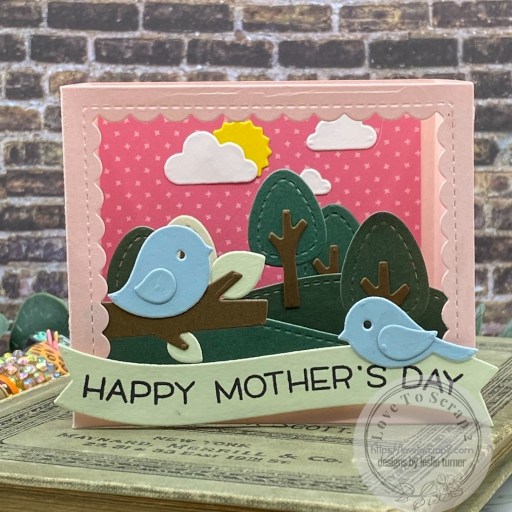
I cut the card base from CutCardStock Basis Coral along with layering panels from prints in the Floral Baby 12×12 Collection Pack and CutCardStock Ginger Snap cardstock. I added a sentiment from the Floral Baby Die Cut Pieces to the card front along with some Back To Basics Rose Enamel Dots. I die cut the turtle pieces for the inside from Basis Coral, Basis Light Brown and Ginger Snap cardstock using the KIS Cuts Water Babies dies. I stamped some detail on the turtle shell using the Floral Baby Water Babies Collection Stamps in Catherine Pooler Samba, Bellini and Do-Si-Do inks, and then assembled him.

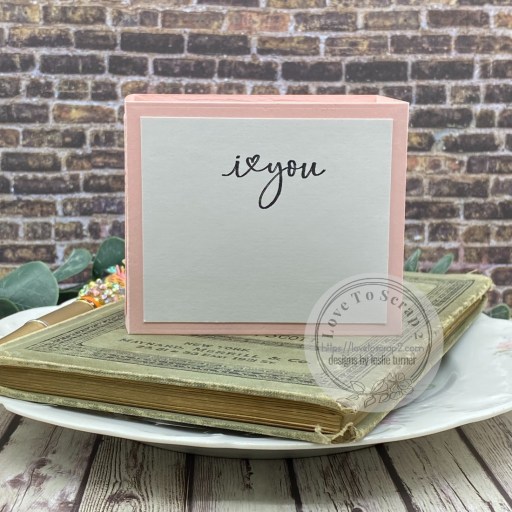
I cut the oval aperture using Back To Basics Stitched Ovals Nested Dies, and then used the Back To Basics Rectangle Nested Dies to cut a resized panel to stamp the sentiment on (also from the Floral Baby Water Babies Collection Stamps). The final step was adhering the turtle to the sentiment panel which protrudes through the opening. So stinkin’ cute I can’t stand it!

Keep It Simple products used:
Floral Baby 12×12 Collection Pack
Floral Baby Die Cut Pieces
Floral Baby Water Babies Collection Stamps
KIS Cuts Water Babies
Back To Basics Stitched Ovals Nested Dies
Back To Basics Stitched Rectangles Nested Dies
Back To Basics Rose Enamel Dots

Affiliate links are used in this post at no cost to you – I really appreciate your support!

Other products used:
CARDSTOCK/PAPER: CutCardStock Basis Coral, Basis Light Brown and Ginger Snap cardstock
INK: Catherine Pooler Samba, Bellini and Do-Si-Do inks
ACCESSORIES: Fiskars 12″ ProCision Rotary Bypass Paper Trimmer, Cricut Paper Trimmer, Bearly Art precision craft glue, My Sweet Petunia Precision Glue Press, Mini MISTI, Big Shot, Scrapbook Adhesives Thin 3D Foam Squares

I hope you’ve loved seeing this project as much as I loved creating it and you’re inspired to get crafty! Be sure to check out ALL the fun goodies in the Keep It Simple online store! Save 10% on your entire order when you shop online using code LoveToScrap2 at checkout! There is no minimum purchase requirement and no usage limits, AND it combines with product, order, and shipping discounts! Is that cool, or what?! Be sure to Follow us on Facebook, Instagram, and Pinterest for lots of crafty inspiration! Thanks so much for stopping by today – we’ll see you next time!

Scrappy hugs,

Love you from my head to-ma-toes

Hi friends, how did it get to be the bottom half of May already?! I’m shaking my head (still) at how fast the year is flying by! I’m up on the CutCardStock blog today with a tutorial for making another fun fold. You know I absolutely LOVE fun folds and I just can’t get enough of them! This clean and simple triangle pocket card features a minimal supply list consisting of Lessebo Pitch Black and Neenah Classic Crest 110# Solar White which I paired with some old Stampin’ Up double-sided paper. I just love black and white used with one other color!

I cut the flat card base and a layering panel from Lessebo Pitch Black cardstock along with two additional layering panels from Neenah Classic Crest 110# Solar White. Next I cut the inner tri-fold panel from a watermelon colored paper from a Stampin’ Up paper stack (an old one, lol… from 2015-2017). I used the PhotoPlay No Pun Intended Fruits & Veggies stamps (another old item from my stash which I haven’t used in years) for the front sentiment and image, and added several red gemstones.

The image on the inside is the same as the front and the inside sentiment is from the Keep It Simple Sunshine & Rainbows stamp set. All stamping was done with Memento Tuxedo Black ink and the images were colored with Copic Ciao alcohol markers and a green ultra fine point Sharpie.

And here’s one final shot with the little card on the inside tucked into the triangle pocket. This turned out so stinkin’ cute and it’s so easy… I can see making these for all kinds of occasions. Be sure to check out my tutorial on the CutCardStock blog if you want to learn how to make it!

Affiliate links are used in this post at no cost to you – I really appreciate your support!

CutCardStock products used:
Lessebo Pitch Black cardstock
Neenah Classic Crest 110# Solar White cardstock

Other products used:
PAPER: Stampin’ Up 2015-2017 In Color Designer Series Paper Stack
STAMPS: PhotoPlay No Pun Intended Fruits & Veggies stamp set, KIS Sentiment Stamps Sunshine & Rainbows
INK: Memento Tuxedo Black ink; Copic Ciao alcohol markers- R14 Light Rouge, R35 Coral; Sharpie Ultra Fine Point green marker
ACCESSORIES: Fiskars 12″ ProCision Rotary Bypass Paper Trimmer, Bearly Art precision craft glue, My Sweet Petunia Precision Glue Press, Mini MISTI, red gemstones

I hope you’ve enjoyed today’s project and you’re inspired to get crafty! Be sure to check out all the awesome cardstock and other goodies at CutCardStock (adhesives, labels, stickers, pens, watercolors and ribbon to name a few). And head on over to the CutCardStock Facebook Page and for more inspiration! Also, be sure to join our Creating with CutCardStock Facebook Group for even more crafty inspiration! Thanks so much for stopping by today – we’ll see you next time!

Scrappy hugs,

groovy hello

Hi friends! Wishing you all a happy and groovy Friday! I’m thrilled to share a side accordion panel card for Brutus Monroe featuring our new Love Planters stamp set and Flower Power papers which I paired with our Playful Patterns paper and Scarlet cardstock. I totally love how this turned out – the bright and bold colors really make me happy! And fun folds always make me happy so it’s a win-win on this one! I’ve made a bunch of these over the past couple years and I typically include a mini version of the instructions if you’d like to learn how to make this.

Here are the mini instructions: Cut the 5-1/2″ x 11″ card base from our Scarlet cardstock, score at 1-3/4″, 3-1/2″, 5-1/4″ and 7″, and fold on all the score lines. Cut a smaller folded piece from the Scarlet cardstock at 3″ x 6″ and score at 3″. From coordinating prints in the Flower Power and Playful Patterns paper packs, cut three 1-1/2″ x 5-1/4″ panels for the left side, a 3-3/4″ x 5-1/4″ panel for the right side, and two 2-3/4″ square panels for the smaller folded piece. Cut one additional 2-3/4″ square panel for a sentiment. Embellish as desired.

I stamped the vases and flowers from the Love Planters stamp set in Raven ink on Neenah Classic Crest Baronial Ivory cardstock and colored them with an assortment of markers. I added some shimmer to the vases with a Sakura Clear Star Gelly Roll pen. I stamped a sentiment from the same Love Planters stamp set in Raven ink and added several Red Shift flat back crystals.

I stamped an additional vase with flower and sentiment from the same stamp set on the inside panel, which completed the card. I included an angled shot so you can see the construction of this super easy fun fold! Let me know if you make one! ;)

Affiliate links are used in this post at no cost to you – I really appreciate your support!

Brutus Monroe products used:
BRU 3249 Love Planters Stamp Set
BRU 1789 Flower Power 6×6 Paper Collection
BRU 4008 Playful Patterns 6×6 Paper Collection
BRU 5413 Scarlet Cardstock
BRU 2543 Raven 2×2 Detail Ink
BRU 2345 Red Shift Flat Back Crystals

Other products used:
CARDSTOCK/PAPER: Neenah Classic Crest 80# Baronial Ivory cardstock
INK: Bic Mark-It Fine Point Markers- Yellow Blaze, Summer Melon, Sunset Orange, Rambunctious Red, Hot Aqua, Oceanview Blue and Margarita Green; Sakura Clear Star Gelly Roll Pen
DIES/PUNCHES: Stampin’ Up 1/4″ Circle Punch
ACCESSORIES: Fiskars 12″ ProCision Rotary Bypass Paper Trimmer, Bearly Art precision craft glue, My Sweet Petunia Precision Glue Press, MISTI stamp tool, Big Shot, Spellbinders Detail Scissors

I hope you’ve enjoyed seeing this project and you’re inspired to get your craft on! Be sure to check out all the amazing stamps and dies, pigments and mists, cardstock and tools (just to name a few) at Brutus Monroe! And if you happen to have a sweet tooth and like to munch while you craft (like I do, lol), check out Scoozie’s Confections & Curiosities! OMG, I’m hooked! ;) Follow us on Facebook, Instagram and YouTube for tons of crafty inspiration! And come on over and join our Fan Club Facebook Group to share your crafty makes using our products! Thanks so much for stopping by today – we’ll see you next time!

Scrappy hugs,

Sending a happy hello

Hey everybody, Happy Wednesday! I hope you’re having a great week! I’m up on the Love From Lizi blog today with a tutorial for making a masculine faux center step card featuring papers, stamps, ephemera and sequins from our new ‘For Him’ release which I totally love! Our design team has been sharing lots of samples in case there’s anybody out there who gets stumped making masculine cards. This fun fold is right up there at the top of my list of favorites and I’ve made quite a few of them. ;)

I cut the card base and faux center panel from Neenah Classic Crest 80# Solar White cardstock along with layering panels from papers in our A Spot of Autumn and Neutrals 6×6 Paper Packs. I used stamps from the Heartfelt Hello Stamp Set for the sentiment and then added a hat from the Vintage Escapes Ephemera. The finishing touch was adding several gemstones from the For Him Sequin Mix.

I cut the inside panel from Solar White cardstock and embellished it with a leftover strip of the plaid paper used on the front and sunglasses from the Vintage Escapes Ephemera. I stamped a sentiment from the Summer Botany Stamp Set and then layered the panel on a panel cut from the Matte Mirror Pastel Cardstock Bundle. The finishing touch (and optional step) was adding a panel of paper from our A Spot of Autumn 6×6 Paper Pack. For more details, be sure to visit the Love From Lizi blog to see my tutorial. ;)

Affiliate links are used in this post at no cost to you – I really appreciate your support!

Love From Lizi products used:
A Spot of Autumn 6×6 Paper Pack
Neutrals 6×6 Paper Pack
Matte Mirror Pastel Cardstock Bundle
Heartfelt Hello Stamp Set
Summer Botany Stamp Set
Vintage Escapes Ephemera
For Him Sequin Mix

Other products used:
CARDSTOCK/PAPER: Neenah Classic Crest 80# Solar White cardstock
INK: Versafine Onyx Black ink, Memento Peanut Brittle ink
ACCESSORIES: Fiskars 12″ ProCision Rotary Bypass Paper Trimmer, Bearly Art precision craft glue, My Sweet Petunia Precision Glue Press, MISTI stamp tool, Spellbinders Detail Scissors, Scrapbook Adhesives Thin 3D Foam Squares, Trinity Pick Up Stick

I hope you’ve enjoyed seeing this project and you’re inspired to get crafty! Be sure to join our Facebook Group and Follow us on Instagram and YouTube for lots of crafty inspiration! Thanks so much for stopping by today – we’ll see you next time!

Scrappy hugs,

hello my friend

Hey everybody, happy Friday! I hope you’ve had a great week. I’m delighted to share a Brutus Monroe DT inspiration project today featuring the amazing New Day stamps and dies which I paired with a floral print in our Plaid Petals paper collection, an off-white paper in the Flower Power paper collection, our Rouge cardstock and a few Light Pink flat back crystals. I totally love how this turned out using these beautifully coordinating products. And this twisted gate fold is such a show-stopper and is easy to make! I’m totally convinced any friend would be happy to receive this card!

Cut the card base from Rouge cardstock at 7-1/2″ x 4-1/4″, scored at 2-1/2″ and 5″. This panel now is divided into three sections. Score the left and right sections from the upper left corner diagonally down to the bottom right corner, leaving the middle section alone. Mountain fold the two diagonal score lines and valley fold the two straight score lines, using a bone folder to burnish the creases.

Cut two panels of either patterned or plain paper at 2-1/4″ x 3-7/8″ and decide which piece you want for the ‘upper’ and ‘lower’ flaps. For the upper flaps (the floral print from our Plaid Petals paper pack on my project), cut the panel diagonally from the upper left corner down to the lower right corner. For the lower flaps (the off-white paper from our Flower Power paper pack on my project), cut the upper right corner down to the lower left corner. Adhere the panels to the flaps.

Using the stamps in the New Day stamps, stencil and dies bundle, stamp the circle frame and a sentiment from our New Day stamp set in pink inks on the off-white paper. Cut the stamped circle frame with the coordinating die, and either die cut or punch the sentiment in a circle. Next, die cut or punch a slightly larger circle from the Rouge cardstock, layer the circles together and adhere them on top of the stamped circle frame popped up on thin 3D foam squares. Adhere the sentiment piece to the card front, applying adhesive only to half of it so the card opens and closes properly. Add a few light pink crystals, which will complete the card front.

Cut an inside panel from the off-white paper at 2-1/4″ x 4″, embellish it with a leftover strip of the floral paper, and stamp an inside sentiment (also from the New Day stamps, stencil and dies bundle). That’s it… I told you it was easy! I’d love to know if you make one! ;)

Affiliate links are used in this post at no cost to you – I really appreciate your support!

Brutus Monroe products used:
BRU 8479 New Day Stamps, Stencil & Dies Bundle
BRU 1322 Plaid Petals 6×6 Paper Collection
BRU 1789 Flower Power 6×6 Paper Collection
BRU 6533 Rouge Cardstock
BRU 7907 Light Pink Flat Back Crystals

Other products used:
INK: Catherine Pooler It’s A Girl and Party Dress inks
DIES/PUNCHES: Love From Lizi Stitched Circle Nested Cutting Dies
ACCESSORIES: Fiskars 12″ ProCision Rotary Bypass Paper Trimmer, Bearly Art precision craft glue, My Sweet Petunia Precision Glue Press, MISTI stamp tool, Big Shot, Scrapbook Adhesives Thin 3D Foam Squares

I hope you’ve enjoyed seeing this project and you’re inspired to get your craft on! Be sure to check out all the amazing stamps and dies, pigments and mists, cardstock and tools (just to name a few) at Brutus Monroe! And if you happen to have a sweet tooth and like to munch while you craft (like I do, lol), check out Scoozie’s Confections & Curiosities! OMG, I’m hooked! ;) Follow us on Facebook, Instagram and YouTube for tons of crafty inspiration! And come on over and join our Fan Club Facebook Group to share your crafty makes using our products! Thanks so much for stopping by today – we’ll see you next time!

Scrappy hugs,

feel better friend

Hey everybody, Happy Saturday! I hope you had a great week and have something fun planned this weekend. I’m up on the CutCardStock blog today with a tutorial for making a friendship card in the form of a library pocket! I used our Lessebo Bubble Gum Pink, Lessebo Blossom Pink and Pop Tone Jellybean Green, along with Neenah Classic Crest 110# Solar White for the card insert. You won’t believe how easy this card is – I see many more of these in my future, lol!

I cut the library pocket card base from Lessebo Bubble Gum Pink along with a layering panel from Lessebo Blossom Pink and the card insert from Neenah Classic Crest 110# Solar White. I used my MISTI to do some outline stamping on the layering panel in Versafine Onyx Black ink using the Stampin’ Up Hand-Penned Petals stamp set. Then I used Catherine Pooler Eucalyptus, Something Borrowed, Grape Crush, Flirty Fuchsia and Pucker Up inks to do the fill-in stamping with an acrylic stamping block.

I also used the coordinating Stampin’ Up Penned Flowers dies to embellish the Solar White card insert. The front sentiment was stamped in Versafine Onyx Black ink using the same Stampin’ Up Hand-Penned Petals stamp set which I cut with a Love From Lizi Stitched Circle Nested Cutting Die. The finishing touch on the front was the addition of several Brutus Monroe Light Pink Flat Back Crystals.

The only thing left to do with the insert card was to stamp a sentiment. This one, from the Stampin’ Up Celebrate Sunflowers stamp set, was also stamped in Versafine Onyx Black ink. Love, love, love how this turned out! Be sure to visit the CutCardStock blog to see my tutorial if you want to learn how to make this! I have to admit that I attempted to watch a video on YouTube but it was awful (as was the accompanying written tutorial) so I ended up going in my own direction. Sometimes you just have to take the bull by the horns, lol!

Affiliate links are used in this post at no cost to you – I really appreciate your support!

CutCardStock products used:
Lessebo Bubble Gum Pink cardstock
Lessebo Blossom Pink cardstock
Pop Tone Jellybean Green cardstock
Neenah Classic Crest 110# Solar White cardstock

Other products used:
STAMPS: Stampin’ Up Hand-Penned Petals and Celebrate Sunflowers stamp sets
INK: Versafine Onyx Black ink; Catherine Pooler Eucalyptus, Something Borrowed, Grape Crush, Flirty Fuchsia and Pucker Up inks; Copic Ciao alcohol marker- G94 Grayish Olive
DIES/PUNCHES: Stampin’ Up Penned Flowers dies, Kadomaru Pro Corner Rounder, Love From Lizi Stitched Circle Nested Cutting Dies
ACCESSORIES: Fiskars 12″ ProCision Rotary Bypass Paper Trimmer, Bearly Art precision craft glue, My Sweet Petunia Precision Glue Press, MISTI stamp tool, MISTI Sticky Mats, 2×2 acrylic stamping block, Big Shot, Brutus Monroe Light Pink Flat Back Crystals, Scrapbook Adhesives Thin 3D Foam Squares

I hope you’ve enjoyed today’s project and you’re inspired to get crafty! Be sure to check out all the awesome cardstock and other goodies at CutCardStock (adhesives, labels, stickers, pens, watercolors and ribbon to name a few). And head on over to the CutCardStock Facebook Page and for more inspiration! Also, be sure to join our Creating with CutCardStock Facebook Group for even more crafty inspiration! Thanks so much for stopping by today – we’ll see you next time!

Scrappy hugs,

Best Dad Ever

Hey y’all, happy Friday! I hope you’ve had a great week! I’m delighted to share a Brutus Monroe DT inspiration project today featuring the awesome Vintage Plaid papers and Occasional Greetings stamp set. I also used our Midnight and Jack O Lantern cardstock along with our Super Sentimental stamp set to make this incredible shirt card come to life. It’s my own fun fold/shape card design and I’m happy to share my instructions with anyone who would like to have them. The Freebies page on my blog is not available right now so use the email address on my Contact page to let me know you’d like to have them. ;)

I cut the shirt card base from Midnight cardstock along with layering panels from an orange and blue plaid (LOVE!) from our Vintage Plaid 6×6 Paper Pack. I used Eyelet Outlet blue gemstones for the buttons. I stamped the sentiment from our Occasional Greetings Stamp Set on a Jack O Lantern cardstock scrap in Raven ink and punched it with a Stampin’ Up 1-3/4″ Circle Punch. I die cut a slightly larger circle (using the Love From Lizi Stitched Circle Nested Cutting Dies) from Midnight cardstock, layered them together, and affixed the sentiment to the shirt front on adhesive foam squares.

I cut the inside panel from Perfect Blend cardstock and embellished it with a leftover strip of the plaid paper used on the front. The finishing touch was stamping a sentiment from our Super Sentimental Stamp Set in Raven ink.

Affiliate links are used in this post at no cost to you – I really appreciate your support!

Brutus Monroe products used:
BRU 5512 Midnight Cardstock
BRU 5437 Jack O Lantern Cardstock
BRU 4929 Vintage Plaid 6×6 Paper Pack
BRU 9306 Occasional Greetings Stamp Set
BRU 1985 Super Sentimental Stamp Set
BRU 4013 Perfect Blend Cardstock
BRU 2543 Raven Detail 2×2 Ink

Other products used:
DIES/PUNCHES: Stampin’ Up 1-3/4″ Circle Punch, Love From Lizi Stitched Circle Nested Cutting Dies
ACCESSORIES: Fiskars 12″ ProCision Rotary Bypass Paper Trimmer, Bearly Art precision craft glue, My Sweet Petunia Precision Glue Press, Mini MISTI, Big Shot, Eyelet Outlet blue gemstones, Scrapbook Adhesives 3D Foam Squares, Scrapbook Adhesives Thin 3D Foam Squares

I hope you’ve enjoyed seeing this project and you’re inspired to get your craft on! Be sure to check out all the amazing stamps and dies, pigments and mists, cardstock and tools (just to name a few) at Brutus Monroe! And if you happen to have a sweet tooth and like to munch while you craft (like I do, lol), check out Scoozie’s Confections & Curiosities! OMG, I’m hooked! ;) Follow us on Facebook, Instagram and YouTube for tons of crafty inspiration! And come on over and join our Fan Club Facebook Group to share your crafty makes using our products! Thanks so much for stopping by today – we’ll see you next time!

Scrappy hugs,

Happy Mother’s Day window card

Howdy peeps, I hope you’re having a great week! They sure are going by at a rapid rate these days. Our new challenge is live this morning over at Creative Creases and I’m delighted to share this Mother’s Day window card with you for Challenge #103. I used quite a few Lawn Fawn products (papers, dies and stamps) along with a boatload of Lessebo cardstock from CutCardStock. I totally love how this turned out!

I pulled out the Lawn Fawn Center Picture Window Card Dies, Shadow Box Card Dies, Shadow Box Ocean Add-On Dies, and Shadow Box Park Add-On Dies, and commenced to cutting all the pieces from CutCardStock Lessebo cardstock and the Lawn Fawn Spring Fling paper pack. I always say the most fun is assembling these kinds of projects, and this was definitely no exception. I had a ball! I used the Lawn Fawn Happy Happy Happy stamp set for the front sentiment which I stamped in Memento Tuxedo Black ink.

I added a panel to the back cut from Lessebo White cardstock and stamped a sentiment from the Stampin’ Up Happy & Heartfelt stamp set, which completed the card. I’ve also included an overhead shot of the card so you can see how stinkin’ cute it is! ;)

Affiliate links are used in this post at no cost to you – I really appreciate your support! 

Products used:
CARDSTOCK/PAPER: CutCardStock Lessebo Blossom Pink, Lessebo Hunter Green, Lessebo Moss Green, Lessebo Sweet Mint, Lessebo Coffee Bean, Lessebo Arctic Blue, Lessebo White, and Lessebo Sunflower Yellow cardstock; Lawn Fawn Spring Fling 6×6 Petite Paper Pack
STAMPS: Lawn Fawn Happy Happy Happy Stamp Set; Stampin’ Up Happy & Heartfelt Stamp Set
INK: Memento Tuxedo Black ink
DIES/PUNCHES: Lawn Fawn Center Picture Window Card Dies, Shadow Box Card Dies, Shadow Box Ocean Add-On Dies, Shadow Box Park Add-On Dies
ACCESSORIES: Fiskars 12″ ProCision Rotary Bypass Paper Trimmer, Bearly Art precision craft glue, MISTI stamp tool, Big Shot, Stampin’ Up Mini Dimensionals

I hope you’ve enjoyed seeing this project and will link up with us this time! Thanks so much for stopping by today – we’ll see you next time! ;)

Scrappy hugs,

Wanderlust

Hey everybody, happy Friday! You’ve undoubtedly read in my previous posts that Ed and I are moving from Colorado to Iowa, so we’ve been super busy. Thank goodness for the ability to schedule posts ahead of time or I’d be SOL! I’m thrilled to share a Brutus Monroe DT inspiration project today featuring the amazing Road Trip stamp set along with our Pink Lemonade cardstock and Spring Splatter papers. Any kind of RV/camper stamp sets have a special place in my heart because we were full-time RVers for several years. We’ve met a lot of awesome people and had some really good times… great memories for sure! I saw this pop up block card year before last on Lisa Curcio’s blog and it’s one of my all-time favorite fun folds to make.

I cut the card base and blocks from our Pink Lemonade cardstock along with layering panels from our Spring Splatter 6×6 Paper Pack. I stamped the camper from the Road Trip stamp set in Raven ink on Solar White cardstock. I colored it with an assortment of markers, fussy cut it and then stamped a sentiment on it in Catherine Pooler Samba ink. I added a tiny bow fashioned from Keep It Simple Back To Basics Black & White Ribbon along with several of our Light Pink Flat Back Crystals.

I added a Solar White panel to the back which I embellished with a leftover strip of the Spring Splatter paper. I stamped another sentiment from the Road Trip stamp set in Raven ink, which completed the card. I included a shot of the card folded flat for mailing. Love it!

Affiliate links are used in this post at no cost to you – I really appreciate your support!

Brutus Monroe products used:
BRU 6557 Pink Lemonade Cardstock
BRU 2051 Spring Splatter 6×6 Paper Pack
BRU 1984 Road Trip Stamp Set
BRU 2543 Raven Detail 2×2 Ink
BRU 7907 Light Pink Flat Back Crystals

Other products used:
CARDSTOCK/PAPER: Neenah Classic Crest 110# Solar White cardstock
INK: Copic Ciao Alcohol Markers- C-3 Cool Gray and C-7 Cool Gray; Sharpie Ultra Fine Point Marker- Red, Sakura Black Micron 08 Pen, Catherine Pooler Samba ink
ACCESSORIES: Fiskars 12″ ProCision Rotary Bypass Paper Trimmer, Bearly Art precision craft glue, My Sweet Petunia Precision Glue Press, MISTI stamp tool, Spellbinders Detail Scissors, Trinity Pick Up Stick, Scrapbook Adhesives Thin 3D Foam Squares, Keep It Simple Back To Basics Black & White Ribbon, small wooden bow maker

I hope you’ve enjoyed seeing this project and you’re inspired to get your craft on! Be sure to check out all the amazing stamps and dies, pigments and mists, cardstock and tools (just to name a few) at Brutus Monroe! And if you happen to have a sweet tooth and like to munch while you craft (like I do, lol), check out Scoozie’s Confections & Curiosities! OMG, I’m hooked! ;) Follow us on Facebook, Instagram and YouTube for tons of crafty inspiration! And come on over and join our Fan Club Facebook Group to share your crafty makes using our products! Thanks so much for stopping by today – we’ll see you next time!

Scrappy hugs,

Together We Have It All

Hey everybody, happy Wednesday! The weeks sure seem to be rolling around pretty quickly these days. I’m up on the Love From Lizi blog today with a tutorial for making a masculine ‘love you just because’ card with a slanted flap. I sure do love me some fun folds and next in line come the fancy cuts which really make a statement! I used paper, stamps, ephemera, pin stripe peel-offs and sequins – all from our ‘For Him’ May release – and I love how it turned out. This release is packed full of wonderful products to get your masculine project mojo going! And our team is having an IG Hop to celebrate this awesome release, so be sure to visit the Love From Lizi Instagram page to hop with us and get in on the chance to win a $30CAD gift card to shop on the site!

I used CutCardStock Basis 110# Natural cardstock for the card base and cut off the front flap at an angle, saving the piece that was cut off. Next, I cut the front layering panel from Basis 80# Natural cardstock, angled the bottom edge, and did a little mixed media work on it. I used Memento Rich Cocoa and Espresso Truffle dye inks, Ranger Antique Linen and Vintage Photo Distress Spritz (sprayed and splattered) along with hand stamping using stamps from the Summer Botany Stamp Set. I used Ranger Walnut Stain Distress Ink around the edges which I had also distressed with the Tim Holtz Distress Tool.

I lightly distressed the inside of the card base also (using the same products sans the stamping) and inked the outside edges with Walnut Stain distress ink. I adhered the leftover piece cut off the front flap along with a patterned paper layer cut from a striped paper in the A Spot of Autumn 6×6 Paper Pack. I adhered a couple pieces of Vintage Escapes Ephemera, then added a couple Brown Mirror Pinstripe Peel-Off Stickers and several sequins from the For Him Sequin Mix to the card front. I stamped a sentiment from the same Summer Botany Stamp Set in Memento Rich Cocoa ink and tore it on all four sides. I lightly inked the edges and popped it up on thin 3D foam squares.

I embellished the inside with a 1/2″ x 4-1/8″ strip of the patterned paper which I distressed with the Walnut Stain distress ink, and then stamped a sentiment from the same stamp set in Rich Cocoa ink. For more details, be sure to visit the Love From Lizi blog to see my tutorial. ;)

Affiliate links are used in this post at no cost to you – I really appreciate your support!

A Spot of Autumn 6×6 Paper Pack
Summer Botany Stamp Set
Vintage Escapes Ephemera 
Brown Mirror Pinstripe Peel-Off Stickers
For Him Sequin Mix

Other products used:
CARDSTOCK/PAPER: CutCardStock Basis 110# Natural and Basis 80# Natural cardstock
INK: Memento Rich Cocoa and Espresso Truffle inks; Ranger Antique Linen and Vintage Photo Distress Spritz; Ranger Walnut Stain distress ink
ACCESSORIES: Fiskars 12″ ProCision Rotary Bypass Paper Trimmer, Bearly Art precision craft glue, My Sweet Petunia Precision Glue Press, MISTI stamp tool, Tim Holtz Distress Tool, Ranger Tiny Blending Tool and Tiny Blending Foam, Scrapbook Adhesives Thin 3D Foam Squares, Trinity Pick Up Stick

I hope you’ve enjoyed seeing this project and you’re inspired to get crafty! Be sure to join our Facebook Group and Follow us on Instagram and YouTube for lots of crafty inspiration! Thanks so much for stopping by today – we’ll see you next time!

Scrappy hugs,