Under the Sea

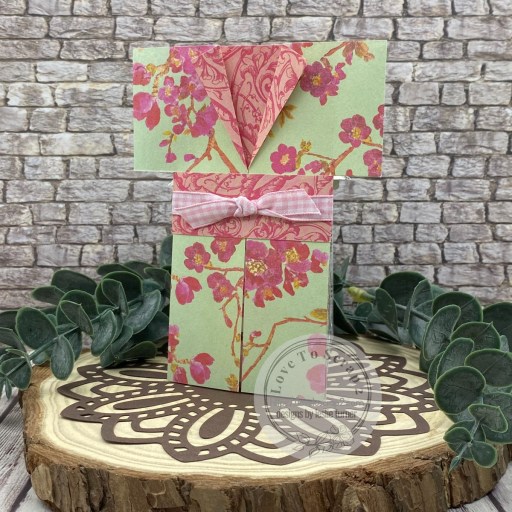
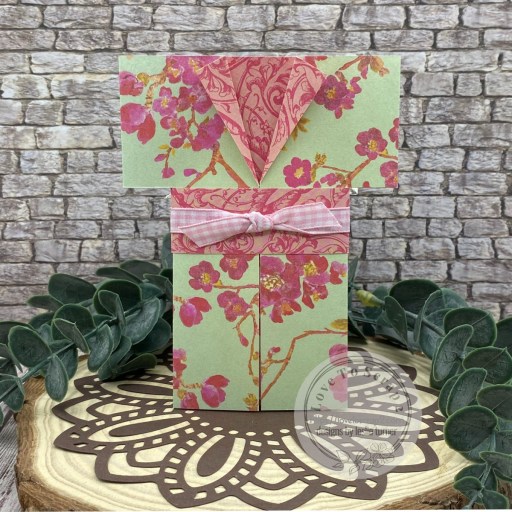
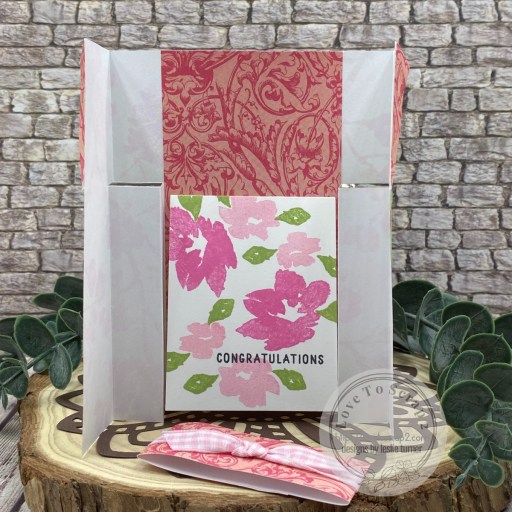
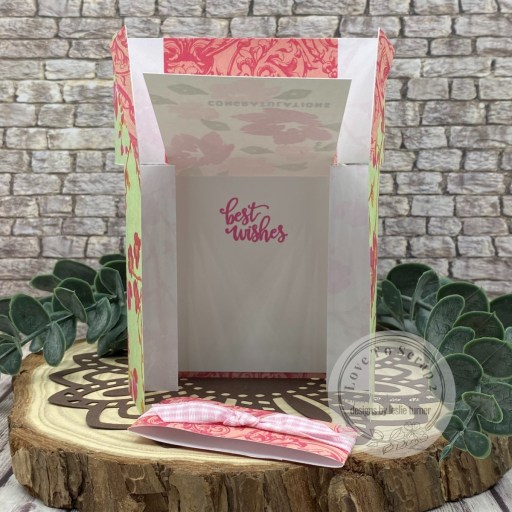
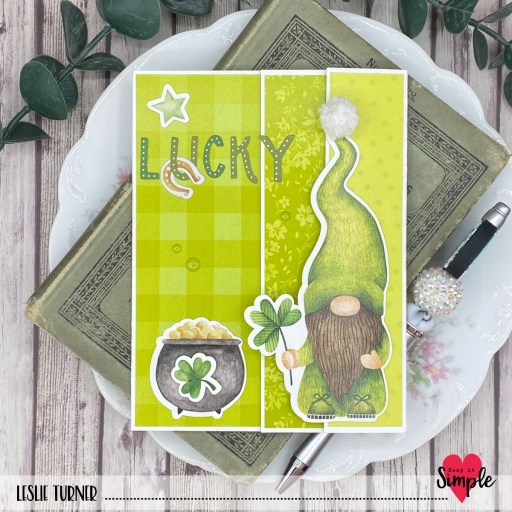
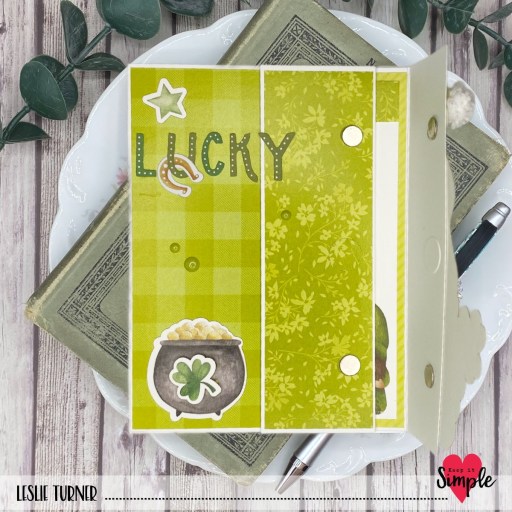
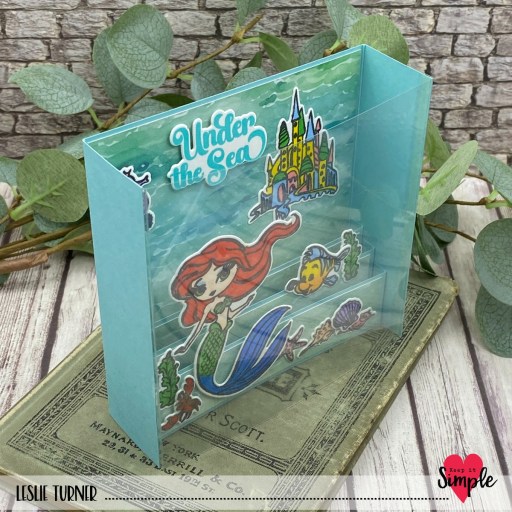
Hey everybody, I hope you’re having a great day! I’ve popped in this morning with a Keep It Simple DT inspiration project created with papers, stamps and dies from our new Once Upon A Time: Ariel Collection. This collection just released last week and if you’re a fan of fairytales and princesses, you are in for a real treat. I used my own open box card design to create an aquarium card, and I totally love how it turned out. I’ve made quite a few open box cards over the years – even a fairly large one for another design team project a couple years ago – and it’s super simple to make. My Freebies page is currently unavailable but drop me a comment on this post if you’d like me to email you my instructions.

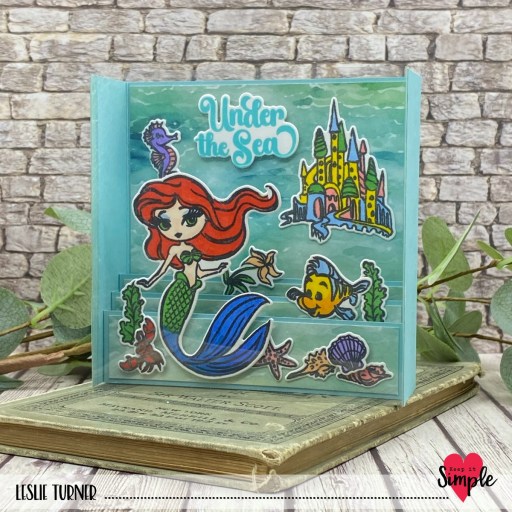
I cut the card base and strips from CutCardStock Basis Aqua cardstock along with layering panels from a watery looking print in the Aerial collection that was perfect for an underwater scene. I stamped a sentiment and quite a few images from the Ariel Collection Stamps on Neenah Classic Crest 110# Solar White cardstock and colored the images with an assortment of markers. I added some shimmer with a Spectrum Noir Crystal Clear Overlay marker and then die cut them with the coordinating Ariel Outline Dies. I built my scene, adding images to all three strips and to the background, along with the sentiment, and popping some of them up on thin adhesive foam squares. The final touch was adding a panel of clear acetate from our Shaker Basics- Foam & Acetate Pack for the aquarium front.

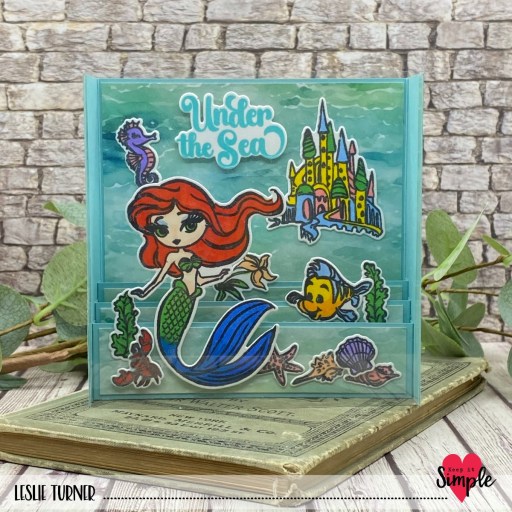
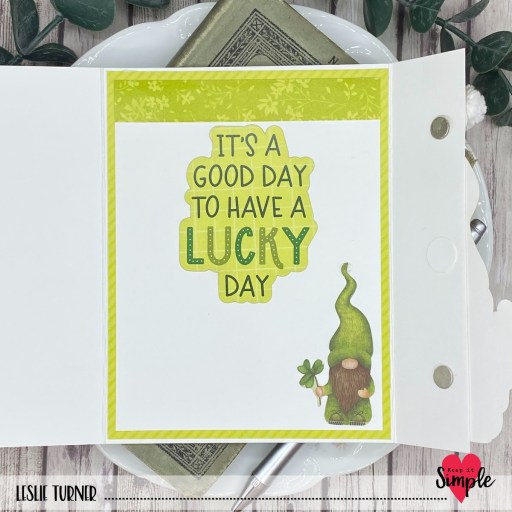
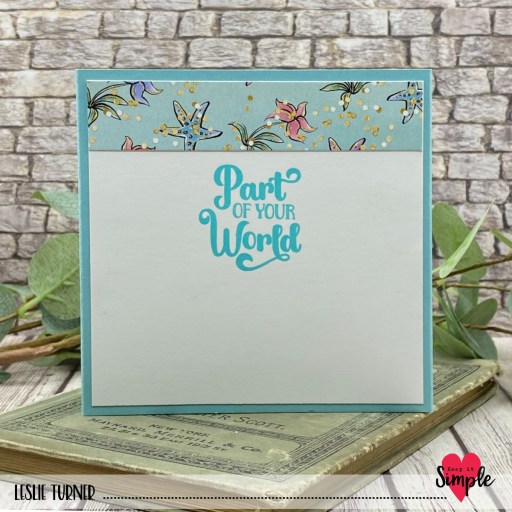
I cut a panel of 80# Solar White cardstock for the back and embellished it with another print in the Ariel Collection. I stamped a sentiment, also from the Ariel Collection Stamps, in Catherine Pooler Cummerbund ink, and this completed the card. I’ve also included an overhead angle shot so you can see the construction. So fun!

Keep It Simple products used:
Once Upon A Time: Ariel 12×12 Collection Pack
Once Upon A Time: Ariel Collection Stamps
Once Upon A Time: Ariel Outline Dies
KIS Shaker Basics- Foam & Acetate Pack

Affiliate links are used in this post at no cost to you – I really appreciate your support!

Other products used:
CARDSTOCK/PAPER: CutCardStock Basis Aqua cardstock, Neenah Classic Crest 110# and 80# Solar White cardstock
INK: Memento Tuxedo Black ink; Bic Mark-It Fine Point markers- Peach Parfait, Sunset Orange, Yellow Blaze, Key Lime, Oceanview Blue, Blue Skies Blue, Hot Aqua, Summer Melon and Polynesian Purple; Sharpie Ultra Fine Point marker- Red; Spectrum Noir Tri-Blends- FS6/7/8; Spectrum Noir Crystal Clear Overlay Marker, Catherine Pooler Cummerbund ink
ACCESSORIES: Fiskars 12″ ProCision Rotary Bypass Paper Trimmer, Elmer’s Craft Bond Tape Runner, Bearly Art precision craft glue, My Sweet Petunia Precision Glue Press, Mini MISTI, Big Shot, Scor-Tape 1/8″, Scrapbook Adhesives Thin 3D Foam Squares

I hope you’ve loved seeing this project as much as I loved creating it and you’re inspired to get crafty! Be sure to check out ALL the fun goodies in the Keep It Simple online store! Save 10% on your entire order when you shop online using code LoveToScrap2 at checkout! There is no minimum purchase requirement and no usage limits, AND it combines with product, order, and shipping discounts! Is that cool, or what?! Be sure to Follow us on Facebook, Instagram, and Pinterest for lots of crafty inspiration! Thanks so much for stopping by today – we’ll see you next time!

Scrappy hugs,

bless this nest

Hey everybody, happy weekend! It’s Sunday afternoon and our weekend is about shot… but it won’t be long before another one rolls around, lol! I’m thrilled to share a Keep It Simple DT inspiration project which is on the Keep It Simple website under How-Tos! I created a new home card and it went live several weeks ago and I forgot to share! It’s THE cutest buckle card and I’m proud to say it’s my own design! I used Crafty Girls papers along with stamps and dies from our Build-A-Birdhouse collection.

Card base, inside sentiment panel and belt were cut from Solar White cardstock along with layering panels from coordinating papers in the Crafty Girls collection. I used stamps and dies from our Build-A-Birdhouse collection for the focal area on the front and the inside sentiment panel. Super cute and fairly easy!

Keep It Simple products used:
Crafty Girls Collection Pack (no longer in stock)
Crafty Girls Flip Sides Pack
Build-A-Birdhouse Stamps
Build-A-Birdhouse Outline Dies

Affiliate links are used in this post at no cost to you – I really appreciate your support!

Other products used:
CARDSTOCK/PAPER: Neenah Classic Crest 110# Solar White cardstock, CutCardStock Basis Light Brown and Pop Tone Sno Cone cardstock
INK: Ranger distress oxide inks- vintage photo and stormy sky; Versafine Onyx Black ink
DIES/PUNCHES: Sizzix Belinda Stitched Hexagons Fanciful Framelits
ACCESSORIES: Fiskars 12″ ProCision Rotary Bypass Paper Trimmer, Bearly Art precision craft glue, My Sweet Petunia Precision Glue Press, Mini MISTI, The Rabbit Hole large blending brush, Waffle Flower Shader Brush 1+, Big Shot

I hope you’ve loved seeing this project as much as I loved creating it and you’re inspired to get crafty! Be sure to check out ALL the fun goodies in the Keep It Simple online store! Save 10% on your entire order when you shop online using code LoveToScrap2 at checkout! There is no minimum purchase requirement and no usage limits, AND it combines with product, order, and shipping discounts! Is that cool, or what?! Be sure to Follow us on Facebook, Instagram, and Pinterest for lots of crafty inspiration! Thanks so much for stopping by today – we’ll see you next time!

Scrappy hugs,

Congratulations Kimono Card

Hi friends, Happy Friday! I hope you’ve had a great first week of March! Our new challenge is live this morning over at Creative Creases and I’m thrilled to share my DT inspiration project for Challenge #101, where we always want to see your fun folds! I turned this awesome little kimono card into a congrats card, and I love how it turned out! I’ve made a few of these over the years, finding my original inspiration from THIS tutorial over at Splitcoast Stampers. This fold is super easy and really packs a punch – and it’s great for just about any occasion.

I cut the card base and sash from coordinating prints in the Colorbok Delilah 12×12 Designer Paper Pad, cutting and folding the kimono as per the tutorial. I added pink gingham ribbon from the Keep It Simple Ruby Ribbon Pack to the sash.

I cut the mini card on the inside from Neenah Classic Crest 80# Solar White cardstock, and stamped the floral images and sentiment in Memento Tuxedo Black, Rose Bud and Bamboo Leaves inks along with Catherine Pooler It’s A Girl ink. The florals and front sentiment are from the Stampin’ Up Hand-Penned Petals stamp set, and the inside sentiment is from the Stampin’ Up Artistically Inked stamp set.

Affiliate links are used in this post at no cost to you – I really appreciate your support! 

Products used:
CARDSTOCK/PAPER: Colorbok Delilah 12×12 Designer Paper, Neenah Classic Crest 80# Solar White cardstock
STAMPS: Stampin’ Up Hand-Penned Petals and Artistically Inked stamp sets
INK: Memento Tuxedo Black, Rose Bud and Bamboo Leaves inks; Catherine Pooler It’s A Girl ink
ACCESSORIES: Fiskars 12″ ProCision Rotary Bypass Paper Trimmer, Bearly Art precision craft glue, MISTI stamp tool, Keep It Simple Ruby Ribbon Pack

I hope you’ve enjoyed seeing this project and will link up with us this month! Thanks so much for stopping by today – we’ll see you next time! ;)

Scrappy hugs,

you’re amazing!

Hi friends, a big ol’ Happy Saturday to you! I hope it’s warming up where you are and you’re getting to do something fun this weekend. I’m delighted to share a Brutus Monroe DT inspiration project today featuring papers from the amazing Fluttering Forest and Vintage Plaid 6×6 Paper Packs along with a sentiment from the Super Sentimental Stamp Set. This tiered pinwheel twist card is one of my favorite fun folds and I’ve made several over the past couple years. My inspiration originally came from Sam Calcott over at Mixed Up Craft. You know what a fun fold fanatic I am, and the pretty patterned papers and butterflies were added bonuses!

I cut the card base and the tiered panels from Raven cardstock along with layering panels from patterns in the Fluttering Forest and Vintage Plaid 6×6 Paper Packs. I love mixing patterns.

I fussy cut four butterflies from the Fluttering Forest paper pack, bent them in the middle, and adhered one to each side of the card.

I stamped a sentiment from the Super Sentimental stamp set in Raven ink on a panel of Perfect Blend cardstock, and this completed the card.

Affiliate links are used in this post at no cost to you – I really appreciate your support!

Brutus Monroe products used:
BRU 9717 Fluttering Forest 6×6 Paper Pack
BRU 4929 Vintage Plaid 6×6 Paper Pack
BRU 7985 Super Sentimental Stamp Set
BRU 4013 Perfect Blend Cardstock 4.25″ x 5.5″
BRU 6519 Raven Cardstock
BRU 2543 Raven Detail 2×2 Ink

Other products used:
ACCESSORIES: Fiskars 12″ ProCision Rotary Bypass Paper Trimmer, Bearly Art precision craft glue, My Sweet Petunia Precision Glue Press, Mini MISTI, Spellbinders Detail Scissors

I hope you’ve enjoyed seeing this project and you’re inspired to get your craft on! Be sure to check out all the amazing stamps and dies, pigments and mists, cardstock and tools (just to name a few) at Brutus Monroe! And if you happen to have a sweet tooth and like to munch while you craft (like I do, lol), check out Scoozie’s Confections & Curiosities! OMG, I’m hooked! ;) Follow us on Facebook, Instagram and YouTube for tons of crafty inspiration! And come on over and join our Fan Club Facebook Group to share your crafty makes using our products! Thanks so much for stopping by today – we’ll see you next time!

Scrappy hugs,

Sending Love on Butterfly Wings

Hey everybody! Happy Wednesday evening – I’m here with my second post today. I hope you’re having a beautiful week and it’s warming up a bit where you are, with Spring on the way! I’m up on the Love From Lizi blog today with a tutorial for making a tented easel card featuring the Butterfly Wings Stamp Set from our newest release – and you may recognize this card from our new release blog hop on Instagram last week. Yep, I’m double-dipping, lol! I also used some of our mirror cardstock, an additional stamp set, some nested cutting dies, and the centers from the purple butterfly border peel-off stickers. And you’ve probably also noticed that this is one of my favorite fun folds and I’m posting another one within the course of a week!

The measurements for this card are as follows:
1. Card base is 4-1/4″ x 11″, scored at 4-1/4″ and 8-1/2″, making the folded card 4-1/4″ square.
2. Front layering panel is 4″ x 4″.
3. Bottom layering panel is 2-1/4″ x 4″.
4. White layering panel for the inside cut at 4″ x 4″. 

The card base and the stopper/bottom sentiment layering panel were cut from CutCardStock Amaranth cardstock and patterned paper layering panels from the Love You 6×6 Specialty Paper Pack. I used the Stitched Label Nested Cutting Dies to cut the background for the butterfly from Amaranth and Neenah Classic Crest 80# Solar White cardstock. I used a strip of purple butterfly border peel-off stickers across the bottom of the easel portion, keeping just the inside tiny butterflies and removing the border strip.

I stamped the large butterfly from the Butterfly Wings stamp set, colored it with Copics and fussy cut it. I adhered the body flat to the label shaped background and popped the wings up on adhesive foam squares. I adhered a piece of purple mirror cardstock from the Matte Mirror Pastel Specialty Cardstock Bundle beneath the Amaranth piece, stamped a sentiment from the Butterfly Wings stamp set in Versafine Onyx Black ink and then popped the stopper up on a 1″ adhesive foam strip.

The inside panel was cut from 80# Solar White cardstock and embellished with a strip from the Love You paper pack. I stamped a sentiment from the Simply Amazing Stamp Set in black ink and adhered the panel to the inside of the card base, which completed the card. If you’re interested in more details, be sure to see my tutorial post on the Love From Lizi blog.

Affiliate links are used in this post at no cost to you – I really appreciate your support!

Love From Lizi products used:
Love You 6×6 Specialty Paper Pack
Matte Mirror Pastel Specialty Cardstock Bundle
Butterfly Wings Stamp Set
Simply Amazing Stamp Set
Stitched Label Nested Cutting Dies
Stitched Rectangle Nested Cutting Dies
Butterfly Border Purple Mirror Peel-Off Stickers

Other products used:
CARDSTOCK/PAPER: CutCardStock Amaranth cardstock, Neenah Classic Crest 80# Solar White cardstock
INK: Memento Tuxedo Black ink, Versafine Onyx Black ink; Copic Ciao- R14 Light Rouge, R22 Light Prawn, G21 Lime Green, C-5 Cool Gray; Spectrum Noir Tri-Blends BP4
ACCESSORIES: Fiskars 12″ ProCision Rotary Bypass Paper Trimmer, Bearly Art precision craft glue, My Sweet Petunia Precision Glue Press, Mini MISTI, Big Shot, EK Tools 3D Dots, 1″ double-sided adhesive foam strip

I hope you’ve enjoyed seeing this project and you’re inspired to get crafty! Be sure to join our Facebook Group and Follow us on Instagram and YouTube for lots of crafty inspiration! Thanks so much for stopping by today – we’ll see you next time!

Scrappy hugs,

Lucky

Hey everybody! Happy Thursday – I hope you’re having a great week. I’m stoked to share a Keep It Simple DT inspiration project with you today created our new Back to Basics 6×9 Lime Collection Pack! OMGosh, I totally love this color. Green (in any variation) has been my all-time favorite color since I can remember, so I thoroughly enjoyed making this. I’ve created quite a few of this version of a triple fold over the years and decided to give this one a little ‘faux’ twist by adhering the second flap down to the card base, thus giving it the ‘faux’ look of a triple fold. I thought that added a little more fun to an already fun design. And of course, these die cuts from our Lucky Day Collection make it even more fun… along with my handmade pom-pom on his hat! ;)

I cut the 5-1/2″ x 11″ card base from Neenah Classic Crest 110# Solar White cardstock and scored it at 1-3/4″, 5-1/2″ and 9-3/4″ on the lone side. I folded the base in half and then folded the two remaining score lines toward the left. Working from left to right, I cut a 3-1/2″ x 5-1/4″ panel from a plaid print in the Lucky Day 6×9 Collection Pack and adhered it to the left side. Next, I cut a 1-1/2″ x 5-1/4″ panel from a floral print and adhered it to the second flap, and then adhered that flap down to the card base with thin adhesive foam squares.

Finally, I cut a 1″ x 5-1/4″ panel from a dotted print and adhered it to the right-hand flap. I added two disc magnets to keep the card closed, and with the card closed, I embellished the front with an assortment of die cut pieces from the Lucky Day Collection. I made a pom-pom from white yarn using a thin skewer and adhered it to the top of his hat. The final step was adding several Back To Basics Lime Enamel Dots.

I cut the 4″ x 5-1/4″ inside panel from 80# Solar White cardstock and embellished it with a leftover strip of the floral paper used on the front. I added a sentiment and a tiny gnome, also from the die cut pieces, and layered the panel on another print from the Lucky Day Collection.

Keep It Simple products used:
Back to Basics 6×9 Lime Collection Pack
Back To Basics Lime Enamel Dots
Lucky Day Die Cut Pieces
Lucky Day Lucky Phrases Die Cut Pieces
Lucky Day Title Die Cut Pieces

Affiliate links are used in this post at no cost to you – I really appreciate your support!

Other products used:
CARDSTOCK/PAPER: Neenah Classic Crest 110# and 80# Solar White cardstock
ACCESSORIES: Fiskars 12″ ProCision Rotary Bypass Paper Trimmer, Bearly Art precision craft glue, My Sweet Petunia Precision Glue Press, Scrapbook Adhesives Thin 3D Foam Squares (white variety), white yarn, skewer, small disc magnets, Stampin’ Up Mini Dimensionals

I hope you’ve loved seeing this project as much as I loved creating it and you’re inspired to get crafty! Be sure to check out ALL the fun goodies in the Keep It Simple online store! Save 10% on your entire order when you shop online using code LoveToScrap2 at checkout! There is no minimum purchase requirement and no usage limits, AND it combines with product, order, and shipping discounts! Is that cool, or what?! Be sure to Follow us on Facebook, Instagram, and Pinterest for lots of crafty inspiration! Thanks so much for stopping by today – we’ll see you next time!

Scrappy hugs,

Life is Sweet

Hey everybody, it’s almost the weekend! OMGosh, we’ve had THE best weather this week… temps in the 40s and 50s here! I’m delighted to share a Keep It Simple DT inspiration project created with our new Life Is Sweet collection. If you love bees and all the buzz that comes with them, this collection is definitely for you! I used papers, stamps and dies from the collection to create this fun accordion card which is a super easy one (details below)!

I cut the 5-1/2″ x 8-1/2″ card base from CutCardStock Lessebo Coffee Bean and scored it at 4-1/4″ on the long side. Next I cut three 4-1/8″ x 5-3/8″ panels for the front and the left/right insides from coordinating prints in the Life Is Sweet 12×12 Collection Pack which I adhered to the card base. I stamped a variety of images and sentiments from the Life Is Sweet Collection Stamps on Neenah Classic Crest 80# Solar White cardstock in Memento Tuxedo Black, Espresso Truffle and Peanut Brittle inks. I colored the images with a variety of markers and cut them with the coordinating Life Is Sweet Outline Dies. I embellished the front of the card, popping some of the images and sentiment up on foam squares, and set the remaining images aside.

I cut the 4-3/4″ x 8″ inside accordion panel from Lessebo Coffee Bean and scored it at 2″, 4″ and 6″ on the long side. I trimmed it at an angle, measuring from the top left corner down to 2″ up from the bottom right corner. I accordion-folded the three score lines (valley-mountain-valley) and adhered it to the inside of the card base. I then cut four 1-7/8″ wide panels (in varying heights matching the sections on the accordion panel) from a honeycomb print in the 12×12 Collection Pack. I lightly traced the angled top edge on each section and trimmed the panels accordingly.

I adhered the layering panels to the accordion panel and embellished it with the stamped images and sentiment. I added a stitched rectangle to the back of the card (for a handwritten message and signature) cut with a Back To Basics Stitched Rectangles Nested Dies, and embellished it with the remaining stamped images.

Keep It Simple products used:
Life Is Sweet 12×12 Collection Pack
Life Is Sweet Collection Stamps
Life Is Sweet Outline Dies
Back To Basics Stitched Rectangles Nested Dies

Affiliate links are used in this post at no cost to you – I really appreciate your support!

Other products used:
CARDSTOCK/PAPER: CutCardStock Lessebo Coffee Bean cardstock, Neenah Classic Crest 110# and 80# Solar White cardstock
INK: Memento Tuxedo Black, Espresso Truffle and Peanut Brittle inks; Bic Mark-It Fine Point markers- Hot Aqua, Polynesian Purple, Pink Flamingo, Rambunctious Red, Honey Brown, Yellow Blaze, Sunset Orange and Cloud Nine Grey; Sharpie Ultra Fine Point markers- Light Green, Medium Green and Brown; Copic Ciao alcohol markers- C-1 and E00
ACCESSORIES: Fiskars 12″ ProCision Rotary Bypass Paper Trimmer, Bearly Art precision craft glue, My Sweet Petunia Precision Glue Press, Mini MISTI, Big Shot, Scrapbook Adhesives Thin 3D Foam Squares, Scrapbook Adhesives 3D Foam Squares

I hope you’ve loved seeing this project as much as I loved creating it and you’re inspired to get crafty! Be sure to check out ALL the fun goodies in the Keep It Simple online store! Save 10% on your entire order when you shop online using code LoveToScrap2 at checkout! There is no minimum purchase requirement and no usage limits, AND it combines with product, order, and shipping discounts! Is that cool, or what?! Be sure to Follow us on Facebook, Instagram, and Pinterest for lots of crafty inspiration! Thanks so much for stopping by today – we’ll see you next time!

Scrappy hugs,

new level of wonderful

Hey everybody, Happy Friday! I hope you’re having an awesome week! Our new challenge is live this morning over at Creative Creases and I’m thrilled to share my DT inspiration project for Challenge #100. I created a 3-tier pull-up card featuring papers from Craft Consortium and ephemera from STAMPlorations, and I totally love how it turned out! This fold has been around for many years (and it has been some time since I made one) and I had forgotten how much fun it is! My inspiration came from an older video HERE (although there are others on YouTube) if you’d like to learn how to make it.

I cut the pieces from CutCardStock Basis 80# White 12×12 cardstock along with layering panels from Craft Consortium Ink Drops-Candy 6×6 papers. I assembled the card while watching Dawn’s video and then gathered an assortment of STAMPlorations Bloom Burst ephemera which I used to embellish the tiers.

I stamped a sentiment from the Stampin’ Up Celebrate Sunflowers stamp set on a scrap piece of Basis White in Memento Tuxedo Black ink, cut it with the coordinating Sunflowers die set, and popped it up on adhesive foam strips. The finishing touch was adding several iridescent gemstones.

Affiliate links are used in this post at no cost to you – I really appreciate your support! 

Products used:
CARDSTOCK/PAPER: CutCardStock Basis 80# White 12×12 cardstock, Craft Consortium Ink Drops-Candy 6×6 paper pad
STAMPS: Stampin’ Up Celebrate Sunflowers stamp set
INK: Memento Tuxedo Black ink
DIES/PUNCHES: Stampin’ Up Sunflowers die set
ACCESSORIES: Fiskars 12″ ProCision Rotary Bypass Paper Trimmer, Bearly Art precision craft glue, My Sweet Petunia Precision Glue Press, MISTI stamp tool, Big Shot, STAMPlorations Bloom Burst ephemera, 1/4″ double-sided foam strips, iridescent gemstones

I hope you’ve enjoyed seeing this project and will link up with us this time! Thanks so much for stopping by today – we’ll see you next time! ;)

Scrappy hugs,

Keep Warm and Drink Cocoa

Hey everybody! Happy first Tuesday in February… I hope you’re having a good week. My lovely friend, Jo, invited me to be her Guest Elf (yep, you read that right…ELF… lol!) for Christmas Kickstart Challenge #95 this month. The theme is ‘Fold It Fancy’ so obviously I couldn’t say no… you know how I love me some fun folds!

You may remember a couple months ago I posted a multi panel pop out card (HERE if you’d like to see it) that I had originally seen on Lisa Curcio’s blog. It was a 5×7 size, which is larger than I typically make, so I painstakingly reworked the measurements and came up with an A2 size. I’m happy to share the measurements for all the pieces below if you’d like to learn how to make one.

From solid cardstock, cut the following:
— Card base: 5-1/2″ x 12″ scored at 4-1/4″, 6″ and 7-3/4″.
— Large pillars (cut two): 4″ x 4-1/2″ scored at 1-1/8″, 2-1/4″ and 3-3/8″.
— Side panels (cut two): 3″ x 3-3/4″ scored at 1/2″, 2-3/4″ and 3-1/4″.
— Center panel: 2-1/2″ x 4-1/2″ scored at 3/4″, 2-1/4″ and 3-3/4″.

From your choice of patterned papers, cut the following:
— Card base: front 4″ x 5-1/4″, inside panels (cut two) 4″ x 5-1/4″, inside M-sections (cut two) 1-1/2″ x 5-1/4″, back 4″ x 5-1/4″ from white or ivory cardstock for a signature panel.
— Large pillars (cut four): 7/8″ x 3-3/4″.
— Side panels (cut two): 2″ x 2-3/4″.
— Center panel (cut two): 1-1/4″ x 2-1/4″.

It’s best to first adhere all the patterned paper pieces to the solid cardstock pieces, in order of how I listed them above. Embellish the card front, side panels, center panel, and back panel as desired. I used fussy cut ephemera from the Traci Vanover Designs Christmas Cocoa 6×6 paper pad I used. Feel free to visit my other post linked above for the link to Lisa’s video in case you want to watch it for the actual assembly. Even though my pieces are sized differently than those on her video, the assembly is the same. I promise it’s not as daunting as it looks! ;)

Here’s a shot of the back panel embellished with a patterned paper strip and layered piece of ephemera. I hope you enjoyed this as much as I did. I definitely love the smaller A2 size, and see more of these in my future, lol!

Affiliate links are used in this post at no cost to you – I really appreciate your support! 

Products used:
CARDSTOCK/PAPER: American Crafts Black 12×12 cardstock, Neenah Classic Crest Baronial Ivory cardstock, Traci Vanover Designs Christmas Cocoa 6×6 paper pad (papers and ephemera)
INK: Memento Tuxedo Black marker
DIES/PUNCHES: Spellbinders Emerald Cut Labels and Tag Dies, Sizzix Script Holiday Words Thinlits, Stampin’ Up 1″ Circle Punch
ACCESSORIES: Fiskars 12″ ProCision Rotary Bypass Paper Trimmer, Bearly Art precision craft glue, My Sweet Petunia Precision Glue Press, Big Shot, Scrapbook Adhesives Thin 3D Foam Squares, brown gemstones

I hope you’ve enjoyed seeing this festive fancy fold card and will link up one with us this month! Thanks so much for stopping by today – we’ll see you next time! ;)

Scrappy hugs,

So Lucky

Hey everybody, Happy Wednesday! I hope your week is going along nicely. I’m up on the Love From Lizi blog today with a tutorial for making a book cradle fold. This is my first attempt at this particular fold (which I saw on the Mixed Up Craft YouTube Channel) and it’s an interesting one. I used stamps and ephemera from our new So Lucky collection which I paired with several green prints from the Winter Warmers 6×6 Patterned Paper Pack and a couple Gold Mirror Peel-Off Stickers. This collection is a must-have for any coffee lovers out there!

I cut the card base pieces from Neenah Classic Crest 110# Solar White cardstock along with layering panels from assorted prints in the Winter Warmers 6×6 Patterned Paper Pack. Be sure to check out my tutorial on the Love From Lizi blog mentioned above for assembly instructions.

There are lots of areas on this card to embellish as desired. I used gold mirror peel-off stickers as well as ephemera and stamped sentiments from the new So Lucky collection. I did not have the dies in the bundle yet when I created this card, so I fussy cut the front sentiment. Here are shots of the back and a side angle so you can see the construction. Pretty cool, huh?!

Affiliate links are used in this post at no cost to you – I really appreciate your support!

Love From Lizi products used:
So Lucky Stamp & Die Bundle
So Lucky Ephemera Pack
Winter Warmers 6×6 Patterned Paper Pack
Straight Gold Mirror Peel-Off Stickers

Other products used:
CARDSTOCK/PAPER: Neenah Classic Crest 110# and 80# Solar White cardstock
INK: Memento Cottage Ivy ink
ACCESSORIES: Fiskars 12″ ProCision Rotary Bypass Paper Trimmer, Bearly Art precision craft glue, My Sweet Petunia Precision Glue Press, MISTI stamp tool, Ranger Glossy Accents, Spellbinders Detail Scissors, Scrapbook Adhesives Thin 3D Foam Squares

I hope you’ve enjoyed seeing this project and you’re inspired to get crafty! Be sure to join our Facebook Group and Follow us on Instagram and YouTube for lots of crafty inspiration! Thanks so much for stopping by today – we’ll see you next time!

Scrappy hugs,