Wishing You A Very Merry Christmas

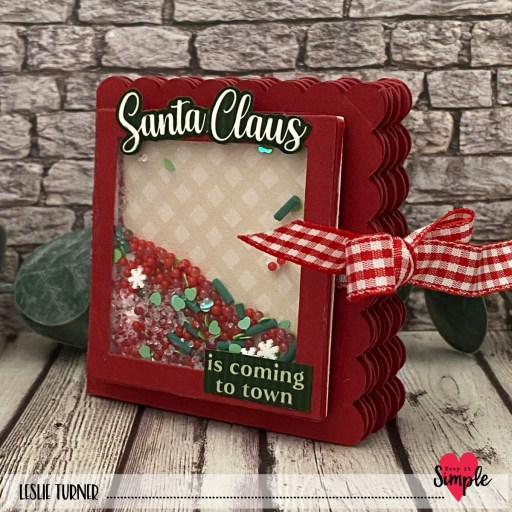
Hey everybody, I hope you’re having a great day! I’m delighted to share a Scrapbook Pal DT inspiration project created with some super fun Lawn Fawn products which are all available on the Scrapbook Pal website. I used the Shutter Card dies, Shutter Card Add-On dies, Scalloped Circle Gift Tag dies, and White Hemp Twine. Now how’s that for one-stop shopping, lol?! I’ve made several shutter cards over the years, all with hand-cut pieces, and when I discovered these Lawn Fawn dies, I knew those days of hand-cutting the shutter card pieces were over. Dang, what a game-changer!

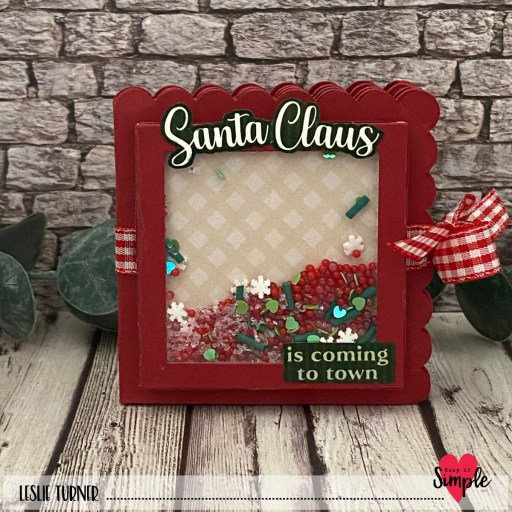
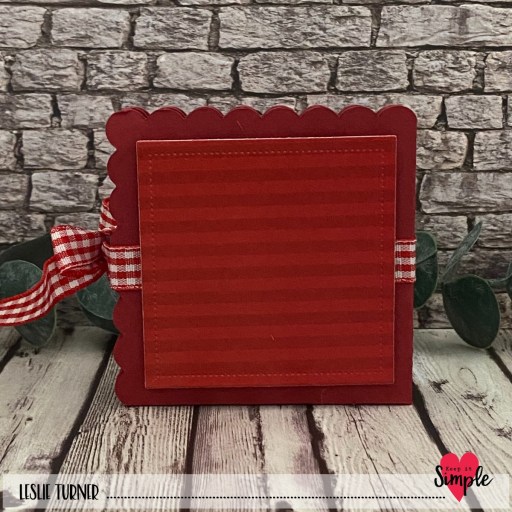
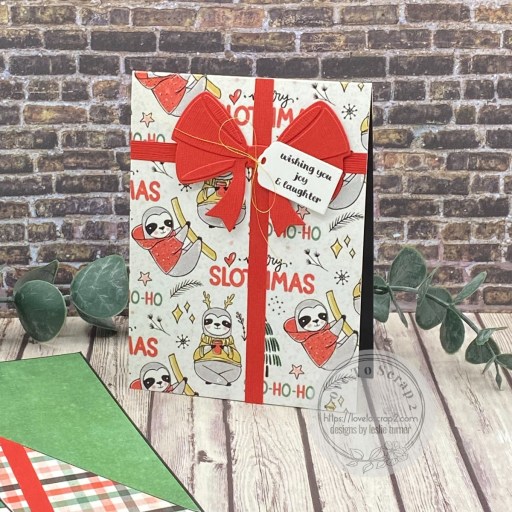
Using the Lawn Fawn Shutter Card dies, Shutter Card Add-On dies and Scalloped Circle Gift Tag dies, I cut the card and belly band pieces from CutCardStock Basis White and Pop Tone Red Hot Cardstock. Then I cut the layering pieces from coordinating prints in the Traci Vanover Designs Peppermint Christmas 6×6 paper pad.

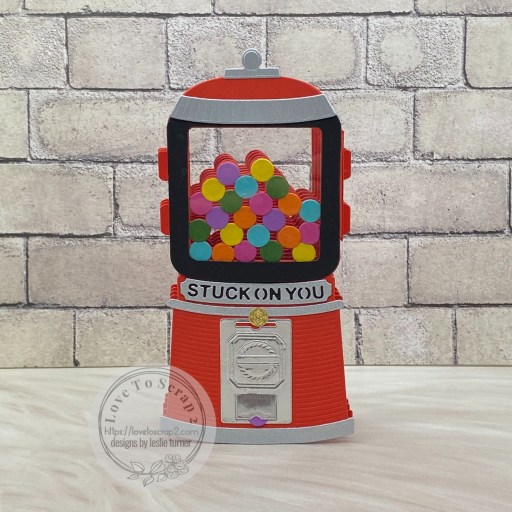
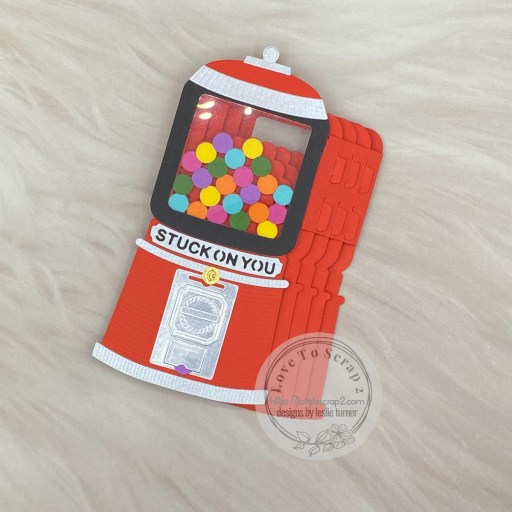
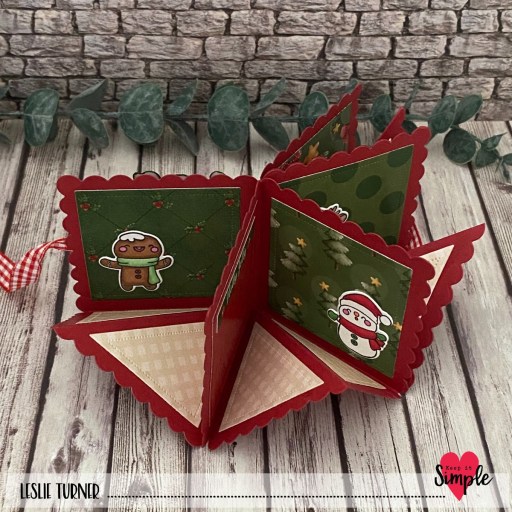
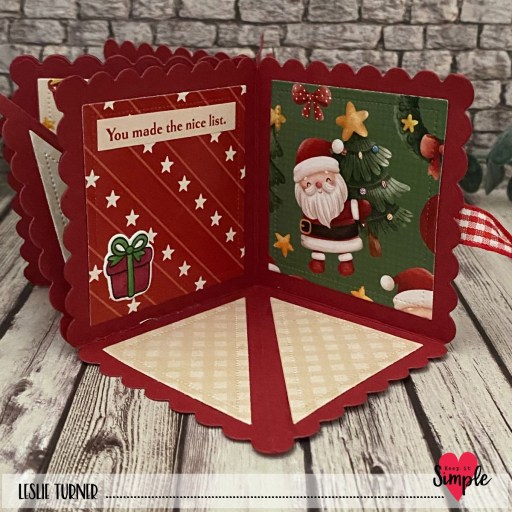
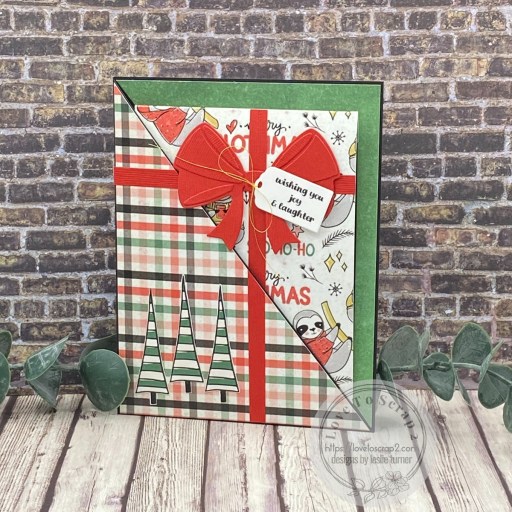
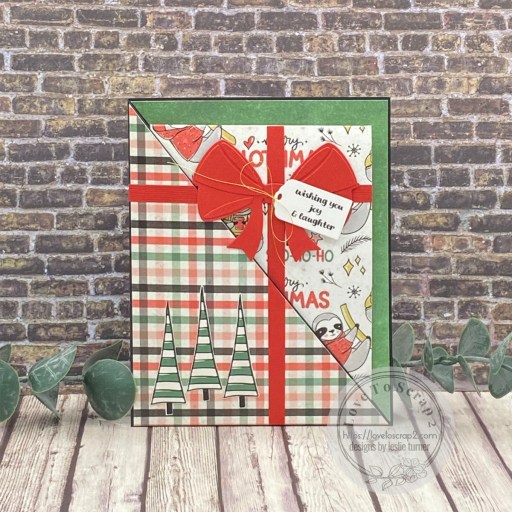
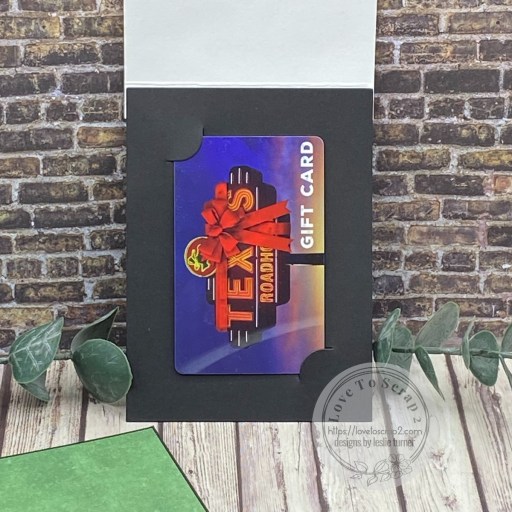
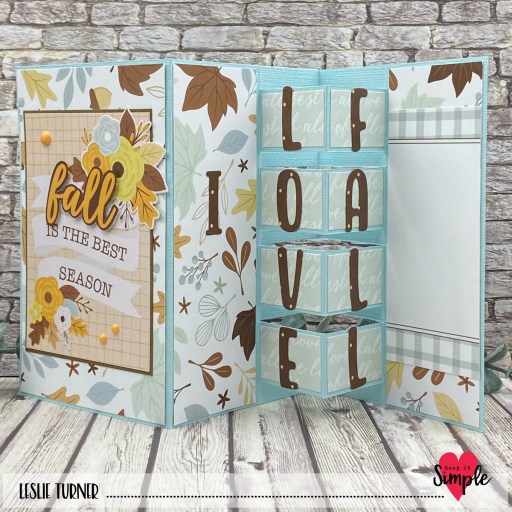
This awesome paper pad also has sheets of ephemera so I fussy cut some for the front and inside. I also added a white twine bow (created from Lawn Fawn Trimmings White Hemp Twin) and some red gemstones to the element on the belly band which completed the project. Here is a shot of the shutter opening…

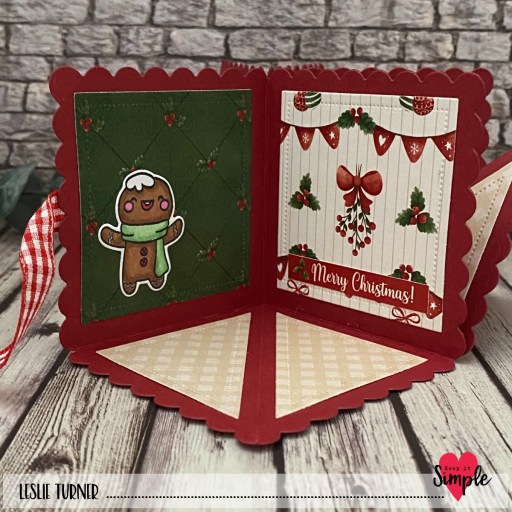
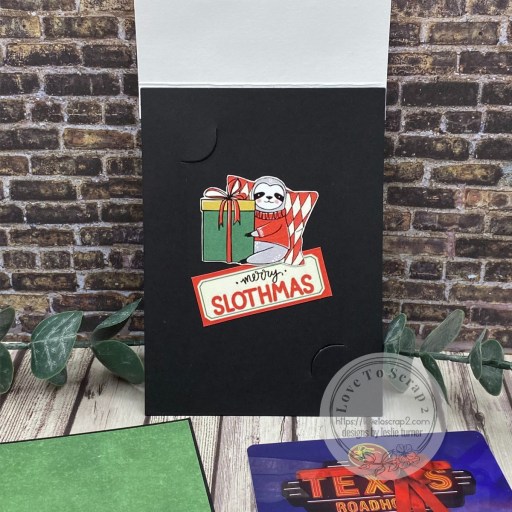
And here is the shutter completely open to see that fun sentiment cut from the ephemera sheet in the paper pad! ;)

Affiliate links are used in this post at no cost to you – I really appreciate your support!

Scrapbook Pal products used:
Lawn Fawn Shutter Card dies
Lawn Fawn Shutter Card Add-On dies
Lawn Fawn Scalloped Circle Gift Tag dies
Lawn Fawn Trimmings White Hemp Twine
My Sweet Petunia Glue Press
Bearly Art precision craft glue
Scrapbook Adhesives Thin 3D Foam Squares White

Other products used:
CARDSTOCK/PAPER: CutCardStock Basis White and Pop Tone Red Hot cardstock, Traci Vanover Designs Peppermint Christmas 6×6 paper pad
ACCESSORIES: Fiskars 12″ ProCision Rotary Bypass Paper Trimmer, Big Shot, small wooden bow maker, iridescent gemstones

I hope you’ve enjoyed this project and you’re inspired to get your craft on! Be sure to check out the awesome array of craft supplies in the Scrapbook Pal store… the selection is amazing! And head over to the Scrapbook Pal FacebookPinterest and Instagram pages for more design team inspiration! And if you haven’t yet subscribed to our YouTube Channel, be sure to do that, too, for tons of hands-on crafty inspiration! Thanks so much for stopping by today – we’ll see you next time! 

Scrappy hugs,

Our Dear Savior’s Birth

Hey everybody! I hope you’re having a fabulous weekend – only one more weekend before the big guy in the red suit gets here! I’m stoked to share an inspiration project for Keep It Simple with you today. I created this open box card with papers, stamps and dies in our new O Holy Night Collection and I love how it turned out. I have instructions for this fun fold (which folds flat for mailing) on the Freebies page on my blog HERE if you’re interested in learning how to make it. It’s an easy and super fun card to decorate.

I cut the card base from CutCardStock Basis Blue cardstock along with layering panels from several coordinating prints in the O Holy Night 12×12 Collection Pack. I stamped a sentiment and several images from the O Holy Night Collection Stamps on Basis White cardstock in Memento Tuxedo Black ink. I colored the images with alcohol markers, adding some details with a Sakura Clear Star Gelly Roll pen and a gold Pentel Slicci pen. I cut the images with the coordinating Outline Dies and trimmed the sentiment, and built the scene on the card layers, popping some of the elements up on adhesive foam squares and the star on an acetate strip.

I cut the back panel from Basis White cardstock and embellished it with a strip of patterned paper from the Collection Pack and a stamped and die cut sentiment.

Keep It Simple products used:
O Holy Night 12×12 Collection Pack
O Holy Night Collection Stamps
O Holy Night Outline Stamps

Affiliate links are used in this post at no cost to you – I really appreciate your support!

Other products used:
CARDSTOCK/PAPER: CutCardStock Basis Blue and Basis White cardstock
INK: Memento Tuxedo Black ink; Spectrum Tri-Blends- GB6/7/10, GY2/3/5, BO1/2/4, LY1/2/3, YG1/2/3, DG1/2/3, LG1/3/5, IG2/4/5, BG2/3/4, PP3, FS6/7/8, BT7/8/9, GT1/2/3; Sakura Clear Star Gelly Roll pen, Pentel Slicci Gold pen
ACCESSORIES: Fiskars 12″ ProCision Rotary Bypass Paper Trimmer, My Sweet Petunia Precision Glue Press, Nuvo Deluxe Adhesive, MISTI stamp tool, Big Shot, Scrapbook Adhesives 3D Foam Squares (large black), Therm O Web Zots small, Scrapbook.com Double-Sided Adhesive Foam Squares

I hope you’ve loved seeing this project as much as I loved creating it and you’re inspired to get crafty! Be sure to check out ALL the fun goodies in the Keep It Simple online store! Save 10% on your entire order when you shop online using code LoveToScrap2 at checkout! There is no minimum purchase requirement and no usage limits, AND it combines with product, order, and shipping discounts! Is that cool, or what?! Be sure to Follow us on Facebook, Instagram, and Pinterest for lots of crafty inspiration! Thanks so much for stopping by today – we’ll see you next time!

Scrappy hugs,

Stuck On You

Hi friends! I hope you are having some fun this weekend, despite the cool weather! Our new challenge is live this morning over at Ally’s Angels and I’m thrilled to share my DT inspiration project for Challenge #89. This is my last inspiration project for Ally’s Angels, as I have handed off all my challenge blogs effective January 1, 2025. Our challenges are always ‘anything goes’ so come on over and play! I created one of THE most fun box cards ever using the Amazing Paper Grace/Spellbinders 3D Vignette Bubble Gum Machine die set and quite a variety of CutCardStock colors of cardstock. I mean… look at this… how stinkin’ cute?!

I cut the bubble gum machine from red, black and silver cardstock; the coin receptacle from Bright Silver Foil; a coin from Bright Gold Foil; and the gum balls from blue, yellow, green, orange, purple and pink. There’s even some acetate on the front to make it look a little more realistic. The assembly is always the most fun–it’s a joy watching 3D projects like this come to life!

I used a Keep It Simple Stitched Squares Nested Die to cut a panel for the back to write a message and sign. And one final photo of the card folded flat for mailing.

Affiliate links are used in this post at no cost to you – I really appreciate your support! 

Products used:
CARDSTOCK/PAPER: CutCardStock Lessebo Cherry Red, Lessebo Pitch Black, Lessebo White, Stardream Metallic Silver, Bright Silver Foil, Bright Gold Foil, Pop Tone Blue Raspberry, Pop Tone Lemon Drop, Scottish Highlands Green, Basis Orange, Astrobrights Planetary Purple and Raspberry Ice cardstock
DIES/PUNCHES: Amazing Paper Grace/Spellbinders Pop Up 3D Vignette Bubble Gum Machine die set, Keep It Simple Stitched Squares Nested Dies
ACCESSORIES: Bearly Art precision craft glue, Big Shot, Grafix Crystal Clear Craft Plastic

I hope you’ve enjoyed seeing this project and will link up with us this time! Thanks so much for stopping by today – we’ll see you again soon! ;)

Scrappy hugs,

Santa Claus is coming to town

Hey everybody! It’s Sunday and I hope you’re having a great weekend! I’m stoked to share a Keep It Simple DT inspiration project with you today created with our new KIS Cuts Circular Pop-Up: Scallop dies. These pop-up die sets are so stinkin’ fun I can’t stand it, and I’ve now showcased projects using all three sets so I feel complete, lol! This Christmas version features papers from our new Here Comes Santa Claus Collection, our red gingham ribbon, and a variety of shaker bits from our Sprinkles line.

I used our new KIS Cuts Scallop Circular Pop-Up dies to cut the base from CutCardStock Lessebo Dawn Maroon cardstock along with stitched square layering panels cut from assorted prints in the Here Comes Santa Claus 6×9 Collection Pack. I stamped several images from the Here Comes Santa Claus Collection Stamps on CutCardStock Basis White in Memento Tuxedo Black ink and colored them with alcohol markers. I cut them with the coordinating Outline Dies and used them to embellish the sections of the pop-up.

I used some red gingham ribbon from our Back To Basics Stars & Stripes Ribbon for the closure. I created a shaker for the front which features six varieties of our Sprinkles in Christmas colors. I also used several sentiments from the cut-apart sheet in the paper collection.

Keep It Simple products used:
KIS Cuts Circular Pop-Up: Scallop dies
Here Comes Santa Claus 6×9 Collection Pack
Here Comes Santa Claus Collection Stamps
Here Comes Santa Claus Outline Dies
Back To Basics Stars & Stripes Ribbon
Back To Basics Shaker Basics – Foam & Acetate Sheets
Sprinkles – 2mm Beads-Caviar Glass Red
Sprinkles – 2mm Beads-Matte Red
Sprinkles – Fine Crushed Glass-Snow White
Sprinkles – Sequins Hearts-Apple
Sprinkles – Polymer Clay-Forest Green Sprinkles
Sprinkles – Polymer Clay-Mickey Snowflake Red & Green

Affiliate links are used in this post at no cost to you – I really appreciate your support!

Other products used:
CARDSTOCK/PAPER: CutCardStock Lessebo Dawn Maroon and Basis 80# White cardstock
INK: Memento Tuxedo Black ink; Spectrum Noir Tri-Blends- LG1/3/5, OR1, DR1/3/4, BP1, EB1/2/3, AP2, RB1/2/3; Bic Mark-It – Fine Point Forest Green, Sakura Clear Star Gelly Roll pen
ACCESSORIES: Fiskars 12″ ProCision Rotary Bypass Paper Trimmer, Bearly Art precision craft glue, MISTI stamp tool, Big Shot, Scrapbook.com Double-Sided Adhesive Foam Squares

I hope you’ve loved seeing this project as much as I loved creating it and you’re inspired to get crafty! Be sure to check out ALL the fun goodies in the Keep It Simple online store! Save 10% on your entire order when you shop online using code LoveToScrap2 at checkout! There is no minimum purchase requirement and no usage limits, AND it combines with product, order, and shipping discounts! Is that cool, or what?! Be sure to Follow us on Facebook, Instagram, and Pinterest for lots of crafty inspiration! Thanks so much for stopping by today – we’ll see you next time!

Scrappy hugs,

wishing you joy & laughter

Hey everybody! I hope you’ve had a great week and have something fun planned this weekend. I’m up on the Emily Moore Designs blog today with a DT inspiration project featuring our Gift Card Holder Die With a Bow
and Mini Gift Tag Holiday Sayings (free download). I created a fun sloth-themed diagonal pocket card (one of my favorite fun folds) as my debut project for this new design team and I’m over the moon excited!

The card base is 5-1/2″ x 8-1/2″ and scored at 4-1/4″ which I cut from CutCardStock Astrobrights Eclipse Black. I sliced the front flap off at an angle (from top left to bottom right) and adhered two prints from the Traci Vanover Designs Embrace The Chill 6×6 paper pad to the diagonal flap and inside back. Next, I glued the flap across the bottom to form the pocket and added horizontal and vertical strips cut from CutCardStock Habanero Red to align with the bow detail on the mini card. The finishing touch was adding three trees to the card base, fussy cut from an ephemera sheet in the sloth paper pad.

I created the base for the mini card using the gift card holder die in the set, cut from the Astrobrights Eclipse Black cardstock. I cut a flap from another print in the sloth paper pad measuring 3-1/2″ x 5-1/4″ and scored at 1/2″ on the long side, which I adhered to the gift card holder base. Using the bow dies in the set, I created the bow from the Habanero Red cardstock and set it aside. I cut another set of horizontal and vertical strips which I adhered to the front of the mini card, lining up with the strips on the card base. I adhered the bow, popping the left side up on adhesive foam squares so the mini card will slide in and out of the pocket nicely.

I printed the Mini Gift Tag Holiday Sayings on Neenah Classic Crest 80# Solar White cardstock. I cut one of them with the mini gift tag die in the set, tied a gold metallic thread bow, and adhered it with a thin adhesive foam square. I fussy cut a couple more pieces of ephemera from the sloth paper pad and adhered them to the inside center of the mini card base so they’re hidden under the gift card.

Emily Moore Designs products used:
Gift Card Holder Die With a Bow
Mini Gift Tag Holiday Sayings (free download)

Affiliate links are used in this post at no cost to you – I really appreciate your support!

Other products used:
CARDSTOCK/PAPER: CutCardStock Astrobrights Eclipse Black and Habanero Red cardstock, Neenah Classic Crest 80# Solar White cardstock, Traci Vanover Designs Embrace the Chill 6×6 paper pad
ACCESSORIES: Fiskars 12″ ProCision Rotary Bypass Paper Trimmer, Bearly Art precision craft glue, My Sweet Petunia Precision Glue Press, MISTI stamp tool, Big Shot, Scrapbook Adhesives 3D Foam Squares and Thin 3D Foam Squares, Coats gold metallic thread

I hope you’ve enjoyed seeing this project and you’re inspired to get crafty! New customers – use code LESLIE10 for 10% off your order! Be sure to Follow us on Facebook, Instagram and YouTube for crafty inspiration! Emily shares videos on all the social media platforms, and they are awesome and on point! Thanks so much for stopping by today – we’ll see you next time!

Scrappy hugs,

Be Bold

Hey everybody! Happy Monday – can you believe we’re already in December?! Yep, that jolly little man in the red suit is gonna be here quick so I hope you’re ready! I’m absolutely delighted to share a Keep It Simple DT inspiration project with you created with items in our NEW Once Upon A Time: Jasmine Collection! This mini bendi card is one of the easiest-ever fun folds and it sure packs a punch. It’s funny how these collections ‘speak’ to me most of the time when I’m deciding on what kind of card to make. And when that happens, the cards come together so easily. This is definitely a fun one to make and you’ll find instructions in the Freebies section of my blog HERE if you’d like to learn how to make it.

I cut the card base and the bendi pieces from CutCardStock Lessebo Aubergine cardstock along with layering panels from coordinating prints in the Jasmine 12×12 Collection Pack. I cut a heart strip from the cut-apart sheet and then dug into the Jasmine Die Cut Pieces to create the scene, popping some up on adhesive foam squares.

I cut two back panels from Neenah Classic Crest Solar White cardstock and embellished them with the leftover pieces of the heart strip (from the cut-apart sheet) used on the front. I left these back panels blank to write a custom message.

Keep It Simple products used:
Once Upon A Time: Jasmine 12×12 Collection Pack
Once Upon A Time: Jasmine Die Cut Pieces

Affiliate links are used in this post at no cost to you – I really appreciate your support!

Other products used:
CARDSTOCK/PAPER: CutCardStock Lessebo Aubergine cardstock, Neenah Classic Crest 80# Solar White cardstock
ACCESSORIES: Fiskars 12″ ProCision Rotary Bypass Paper Trimmer, Bearly Art precision craft glue, My Sweet Petunia Precision Glue Press, Scrapbook.com Double-Sided Adhesive Foam Squares

I hope you’ve loved seeing this project as much as I loved creating it and you’re inspired to get crafty! Be sure to check out ALL the fun goodies in the Keep It Simple online store! Save 10% on your entire order when you shop online using code LoveToScrap2 at checkout! There is no minimum purchase requirement and no usage limits, AND it combines with product, order, and shipping discounts! Is that cool, or what?! Be sure to Follow us on Facebook, Instagram, and Pinterest for lots of crafty inspiration! Thanks so much for stopping by today – we’ll see you next time!

Scrappy hugs,

fall is the best season

Hi friends! As I sit here looking outside at the snow we got last night, I’m reminded of how blessed we are. So many people don’t care for snow but Ed and I absolutely love it. I’m delighted to share a Keep It Simple DT inspiration project with you this morning created with our new Nuts About Fall Collection. This one is called a building block card and is such a fun card to make -it really packs a punch when the recipient opens it up! This is the second or third one I’ve made, and my inspiration comes from THIS Splitcoast Stampers tutorial.

I cut the card base from CutCardStock Jet Stream Blue cardstock along with layering panels from CutCardStock Lessebo Coffee Bean and an assortment of prints in the Nuts About Fall 12×12 Collection Pack. I used a journaling card, a fussy cut floral and a word from the cut apart sheet as the focal image. I popped the ‘fall’ up on several adhesive foam squares and added several Back To Basics Mango Enamel Dots which completed the card front.

The inside is where it’s happening on this card! I adhered the pieces to the sections on the inside and used the KIS Cuts Twinkling Stars Font dies to cut the ‘I LOVE FALL’ sentiment. Isn’t this fun?!

Keep It Simple products used:
Nuts About Fall 12×12 Collection Pack
KIS Cuts Twinkling Stars Font Dies
Back To Basics Mango Enamel Dots

Affiliate links are used in this post at no cost to you – I really appreciate your support!

Other products used:
CARDSTOCK/PAPER: CutCardStock Jet Stream Blue and Lessebo Coffee Bean cardstock, Neenah Classic Crest 80# Solar White cardstock
INK: Memento Rich Cocoa marker
ACCESSORIES: Fiskars 12″ ProCision Rotary Bypass Paper Trimmer, Cricut Paper Trimmer, Elmer’s Craft Bond Tape Runner, Bearly Art precision craft glue, Big Shot, Scrapbook Adhesives Thin Adhesive Foam Squares

I hope you’ve loved seeing this project as much as I loved creating it and you’re inspired to get crafty! Be sure to check out ALL the fun goodies in the Keep It Simple online store! Save 10% on your entire order when you shop online using code LoveToScrap2 at checkout! There is no minimum purchase requirement and no usage limits, AND it combines with product, order, and shipping discounts! Is that cool, or what?! Be sure to Follow us on Facebook, Instagram, and Pinterest for lots of crafty inspiration! Thanks so much for stopping by today – we’ll see you next time!

Scrappy hugs,

Incredibly Grateful

Howdy peeps! Here’s to a terrific Thursday – I hope it’s not too cold yet where you are. I have a fun ScrapbookingStore DT inspiration project to share with you today created with the November 2024 Scrapbook Kit with Upgrades. I came across a multi panel pop out card HERE on Lisa Curcio’s blog which I’ve never seen before, so of course I HAD to try it… and I’m so glad I did – it’s a fun one! It’s 5×7 which is larger than I typically make, so I reworked the measurements and came up with an A2 size for another design team that I’ll share soon, so stay tuned. ;) But for now, this is the 5×7 version made according to Lisa’s video.

I cut the card base, belly band and all the pop out elements from CutCardStock Lessebo Coffee Bean cardstock, along with layering panels from CutCardStock Basis Natural and coordinating prints in the collection. The focal image on the front is a trimmed and layered journaling card from the paper pack attached to the belly band. I embellished the front (beneath the belly band) and two of the inside panels with stickers from the sticker sheet in the paper pack.

I cut the back panel from Basis Natural and embellished it with a leftover plaid print used on the inside of the card. I added a sticker for the sentiment, which completed the card.

Affiliate links are used in this post at no cost to you – I really appreciate your support!

ScrapbookingStore products used:
November 2024 Scrapbook Kit with Upgrades:
Echo Park Fall Collection Kit
Upgrades: Momenta Clear Stamps
Leaf Stickers
Simple Stories Acorn Lane Card Kit

Other products used:
CARDSTOCK/PAPER: CutCardStock Lessebo Coffee Bean and Basis Natural cardstock
ACCESSORIES: Fiskars 12″ ProCision Rotary Bypass Paper Trimmer, Bearly Art precision craft glue, My Sweet Petunia Precision Glue Press, Keep It Simple Back To Basics Ruby Enamel Dots

I hope you’ve enjoyed today’s project and you’re thinking about all the fun you could have with this month’s kit… you really ought to think about joining the Subscription Club! Be sure to Follow us on Facebook, Instagram, Pinterest and YouTube for lots of crafty inspiration! And if you do decide to join the Subscription Club, join our ScrapbookingStore Club Member Group on Facebook for more inspiration and to share your projects! Thanks so much for stopping by today – we’ll see you next time!

Scrappy hugs,

Blessed and Grateful

Hey everybody, Happy Wednesday! I hope you’re having a great week! I’m delighted to share another ScrapbookingStore DT inspiration project created with the November 2024 Scrapbook Kit with Upgrades. I made a shutter card using the Lawn Fawn Shutter Card dies. I’ve made several shutter cards over the years by handcutting the pieces (before owning the dies) and the dies are so much easier. The handwritten notes in my tutorial folder are not shareable (LOL) but I did run across a Splitcoast Stampers tutorial HERE if you’re interested in looking, which is pretty darn close to my handwritten instructions.

Using the Lawn Fawn Shutter Card dies, I cut the card base and other pieces from Solar White cardstock, along with the belly band and layering panels from coordinating prints in the collection. I created a belly band element using the circle die cut from the inside panel and a Spellbinders Classic Scalloped Circles die. I embellished it and the card front and inside with stickers from the sticker sheet in the paper pack and the sheet of leaf stickers in the upgrades. I used the set of stamps in the upgrades to stamp a sentiment in Catherine Pooler Icing on the Cake ink on the belly band element. The finishing touch was adding several iridescent gemstones for a little bling.

I cut the back panel from Solar White cardstock and embellished it with a strip of plaid paper used on the front flaps, along with some stickers from the sticker sheet and the upgrades. I stamped another sentiment from the stamp set in the upgrades in brown ink.

Affiliate links are used in this post at no cost to you – I really appreciate your support!

ScrapbookingStore products used:
November 2024 Scrapbook Kit with Upgrades:
Echo Park Fall Collection Kit
Upgrades: Momenta Clear Stamps
Leaf Stickers
Simple Stories Acorn Lane Card Kit

Other products used:
CARDSTOCK/PAPER: Neenah Classic Crest 80# Solar White cardstock
INK: Catherine Pooler Icing on the Cake ink
DIES/PUNCHES: Lawn Fawn Shutter Card dies, Spellbinders Classic Scalloped Circles Large die
ACCESSORIES: Fiskars 12″ ProCision Rotary Bypass Paper Trimmer, Bearly Art precision craft glue, My Sweet Petunia Precision Glue Press, MISTI stamp tool, Big Shot, iridescent gemstones, 1″ double-sided foam strip.

I hope you’ve enjoyed today’s project and you’re thinking about all the fun you could have with this month’s kit… you really ought to think about joining the Subscription Club! Be sure to Follow us on Facebook, Instagram, Pinterest and YouTube for lots of crafty inspiration! And if you do decide to join the Subscription Club, join our ScrapbookingStore Club Member Group on Facebook for more inspiration and to share your projects! Thanks so much for stopping by today – we’ll see you next time!

Scrappy hugs,

Farm Fresh Pumpkins

Hi friends! I have a fun ScrapbookingStore DT inspiration project to share with you today created with the November 2024 Scrapbook Kit with Upgrades. It’s been a minute since I created a sidewalk cafe sign card and I thought the papers and stickers in this month’s kit were perfect for this card! Despite it’s complex look, this card is really pretty simple, and it folds flat for mailing.

I cut the card base and box from CutCardStock Lessebo Brick Orange cardstock. The card base is 4-1/4″ x 11″, scored at 5-1/2″. The box is 1-1/4″ x 6-1/2″, scored at 1/2″, 1-1/4″, 5-1/4″ and 6″. The strip for the inside of the box is 1-1/8″ x 4-3/4″, scored at 3/8″ and 4-3/8″. The decorative strip for the box front is 1-1/8″ x 3-7/8″, cut from patterned paper.

To make the ‘legs’ for the cafe sign, close the card base and measure 1″ inward from the left edge. Cut upward 1-1/2″, across for a length of 2-1/4″, and then back down 1-1/2″. Remove the pieces and discard. Note: You can cut each half of the card base separately if you don’t want to cut through two layers of cardstock.

The background pieces for the front and back are both 4-1/8″ x 5-3/8″, cut from patterned paper. Measure 7/8″ inward from the left edge and cut upward 1-1/2″. Cut across for a length of 2-3/8″ and then back down 1-1/2″. Do this for both pieces.

I trimmed a journaling card in the paper pack to use as the focal image. I chose several floral cluster stickers, adhered them to Solar White cardstock scraps, and trimmed around the stickers. I adhered one piece to the strip inside the box and the other piece directly on the background at the bottom of the focal image, both on black foam strips. The finishing touch was adding some pumpkin stickers to the outside of the box.

The inside panel is 3-3/4″ x 4″, cut from Solar White cardstock and embellished with strips of paper in the collection. I added a sentiment sticker along with floral and pumpkin stickers, which completed the card.

Here are a couple angled shots so you can see the construction. So stinkin’ cute!

Affiliate links are used in this post at no cost to you – I really appreciate your support!

ScrapbookingStore products used:
November 2024 Scrapbook Kit with Upgrades:
Echo Park Fall Collection Kit
Upgrades: Momenta Clear Stamps
Leaf Stickers
Simple Stories Acorn Lane Card Kit

Other products used:
CARDSTOCK/PAPER: CutCardStock Lessebo Brick Orange cardstock, Neenah Classic Crest 80# Solar White cardstock
ACCESSORIES: Fiskars 12″ ProCision Rotary Bypass Paper Trimmer, Cricut Paper Trimmer, Bearly Art precision craft glue, My Sweet Petunia Precision Glue Press, Ranger Letter It Black 3D Adhesive Foam

I hope you’ve enjoyed today’s project and you’re thinking about all the fun you could have with this month’s kit… you really ought to think about joining the Subscription Club! Be sure to Follow us on Facebook, Instagram, Pinterest and YouTube for lots of crafty inspiration! And if you do decide to join the Subscription Club, join our ScrapbookingStore Club Member Group on Facebook for more inspiration and to share your projects! Thanks so much for stopping by today – we’ll see you next time!

Scrappy hugs,