Your kindness makes a difference

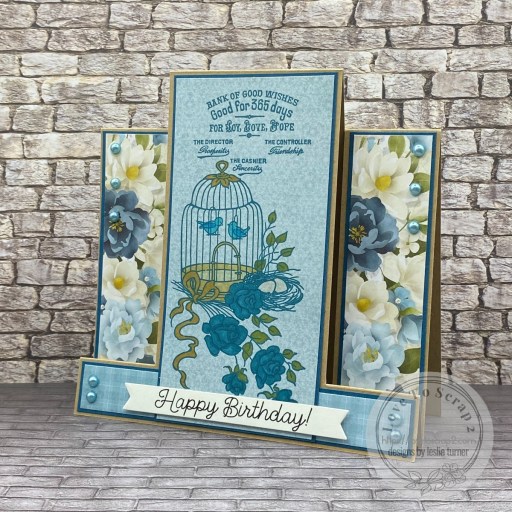
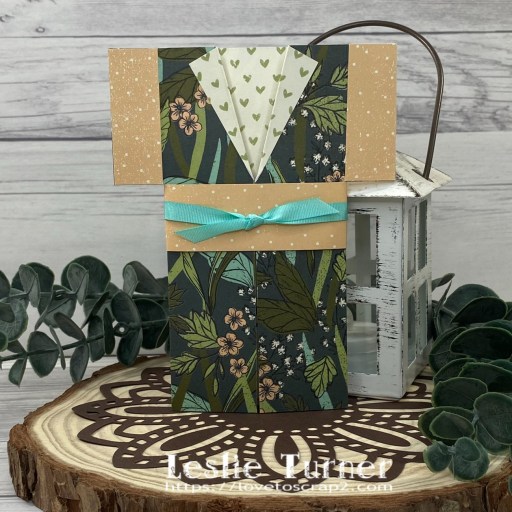
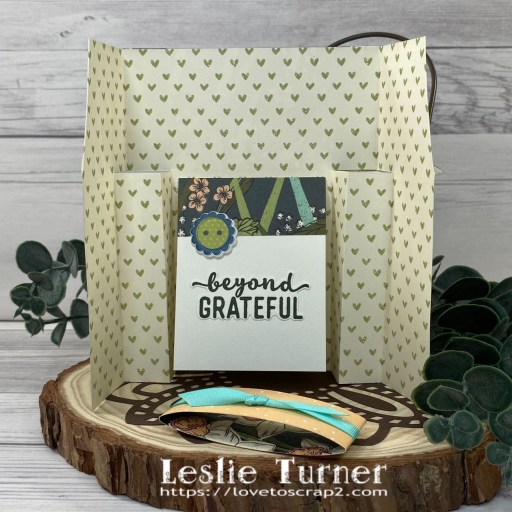
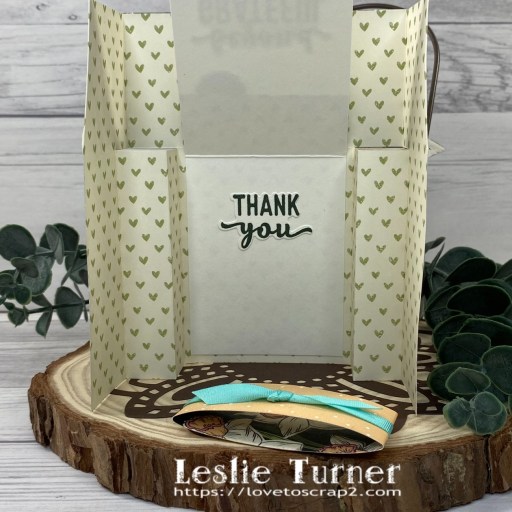
Hey everybody, happy Wednesday! I hope your week is going along nicely. I’m up on the Scrapbook Pal blog today sharing a tutorial for creating a side accordion panel card. It’s only fitting that I’m featuring one of my all-time favorite fun folds as my debut project for this new design team! I couldn’t be more excited about this opportunity – it’s definitely a dream come true! I used the absolutely gorgeous Pinkfresh Studio Kindness in Bloom stamps, stencils and dies, and love how this card turned out. What a stunning suite of products, and I know you’re going to love them, too!

I started by stamping all the images in the Pinkfresh Studio Kindness in Bloom stamp set in Memento Tuxedo Black ink on Solar White cardstock. I used Ranger speckled egg and antique linen distress inks along with Ranger vintage photo distress spritz with the Kindness in Bloom stencils to give the images some color. I cut them with the coordinating Kindness in Bloom dies and set them aside.

I cut the card base and folded panel from CutCardStock Basis Aqua cardstock along with layering panels from Neenah Classic Linen Gold Pearl cardstock and Doodlebug Design Buffalo Check-Wood Grain and Swiss Dot Rainbow Petite Prints 6×6 double-sided papers.

I adhered the layers together and assembled the card.

Next, I added the stamped images and front and inside sentiments. The finishing touch was adding a few white pearls to the card front.

Affiliate links are used in this post at no cost to you – I really appreciate your support!

Scrapbook Pal products used:
Pinkfresh Studio Kindness in Bloom stamp set
Pinkfresh Studio Kindness in Bloom stencils
Pinkfresh Studio Kindness in Bloom die set
Memento Tuxedo Black ink
MISTI stamp tool
Ranger-Wendy Vecchi Make Art Stay-tion 7”
Ranger distress tiny blending tools
Ranger distress tiny blending foams
Ranger speckled egg distress ink
Ranger antique linen distress ink
Ranger vintage photo distress spritz
My Sweet Petunia Glue Press
Bearly Art precision craft glue
Scrapbook Adhesives Thin 3D Foam Squares White

Other products used:
CARDSTOCK/PAPER: CutCardStock Basis Aqua cardstock, Neenah Classic Linen Gold Pearl cardstock, Neenah Classic Crest 80# Solar White cardstock, Doodlebug Design Buffalo Check-Wood Grain and Swiss Dot Rainbow Petite Prints 6×6 double-sided papers
ACCESSORIES: Fiskars 12″ ProCision Rotary Bypass Paper, Big Shot, Darice small white pearls

I hope you’ve enjoyed this project and you’re inspired to get your craft on! Be sure to check out the awesome array of craft supplies in the Scrapbook Pal store… the selection is amazing! And head over to the Scrapbook Pal FacebookPinterest and Instagram pages for more design team inspiration! And if you haven’t yet subscribed to our YouTube Channel, be sure to do that, too, for tons of hands-on crafty inspiration! Thanks so much for stopping by today – we’ll see you next time! 

Scrappy hugs,

Bank of Good Wishes

Hey everybody! Wow. Just wow. November 8th already. The days just seem to fly by. My Mom always said ‘the older you get, the faster time flies’ and I can think of no truer words. I’m sharing another guest design project for Creative Creases Challenge and this one is for Challenge #95, so come on over and play with us! Anything goes with a fun fold, so if you’re a fellow fun fold fanatic, this challenge is for you! I created a tall center step card which is a tad larger than the normal A2 size cards I typically make, and I love how it turned out. My inspiration for this card came from THIS tutorial at Beccy’s Place. I prefer handwritten instructions over videos and Beccy’s instructions are great. She included a diagram of the cut and score lines for the piece of cardstock which is super helpful.

I cut the step card base from CutCardStock 12×12 Twine cardstock along with layering panels from CutCardStock Lessebo Amazon Dark Teal cardstock and Hot Off The Press Magnolia Blossoms 6×6 double-sided papers. I stamped the Stampendous Mini Birdhouse Bank image in Catherine Pooler Daydream ink on the large front layering panel and colored it with alcohol markers. I had a leftover Happy Birthday sentiment on my desk that I had created with the draw function on my Cricut which I cut with a My Favorite Things Essential Fishtail Sentiment Strip die. The finishing touch was adding several Eyelet Outlet 5mm blue pearls.

I cut the back panel from CutCardStock Lessebo Ivory cardstock and embellished it with leftover strips of paper and cardstock used on the front. I left it blank to write a custom message.

Affiliate links are used in this post at no cost to you – I really appreciate your support! 

Products used:
CARDSTOCK/PAPER: CutCardStock 12×12 Twine, Lessebo Amazon Dark Teal and Lessebo Ivory cardstock; Hot Off The Press Magnolia Blossoms 6×6 double-sided papers
STAMPS: Stampendous Mini Birdhouse Bank stamp
INK: Catherine Pooler Daydream ink; Spectrum Noir Tri-Blends- TB4, BT4/8, GB1/3/5, YG2, FS6; Cricut 0.4 black pen
DIES/PUNCHES: My Favorite Things Essential Fishtail Sentiment Strips
ACCESSORIES: Cricut Paper Trimmer, Elmer’s Craft Bond Tape Runner, Bearly Art precision craft glue, MISTI stamp tool, Big Shot, foam adhesive squares, Eyelet Outlet 5mm blue pearls

I hope you’ve enjoyed seeing this project and will link up with us this time! Thanks so much for stopping by today – we’ll see you next time! ;)

Scrappy hugs,

hello FALL

Hey everybody! Happy Hump Day – did you survive the time change?! I personally wish they’d just leave the time alone. SMH. I’m thrilled to share another Keep It Simple DT inspiration project with you today featuring the square version of our new KIS Cuts Circular Pop-Ups. I made a Fall version using papers and die cut pieces from our new Nuts About Fall Collection. OMGosh, these little pop-ups are so stinkin’ fun and can be decorated a gazillion ways. You gotta check them out! I’m very honored because this die set was modeled after the carousel card I made earlier this year. That post is HERE if you’d like to see it. And I have to say that having the die set makes this project much more enjoyable versus hand-cutting the pieces. ;)

Using the KIS Cuts Circular Pop-Up: Square dies, I cut the base pieces from CutCardStock Basis Light Brown cardstock along with frames and panels for all the pages from coordinating prints in the Nuts About Fall 6×9 Collection Pack. I embellished each page with items from the Nuts About Fall Die Cut Pieces, Mango Enamel Dots and Hearts, and Lilac Enamel Dots. I made a twine closure using Canvas Corp jute rope and a leaf charm from The Funkie Junkie Boutique. Here are shots of the front, inside pages and the back. I totally love how this turned out!

Keep It Simple products used:
KIS Cuts Circulcar Pop-Up: Squqre
Nuts About Fall 6×9 Collection Pack
Nuts About Fall Die Cut Pieces
Back To Basics Mango Enamel Dots
Back To Basics Mango Enamel Hearts
Back To Basics Lilac Enamel Dots

Affiliate links are used in this post at no cost to you – I really appreciate your support!

Other products used:
CARDSTOCK/PAPER: CutCardStock Basis Light Brown cardstock
ACCESSORIES: Fiskars 12″ ProCision Rotary Bypass Paper Trimmer, My Sweet Petunia Precision Glue Press, Nuvo Deluxe Adhesive, Big Shot, Scrapbook.com Double-Sided Adhesive Foam Squares, Canvas Corp jute rope, The Funkie Junkie Boutique leaf charm

I hope you’ve loved seeing this project as much as I loved creating it and you’re inspired to get crafty! Be sure to check out ALL the fun goodies in the Keep It Simple online store! Save 10% on your entire order when you shop online using code LoveToScrap2 at checkout! There is no minimum purchase requirement and no usage limits, AND it combines with product, order, and shipping discounts! Is that cool, or what?! Be sure to Follow us on Facebook, Instagram, and Pinterest for lots of crafty inspiration! Thanks so much for stopping by today – we’ll see you next time!

Scrappy hugs,

Spooky

Hey everybody, I hope you’re having a great week! Well, today is election day in the States so please pray for a favorable outcome for our nation. And also today would have been my sister’s 76th birthday and I’m sure she’s celebrating in Heaven. I’m delighted to share one final Halloween project for Keep It Simple created with our new Haunted Halloween Collection. Seems like I made quite a few Halloween projects this year, and this vertical split panel fold is such a fun one I just couldn’t resist! The instructions for this fold are in the Freebies section of my blog HERE if you’d like to learn how to make it.

I cut the card base from CutCardStock Lessebo Pitch Black cardstock along with layering panels from coordinating papers in the Haunted Halloween 6×9 Collection Pack. I stamped several images from the Spooky Characters Collection Stamps, colored them with alcohol markers, and cut them with the coordinating Spooky Characters Outline Dies. I used those and a sentiment die cut from the Die Cut Pieces Mega Pack to build the scene on the front on a stitched rectangle cut with a Back To Basics Stitched Rectangles Nested Die.

I cut the inside panel from Neenah Classic Crest 80# Solar White cardstock and embellished it with a strip of paper from the 6×9 Collection pack and a stamped/die cut bat. I stamped a sentiment from the Haunted Sentiments Stamps and added a disc magnet behind the front focal to keep the card closed.

Keep It Simple products used:
Haunted Halloween 6×9 Collection Pack
Haunted Halloween Spooky Characters Collection Stamps
Haunted Halloween Spooky Characters Outline Dies
Haunted Halloween Haunted Sentiments Stamps
Haunted Halloween Die Cut Pieces Mega Pack
Back To Basics Stitched Rectangles Nested Dies

Affiliate links are used in this post at no cost to you – I really appreciate your support!

Other products used:
CARDSTOCK/PAPER: CutCardStock Lessebo Pitch Black cardstock, Neenah Classic Crest 80# Solar White cardstock
STAMPS: Catherine Pooler Chiffon and Sauna inks; Spectrum Noir Tri-Blends- IG2/4/5, EB5/6/7
INK: Memento Tuxedo Black ink
ACCESSORIES: Cricut Paper Trimmer, Elmer’s Craft Bond Tape Runner, Bearly Art precision craft glue, MISTI stamp tool, Big Shot, 1/4″ double-sided foam strips, small disc magnet, Ranger, distress collage medium, thin 1mm adhesive foam squares

I hope you’ve loved seeing this project as much as I loved creating it and you’re inspired to get crafty! Be sure to check out ALL the fun goodies in the Keep It Simple online store! Save 10% on your entire order when you shop online using code LoveToScrap2 at checkout! There is no minimum purchase requirement and no usage limits, AND it combines with product, order, and shipping discounts! Is that cool, or what?! Be sure to Follow us on Facebook, Instagram, and Pinterest for lots of crafty inspiration! Thanks so much for stopping by today – we’ll see you next time!

Scrappy hugs,

Christmas Greetings

Hey everybody! A very Happy Friday to all! Our new challenge is live this morning over at Merry Little Christmas Challenge Blog and I’m delighted to share my DT inspiration project for MLCCB #59 – Anything Christmas Goes! I created a pretty screen fold card for this challenge featuring framed vellum panels and lots of festive Simple Stories ephemera bits. It has been a long while since I created a screen fold card and I really like how this one turned out!

I cut the card base from CutCardStock Lessebo Cement Gray and Lessebo Granite Gray, using a Spellbinders Labels Twenty Five die to cut the legs of the screen panels. I cut a rectangular aperture into each section with a Spellbinders Curved Matting Basics B die. Next, I cut a screen and frame for each panel from Glama Natural Translucent Clear Vellum and Lessebo Dawn Maroon using the same Spellbinders Curved Matting Basics B dies.

I die cut sentiments from Bright Gold Foil cardstock using Spellbinders Create A Christmas Sentiment die set. The final step was embellishing each of the screens with Simple Stories Hearth & Holiday Floral Bits and the die cut sentiments.

Affiliate links are used in this post at no cost to you – I really appreciate your support! 

Products used:
CARDSTOCK/PAPER: CutCardStock Lessebo Cement Gray, Lessebo Granite Gray, Lessebo Dawn Maroon, Glama Natural Translucent Clear Vellum, and Bright Gold Foil cardstock
DIES/PUNCHES: Spellbinders Labels Twenty Five dies, Spellbinders Curved Matting Basics B dies, and Spellbinders Create a Christmas Sentiment die set
ACCESSORIES: Fiskars 12″ ProCision Rotary Bypass Paper Trimmer, Elmer’s Craft Bond Tape Runner, Bearly Art precision craft glue, Big Shot, Simple Stories Hearth & Holiday Floral Bits, 1/2″ double-sided foam strips

I hope you’ve enjoyed seeing this project and will link up with us this time! Thanks so much for stopping by today – we’ll see you next time! ;)

Scrappy hugs,

Kimono Thank You Card

Hi friends! Happy Fri-YAY! What I want to know is how did it get to be November 1st and where did this year go?! Our new challenge is live this morning over at Love To Scrap Challenge Blog and I’m thrilled to share my DT inspiration project for LTSCB #170 – Anything Goes! As you know, I get a lot of my inspiration from Splitcoast Stampers and this adorable kimono card was showcased in one of their newsletters a while back HERE. I came across it in my search for something else and decided to make one!

I cut the card base from a pretty double-sided patterned paper in the Stampin’ Up Daffodil Afternoon DSP pack. I added teal ribbon from the Stampin’ Up Best Day Ever Ribbon to the belt.

I created the little top-folding card on the inside from CutCardStock Basis 80# Natural cardstock and embellished it with a scrap of DSP used on the front. I stamped front and inside sentiments from the Stampin’ Up Charming Sentiments stamp set in Catherine Pooler Spruce ink and cut them with the coordinating Stampin’ Up Sentiment Silhouettes dies. I embellished the little card with a Keep It Simple Max and Daisy Puffy Sticker Button.

Affiliate links are used in this post at no cost to you – I really appreciate your support! 

Products used:
CARDSTOCK/PAPER: CutCardStock Basis 80# Natural cardstock, Stampin’ Up Daffodil Afternoon DSP
STAMPS: Stampin’ Up Charming Sentiments stamp set
INK: Catherine Pooler Spruce ink
DIES/PUNCHES: Stampin’ Up Sentiment Silhouettes dies
ACCESSORIES: Tonic Studios 12″ Guillotine Paper Trimmer, Fiskars 12″ SureCut Paper Trimmer, Tombow Mono Dots adhesive, Bearly Art precision craft glue, MISTI stamp tool, Big Shot, Stampin’ Up Best Year Ever Ribbon (teal), Keep It Simple Max and Daisy Puffy Sticker Buttons

I hope you’ve enjoyed seeing this project and will link up with us this time! Thanks so much for stopping by today – we’ll see you next time! ;)

Scrappy hugs,

Fright Night

Hey everybody! Happy Saturday – I hope you have something totally fun planned this weekend! I have a fun Keep It Simple DT inspiration project to share today for our Halloween hop. The theme is “In Disguise” and these little ghouls in costumes on my accordion card are perfect! Be sure to visit the KIS Instagram Page to start hopping with us. This was a fun card and I really enjoyed creating the scene on the front, complete with a bat hanging upside down, lol!

I cut the 5-1/2″ x 8-1/2″ card base from CutCardStock Lessebo Pitch Black cardstock along with layering panels from coordinating prints and a scalloped border in the Haunted Halloween 6×9 Collection Pack. I went through the Die Cut Pieces Mega Pack (and boy howdy, this is a mega pack indeed!) and chose the ones I wanted to use for my little scene, popping the little ghoul, the star and the bat up on foam squares and strips. I scored and creased the wings on the bat for a little dimension.

I cut a 5-1/4″ x 10″ panel for the accordion on the inside from Hammermill 32# copy paper and stamped a spider web background (using the Spider Web Background Stamp) on it. I then scored this panel at 2”, 3”, 4”, 5”, 6”, 7” and 8”, folded it on the score lines, and adhered the outside portions to the inside of the card base. I stamped several spiders from The Moon Made Me Do It stamp set and cut them with the coordinating die set.

I added a few more ghouls and sentiments from the Die Cut Pieces Mega Pack, staggering them on the mountain folds of the accordion portion. The finishing touch was adding a panel to the back of the card which I cut from Neenah Classic Crest Solar White cardstock and embellished with a sentiment from the Die Cut Pieces and a stamped spider.

Keep It Simple products used:
Haunted Halloween 6×9 Collection Pack
Haunted Halloween Die Cut Pieces Mega Pack
A Wee Bit Wicked Spider Web Background Stamp
A Wee Bit Wicked The Moon Made Me Do It Stamps
A Wee Bit Wicked The Moon Made Me Do It Outline Dies

Affiliate links are used in this post at no cost to you – I really appreciate your support!

Other products used:
CARDSTOCK/PAPER: CutCardStock Lessebo Pitch Black cardstock, Neenah Classic Crest 110# and 80# Solar White cardstock, Hammermill 32# white copy paper
ACCESSORIES: Cricut Paper Trimmer, Bearly Art precision craft glue, MISTI stamp tool, Big Shot, 1/2″ double-sided foam strips, Scrapbook.com Double-Sided Foam Adhesive Squares

I hope you’ve loved seeing this project as much as I loved creating it and you’re inspired to get crafty! Be sure to check out ALL the fun goodies in the Keep It Simple online store! Save 10% on your entire order when you shop online using code LoveToScrap2 at checkout! There is no minimum purchase requirement and no usage limits, AND it combines with product, order, and shipping discounts! Is that cool, or what?! Be sure to Follow us on Facebook, Instagram, and Pinterest for lots of crafty inspiration! Thanks so much for stopping by today – we’ll see you next time!

Scrappy hugs,

Boo Crew fun fold

Hey everybody, happy Wednesday! I hope your week is bouncing along nicely! I’m back today with another fun ScrapbookingStore DT inspiration project created with the October 2024 Scrapbook Kit with Upgrades. I seem to be making more Halloween cards over the past few years. I totally love all the coordinating items in this month’s kit – they make some pretty awesome projects. I came up with a combination Joy fold and Z-fold way back in June 2016 (posted on my original blog HERE) for a birthday card for Ed. Then, a little over three years later, I made a Christmas version (turned in vertical orientation) HERE if you’re interested in looking. So I dug out those instructions to make this Halloween version and I love how it turned out!

I cut the card base and pieces from CutCardStock Lessebo Pitch Black along with layering panels from Lessebo Brick Orange cardstock and four coordinating prints in the collection. I used stickers from both the collection and the upgrades to decorate each section.

I created a little scene on the inside of the folded panel using stickers, leaving room to sign. I included an overhead shot so you can see the construction. I love this fold and I hope it won’t be another five years before I make my next one, lol!

Affiliate links are used in this post at no cost to you – I really appreciate your support!

ScrapbookingStore products used:
October 2024 Scrapbook Kit with Upgrades:
Echo Park Halloween Magic Collection Kit
Upgrades: Brianna Nicole Designz Spooky Realm Stickers
The Paper Studio Pumpkin Stick-A-Bilities
Recollections Black Alpha Stickers

Other products used:
CARDSTOCK/PAPER: CutCardStock Lessebo Pitch Black and Lessebo Brick Orange cardstock, Neenah Classic Crest 80# Solar White cardstock
ACCESSORIES: Fiskars 12″ ProCision Rotary Bypass Paper Trimmer, My Sweet Petunia Precision Glue Press, Nuvo Deluxe Adhesive, thin 1-mm adhesive foam squares

I hope you’ve enjoyed today’s project and you’re thinking about all the fun you could have with this month’s kit… you really ought to think about joining the Subscription Club! Be sure to Follow us on Facebook, Instagram, Pinterest and YouTube for lots of crafty inspiration! And if you do decide to join the Subscription Club, join our ScrapbookingStore Club Member Group on Facebook for more inspiration and to share your projects! Thanks so much for stopping by today – we’ll see you next time!

Scrappy hugs,

EEK!

Hi friends! Happy Tuesday – the weeks sure are flying by! I have a fun ScrapbookingStore DT inspiration project to share with you today created with the awesome October 2024 Scrapbook Kit with Upgrades. The papers and coordinating spooky elements in this collection are some of the best! I’ve had handwritten instructions for a triple easel card in my arsenal for quite some time and decided it was (finally) time to make one. So fun, and I sure love how it turned out!

I cut the three easel card bases from CutCardStock Lessebo Amethyst along with layering panels from Lessebo Pitch Black and two purple coordinating prints in this month’s kit. I embellished each easel with papers and stickers from the collection, stickers from two of the upgrades, and gemstones from my stash. I created a ‘stopper’ on the front easel with a Keep It Simple Crafty Girls button and a tiny bow tied from Doodlebug Design Lily White Doodle Twine.

Here’s a shot of the card folded up flat, ready to mail. I love it!

Affiliate links are used in this post at no cost to you – I really appreciate your support!

ScrapbookingStore products used:
October 2024 Scrapbook Kit with Upgrades:
Echo Park Halloween Magic Collection Kit
Upgrades: Brianna Nicole Designz Spooky Realm Stickers
The Paper Studio Pumpkin Stick-A-Bilities
Recollections Black Alpha Stickers

Other products used:
CARDSTOCK/PAPER: CutCardStock Lessebo Amethyst and Lessebo Pitch Black cardstock
ACCESSORIES: Fiskars 12″ ProCision Rotary Bypass Paper Trimmer, My Sweet Petunia Precision Glue Press, Nuvo Deluxe Adhesive, Keep It Simple Crafty Girls Buttons, Doodlebug Design Lily White Doodle Twine, cordless glue gun, Darice orange and purple gemstones

I hope you’ve enjoyed today’s project and you’re thinking about all the fun you could have with this month’s kit… you really ought to think about joining the Subscription Club! Be sure to Follow us on Facebook, Instagram, Pinterest and YouTube for lots of crafty inspiration! And if you do decide to join the Subscription Club, join our ScrapbookingStore Club Member Group on Facebook for more inspiration and to share your projects! Thanks so much for stopping by today – we’ll see you next time!

Scrappy hugs,

Meet me at the pumpkin patch

Hey everybody! Happy Thursday – the weeks are just FLYING by! We’ve had a busy week with doctor appointments. All is well… just check-ups and lab work, and even got some good news. I’m delighted to share a Keep It Simple DT inspiration project with you today featuring our new KIS Cuts Pumpkin Builder that was released last week. Talk about a whole lotta fun for Autumn/Fall and Halloween projects! I took a quick break from Halloween and created a Fall-themed split panel fold. I have a pet peeve about stuff hanging off the edges of an A2 card but I couldn’t help myself on this one… just gonna have to use a larger envelope.

Using my own instructions for the vertical split panel fold HERE (which I turned horizontally) I cut the card base from Neenah Classic Crest 110# Solar White cardstock along with layering panels from coordinating prints in the Mango 12×12 Collection Pack. I cut the pumpkin from a couple more coordinating prints in the same paper pack using the Pumpkin Builder dies. I inked the stem, tendrels and leaf with Catherine Pooler Over Coffee and Spruce inks. I stamped the sentiment from the Autumn Charm Autumn Sentiments Stamps in Spruce ink and cut it with the coordinating Autumn Sentiments Outline Dies. I added some small disc magnets to keep the card closed, and the finishing touch was adding a few orange gemstones.

I cut the inside panel fron 80# Solar White cardstock and embellished it with a leftover strip of paper from the same paper pack. I stamped the sentiment from the same stamp set in the Over Coffee and Spruce inks.

Keep It Simple products used:
Mango 12×12 Collection Pack
KIS Cuts Pumpkin Builder
Autumn Charm Sentiments Stamps
Autumn Charm Sentiments Outline Dies

Affiliate links are used in this post at no cost to you – I really appreciate your support!

Other products used:
CARDSTOCK/PAPER: Neenah Classic Crest 110# Solar White cardstock
INK: Catherine Pooler Over Coffee and Spruce inks
ACCESSORIES: Fiskars 12″ ProCision Rotary Bypass Paper Trimmer, My Sweet Petunia Precision Glue Press, Nuvo Deluxe Adhesive, MISTI stamp tool, Big Shot, Ranger Distress Collage Medium, small disc magnets, orange gemstones

I hope you’ve loved seeing this project as much as I loved creating it and you’re inspired to get crafty! Be sure to check out ALL the fun goodies in the Keep It Simple online store! Save 10% on your entire order when you shop online using code LoveToScrap2 at checkout! There is no minimum purchase requirement and no usage limits, AND it combines with product, order, and shipping discounts! Is that cool, or what?! Be sure to Follow us on Facebook, Instagram, and Pinterest for lots of crafty inspiration! Thanks so much for stopping by today – we’ll see you next time!

Scrappy hugs,