best day ever

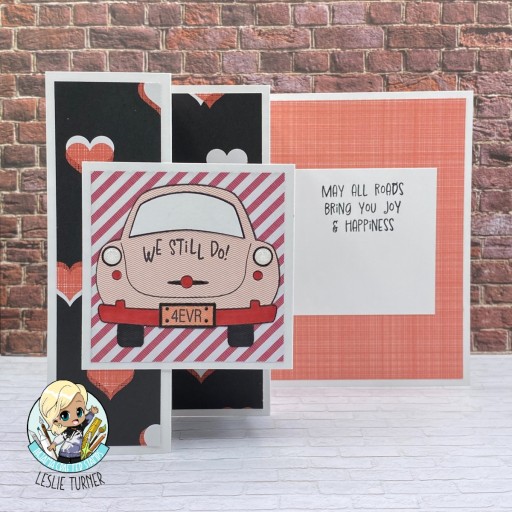
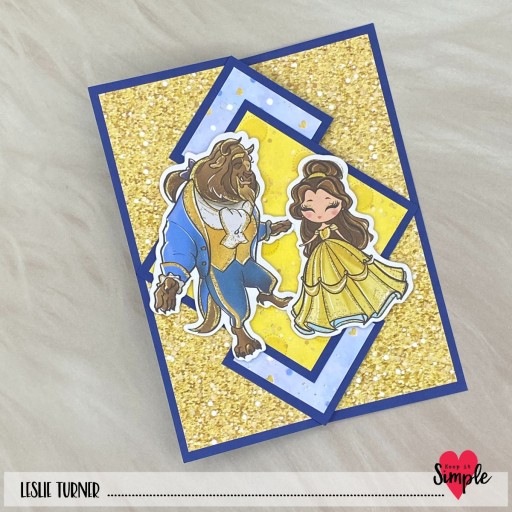
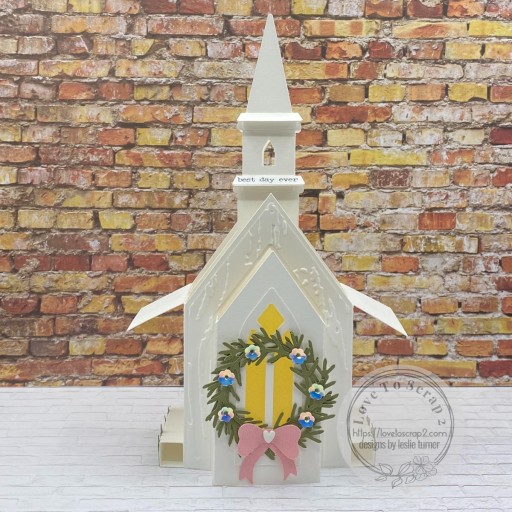
Hi friends! I hope you are having the kind of beautiful weather we’re having out here in southwestern Colorado! I’m delighted to share that one of my projects was a top pick a few weeks ago over at Scrapping4fun Challenges. I was invited to guest design for an upcoming challenge, so here I am just in time for Challenge #235 – Wedding/Anniversary! I dug into my arsenal of SVG cut files and came up with this pretty church box card (cut file from SVG Cuts) to make for this challenge. I tailored it for a wedding by changing the wreath a bit, adding yellow vellum to the windows, and adding grass on the sides of the church. I love how it turned out!

Using my Cricut Explore Air 2 and the SVG Cuts Church Box Card cut file, I cut all the church pieces from CutCardStock Basis White cardstock and the wreath from 12×12 Cardstock Shop green and pink textured cardstock. I assembled the wreath, adding flower sequins and a white heart from the Keep It Simple Sprinkles Polymer Clay-Pink & White Hearts with Pearls mix.

Next, I die cut a grass border for each side of the church from the green textured cardstock using the Precious Marieke grass border die, and hand-cut small pieces of 12×12 Cardstock Shop yellow vellum for the front and side windows. The final touch on the front was adding a Tim Holtz idea-ology Small Talk sentiment sticker to the bottom steeple element.

For the back, I stamped a floral pattern on the frame using the Keep It Simple Simply Spring stamp set in Catherine Pooler Pink Champagne ink. I colored the florals with a few alcohol markers (to bring in the purple and pink in the iridescent flower sequins on the wreath) and added some Eyelet Outlet white glitter enamel dots. I stamped a tiny sentiment from the Trinity Stamps A Sentiment for (Almost) Everything stamp set in Memento Tuxedo Black ink on a Basis White scrap, trimmed it, and adhered it horizontally to the sentiment panel. The assembly is always the most fun, and I really enjoyed putting this one together. It was quite easy, actually!

Affiliate links are used in this post at no cost to you – I really appreciate your support! 

Products used:
CARDSTOCK/PAPER: CutCardStock Basis 80# 12×12 White cardstock, 12×12 Cardstock Shop Green Textured and Pink Textured cardstock and Yellow Translucent vellum
STAMPS: Keep It Simple Simply Spring stamp set, Trinity Stamps A Sentiment for (Almost) Everything stamp set
INK: Catherine Pooler Pink Champagne ink; Spectrum Noir Tri-Blends- MG1, DG1, LV1; Memento Tuxedo Black ink
DIES/PUNCHES: SVG Cuts Church Box Card SVG cut file, Precious Marieke Grass Border die
ACCESSORIES: Cricut Explore Air 2, Fiskars 12″ ProCision Rotary Bypass Paper Trimmer, Elmer’s Craft Bond Tape Runner, Bearly Art precision craft glue, MISTI stamp tool, Big Shot, Tim Holtz Alterations/Texture Fades Woodgrain embossing folder, Keep It Simple Sprinkles Polymer Clay-Pink & White Hearts with Pearls, Eyelet Outlet white glitter enamel dots, Tim Holtz idea-ology Small Talk sentiment stickers

I hope you’ve enjoyed seeing this project and will link up a wedding or anniversary project with us this time! Thanks so much for stopping by today – we’ll see you next time! ;)

Scrappy hugs,

We Still Do!

Hey everybody! Can you believe we’re near the end of April already?! I’m thoroughly enjoying sharing all these Pajama Crafter Stamps projects with y’all! I love to work ahead on my design teams and had created quite a few cards prior to stepping down from the Pajama Crafter Stamps DT at the end of February that had not been showcased on my blog or social media platforms. This side accordion panel card features the new Just Married stamp set which I paired with an older Stampin’ Up paper pad. I love the color palette and thought it was perfect for an anniversary card! I’ve seen this fun fold on Pinterest, Sharon Armstrong has a video on her blog, and Lisa Curcio has a version on her blog that she calls an expanding accordion fun fold. So there are a few resources (and different names) out there for this one.

Here are the mini instructions: Cut the 5-1/2″ x 11″ card base from CutCardStock Lessebo White cardstock, score at 1-3/4″, 3-1/2″, 5-1/4″ and 7″, and fold on all the score lines. Cut a smaller folded piece from White at 3″ x 6″ and score at 3″. From coordinating prints in the Stampin’ Up Stacked With Love designer series paper stack, cut three 1-1/2″ x 5-1/4″ panels for the left side, a 3-3/4″ x 5-1/4″ panel for the right side, and two 2-3/4″ square panels for the smaller folded piece. Cut one additional 2-3/4″ square panel from white cardstock for a sentiment. Embellish as desired.

I stamped the car from the Just Married stamp set in Memento Tuxedo Black ink on a light print in the paper stack, and colored the trunk release, bumper, license plate and tires with alcohol markers. I paper-pieced the back window with a white cardstock scrap and added Eyelet Outlet white glitter enamel dots to the back lights. I stamped sentiments from the same stamp set which completed the card.

Here’s an overhead shot so you can see the construction. Super easy fold that really packs a punch!

Affiliate links are used in this post at no cost to you – I really appreciate your support!

Pajama Crafter Stamps products used:
Just Married stamp set

Other products used:
CARDSTOCK/PAPER: CutCardStock Lessebo White cardstock, Stampin’ Up Stacked With Love designer series paper stack
INK: Memento Tuxedo Black ink (pad and marker); Spectrum Noir Tri-Blends- CR3/6/10; black Copic Sketch, Sakura Pigma 08 Micron pen
ACCESSORIES: Fiskars 12″ ProCision Rotary Bypass Paper Trimmer, Elmer’s Craft Bond Tape Runner, Bearly Art precision craft glue, MISTI stamp tool, Eyelet Outlet White Glitter Enamel Dots

I hope you’ve enjoyed this project! Be sure to check out all the awesome stamps, dies and other goodies at Pajama Crafter Stamps which is the new home of the Prickley Pear Stamps brand and the Pajama Crafter Stamps line! Keep up with news and sales by following Pajama Crafter Stamps on Facebook, Instagram and Pinterest, and join Pajama Crafter Stamps & Friends for lots of fun crafty ideas and to share your creativity! And finally, be sure to visit the Pajama Crafter Stamps blog and sign up for the newsletter to stay in touch! Thanks so much for stopping by today – we’ll see you next time! ;)

Scrappy hugs,

hello Spring

Hey everybody! Happy Sunday – I hope you’re having a great weekend! I have a fun shaker card to share for Keep It Simple this morning featuring our new Melody Stories alpha stamps and dies! Have you ever made a shaker card with alpha die cuts? Well, I haven’t either – until now! It’s made just like a regular shaker card but with a bunch of alpha die cuts (and a few floral die cut pieces) instead of shaker bits, and I thought it would be a fun and unique way to showcase our new alphas! We have several new sets of alpha stamps and dies in the store, so be sure to check them out! And if you make a purchase, remember to use my code LoveToScrap2 for 10% off your entire order!

I cut a standard A2 size top-folding landscape card base from CutCardStock Cougar Smooth 100# White cardstock and rounded the bottom right corner. I cut layering panels and a frame for the shaker (using a Back To Basics Stitched Rectangles Nested Die) from coordinating papers in the Simply Spring 6×9 Collection Pack. I die cut a bunch of alphas using the KIS Cuts Melody Stories Font for the inside of the shaker and threw in a few flowers from the Simply Spring Die Cut Pieces.

Using the KIS Alphabet Stamps Melody Stories Font, I stamped ‘SPRING’ in black ink and die cut the letters with the coordinating KIS Cuts Melody Stories Font and adhered them in the bottom right corner. I grabbed a butterfly (and scored the wings) and the word ‘hello’ from the Simply Spring Die Cut Pieces and adhered them to the front of the shaker.

I cut the inside panel from Cougar Smooth 80# White cardstock and embellished it with strips from the floral pattern and white cardstock used on the front and a die cut from the Simply Spring Die Cut Pieces.

Keep It Simple products used:
Simply Spring 6×9 Collection Pack
Simply Spring Die Cut Pieces
KIS Alphabet Stamps Melody Stories Font
KIS Cuts Melody Stories Font
Back To Basics Stitched Rectangles Nested Dies

Affiliate links are used in this post at no cost to you – I really appreciate your support!

Other products used:
CARDSTOCK/PAPER: Cougar Smooth 100# White cardstock, Cougar Smooth 80# White cardstock
INK: Memento Tuxedo Black ink
DIES/PUNCHES: Kadomaru Pro corner rounder
ACCESSORIES: Fiskars 12″ ProCision Rotary Bypass Paper Trimmer, Elmer’s Craft Bond Tape Runner, Bearly Art precision craft glue, MISTI stamp tool, Big Shot, Grafix Crystal Clear Craft Plastic, GKD Shaker Strips, Scrapbook Adhesives 3D Foam Squares (small white)

I hope you’ve loved seeing this project as much as I loved creating it and you’re inspired to get crafty! Be sure to check out ALL the fun goodies in the Keep It Simple online store! Save 10% on your entire order when you shop online using code LoveToScrap2 at checkout! There is no minimum purchase requirement and no usage limits, AND it combines with product, order, and shipping discounts! Is that cool, or what?! Be sure to Follow us on Facebook, Instagram, and Pinterest for lots of crafty inspiration! Thanks so much for stopping by today – we’ll see you next time!

Scrappy hugs,

Welcome, Little One (set of 3)

Hey everybody! Happy Friday! I hope you’ve had a great week and you’re looking forward to some beautiful Spring weather this weekend! Mother Nature is finally acting like she likes us… our nights are in the 40s now and we haven’t had any more snow for about a week now. For no particular reason, I’ve been in baby card mode for several weeks and today I have a set of three super adorable baby crib pop up cards to share that I created with my Cricut and an old Silhouette cut file I’ve had in my arsenal for many years.

For many years, Silhouette only offered Studio cut files which couldn’t be used with any other cutting machine, so when I gave my Cameo away and bought another brand of cutting machine I wasn’t able to use any of the gazillion files in my Silhouette library. Fortunately, Silhouette has finally started offering SVG cut files in addition to their Studio files so I’ve gone back into my library and repurchased the SVG version of many of the Studio files I already owned. It’s crappy that one has to repurchase the SVG version but in most cases they don’t cost very much so it’s more of an inconvenience. But long story short, this baby crib pop up card SVG cut file was one of those that I repurchased so I made it in three colors while I had my Cricut out! ;)

All three cards are identical except for the blue, pink and green double-sided patterned papers from Keep It Simple Back To Basics Royal, Rose and Jade 12×12 Collection Packs and the matching Back To Basics Ribbon and Enamel Hearts. I fashioned the bows with a cute little wooden bow maker that my awesome friend, Maureen, gifted me this past Christmas. The baby rattle on the front of each card was cut from CutCardStock Stardream Metallic Eris cardstock which is a pretty shimmery white. The front and inside sentiments are from Paper Pretties Oh Baby stamp set, stamped in Memento Tuxedo Black ink.

How adorable is the baby room scene inside?! So stinkin’ cute, I can’t even stand it! The window frame, shelf and 3D crib were also cut from the Eris cardstock. The building blocks were cut from papers in the Keep It Simple Ruby, Royal and Lemon 12×12 Collection Packs and backed with Neenah Classic Crest Solar White cardstock scraps.

Affiliate links are used in this post at no cost to you – I really appreciate your support! 

Products used:
CARDSTOCK/PAPER: Keep It Simple Back To Basics Royal, Rose, Jade, Ruby and Lemon 12×12 Collection Packs; CutCardStock Stardream Metallic Eris cardstock, Neenah Classic Crest 110# Solar White cardstock
STAMPS: Paper Pretties Oh Baby stamp set
INK: Memento Tuxedo Black ink
DIES/PUNCHES: The Design Store Baby Crib Pop Up Card SVG cut file
ACCESSORIES: Cricut Explore Air 2, wooden bow maker, Elmer’s Craft Bond Tape Runner, Bearly Art precision craft glue, MISTI stamp tool, Keep It Simple Back To Basics Royal, Rose and Jade Ribbon and Enamel Hearts, Scrapbook Adhesives 3D Foam Squares (small white)

I hope you’ve enjoyed seeing these adorable baby crib pop up cards! If you’re interested in any of the Keep It Simple paper packs, ribbon or enamel hearts that I’ve used, remember you can get 10% off your entire order with my code LoveToScrap2! There is no minimum purchase requirement or usage limit with this code, and it combines with product, order and shipping discounts! Thanks so much for stopping by today – we’ll see you next time! ;)

Scrappy hugs,

forever and ever more

Hi everyone! Happy Thursday – I hope you have something fun planned this weekend! I’m up on the CutCardStock blog today with a tutorial for making a masculine style anniversary card featuring our Lessebo Granite Gray and Cement Gray along with Bright Gold Foil. It seems that most anniversary cards appeal to the lady, so I used some cool metal textures papers in my stash which give this card a masculine feel. I then added floral and butterfly ephemera and gold pearls for the feminine flair, hopefully appealing to both the lady and gentleman. You know how much I love me some fun folds, and I really enjoyed putting this particular version of the corner fold card together! Be sure to visit the CutCardStock website this month for a variety of sales (one each week) on closeout and overstock items!

I cut a standard size side-folding A2 card base from Lessebo Granite Gray cardstock along with layering panels from Bright Gold Foil and two coordinating Craft Consortium Metal Textures papers. I grabbed several 49 and Market Curators Botanical Ephemera Bits and adhered the largest one with 1″ double-sided foam strips. I scored the butterfly so the wings bend upward and adhered the sentiment below the butterfly. I finished the front with several Kat Scrappiness gold pearls.

I cut the inside panels from Bright Gold Foil and Lessebo Cement Gray, and stamped a sentiment from The Cat’s Pajamas Simply Stacked Sentiments stamp set.

Affiliate links are used in this post at no cost to you – I really appreciate your support!

CutCardStock products used:
Neenah Classic Crest 110# Solar White cardstock
Cougar Smooth 100# White cardstock
Cougar Smooth 80# White cardstock

Other products used:
PAPER: Craft Consortium Metal Textures 6×6 paper pad
STAMPS: The Cat’s Pajamas Simply Stacked Sentiments stamp set
INK: Memento Tuxedo Black ink
ACCESSORIES: Fiskars 12″ ProCision Rotary Bypass Paper Trimmer, Elmer’s Dot Runner, Bearly Art precision craft glue, 49 and Market Curators Botanical Ephemera Bits, 1″ double-sided foam strip, MISTI stamp tool, Kat Scrappiness Gold Pearl Mix

I hope you’ve enjoyed today’s project and you’re inspired to get crafty! Be sure to check out all the awesome cardstock and other goodies at CutCardStock (adhesives, labels, stickers, pens, watercolors and ribbon to name a few). And head on over to the CutCardStock Facebook Page and for more inspiration! Also, be sure to join our Creating with Card Stock Facebook Group for even more crafty inspiration! Thanks so much for stopping by today – we’ll see you next time!

Scrappy hugs,

Hip Hop Hooray Twisted GC Holder

Hi everyone! Happy Tuesday – I hope your week has started off on a happy note! I have an amazing ScrapbookingStore DT inspiration project to share with you today, created with the awesome April 2024 Scrapbook Kit with Upgrades. This month’s kit has Easter vibes and all the Spring feels to it, and I totally love it! The twisted card was showcased in an old Splitcoast Stampers newsletter and the tutorial is HERE. So glad I finally got around to making one… not only is the shape super fun, but the design is awesome! What a great way to give a gift card or cash or any occasion!

I cut the card base from CutCardStock Brown Bag Kraft Paper along with layering panels from CutCardStock Aubergine cardstock and assorted patterned papers in the kit. I created a little scene using stickers from the sticker sheet.

I embellished the inside panels with additional papers and stickers from the kit. This card was really easy and worked up fast – it would be a great one to mass produce for gift card or cash giving!

Affiliate links are used in this post at no cost to you – I really appreciate your support!

ScrapbookingStore products used:
April 2024 Scrapbook Kit with Upgrades:
Echo Park It’s Easter Time 12×12 Collection Kit
Upgrades: Echo Park It’s Easter Time Chipboard Phrases
      DIY Shop Textured Flowers Embellishments
      We R Memory Keepers 2×4 Journaling Cards

Other products used:
CARDSTOCK/PAPER: CutCardStock Brown Bag Kraft Paper and Lessebo Aubergine cardstock
ACCESSORIES: Fiskars 12″ ProCision Rotary Bypass Paper Trimmer, Elmer’s Craft Bond Tape Runner

I hope you’ve enjoyed today’s project and you’re thinking about all the fun you could have with this month’s kit… you really ought to think about joining the Subscription Club! Be sure to Follow us on Facebook, Instagram, Pinterest and YouTube for lots of crafty inspiration! And if you do decide to join the Subscription Club, join our ScrapbookingStore Club Member Group on Facebook for more inspiration and to share your projects! Thanks so much for stopping by today – we’ll see you next time!

Scrappy hugs,

Bunny Kisses fun fold

Hi friends! Wow, the weekend sure flew by, didn’t it?! I’m back with my second post this morning to share an amazing ScrapbookingStore DT inspiration project created with the awesome April 2024 Scrapbook Kit with Upgrades. This tented easel card features papers and stickers from the kit along with a chipboard accent from the upgrades. I love how it turned out, and of course it helps to have pretty papers with matching elements! This is a super easy fold – cardstock size is 4-1/4″ x 11″, scored at 4-1/4″ and 8-1/2″, making the folded card 4-1/4″ square. Front layering panel is 4″ x 4″ and bottom layering panel is 2-1/4″ x 4″ with a white layering panel for the inside cut at 4″ x 4″. It’s small but it’s mighty! ;)

I cut the card base from Neenah Classic Crest Solar White cardstock along with layering panels from CutCardStock Pop Tone Black Licorice and an assortment of papers in this month’s kit. The focal image/sentiment was cut with a Spellbinders Classic Oval Die, layered on a scalloped oval cut with a Classic Scalloped Oval Die, and popped up on 1″ double-sided foam strips. I added a tiny bow fashioned from Keep It Simple Back To Basics Mango Ribbon with a small wooden bowmaker that my awesome friend, Maureen, gifted me this past Christmas. I created the easel ‘stop’ using a sticker from the sticker sheet adhered to a cardstock scrap, trimmed, and popped up on thick foam squares. the finishing touch was adding a chipboard banner and tulip from the upgrades.

I embellished the inside panel with a strip cut from an additional patterned paper in the kit, a narrow black cardstock strip, and a square-cut journaling card from the collection. I included an additional angled shot so you can better see the construction. Love!

Affiliate links are used in this post at no cost to you – I really appreciate your support!

ScrapbookingStore products used:
April 2024 Scrapbook Kit with Upgrades:
Echo Park It’s Easter Time 12×12 Collection Kit
Upgrades: Echo Park It’s Easter Time Chipboard Phrases
      DIY Shop Textured Flowers Embellishments
      We R Memory Keepers 2×4 Journaling Cards

Other products used:
CARDSTOCK/PAPER: Neenah Classic Crest 80# Solar White cardstock, CutCardStock Pop Tone Black Licorice cardstock
DIES/PUNCHES: Spellbinders Classic Ovals Large and Classic Scalloped Ovals Large
ACCESSORIES: Fiskars 12″ ProCision Rotary Bypass Paper Trimmer, Elmer’s Craft Bond Tape Runner, Bearly Art precision craft glue, Big Shot, 1″ double-sided foam strips, Keep It Simple Back To Basics Mango Ribbon, thick foam squares

I hope you’ve enjoyed today’s project and you’re thinking about all the fun you could have with this month’s kit… you really ought to think about joining the Subscription Club! Be sure to Follow us on Facebook, Instagram, Pinterest and YouTube for lots of crafty inspiration! And if you do decide to join the Subscription Club, join our ScrapbookingStore Club Member Group on Facebook for more inspiration and to share your projects! Thanks so much for stopping by today – we’ll see you next time!

Scrappy hugs,

today is your day

Hey everybody! Happy Monday! I hope your weekend was a good one! Our new challenge is live this morning over at Ally’s Angels and I’m delighted to share my DT inspiration project for Challenge #81! Our challenges are always ‘anything goes’ so come on over and play! Beginning this month we have a slight change in our structure – we’re now starting at 4:00 AM Mountain Time on the 15th of the month and ending at 4:00 PM Mountain Time on the 10th of the following month. I created a pull tab flip card for this challenge and I love how it turned out. I learned about this fun fold a while back from my friend, Debbie, who got her inspiration from the StampingJill YouTube video HERE. I’ve made a couple of these already and they are so fun!

Card base and one layering panel were cut from Neenah Classic Crest Solar White cardstock along with additional layering panels from CutCardStock Surf Pearl Canvas Textured cardstock and coordinating papers from the Keep It Simple Celebrate The Little Things 12×12 Collection Pack.

I embellished the inside of the flip layers with stickers and ephemera from the same Celebrate The Little Things Collection Pack. I used Ellen Hutson ribbon and Doodlebug Design Lily White Doodle Twine on the pull tab.

Affiliate links are used in this post at no cost to you – I really appreciate your support! 

Products used:
CARDSTOCK/PAPER: Neenah Classic Crest 110# and 80# Solar White cardstock, CutCardStock Aqua Pearl Canvas Textured cardstock, Keep It Simple Celebrate The Little Things 12×12 Collection Pack with Die Cut Sticker Sheet and Ephemera Die Cuts
DIES/PUNCHES: Stampin’ Up Curvy Corner Trio Punch, Kadomaru Pro Corner Rounder, Spellbinders Fancy Framed Tags One dies
ACCESSORIES: Fiskars 12″ ProCision Rotary Bypass Paper Trimmer, Scrapbook Adhesive E-Z Runner, Bearly Art precision craft glue, Big Shot, Scrapbook Adhesives 3D Foam Squares, Ellen Hutson ribbon, Doodlebug Design Lily White Doodle Twine

I hope you’ve enjoyed seeing this project and will link up with us this time! We’d love to see what you create! Thanks so much for stopping by today – we’ll see you next time! ;)

Scrappy hugs,

Living the fairy tale

Hey everybody, Happy Friday! It’s launch day at Keep It Simple and I’m absolutely delighted to share an inspiration project featuring items in our new Belle: Once Upon A Time Collection! I love the fairy tale theme and what little girl (and maybe some big girls) wouldn’t just swoon over this collection?! I used papers, stamps, dies and die cut pieces to create this awesome pop out z-fold. My inspiration came from a fun fold Lisa Curcio shared on her blog that she called a ‘pop up and pull out’ and features a cut and scored pop up mechanism. Soon after making this card, I made another one with a simple tube type pop up mechanism that I think is much simpler, and I’ll be sharing that one soon.

I cut the card base and layers from CutCardStock Basis Blue cardstock along with layering panels from several coordinating papers in the Belle 6×9 Collection Pack. I added the characters from the Die Cut Pieces, popping them up on double-sided foam strips.

I added the castle from the Die Cut Pieces to the inside along with a sentiment from the Collection Stamps which I stamped in Catherine Pooler Suede Shoes ink and cut the with the coordinating Outline Dies.

I cut the back panel from Neenah Classic Crest Solar White cardstock and embellished it with one of the prints used on the front. I added another sentiment from the Collection Stamps, also stamped in Catherine Pooler Suede Shoes ink, and cut with the coordinating Outline Dies.

Keep It Simple products used:
Belle: Once Upon A Time 6×9 Collection Pack
Belle: Once Upon A Time Collection Stamp
Belle: Once Upon A Time Outline Dies
Belle: Once Upon A Time Die Cut Pieces

Affiliate links are used in this post at no cost to you – I really appreciate your support!

Other products used:
CARDSTOCK/PAPER: CutCardStock Basis Blue cardstock, Neenah Classic Crest 80# Solar White cardstock
INK: Catherine Pooler Suede Shoes ink
ACCESSORIES: Fiskars 12″ ProCision Rotary Bypass Paper Trimmer, Elmer’s Craft Bond Tape Runner, Bearly Art precision craft glue, MISTI stamp tool, Big Shot, 1/2″ double-sided foam strips

I hope you’ve loved seeing this project as much as I loved creating it and you’re inspired to get crafty! Be sure to check out ALL the fun goodies in the Keep It Simple online store! Save 10% on your entire order when you shop online using code LoveToScrap2 at checkout! There is no minimum purchase requirement and no usage limits, AND it combines with product, order, and shipping discounts! Is that cool, or what?! Be sure to Follow us on Facebook, Instagram, and Pinterest for lots of crafty inspiration! Thanks so much for stopping by today – we’ll see you next time!

Scrappy hugs,

party time!

Hi friends! Happy last Friday in March! Can you believe it?! I’m back this morning to share another Keep It Simple DT inspiration project made with our Penguin Party Collection which I totally love! The color palette is really wonderful and makes THE best Winter-themed cards! This version of the double flap fun fold is among my favorites so I’ve made another one to showcase these little cuties on this birthday card!

I cut the card base and panels from Neenah Classic Crest Solar White cardstock along with additional layering panels from coordinating papers in the Penguin Party 6×9 Collection Pack. I embellished all three layers with Penguins and Phrases Die Cut Pieces as well as an element from the Happy Birthday Page Title. The finishing touch was adding a bow fashioned from a light blue ribbon from the Back To Basics Royal Ribbon. This is an easy design that really packs a punch and delights the recipient!

Sharing in the following challenges:
1.https://classicdesignchallenge.blogspot.com/2024/03/classic-design-challenge-03-2024-marapr.html
2.https://craftycatzweeklychallenge.blogspot.com/2024/03/crafty-catz-challenge-668.html

Keep It Simple products used:
Penguin Party 6×9 Collection Pack
Penguin Party Penguins Die Cut Pieces
Penguin Party Phrases Die Cut Pieces
Penguin Party Happy Birthday Page Title
Back To Basics Royal Ribbon

Affiliate links are used in this post at no cost to you – I really appreciate your support!

Other products used:
CARDSTOCK/PAPER: Neenah Classic Crest 80# Solar White cardstock
ACCESSORIES: Tonic Studios 12″ Guillotine Paper Trimmer, Bearly Art precision craft glue, 1/2″ double-sided foam strip

I hope you’ve loved seeing this project as much as I loved creating it and you’re inspired to get crafty! Be sure to check out ALL the fun goodies in the Keep It Simple online store! Save 10% on your entire order when you shop online using code LoveToScrap2 at checkout! There is no minimum purchase requirement and no usage limits, AND it combines with product, order, and shipping discounts! Is that cool, or what?! Be sure to Follow us on Facebook, Instagram, and Pinterest for lots of crafty inspiration! Thanks so much for stopping by today – we’ll see you next time!

Scrappy hugs,