A Perfect Christmas

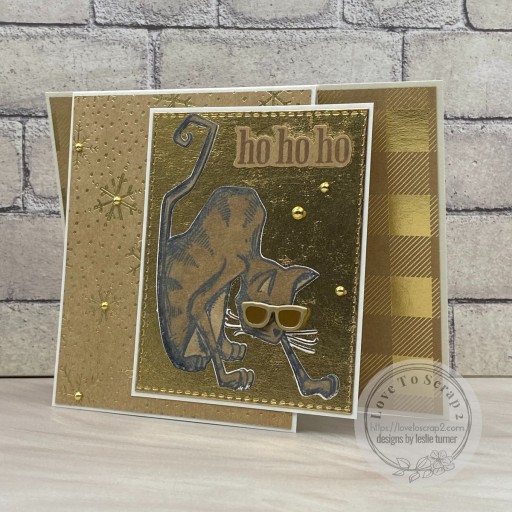
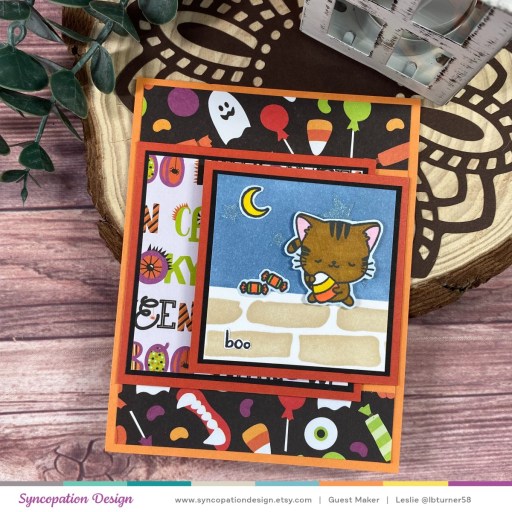
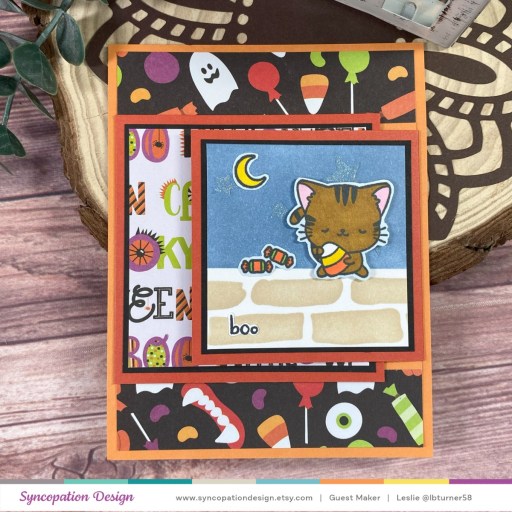
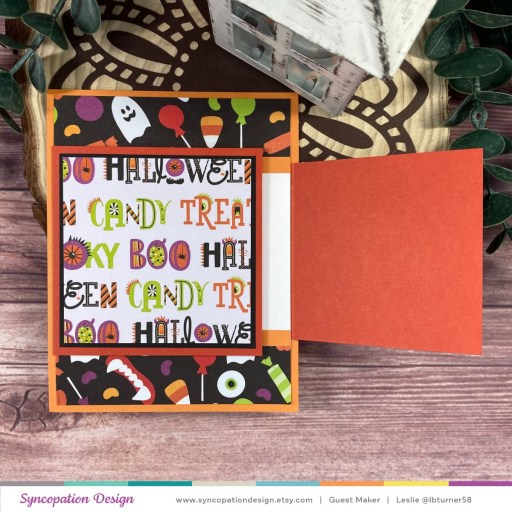
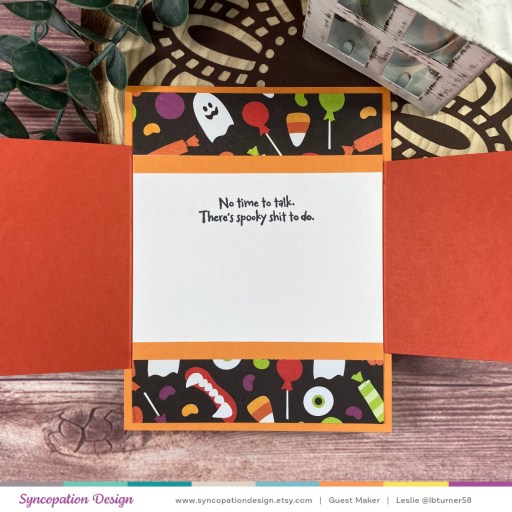
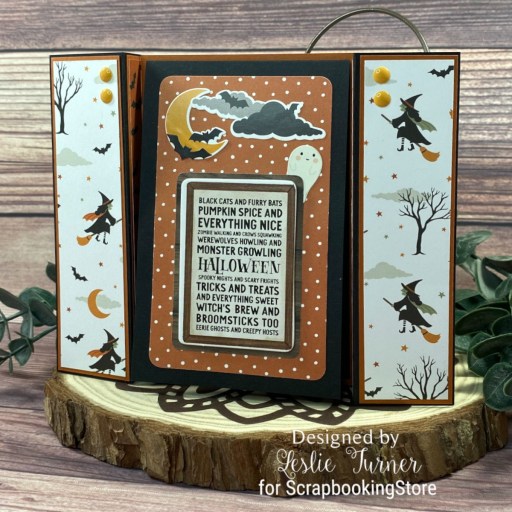
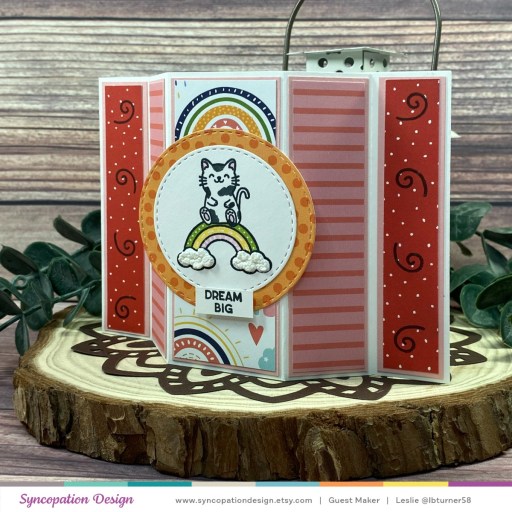
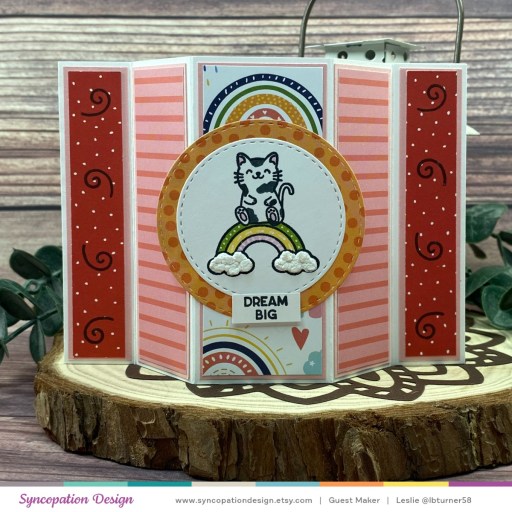
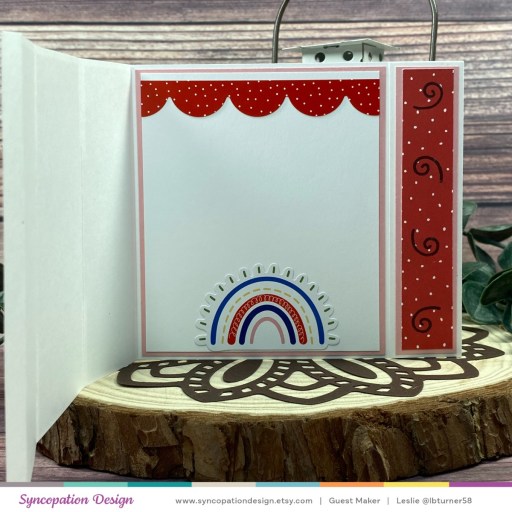
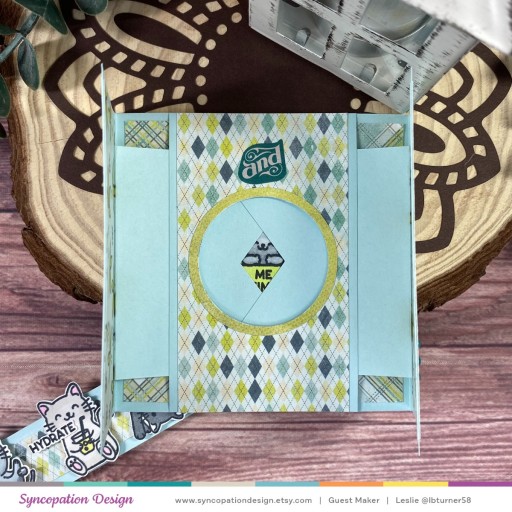
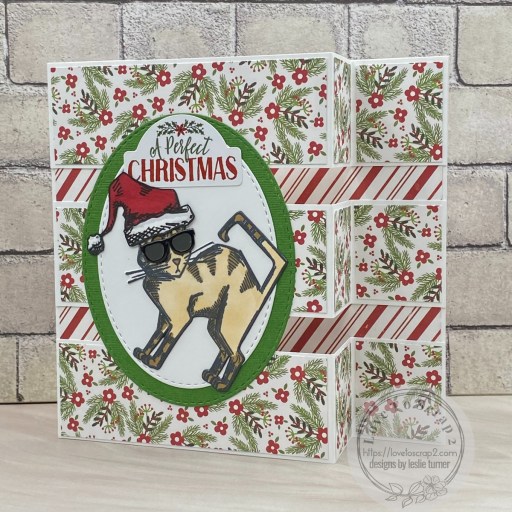
Hi friends! I hope you are healthy and happy, and your weekend has started off nicely! I have a very cool triple Z-fold to share with you this morning that I created for the 2023 Cat Lovers Christmas Challenge honoring our dear friend, Janis. I’ve seen several versions of a triple Z-fold on Pinterest and since the basic Z-fold is one of the easiest to make, I figured adding the triple strips would be a breeze – and it was! I made this one in a standard A2 size and it folds flat for mailing. I have shared the instructions for this easy fun fold in the Freebies section of my blog, so be sure to check it out you’d like to learn how to make it. I totally love Tim’s Crazy Cat stamps and dies, and this is the second card I made using them for the cat lovers Christmas challenge. These cats never get old! And I couldn’t resist putting sunglasses on this guy, too! ;)

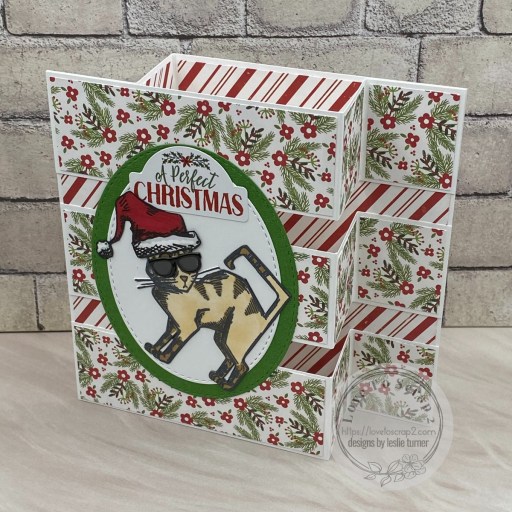
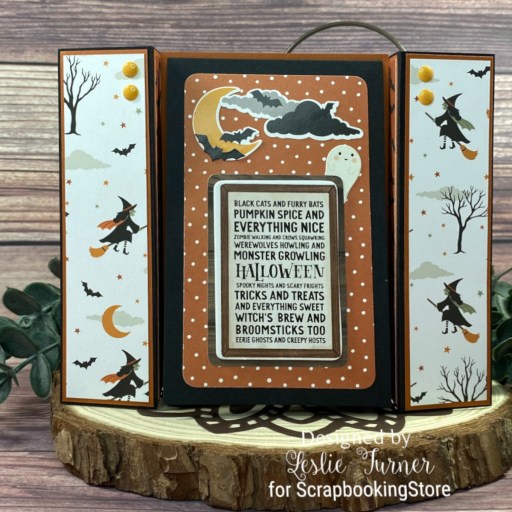
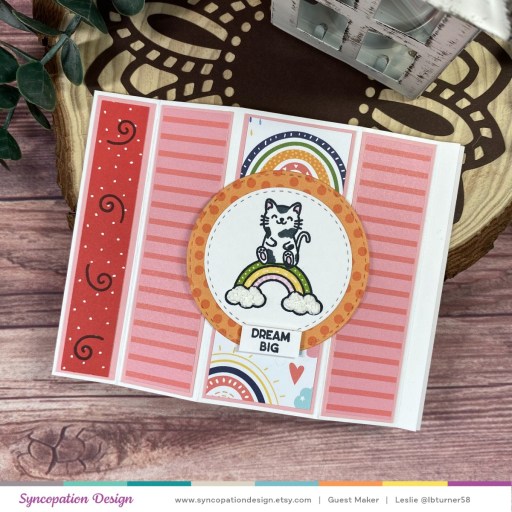
I cut the card base and strips from 80# Solar White cardstock along with layering panels from two coordinating prints in the Echo Park A Perfect Christmas Collection Kit. Using the Keep It Simple Stitched Ovals Nested Dies, I die cut ovals from Solar White cardstock and CutCardStock Scottish Highlands Green cardstock. I adhered them to the card front and added a sentiment sticker from the Echo Park collection. I stamped the cat from the Stampers Anonymous Crazy Cats stamp set on Solar White cardstock, colored him with alcohol markers and cut him with the coordinating Crazy Cats Framelits.

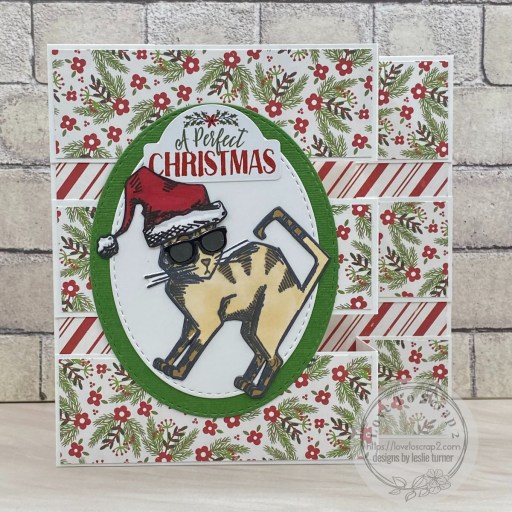
I wanted to use the Santa hat in the Stampers Anonymous Crazy Things stamp set but it was right-hand oriented, so I used the Neat & Tangled Backdrop stamp and Memento Tuxedo Black ink to reverse the image and make it left-hand oriented which ‘flowed’ better with the this particular cat. I darkened the outline just a tad with a Sakura black Pigma Micron 08 pen. I colored the image with alcohol markers, and fussy cut it, and added an Eyelet Outlet Sunglasses Brad.

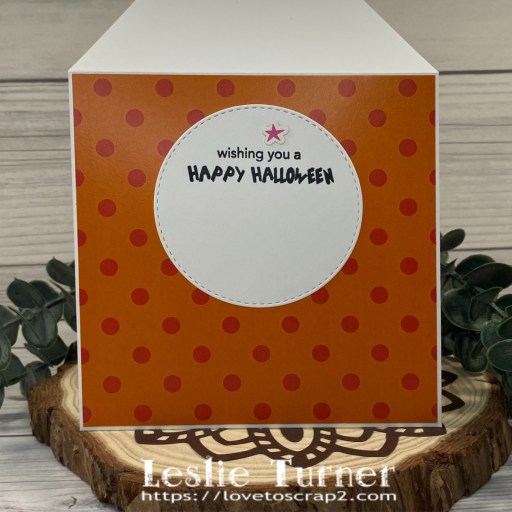
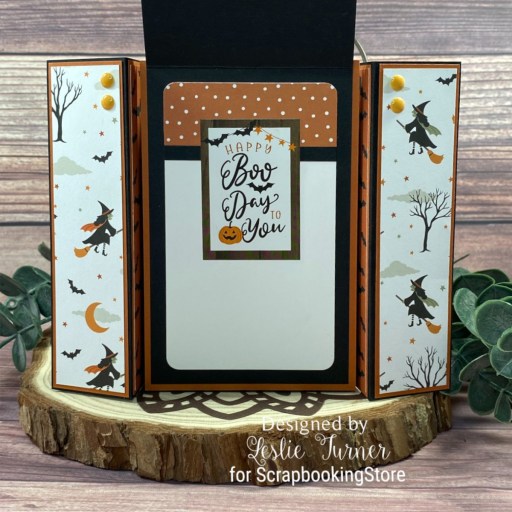
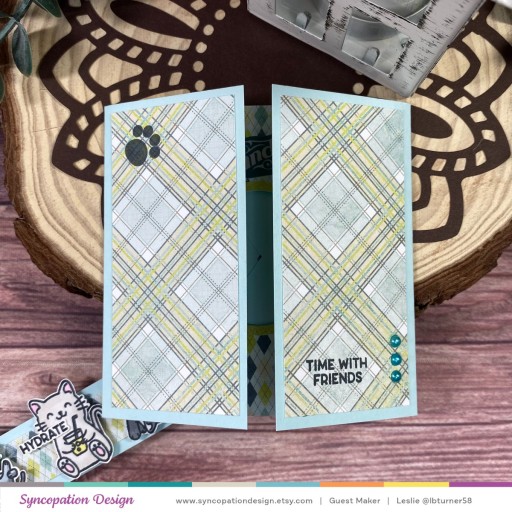
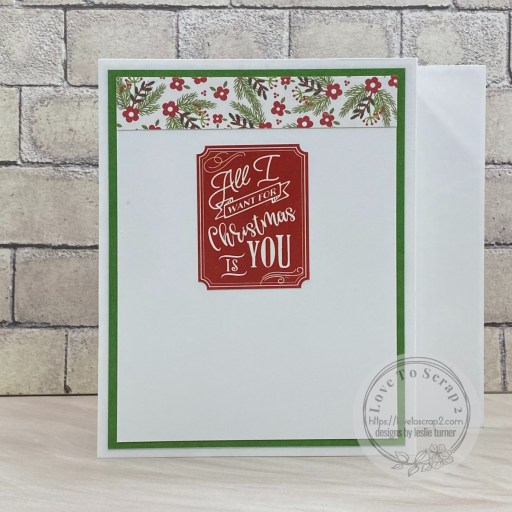
I cut the back panel from Neenah Classic Solar White cardstock and embellished it with a leftover strip of patterned paper used on the front. I added a sentiment sticker from the Echo Park collection and layered the panel on Scottish Highlands Green cardstock.

Sharing in the following challenges:
1. Classic Design Challenge: October #10 – Anything Goes
2. Creative Creases Challenges: #68 – Anything Goes with a Fun Fold
3. Critter Crazy Challenge Blog: #79 – Anything Goes with a Featured Critter
4. Cut It Up Challenges: 3289 – Add A Sentiment

Affiliate links are used in this post at no cost to you – I really appreciate your support! 

Products used:
CARDSTOCK/PAPER: Neenah Classic Crest 80# Solar White cardstock, CutCardStock Scottish Highlands Green cardstock, Echo Park A Perfect Christmas Collection Kit
STAMPS: Stampers Anonymous Crazy Cats and Crazy Things Stamps, Neat & Tangled Backdrop stamp
INK: Memento Tuxedo Black ink (pad and marker), Sakura black Pigma Micron 08 pen, Arteza alcohol markers- R21, YR19, CG08, BR84
DIES/PUNCHES: Keep It Simple Stitched Ovals Nested Dies, Stampers Anonymous Crazy Cats Framelits
ACCESSORIES: Tonic Studios 12″ Guillotine Paper Trimmer, Gina K Designs Adhesive Dot Runner, Bearly Art precision craft glue, MISTI stamp tool, Big Shot, Eyelet Outlet Sunglasses Brads

I hope you’ve enjoyed seeing this triple Z-fold! If you’re a cat lover, come on over and link up some cat-themed Christmas cards in the challenge! We’d love to see what you come up with! Thanks so much for stopping by today – we’ll see you next time! ;)

Scrappy hugs,

ho ho ho fun fold

Happy Thursday, everybody! The weekend is almost here and I hope you have something fun planned this weekend! I’ve been busy creating cards for the 2023 Cat Lovers Christmas Challenge that has been organized to honor our friend, Janis. This front flap card is one of my most favorite fun folds because it’s so easy and really packs a punch. And I used a kraft and gold color scheme which I really love. It’s been a while since I pulled out the Stampers Anonymous Crazy Cats stamps and dies, so I made two cards while I had them out, with different cats, of course! And don’t you just love the sunglasses?! Bahahaha!

I cut the flat card base from CutCardStock Basis 110# Natural and the front flap from Basis 80# Natural cardstock. I cut layering panels from coordinating prints in the American Crafts Kraft & Gold Print 6×6 paper pad. I stamped the cat from the Stampers Anonymous Crazy Cats stamp set in Memento Tuxedo Black ink on 80# Basis Natural, colored him with alcohol markers, and cut him with the coordinating Crazy Cats Framelits.

I adhered the cat to a rectangle cut with the Keep It Simple Stitched Rectangles Nested Dies that I layered on a Basis 80# Natural panel. I stamped the sentiment from the Paper Smooches Holiday Cheer stamp set in Catherine Pooler Over Coffee ink on the back side of a scrap, fussy cut, and adhered it to the rectangle. I removed the prongs from an Eyelet Outlet Sunglasses Brad and adhered the sunglasses to the cat with Stampin’ Up Mini Dimensionals. The final touch was adding several pearls Kat Scrappiness Gold Pearl Mix.

I cut the inside panel from CutCardStock Basis 80# Natural cardstock and embellished it with a scrap of the plaid print used on the front. I stamped the sentiment (also from the Paper Smooches Holiday Cheer stamp set) in Catherine Pooler Over Coffee ink and layered it on the back side of a scrap.

Sharing in the following challenges:
1. Christmas Craft Creations: October Challenge – Monochromatic

2. Classic Design Challenge: October #10 – Anything Goes

Affiliate links are used in this post at no cost to you – I really appreciate your support! 

Products used:
CARDSTOCK/PAPER: CutCardStock Basis 110# Natural and Basis 80# Natural cardstock, American Crafts Kraft & Gold Print 6×6 paper pad
STAMPS: Stampers Anonymous Crazy Cats Stamps, Paper Smooches Holiday Cheer stamp set
INK: Memento Tuxedo Black ink, Catherine Pooler Over Coffee ink, Arteza BR84 alcohol marker
DIES/PUNCHES: Stampers Anonymous Crazy Cats Framelits, Keep It Simple Stitched Rectangles Nested Dies
ACCESSORIES: Tonic Studios 12″ Guillotine Paper Trimmer, Gina K Designs Adhesive Dot Runner, Bearly Art precision craft glue, MISTI stamp tool, Big Shot, Eyelet Outlet Sunglasses Brads, Stampin’ Up Mini Dimensionals, Kat Scrappiness Gold Pearl Mix

I hope you’ve enjoyed seeing this project and will link up with us this time! Thanks so much for stopping by today – we’ll see you next time! ;)

Scrappy hugs,

Ride or Die Witches

Hi friends! Happy Hump Day – I hope you’re having a great week! I’ve popped in this morning to share a fun Halloween card that I made for a swap in one of my design teams. The recipient has received it so it’s safe to share! I have to admit that I was not fond of this triple point card at all when I first saw it and I don’t know why; it just didn’t appeal to me. It seems to be pretty popular and after seeing so many of them, it has actually ‘grown’ on me. I’ve made a couple of them now (this was the first one) and I didn’t use any instructions – I was able to make it from memory, lol. It’s really very simple – cut the front flap into a point and rotate the triangular corners upward at an angle on each side to create the triple point at the bottom. That’s it!

I cut the card base from Neenah Classic Crest 80# Solar White cardstock along with a spider web layering panel from the Keep It Simple A Wee Bit Wicked 12×12 Collection Pack. Using the Keep It Simple Stitched Circles Nested Dies, I cut a large circle from CutCardStock Silk Glitter Opulent Opal 12×12 cardstock and adhered witch and star die cuts from the Keep It Simple A Wee Bit Wicked Die Cut Pieces. I chose a sentiment from the Die Cut Pieces, trimmed it and rounded the corners with my Kadomaru Pro corner rounder.

I cut the inside panel from an orange dotted print in the Keep It Simple A Wee Bit Wicked 6×9 Collection Pack and adhered a slightly smaller stitched circle die cut. I stamped a sentiment from the Prickley Pear Stamps Bats 2 stamp set in Memento Tuxedo Black ink and added a star die cut.

Sharing in the following challenges:
1. Classic Design Challenge: October #10 – Anything Goes
2. Creative Crafting Uncles: #46 – Halloween
3. Halloween Crafts All Year ‘Round: #9 – Anything Halloween Goes
4. Sparkles Monthly Challenge Blog: #169 – Things That Go Bump in the Night
5. Try It On Tuesday: Halloween

Affiliate links are used in this post at no cost to you – I really appreciate your support! 

Products used:
CARDSTOCK/PAPER: Neenah Classic Crest 80# Solar White cardstock, CutCardStock Silk Glitter Opulent Opal 12×12 cardstock, Keep It Simple A Wee Bit Wicked 12×12 and 6×9 Collection Packs
STAMPS: Prickley Pear Stamps Bats 2 stamp set
INK: Memento Tuxedo Black ink
DIES/PUNCHES: Keep It Simple Stitched Circles Nested Dies, Kadomaru Pro Corner Rounder
ACCESSORIES: Tonic Studios 12″ Guillotine Paper Trimmer, Tombow Mono Dots adhesive, Bearly Art precision craft glue, MISTI stamp tool, Big Shot, Keep It Simple A Wee Bit Wicked Die Cut Pieces, 1/2″ and 1/4″ double-sided foam strips

I hope you’ve enjoyed seeing this project and will link up with us this time! Thanks so much for stopping by today – we’ll see you next time! ;)

Scrappy hugs,

boo fun fold

Hey everybody! It’s Saturday and I hope you have a fun weekend planned! Has the weather cooled off any where you are? Our nights are down in the upper 30s/low 40s and our days are in the mid to high 60s which makes us happy! I’ve popped in this morning to share another Syncopation Design inspiration project created with the super cool Code Orange stamp set! *Minor profanity alert!* OMGoodness, I totally love these stamps because there are so many options for fun Halloween cards! The card I made is yet another version of the double flap fun fold! I have quite a few double flap fun folds in my tutorial arsenal and each one is just as fun as the next! ;)

I started by inking the Solar White panel for the smaller flap. I used The Crafter’s Workshop Mini Bricks stencil with Ranger antique linen distress ink and a blending brush across the bottom. I masked that off and used Ranger stormy sky distress ink and a blending brush for the sky. I mixed a tiny bit of Judi-Kins Iridescent Sparkle embossing powder in some DreamWeaver Translucent embossing paste and applied it through the Keep It Simple Starry Skies stencil. This was a total experiment… I wasn’t sure mixing embossing powder and embossing paste would even work, but it actually turned out pretty cool looking with translucent sparkly stars!

So, while the stars were drying, I cut the card base and all the layering panels from CutCardStock Pop Tone Orange Fizz, Pop Tone Tangy Orange and Pop Tone Black Licorice, along with coordinating Halloween papers from The Paper Studio Four Seasons and Everything In Between -2- paper pad. I stamped the kitty, moon, candy and one-word sentiment on a scrap piece of Solar White cardstock, colored the images with alcohol markers, and fussy cut them. I popped the kitty up on foam pads and adhered the moon, candy and sentiment flat on the panel.

Here’s a shot of the smaller panel opened up revealing the slightly larger panel.

And here’s a shot of the slightly larger panel opened revealing the hilarious inside sentiment. Gotta love Jennifer’s sense of humor! :D

Sharing in the following challenges:
1. A Perfect Time To Craft Open Challenge: October #10-2023 – Anything Goes
2. Critter Crazy Challenge Blog: #79 – Anything Goes with a Featured Critter

Syncopation Design products used:
Code Orange stamp set

Affiliate links are used in this post at no cost to you – I really appreciate your support!

Other products used:
CARDSTOCK/PAPER: CutCardStock Pop Tone Orange Fizz, Pop Tone Tangy Orange, and Pop Tone Black Licorice cardstock, Neenah Classic Crest 80# Solar White cardstock, The Paper Studio Four Seasons and Everything In Between -2- paper pad
INK: Memento Tuxedo Black ink; Arteza alcohol markers- Y02/32, YR33, YG05, RP09, GB08; Ranger antique linen and stormy sky distress inks
ACCESSORIES: Tonic Studios 12″ Guillotine Paper Trimmer, Tombow Mono Dots adhesive, Bearly Art precision craft glue, MISTI stamp tool, The Crafter’s Workshop Mini Bricks stencil, Keep It Simple Starry Skies Stencil, blending brushes, DreamWeaver Translucent embossing paste, Judi-Kins Iridescent Sparkle embossing powder, Stampin’ Up Dimensionals

I hope you’ve enjoyed this project and are inspired to get crafty! Be sure to check out all the fun digital papers, pocket cards, elements, cut files, bundles and scrap kits, as well as clear stamps in the Syncopation Design Etsy store! And be sure to Follow on Instagram and Facebook for crafty inspiration! Thanks so much for stopping by today – we’ll see you next time!

Scrappy hugs,

Black Cats and Furry Bats fun fold

Hey everybody! Are you working on Halloween cards or are you more of an Autumn/Fall-themed card maker? I have to admit that I typically don’t send out many Halloween cards but I’ve made quite a few this year! I have an awesome ScrapbookingStore DT inspiration project to share with you today, created with the October 2023 Scrapbook Kit with Upgrades. I love that every item coordinates beautifully with the next, and the neutral color palette really lends itself to some spooky crafting! This accordion center panel design made a most awesome Halloween card featuring papers and stickers along with chipboard accents and enamel dots from this month’s kit. I’ve once again found some inspiration from Lisa Curcio, SU demonstrator, who posted this awesome design on Instagram.

I cut the card base and folded center panel from CutCardStock Basis Dark Orange cardstock and embellished them with CutCardStock Basis Black cardstock and coordinating papers from the kit. The focal is a chipboard element from the upgrades which I adhered to the folded center panel along with several stickers from the sticker sheet. The finishing touch was adding a few enamel dots from the upgrades.

I cut the inside panel of the center folded element from Neenah Classic Crest Solar White cardstock and embellished it with strips of coordinating paper from the kit and Basis Black cardstock. I added a sentiment sticker from the sticker sheet which completed the card.

Sharing in the following challenges:
1. A Perfect Time To Craft Open Challenge: October #10-2023 – Anything Goes
2. A Place To Start: October 2023 – Anything Goes
3. Di’s Digi Stamps Challenge: Halloween or Thankful/Thanks
4. Penny’s Paper-Crafty Challenge Blog: #557 – Anything Goes with Paper

Affiliate links are used in this post at no cost to you – I really appreciate your support!

ScrapbookingStore products used:
October 2023 Scrapbook Kit with Upgrades

Other products used:
CARDSTOCK/PAPER: CutCardStock Basis Dark Orange and Basis Black cardstock, Neenah Classic Crest 110# and 80# Solar White cardstock
DIES/PUNCHES: Kadomaru Pro Corner Rounder
ACCESSORIES: Tonic Studios 12″ Guillotine Paper Trimmer, Tombow Mono Dots adhesive, Bearly Art precision craft glue

I hope you’ve enjoyed today’s project and you’re thinking about all the fun you could have with this month’s kit… you really ought to think about joining the Subscription Club! Be sure to Follow us on Facebook, Instagram, Pinterest and YouTube for lots of crafty inspiration! And if you do decide to join the Subscription Club, join our ScrapbookingStore Club Member Group on Facebook for more inspiration and to share your projects! Thanks so much for stopping by today – we’ll see you next time!

Scrappy hugs,

‘Hairy Scary’ Matchbook

Hey everybody! I’m back with another fun post today and I hope you aren’t getting sick of me yet, lol! I just HAD to post this Hairy Scary Matchbook that I created with the Art Impressions Halloween Matchbook stamps and dies! The Give Us A Fright Challenge #362 over at Art Impressions started yesterday and I’m all in! I love nothing more than an Ai Matchbook and it doesn’t matter to me what the occasion is!

For some reason I always reach for Polly’s Paper Studio double-sided papers to cut the Matchbook template from. I then stamped all the Halloween elements on CutCardStock Basis White cardstock and colored them with alcohol markers. The fun part of these Matchbooks is always the assembly! I LOVE watching them come to life!

Here are a few more angled shots and one with the teeny tiny envelope! So stinkin’ cute, I can’t stand it!

Sharing in these additional challenges:
1. 613 Avenue Create: October 2023 – Anything Goes w/ optional Autumn Colors
2. A Perfect Time To Craft Open Challenge: October #10-2023 – Anything Goes
3. Creative Creases Challenges: #68 – Anything Goes with a Fun Fold
4. Di’s Digi Stamps Challenge: Halloween or Thankful/Thanks
5. Penny’s Paper-Crafty Challenge Blog: #557 – Anything Goes with Paper

Affiliate links are used in this post at no cost to you – I really appreciate your support! 

Products used:
CARDSTOCK/PAPER: CutCardStock Basis White cardstock, Polly’s Paper Studio double-sided papers
STAMPS: Art Impressions Halloween Matchbook Stamps
INK: Catherine Pooler Black Jack ink; Arteza alcohol markers- YR32/33/39, PB09/14, GS05/07/09, Y02/07/25/31; Pentel Slicci Gold Pen
DIES/PUNCHES: Art Impressions Halloween Matchbook Dies, Matchbook Template Die and Matchbook Envelope Dies
ACCESSORIES: Tonic Studios 12″ Guillotine Paper Trimmer, Bearly Art precision craft glue, MISTI stamp tool, Big Shot

I hope you’ve enjoyed seeing this super adorable Hairy Scary Matchbook! Thanks so much for stopping by today – we’ll see you next time! ;)

Scrappy hugs,

Ghoul Gang

Hey everybody! HaPpY fRiDaY to you! I’ve popped in this morning to share a Syncopation Design inspiration project created with the awesome Code Orange stamp set! I used quite a few stamps in this set for my card and I absolutely love how it turned out! What better day than Friday the 13th to share this cool ghoul W-fold design! I’ve made a few these in the past and always chuckle because it really should be called an M-fold! Regardless, it’s a fun one to put together! I’ve had the handwritten instructions for this in my arsenal for a number of years and don’t remember who to give credit to, but there are many tutorials out there by searching for a W-fold.

I cut the card base and inside strip and panels from CutCardStock Basis Black cardstock along with front and inside layering panels from coordinating prints in the American Crafts Halloween 6×6 paper pad. I stamped the focal image for the front in Memento Tuxedo Black ink on Solar White cardstock, colored it with alcohol markers, and cut it with an oval die from the Keep It Simple Stitched Ovals Nested Dies. I also cut a slightly larger oval from the Basis Black to layer beneath the focal image. I added a strip of patterned paper and two strips of MAMBI skinny washi tape to the top of the front panel which completed the card front.

I stamped the images for the inside on Solar White cardstock, colored them with alcohol markers and cut them with an oval die from the Keep It Simple stitched oval dies. I assembled the panels and adhered them to the strip. Such a fun, fun design!

Sharing in the following challenges:
1. 613 Avenue Create: October 2023 – Anything Goes w/ optional Autumn Colors
2. A Perfect Time To Craft Open Challenge: October #10-2023 – Anything Goes
3. Crafty Gals Corner: #248 – Halloween Colors
4. Creative Creases Challenges: #68 – Anything Goes with a Fun Fold
5. Di’s Digi Stamps Challenge: Halloween or Thankful/Thanks
5. Penny’s Paper-Crafty Challenge Blog: #557 – Anything Goes with Paper

Syncopation Design products used:
Code Orange stamp set

Affiliate links are used in this post at no cost to you – I really appreciate your support!

Other products used:
CARDSTOCK/PAPER: CutCardStock Basis Black cardstock, Neenah Classic Crest 80# Solar White cardstock, American Crafts Halloween 6×6 paper pad
INK: Memento Tuxedo Black ink; Arteza alcohol markers- YG54/57, YR32, Y02/32, P34, RP09, NG06/08, BR52/68
DIES/PUNCHES: Keep It Simple Stitched Ovals Nested Dies
ACCESSORIES: Tonic Studios 12″ Guillotine Paper Trimmer, Tombow Mono Dots adhesive, Bearly Art precision craft glue, MISTI stamp tool, Big Shot, Me & My Big Ideas yellow/gold and black/white skinny washi tape

I hope you’ve enjoyed this project and are inspired to get crafty! Be sure to check out all the fun digital papers, pocket cards, elements, cut files, bundles and scrap kits, as well as clear stamps in the Syncopation Design Etsy store! And be sure to Follow on Instagram and Facebook for crafty inspiration! Thanks so much for stopping by today – we’ll see you next time!

Scrappy hugs,

Boo Crew box card

Howdy peeps! I hope you’re ready for the weekend and have something fun planned! I have a great ScrapbookingStore DT inspiration project to share with you today, created with the awesome October 2023 Scrapbook Kit with Upgrades! You know I’m a huge fan of fun folds and the awesome assortment of products in this month’s collection have my head spinning with ideas! This floating elements box card features coordinating papers and ghoulish character stickers along with enamel dots and a tag from the upgrades! My inspiration for this fun fold came from Sam Calcott over at Mixed Up Craft. I totally love her designs!

I cut the card base from CutCardStock 12×12 Twine cardstock and embellished it with CutCardStock Pop Tone Hot Fudge cardstock and patterned papers (on the front and inside) from the collection. I adhered five character stickers from the sticker sheet to small scraps of CutCardStock Basis White cardstock and fussy cut them. I cut a circle in the card base using the Keep It Simple Stitched Circles Nested Dies and added the ghoulish cuties across the aperture, anchoring them to an acetate strip to create the appearance of floating. I used more stickers from the sticker sheet and enamel dots from the upgrades to finish embellishing the card front.

I cut the back panel from Basis White cardstock and embellished it with a strip of coordinating paper from the kit. I added a sentiment from the Frames & Tags in the upgrades and layered the panel on Pop Tone Hot Fudge cardstock.

Sharing in the following challenges:
1. 613 Avenue Create: October 2023 – Anything Goes w/ optional Autumn Colors
2. A Perfect Time To Craft Open Challenge: October #10-2023 – Anything Goes
3. Crafty Gals Corner: #248 – Halloween Colors
4. Halloween Crafts All Year ‘Round: #8 – Anything Halloween Goes
5. Wednesday’s Creative Inspirations Challenge Blog: Autumn or Halloween

Affiliate links are used in this post at no cost to you – I really appreciate your support!

ScrapbookingStore products used:
October 2023 Scrapbook Kit with Upgrades

Other products used:
CARDSTOCK/PAPER: CutCardStock 12×12 Twine, Pop Tone Hot Fudge and Basis White cardstock
DIES/PUNCHES: Keep It Simple Stitched Circles Nested Dies, Kadomaru Pro Corner Rounder
ACCESSORIES: Tonic Studios 12″ Guillotine Paper Trimmer, Tombow Mono Dots adhesive, Bearly Art precision craft glue, Big Shot, Grafix Crystal Clear Craft Plastic, 1/2″ double-sided foam strips

I hope you’ve enjoyed today’s project and you’re thinking about all the fun you could have with this month’s kit… you really ought to think about joining the Subscription Club! Be sure to Follow us on Facebook, Instagram, Pinterest and YouTube for lots of crafty inspiration! And if you do decide to join the Subscription Club, join our ScrapbookingStore Club Member Group on Facebook for more inspiration and to share your projects! Thanks so much for stopping by today – we’ll see you next time!

Scrappy hugs,

Dream Big fun fold

Hey everybody! Happy Thursday – it’s almost the weekend! I’ve popped in this morning to share another Syncopation Design inspiration project created with the super adorable and way amazing Cat Therapy stamp set! I can’t get enough of these kitties! And this stamp set has SO MUCH to offer with over 50 stamps in it! Dang! I created a bay window fold to show off this little guy (or gal) on a rainbow! This is a new-to-me fold that was showcased in a recent Splitcoast Stampers newsletter HERE. You know I’m always on the lookout to try new ones and this one is super easy and really packs a punch!

I cut the card base from Neenah Classic Crest Solar white cardstock and layering panels from Papertrey Ink Sweet Blush cardstock and assorted prints from the Echo Park My Favorite Summer Collection Kit. I stamped the sentiment and kitty on a scrap piece of Solar White cardstock, trimmed the sentiment and colored the image with alcohol markers. I cut the image with a Keep It Simple Stitched Circles Nested Die and a slightly larger circle from a coordinating print in the Summer collection. I added some Cosmic Shimmer Fluffy Stuff to the little clouds after adhering the circular panel to the card front. The final touch was stamping swirls (from the same stamp set) down both sides of the card front for a little interest.

I cut the inside panels from Solar White and Sweet Blush cardstock, added a couple stickers from the Summer collection to the inside, leaving it blank with plenty of room to write a custom message. The fun part is that this card folds completely flat for mailing!

Sharing in the following challenges:
1. A Perfect Time To Craft Open Challenge: October #10-2023 – Anything Goes
2. A Place To Start: October 2023 – Anything Goes
3. Fab ‘n’ Funky Challenges: #581 – Show Us Some Coloring
4. Use Your Stuff: #494 – Small Type

Syncopation Design products used:
Cat Therapy stamp set

Affiliate links are used in this post at no cost to you – I really appreciate your support!

Other products used:
CARDSTOCK/PAPER: Neenah Classic Crest 80# Solar White cardstock, Papertrey Ink Sweet Blush cardstock, Echo Park My Favorite Summer Collection Kit
INK: Memento Tuxedo Black ink; Arteza alcohol markers- GG00/02, RP09, Y27, YG16; Sharpie fine point white paint pen
DIES/PUNCHES: Keep It Simple Stitched Circles Nesting Dies
ACCESSORIES: Tonic Studios 12″ Guillotine Paper Trimmer, Tombow Mono Dots adhesive, Bearly Art precision craft glue, MISTI stamp tool, Big Shot, Cosmic Shimmer Puffy Stuff, Milwaukee heat tool, Stampin’ Up Mini Dimensionals

I hope you’ve enjoyed this project and are inspired to get crafty! Be sure to check out all the fun digital papers, pocket cards, elements, cut files, bundles and scrap kits, as well as clear stamps in the Syncopation Design Etsy store! And be sure to Follow on Instagram and Facebook for crafty inspiration! Thanks so much for stopping by today – we’ll see you next time!

Scrappy hugs,

Time With Friends fun fold

Hi friends! I hope you’re having a great week! I’ve popped in this morning with my second post to share a Syncopation Design inspiration project! I was gifted the super adorable Cat Therapy stamp set, and of course, being a Crazy Cat Lady, all kinds of ideas were swimming through my head! It has been a minute since I created a shutter card (shutter – as in camera) and I once again tried my hand at it and used several of the images in this stamp set. I love how it turned out! If you are a fellow cat person, you need this stamp set in your stash – it has over 50 stamps in it!

I cut the card base, inside pieces and belly band from CutCardStock Sno Cone cardstock, along with layering panels from coordinating papers in the Basic Grey Marjolaine 6×6 paper pad and Neenah Classic Crest Solar White cardstock. I stamped several images and sentiments in Memento Tuxedo Black ink from the Cat Therapy stamp set on Solar White, fussy cut them and adhered them to the belly band. I stamped a paw print and sentiment on the card front in black ink, and added several turquoise pearls.

I used circle punches to create an aperture on the inside for the shutter mechanism, and added a sticker from the 7 Gypsies Architextures Create Stash Paque. Here is a shot of the shutter opening up.

And here is a shot of the shutter completely open revealing another adorable kitty from the stamp set getting in some ‘me time.’ How stinkin’ cute is this?!

Sharing in the following challenges:
1. A Perfect Time To Craft Open Challenge: October #10 – Anything Goes
2. A Place To Start: October 2023 – Anything Goes
3. Fab ‘n’ Funky Challenges: #581 – Show Us Some Coloring
4. Jan’s Digi Stamps Challenge: October Anything Goes

Syncopation Design products used:
Cat Therapy stamp set

Affiliate links are used in this post at no cost to you – I really appreciate your support!

Other products used:
CARDSTOCK/PAPER: CutCardStock Pop Tone Sno Cone cardstock, Neenah Classic Crest Solar White cardstock, Basic Grey Marjolaine 6×6 paper pad
INK: Memento Tuxedo Black ink; Arteza alcohol markers- NG04/06/08, GS09, Y07, YG07, RP09
DIES/PUNCHES: Stampin’ Up 1-3/4″ and 2″ circle punches, EK Success 2-1/4″ circle punch
ACCESSORIES: Tonic Studios 12″ Guillotine Paper Trimmer, Tombow Mono Dots adhesive, Bearly Art precision craft glue, MISTI stamp tool, 7Gypsies Architextures Create Stash Paque, Eyelet Outlet turquoise pearls, Scrapbook Adhesives 3D Foam Squares Variety Pack (small white)

I hope you’ve enjoyed this project and are inspired to get crafty! Be sure to check out all the fun digital papers, pocket cards, elements, cut files, bundles and scrap kits, as well as clear stamps in the Syncopation Design Etsy store! And be sure to Follow on Instagram and Facebook for crafty inspiration! Thanks so much for stopping by today – we’ll see you next time!

Scrappy hugs,