9/17/23 Rising Star at A Place To Start!
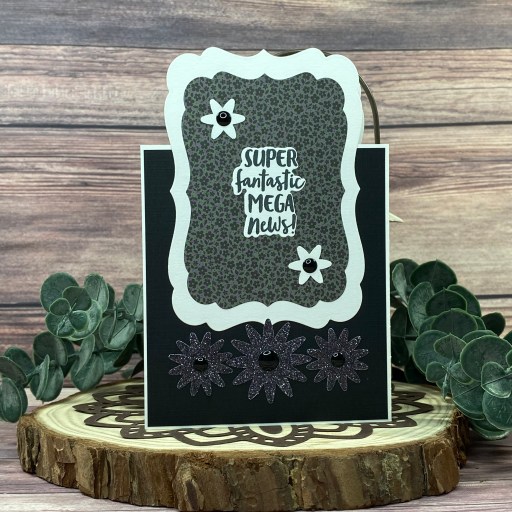
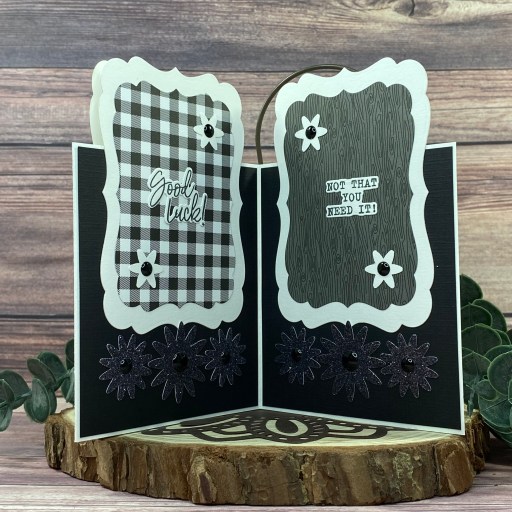
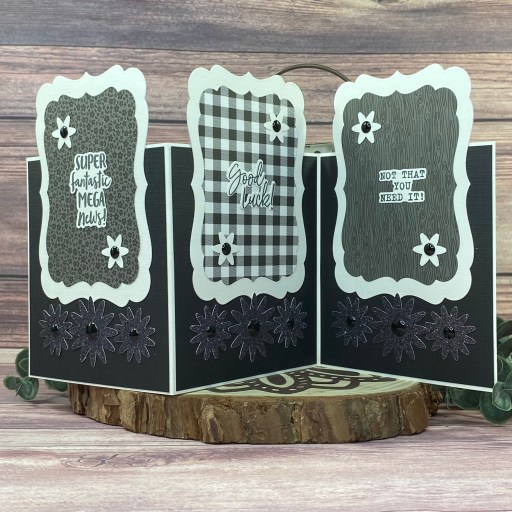
Hey everybody! Dang, can you believe how fast the time is flying?! We’re already headed into the middle of September! I’m up on the Prickley Pear Stamps blog today with an inspiration project featuring the new Christmas with Spinach and Ramona stamp set! This is one of the cutest stamp sets I have ever had in my hands and I created an inverted standing triple panel card to show off these adorable little critters!

I cut the card base and front panel from CutCardStock Basis 80# White 12×12 cardstock. I stamped the image from the Christmas with Spinach and Ramona stamp set on the front panel and colored it with alcohol markers, adding some accents with metallic pens. I stamped snowflakes all over the card base and front panel and added clear iridescent gemstones to the center of random snowflakes for some pretty sparkle. I stamped the sentiment on Basis White, trimmed it into three strips, and added it to the front which completed the card.


Sharing in the following challenges:
1. A Perfect Time To Craft Open Challenge: September #9-2023 – Anything Goes
2. A Place To Start: September 2023 – Anything Goes w/ optional All That Glitters
3. Classic Design Challenge: September #9 – Anything Goes
Affiliate links are used in this post at no cost to you – I really appreciate your support!
Prickley Pear Stamps products used:
Christmas with Spinach and Ramona
Other products used:
CARDSTOCK/PAPER: CutCardStock Basis 80# White 12×12 cardstock
INK: Memento Tuxedo Black ink (pad and marker), Catherine Pooler Tranquil ink; Arteza alcohol markers- YG12/13/17/22, RP09/16, R14/15/21, B14/17, Y02, BR52/86, PB16, GS09, YR32; Pentel Slicci Gold, Metallic Violet and Metallic Green pens; Copic black 0.3 multi-liner pen, Sakura White Gelly Roll pen
ACCESSORIES: Tonic Studios 12″ Guillotine Paper Trimmer, Tombow Mono Dots adhesive, Bearly Art precision craft glue, MISTI stamp tool, clear iridescent gemstones
I hope you’ve enjoyed this project! Be sure to check out all the awesome stamps and dies at Prickley Pear Stamps! Save 10% on anything on the site when you shop at Prickley Pear Stamps by using coupon code LESLIE10 at checkout! And be sure to ‘like’ and ‘follow’ the Prickley Pear Stamps Facebook page to keep up with news and sales, and join Prickley Pear Pals (the fan group) for lots of fun crafty ideas and to share your creativity! And finally, we’d love to see you visit the Prickley Pear Stamps blog and become a Follower! Hope to see you there! Thanks so much for stopping by today – we’ll see you next time! ;)
Scrappy hugs,