Friends Are Flowers Envelope Box Card

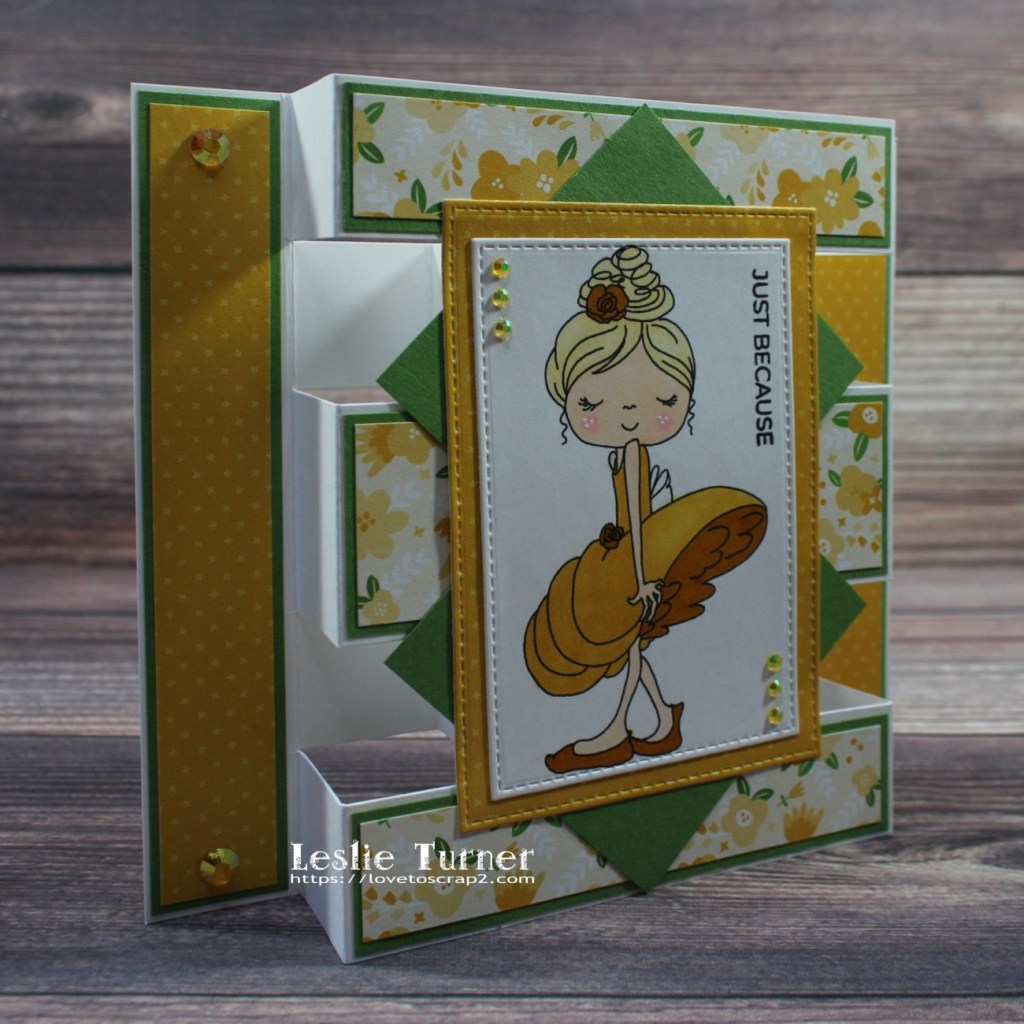
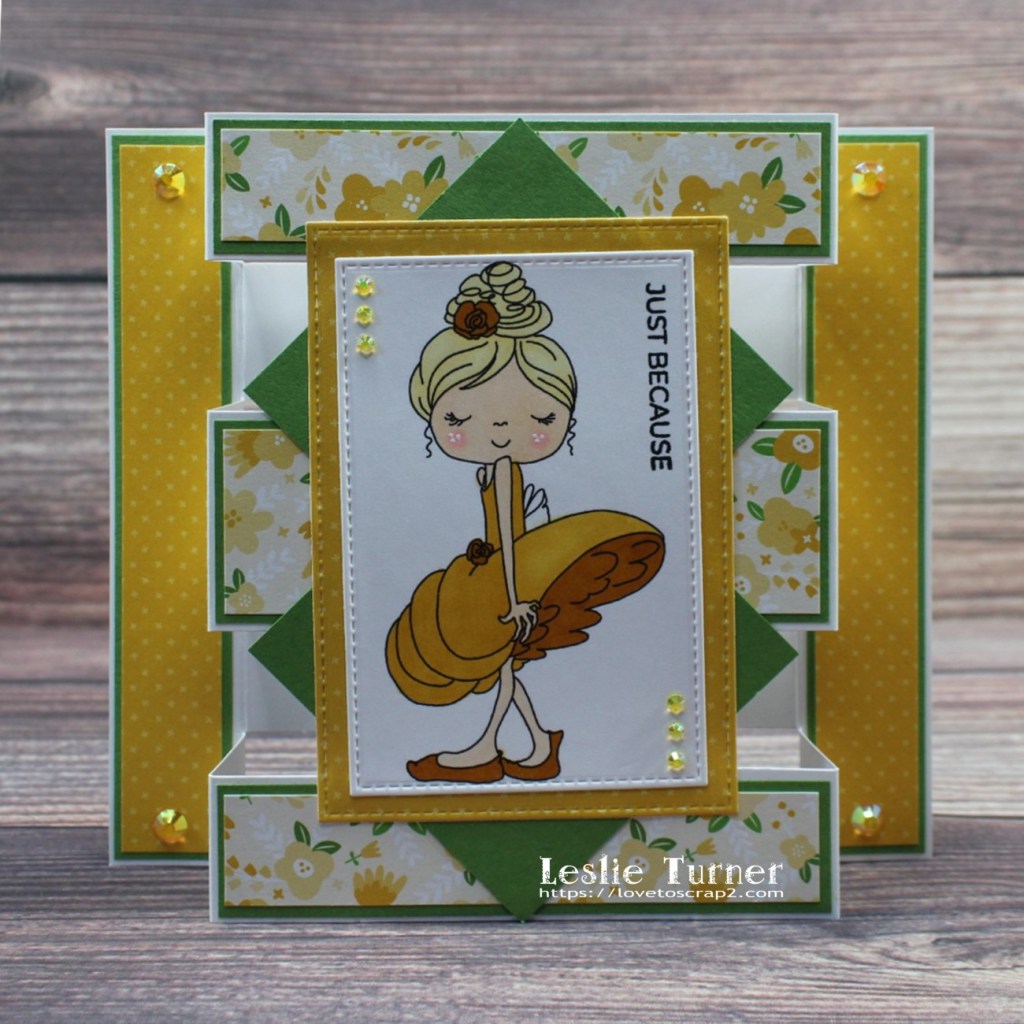
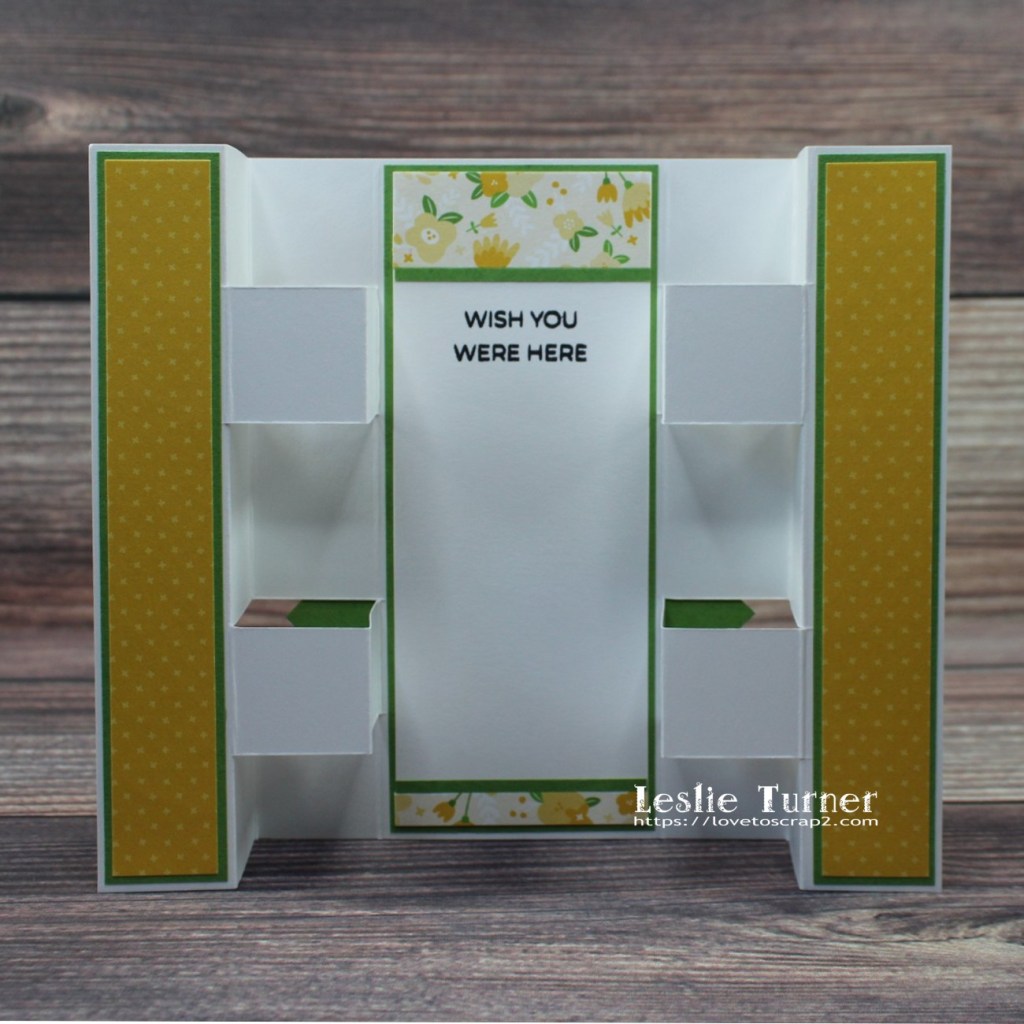
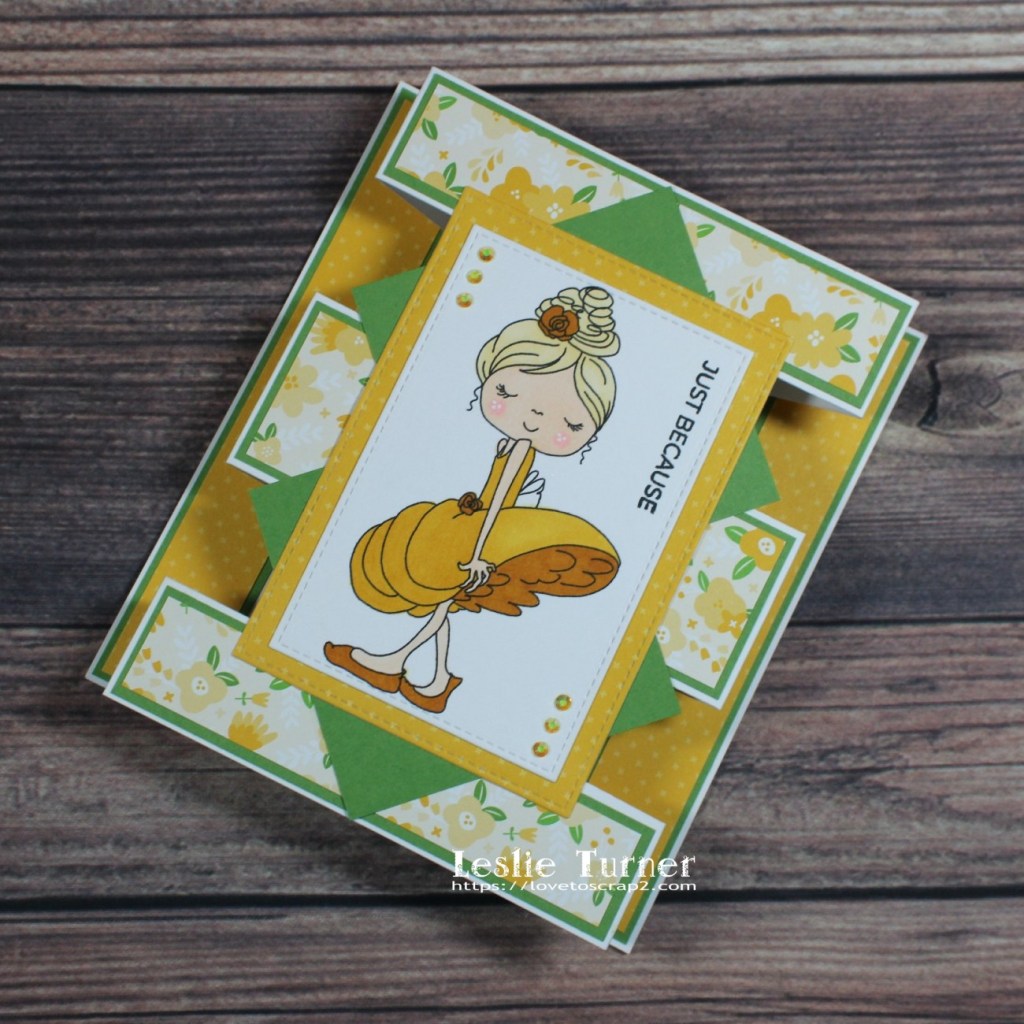
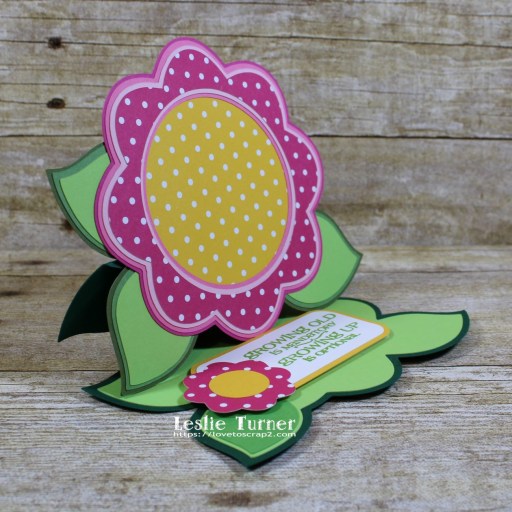
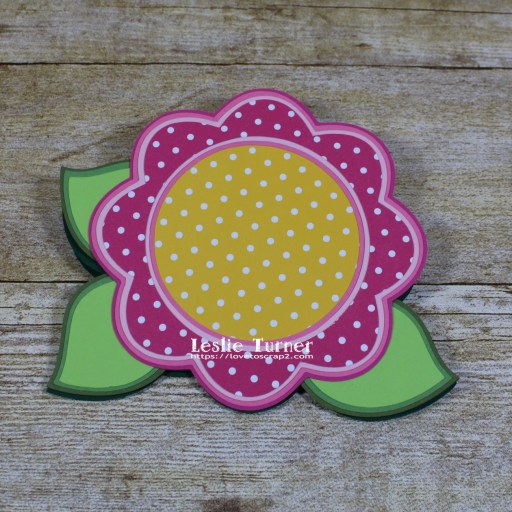
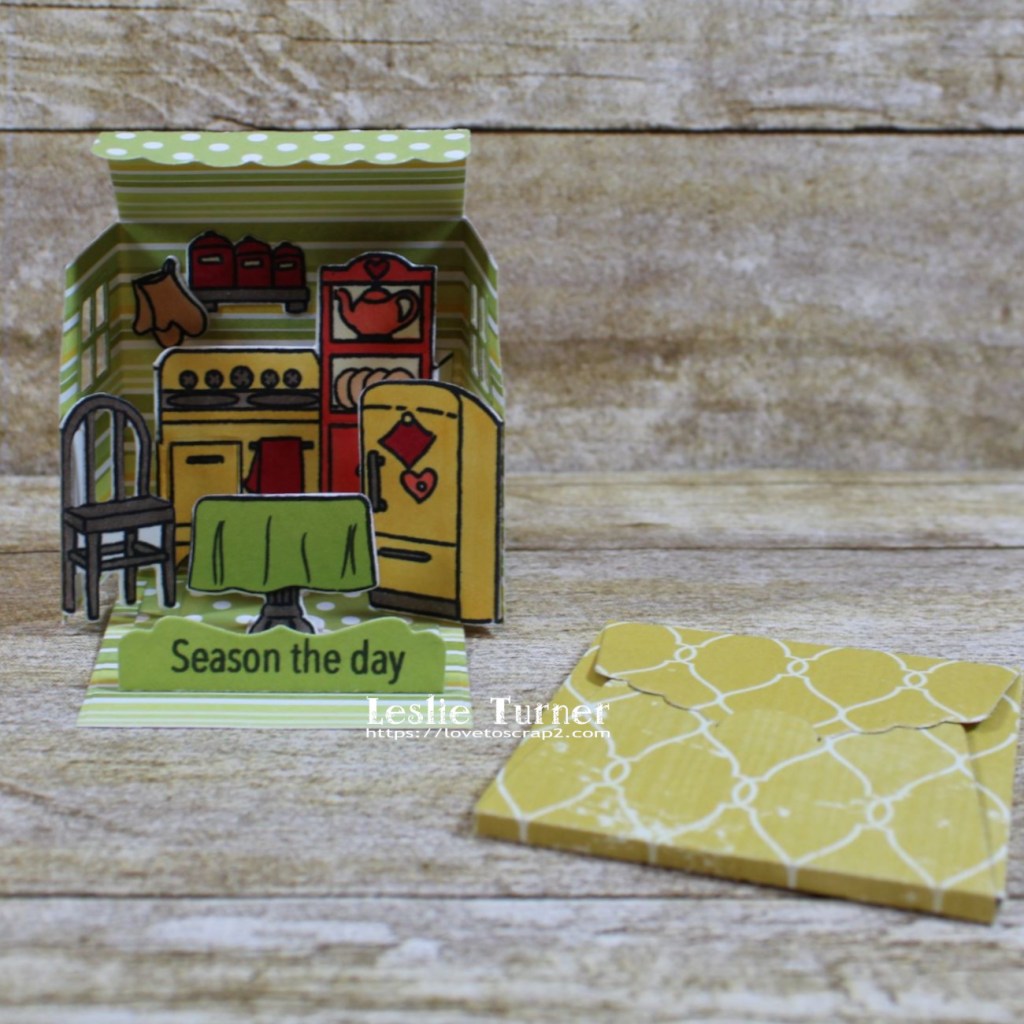
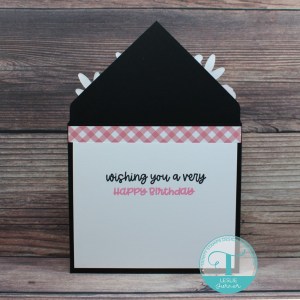
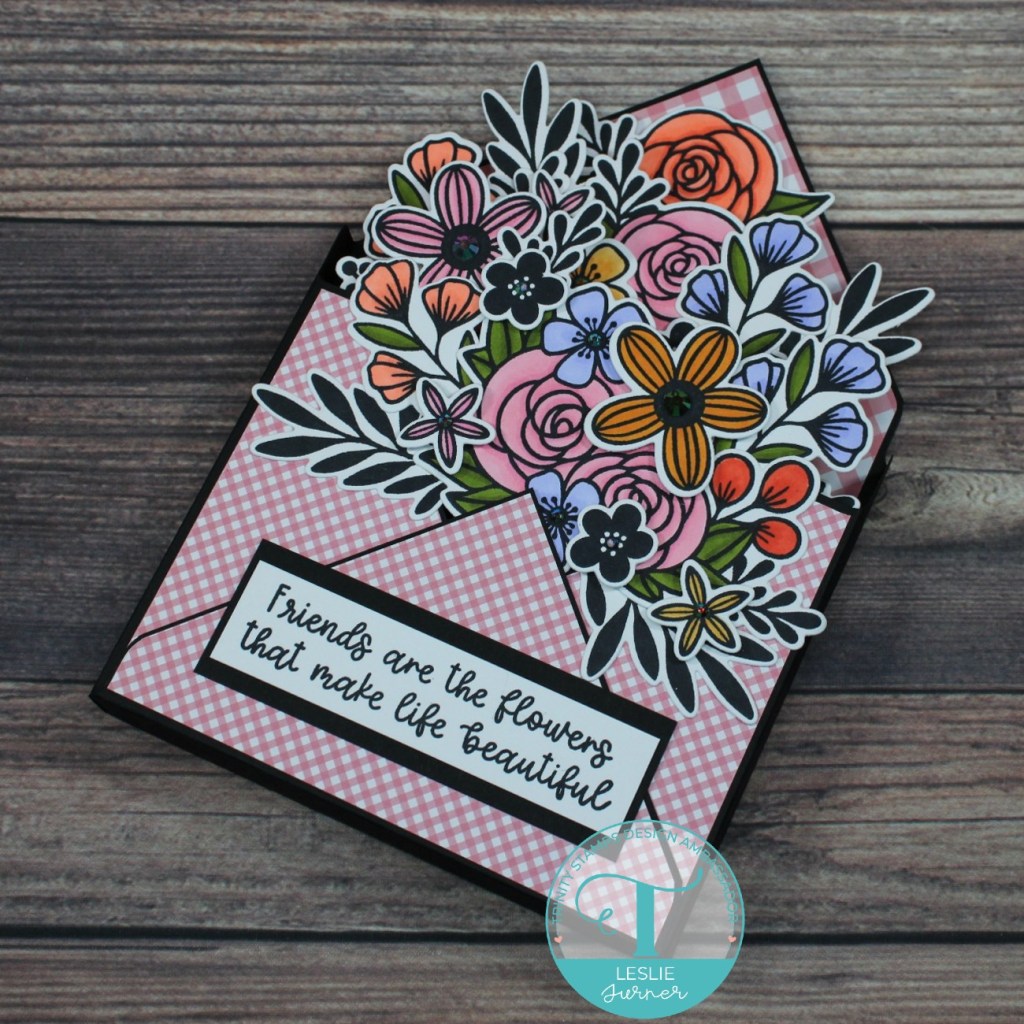
Hi friends! A very Happy Friday to you – I hope you have something fun planned for the weekend! Affiliate links are used in this post at no cost to you. I really appreciate your support! I’ve popped in this afternoon with a Trinity Stamps Ambassador inspiration project that I finished up yesterday afternoon which I’m super stoked to share! If you know me, you know I absolutely love fun folds, and box cards are at the top of the list of my favorites! Trinity Stamps recently released their Summer Blooms Floral Papercrafting Kit and I had a blast stamping, coloring and die cutting all the blooms in this kit for my envelope box card! This is my own design that I created with my WRMK Envelope Punch Board and this one does not fold flat for mailing like the typical box card (which I did for more stability) but I plan to work on an envelope box card design that does fold flat, so stay tuned! ;)

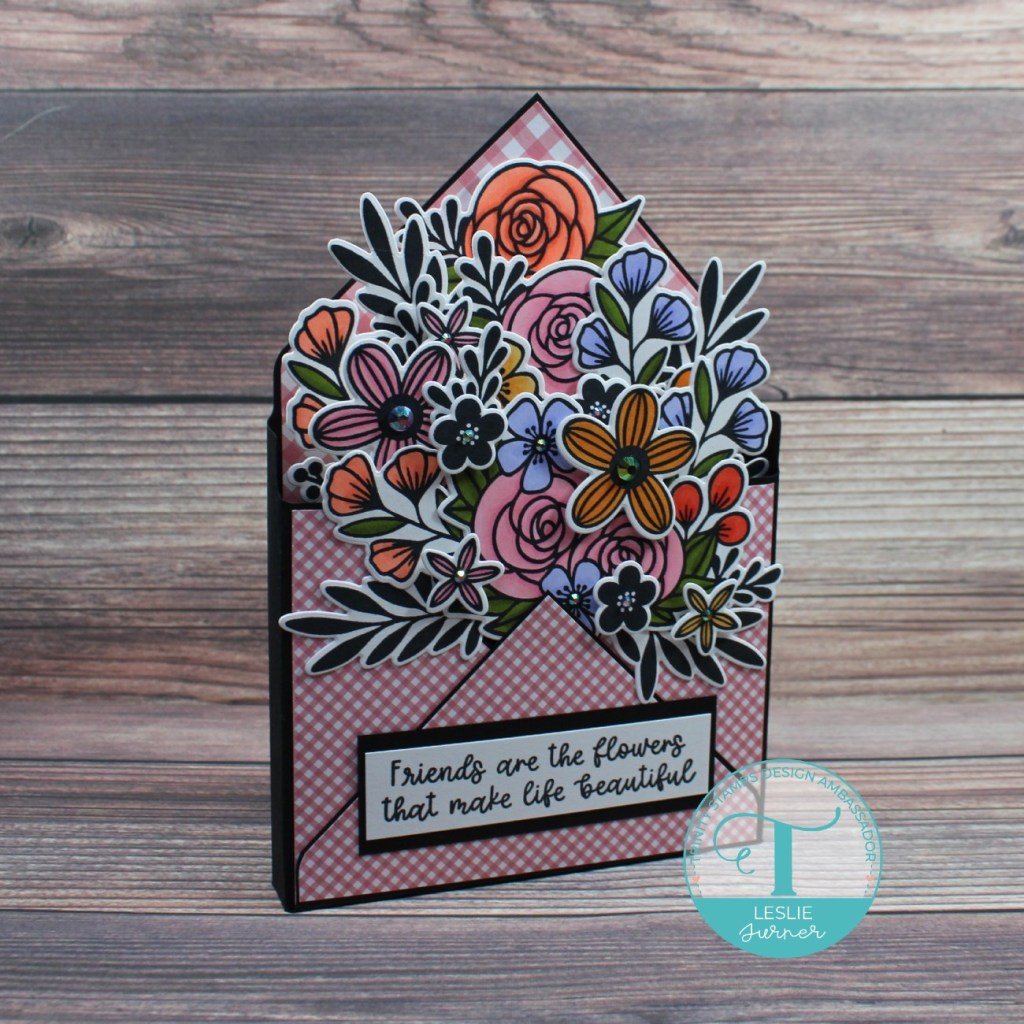
I cut the envelope base from CutCardStock Basis Black cardstock, scored and punched it with the WRMK Envelope Punch Board, and covered the flaps with gingham paper. Using the Summer Blooms Floral Papercrafting Kit, I stamped the blooms (in multiples) on Neenah Classic Crest 110# Solar White cardstock, colored them with alcohol markers and die cut them with the coordinating dies (also included in the kit), and arranged them in layers on the front and inside of the box. I stamped a sentiment from the Friends Are Flowers stamp set, trimmed it and layered it on black cardstock. The final step was adding gemstones from the Summer Sparkles Embellishment Mix (also included in the kit) with the Trinity Pick-Up Stick which really added some pretty sparkle.

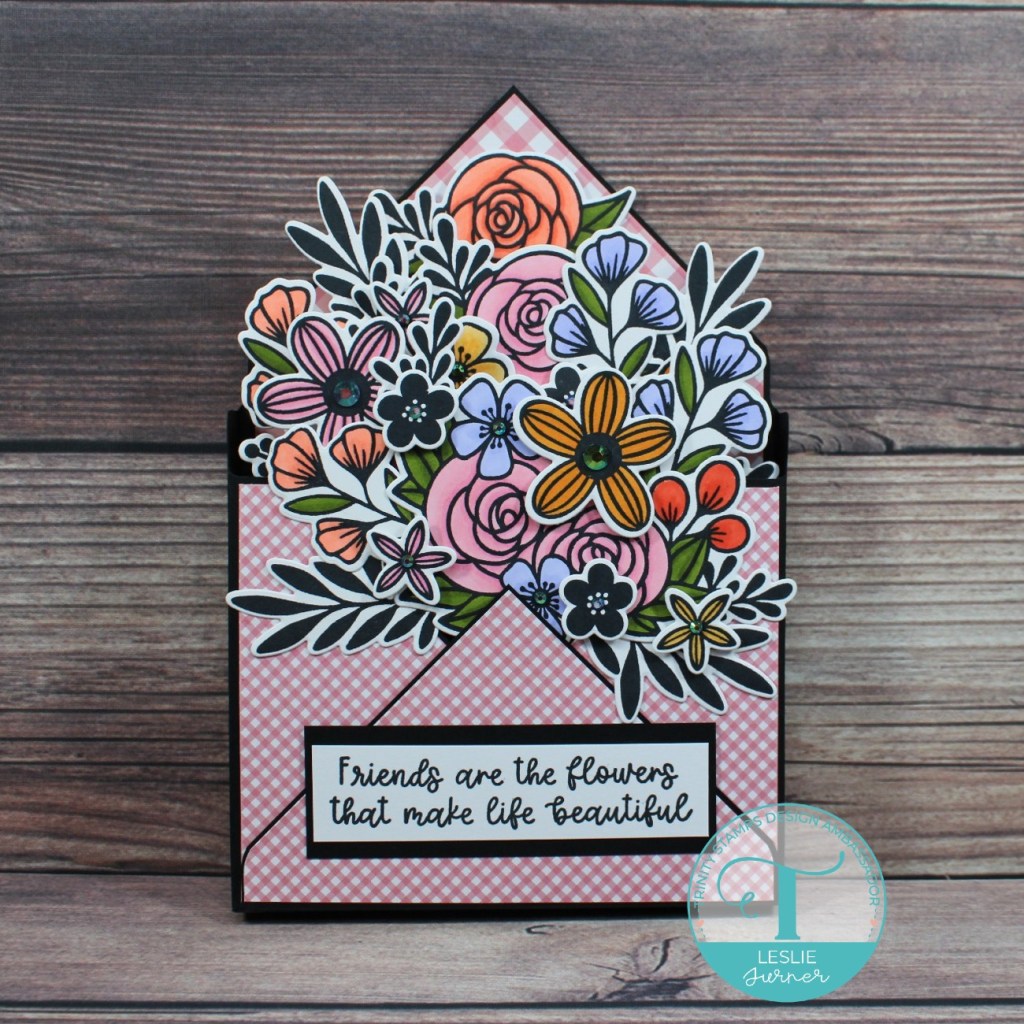
Looking at the overhead shot, you can see there are three layers of blooms. I embellished the back of the box with a strip of the pink gingham paper and a piece of Neenah Classic Crest 110# Solar White cardstock. Using stamps from Supporting Script Sentiments stamp set and Just For You stamp set, I stamped the sentiment in black and pink ink.

And one more peek… so loving how this turned out! It took a little while to stamp, color and die cut all the blooms, but it was well worth it!

Trinity Stamps products used:
Summer Blooms Floral Papercrafting Kit (includes Summer Blooms stamps and dies, and Summer Sparkles Embellishment Mix)
Friends Are Flowers stamp set
Supporting Script Sentiments stamp set
Just For You stamp set
Trinity Pick-Up Stick,

Other products used:
Cardstock/Paper: Neenah Classic Crest 110# Solar White cardstock, CutCardStock Basis Black cardstock, Hot Off The Press Gingham #2 6×6 papers
Ink: Memento Tuxedo Black ink; Arteza alcohol markers- YG13, YG15, YR04, YR17, PB06, R05, R14, RP15, RP16; Catherine Pooler It’s A Girl ink
Dies/Punches: We R Memory Keepers Envelope Punch Board
Accessories: Tonic Studios 12″ Guillotine Paper Trimmer, MISTI stamp tool, Big Shot, Darice Double-Sided Adhesive Foam Circles

I hope you’ve enjoyed today’s project and you’re inspired to get those craft supplies out to play! Be sure to check out all the amazing stamps, dies and other goodies at Trinity Stamps! And head on over to the Trinity Stamps Facebook Page for loads of inspiration! And while you’re at it, join the Trinity Stamps Facebook community group to connect with other Trinity Stamps fans! Thanks so much for stopping by today – we’ll see you next time!

Scrappy hugs,
lesliesig

Just Because

Hi friends! Happy Monday and Happy Labor Day if you’re in the States! I hope you’ve had a great long weekend! Affiliate links are used in this post at no cost to you. I really appreciate your support! I created this sweet ‘just because’ tower card for The Outlawz September Progressive/Freebie Challenge where Hetty Clare Art is our sponsor this month. We were gifted the super adorable digital image called The Little Ballerina to play with for this challenge, and I used a yellow and green color combo for this fun fold.

I printed the digital image on Neenah Classic Crest Solar White cardstock, cut it with a My Favorite Things Stitched Rectangle STAX Die-namics and colored it with alcohol markers. I cut the card base from Neenah Classic Crest Solar White cardstock along with layering panels from CutCardStock Pop-Tone Gumdrop Green cardstock and Lawn Fawn Spring Fling patterned papers. I adhered the layers together and then adhered them to the card base. I stamped the sentiment from the Trinity Stamps A Sentiment For (Almost) Everything stamp set and then added several gemstones from the Trinity Stamps Brilliant Citrine Embellishment Mix to finish the card. I applied the gemstones with the Trinity Stamps Pick Up Stick which is amazing! ;)

I cut the back panel from Neenah Classic Crest Solar White cardstock and embellished it with strips of CutCardStock Pop-Tone Gumdrop Green cardstock and Lawn Fawn Spring Fling patterned paper. I stamped the sentiment from the same Trinity Stamps A Sentiment For (Almost) Everything stamp set and layered the panel on the green cardstock.

And one more peek… folded flat for mailing. What an adorable image! And I really love this fold!

Products used:
Cardstock/Paper: Neenah Classic Crest Solar White cardstock, CutCardStock Pop-Tone Gumdrop Green cardstock, Lawn Fawn Spring Fling 6×6 Petite Paper Pack
Stamps: Trinity Stamps A Sentiment For (Almost) Everything stamp set
Ink: Arteza alcohol markers- Y39, Y24, Y33, BR28, R27; Sakura White Gelly Roll pen, Memento Tuxedo Black ink
Dies/Punches: My Favorite Things Stitched Rectangle STAX Die-namics
Accessories: Tonic Studios 12″ Guillotine Paper Trimmer, Fiskars 12″ SureCut Paper Trimmer, Big Shot, Bearly Art precision craft glue, MISTI stamp tool, Trinity Stamps Brilliant Citrine Embellishment Mix, Trinity Stamps Pick Up Stick

I hope you’ve enjoyed this project and will come over and join in all the fun at The Outlawz Challenges! Lots of fun going on! Thanks so much for stopping by today – we’ll see you next time! ;)

Scrappy hugs,
lesliesig

No one’s butter than YOU!

Hi everyone! A very Happy Saturday to you – I hope you’ve had a great week! Things are status quo here. The hubs had a pinched ulnar nerve released in his left arm several days ago and is doing well. I have to keep reminding him to take it easy and not over use his arm… you know how men are! ;) Affiliate links are used in this post at no cost to you. I really appreciate your support! I’m thrilled to be back on the Eyelet Outlet blog today with another awesome DT inspiration project! I created a fun birthday popcorn machine box card featuring our Popcorn & Ticket Brads and Red Jewel Bling! This was definitely a fun one! My Scan N Cut lives in a cabinet to keep it from getting dusty, and when I bring it out, I typically cut multiple files which keep me busy assembling for weeks to come. ;)

I cut the box card base from CutCardStock Basis Gold cardstock, and all the elements from CutCardStock Basis Red cardstock, Neenah Classic Crest 80# Solar White cardstock, Hygloss Silver Foil cardstock, and K & Co. Essentials Dark designer paper. I assembled the card and added a stamped sentiment, a Ticket Brad and Red Jewel Bling.

Here’s a shot of the back showing an additional sentiment and a Popcorn Brad on the signature panel.

And one more peek… what a super fun card! As you well know, I absolutely LOVE box cards and I really enjoyed creating this one, and these brads were just the ‘ticket!’

Eyelet Outlet products used:
Popcorn & Ticket Brads
Red Jewel Bling

Other products used:
Cardstock/Paper: CutCardStock Basis Gold cardstock, CutCardStock Basis Red cardstock, Neenah Classic Crest 80# Solar White cardstock, Hygloss Silver Foil cardstock, K & Co. Essentials Dark designer paper pad
Stamps: Avery Elle Loads of Wishes stamp set, The Project Bin Just Poppin’ stamp set
Ink: Yellow Paper Mate Flair pen, Memento Rhubarb Stalk ink
Dies/Punches: My Scrap Chick Popcorn Box Card cut file
Accessories: Brother Scan N Cut, Bearly Art precision craft glue, MISTI stamp tool

I hope you’ve enjoyed today’s project! Be sure to check out all the fun goodies at Eyelet Outlet! I can already see you drooling, lol! Be sure to ‘like’ and ‘follow’ Eyelet Outlet Facebook Page to keep up with news and sales, and while you’re at it, join the Eyelet Outlet Fans Facebook group for lots of creative inspiration! Thanks so much for stopping by today – we’ll see you next time! ;)

Scrappy hugs,
lesliesig

You Rock!

Hey everybody! Hope you’re having an amazing weekend! It’s been quiet here and I’ve gotten a little studio time in while hubby is tending to his garden. We are both in awe over his green thumbs! We had air fried green tomatoes for dinner last night and they were amazing! We have a friend who cans every Summer, and she and Ed have worked out an agreement where Ed shares garden produce with her which she cans and shares some back with us. Love it! ;) Affiliate links are used in this post at no cost to you. I really appreciate your support! Today I’m sharing a fun masculine birthday card I created for my musician son (who plays guitar and drums) that I’m entering into The Outlawz Monday Greetings Challenge. The theme is ‘Make It Masculine’ and this is perfect! The challenge ends tonight so I better get on the stick and get it entered! ;)

I used My Scrap Chick’s fun Rock Band Box Card cut file with my Scan N Cut. I cut all the pieces from CutCardStock Basis Light Brown cardstock, CutCardStock Basis Black cardstock, CutCardStock Basis Gold cardstock, Neenah Classic Crest Solar White cardstock, CutCardStock Curious Metallic White Gold cardstock, Hygloss Silver Foil cardstock and Hygloss Gold Foil cardstock. I stamped the front sentiment in black ink using The Project Bin Jukebox Birthday stamp set.

I stamped back sentiment using the Inspired By Stamping Little Phrases stamp set. L-O-V-E the bull horns! :D

And one more look… this was a blast putting together! Box cards are one of my all-time favorites because they always pack a punch and the recipients always love them! Plus they can be displayed for a long while after they are opened! ;)

Products used:
Cardstock/Paper: CutCardStock Basis Light Brown cardstock, CutCardStock Basis Black cardstock, CutCardStock Basis Gold cardstock, Neenah Classic Crest Solar White cardstock, CutCardStock Curious Metallic White Gold cardstock, Hygloss Silver Foil cardstock, Hygloss Gold Foil cardstock
Stamps: The Project Bin Jukebox Birthday stamp set, Inspired By Stamping Little Phrases stamp set
Ink: Memento Tuxedo Black ink
Dies/Punches: My Scrap Chick Rock Band Box Card cut file
Accessories: Brother Scan N Cut, Darice Diamond Plate embossing folder, Bearly Art precision craft glue

I hope you’ve enjoyed this project and will come over and join in all the fun at The Outlawz Challenges! Lots of fun going on! Thanks so much for stopping by today – we’ll see you next time! ;)

Scrappy hugs,
lesliesig

Welcome to the neighborhood

Hi friends! Happy Hump Day – I hope your week is going well! We sure are enjoying the weather out here… we’ve had some over-cast days with rain here and there for over a week now, and we’re waking up to glorious temps in the 50s! Affiliate links are used in this post at no cost to you. I really appreciate your support! I’ve popped in this morning with another Trinity Stamps inspiration project – a pretty ‘welcome neighbor’ gatefold card created with the gorgeous Succulent Banner stamp set and coordinating Succulent Banner die set, embellished with Ruby Radiance Embellishment Mix. I don’t watercolor very often but I did break out some watercolor paper, distress inks and my Niji brush for this one!

I cut a 5″ square gatefold card base from Neenah Classic Crest 110# Solar White cardstock along with front and inside layering panels from CutCardStock Pop-Tone Jellybean Green cardstock and P13 Always and Forever papers. I die cut stitched circles from the white and green cardstock and layered them together. Using the Succulent Banner stamp set, I stamped the image in Ranger Black Soot archival ink on Bristol smooth watercolor paper, and watercolored the image with Ranger peeled paint, forest moss, fired brick and mowed lawn distress ink on my Tim Holtz Glass Media Mat. I stamped a partial image on a scrap of the watercolor paper solely for the front flower which I watercolored and fussy cut. Once the images were dry, I cut the image with the coordinating Succulent Banner die, adhered it to another plain die cut, then adhered it to the layered circle die cuts. I adhered the single fussy-cut flower to the main image with a 1mm thick foam square for a tad bit of dimension. I adhered the layered circle die cuts to the front left flap along with four die cut corners cut from the green cardstock. I added a tiny magnet closure and then finished the front with several gemstones from the Ruby Radiance Embellishment Mix.

I cut the inside panel from Neenah Classic Crest 80# Solar White cardstock, embellished it with strips of CutCardStock Pop-Tone Jellybean Green cardstock and P13 Always and Forever papers used on the front, stamped the sentiment in Ranger Black Soot archival ink, and layered the panel on the green cardstock.

And one more look… totally loving how this turned out! I really do need to watercolor more often as I really enjoyed this!

Trinity Stamps products used:
Succulent Banner stamp set
Succulent Banner die
Ruby Radiance Embellishment Mix

Other products used:
Cardstock/Paper: Strathmore Bristol smooth surface watercolor paper, Neenah Classic Crest 110# and 80# Solar White cardstock, CutCardStock Pop-Tone Jellybean Green cardstock, P13 Always and Forever 6×8 paper pad
Ink: Ranger Black Soot archival ink; Ranger distress ink- peeled paint, forest moss, fired brick and mowed lawn
Dies/Punches: JustRite A2 Card Front Basics die set, Memory Box Stitched Circle Layers
Accessories: Tonic Studios 12″ Guillotine Paper Trimmer, Tim Holtz Glass Media Mat, Bearly Art precision craft glue, Niji water brush, Gemini Junior, MISTI stamp tool, Brutus Monroe mini disc magnet, Ranger Distress Collage Medium Matte

I hope you’ve enjoyed today’s project and you’re inspired to get those craft supplies out to play! Be sure to check out all the amazing stamps, dies and other goodies at Trinity Stamps! And head on over to the Trinity Stamps Facebook Page for loads of inspiration! And while you’re at it, join the Trinity Stamps Facebook community group to connect with other Trinity Stamps fans! Thanks so much for stopping by today – we’ll see you next time!

Scrappy hugs,
lesliesig

The smell of Christmas goodies

Ahoy, Mateys… okay, this is my last post for today. I don’t particularly like having to write so many blog posts (with interruptions from the hubs and cats) but I do enjoy sharing my projects! Affiliate links are used in this post at no cost to you. I really appreciate your support! This adorable apron box card is for The Outlawz Festive Fridays Challenge where the themes to choose from are Christmas, Thinking of You, Anything Goes or Congratulations, and I chose the Christmas theme this time. Isn’t this apron just the cutest?!

I cut the pieces for the box card from CutCardStock Basis Red cardstock, CutCardStock Basis Brown cardstock, CutCardStock Basis Teal cardstock, Neenah Classic Crest Baronial Ivory cardstock, and The Paper Studio Four Seasons and Everything In Between -2- paper pad, and assembled the card.

I typed the sentiment in brown font, trimmed it and layered it on brown cardstock. I found it handwritten in my stuff and I don’t know who to credit; I’m sure I found it online at some point and thought it was cute, so I jotted it down. It’s perfect for this box card!

And one more look… this is so stinkin’ cute, I can’t stand it! It’s already slated to go to a dear someone who loves to cook! ;)

Products used:
Cardstock/Paper: CutCardStock Basis Red cardstock, CutCardStock Basis Brown cardstock, CutCardStock Basis Teal cardstock, Neenah Classic Crest Baronial Ivory cardstock, The Paper Studio Four Seasons and Everything In Between -2- paper pad
Dies/Punches: My Scrap Chick Christmas Apron Box Card cut file
Accessories: Bearly Art precision craft glue, narrow red/white gingham ribbon from stash

I hope you’ve enjoyed this project and will come over and join in all the fun at The Outlawz Challenges! Lots of fun going on! Thanks so much for stopping by today – we’ll see you next time! ;)

Scrappy hugs,
lesliesig

Growing Up vs Growing Old

Hey y’all, I’m baaaack! Today is the day for entering projects into The Outlawz Challenges before several of them end! I think that refers to ‘the skin of my teeth’ lol! The projects have been made but I’ve had a lot going on and haven’t really been entering many challenges lately. I need to fix that! Affiliate links are used in this post at no cost to you. I really appreciate your support! I’m entering this adorable easel card into The Outlawz Monday Greetings Challenge where the theme is to Add Spots or Stripes. I think I’m covered with the spots! Well, I’m not covered with spots but my card is, lol! #insertcheesycornygrin

I cut all the required pieces from CutCardStock Basis Green cardstock, CutCardStock Pop-Tone Jellybean Green cardstock, CutCardStock Pop-Tone Gumdrop Green cardstock, American Crafts Key Lime cardstock, CutCardStock Basis Magenta cardstock, CutCardStock Granny Smith cardstock, CutCardStock Basis Pink cardstock, CutCardStock Basis Gold cardstock, Colorbok Pink cardstock, Neenah Classic Crest Solar White cardstock, Colorbok yellow and pink Seeing Dots cardstock.

I stamped the sentiment from The Cat’s Pajamas Sassy Birthday stamp set in Catherine Pooler Lime Rickey ink.

And one more look, closed and ready to mail… how fun is this?! I’m absolutely loving how this turned out!

Products used:
Cardstock/Paper: CutCardStock Basis Green cardstock, CutCardStock Pop-Tone Jellybean Green cardstock, CutCardStock Pop-Tone Gumdrop Green cardstock, American Crafts Key Lime cardstock, CutCardStock Basis Magenta cardstock, CutCardStock Granny Smith cardstock, CutCardStock Basis Pink cardstock, CutCardStock Basis Gold cardstock, Colorbok Pink cardstock, Neenah Classic Crest Solar White cardstock, Colorbok yellow and pink Seeing Dots cardstock
Stamps: The Cat’s Pajamas Sassy Birthday stamp set
Ink: Catherine Pooler Lime Rickey ink
Dies/Punches: My Scrap Chick Blooming Layers Easel Card
Accessories: Brother Scan N Cut, Bearly Art precision craft glue, Scotch 3M Foam Tape

I hope you’ve enjoyed this project and will come over and join in all the fun at The Outlawz Challenges! Lots of fun going on! Thanks so much for stopping by today – we’ll see you next time! ;)

Scrappy hugs,
lesliesig

Cycle-Riding Santa!

Hi friends! Hope you’re having a great week! We’re on the downside to the weekend and time is zooming by! Affiliate links are used in this post at no cost to you. I really appreciate your support! I’ve popped in this morning to share a project I’m entering into The Outlawz Sunday Songs & Rhymes Challenge where SheepSki Designs is sponsoring and the theme is the song or rhyme “The Open Road.” My inspiration came literally from the word ‘travel’ so I decided to share a cycle-riding Santa box card that I made with my Scan N Cut. What a hoot! He’s definitely ridin’ in for the challenge, lol!

I sure do love me some box cards and made quite a few for a variety of occasions while I had my Scan N Cut out several weeks ago. I cut the pieces for this one from CutCardStock Basis Dark Red cardstock, CutCardStock Basis Red cardstock, CutcardStock Basis Black cardstock, CutCardStock Basis Light Brown cardstock, Neenah Classic Crest Solar White cardstock, Neenah Classic Crest Baronial Ivory cardstock scrap, and Hygloss Silver Foil cardstock.

I cut the sentiment panel on the back from CutCardStock Basis Green cardstock and Neenah Classic Crest Solar White cardstock, and stamped the sentiment from The Project Bin Mid Century Christmas stamp set. So perfect!

And one more look… so smitten with this one! He’s so stinkin’ cute I can’t stand it! The best part about box cards is they fold flat for mailing!

Products used:
Cardstock/Paper: CutCardStock Basis Dark Red cardstock, CutCardStock Basis Red cardstock, CutcardStock Basis Black cardstock, CutCardStock Basis Light Brown cardstock, Neenah Classic Crest Solar White cardstock, Neenah Classic Crest Baronial Ivory cardstock scrap, Hygloss Silver Foil cardstock, CutCardStock Basis Green cardstock
Stamps: The Project Bin Mid Century Christmas stamp set
Ink: Memento Cottage Ivy ink
Dies/Punches: My Scrap Chick Gnome Cycle cut file
Accessories: Brother Scan N Cut, Bearly Art precision craft glue, MISTI stamp tool

I hope you’ve enjoyed this project and will come over and join in all the fun at The Outlawz Challenges! Lots of fun going on! Thanks so much for stopping by today – we’ll see you next time! ;)

Scrappy hugs,
lesliesig

Friends are flowers

Hi friends! I hope your week is going well and you’re staying healthy and creative! Absolutely no complaints here – I’ve gotten a lot of studio time in lately which makes me happy! Affiliate links are used in this post at no cost to you. I really appreciate your support! I’m thrilled to share my first project as a Trinity Stamps Ambassador! We haven’t gotten our official assignments yet but have been given the go-ahead to share whatever projects we want to create until the assignments roll in. So I created a pretty front step card (you know how I LOVE this fold!) featuring the Friends are Flowers stamp set and the coordinating Friends are Flowers die set! I sure do love me some gnomes and I’ve added several of their most adorable gnome stamps and dies to my stash!

I stamped the image from the Friends are Flowers stamp set on Neenah Classic Crest Solar White cardstock, colored it with alcohol markers and cut it with the coordinating Friends are Flowers die set. I adhered the die cut image to a white stitched oval die cut, adding shimmer to the butterfly and popping it up on an Adhesive Foam Circle. I cut a slightly larger stitched oval from CutCardStock Pop Tone Wild Cherry cardstock and adhered it beneath the white oval. I cut the card base from Neenah Classic Crest Solar White cardstock and panels from CutCardStock Pop Tone Wild Cherry cardstock and yellow and white dotted cardstock, and assembled the card. I stamped the sentiment on Solar White cardstock, cut it with the coordinating die, and adhered it to the bottom of the card front.

I cut the back panel from Neenah Classic Crest Solar White cardstock and embellished it with strips of yellow dotted and CutCardStock Pop Tone Wild Cherry cardstock, stamped the sentiment from the Succulent Banner stamp set and layered the panel on the red cardstock.

And one more look… I absolutely love this stamp set! Such a cute guy! ;)

Trinity Stamps products used:
Friends are Flowers stamp set
Friends are Flowers die set
Succulent Banner stamp set

Other products used:
Cardstock/Paper: Neenah Classic Crest Solar White cardstock, CutCardStock Pop Tone Wild Cherry cardstock, Colorbok Seeing Dots yellow cardstock
Ink: Memento Tuxedo Black ink; Nuvo alcohol markers- Rich Reds Collection, Fragrant Oranges Collections, Sunshine Yellows Collection, Organic Greens Collection, Irish Clover Collection, Woodland Greens Collection, Marina Blues Collection, Indigo Ink Collection, Palma Violets Collection, Flamingo Pinks Collection, Natural Browns Collection, Fair Skin Tones Collection, Ombre Collection; Sakura Clear Star Gelly Roll pen
Dies/Punches: Memory Box Stitched Oval Layers
Accessories: Tonic Studios 12″ Guillotine Paper Trimmer, MISTI stamp tool, Gemini Junior, Bearly Art precision craft glue, Darice Double-Sided Adhesive Foam Circles

I hope you’ve enjoyed today’s project and you’re inspired to get those craft supplies out to play! Be sure to check out all the amazing stamps, dies and other goodies at Trinity Stamps! And head on over to the Trinity Stamps Facebook Page for loads of inspiration! And while you’re at it, join the Trinity Stamps Facebook community group to connect with other Trinity Stamps fans! Thanks so much for stopping by today – we’ll see you next time!

Scrappy hugs,
lesliesig

‘Season The Day’ matchbook

Hi friends! I’ve popped in this morning to share another matchbook I created – this one is a kitchen scene and is earmarked for my daughter who loves to cook! Affiliate links are used in this post at no cost to you. I really appreciate your support! I mentioned a while back when I was sharing the other little matchbooks I was making that I had bought four of the Art Impressions matchbook die sets and I’m finally getting around to sharing the fourth one. I’m entering this one in The Outlawz Festive Fridays Challenge and have chosen the ‘Anything Goes’ theme. These are so stinkin’ fun, I can’t stand it! There are two more that I need to get to add to my collection, so stay tuned!

I used double-sided patterned paper from Polly’s Paper Studio for the matchbook base. I stamped all the kitchen elements on Neenah Classic Crest 80# Solar White cardstock, colored them with alcohol markers, and cut them with the coordinating dies. I just love all the detail on the kitchen elements! Bonnie Krebs does an amazing job designing these!

Here are shots going around the outside and a shot of the itty bitty envelope.

Products used:
Cardstock/Paper: Neenah Classic Crest Solar White cardstock, Polly’s Paper Studio double-sided patterned paper
Stamps: Art Impressions Matchbook Kitchen Set stamps
Ink: Memento Tuxedo Black ink; Nuvo alcohol marker collections- Coral Reef, Rich Reds, Fragrant Oranges, Fair Skin Tones, Pebble Beach
Dies/Punches: Art Impressions Matchbook Die Template, Matchbook Kitchen Set dies, and Matchbook Envelope Die
Accessories: Tonic Studios 12″ Guillotine Paper Trimmer, Gemini Junior, MISTI stamp tool, Bearly Art precision craft glue

I hope you’ve enjoyed seeing this matchbook! Thanks so much for stopping by today – we’ll see you next time! ;)

Scrappy hugs,
lesliesig