Just popping up

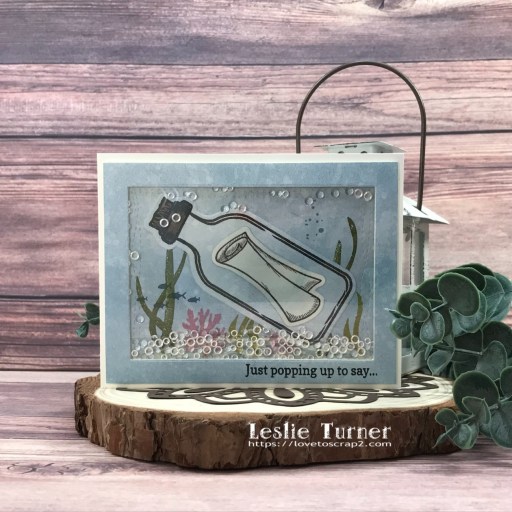
Hey everybody! I hope you’re having great weather and you have something fun planned this weekend! Our new challenge is live this morning over at Mix It Up Challenge Blog and I’m excited to share my DT inspiration project for MIUCB #67 – Anything Goes + optional Make Your Own Background! We’d love to see either you Anything Goes project or one playing the twist of making your own background! As always, the twist is not required to play! I created an inked background for this super cute shaker card featuring a message in a bottle!

I cut a standard A2 size side-folding card base from Neenah Classic Crest 110# Solar White cardstock along with a layering panel from 80# Solar White. I inked the layering panel with Catherine Pooler Tranquil, Stone Blue and Cove Blue inks, trimmed it, and cut a frame using a My Favorite Things Wonky Stitched Rectangle STAX die. Using the Stampin’ Up Whale Done stamp set, I stamped an underwater scene in Catherine Pooler Green Tea, Eucalyptus and Pink Champagne inks on the rectangle cut from the frame. I stamped the sentiment from the Neat & Tangled Out of the Box stamps in the bottom right corner of the frame in Memento Tuxedo Black ink.

I stamped the bottle and message from the Spellbinders Message in a Bottle stamps in Memento Tuxedo Black ink, inked the bottle, and cut both of the images with the coordinating Spellbinders Message in a Bottle dies. I assembled the shaker, using Kat Scrappiness 3mm and 4mm Sparkling Clear Droplets for the shaker mix.

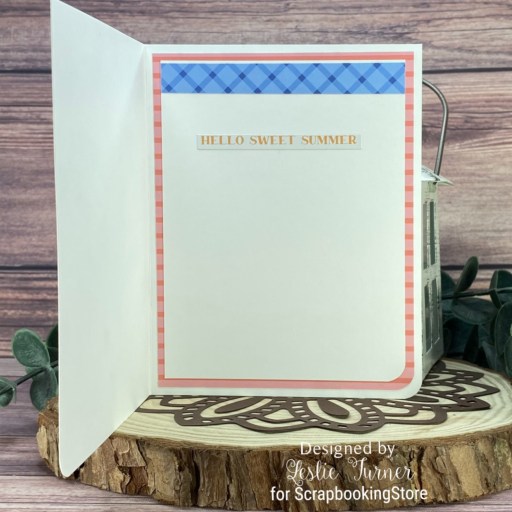
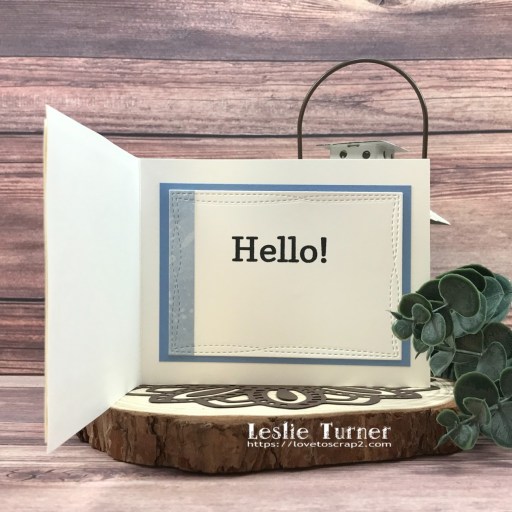
I embellished a piece of 80# Solar White cardstock with a leftover piece of inked cardstock and cut a panel for the inside using the My Favorite Things Wonky Stitched Rectangle STAX die. I stamped another sentiment from the Neat & Tangled Out of the Box stamps and layered the panel on CutCardStock Basis Blue cardstock.

Sharing in the following challenges:
1. A Perfect Time To Craft Open Challenge: September #9-2023 – Anything Goes
2. Classic Design Challenge: September #9 – Anything Goes
3. Crafts Galore Encore Challenge Blog: #115 – Anything Goes
4. Di’s Digistamps Challenge: Die Cuts and/or Punches

Affiliate links are used in this post at no cost to you – I really appreciate your support! 

Products used:
Cardstock/Paper: Neenah Classic Crest 110# and 80# Solar White cardstock, CutCardStock Basis Blue cardstock
Stamps: Spellbinders Message in a Bottle stamps, Stampin’ Up Whale Done stamp set, Neat & Tangled Out of the Box stamps
Ink: Memento Tuxedo Black ink; Catherine Pooler Tranquil, Stone Blue, Cove Blue, Green Tea, Eucalyptus and Pink Champagne inks; Arteza alcohol marker- BR82
Dies/Punches: Spellbinders Message in a Bottle dies, My Favorite Things Wonky Stitched Rectangle STAX
Accessories: Tonic Studios 12″ Guillotine Paper Trimmer, Bearly Art precision craft glue, MISTI stamp tool, Big Shot, Grafix Crystal Clear Craft Plastic, Scotch 3M Foam Tape, Kat Scrappiness 3mm Sparkling Clear Droplets and 4mm Sparkling Clear Droplets

I hope you’ve enjoyed seeing this project and will link up with us this time! Thanks so much for stopping by today – we’ll see you next time! ;)

Scrappy hugs,

So Much Fun

Hey everybody! Not sure where this year has gone but the months just continue to fly right on by! I’m delighted to be back with another Keep It Simple DT inspiration project created with papers, stamps and dies in the new Craft Mode Collection! This fun slimline shaker card features stamped and die cut craft supplies included in the shaker mix! How fun is that?!

I cut a 3-3/4″ x 9″ slimline card base from Neenah Classic Crest 80# Solar White cardstock. I then cut a layering panel from a pink print in the Craft Mode 12×12 Collection Pack. Using the Wavy Slimline Die, I cut a shaker panel for the front from a green print in the Craft Mode 12×12 Collection Pack, reserving the negative spaces to use on the shaker, along with an acetate panel.

I stamped the scissors, tape, washi tape and glitter elements from the Craft Mode Stamps in Memento Tuxedo Black ink on Solar White cardstock. I colored them with fine point markers and cut them with the coordinating Craft Mode Outline Dies. I added Kat Scrappiness Crystal Clear Pinwheel Sequin Mix and Pearl Glass Dots along with the die cut craft supplies to the shaker and sealed it up. I stamped a sentiment from the same Craft Mode Stamps, trimmed it and adhered it to the top right corner of the shaker.

I cut the inside panel from Solar White cardstock and embellished it with the green patterned paper used on the front. I stamped a sentiment from the At The Expo Stamps in Memento Tuxedo Black ink and layered the panel on the pink patterned paper used on the front.

Sharing in the following challenges:
1. 613 Avenue Create: August 2023 – Anything Goes w/ optional CAS (no twist)
2. A Perfect Time To Craft Open Challenge: August #8-2023 – Anything Goes
3. Classic Design Challenge: August #8 – Anything Goes
4. Jan’s Digi Stamps Challenges: August Anything Goes
5. Once Upon A Time Challenges: #13 – It Feels Good To Be Yourself (a die-hard crafter!)

Keep It Simple products used:
Craft Mode 12×12 Collection Pack
Craft Mode Stamps
Craft Mode Outline Dies
At The Expo Stamps
Wavy Slimline Die

Affiliate links are used in this post at no cost to you – I really appreciate your support!

Other products used:
CARDSTOCK/PAPER: Neenah Classic Crest 80# Solar White cardstock
INK: Memento Tuxedo Black ink; Bic Mark-It Fine Point markers- Fandango Pink, Petal Pink, Polynesian Purple, Misty Blue, Oceanview Blue, Cloud Nine Grey, Summer Melon, Tiki Hut Tan; Sakura Clear Star Gelly Roll pen
ACCESSORIES: Tonic Studios 12″ Guillotine Paper Trimmer, CutCardStock Plus High Capacity adhesive, Bearly Art precision craft glue, MISTI stamping tool, Big Shot, Grafix Crystal Clear Craft Plastic; Kat Scrappiness Crystal Clear Pinwheel Sequin Mix and Pearl Glass Dots; 1″ double-sided foam strips

I hope you’ve loved seeing this project as much as I loved creating it, and you’re inspired to get crafty! Be sure to check out ALL the fun goodies in the Keep It Simple store such as paper, stamps, die cuts, ephemera, washi tape and enamel dots to name just a few! You’ll go crazy! Be sure to Follow us on Facebook, Instagram, and Pinterest for lots of crafty inspiration! Thanks so much for stopping by today – we’ll see you next time!

Scrappy hugs,

Happy Days!

Howdy peeps! Happy Wednesday – I hope you’re having a great week! I’m delighted to be back to share another ScrapbookingStore DT inspiration project created with the amazing June 2023 Scrapbook Kit with Upgrades! I’m sure you know that shakers are high up on my list of favorite kinds of projects. This one features papers, stickers, and ephemera and chipboard from the upgrades, and is packed with different shaker mixes! I have to ask – is there such a thing as too much shaker mix in a shaker card?! Bahahaha!

I cut a standard A2 size side-folding card base from Neenah Classic Crest 110# Solar White cardstock and rounded the bottom right corner. I cut a layering panel from a pretty pink striped print in the collection and grabbed a frame from the pack of ephemera in the upgrades for the shaker.

I used Kat Scrappiness Bubble Gum Sprinkles Sequin Mix, Crystal Clear Pinwheel Sequin Mix, and Pearl Glass Dots for the shaker mix, and added a chipboard tree from the upgrades to the front of the shaker element. I fussy cut a sentiment from a piece of ephemera which I embellished with dots from a Kirarina Wink White Pearl marker for a little interest. The finishing touch was adding a few more pieces of the Bubble Gum Sprinkles using my Trinity Pick Up Stick.

I cut the inside panel from 80# Solar White cardstock and embellished it with a strip of patterned paper in the kit. I added a sentiment sticker and layered the panel on the pink striped paper used on the front.

Sharing in the following challenges:
1. 613 Avenue Create: June 2023 – Anything Goes w/ optional Good Old Summertime (playing twist)
2. A Perfect Time To Craft: June #6-2023 – Anything Goes
3. A Place To Start: June 2023 – Anything Goes
4. Classic Design Challenge: June #6 – Anything Goes
5. Crafty Calendar Challenge: June Challenge – Summertime
6. Make My Monday: #202 – Summer Theme
7. Wednesday’s Creative Inspirations Challenge Blog: June Challenge – Something For the Girls

Affiliate links are used in this post at no cost to you – I really appreciate your support!

ScrapbookingStore products used:
June 2023 Scrapbook Kit with Upgrades

Other products used:
CARDSTOCK/PAPER: Neenah Classic Crest 110# and 80# Solar White cardstock,
INK: Kirarina Wink White Pearl marker
DIES/PUNCHES: Kadomaru Pro Corner Rounder
ACCESSORIES: Tonic Studios 12″ Guillotine Paper Trimmer, CutCardStock Plus High Capacity adhesive, Art Glitter Dries Clear adhesive, Grafix Craft Plastic, 1/2″ double-sided foam strip; Kat Scrappiness Bubble Gum Sprinkles Sequin Mix, Crystal Clear Pinwheel Sequin Mix, and Pearl Glass Dots; Trinity Pick Up Stick

I hope you’ve enjoyed today’s project and you’re thinking about all the fun you could have with this month’s kit… you really ought to think about joining the Subscription Club! Be sure to Follow us on Facebook, Instagram, Pinterest and YouTube for lots of crafty inspiration! And if you do decide to join the Subscription Club, join our ScrapbookingStore Club Member Group on Facebook for more inspiration and to share your projects! Thanks so much for stopping by today – we’ll see you next time!

Scrappy hugs,

Love You shaker

Hey everybody! A very Happy Tuesday to you – I hope you’re having a great week! I’m up on the Prickley Pear Stamps blog today with an inspiration project featuring the Love You dies from the January new release! There is a coordinating stamp set that goes with these dies which I didn’t use for this project, but stay tuned for some inspiration coming soon using the stamps and the dies! These are some awesome products and the sky is the limit with how they can be used! I absolutely LOVE shakers and as soon as I had these in my hand I knew I was going to make one!

I cut a standard A2 size top-folding landscape card base from Neenah Classic Crest 110# Solar White cardstock along with layering panels from two coordinating prints in the Hot Off The Press Sweet Pea 6×6 double-sided cardstock pack. I die cut the large sentiment into the floral cardstock using the Love You dies and reserving the negative spaces on the two heart Os and the E. I adhered a piece of Grafix Craft Plastic behind the apertures and added 1/2″ double-sided foam strips to the back of the panel.

I adhered the pink plaid cardstock to the card base and added several pinches of Pretty Pink Posh Strawberry Burst and Ballerina Pink sequins before sealing it up. Really happy with how this turned out!

Affiliate links are used in this post at no cost to you – I really appreciate your support!

Prickley Pear Stamps products used:
Love You dies

Other products used:
Cardstock/Paper: Neenah Classic Crest 110# Solar White cardstock, Hot Off The Press Sweet Pea 6×6 double-sided cardstock pack
Accessories: Tonic Studios 12″ Guillotine Paper Trimmer, Art Glitter Dries Clear adhesive, Tombow Mono permanent adhesive, Big Shot, 1/2″ double-sided foam strips, Grafix Craft Plastic, Pretty Pink Posh Strawberry Burst and Ballerina Pink sequins

I hope you’ve enjoyed this project! Be sure to check out all the awesome stamps and dies at Prickley Pear Stamps! Save 10% on anything on the site when you shop at Prickley Pear Stamps by using coupon code LESLIE10 at checkout! And be sure to ‘like’ and ‘follow’ the Prickley Pear Stamps Facebook page to keep up with news and sales, and join Prickley Pear Pals (the fan group) for lots of fun crafty ideas and to share your creativity! And finally, we’d love to see you visit the Prickley Pear Stamps blog and become a Follower! Hope to see you there! Thanks so much for stopping by today – we’ll see you next time! ;)

Scrappy hugs,

Love You Shaker

2/3/23 Rising Star at A Place To Start!

Hey everybody! Happy Tuesday – I hope you’re having a good week so far! It’s super chilly here and we’ve driven in the snow to doctor appointments and grocery shopping, but otherwise trying to stay indoors where it’s cozy! I’ve popped in today to share a quick Kat Scrappiness Creative Influencer inspiration project featuring the Love Lightbulb Shaker Card Kit! I totally love shakers and I used this one as the focal embellishment on the front of this ‘love you just because’ card. I used a gold and black color combo with Kat Scrappiness Gold Solid Confetti Mix (with a few black sequins from my stash) and the Friendship Greetings stamp set.

I cut a standard A2 side-folding card base from Neenah Classic Crest 110# Solar White cardstock and layering panels from Darice black cardstock and Stampin’ Up Gold Fancy Foil Designer Vellum. I colored the shaker frame with a Kirarina Wink gold metallic marker and the ‘love’ element with a Copic Sketch black marker.

I used Kat Scrappiness Gold Solid Confetti Mix along with a few black sequins from my stash as the shaker filler, and then adhered a few random pieces of the gold confetti on the background. Using the Kat Scrappiness Friendship Greetings stamp set, I stamped the word ‘you’ on a scrap piece of Solar White cardstock in Memento Tuxedo Black ink, trimmed it, and adhered it to the lightbulb.

I cut the inside panel from Solar White cardstock, embellished it with strips of the foiled vellum and black cardstock used on the front, and stamped the sentiment (from the same stamp set) in black ink.

Sharing in the following challenges:
1. A Place To Start: January 2023 Anything Goes
2. Jan’s Digi Stamps Challenge: January 2023 Anything Goes

Affiliate links are used in this post at no cost to you – I really appreciate your support!

Kat Scrappiness products used:
Love Lightbulb Shaker Card Kit
Gold Solid Confetti Mix
Friendship Greetings Stamp Set

Other products used:
Cardstock/Paper: Neenah Classic Crest 110# Solar White cardstock, Darice black cardstock, Stampin’ Up Fancy Foil Designer Vellum
Ink: Memento Tuxedo Black ink; Kirarina Wink Gold Metallic Marker; Copic Sketch Black Marker
Accessories: Tonic Studios 12″ Guillotine Paper Trimmer, MISTI stamping tool, Spiegelmom Scraps Elegant Winter Sequin Mix

I hope you’ve enjoyed this project and I’ve inspired you to get crafty! Be sure to check out all the amazing stuff in the Kat Scrappiness store… there’s some of just about everything you’ll need to get your craft on, I promise! Be sure to Follow us on Facebook, Instagram, Pinterest and YouTube for tons of crafty inspiration! And we’d love it if you’d join the Kat Scrappiness Insiders and Stamping Enablers Facebook Groups for lots of fun crafty ideas and to share your creativity! Thanks so much for stopping by today – we’ll see you next time!

Scrappy hugs,

Have yourself a merry little Christmas

Hi friends! Welcome 2023! Sure can’t believe it’s here already… seems like we just rung in 2022! Our new challenge is live this morning over at Merry Little Christmas Challenge Blog and I’m excited to share my DT inspiration project for MLCCB #48 – Anything Christmas Goes! I used the Hot Off The Press Forest Snow Globe Chipboard Kit as the focal element on this adorable shaker card done in neutrals. I typically don’t use tan and gray together, but this totally works!

I cut a standard A2 size top-folding card base from Neenah Classic Crest 110# Solar White cardstock, a layering panel from kraft corrugated paper and four strips of CutCardStock Shadow Gray cardstock in varying widths. I created the focal shaker element using the Hot Off The Press Forest Snow Globe Chipboard Kit, and enhanced the globe with a layered circle frame cut from CutCardStock Stardream Metallic Silver cardstock. I colored the tree, rabbit, deer, geese and base with alcohol markers. I sprayed the background with Tattered Angels Pewter Color Wash and flicked silver paint from a Posca silver paint pen over it. Finally, I created snowbanks with layers of Solar White cardstock. I assembled the snow globe and added a pinch of homemade snow mix consisting of Stampin’ Up Snowflake sequins, Neat & Tangled sequins, Spiegelmom Snowy Fields sequins, and Pretty Pink Posh Marshmallow Seed Beads. The final step was adding a sentiment from the Concord & 9th Tiny Trees Turnabout Stamp Set stamped in Catherine Pooler Black Jack ink.

I cut the inside panel from Solar White cardstock and embellished it with strips of CutCardStock Stardream Metallic Silver and Shadow Gray cardstock used on the front. I stamped a sentiment from the Concord & 9th Home for the Holidays stamp set in Catherine Pooler Black Jack ink.

Sharing in the following challenges:
1. 613 Avenue Create: #202301 – January Anything Goes
2. A Perfect Time To Craft: #1-2023 – Anything Goes
3. Classic Design Challenge: January 2023 #1 – Anything Goes
4. Crafting Happiness Challenges: #138 – Celebrations (Christmas)
5. Creative Moments: #241 – Christmas/Winter Celebrations
6. Di’s Digi Challenges: Any Winter Holiday
7. Moving Along With The Times: #150 – Use Kraft Card (I used corrugated kraft cardstock)
8. Once Upon A Time Challenge Blog: #6 – The Snowy Day
9. Sparkles Christmas Challenges: #144 – Sparkle/Glitter Accents
10. Winter Wonderland Challenge Blog: End of Year Anything Christmas Goes

Affiliate links are used in this post at no cost to you – I really appreciate your support! 

Products used:
Cardstock/Paper: Neenah Classic Crest 110# and 80# Solar White cardstock, CutCardStock Stardream Metallic Silver cardstock, CutCardStock Shadow Gray cardstock, kraft corrugated paper
Stamps: Concord & 9th Tiny Trees Turnabout Stamp Set and Home for the Holidays stamp set
Ink: Arteza alcohol markers- NG06/08, BR51/84, YG10; Tattered Angels Pewter Color Wash, Posca silver paint pen, Catherine Pooler Black Jack ink
Dies/Punches: Spellbinders Classic Circles Small dies
Accessories: Tonic Studios 12″ Guillotine Paper Trimmer, Hot Off The Press Forest Snow Globe Chipboard Kit, Bearly Art precision craft glue, MISTI stamp tool, Big Shot; homemade shaker snow mix (Stampin’ Up Snowflake sequins, Neat & Tangled sequins, Spiegelmom Snowy Fields sequins, and Pretty Pink Posh Marshmallow Seed Beads)

I hope you’ve enjoyed seeing this project and will link up with us this time! We’d love to see your Christmas project! Thanks so much for stopping by today – we’ll see you next time! ;)

Scrappy hugs,

Merry Christmas Scene in a Bottle

Hey everybody! Happy Friday – I hope you’re having an awesome week! I’ve popped in this morning to share another Kat Scrappiness Creative Influencer inspiration project with you! I know I’ve shared many times that I absolutely love shakers – so instead of a ‘message in a bottle’, we have a ‘scene in a bottle’ which is one of the many relatively new products in the store. In addition to this Christmas Scene in a Bottle Shaker Card Kit, I used the Christmas Gnomes Stamp Set, Friendship Greetings Stamp Set, 3mm Sparkling Clear Droplets and 4mm Sparkling Clear Droplets to create this Christmas card with an inked background! So fun!

I cut a 3-1/2″ x 6″ mini slimline card base from Neenah Classic Crest 110# Solar White cardstock. Next, I DTP-inked a panel of Strathmore Bristol 100# Smooth with Ranger stormy sky, faded jeans, prize ribbon and villainous potion distress inks. When it was completely dry, I flicked water on it and blotted it with paper towel, and adhered it to the card base.

I colored the cork on the end with a brown Tombow marker and added some CutCardStock Brown Bag Kraft paper to resemble cork. Next, I used brown, red, gold and green Tombow markers to color the scene in the bottle, and applied Nuvo White Blizzard Glitter Drops to the trees and ground for the snow.

I assembled the shaker, laid down 3mm Sparkling Clear Droplets and 4mm Sparkling Clear Droplets onto the background, and adhered the shaker over top of them. I adhered a few more clear droplets on the background and added a stamped and trimmed sentiment from the Christmas Gnomes stamp set, which completed the card front.

I cut the inside panel from #80 Solar White cardstock, stamped a sentiment from the Friendship Greetings stamp set, and layered the panel on CutCardStock Basis Medium Blue cardstock.

Sharing in the following challenges:
1. A Perfect Time To Craft Open Challenge: #10-2022 – Anything Goes
2. Classic Design Challenge: October #10 – Anything Goes
3. Crafty Catz: #611 – Anything Goes w/ optional Ribbon or Twine (no twist)
4. Fab ‘n’ Funky Challenges: #559 – Season’s Greetings
5. Inkspirational: #276 – Word Prompt: Imagine

6. Penny’s Paper-Crafty Challenge Blog: #532 – Anything Goes with Paper
7. Winter Wonderland Challenge Blog: Let It Snow!

Affiliate links are used in this post at no cost to you – I really appreciate your support!

Kat Scrappiness products used:
Christmas Scene in a Bottle Shaker Card Kit
Christmas Gnomes Stamp Set
Friendship Greetings Stamp Set
3mm Sparkling Clear Droplets
4mm Sparkling Clear Droplets

Other products used:
Cardstock/Paper: CutCardStock Brown Bag Kraft Paper and Basis Medium Blue cardstock, Strathmore Bristol 100# Smooth
Ink: Ranger distress inks- stormy sky, faded jeans, prize ribbon and villainous potion; Tombow markers- brown, red, gold and green; American Crafts Gold Metallic Marker
Accessories: Tonic Studios 12″ Guillotine Paper Trimmer, Bearly Art precision craft glue, MISTI stamping tool, Nuvo White Blizzard Glitter Drops

I hope you’ve enjoyed this project and I’ve inspired you to get crafty! Be sure to check out all the amazing stuff in the Kat Scrappiness store… there’s some of just about everything you’ll need to get your craft on, I promise! Be sure to Follow us on Facebook, Instagram, Pinterest and YouTube for tons of crafty inspiration! And we’d love it if you’d join the Kat Scrappiness Insiders and Stamping Enablers Facebook Groups for lots of fun crafty ideas and to share your creativity! Thanks so much for stopping by today – we’ll see you next time!

Scrappy hugs,

Saddle On Up

Hey everybody! How’s your day going?! Life is beautiful here in southwestern Colorado and we’re totally enjoying our slightly cooler Autumn weather! I’m stoked to be back this afternoon with another Keep It Simple DT inspiration project to share! You know how I love me some shaker cards, and this one featuring products from the new Little Cowgirl Birthday release is the absolute sweetest one ever! I used the Little Cowgirl Birthday Collection Pack 6×6 Cardstock, Little Cowgirl Birthday Die Cut Pieces and Little Cowgirl Birthday Sentiments Stamp Set, along with the Back To Basics Rose Collection Pack 6×6 Cardstock and Back To Basics Rose Enamel Hearts which are already in the store.

I cut a top-folding square card base along with layering panels from the 6×6 Collection Pack and the 6×6 Rose Collection Pack, and adhered the floral panel to the card base. I made a frame out of the rose panel and added several Scotch 3M Foam Strips to the back side. I adhered the large cowgirl on pony die cut from the Die Cut Pieces to the background panel, and added some Kat Scrappiness hollow square confetti (free sample with an order). I stamped a sentiment from the Birthday Sentiments Stamp Set in Memento Rich Cocoa ink on a lighter shade of rose cardstock in the Rose Collection Pack, punched it with a circle punch and layered it on a slightly larger Solar White cardstock punched circle. I added a Rose Enamel Heart to the punched sentiment, which completed the card front.

I cut the inside panel from 80# Solar White cardstock, embellished it with leftover strips of cardstock from the 6×6 Collection Pack and the 6×6 Rose Collection Pack used on the front, and stamped another sentiment from the Birthday Sentiments Stamp Set in Rich Cocoa ink.

Sharing in the following challenges:
1. 613 Avenue Create: #202210 – Anything Goes w/optional But First… (no twist)
2. A Perfect Time To Craft Open Challenge: #10-2022 – Anything Goes
3. A Place To Start – #102022 – Anything Goes w/ optional Circles and Squares (playing twist)
4. Classic Design Challenge: October #10 – Anything Goes
5. Crafts Galore Encore Challenge Blog: #104 – Anything Goes
6. Critter Crazy Challenges: #67 – Anything Goes with a Featured Critter
7. Jan’s Digi Stamps Challenges: October Anything Goes
8. QKR Stampede: #453 – Anything Goes

Keep It Simple products used:
Little Cowgirl Birthday Collection Pack 6×6 Cardstock
Little Cowgirl Birthday Die Cut Pieces
Little Cowgirl Birthday Sentiments Stamp Set
Back To Basics Rose Collection Pack 6×6 Cardstock
Back To Basics Rose Enamel Hearts

Affiliate links are used in this post at no cost to you – I really appreciate your support!

Other products used:
Cardstock/Paper: Neenah Classic Crest 110# and 80# Solar White cardstock
Ink: Memento Rich Cocoa ink
Dies/Punches: My Favorite Things Wonky Stitched Square STAX Die-namics, Stampin’ Up 1-1/4″ and 1″ Circle Punches
Accessories: Tonic Studios 12″ Guillotine Paper Trimmer, Bearly Art precision craft glue, MISTI stamping tool, Big Shot, Grafix Craft Plastic, Scotch 3M Foam Strips, Kat Scrappiness Hollow Square Confetti Sample

I hope you’ve loved seeing this project as much as I loved creating it, and you’re inspired to get crafty! Be sure to check out ALL the fun goodies in the Keep It Simple store such as paper, stamps, die cuts, ephemera, washi tape and enamel dots to name just a few! You’ll go cray-cray! Be sure to Follow us on Facebook, Instagram, and Pinterest for lots of crafty inspiration! Thanks so much for stopping by today – we’ll see you next time!

Scrappy hugs,

Hey Chickee!

Hey everybody! I’m back with one last post on this fine Saturday morning! I’ve been asked to guest design for InkyStamper for the month of October, and I can’t tell you how much fun I’ve had playing with their super adorable stamps and dies! So stay tuned for posts every Wednesday this month! ;)

Now for the surprise… Chickee is being released today for World Card Making Day! The stamp set is FREE with a $30 purchase and the die is only a $5 add-on! How awesome is that?! I had the privilege of creating a fun shaker note card using these stamps and die as an extra project, which I paired with Doodlebug Design Gingham-Linen Rainbow Petite Prints 6×6 double-sided cardstock (some of my favorite cardstock!) and Picket Fence Studios Rainbow Sequins from the store. What friend wouldn’t love to get a card featuring this gal?!

I cut a standard A2 size side-folding card base from 110# Solar White cardstock along with a layering panel from Doodlebug Design Gingham-Linen Rainbow Petite Prints which I adhered to the card base. I stamped Chickee on Solar White cardstock, colored her with alcohol markers, and cut her with the coordinating die.

I cut a frame from CutCardStock Pop Tone Lemon Drop cardstock using the Cottage Cutz Double-Stitched Rectangle Dies. I stuck some 7 Gypsies Architext Tall Base Chicken Wire to a piece of acetate cut to fit the frame, and adhered it to the back side of the frame. I laid the frame on the card front to get an idea of where to stamp the sentiment and adhere the image, and once that was done, I added four Scotch 3M adhesive foam strips to the back of the frame, laid down some Picket Fence Studios Rainbow Sequins, and adhered the shaker to the card front. I adhered three loose yellow sequins, which completed the card front.

I cut the inside panel from 80# Solar White cardstock and embellished it strips of the gingham and yellow cardstock used on the front. I left the panel blank, leaving plenty of room to write a custom message.

Sharing in the following challenges:
1. A Perfect Time To Craft Open Challenge: #10-2022 – Anything Goes
2. Classic Design Challenge: October #10 – Anything Goes
3. Crafts Galore Encore Challenge Blog: #104 – Anything Goes
4. Crafty Catz: #608 – Anything Goes w/ optional Use the Color Blue Somewhere (playing twist-sequins)
5. Crafty Friends Challenge Blog: #160 – Use More Than One Die
6. Critter Crazy Challenges: #67 – Anything Goes with a Featured Critter
7. QKR Stampede: #453 – Anything Goes

InkyStamper products used:
Chickee stamps and die
Doodlebug Design Gingham-Linen Rainbow Petite Prints 6×6 double-sided cardstock
Picket Fence Studios Rainbow Sequins

Affiliate links are used in this post at no cost to you – I really appreciate your support! 

Products used:
Cardstock/Paper: Neenah Classic Crest 110# and 80# Solar White cardstock, CutCardStock Pop Tone Lemon Drop cardstock
Ink: Memento Tuxedo Black ink; Arteza alcohol markers- Y12/22, YR12
Dies/Punches: Cottage Cutz Double-Stitched Rectangle Dies
Accessories: Tonic Studios 12″ Guillotine Paper Trimmer, Bearly Art precision craft glue, MISTI stamp tool, Big Shot, Grafix Craft Plastic, 7 Gypsies Architext Tall Base Chicken Wire, Scotch 3M Adhesive Foam Strips

I hope you’ve enjoyed seeing this guest design project for InkyStamper! Check out ALL the fun goodies in the InkyStamper store – not just stamps and dies but lots of other crafty products, too! Be sure to take advantage of the FREE Chickee stamp set with a $30 purchase and get the die for a $5 add-on! Follow on Facebook, Instagram and YouTube for lots of crafty inspiration! Thanks so much for stopping by today – we’ll see you next time! ;)

Scrappy hugs,

Congrats see-through shaker

Hey everybody! Happy Hump Day – I hope you’re having a great week! I’ve popped in today to share another Kat Scrappiness Creative Influencer inspiration project! I’ve been playing (again) with the Kat Scrappiness Oopsie Daisy Layered Stamp Set and coordinating dies, along with the Kat Scrappiness Mini slimline Postage Stamp Edge Dies and Congrats Word Die, and created a pretty congrats card. I love shaker cards, and rather than creating one with a traditional shaker, I created a see-through shaker element on this card that really gives it some pizzazz!

I cut a standard A2 size side-folding card base from Neenah Classic Crest 110# Solar White cardstock along with a layering panel from Sunny Studio Striped Silly cardstock. I cut an aperture into the card front with a Kat Scrappiness Mini slimline Postage Stamp Edge Die.

Using my We R Memory Keepers Fuse Tool and a pouch, I created a shaker element (with a blue and clear sequin mix sample that Kat tucked into one of my orders), adhered it to the back of the aperture, and concealed the edges of the pouch with a white cardstock frame to give it a clean finished look.

I stamped and die cut a single daisy (using the Kat Scrappiness Oopsie Daisy stamps and dies) which I adhered to the bottom right corner of the aperture. I used the Kat Scrappiness Congrats Word Die for the main sentiment, cut from Solar White cardstock.

I cut the inside panel from 80# Solar White cardstock along with layering panels from CutCardStock Royal Sundance Midnight Blue Linen cardstock and Sunny Studio Striped Silly cardstock. The sentiment is computer-generated and placed so it’s visible through the see-through shaker.

Sharing in the following challenges:
1. A Perfect Time To Craft Open Challenge: #9-2022 – Anything Goes
2. A Place To Start: #092022 – Anything Goes w/optional Fantasy (no twist)
3. Classic Design Challenge: September #9 – Anything Goes
4. QKR Stampede: #452 – Anything Goes
5. Sweet Stampers Challenge Blog: #72 – Add A Sentiment
6. World Wide Open Design Team Challenge: #09 – Anything Goes

Affiliate links are used in this post at no cost to you – I really appreciate your support!

Kat Scrappiness products used:
Oopsie Daisy Layered Stamp Set
Oopsie Daisy Coordinating Dies
Mini slimline Postage Stamp Edge Dies
Congrats Word Die w/Shadow Dies

Other products used:
Cardstock/Paper: Neenah Classic Crest 110# and 80# Solar White cardstockCutCardStock Royal Sundance Midnight Blue Linen cardstock, Sunny Studio Striped Silly 6×6 cardstock
Stamps: Computer-generated sentiment
Ink: Catherine Pooler Stone Blue, Cove Blue, Shea Butter, Icing on the Cake, Eucalyptus and Spruce inks
Accessories: Tonic Studios 12″ Guillotine Paper Trimmer, Fiskars SureCut Trimmer, Bearly Art precision craft glue, MISTI stamping tool, Big Shot, We R Memory Keepers Fuse Tool and Pouch, iCraft Supertape

I hope you’ve enjoyed this project and I’ve inspired you to get crafty! Be sure to check out all the amazing stuff in the Kat Scrappiness store… there’s some of just about everything you’ll need to get your craft on, I promise! Be sure to Follow us on Facebook, Instagram, Pinterest and YouTube for tons of crafty inspiration! And we’d love it if you’d join the Kat Scrappiness Insiders and Stamping Enablers Facebook Groups for lots of fun crafty ideas and to share your creativity! Thanks so much for stopping by today – we’ll see you next time!

Scrappy hugs,