You’re the Sweetest

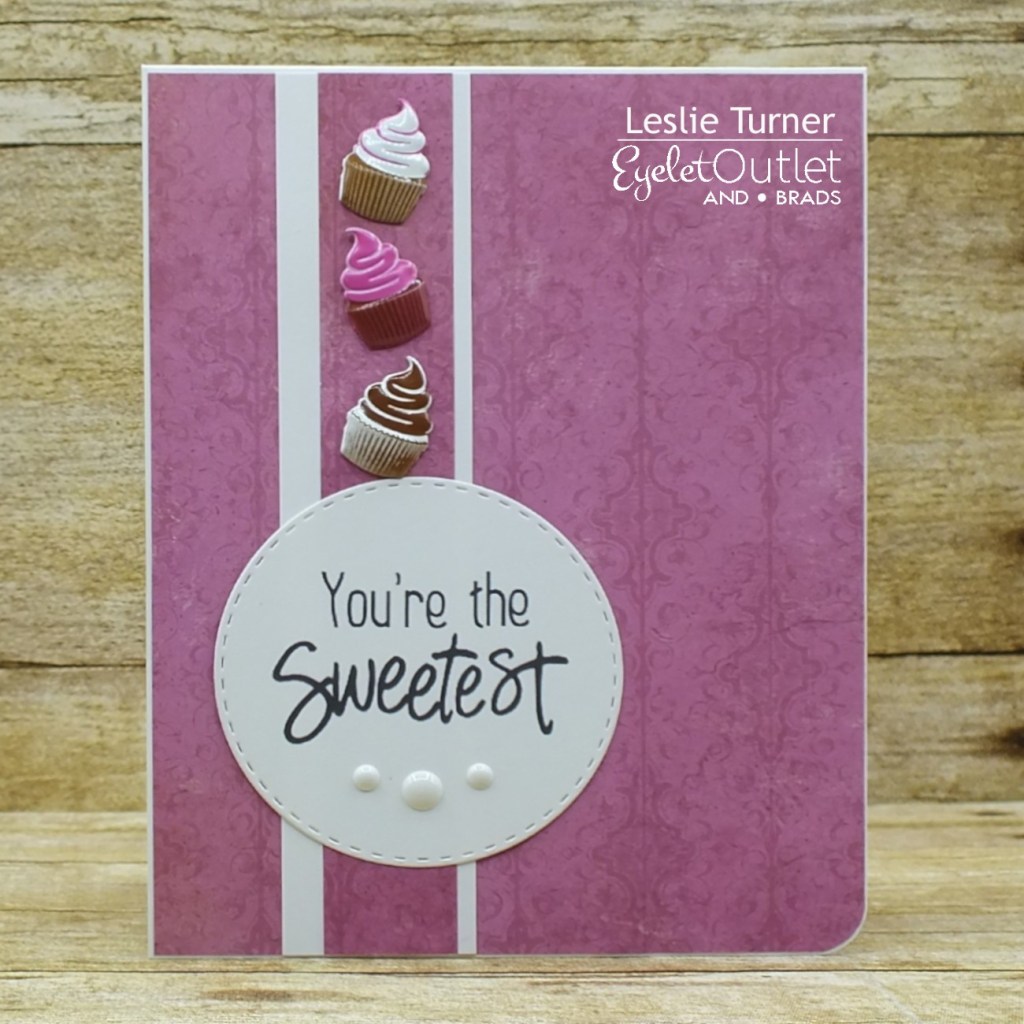
Hi everyone! Well, another week has come and gone and we find ourselves busting into another weekend! I hope you have something fun planned! I’m happy to be back on the Eyelet Outlet blog today with another awesome DT inspiration project! I created a sweet friendship card featuring our new Cupcake Swirl Brads that hit the store last week! Don’t these look super yummy?! I paired them with White Enamel Dots on the front and used a little bit of Valentine Washi Tape on the inside. This easy design is just the ticket if you need some uplifting friendship cards in your stash!

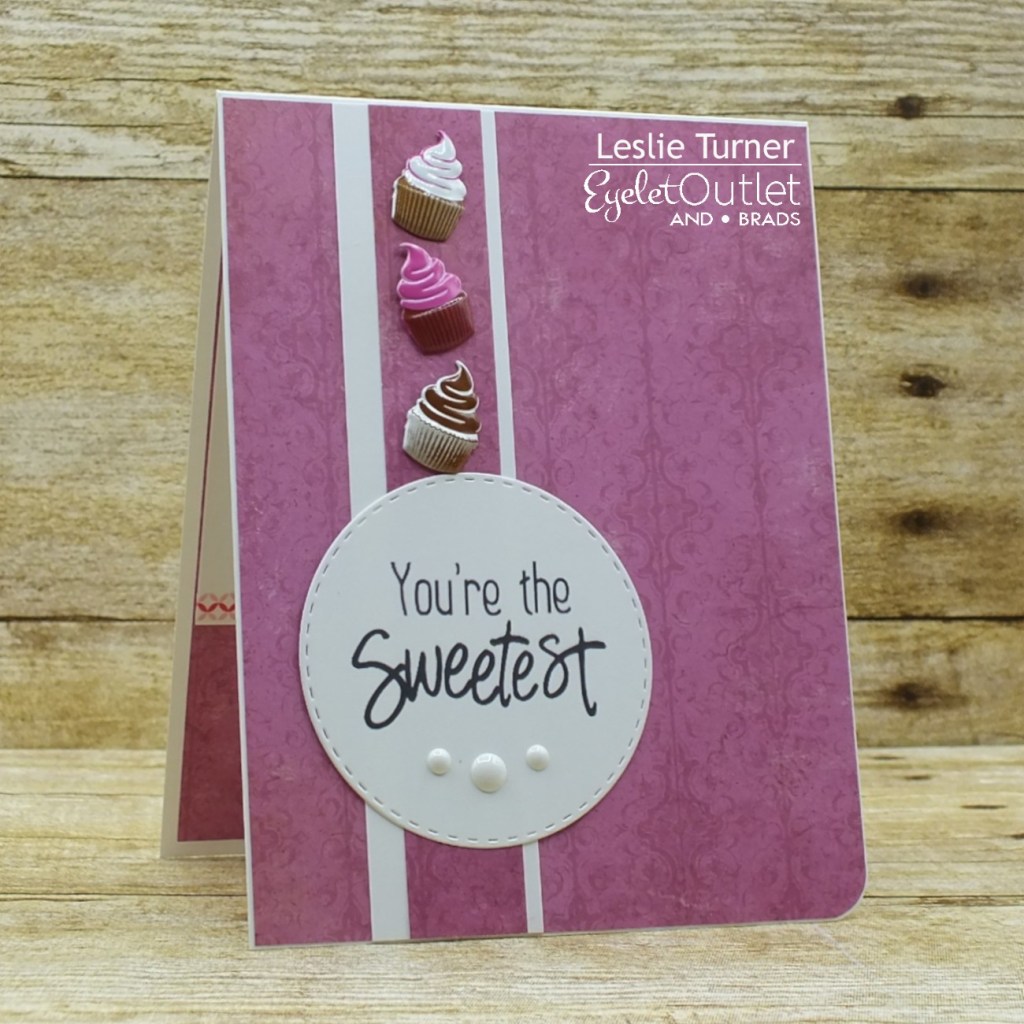
I cut a standard A2 size top-folding card base and layering strip from Neenah Classic Crest Solar White cardstock along with a pink patterned paper layering panel and strip from one of my favorites, The Paper Studio Tattered and Worn paper pad. I rounded the bottom right corner of the card base and layering panel, and adhered the panels to the card base. I adhered the strips together, added three Cupcake Swirl Brads toward the top, and adhered the strip vertically to the card base. The final step to complete the front was adding a die cut digital sentiment embellished with White Enamel Dots.

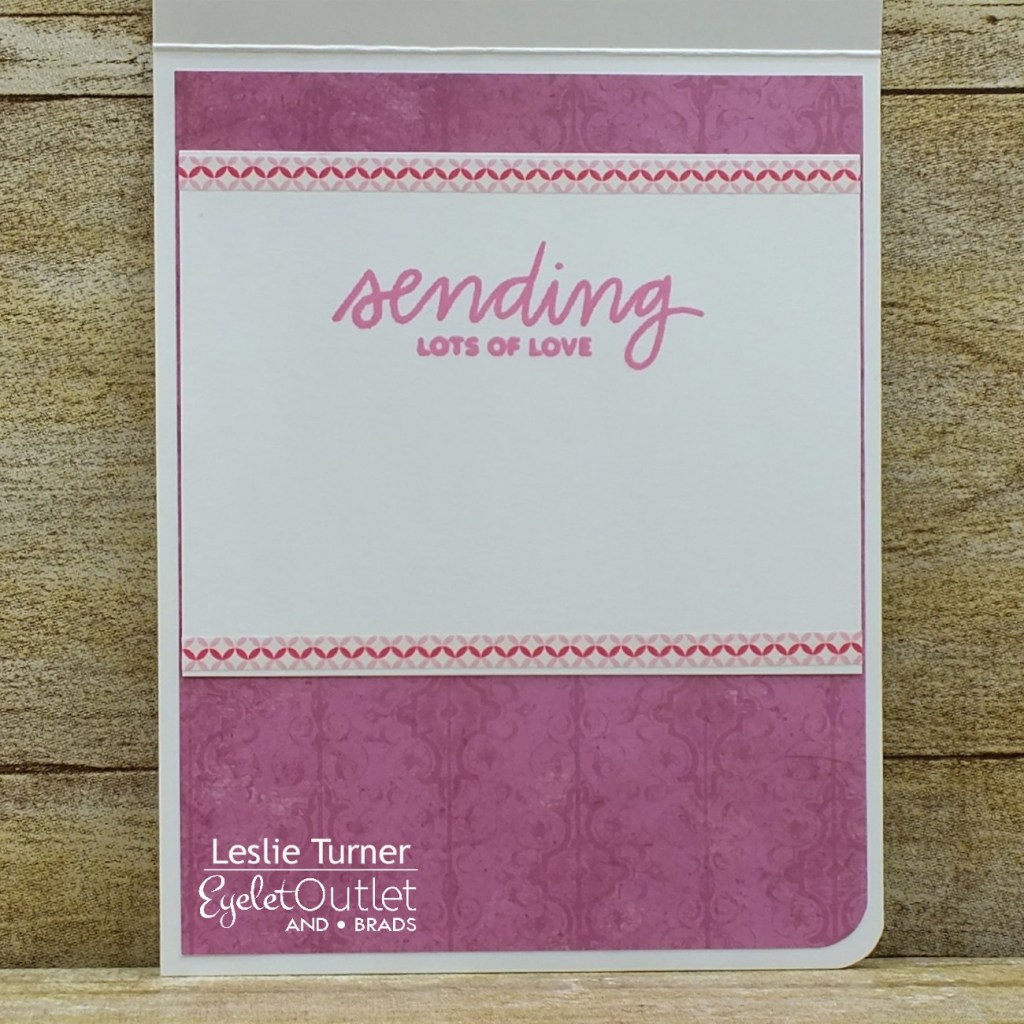
I cut a short panel for the inside from Neenah Classic Crest Solar White cardstock, embellished it with strips of Valentine Washi Tape and stamped the sentiment from the Pretty Pink Posh Everyday Greetings stamp set, and layered it on a patterned paper layer.

And one more peek… such a fun friendship card that could be used for a variety of occasions! I’m in love with these cupcake brads!

Eyelet Outlet products used:
Cupcake Swirl Brads
Valentine Washi Tape
White Enamel Dots

Other products used:
Cardstock/Paper: Neenah Classic Crest Solar White cardstock, The Paper Studio Tattered and Worn 12×12 paper pad
Stamps: My Scrap Chick digital sentiment, Pretty Pink Posh Everyday Greetings stamp set
Ink: Hero Arts Bubble Gum ink
Dies/Punches: Kadomaru corner rounder, Memory Box Stitched Circle Layers
Accessories: Tonic Studios 12″ Guillotine Paper Trimmer, Tombow Mono permanent adhesive, Bearly Art precision craft glue, Big Shot, MISTI stamp tool

I hope you’ve enjoyed today’s project! Be sure to check out all the fun goodies at Eyelet Outlet! I can already see you drooling, lol! Be sure to ‘like’ and ‘follow’ Eyelet Outlet Facebook Page to keep up with news and sales, and while you’re at it, join the Eyelet Outlet Fans Facebook group for lots of creative inspiration! Thanks so much for stopping by today – we’ll see you next time! ;)

Scrappy hugs,
lesliesig

Happy Holidays fun fold

Hi friends! Another Friday has come around and I hope you’ve had an awesome week! We have had some absolutely gorgeous weather here this past week, and even though a couple days were a little windy, we still enjoyed the temps. Affiliate links are used in this post at no cost to you – I really appreciate your support! I’m up on the Prickley Pear Stamps blog today with a pretty triple pocket twist card that I created using the Ornaments Set 2 stamp set and coordinating Ornament die. This fold was showcased in a recent Splitcoast Stampers newsletter HERE and I knew it was one I wanted to try! You know me and fun folds, lol! ;)

I cut the triple pocket base from Neenah Classic Crest Baronial Ivory cardstock along with layering panels from Hot Off The Press Poinsettia Passion double-sided cardstock which I adhered to the card base. I did a little masking with the ornament I created for the focal on the front of the card. Using the Ornaments Set 2 stamp set I masked off the image inside the ornament and stamped the Happy Holidays sentiment inside the border. I cut it with the coordinating Ornament die and added gold cord as the ornament hanger. I wrapped a length of burgundy checkerboard satin ribbon around the card and tied it in a bow, adhering the ribbon to the back of the card and adhering the die cut ornament to the front of the ribbon. The card opens to reveal three small cards in the inside pockets which I cut from CutCardStock Basis Burgundy cardstock with layering panels cut from the poinsettia cardstock and ivory cardstock.

I added CRAFTplorations Comfort & Joy Clear Stickers to the three small cards inside.

And one more peek… I thoroughly enjoyed creating this card! And the stamped and die cut ornament is just the ticket for the focal on the front!

Prickley Pear Stamps products used:
Ornaments Set 2 stamp set
Ornament die

Other products used:
Cardstock/Paper: Neenah Classic Crest Baronial Ivory cardstock, CutCardStock Basis Burgundy cardstock, Hot Off The Press Poinsettia Passion double-sided cardstock
Ink: Catherine Pooler Cranberry Fizz ink
Accessories: Tonic Studios 12″ Guillotine Paper Trimmer, MISTI stamp tool, Big Shot, Darice Double-Sided Adhesive Foam Circles, CRAFTplorations Comfort & Joy Clear Stickers, GKD Gold Cord, Really Reasonable Ribbon Checkerboard Satin Ribbon, ScraPerfect iridescent gemstones

I hope you’ve enjoyed this project! Be sure to check out all the awesome stamps and dies at Prickley Pear Stamps! If you’d like to save 10% on anything on the site when you shop at Prickley Pear Stamps, use the coupon code LESLIE10 at checkout! And be sure to ‘like’ and ‘follow’ the Prickley Pear Stamps Facebook page to keep up with news and sales, and join Prickley Pear Pals (the fan group) for lots of fun crafty ideas and to share your creativity! And finally, we’d love to see you visit the Prickley Pear Stamps blog that’s in the process of being revived and become a Follower! Hope to see you there! Thanks so much for stopping by today – we’ll see you next time! ;)

Scrappy hugs,
lesliesig

Hydrangea twisted gate fold

Hi peeps! Happy Hump Day! I’ve got to run an errand this morning so I thought I’d get on real quick and share a pretty card (taking a break from Halloween cards, lol) before I get too busy. Affiliate links are used in this post at no cost to you – I really appreciate your support! Proud to be up on the Prickley Pear Stamps blog again this morning with another fun fold – a twisted gate fold card. This is truly one of the prettiest folds out there and when created with the gorgeous Sketched Florals – Hydgrangea stamp set it’s just stunning! Their Sketched Florals line is amazing!

I stamped the Sketched Florals – Hydgrangea image on Neenah Classic Crest 80# Solar White cardstock, colored it with alcohol markers and cut layering panels. I cut the twisted gate fold card base from CutCardStock Basis Dark Purple cardstock along with purple dotted patterned paper layering panels. I stamped the sentiment (from the same stamp set) in purple ink, cut it with a My Favorite Things Wonky Stitched Rectangle STAX Die-namics die and adhered it to the front. I added Clear Star shimmer to the centers of the flowers to finish the card front.

I cut the inside panel from Neenah Classic Crest 80# Solar White cardstock and embellished it with strips of purple dotted patterned paper and a narrow strip of CutCardStock Basis Dark Purple cardstock. I stamped the sentiment from the Flowers For Beautiful You stamp set in purple ink and layered the panel on dark purple cardstock.

And one more peek… I do so love this fold, and this stamp set is just gorgeous!

Prickley Pear Stamps products used:
Sketched Florals – Hydgrangea stamp set
Flowers For Beautiful You stamp set

Other products used:
Cardstock/Paper: Neenah Classic Crest 80# Solar White cardstock, CutCardStock Basis Dark Purple cardstock, Doodlebug Design Dot-Grid-Daisy-Stripe Rainbow Petite Prints 6×6 double-sided cardstock
Ink: Nuvo alcohol markers- 405-Sunshine Yellow Collection, 409/420-Organic Greens Collection, 431-Indigo Ink Collection, 436/443-Palma Violets Collection; Sakura Clear Star Gelly Roll pen, Catherine Pooler Drive-In ink
Dies/Punches: My Favorite Things Wonky Stitched Rectangle STAX Die-namics
Accessories: Tonic Studios 12″ Guillotine Paper Trimmer, Bearly Art precision craft glue, MISTI stamp tool, Big Shot

I hope you’ve enjoyed this project! Be sure to check out all the awesome stamps and dies at Prickley Pear Stamps! If you’d like to save 10% on anything on the site when you shop at Prickley Pear Stamps, use the coupon code LESLIE10 at checkout! And be sure to ‘like’ and ‘follow’ the Prickley Pear Stamps Facebook page to keep up with news and sales, and join Prickley Pear Pals (the fan group) for lots of fun crafty ideas and to share your creativity! And finally, we’d love to see you visit the Prickley Pear Stamps blog that’s in the process of being revived and become a Follower! Hope to see you there! Thanks so much for stopping by today – we’ll see you next time! ;)

Scrappy hugs,
lesliesig

Flying by with a Halloween HI

Hi everybody! Happy Tuesday to you – I hope your week has started off nicely! Affiliate links are used in this post at no cost to you – I really appreciate your support! I’m back up on the Prickley Pear Stamps blog today with another Halloween card! It’s that time of year, you know! ;) I created a fun fold using the super adorable Bats stamp set, Bats 2 stamp set and coordinating Bat die. I’ve made several of these free standing pop-up cards in the past and they are definitely fun and pack a huge punch. I dug into one of my favorite paper pads for coordinating papers in the traditional Halloween colors!

I cut the card base from CutCardStock Basis Black cardstock and adhered patterned paper layers cut from The Paper Studio Four Seasons and Everything In Between -2- paper pad. I cut the stand-up portion of the card from CutCardStock Basis Orange cardstock (which they no longer carry, unfortunately) and a layering panel from Neenah Classic Crest Solar White 80# cardstock which I embellished with leftover pieces of the patterned paper. Using the Bats stamp set and Bats 2 stamp set, I stamped a sentiment and some bats in purple, green, black and orange inks. I stamped a separate bat on Neenah Classic Crest Solar White 110# cardstock in black ink, cut it with the coordinating Bat die and adhered it to the front of the box portion of the card.

I cut the back panel from Neenah Classic Crest 80# Solar White cardstock and embellished it with a leftover piece of the patterned paper. I left this panel blank for a custom message and signature.

And one more look… super fun card in traditional Halloween colors! Love, love, love these bat stamps and die!

Prickley Pear Stamps products used:
Bats stamp set
Bats 2 stamp set
Bat die

Other products used:
Cardstock/Paper: CutCardStock Basis Black cardstock, CutCardStock Basis Orange cardstock, Neenah Classic Crest 80# Solar White cardstock, The Paper Studio Four Seasons and Everything In Between -2- paper pad
Ink: Memento Tuxedo Black ink; Catherine Pooler Orange Twist, Lime Rickey and Sugared Lavender inks
Dies/Punches: Stampin’ Up Slot Punch
Accessories: Tonic Studios 12″ Guillotine Paper Trimmer, MISTI stamp tool, Big Shot, Bearly Art precision craft glue

I hope you’ve enjoyed this project! Be sure to check out all the awesome stamps and dies at Prickley Pear Stamps! If you’d like to save 10% on anything on the site when you shop at Prickley Pear Stamps, use the coupon code LESLIE10 at checkout! And be sure to ‘like’ and ‘follow’ the Prickley Pear Stamps Facebook page to keep up with news and sales, and join Prickley Pear Pals (the fan group) for lots of fun crafty ideas and to share your creativity! And finally, we’d love to see you visit the Prickley Pear Stamps blog that’s in the process of being revived and become a Follower! Hope to see you there! Thanks so much for stopping by today – we’ll see you next time! ;)

Scrappy hugs,
lesliesig

Happy Birthday, Hot Stuff!

Hi friends! I hope you’re having a great day! I’ve been in my studio for a while today and thought I’d pop in this evening to share a super cute card I created for The Outlawz Challenges October Freebie/Progressive Challenge. Our sponsor this month is Oddball Art Co. and we were gifted the awesome Tiff’s Garden digital image to play with! Affiliate links are used in this post at no cost to you – I really appreciate your support! I’ve had this image printed for a couple weeks now and just couldn’t decide what kind of card I wanted to create. She’s one of Oddball’s ‘Creepy Cute Girls’ but I didn’t want to create another Halloween card, so I came up with a zig-zag fun fold birthday card!

Using my own template, I cut the zig-zag card base from Neenah Classic Crest Solar White cardstock along with layering panels from CutCardStock Pop-Tone Black Licorice cardstock and FPTFY Color Pop holiday digital paper that I already had out on my desk from another project. I adhered the layers together and then adhered the panels to the card base. I cut the image with a stitched oval die and colored it with alcohol markers. I layered it on a slightly larger stitched oval die cut and adhered it to the front of the card.

I treated myself recently to several sets of Taylored Expressions Simple Strips with the coordinating Assymetrical die, so I used three of the sentiments from the Birthday set on this card. I couldn’t resist a little humor, lol! ;)

And one more look… this was such a fun card to create! The bright colors really worked with this super cute image!

Products used:
Cardstock/Paper: Neenah Classic Crest Solar White cardstock, CutCardStock Pop-Tone Black Licorice cardstock, Free Pretty Things For You Color Pop holiday digital paper
Stamps: Oddball Art Co. Tiff’s Garden digital image, Taylored Expressions Simple Strips – Birthday
Ink: Arteza alcohol markers- BR28, B32/37, G15, R35/43, BG54, YG22, NG02, YR15; Pentel Slicci gold pen
Dies/Punches: Memory Box Stitcheed Oval Layers, Taylored Expressions Simple Strips – Asymmetrical die
Accessories: Tonic Studios 12″ Guillotine Paper Trimmer, Big Shot, Bearly Art precision craft glue, Imaginisce hot pink adhesive gems

I hope you’ve enjoyed this project and will come over and join in all the fun at The Outlawz Challenges! Lots of fun going on! Thanks so much for stopping by today – we’ll see you next time! ;)

Scrappy hugs,
lesliesig

Merry Christmas Fun Fold

Hey, everybody! A very Happy Monday to you! I hope you had a marvelous weekend and you were able to do something fun! We had our first snow nearly a week ago and I loved every minute of it! Snow is just so beautiful when it’s falling! I’m thrilled to be back on the Clear Scraps blog today with another awesome DT inspiration project! It’s been a minute (2015, lol!) since I created a teepee card (look HERE if you’re interested) so I thought it was time to revisit that fun fold! I used the awesome Vine Circle Chipboard Embellishments to create this Christmas card in non-traditional colors of pink and green! I’m always in Christmas mode and I’m really happy with how this card turned out!

I created the card base from white cardstock, cut layering panels from green cardstock as well as coordinating pink and green patterned paper panels which I adhered to the card base, and then added a round magnet closure. I used both of the Vine Circle Chipboard Embellishments and created Christmas wreaths. I mixed white chalk paint with several drops of green India ink and painted the large one, and mixed white chalk paint with several drops of magenta India ink and painted the small one. Once dry, I dabbed glue on them with a sponge and sprinkled clear glitter on them. I embellished the large green wreath with iridescent gemstones and the small pink wreath with white flat-back pearls for interest and different textures.

I adhered the wreaths to the front of the card and added a stamped and silver embossed sentiment cut with a fishtail die. The final step was adding a few more pearls at the bottom.

Here are shots of the other two sides. The cool part is that this card folds flat for mailing! Be sure to see my tutorial on the Clear Scraps blog if you’re interested in seeing how it was made!

Clear Scraps products used:
Vine Circle Chipboard Embellishments

Other products used:
Cardstock/Paper: Neenah Classic Crest Solar White cardstock, CutCardStock Basis Light Lime cardstock, Hot Off The Press Sweet Pea 6×6 double-sided papers
Stamps: Trinity Stamps A Sentiment For (Almost) Everything stamp set,
Ink: Dr. Ph. Martin’s Grass Green and Magenta India Inks, Versamark
Dies/Punches: My Favorite Things Die-namics Essential Fishtail Sentiment Strips
Accessories: Tonic Studios 12″ guillotine paper trimmer, Bearly Art precision craft glue, Folkart White Adirondack chalk paint, Stampin’ Up Dazzling Diamonds glitter, Krylon fixative, Darice white flat-back pearls, ScraPerfect iridescent gemstones, Trinity Stamps Pick-Up Stick, MISTI stamp tool, Big Shot, round magnet, SweetStamps fine detail silver embossing powder, Milwaukee heat tool, Darice double-sided adhesive foam circles

I hope you’ve enjoyed today’s project and you’re inspired to get those craft supplies out to play! Be sure to check out all the amazing acrylic, wood and chipboard goodies at Clear Scraps… OMGoodness, you won’t be disappointed! And head on over to the Clear Scraps Facebook Page for lots of inspiration! And while you’re at it, join the Clear Scraps Facebook Creative Group to connect with other Clear Scraps fans! Thanks so much for stopping by today – we’ll see you next time!

Scrappy hugs,
lesliesig

BOO!

Hi friends! I hope you are having a beautiful weekend! It’s nice and chilly here, and we are all healthy and happy, so life is good! Affiliate links are used in this post at no cost to you – I really appreciate your support! I’m up on the Prickley Pear Stamps blog today with another fun Halloween card. This latch card features the super adorable Bats stamp set, Bats 2 stamp set and coordinating Bat die. I absolutely love the fold but I’ve only made a few of them over the years. My problem is that my tutorial files are about 6″ thick and there are just too many to choose from, lol! The BOO! die cut is the latch that the circular element slides under to keep the card closed.

I cut the card base and circle die cut from Neenah Classic Crest Solar White 80# cardstock along with layering panels and slightly smaller circle die cuts from CutCardStock Basis Black cardstock and coordinating papers from the Halloween 6×6 Cardstock Pad. I stamped the large bat from the Bats 2 stamp set, cut it with the coordinating Bat die (along with one additional bat cut from black cardstock) and adhered them to the circular panel in a layered fashion. I stamped the small bats and BOO sentiment from the Bats stamp set. I added the large BOO! die cut to use as the latch to keep the card closed. I cut the inside panel from another coordinating paper from the Halloween 6×6 Cardstock Pad and layered it on CutCardStock Basis Black cardstock. I stamped the sentiment and spider web from the Bats 2 stamp set to complete the card.

And one more look… super happy with this fun card! Absolutely loving both of these stamp sets and coordinating die!

Prickley Pear Stamps products used:
Bats stamp set
Bats 2 stamp set
Bat die

Other products used:
Cardstock/Paper: Neenah Classic Crest 80# Solar White cardstock, CutCardStock Basis Black cardstock, Halloween 6×6 Cardstock Pad
Ink: Memento Tuxedo Black ink, Catherine Pooler Black Jack ink
Dies/Punches: Spellbinders Standard Circles dies, Stampin’ Up Boo To You Framelits
Accessories: Tonic Studios 12″ Guillotine Paper Trimmer, MISTI stamp tool, Big Shot, Bearly Arts precision craft glue

I hope you’ve enjoyed this project! Be sure to check out all the awesome stamps and dies at Prickley Pear Stamps! If you’d like to save 10% on anything on the site when you shop at Prickley Pear Stamps, use the coupon code LESLIE10 at checkout! And be sure to ‘like’ and ‘follow’ the Prickley Pear Stamps Facebook page to keep up with news and sales, and join Prickley Pear Pals (the fan group) for lots of fun crafty ideas and to share your creativity! And finally, we’d love to see you visit the Prickley Pear Stamps blog that’s in the process of being revived and become a Follower! Hope to see you there! Thanks so much for stopping by today – we’ll see you next time! ;)

Scrappy hugs,
lesliesig

Christmas presents come and go

Hi everyone! A big ol’ Happy Saturday to you! I hope you’ve had an awesome week and are planning to do something fun and relaxing this weekend! Affiliate links are used in this post at no cost to you – I really appreciate your support! I’m stoked to be back on the Eyelet Outlet blog today with another awesome DT inspiration project! I created a card using some of the new brads that hit the store a few days ago! What’s more fun than new brads?! These Gift Brads are super versatile and can be used for any occasion, and I paired them with our Gold Skinny Washi Tape and Green Enamel Dots to create a simple Christmas card!

I cut a standard size A2 top-folding card base from Neenah Classic Crest 110# Solar White cardstock, along with layering panels from Neenah Classic Crest 80# Solar White cardstock, CutCardStock Basis Dark Red cardstock and Christmas Holiday Print 6×6 Cardstock Pad. I cut the white cardstock and red dotted cardstock layering panels at an angle, butted them together and applied a strip of Gold Skinny Washi Tape at the seam. I stamped the sentiment in red ink, added the Gift Brads, and adhered the panel to the dark red cardstock. The finishing touch on the front was the addition of several Green Enamel Dots.

I cut the inside panel from Neenah Classic Crest 80# Solar White cardstock and embellished it with strips of the red dotted cardstock and gold washi tape, stamped the sentiment in red ink, and adhered the panel to dark red cardstock.

And one more peek… such a sweet and simple Christmas card with some amazing brads and festive gold washi tape! Love how this turned out!

Eyelet Outlet products used:
Gift Brads
Gold Skinny Washi Tape
Green Enamel Dots

Other products used:
Cardstock/Paper: Neenah Classic Crest Solar White cardstock, CutCardStock Basis Dark Red cardstock, Christmas Holiday Print 6×6 Cardstock Pad
Stamps: Stampingbella Festive Gnome Sentiments stamp set, The Project Bin Merriest Christmas stamp set
Ink: Memento Rhubarb Stalk ink
Accessories: Tonic Studios 12″ Guillotine Paper Trimmer, Tombow Mono permanent adhesive, MISTI stamp tool

I hope you’ve enjoyed today’s project! Be sure to check out all the fun goodies at Eyelet Outlet! I can already see you drooling, lol! Be sure to ‘like’ and ‘follow’ Eyelet Outlet Facebook Page to keep up with news and sales, and while you’re at it, join the Eyelet Outlet Fans Facebook group for lots of creative inspiration! Thanks so much for stopping by today – we’ll see you next time! ;)

Scrappy hugs,
lesliesig

Snowy Scenes Fun Fold

Happy Friday, everybody! I hope you’ve had an amazing week! We only had one appointment (for two felines) this week so I’ve gotten quite a bit of crafting in… and that makes me happy! I’m stoked to be back on the CutCardStock blog today with an awesome DT inspiration project featuring our Royal Sundance cardstock that’s on sale this month, so be sure to stock up! Affiliate links are used in this post at no cost to you. I really appreciate your support! I’ve been on a pinwheel twist card ‘kick’ for the last couple weeks (I have made four, lol) and this is the first one I’ve posted. I absolutely love making these… you know me and fun folds! I used Royal Sundance Felt Natural cardstock, Royal Sundance Linen Midnight Blue cardstock and Winter Wonderland 6×6 Cardstock Pad with just a few other items in my studio, so a very short list of supplies is needed!

This card folds flat to fit in a standard A2 size envelope, however, you could easily alter the dimensions to make it as large or as small as you want. I cut the card base and three extra panels from Royal Sundance Felt Natural cardstock. I cut layering panels from Royal Sundance Linen Midnight Blue cardstock. I picked the four scenes I wanted to use from the Winter Wonderland 6×6 Cardstock Pad and cut panels from each. The scenic panels were adhered to the blue layering panels and then adhered to the Natural felt panels.

I added a sentiment to each panel using the STAMPplorations Merry Everything Clear Stickers.

Here’s a shot from above so you can see the construction. It really is pretty simple and straight-forward. Be sure to check out my tutorial on the CutCardStock blog!

CutCardStock products used:
Royal Sundance Felt Natural cardstock
Royal Sundance Linen Midnight Blue cardstock
Winter Wonderland 6×6 Cardstock Pad

Other products used:
Accessories: Tonic Studios 12″ Guillotine Paper Trimmer, Bearly Art precision craft glue, STAMPplorations Merry Everything Clear Stickers

I hope you’ve enjoyed today’s project and you’re inspired to get crafty! Be sure to check out all the awesome cardstock and other goodies at CutCardStock (adhesives, labels, stickers, pens, watercolors and ribbon to name a few). And head on over to the CutCardStock Facebook Page for more inspiration! Thanks so much for stopping by today – we’ll see you next time!

Scrappy hugs,
lesliesig

You’ve been Boozed

Hi friends! How’s the weather where you are? We had our first snow day before yesterday and it sure was a beautiful sight! It snowed a little bit more today but it didn’t stick, so we’ll see what tonight brings! Affiliate links are used in this post at no cost to you. I really appreciate your support! I indulged myself in some super adorable Trinity Stamps Halloween stamps and dies, and have a fun Trinity Stamps Ambassador inspiration project to share this evening! I made this card a couple weeks ago and have had so much going on that I haven’t had a chance to post it, so I’m chomping at the bit! ;)

I cut a standard A2 size side-folding card base from Neenah Classic Crest 110# Solar White cardstock along with layering panels from CutCardStock Basis Dark Purple cardstock and Hot Off The Press purple gingham patterned paper which I adhered together. I added embellishing strips cut from CutCardStock Pop-Tone Gumdrop Green cardstock and CutCardStock Pop-Tone Tangy Orange cardstock to the bottom of the panel. Using the Creepy Cocktails Die Set, I die cut the glasses and extra elements from Neenah Classic Crest 80# Solar White cardstock, CutCardStock Basis Red cardstock, CutCardStock Pop-Tone Grape Jelly cardstock, CutCardStock Pop-Tone Gumdrop Green cardstock, and CutCardStock Curious Metallic Night cardstock, and adhered them to the front panel. I stamped three of the sentiments from the Trick or Drink Stamp Set in purple, orange and green ink, trimmed them, and adhered them to the front panel. I added strips of clear gemstones to the top and bottom of the green embellishing strip, and then added Glossy Accents to the bubbles and tiny black gemstones as the spider’s eyes.

I cut the inside panel from Neenah Classic Crest 80# Solar White cardstock and embellished it with leftover strips of the purple gingham paper and red, green, and dark purple cardstock. I stamped another sentiment from the Trick or Drink Stamp Set in black ink and layered the panel on dark purple cardstock.

And one more peek… how stinkin’ cute is this?! I fell in the love with these stamps and dies the moment I laid eyes on them! So fun!

Trinity Stamps products used:
Trick or Drink Stamp Set
Creepy Cocktails Die Set

Other products used:
Cardstock/Paper: Neenah Classic Crest 110# and 80# Solar White cardstock, CutCardStock Basis Dark Purple cardstock, CutCardStock Basis Red cardstock, CutCardStock Pop-Tone Grape Jelly cardstock, CutCardStock Pop-Tone Gumdrop Green cardstock, CutCardStock Pop-Tone Tangy Orange cardstock, CutCardStock Curious Metallic Night cardstock, Hot Off The Press Gingham #1 6×6 papers
Ink: Arteza Alcohol Marker- BK00; Catherine Pooler Grape Crush, Mandarin Spice, and Lime Rickey inks
Accessories: Tonic Studios 12″ Guillotine Paper Trimmer, Glossy Accents, Bearly Art precision craft glue, MISTI stamp tool, Big Shot, Eyelet Outlet Clear Jewel Strips, Darice tiny Black Gemstones

I hope you’ve enjoyed today’s project and you’re inspired to get those craft supplies out to play! Be sure to check out all the amazing stamps, dies and other goodies at Trinity Stamps! And head on over to the Trinity Stamps Facebook Page for loads of inspiration! And while you’re at it, join the Trinity Stamps Facebook community group to connect with other Trinity Stamps fans! Thanks so much for stopping by today – we’ll see you next time!

Scrappy hugs,
lesliesig