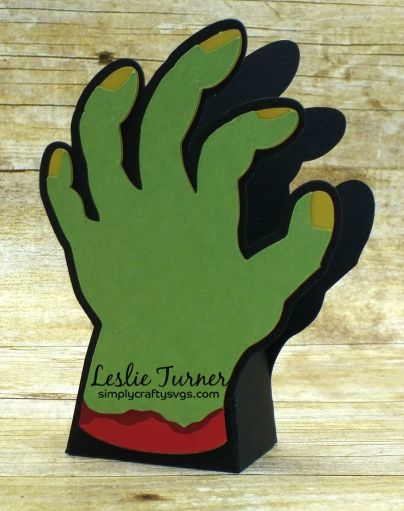
Hi everyone! Happy Thursday – we’re rapidly approaching the middle of October already, lol! Today is my post day on the Simply Crafty SVGs Blog and I’m excited to share my DT inspiration project with you, a fun Halloween treat box created with the Simply Crafty SVGs Zombie Hand Treat Box cut file! Love, love, love this! Can’t wait to put some kind of fun treats in it… I think it would make a good addition to my desk at work! ;)
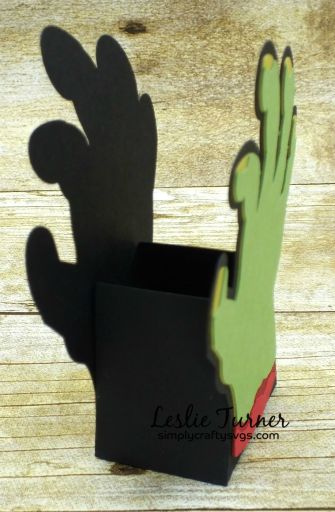
Here’s a side shot showing the little box to put the treats in.
This was a super fun cut file to work with – all the pieces layer so nicely! Makes a very realistic and creepy hand!
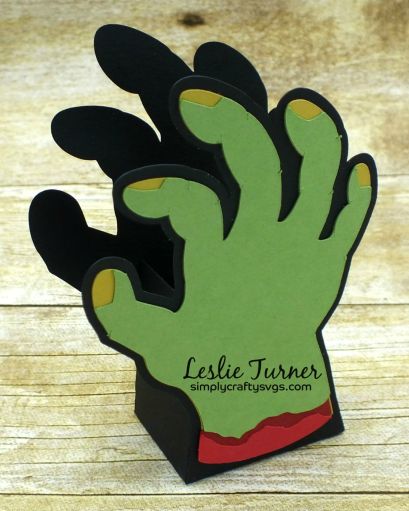
And one final shot from above. Sure do love how this turned out!
Products used: Cardstock/Paper: Marco’s Black Kaleida cardstock, GKD Grass Green and Prickly Pear cardstock, Stampin’ Up Cherry Cobbler and Real Red cardstock Dies/Punches: Simply Crafty SVGs Zombie Hand Treat Box cut file
I hope you’ve enjoyed this fun Creepy Zombie Hand! Be sure to check out all the fun cut files at Simply Crafty SVGs – I know you’ll love what you see! Thanks so much for stopping by today – we’ll see you next time! ;)
** Best Technique Winner at Classic Design Team Open Challenge Blog! **
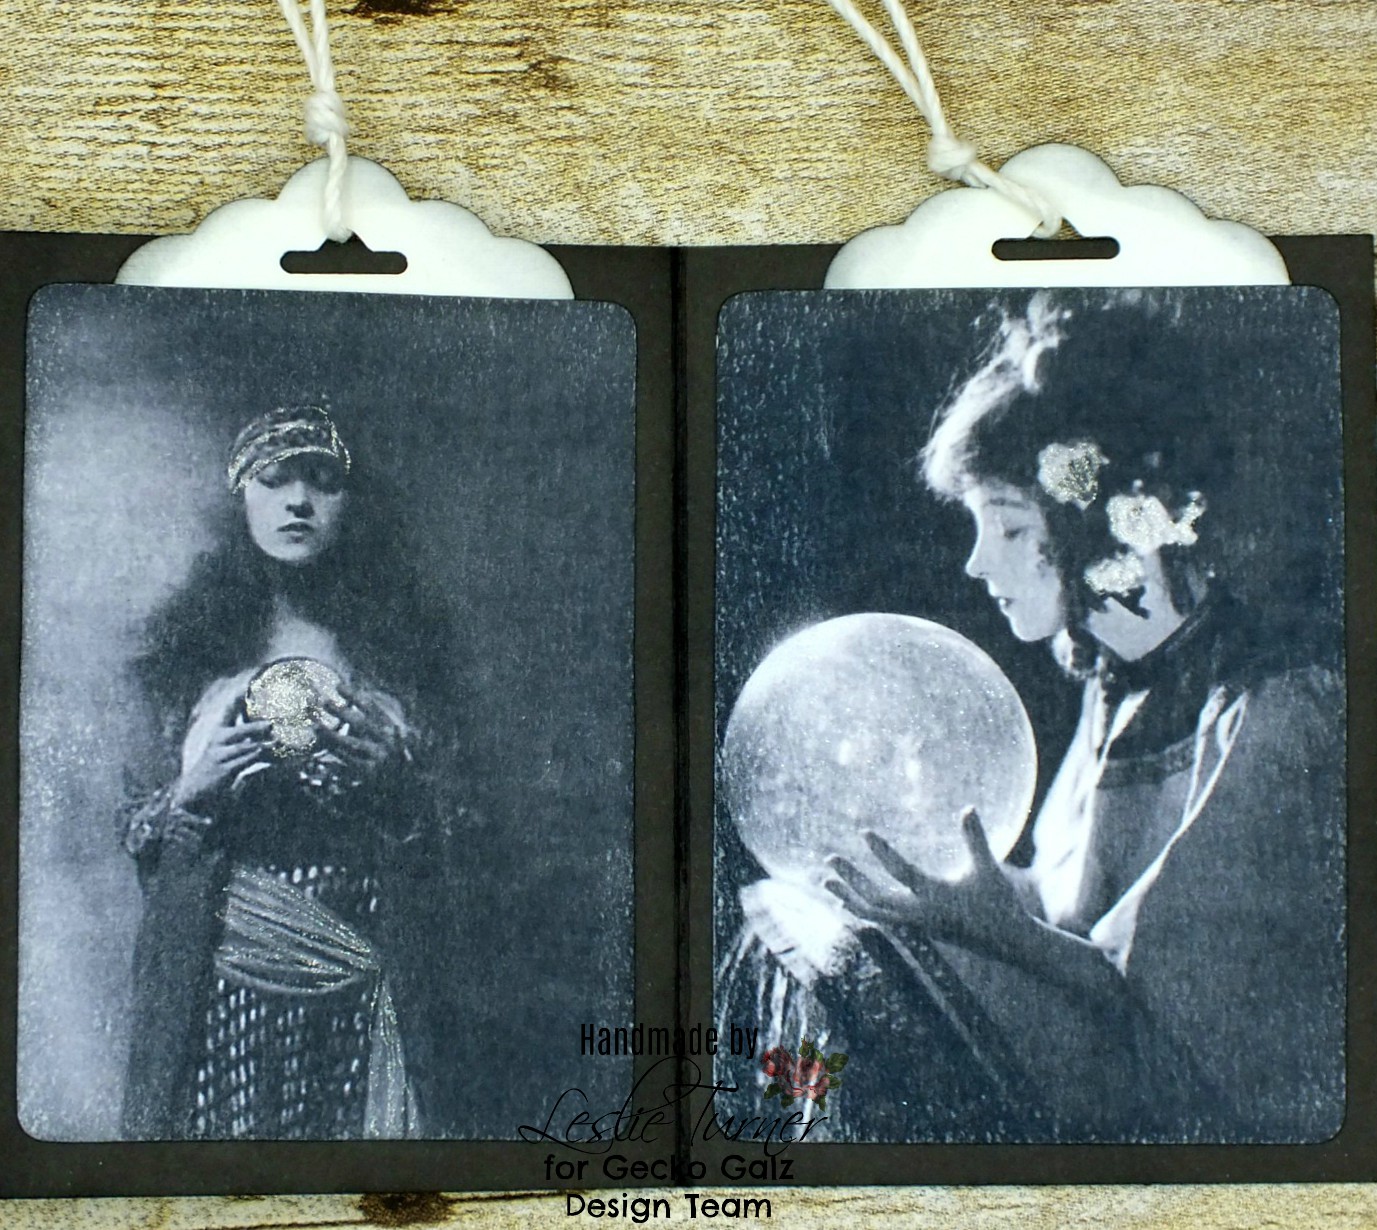
Hello crafty peeps! Happy Sunday – here’s to a wonderful week coming up! Today is my Featured Post Day on the Gecko Galz blog and I’m stoked to share my DT inspiration project using elements from the Gecko Galz Good Fortune Collage Set and Frightfully Delightful Digital Junk Journal Kit. I created an awesome little accordion book with journal tags. OMG, so fun – I love the front cover!
Using six different Gecko Galz digital fortune teller images, I created pockets on each ‘page’ and tucked a journal card in each one. I rounded the corners and inked the edges of all the images and tags, and embellished each image with a Clear Star shimmer pen and/or Crystal Clear Sparkle Overlay marker for a little interest.
Here are close-ups of the fortune teller images…
And here’s the back – love the Ouija board!
One final shot of the book closed and tied up. I adhered a length of sheer ribbon beneath the front cover that I wrapped around the back and tied in a bow. I’m stoked about how this turned out!
Products used: Cardstock/Paper: GKD Charcoal Brown cardstock, Marco’s Cream Antique Linen cardstock Stamps: Gecko Galz Good Fortune Collage Set and Frightfully Delightful Digital Junk Journal Kit Ink: Ranger Black Soot Distress Ink, Sakura Clear Star Gelly Roll pen, Spectrum Noir Crystal Clear Sparkle Overlay marker Dies/Punches: Stampin’ Up Scalloped Tag Topper Punch Accessories: Kadomaru Pro Corner Rounder, Off-white Hemptique Bamboo Cord, Ribbon from stash
I hope you’ve enjoyed this fun little accordion book and will link up a project with us this month! And don’t forget to check out all the fun goodies at the Gecko Galz Etsy store! Thanks so much for stopping by today – we’ll see you next time! ;)
** 10/13/18 Top 3 Winner at A Gem of A Challenge! **
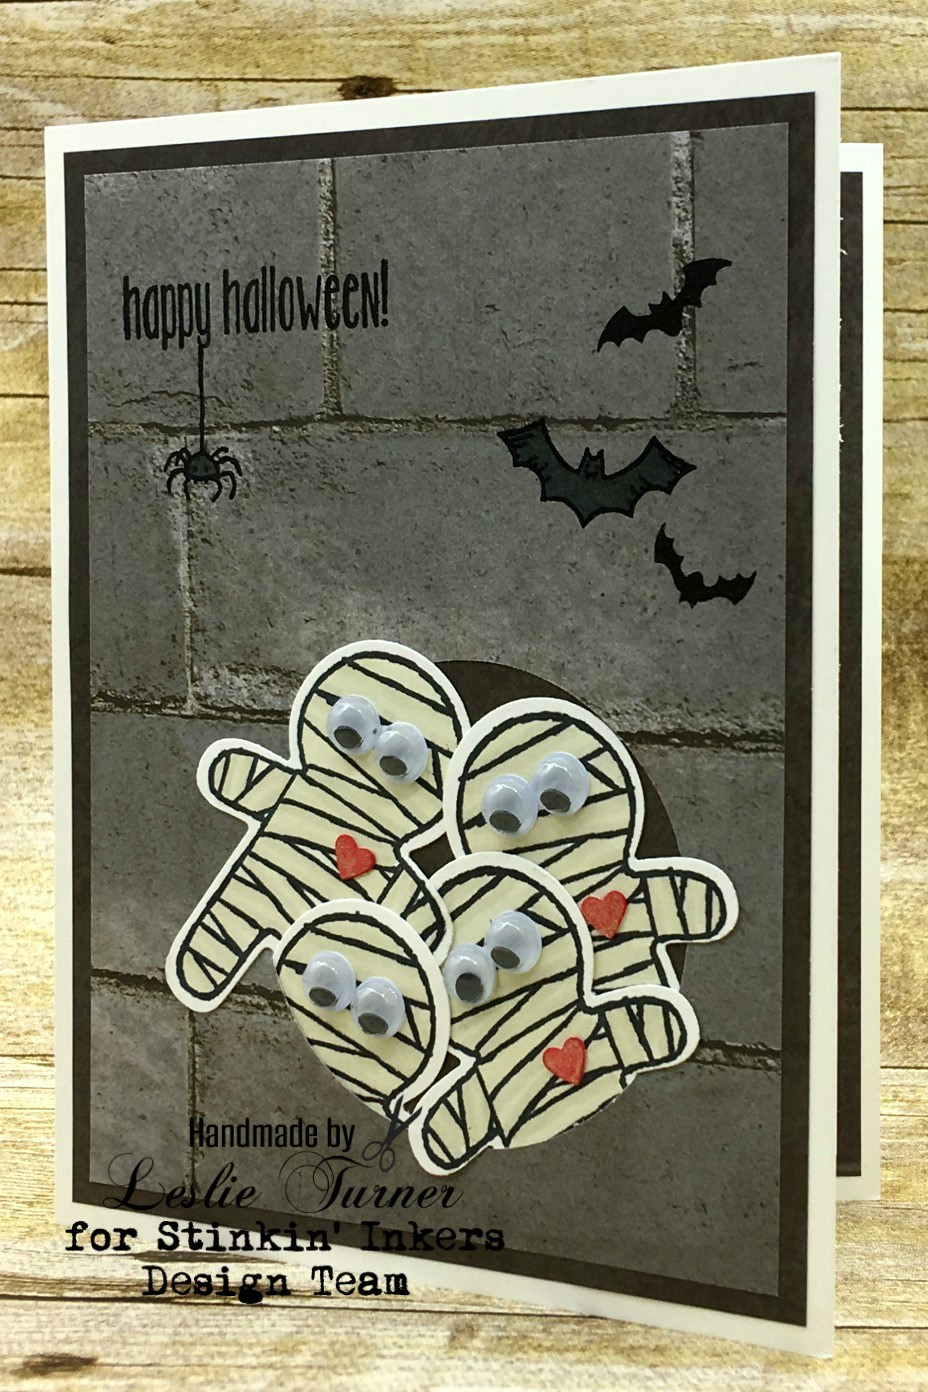
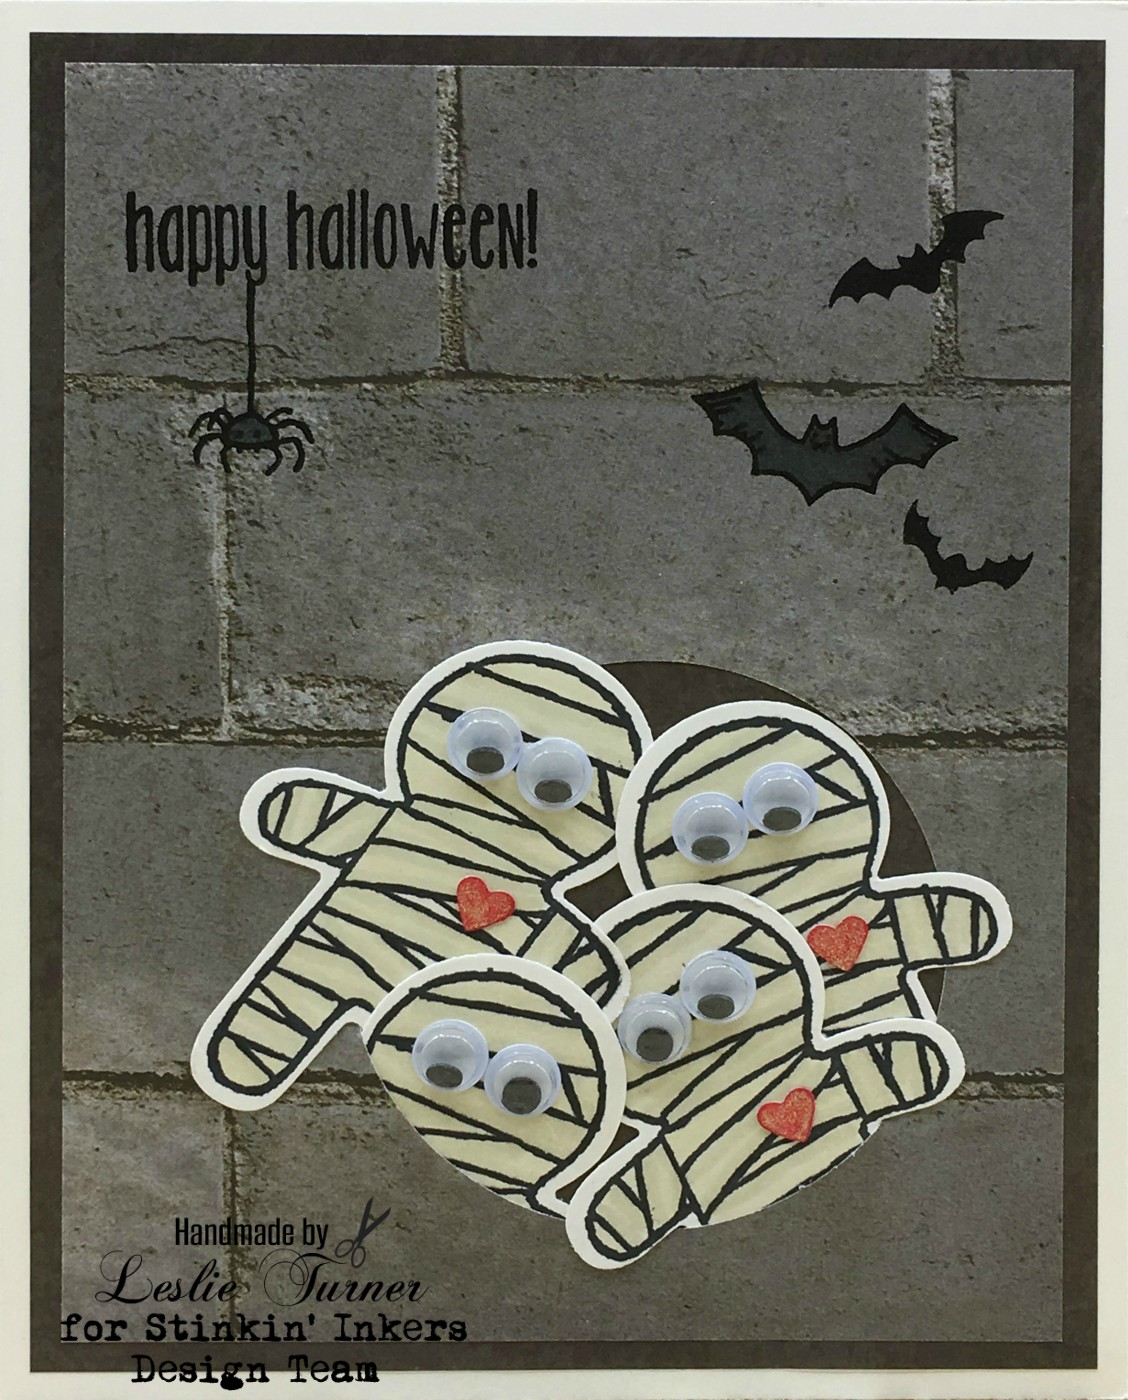
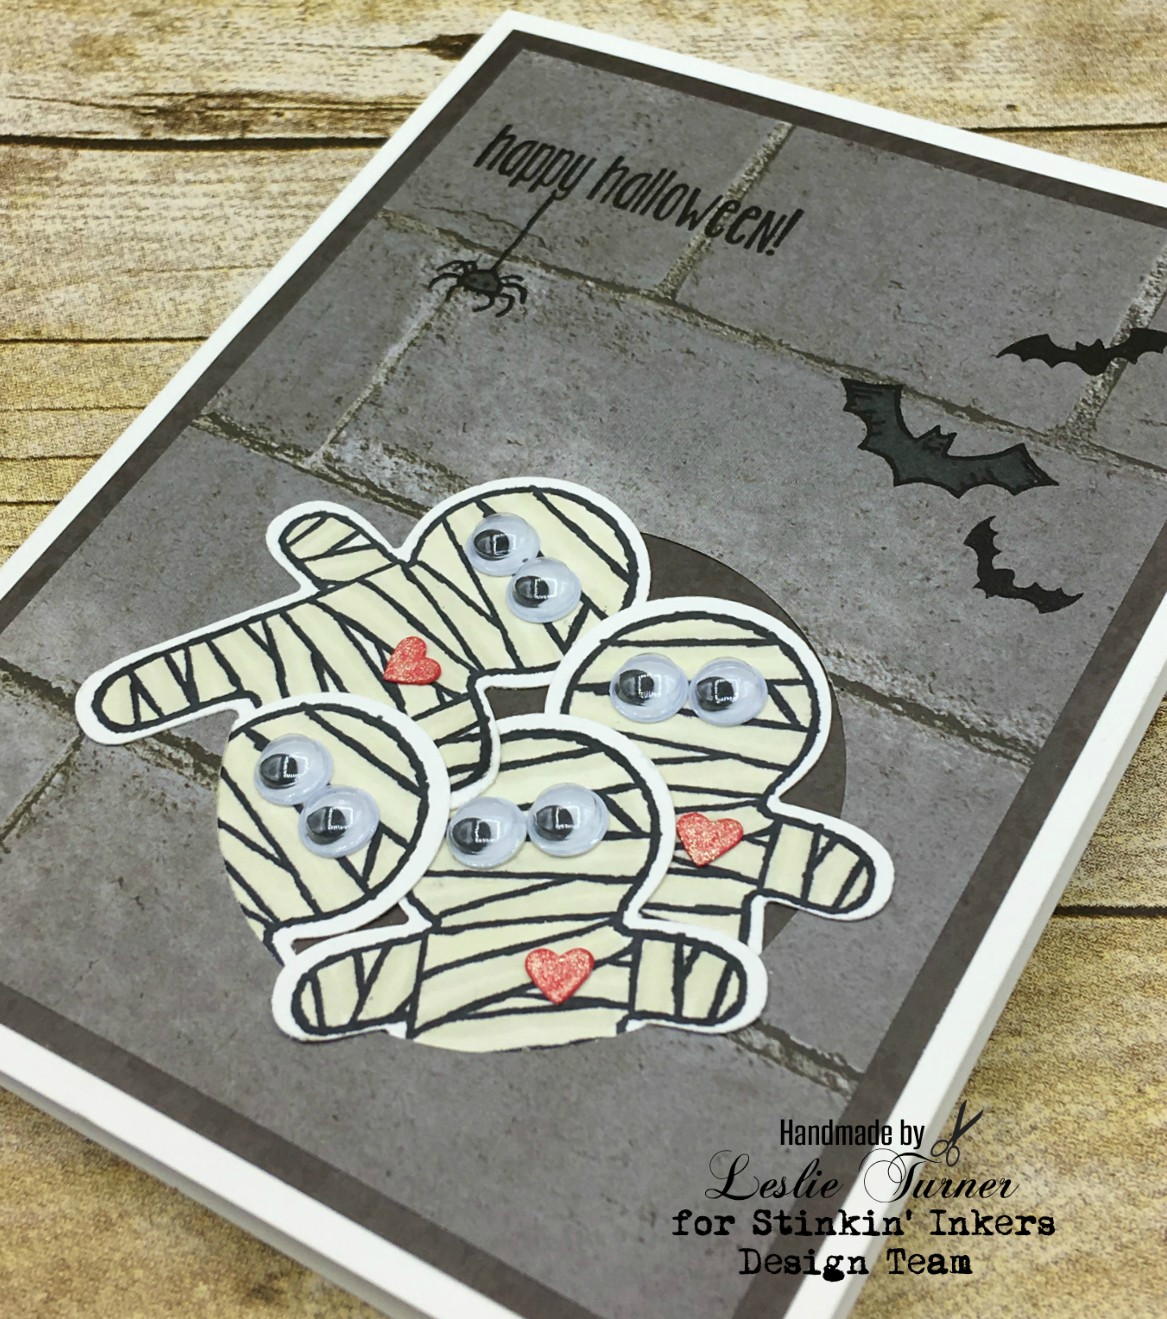
Hello, my crafty friends! It’s a cool brisk morning here in Colorado (weather I truly love) and I’m happy to be back this morning to share my Stinkin’ Inkers DT inspiration project for The Eyes Have It Challenge! We want to see your project… yep, you guessed it… with eyes on it! I had an absolute blast creating this card. I have a pack of mini wiggly eyes in my stash and out they came, four pairs of them!
I cut a large circle aperture in my background papers and stamped the sentiment, a spider web and some bats. Then I stamped four mummies, punched them out and colored them with Spectrum Noir markers. I added the mini wiggly eyes and tiny shimmery hearts to them after I positioned them in the aperture.
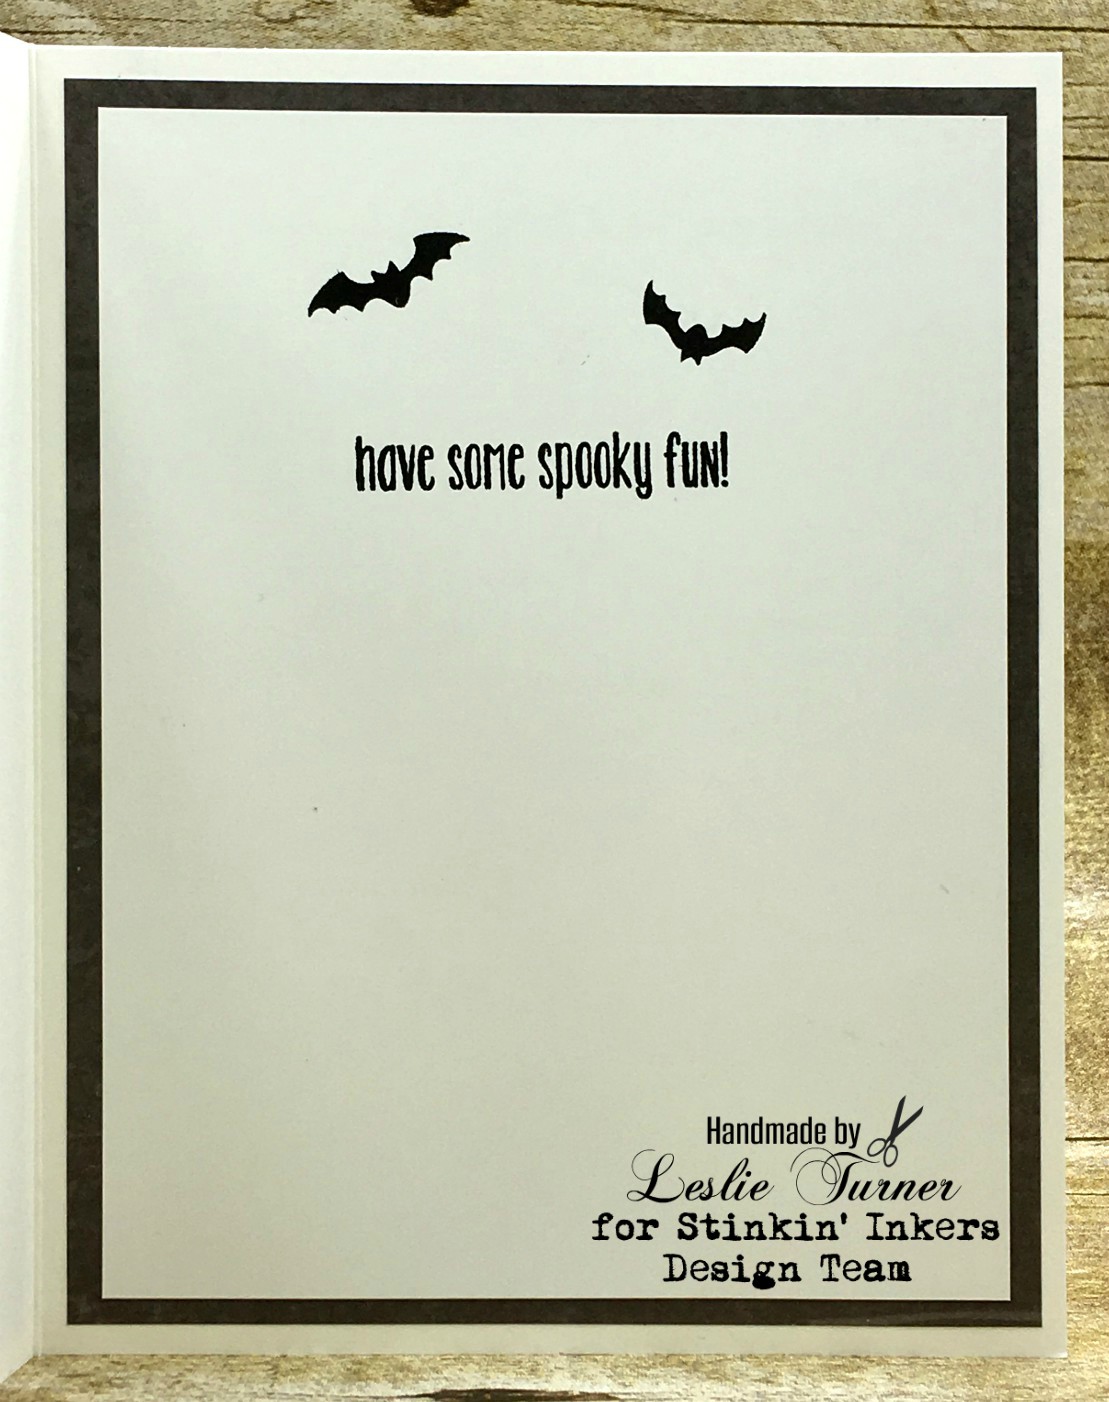
I kept the inside fairly simple with a stamped sentiment and a couple bats on a layered panel.
One more angled shot so you can see how cute these little mummies really are, lol! And yes, the patterns on their mini wiggly eyes is from the LED lights in the top of my light box, and it does kind of give them a little creep-appeal, lol!
Products used:
Cardstock/Paper: Stampin’ Up Whisper White cardstock, The Paper Studio Entirely Textures paper
Stamps: Stampin’ Up Spooky Fun and Cookie Cutter Halloween stamp sets
Ink: Spectrum Noir- GG1, GG2, GG3, BGR2, DR2, Sakura Clear Star Gelly Roll pen, StazOn Black ink, Memento Tuxedo Black ink
Dies/Punches: EK Success 2-1/4″ circle punch, Stampin’ Up Cookie Cutter punch
Accessories: Tim Holtz Stamp Platform, mini wiggly eyes
I hope you’ve enjoyed today’s project and will link up something with eyes this month! We can’t wait to see what you create! Thanks for stopping by today – we’ll see you next time! ;)
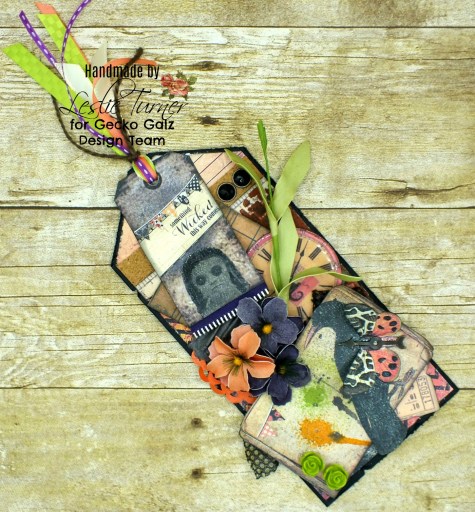
Hello, my crafty friends! October is a month of fun… cooler weather and wonderful smells, my birthday (the big ‘six-oh’ this year), Halloween, and a little closer to Christmas! Another fun challenge is live over at Gecko Galz and I’m excited to share my DT inspiration project for the October Witching Hour Customer Challenge!
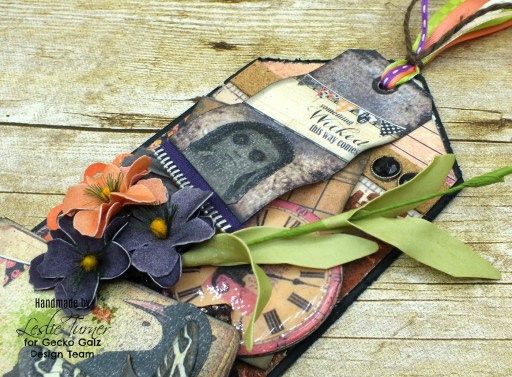
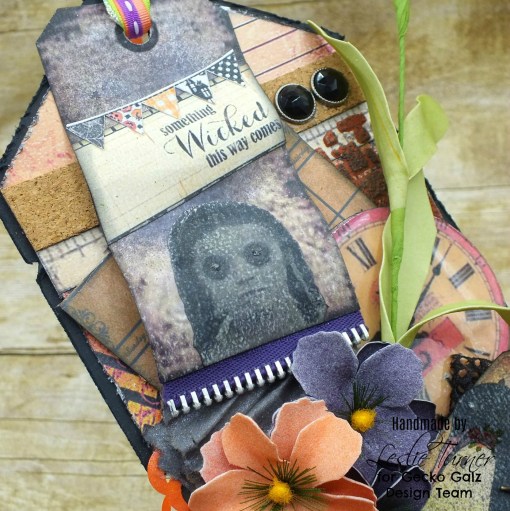
This was so much fun! I hand-cut my tag and distressed the edges. I added some Gecko Galz digital paper, cork tape and rust paste with stencil. While the rust paste was drying, I gathered Gecko Galz digital ephemera, brads and other doo-dads, flowers and ribbon. And how creepy is that little girl?! LOL!
I fussy cut and inked the edges of all the pieces of digital ephemera and started laying out all the elements.
When I was happy with the placement of everything, I started gluing and adhering. Fortunately, I had punched out the watch face and covered it with Glossy Accents the night before so it was dry and ready to use.
I had lots of ribbon scraps to use on the top – I’m a ‘ribbon ho’ and don’t throw much away, lol!
There are tons of layers on this, that’s for sure. Did I mention how creepy that little girl is?! I dotted Glossy Accents on her eyes for a little extra creepiness…
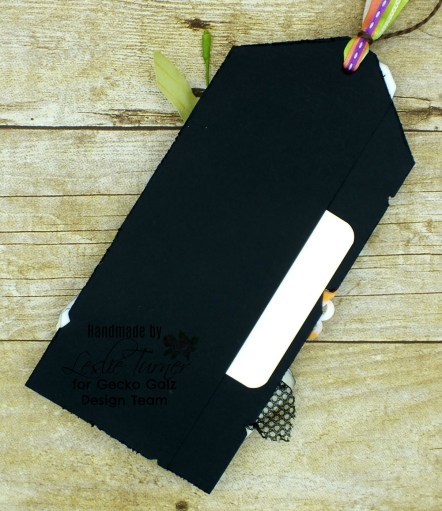
Here’s a shot of the back showing the gift card holder. Really happy with how this turned out!
Products used: Cardstock/Paper: GKD Onyx Black Cardstock, Kraft Corrugated Paper Stamps: Gecko Galz Frightfully Delightful Digital Junk Journal Kit and Alter It Digital Collage Sheets Ink: Ranger Black Soot Distress Ink; Spectrum Noir Crystal Clear Sparkle Overlay marker; Tattered Angels Tarnished Silver, Orange and Moss Green Glimmer Mists Dies/Punches: EK Success 2-1/4″ Circle Punch Accessories: Ranger Glossy Accents, Cork Tape, The Crafter’s Workshop Mini Cubist Stencil, Prima Red Rust/Brown Rust/Mint Green Rust Paste, Tim Holtz Idea-ology Game Spinner, Indygo Junction Purple Zipper, Black Fabric Mesh scrap, Stampin’ Up Doily, Hobby Lobby Flowers, Petaloo Round Black Brads and Green Flower Brads
I hope you’ve enjoyed this creepy tag and will link up a project with us this month! We’d love to see what you create! And don’t forget to check out all the fun goodies at the Gecko Galz Etsy store! You will fall madly in love… so many fun items to choose from! Thanks so much for stopping by and we’ll see you again soon! ;)
** 10/11/18 Top 3 Winner at Cardz 4 Galz! **
** 10/15/18 Top 5 at Crafty Cardmakers! **
** 11/1/18 Top 3 at Sparkle N Sprinkle Creative Challenges! **
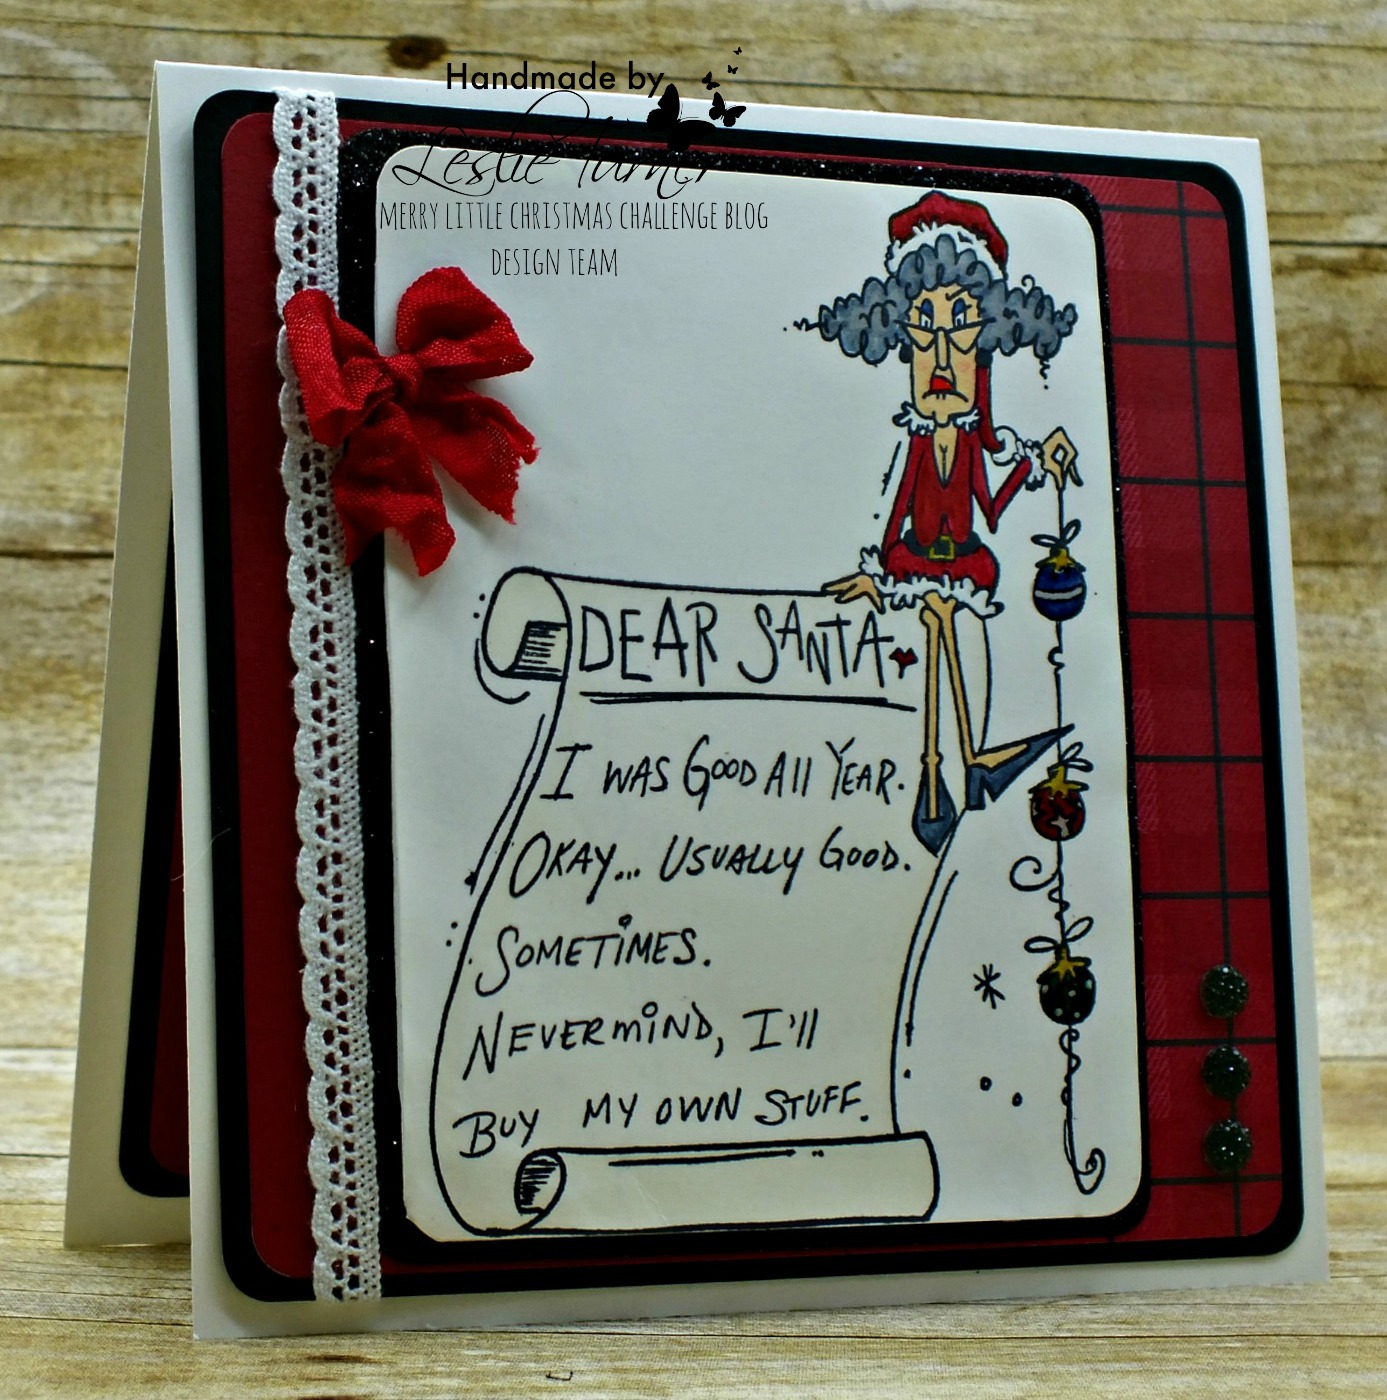
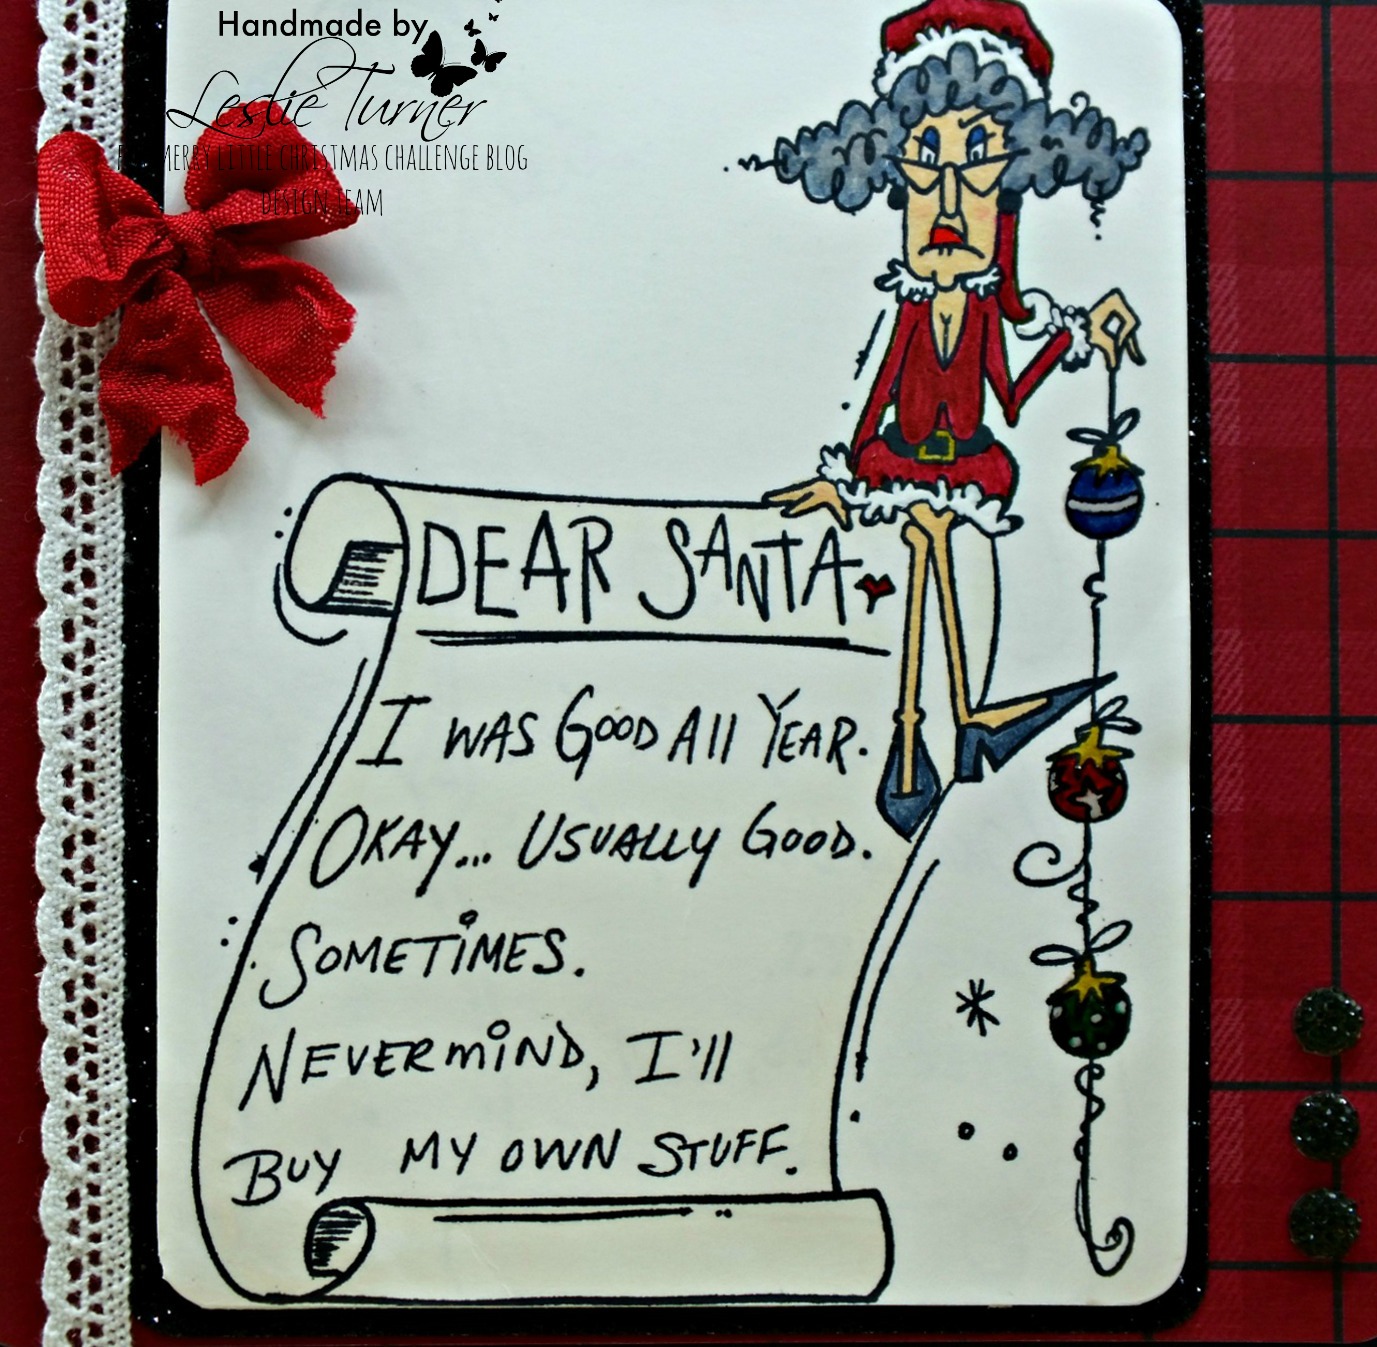
Hi everyone! Happy Monday and October 1st! Can you believe how fast the time is flying by?! Another fun challenge is live this morning over at Merry Little Christmas Challenge Blog and I’m happy to share my DT inspiration project for MLCCB #3 – October Anything Christmas Goes! This huge stamp is from Sparkle N Sprinkle – I absolutely love Stella (kinda reminds me of me, lol) and I had a grand time creating this Christmas card!
What a fun stamp, lol! I colored the image with Zig Clean Color markers and layered it on black glitter paper, and then layered it on some fun paper that looks like red flannel material. I added a scrap of crochet ribbon, some black glitter Gumdrops and a tiny red bow.
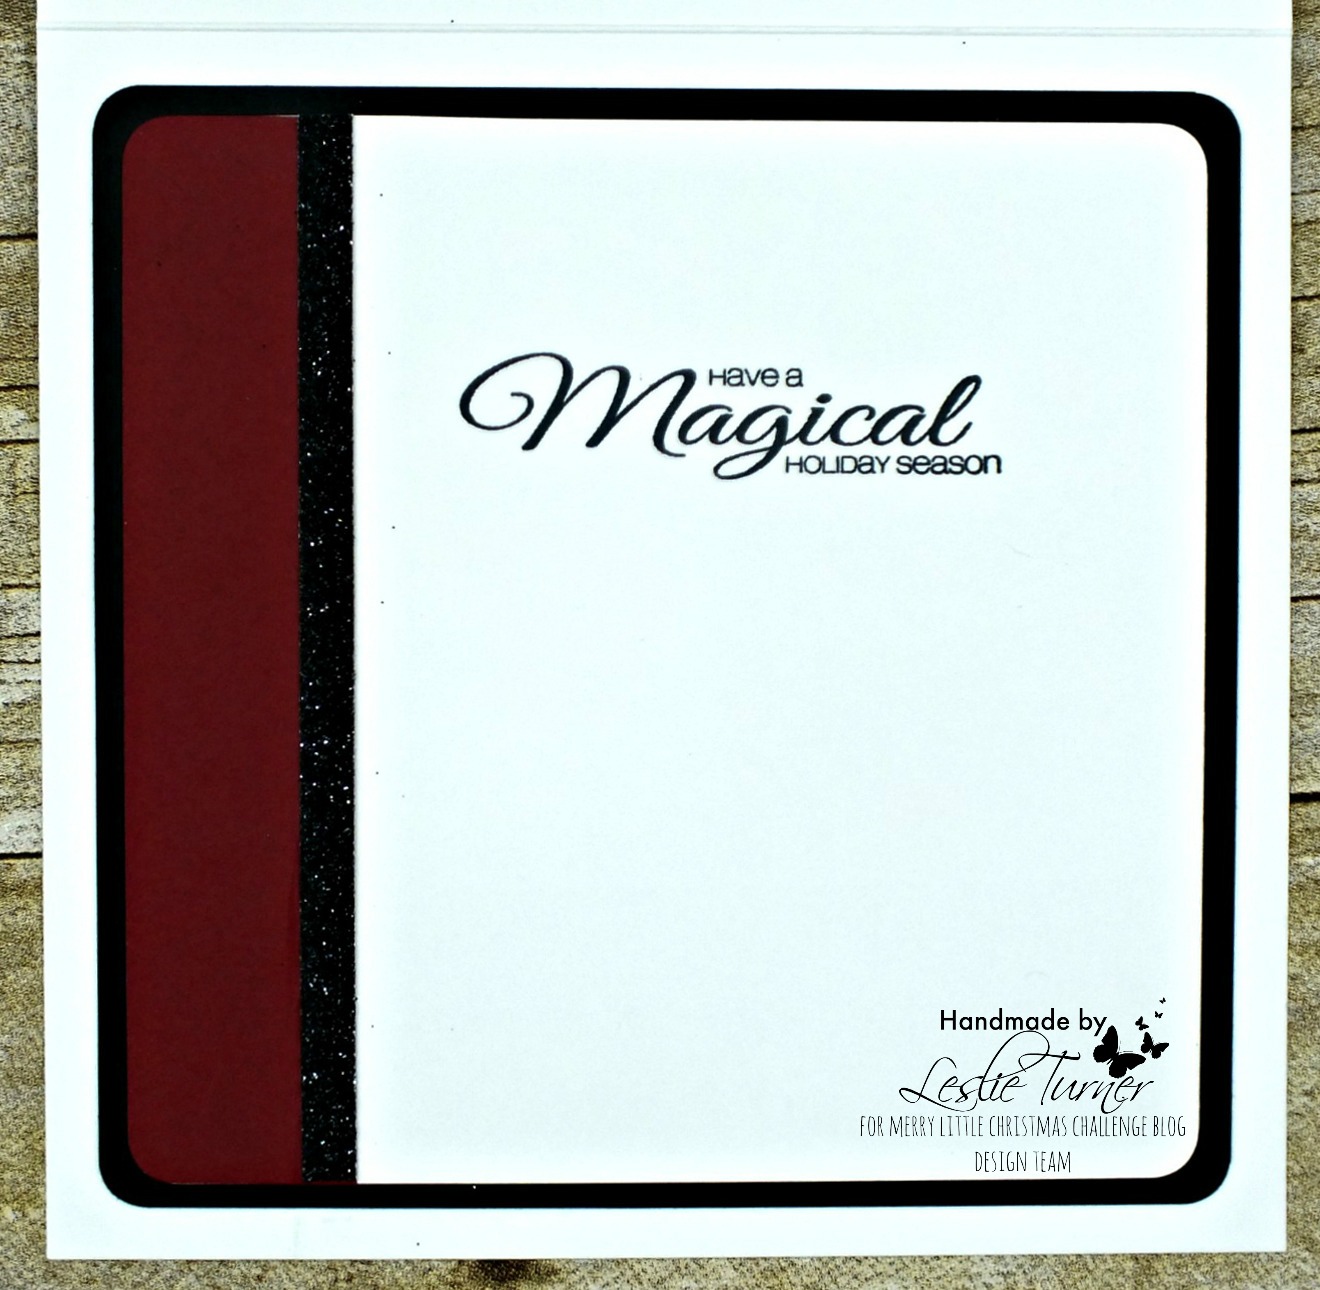
I decorated the inside panel with a strip of red cardstock and a scrap of black glitter paper, then stamped the sentiment and layered it on black cardstock. Love how this fun card turned out!
Products used:
Cardstock/Paper: Stampin’ Up Whisper White, Cherry Cobbler and Basic Black cardstock, Stampin’ Up Black Glimmer Paper, Stampin’ Up Warmth & Cheer DSP
Stamps: Sparkle N Sprinkle Stella-Dear Santa rubber stamp, CAS-ual Fridays Stamps Snowy Sayings stamp set
Ink: Memento Tuxedo Black ink pad and marker; Zig Clean Color markers- Wine Red, Red, Flesh, Deep Green, Dull Blue, Lt Gray, Blue Gray, Ochire; Sakura White Gelly Roll pen; Spectrum Noir-IG2, IG3 and Crystal Clear Sparkle overlay marker
Accessories: Tim Holtz stamp platform, Katomaru Pro corner rounder, Queen & Co. Black Goosebumps
I hope you’ve enjoyed today’s project and will link up a Christmas creation with us this month! You know you need to get started on those Christmas cards, lol! Thanks for stopping by and we’ll see you again soon! ;)
** 10/8/18 Top 3 Pick at Always Fun Challenges! ** ** 10/11/18 Top 3 Pick at Aud Sentiments Challenge Blog! **
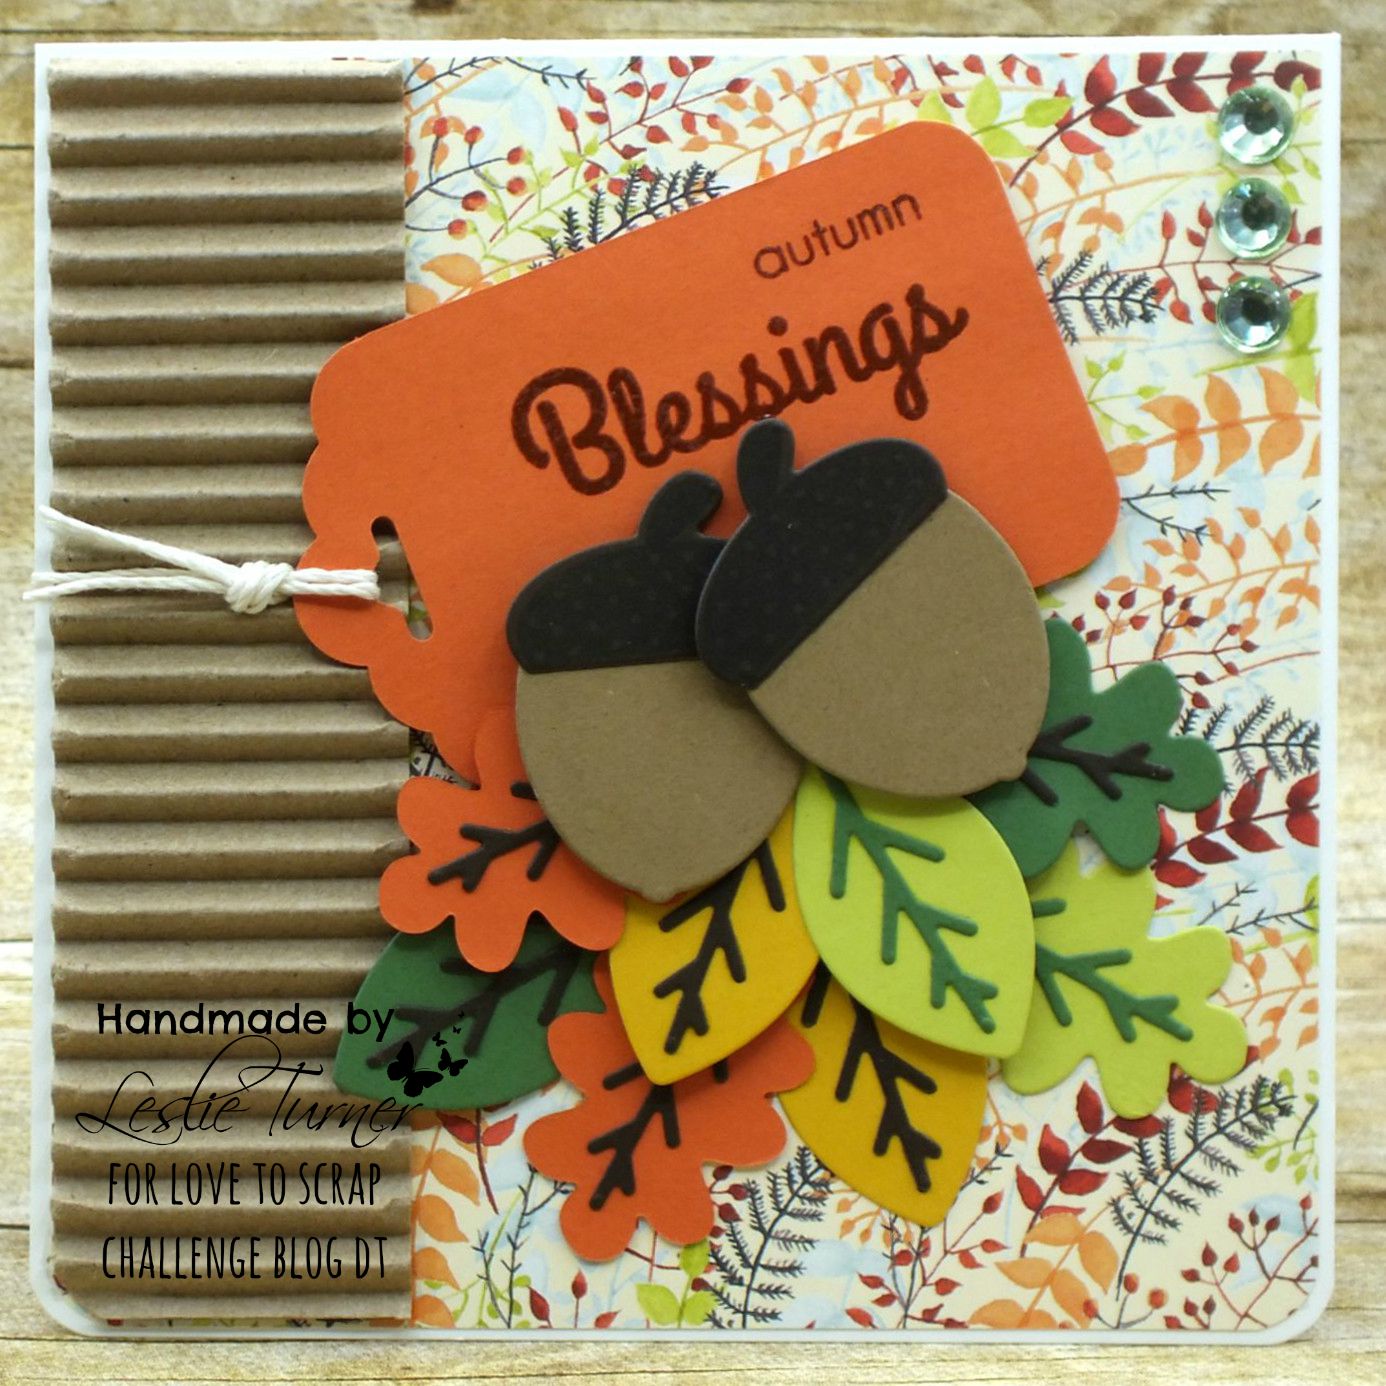
Hi everyone! Happy Monday and it’s already October 1st! A new challenge is live this morning over Love To Scrap Challenge Blog and I’m stoked to share my DT inspiration project for LTSCB #114 – Fall Back! We’re being sponsored this month by the amazing CAS-ual Fridays Stamps and we’d love to see a Fall project which could include Fall, Autumn, Thanksgiving and/or Halloween! I created a pretty Autumn card using the gorgeous Autumn Blessings Stamps and Acorn Fri-Dies from CAS-ual Fridays Stamps!
Fall is my favorite season and it was totally easy finding Fall colored paper to go with the cardstock, stamps and dies. Everything just went together seamlessly. I cut a tag and embossed the sentiment on it, and then cut all the leaves in pairs (two of each color) and arranged them on/under the tag. I love corrugated paper so I cut a strip of that, and then the final touch were a few gemstones.
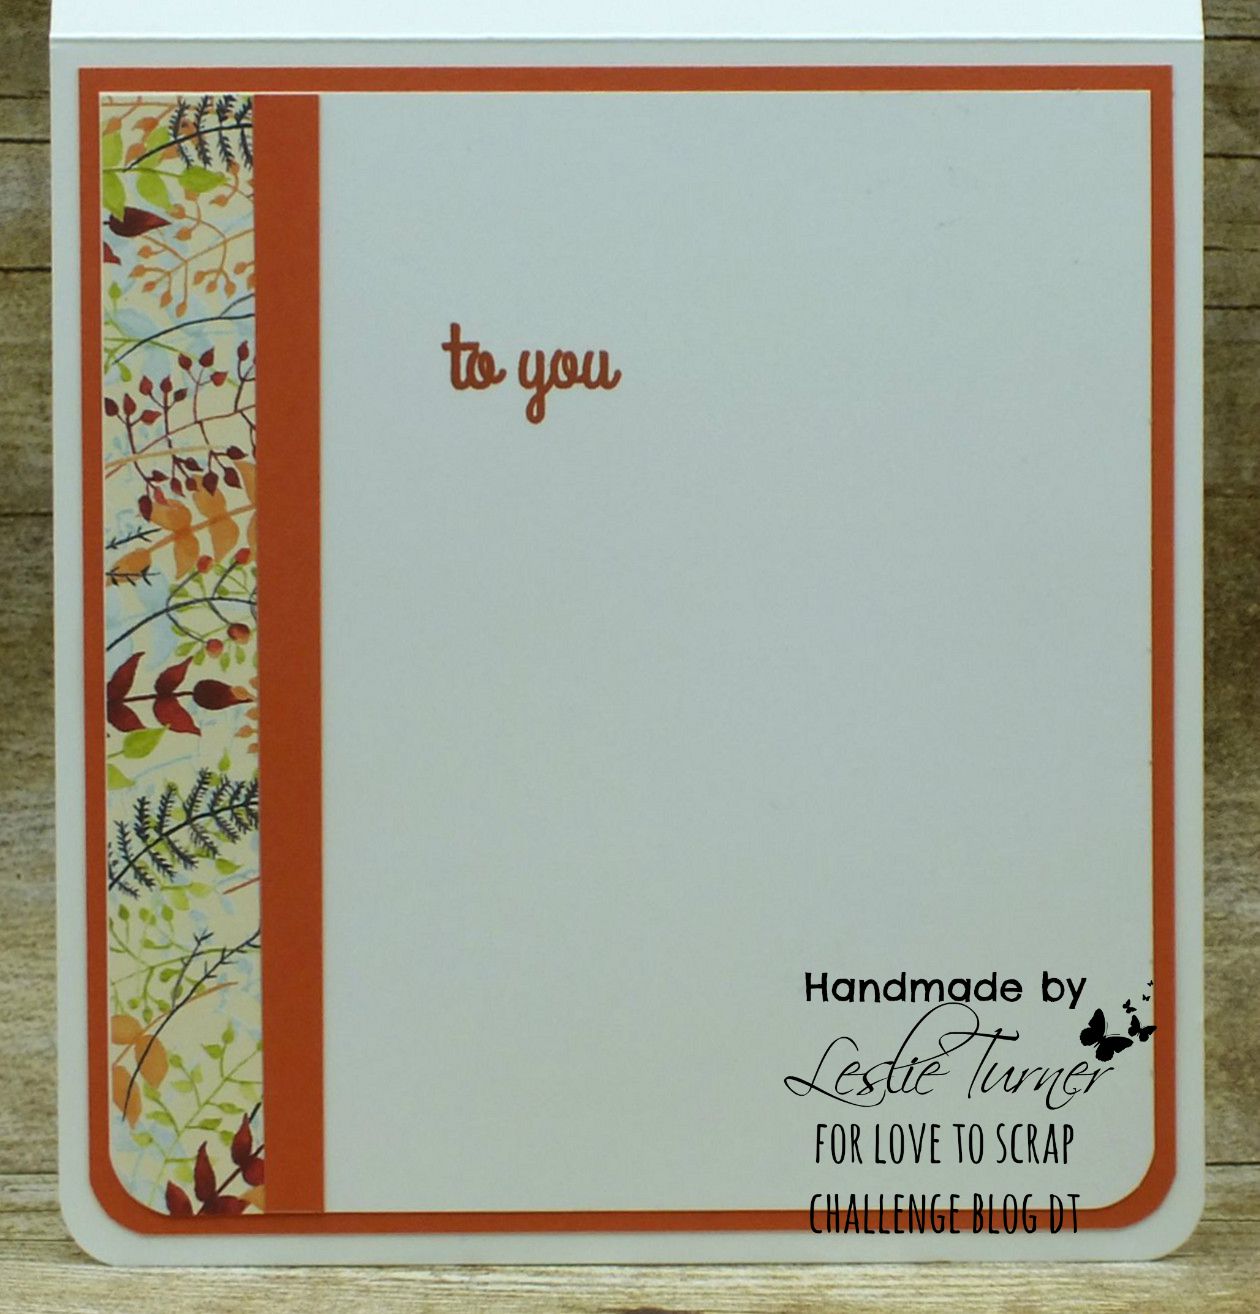
I decorated the inside panel with a leftover strip of paper from the front and stamped a continuation of the sentiment on the inside.
Here’s one final angled shot to show the dimension. I just love how this turned out!
Products used: Cardstock/Paper: Stampin’ Up Thick Whisper White, Tangerine Tango, Garden Green, Lemon Lime Twist, Crushed Curry cardstock, GKD Dark Chocolate cardstock, Stampin’ Up Painted Autumn DSP, Kraft corrugated paper Stamps: CAS-ual Fridays Stamps Autumn Blessings Stamps and Acorn Fri-Dies Ink: Stampin’ Up Cajun Craze ink, Versamark Dazzle Dies/Punches: Stampin’ Up Scalloped Tag Topper punch Accessories: Tim Holtz Stamp Platform, Hero Arts Clear Embossing Powder, Kadomaru Pro corner rounder, Hemptique off-white bamboo cord, Imaginisce green gemstones
I hope you’ve enjoyed today’s project and will link up a Fall project with us this month! And be sure to check out all the fun stamps and dies at CAS-ual Fridays Stamps – you will love what you see! Thanks so much for stopping by – we’ll see you again soon! ;)
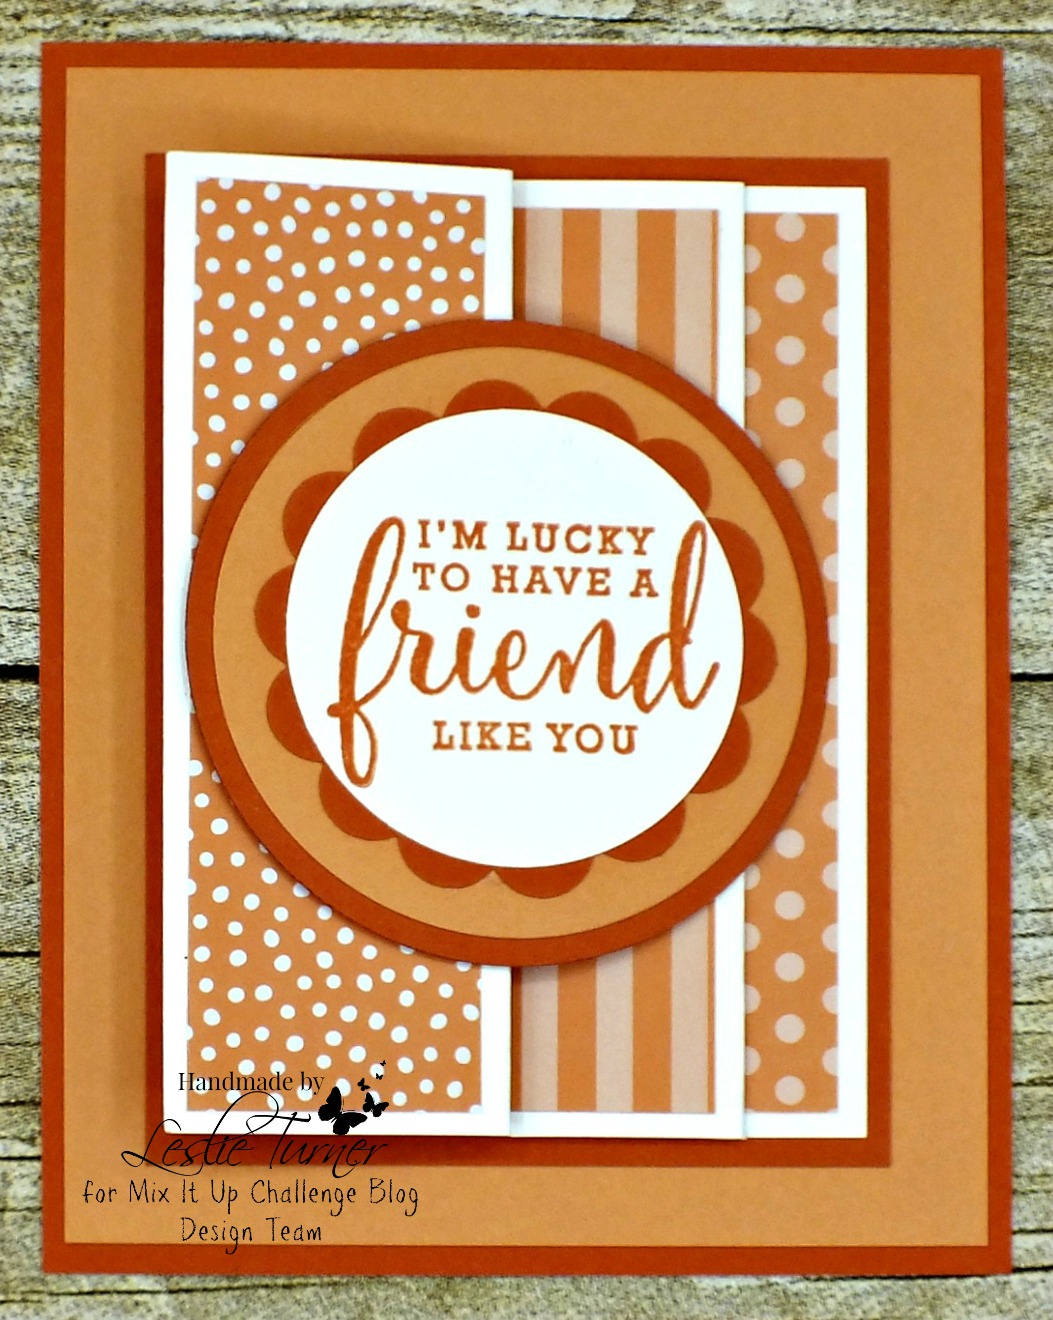
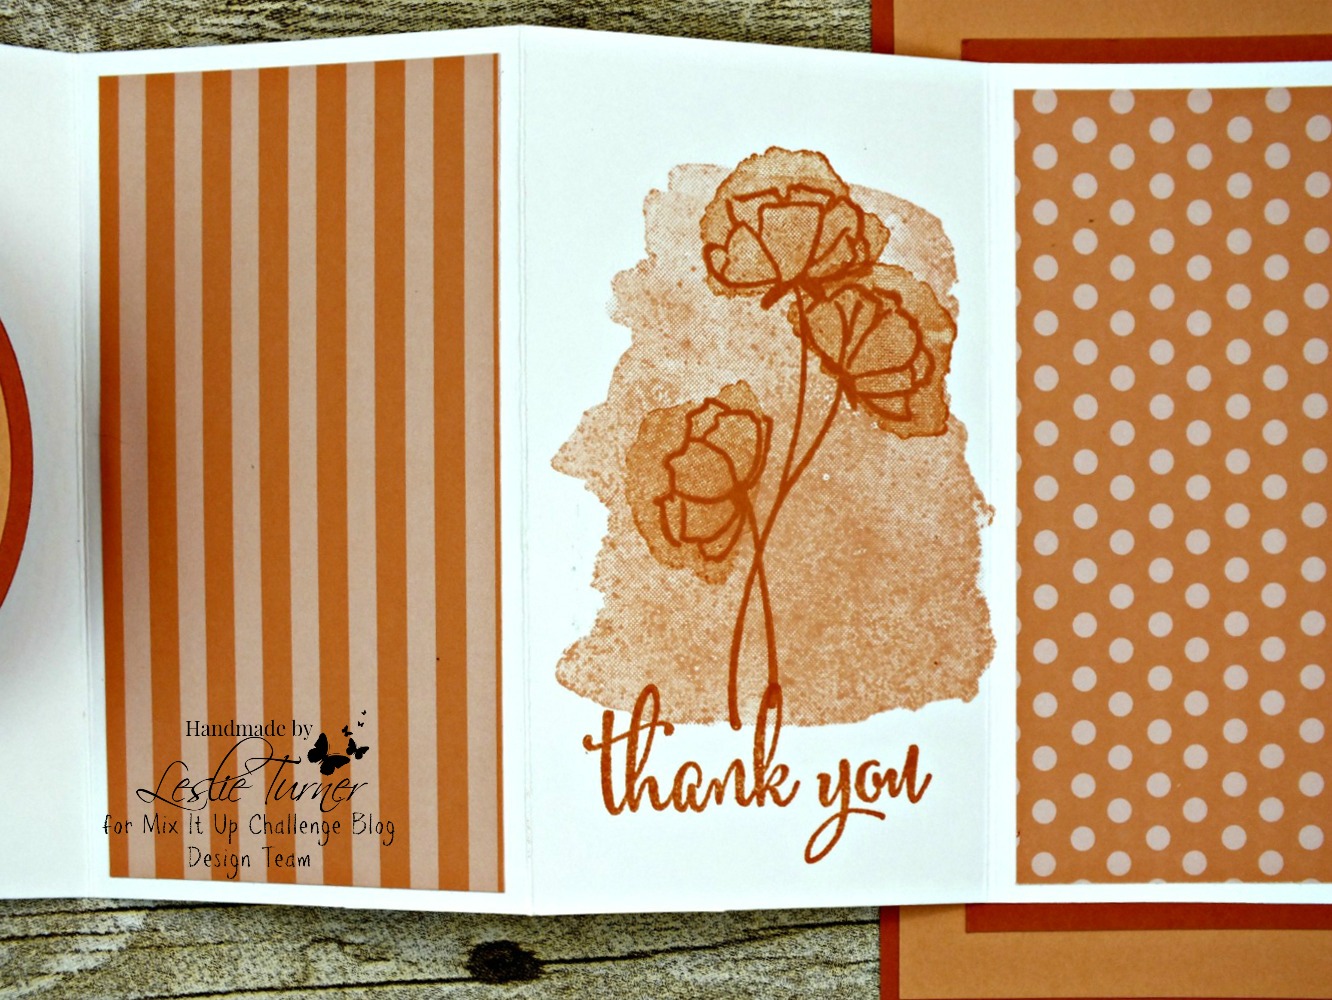
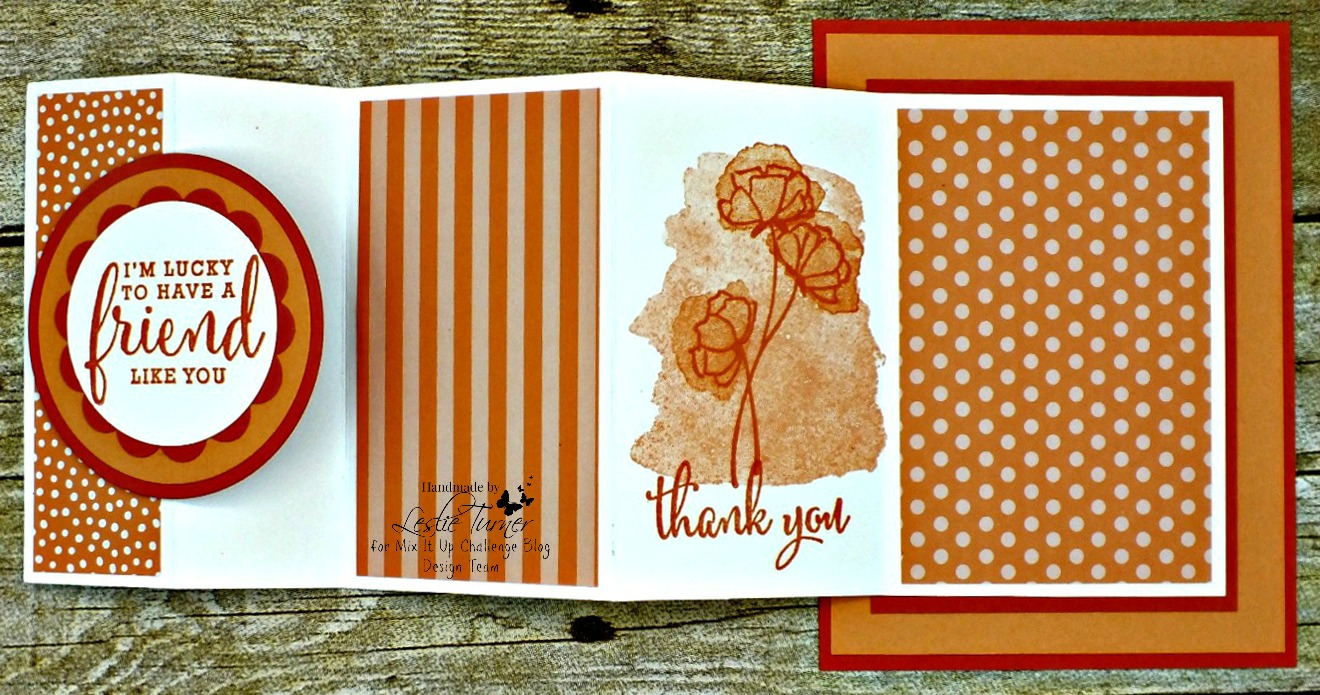
Hi everyone! It’s October 1st and Monday and quite a busy morning! A new challenge is live this morning over at Mix It Up Challenge Blog and I’m proud to share my DT inspiration project for MIUCB #16 – Anything Goes + Monochrome! Our challenges are always Anything Goes and we’d absolutely love to see you play the technique twist – this month it would be a monochrome project in variations of any color!
I really love fun folds and am always on the hunt for new ones. My inspiration for this friendship card came from my friend Dawn who created a fold-out panel card HERE. I absolutely fell in love with this fold and just had to try it! Love how it turned out!
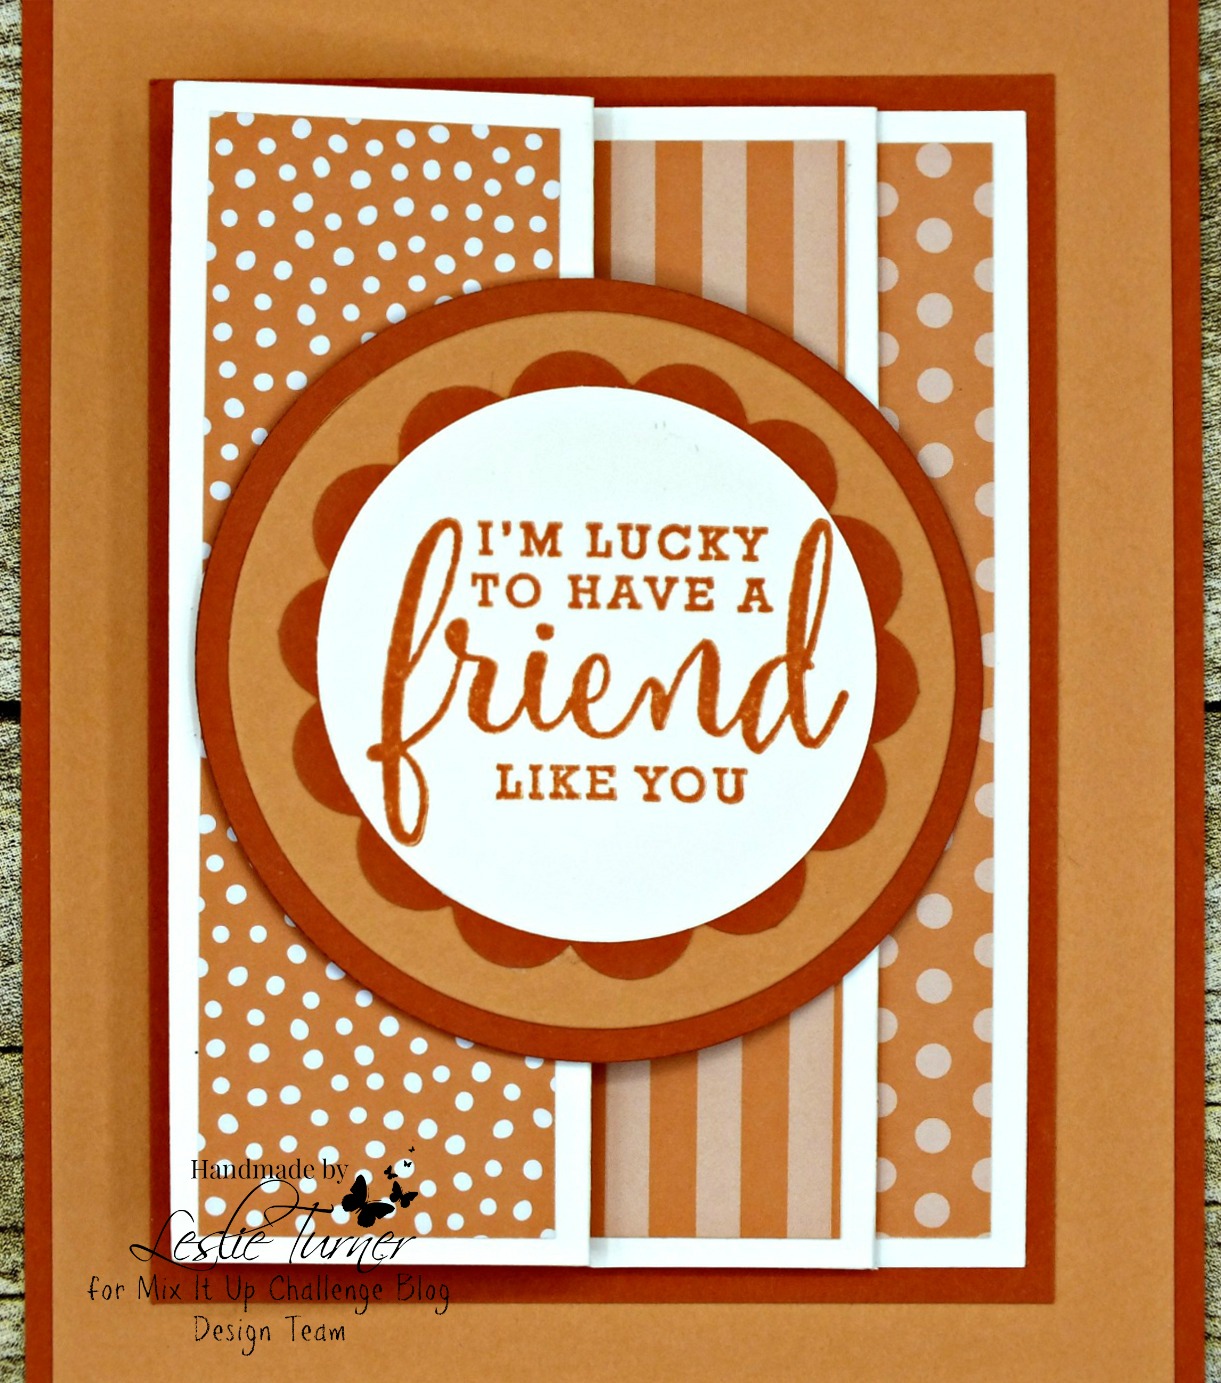
I got some new Stampin’ Up designer series paper a while back and settled on several patterned papers from that collection along with some contrasting cardstock for this card. I stamped a sentiment, punched it with a circle punch and layered it on a scalloped die cut and two more circle die cuts.
I stamped an image and sentiment in the fold out panel.
Here’s a shot of the fold out panel completely open.
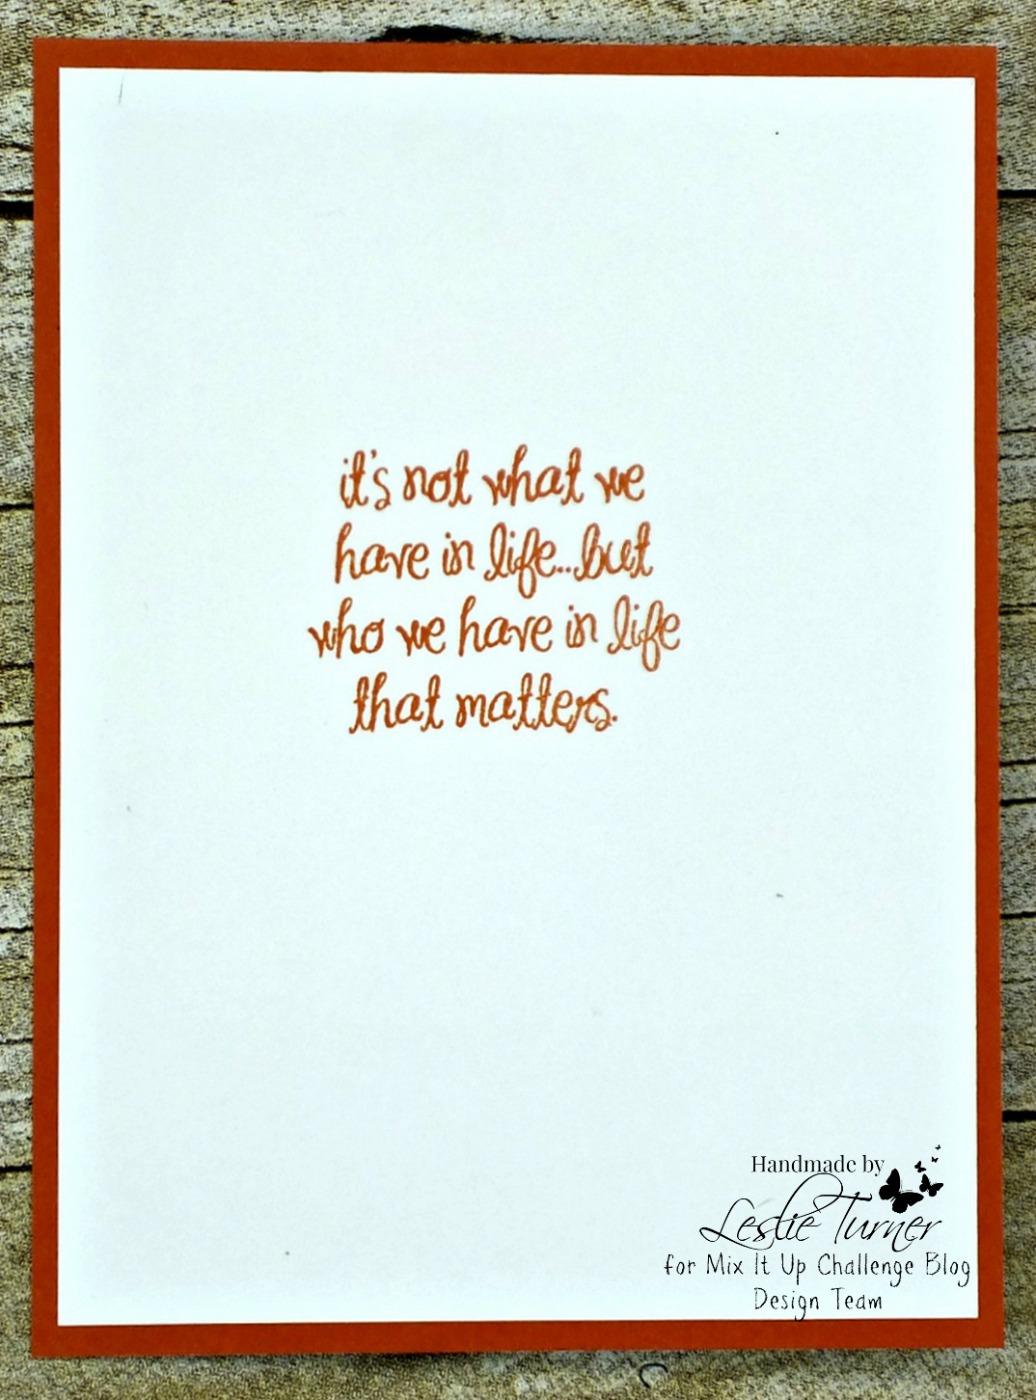
I stamped a sentiment on the back as well. Such a fun card!
Products used:
Cardstock/Paper: Stampin’ Up Whisper White, Tangerine Tango and Grapefruit Grove cardstock, Stampin’ Up Grapefruit Grove 6×6 DSP
Stamps: Stampin’ Up Love What You Do and Thankful Life stamp sets
Ink: Stampin’ Up Tangerine Tango and Grapefruit Grove ink
Dies/Punches: Stampin’ Up 2″ circle punch, EK Success 2-1/4″ circle punch
Accessories: Tim Holtz Stamp Platform
I hope you’ve enjoyed today’s project and will link up a project with us this month! Remember, all of our challenges are anything goes with an optional technique twist to inspire you… the twist is not required to play! Thanks so much for hanging with me this morning – we’ll see you again soon! ;)
** 10/16/18 Winner at A Bit More Time To Craft Challenge! **
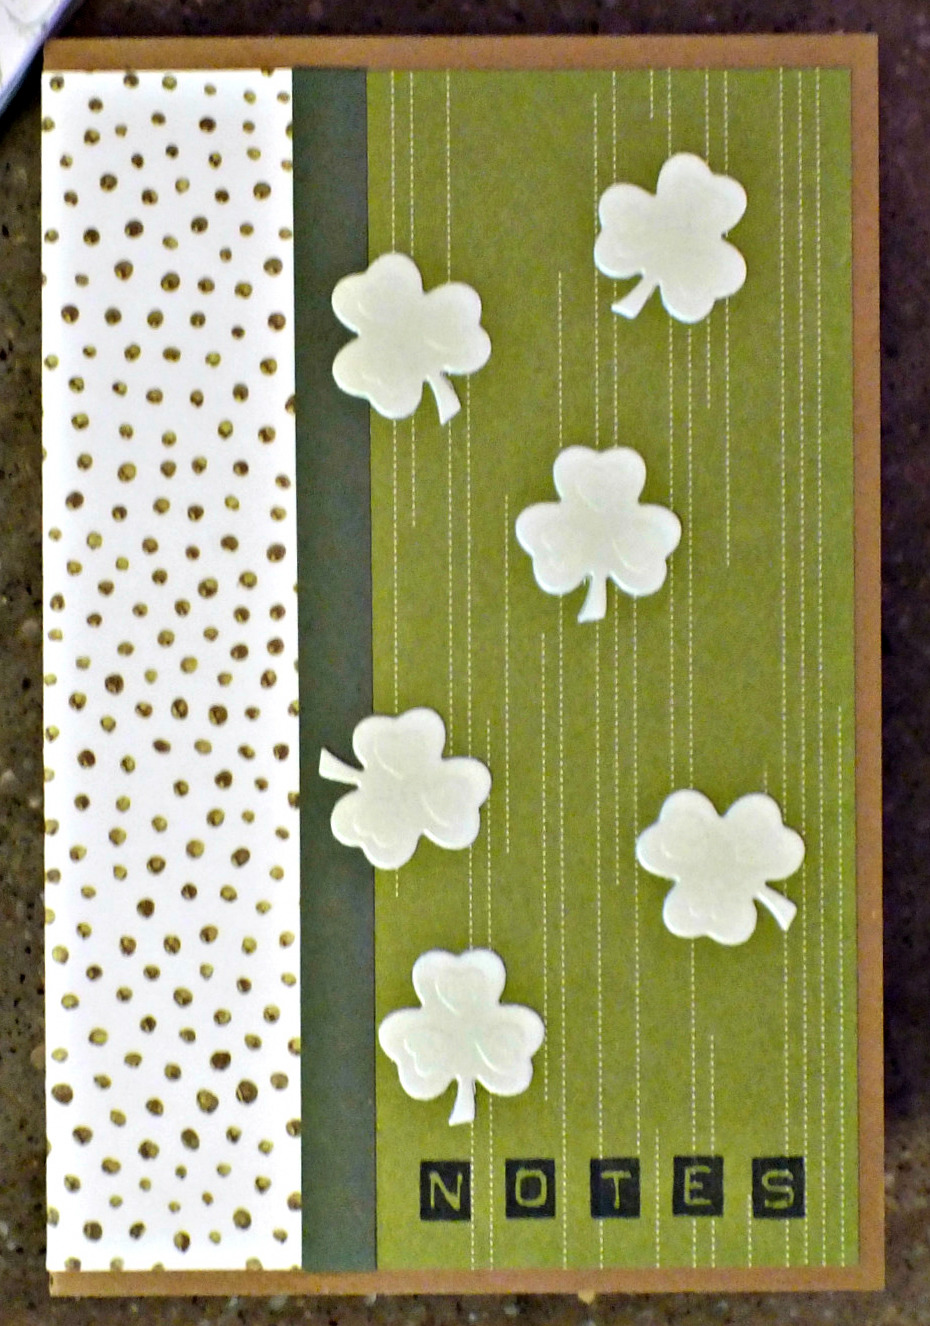
Hi everyone! Well, we’re another month closer to Christmas, lol! Hopefully the temps have started to cool off where you are… ours have – 70s during the day and mid to upper 30s at night! Fall is my favorite time of year! Our October challenge is live over at Love To Craft Challenge Blog and I’m happy to share my DT inspiration project for LTCCB #27 – October Anything Goes! My last two projects for this DT have been recreations of post-it note pad holders that I made last year for a friend. They were such fun that I decided to make a few more this year, and this shamrock-themed one is the third and final one in my post-it note holder mini series.
I used Stampin’ Up papers and stamps along with a small shamrock die from a large Sizzix die set. Really loving how this turned out!
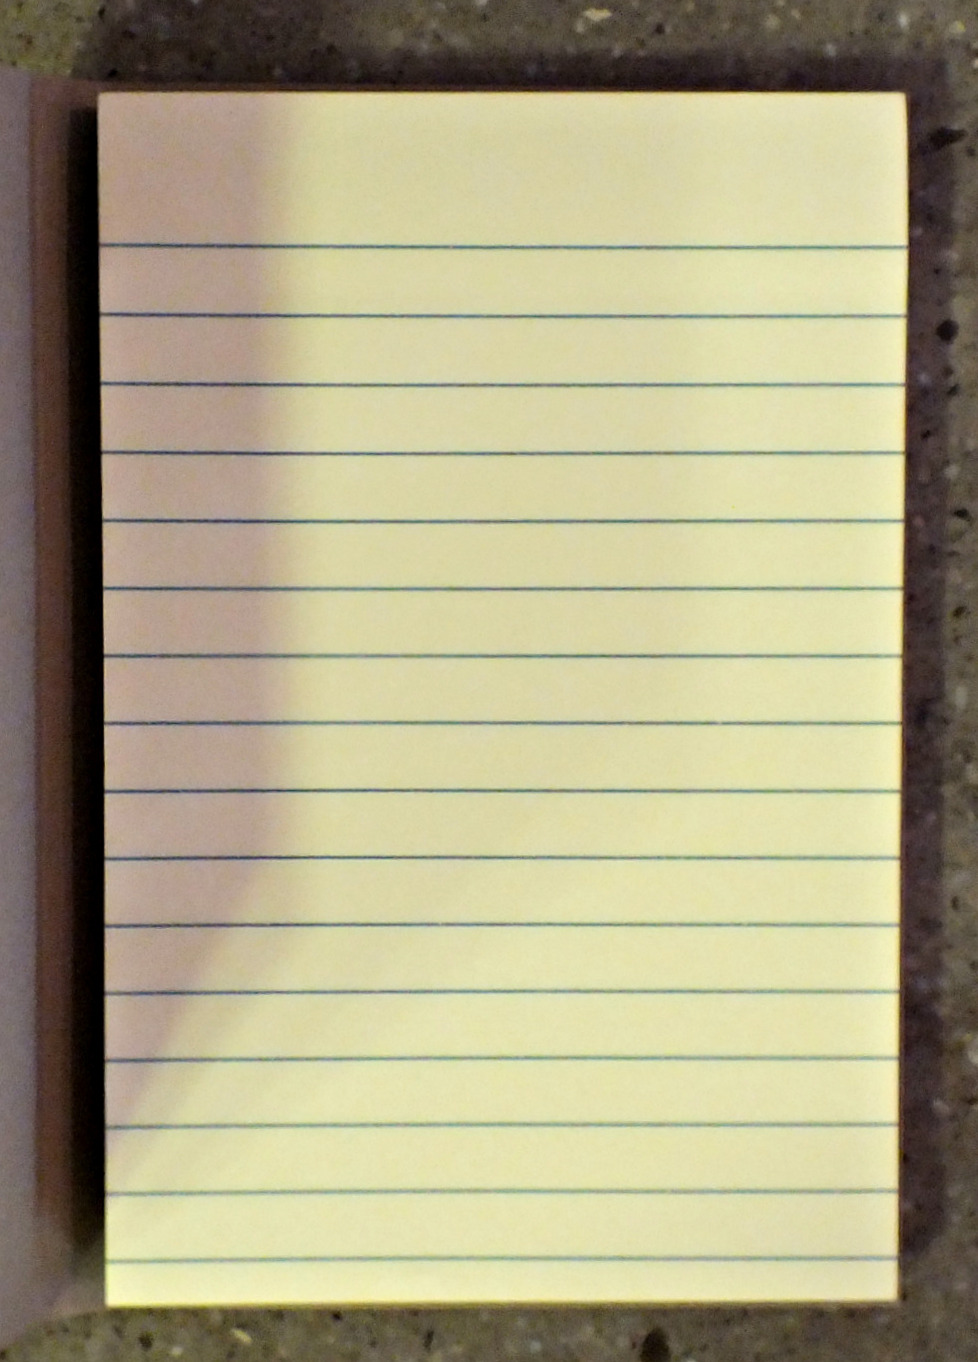
Here’s a shot with the holder open revealing the post-it note pad.
Products used:
Cardstock/Paper: Paper Accents 120# Kraft cardstock, Stampin’ Up Pretty Petals DSP, Stampin’ Up Into The Woods DSP, Paper Accents Pearlized Cardstock
Stamps: Stampin’ Up Labeler Alphabet Stamp Set
Ink: Memento Tuxedo Black Ink
Dies/Punches: Sizzix Calendar Months Die Set
Accessories: 4×6 Post-It Note Pad
I hope you’ve enjoyed this third and final post-it note pad holder in my mini series! Be sure to link up an anything goes project with us this month – we’d love to see what you’re working on! Thanks so much for stopping by and we’ll see you next time! ;)
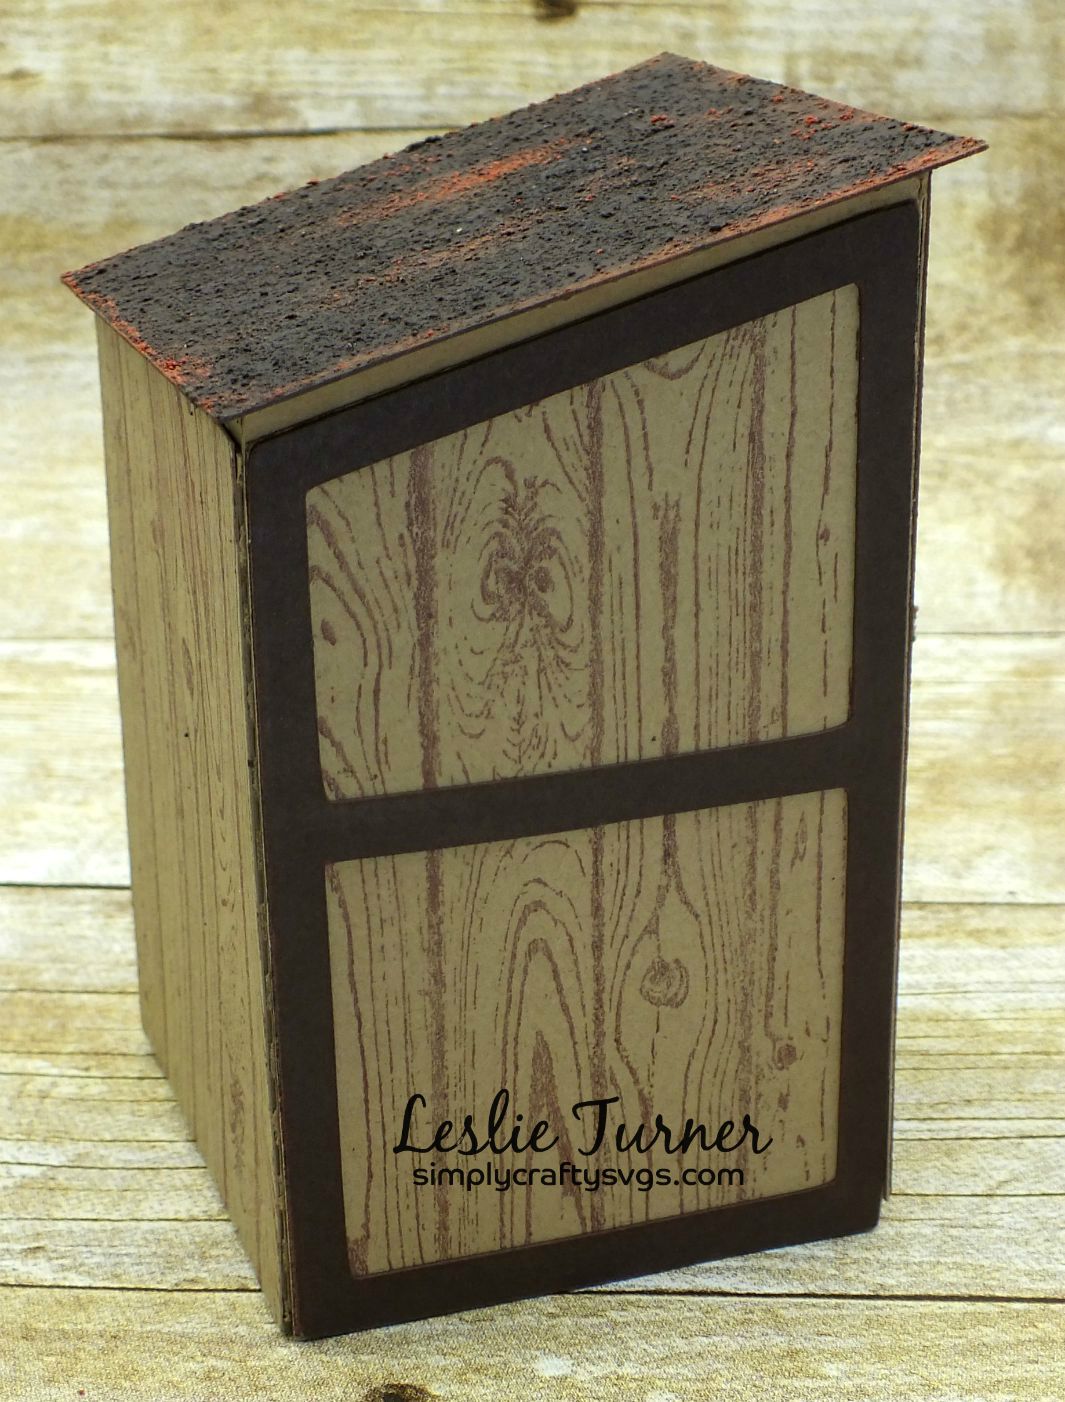
Hi everyone! Happy Hump Day – I hope you’re having a great week! Today is my post day on the Simply Crafty SVGs Blog and I’m excited to share my DT inspiration project with you, a very cool Rustic Outhouse created with the Simply Crafty SVGs Outhouse cut file. OMG, I had THE best time creating this! I dug out the rust paste and made the hardware on the door and the roof rusty! Gotta have some rust!
I used a woodgrain background stamp on all the pieces beneath the trim. I have to say that Simply Crafty SVGs owner, Sandy, thought of everything when she created this cut file… even a toilet seat and toilet paper, lol!
Here are shots from different angles. This is the first time I’ve played with the rust paste and I think I like it! :)
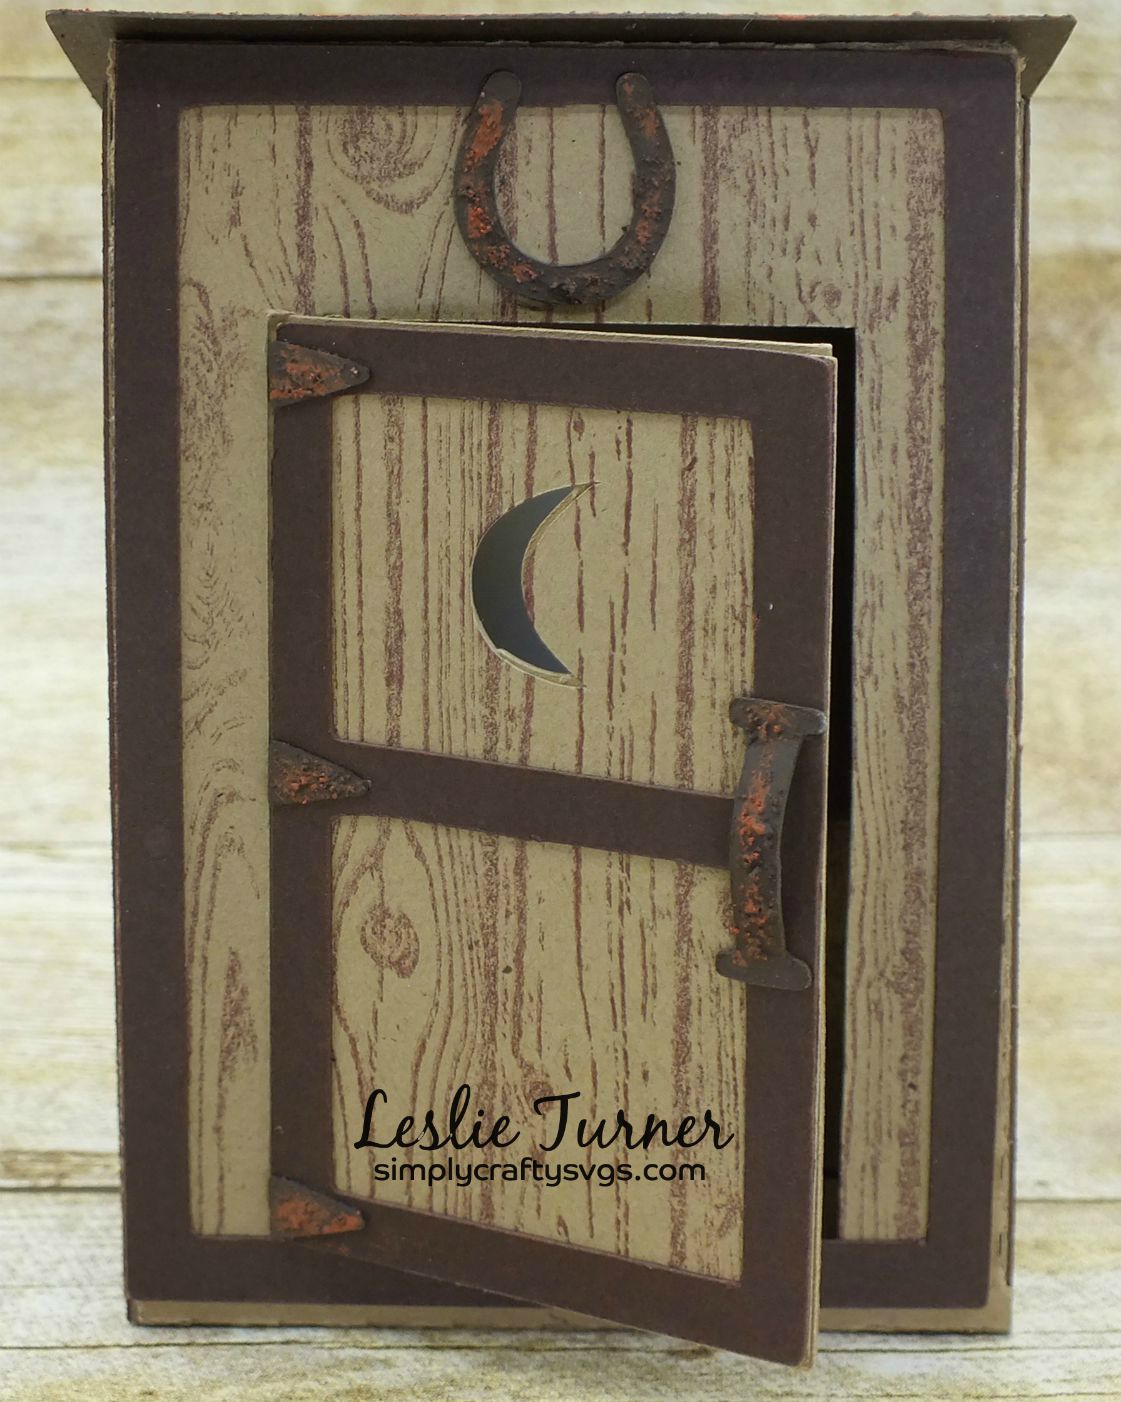
And back to the front, showing all that glorious rust on the door hinges and handle, and some on the horseshoe above the door! Loving how this turned out!
Products used: Cardstock/Paper: Paper Accents 120# Kraft cardstock, Marco’s Brown Bag cardstock, Stampin’ Up Whisper White cardstock, GKD Dark Chocolate cardstock Stamps: Stampin’ Up Hardwood Background Stamp Ink: Memento Rich Cocoa Ink Dies/Punches: Simply Crafty SVGs Outhouse Cut File Accessories: Scan N Cut, Fiskars Large Stamp Positioner, Prima Red and Brown Rust Paste
I hope you’ve enjoyed seeing this fun little outhouse! What a fun piece of home decor! Be sure to check out all the fun cut files at Simply Crafty SVGs! And there are tons of FREE cut files if you just want to try them out! I promise you will have fun, fun, fun! Thanks so much for stopping by today – we’ll see you next time! ;)
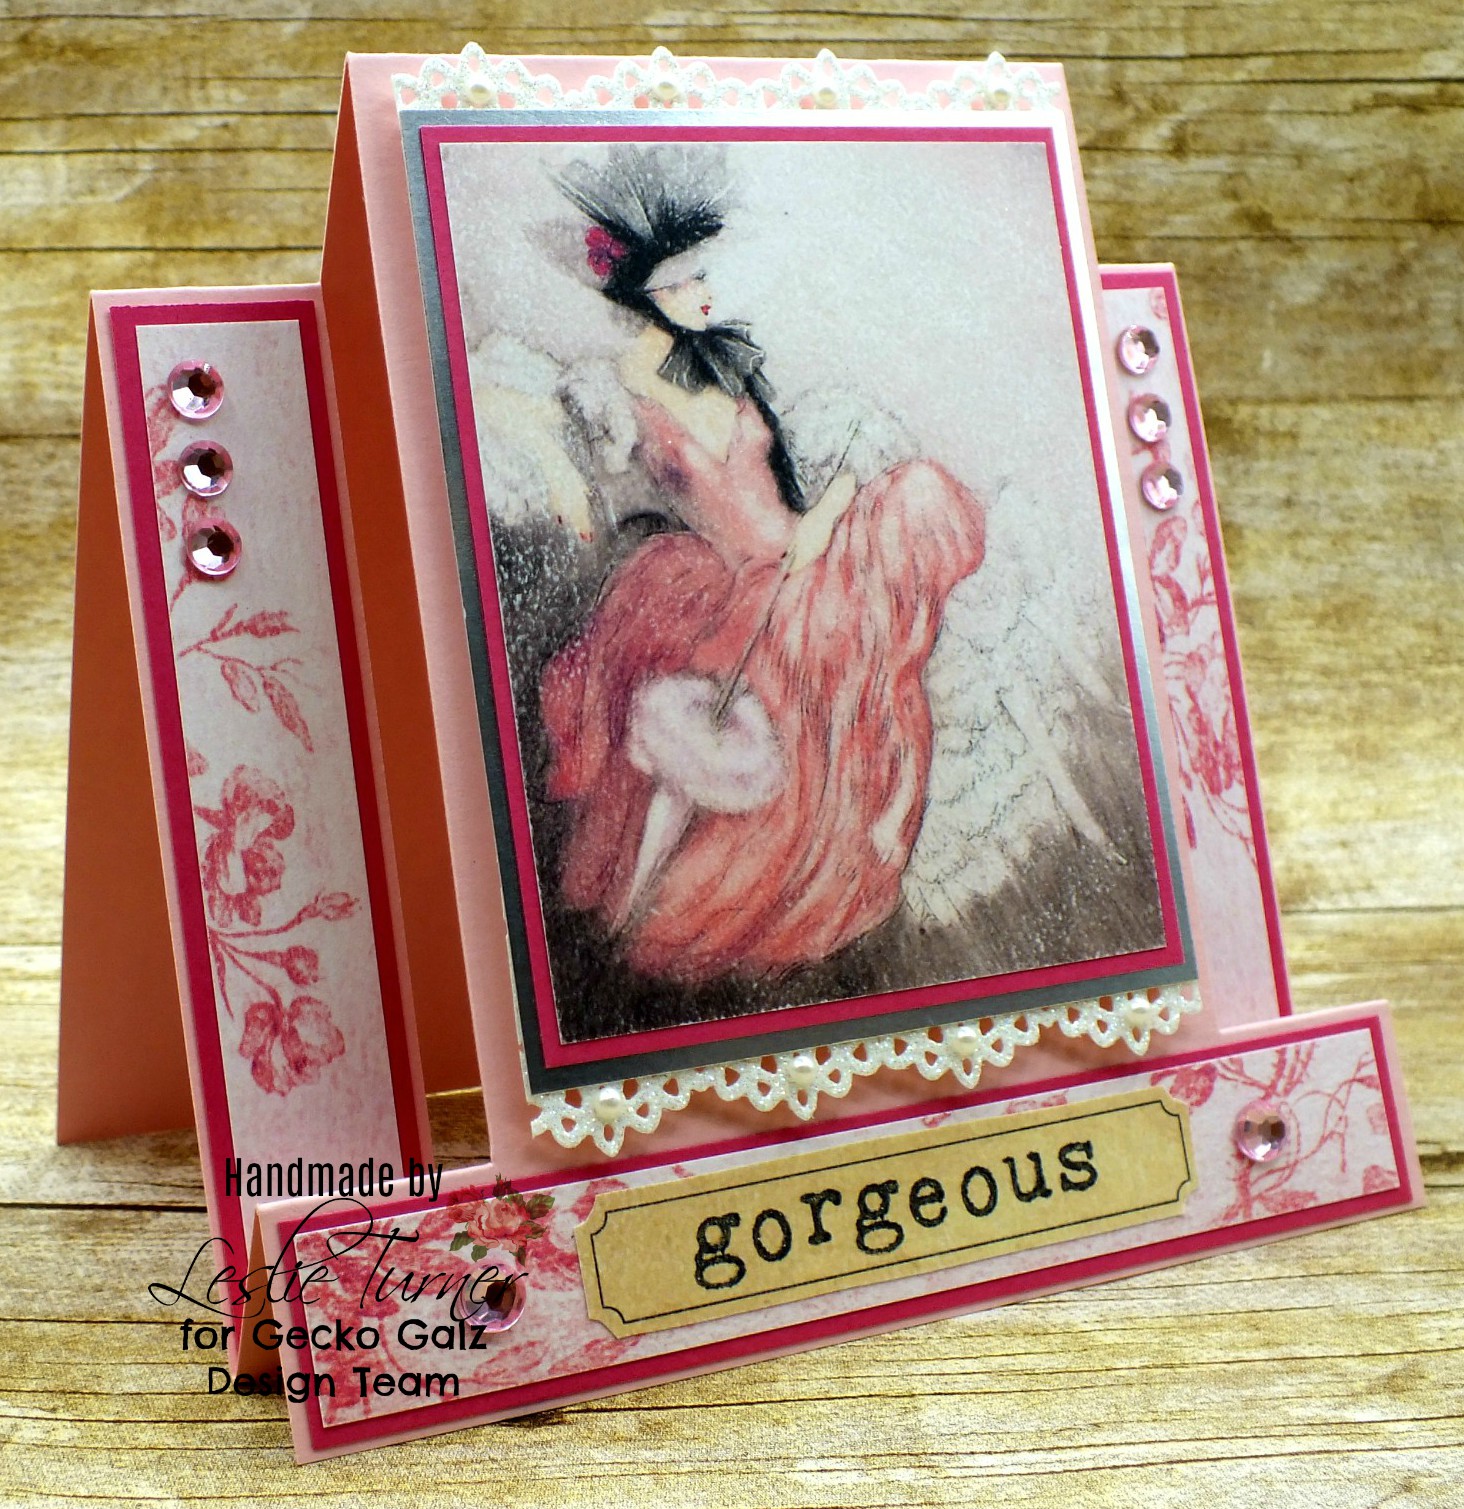
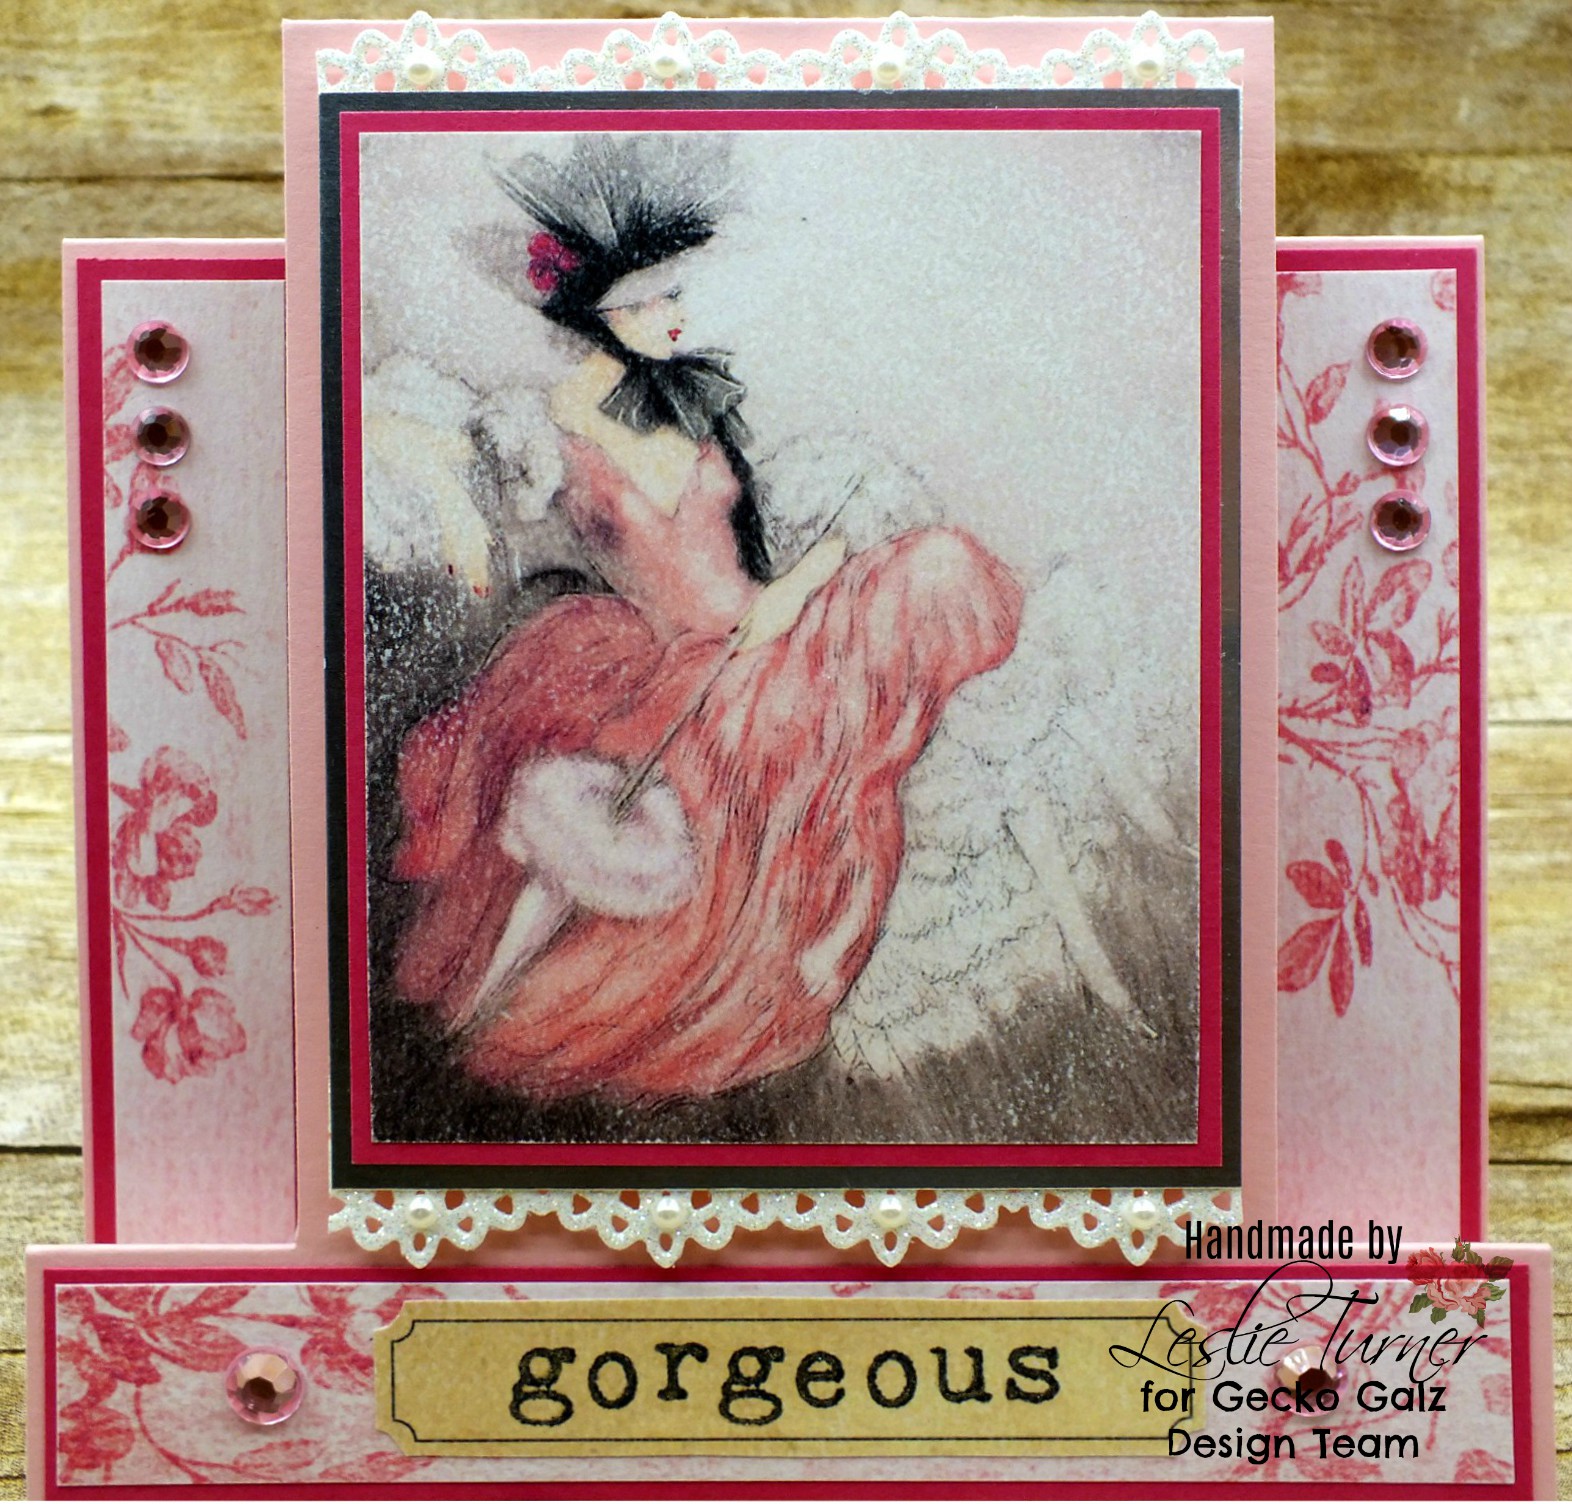
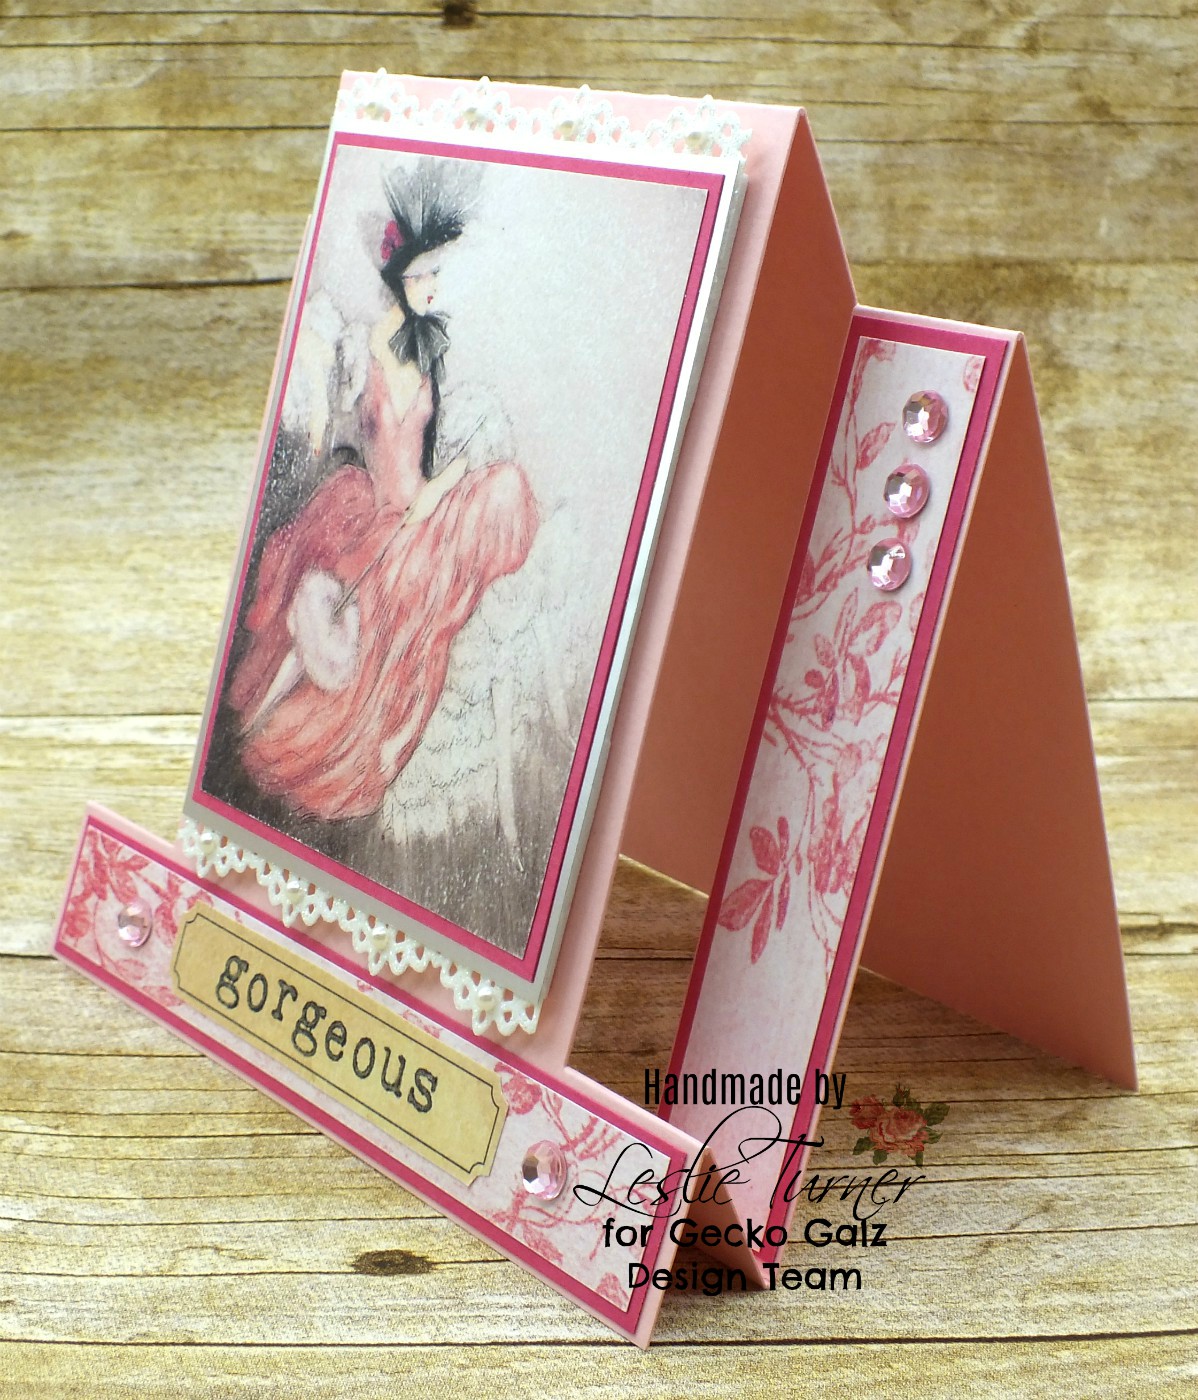
Hello crafty peeps! Seems like I was just here posting a pile of projects for the 1st and now we’re already a week into September! This month will be gone in a blink too, lol! Today is my Featured Post Day on the Gecko Galz blog and I’m excited to share my DT inspiration project using an absolutely gorgeous image from the Tres Chic Collage Set as well as paper from the Paper Roses Mini Paper Pack and sentiment from the Charming Words Collage Set! It’s been a while since I created a step card and I thought this image and the paper would look just beautiful on one. Our challenge this month is Putting on the Ritz so come play with us!
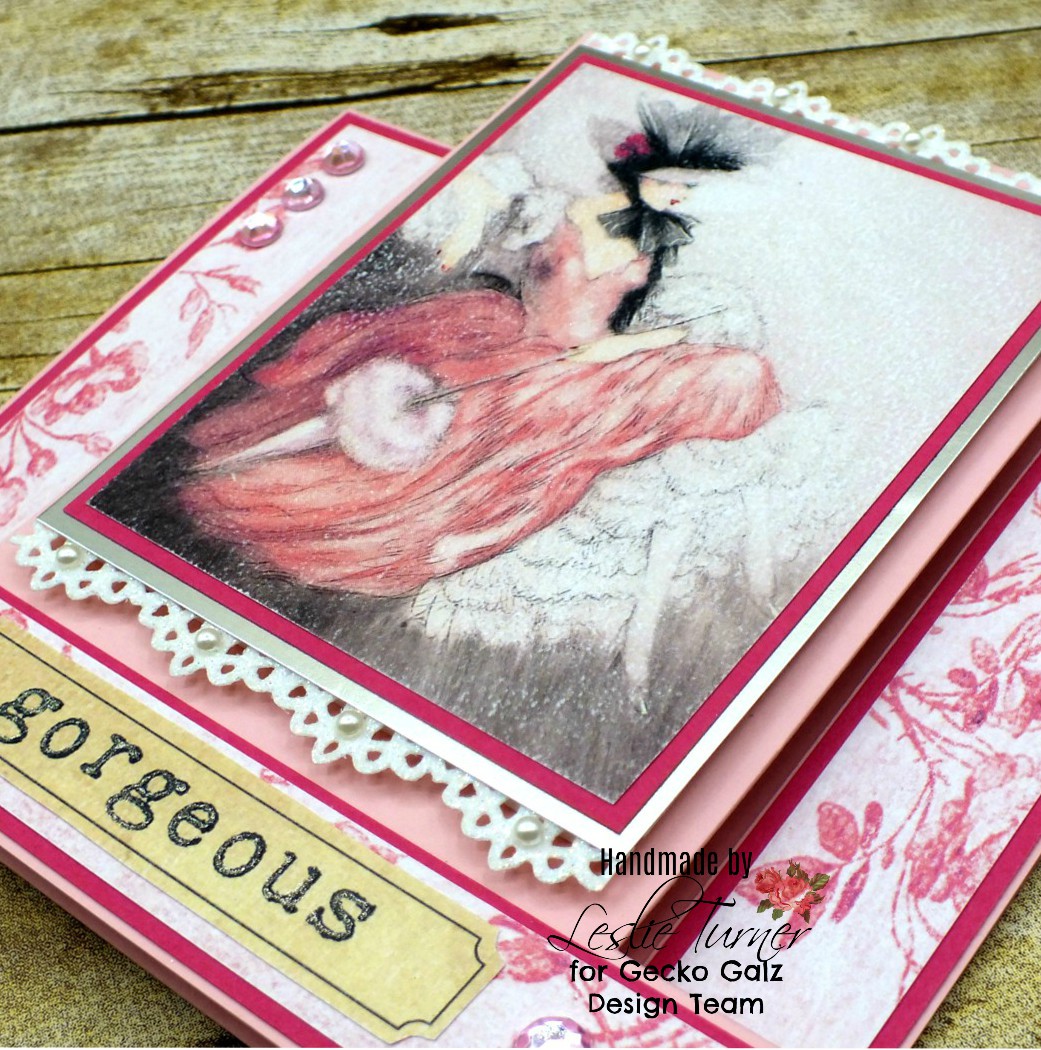
I created the step card base from light pink cardstock. I trimmed the image and layered it on a darker pink cardstock and then on silver foil cardstock. I gave her dress a nice coat of clear sparkle overlay marker to give it some gorgeous shimmer. I created a lace edge die cut from white glitter paper and used sections above and below the layered image, and then layered the image on white foam.
I cut panels for the sides and bottom of the step card base from the Paper Roses Mini Paper Pack and layered them on the darker pink cardstock. I added a sentiment from the Charming Words Collage Set across the bottom panel and traced the word with a clear star shimmer pen. I affixed several large pink gemstones on the sides and bottom as well as tiny white pearls on the lace die cut.
And here’s one final look… absolutely loving how this turned out!
Products used: Cardstock/Paper: GKD Innocent Pink cardstock, Stampin’ Up Melon Mambo cardstock, Stampin’ Up Dazzling Diamonds Glimmer paper, Stampin’ Up Silver Foil Sheet, Gecko Galz Paper Roses Mini Paper Pack Stamps: Gecko Galz Tres Chic Collage Set Ink: Spectrum Noir Crystal Clear Sparkle overlay marker, Sakura Clear Star Gelly Roll pen Dies/Punches: Crafter’s Companion Lace Edge die Accessories: Gecko Galz Charming Words Collage Set, Darice white Foamies foam, large pink gemstones, tiny white flat-back pearls
I hope you’ve enjoyed this ritzy step card and will link up a ritzy project with us this month! We’d love to see what you create! And don’t forget to check out all the fun goodies at the Gecko Galz Etsy store! You will fall in love and spend many hours there, lol! Thanks so much for stopping by today – we’ll see you next time! ;)