Ride

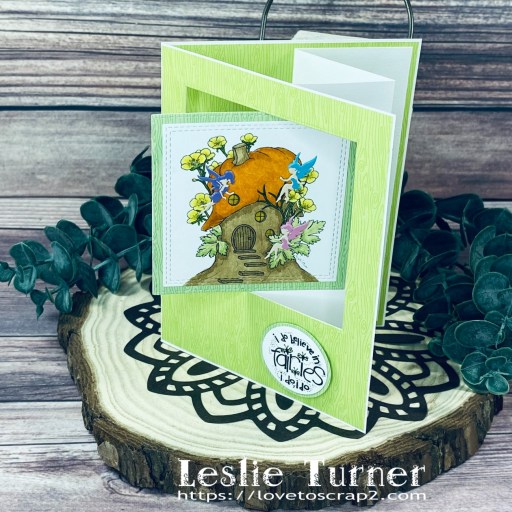
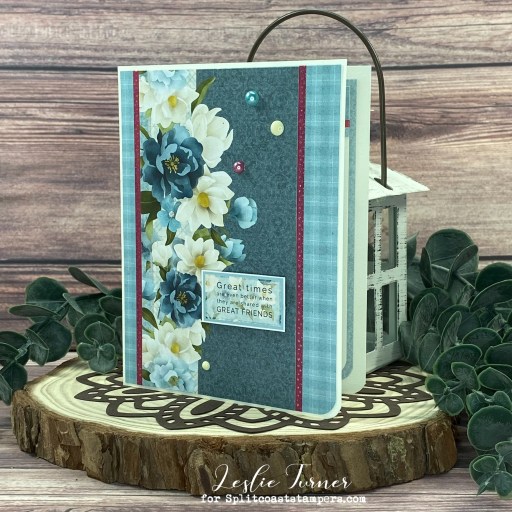
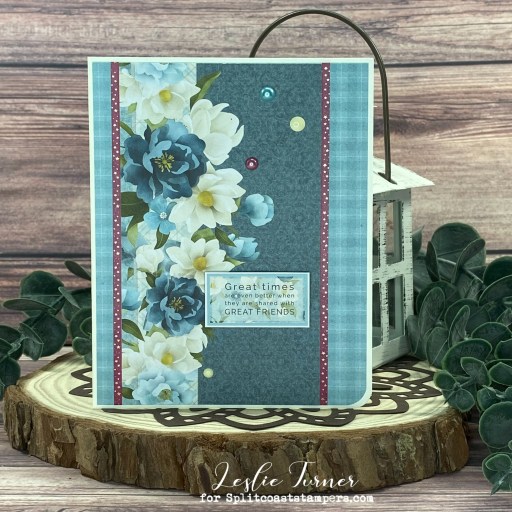
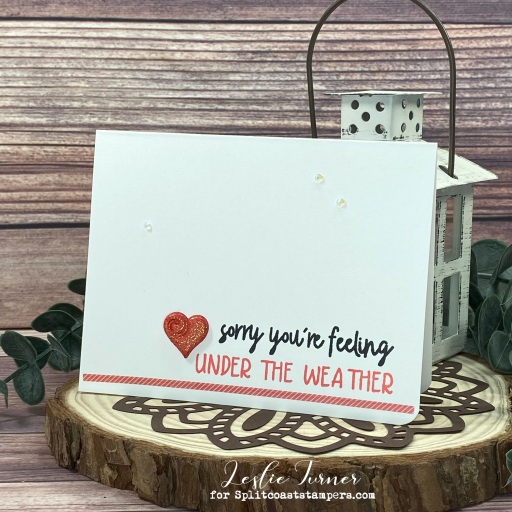
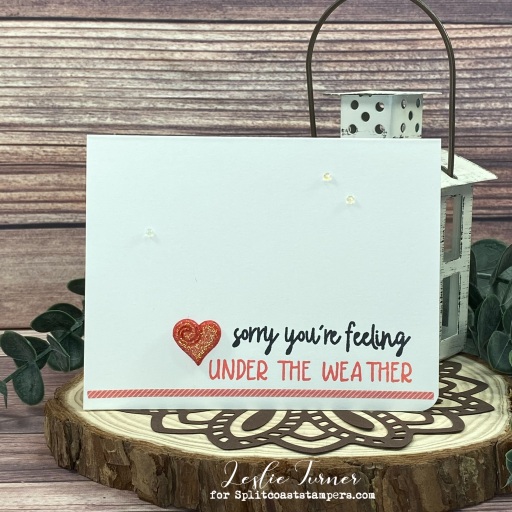
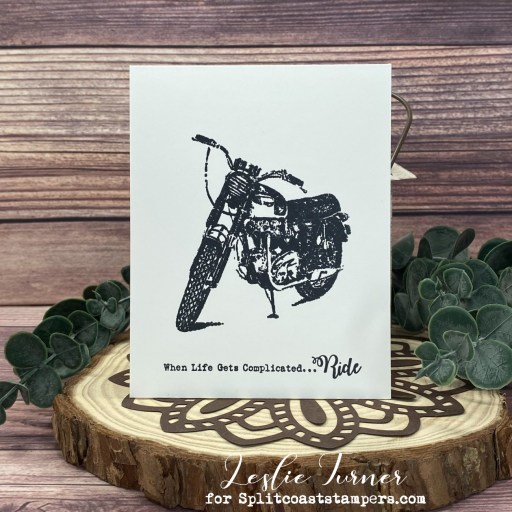
Hi friends! Can you believe how fast these weeks and weekends are flying by?! It’ll be Christmas before we know it! And you think I’m kidding?! Bahahaha! I’m pumped to share another Splitcoast Stampers Dirty Dozen DT inspiration project with you created with an awesome IndigoBlu stamp set! Before Ed became disabled, we owned several motorcycles and rode quite frequently with our group of friends. Such good times and such good memories! This clean and simple card has a super short list of supplies and is actually a one-layer card! I don’t do one-layer cards very frequently so I’m rather proud of this one!

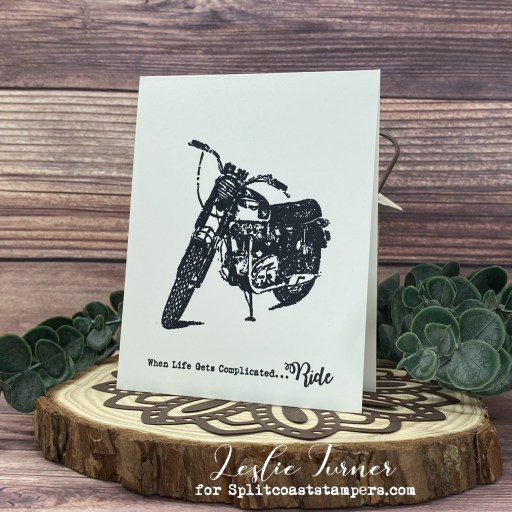
I cut a standard A2 size top-folding card base from Neenah Classic Crest 110# Solar White cardstock. I stamped the bike image from the IndigoBlu Ride Long stamp set in Memento Tuxedo Black ink on the front flap and the sentiment just beneath it. BOOM… that’s it!

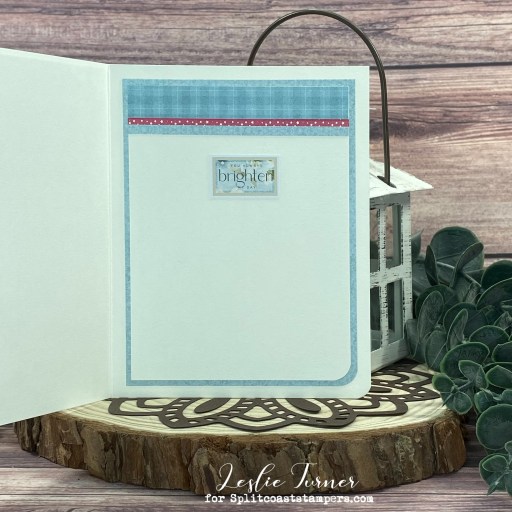
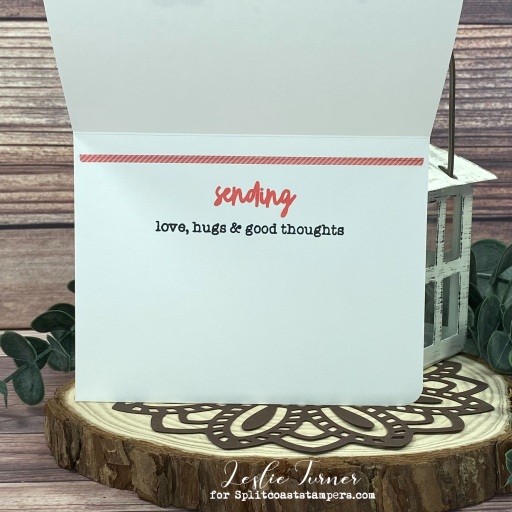
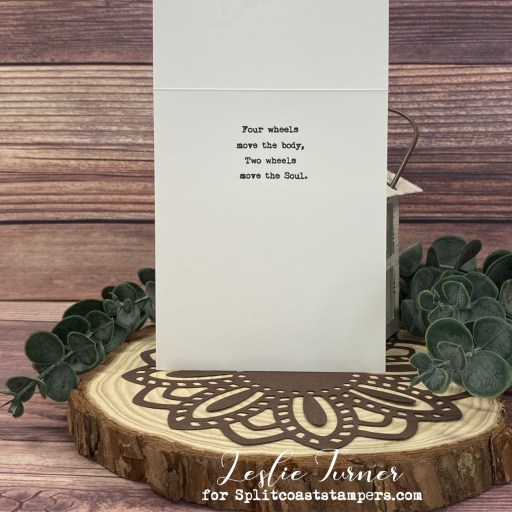
I stamped the other sentiment from the Ride Long stamp set on the inside. Such a fun, easy card!

Sharing in the following challenges:
1. 613 Avenue Create: August 2023 – Anything Goes w/ optional CAS (playing twist)
2. A Perfect Time To Craft Open Challenge: August #8-2023 – Anything Goes
3. Classic Design Challenge: August #8 – Anything Goes

Affiliate links are used in this post at no cost to you – I really appreciate your support! 

Products used:
CARDSTOCK/PAPER: Neenah Classic Crest 110# Solar White cardstock
STAMPS: IndigoBlu Ride Long stamp set
INK: Memento Tuxedo Black ink
ACCESSORIES: Tonic Studios 12″ Guillotine Paper Trimmer, MISTI stamp tool

I hope you’ve enjoyed seeing this project and will consider joining the Splitcoast Stampers Fan Club which costs less than $25 for an entire year! There are tons of member perks (like seeing all the Dirty Dozen DT’s inspiration projects each month) in addition to access to all the other free content on the Splitcoast Stampers website. Be sure to check it out! The subscription is seriously awesome! Thanks for stopping by today – we’ll see you again soon!

Scrappy hugs,

love much & laugh often

Hey everybody! Happy Saturday! Another week bites the dust, lol! I’ve popped in this morning to share another Splitcoast Stampers Dirty Dozen DT inspiration project featuring a double-layer debossed/embossed background of clock faces on a note card! The top layer is debossed with dark ink swiped onto the embossing folder and the second layer is regular embossing. Fun technique… not sure what it’s called but I like it! And I’m sure I didn’t make it up but I’ve never seen another project like it! LOL!

I cut a standard A2 size side-folding card base from CutCardStock Basis Brown along with two layering panels from the Core’dination Kraft-Core Nostaglic Collection cardstock pad. I ran one of the panels through the Big Shot with the Tim Holtz pocket watches embossing folder. For the other one, I swiped Catherine Pooler Sand Castle ink directly onto the embossing folder prior to running it through the Big Shot for a debossed effect. I trimmed both panels up a bit and adhered them together and then to the card base. I stamped the sentiment from the Prickley Pear Stamps Steampunk Gears 2 stamp set in Catherine Pooler Over Coffee ink and tore it into a strip. The finishing touch was adding several Eyelet Outlet 5mm ivory pearls to the sentiment strip and 3mm brown pearls to the clock faces.

I cut the inside panel from Neenah Classic Crest Baronial Ivory cardstock and embellished it with leftover strips of the debossed panel on the front and the Basis Brown used for the card base. Since this is a note card, I left the panel blank with plenty of room to write a custom message.

Sharing in the following challenges:
1. A Perfect Time To Craft Open Challenge: August #8-2023 – Anything Goes
2. Classic Design Challenge: August #8 – Anything Goes
3. Crafty Calendar Challenge: August Anything Goes

Affiliate links are used in this post at no cost to you – I really appreciate your support! 

Products used:
CARDSTOCK/PAPER: CutCardStock Basis Brown cardstock, Neenah Classic Crest Baronial Ivory cardstock, Core’dinations Kraft-Core Nostaglic Collection cardstock pad
STAMPS: Prickley Pear Stamps Steampunk Gears 2 stamp set
INK: Catherine Pooler Sand Castle and Over Coffee inks
ACCESSORIES: Tonic Studios 12″ Guillotine Paper Trimmer, Tim Holtz Alterations/Texture Fades Pocket Watches Embossing Folder, Art Glitter Dries Clear adhesive, MISTI stamp tool, Big Shot, Eyelet Outlet 3mm brown and 5mm ivory pearls

I hope you’ve enjoyed seeing this project and will consider joining the Splitcoast Stampers Fan Club which costs less than $25 for an entire year! There are tons of member perks (like seeing all the Dirty Dozen DT’s inspiration projects each month) in addition to access to all the other free content on the Splitcoast Stampers website. Be sure to check it out! The subscription is seriously awesome! Thanks for stopping by today – we’ll see you again soon!

Scrappy hugs,

Summer Sun & Fun ATCs

Hey everybody! I just can’t wrap my head around it being the first week of August already! I’ve stopped by this morning to share another Splitcoast Stampers Dirty Dozen DT inspiration project which is a set of fun summer-themed ATCs for my collection! Sorry/not sorry for hardly ever trading them as the name suggests, lol! These have ink smooshed backgrounds and I used one of my most favorite-ever stamp sets from The Project Bin!

I cut two card bases and punched two coin bases from Neenah Classic Crest 110# Solar White cardstock and set them aside. I smooshed a separate panel of Solar White cardstock into Ranger speckled egg and salvaged patina distress inks spritzed with water from my Tim Holtz distress sprayer onto my craft mat, drying with my Milwaukee heat tool between smooshes. When the colors were like I wanted, I sprayed the panel with a homemade mist of Let’s Resin Teal Chameleon Powder and water in a Ranger Mini Mister and allowed it to dry thoroughly. I then cut two more card bases and punched two more coin bases from this inked panel.

Using The Project Bin’s Summer Fun stamp set, I stamped sentiments on each of the ATCs in Cahterine Pooler Daydream ink. I added an Eyelet Outlet sun, flop flop and fish brad to three of them, and two strips of Eyelet Outlet skinny silver washi tape to the fourth one. I adhered the extra cards and coins to the back of the embellished ones for stability.

Sharing in the following challenges:
1. A Perfect Time To Craft Open Challenge: August #8-2023 – Anything Goes
2. Classic Design Challenge: August #8 – Anything Goes
3. Sisterhood of Snarky Stampers: #240 – A is for ATC

Affiliate links are used in this post at no cost to you – I really appreciate your support! 

Products used:
CARDSTOCK/PAPER: Neenah Classic Crest 110# Solar White cardstock
STAMPS: The Project Bin Summer Fun stamp set
INK: Ranger speckled egg and salvaged patina distress inks; Catherine Pooler Daydream ink
DIES/PUNCHES: Fiskars 2-1/2″ circle punch
ACCESSORIES: Tonic Studios 12″ Guillotine Paper Trimmer, Art Glitter Dries Clear adhesive, Tim Holtz Distress Sprayer, Milwaukee Heat Tool, Let’s Resin Teal Chameleon Powder, Ranger Mini Mister, MISTI stamp tool, Eyelet Outlet skinny silver glitter washi tape and sun, flip flop and fish brads

I hope you’ve enjoyed seeing this project and will consider joining the Splitcoast Stampers Fan Club which costs less than $25 for an entire year! There are tons of member perks (like seeing all the Dirty Dozen DT’s inspiration projects each month) in addition to access to all the other free content on the Splitcoast Stampers website. Be sure to check it out! The subscription is seriously awesome! Thanks for stopping by today – we’ll see you again soon!

Scrappy hugs,

happy birthday to you

Hi friends! Happy Thursday! We’re another day closer to Friday so that’s a big YAY for all my working friends! I’m back this morning with another Splitcoast Stampers Dirty Dozen DT inspiration project featuring some gorgeous patterned papers and die cuts and a fabulous fun fold called a reverse easel card! I’ve had these instructions in my tutorial folder for quite some time and have never made one so I thought it was time to try it out! I love how it turned out!

I cut the card base from CutCardStock Basis 80# White 12×12 cardstock along with embellishing panels from Craft Consortium Ink Drops-Vivid 6×6 paper pad. I used the My Favorite Things Double Stitched Square STAX to die cut two squares which I layered on slightly larger squares cut from CutCardStock Curious Metallic Gold Leaf cardstock.

I used the My Favorite Things Stitched Pinking Edge Square STAX to cut panels from a pretty butterfly print in the Kraft & Creativity Showering Nature 12×12 paper pack. I fussy cut a butterfly and adhered it to a Basis White cardstock scrap for stability, and adhered it to the base for an easel stop. I added the sentiment die cut from Gold Leaf cardstock using the My Favorite Things Swirly Birthday die. The finishing touch was adding several YNS Purple Glitter Gumdrops.

Sharing in the following challenges:
1. A Perfect Time To Craft Open Challenge: August #8-2023 – Anything Goes
2. Classic Design Challenge: August #8 – Anything Goes
3. Crafts Galore Encore Challenge Blog: #114 – August Anything Goes

Affiliate links are used in this post at no cost to you – I really appreciate your support! 

Products used:
CARDSTOCK/PAPER: CutCardStock Basis 110# White 12×12 and Curious Metallic Gold Leaf cardstock, Kraft & Creativity Showering Nature 12×12 paper pack, Craft Consortium Ink Drops-Vivid 6×6 paper pad
DIES/PUNCHES: My Favorite Things Stitched Pinking Edge Square STAX, Double Stitched Square STAX and Swirly Birthday Die
ACCESSORIES: Tonic Studios 12″ Guillotine Paper Trimmer, Tape Runner, Art Glitter Dries Clear adhesive, Big Shot, YNS Purple Glitter Gumdrops

I hope you’ve enjoyed seeing this project and will consider joining the Splitcoast Stampers Fan Club which costs less than $25 for an entire year! There are tons of member perks (like seeing all the Dirty Dozen DT’s inspiration projects each month) in addition to access to all the other free content on the Splitcoast Stampers website. Be sure to check it out! The subscription is seriously awesome! Thanks for stopping by today – we’ll see you again soon!

Scrappy hugs,

Frightful & Delightful

Hi friends! Well, we’re into the first week of August already and Halloween will be upon us in no time! That said, I’m back up on the Prickley Pear Stamps blog this morning with a frightful and delightful Halloween scene complete with a couple scary cats and a bat in a graveyard! Boooooo! I used the Scary Cat & Bats stamp set along with the Trick or Treat Koala Goblins stamps and dies and a die set in my stash to build this fun scene!

I cut a standard A2 size top-folding card base from Neenah Classic Crest Solar White along with a layering panel from Basis Gray. I stamped one of the cats from the Scary Cat & Bats stamp set in Memento Tuxedo Black ink on Solar White and fussy cut him.

I stamped the small cat from the Trick or Treat Koala Goblins stamp set on CutCardStock Basis Gray and the gravestones on CutCardStock Dolphin, and cut them with the coordinating Trick or Treat Koala Goblins dies. Using a Halloween Scenes die set in my stash, I cut the spooky tree and fence from CutCardStock Basis Black. The fun part is always building the scene! I stamped the small bat and sentiment from the Scary Cat & Bats stamp set which completed the card.

Sharing in the following challenges:
1. A Perfect Time To Craft Open Challenge: August #8-2023 – Anything Goes
2. Classic Design Challenge: August #8 – Anything Goes
3. Halloween Crafts All Year ‘Round: #6 – Anything Goes Halloween

Affiliate links are used in this post at no cost to you – I really appreciate your support!

Prickley Pear Stamps products used:
Scary Cat & Bats stamp set
Trick or Treat Koala Goblins stamp set
Trick or Treat Koala Goblins dies

Other products used:
Cardstock/Paper: Neenah Classic Crest 80# Solar White cardstock, CutCardStock Basis Gray, Basis Black and Dolphin cardstock
Ink: Memento Tuxedo Black ink; Arteza alcohol markers- Y02, YR25
Dies/Punches: Stampin’ Up Halloween Scenes Edgelits
Accessories: Tonic Studios 12″ Guillotine Paper Trimmer, MISTI stamp tool, Big Shot, Tape Runner, Art Glitter Dries Clear adhesive, 1-mm thick foam squares

I hope you’ve enjoyed this project! Be sure to check out all the awesome stamps and dies at Prickley Pear Stamps! Save 10% on anything on the site when you shop at Prickley Pear Stamps by using coupon code LESLIE10 at checkout! And be sure to ‘like’ and ‘follow’ the Prickley Pear Stamps Facebook page to keep up with news and sales, and join Prickley Pear Pals (the fan group) for lots of fun crafty ideas and to share your creativity! And finally, we’d love to see you visit the Prickley Pear Stamps blog and become a Follower! Hope to see you there! Thanks so much for stopping by today – we’ll see you next time! ;)

Scrappy hugs,

I do believe in fairies

Hi friends! I hope you’re having a great week! It’s so hard to believe we’re a couple days into the month of August already! I’ve been saying for years that once my sister’s birthday hits on the 8th, Christmas is here in no time! I’m delighted to share that I’m once again guest designing for Penny’s Paper-Crafty Challenge Blog! One of my projects scored a win at Penny’s back in mid-June so I was invited to join in Challenge #552! SheepSki Designs is our sponsor this time, so be sure to come on over and play! I was gifted the adorable Buttercup Cottage digital image for this challenge and created a swing flap fun fold with a fairy theme. I totally love how this turned out!

I cut the card base from CutCardStock Basis 80# White cardstock along with layering panels from coordinating prints in the Doodlebug Design Buffalo Check-Woodgrain Rainbow Petite Prints 6×6 paper pad. I printed the SheepSki Designs Buttercup Cottage digital image and an old Melonheadz Fairies digital sentiment on Basis White cardstock and colored the image with alcohol markers and a Faber Castell artist pitt pen.

I cut the image with a My Favorite Things Double Stitched Square STAX, added three Eyelet Outlet Fairy Brads, and layered it on a square cut from a darker green patterned paper with a Keep It Simple Stitched Squares Nested Die. I punched out the digital sentiment with a Stampin’ Up 1-1/4″ circle punch and layered it on a slightly larger circle punched from a darker green patterned paper with a Stampin’ Up 1-3/8″ circle punch, popped up on Stampin’ Up Dimensionals.

I layered a coordinating buffalo check patterned paper on the inside and stamped a sentiment in Memento Tuxedo Black ink from the Keep It Simple Birthday sentiment stamp set. The final photo shows the card folded flat for mailing. A ‘fun’ fold, for sure! ;)

Sharing in the following challenges:
1. A Perfect Time To Craft Open Challenge: August #8-2023 – Anything Goes
2. Classic Design Challenge: August #8 – Anything Goes
3. Crafts Galore Encore Challenge Blog: #114 – August Anything Goes
4. Wednesday’s Creative Inspirations Challenge Blog: August Challenge – Fairies!

Affiliate links are used in this post at no cost to you – I really appreciate your support! 

Products used:
CARDSTOCK/PAPER: CutCardStock Basis 80# White cardstock, Doodlebug Design Buffalo Check-Woodgrain Rainbow Petite Prints 6×6 paper pad
STAMPS: SheepSki Designs Buttercup Cottage digital image, Melonheadz Fairies digital sentiment, Keep It Simple Birthday sentiment stamp set
INK: Arteza alcohol markers- YG16/17, Y03/16, YR12/14, BR64/74; Faber Castell May Green Pitt Artist pen, Memento Tuxedo Black ink
DIES/PUNCHES: My Favorite Things Double Stitched Square STAX, Keep It Simple Stitched Squares Nested Dies, Stampin’ Up 1-1/4″ and 1-3/8″ circle punches
ACCESSORIES: Tonic Studios 12″ Guillotine Paper Trimmer, Bearly Art precision craft glue, MISTI stamp tool, Big Shot, Eyelet Outlet Fairy Brads, Stampin’ Up Dimensionals

I hope you’ve enjoyed seeing this project and will link up with us this fortnight! Thanks so much for stopping by today – we’ll see you next time! ;)

Scrappy hugs,

Great Times – Great Friends

Hey everybody! Happy Hump Day! I hope you’re staying cool in this slightly warm (LOL) weather! I’ve popped in to share another Splitcoast Stampers Dirty Dozen DT inspiration project this morning. This pretty friendship card features Hot Off The Press papers and ephemera along with skinny washi tape, enamel dots and pearls. Sometimes patterned paper can really make a statement!

I cut a standard A2 size side-folding card base from CutCardStock Basis 80# Natural cardstock along with layering panels from Hot Off The Press Magnolia Blossoms 6×6 double-sided papers, and rounded the bottom right corners. I affixed strips of MAMBI pink skinny washi tape on the sides of the vertical panel and adhered an ephemera sentiment. The finishing touch was adding Eyelet Outlet ivory enamel dots and 5mm pink pearls and Keep It Simple Clementine pearls.

I cut the inside panel from Basis 80# Natural as well and embellished it with strips of Hot Off The Press Magnolia Blossoms patterned paper and MAMBI pink skinny washi tape. I added another ephemera sentiment from the HOTP paper pack.

Sharing in the following challenges:
1. A Perfect Time To Craft Open Challenge: August #8-2023 – Anything Goes
2. Classic Design Challenge: August #8 – Anything Goes
3. My Time To Craft: #513 – Shades of Blue

Affiliate links are used in this post at no cost to you – I really appreciate your support! 

Products used:
CARDSTOCK/PAPER: CutCardStock Basis 80# Natural cardstock, Hot Off The Press Magnolia Blossoms 6×6 double-sided papers
DIES/PUNCHES: Kadomaru Pro corner rounder
ACCESSORIES: Tonic Studios 12″ Guillotine Paper Trimmer, Scotch Advanced Tape Glider, Art Glitter Dries Clear adhesive, Me & My Big Ideas pink skinny washi tape, 1/4″ double-sided foam strips, Eyelet Outlet ivory enamel dots and 5mm pink pearls, Keep It Simple Clementine pearls

I hope you’ve enjoyed seeing this project and will consider joining the Splitcoast Stampers Fan Club which costs less than $25 for an entire year! There are tons of member perks (like seeing all the Dirty Dozen DT’s inspiration projects each month) in addition to access to all the other free content on the Splitcoast Stampers website. Be sure to check it out! The subscription is seriously awesome! Thanks for stopping by today – we’ll see you again soon!

Scrappy hugs,

make today count

Hey everybody! I hope your week has started off rather nicely! I have another Splitcoast Stampers Dirty Dozen DT inspiration project to share with you today – a motivational tag with inlaid die cuts and bold pops of purple, lime green and pink! I love making tags and don’t seem to make very many for some reason. And I used a dragonfly die set that I’ve had in my stash for quite some time and have never used, so I thought it was time to bring it out for a play!

I cut two tags from CutCardStock Basis Black cardstock and die cut three dragonfly shaped apertures into one of them, using the Prickley Pear Stamps dainty Dragonflies dies, reserving the negative space pieces to put back into the apertures for a little dimension. I die cut the dragonflies twice more from Basis Black and purple, lime green and pink striped papers in the Doodlebug Design Dot-Stripe Rainbow Petite Prints 6×6 paper pad, and adhered them on top of the negative spaces in the tag with the striped papers on top.

I added gemstones from the Trinity Stamps Amethyst Accent, Andradite Sparkle and Morganite Muse Embellishment Mixes using my Trinity Pick Up Stick. I adhered several motivational sentiments from the Tim Holtz Idea-ology Small Talk stickers. The final touch was adding black stripe ribbon from Really Reasonable Ribbon which I tied with Doodlebug Design Lily White Doodle Twine.

Sharing in the following challenges:
1. A Perfect Time To Craft Open Challenge: August #8-2023 – Anything Goes
2. Classic Design Challenge: August #8 – Anything Goes
3. Crafts Galore Encore Challenge Blog: #114 – August Anything Goes

Affiliate links are used in this post at no cost to you – I really appreciate your support! 

Products used:
CARDSTOCK/PAPER: CutCardStock Basis Black cardstock, Doodlebug Design Dot-Stripe Rainbow Petite Prints 6×6 paper pad
DIES/PUNCHES: Prickley Pear Stamps Dainty Dragonflies dies, Stampin’ Up 1/4″ and 1/2″ circle punches
ACCESSORIES: Tonic Studios 12″ Guillotine Paper Trimmer, Art Glitter Dries Clear adhesive, Big Shot, Tim Holtz Idea-ology Small Talk sentiment stickers, Doodlebug Design Lily White Doodle Twine, Really Reasonable Ribbon black stripe ribbon, Trinity Stamps Amethyst Accent, Andradite Sparkle and Morganite Muse Embellishment Mixes, Trinity Pick Up Stick

I hope you’ve enjoyed seeing this project and will consider joining the Splitcoast Stampers Fan Club which costs less than $25 for an entire year! There are tons of member perks (like seeing all the Dirty Dozen DT’s inspiration projects each month) in addition to access to all the other free content on the Splitcoast Stampers website. Be sure to check it out! The subscription is seriously awesome! Thanks for stopping by today – we’ll see you again soon!

Scrappy hugs,

UPcycled Congrats

Howdy peeps! Happy Monday! It sure got here fast, lol! I have another Splitcoast Stampers Dirty Dozen DT inspiration project to share with you this morning – a congrats card created with a piece of an empty tissue box! I’ve made several cards from upcycled tissue boxes over the last few months and always love how they turn out! Nothing like keeping a little something out of the landfill, even if it’s only a small piece!

I cut a 3-1/2″ x 6″ mini slimline card base from CutCardStock Basis 110# Natural cardstock along with a layering panel from CutCardStock Pop Tone Black Licorice cardstock. I trimmed a piece of the tissue box down to size and layered it on the black cardstock and then to the front of the card base. I die cut the sentiment from CutCardStock Basis 80# Natural and Pop Tone Black Licorice using the Kat Scrappiness Congrats Word Die with Shadow. The finishing touch was adding several Eyelet Outlet Black Glitter Enamel Dots.

I cut the inside panel from Basis 80# White and embellished it with a leftover piece of Black Licorice cardstock. I stamped the sentiment from the Keep It Simple Congratulations sentiment stamp set in Memento Tuxedo Black ink and layered the panel on Black Licorice.

Affiliate links are used in this post at no cost to you – I really appreciate your support! 

Products used:
CARDSTOCK/PAPER: CutCardStock Basis 110# Natural, Basis 80# Natural and Pop Tone Black Licorice cardstock
STAMPS: Keep It Simple Congratulations sentiment stamp set
INK: Memento Tuxedo Black ink
DIES/PUNCHES: Kat Scrappiness Congrats Word Die with Shadow
ACCESSORIES: Tonic Studios 12″ Guillotine Paper Trimmer, empty tissue box, Tombow Mono permanent adhesive, Art Glitter Dries Clear adhesive, MISTI stamp tool, Big Shot, Eyelet Outlet Black Glitter Enamel Dots

I hope you’ve enjoyed seeing this project and will consider joining the Splitcoast Stampers Fan Club which costs less than $25 for an entire year! There are tons of member perks (like seeing all the Dirty Dozen DT’s inspiration projects each month) in addition to access to all the other free content on the Splitcoast Stampers website. Be sure to check it out! The subscription is seriously awesome! Thanks for stopping by today – we’ll see you again soon!

Scrappy hugs,

under the weather

Hi friends! Well, the weekend is half over and I hope you’re doing something fun! Blink and it’ll be Monday again, lol! I’ve popped in this morning to share another Splitcoast Stampers Dirty Dozen DT inspiration project. This clean and simple get well card features an adorable heart button and a strip of washi tape with a little stamping. A very simple design that would easily be mass produced to have a few extra in your stash.

I cut a standard A2 size top-folding landscape card base from Neenah Classic Crest 110# Solar White cardstock and rounded the bottom right corner. I added a strip of MAMBI skinny washi tape across the bottom. I stamped the sentiment from the Keep It Simple Get Well sentiment stamp set in Memento Tuxedo Black and Catherine Pooler Coral Cabana inks just above the washi tape. I added a My Love heart button from Buttons Galore & More along with a few clear gemstones from the Buttons Galore & More Wish Upon A Star Mix Upz Embellishments.

I kept the inside just as simple as the front. I added a strip of the MAMBI washi tape and stamped another sentiment from the Keep It Simple Get Well sentiment stamp set in the same inks used on the front.

Affiliate links are used in this post at no cost to you – I really appreciate your support! 

Products used:
CARDSTOCK/PAPER: Neenah Classic Crest 110# Solar White cardstock
STAMPS: Keep It Simple Get Well sentiment stamp set
INK: Memento Tuxedo Black ink, Catherine Poole Coral Cabana ink
DIES/PUNCHES: Kadomaru Pro corner rounder
ACCESSORIES: Tonic Studios 12″ Guillotine Paper Trimmer, Art Glitter Dries Clear adhesive, MISTI stamp tool, Me & My Big Ideas skinny washi tape, Buttons Galore & More My Love heart button and Wish Upon A Star Mix Upz Embellishments

I hope you’ve enjoyed seeing this project and will consider joining the Splitcoast Stampers Fan Club which costs less than $25 for an entire year! There are tons of member perks (like seeing all the Dirty Dozen DT’s inspiration projects each month) in addition to access to all the other free content on the Splitcoast Stampers website. Be sure to check it out! The subscription is seriously awesome! Thanks for stopping by today – we’ll see you again soon!

Scrappy hugs,