HELLO mini slimline

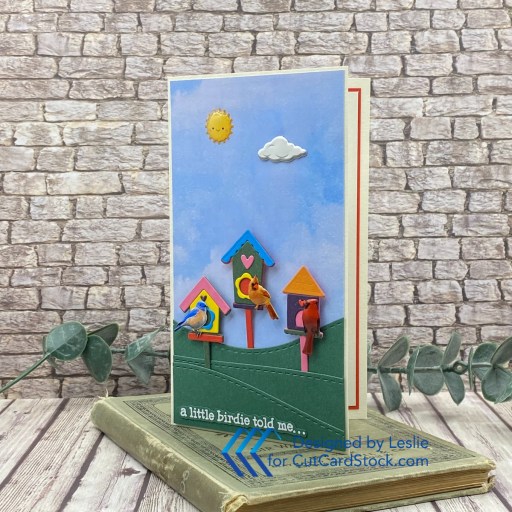
Hey everybody, happy middle of the week! The weeks sure are rolling by fast… and I sure wish some warmer weather would follow. Our southern friends are having heat waves and we have snow on the ground! In all honesty, we’ve had a very mild Winter so I’m really not complaining. I’m up on the CutCardStock blog today with a tutorial for making a fun friendship card featuring the Spellbinders Sunset In A Glass die set that I’m totally in love with! I actually had another project created and scheduled to go live this morning, but since our Lessebo cardstock is 10% off throughout the month of March (and it happens to be my favorite), I decided to switch gears and share this mini slimline card instead. Good choice, right?! I used six colors from our Lessebo line as well as light and medium shades of kraft.

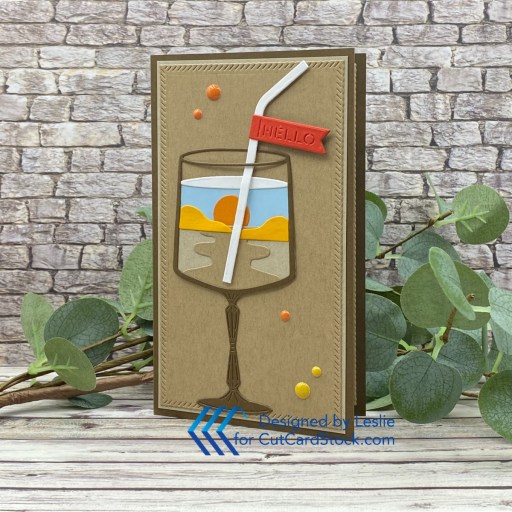
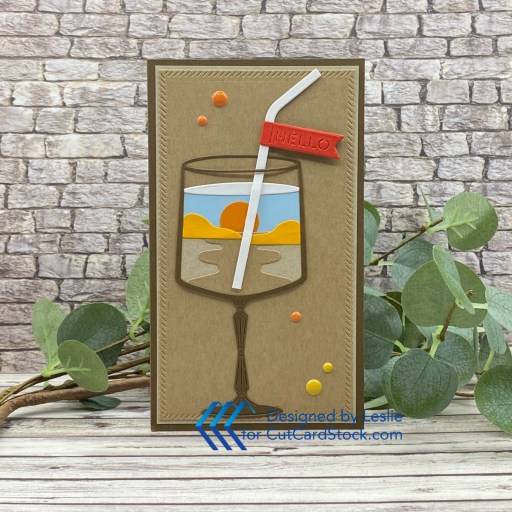
I cut my go-to size of 3-1/2″ x 6″ mini slimline card base from Lessebo Coffee Bean as well as a layering panel from Desert Storm cardstock (the lighter one) and a die cut panel from Twine cardstock (the slightly darker one) using a Kat Scrappiness Mini Slimline Stitched Rope Die. Then I went to work creating the focal image. Using the Spellbinders Sunset In A Glass die set, I cut the pieces from Lessebo Coffee Bean, Lessebo Brick Orange, Lessebo Sunset Orange, Lessebo Cherry Red, Lessebo Arctic Blue, Lessebo White, Twine and Desert Storm. Once I completed the assembly of the glass, the finishing touch was adding several Freckled Fawn Enamel Dots.

I used the same Kat Scrappiness Mini Slimline Stitched Rope Die to cut the inside panel from Twine cardstock and then added a slightly smaller panel of Desert Storm cardstock. The sentiment is from the Pinkfresh Studio Wonderful Sentiments stamp set which I stamped in Catherine Pooler Icing on the Cake ink.

Affiliate links are used in this post at no cost to you – I really appreciate your support!

CutCardStock products used:
Lessebo Coffee Bean cardstock
Lessebo Brick Orange cardstock
Lessebo Sunset Orange cardstock
Lessebo Cherry Red cardstock
Lessebo Arctic Blue cardstock
Lessebo White cardstock
Twine cardstock
Desert Storm cardstock

Other products used:
STAMPS: Pinkfresh Studio Wonderful Sentiments Stamp Set
INK: Catherine Pooler Icing on the Cake ink
DIES/PUNCHES: Spellbinders Sunset In A Glass Die Set, Kat Scrappiness Mini Slimline Stitched Rope Dies
ACCESSORIES: Fiskars 12″ ProCision Rotary Bypass Paper Trimmer, Bearly Art precision craft glue, My Sweet Petunia Precision Glue Press, MISTI stamp tool, Big Shot, Scrapbook Adhesives 3D Foam Squares, Freckled Fawn Enamel Dots

I hope you’ve enjoyed today’s project and you’re inspired to get crafty! Be sure to check out all the awesome cardstock and other goodies at CutCardStock (adhesives, labels, stickers, pens, watercolors and ribbon to name a few). And head on over to the CutCardStock Facebook Page and for more inspiration! Also, be sure to join our Creating with CutCardStock Facebook Group for even more crafty inspiration! Thanks so much for stopping by today – we’ll see you next time!

Scrappy hugs,

Happy Birthday

Hey everybody, happy Fri-YAY! Every day is Fri-YAY when you’re retired… there’s nothing more rewarding than being able to do whatever the heck you wanna do anytime you wanna do it! I’m delighted to share a Brutus Monroe DT inspiration project today featuring the amazing Doodle Bookmarks, Lace Layers Nested Dies, Vintage Plaid paper, and Super Sentimental stamp set. Of course, I used a boat-load of other awesome BM products to make this fun birthday mini slimline card, and I love how it turned out!

I started by coloring a Doodle Bookmark with an assortment of bold color markers. I covered the entire bookmark with embossing ink and then heat embossed it in Icicle embossing powder. I repeated the process two more times which gave the bookmark some awesome shine.

I cut my go-to size of 3-1/2″ x 6″ mini slimline card base from Raven cardstock along with layering panels from Vintage Plaid 6×6 paper and Not Your Mamas cardstock. I die cut a sentiment panel from a Lace Layers Nested Die along with a small Raven cardstock panel. I stamped a sentiment from the Super Sentimental stamp set in Alabaster White ink, and added a few Blue Shift Flat Back Crystals.

I cut the inside panel from Perfect Blend cardstock and embellished it with leftover strips of Vintage Plaid paper and Raven cardstock. I stamped another sentiment from the Super Sentiment stamp set in Raven ink, and this completed the the card.

Affiliate links are used in this post at no cost to you – I really appreciate your support!

Brutus Monroe products used:
BRU 3416-2 Doodle Bookmarks
BRU 6487 Lace Layers Nested Dies
BRU 4929 Vintage Plaid 6×6 Paper Pack
BRU 7985 Super Sentimental Stamp Set
BRU 2081 Embossing 2×2 Ink
BRU 2517 Icicle Ultra Fine Embossing Powder
BRU 2524 Alabaster Pigment White 2×2 Ink
BRU 6519 Raven Cardstock
BRU 9494 Not Your Mamas Cardstock
BRU 4013 Perfect Blend Cardstock
BRU 2543 Raven Detail 2×2 Ink
BRU 8699 Blue Shift Flat Back Crystals
BRU 9569 Squeaky Clean Lavender Stamp Cleaner
BRU 1729 Microfiber Stamp Cloth

Other products used:
INK: Bic Mark-It fine point markers- Rambunctious Red, Sunset Orange, Yellow Blaze, Margarita Green, Forest Green, Blue Skies Blue, Hot Aqua, Polynesian Purple, Fandango Pink, Peach Parfait
ACCESSORIES: Fiskars 12″ ProCision Rotary Bypass Paper Trimmer, Bearly Art precision craft glue, My Sweet Petunia Precision Glue Press, Mini MISTI, Big Shot, Scrapbook Adhesives 3D Thin Foam Squares, Trinity Pick Up Stick

I hope you’ve enjoyed seeing this project and you’re inspired to get your craft on! Be sure to check out all the amazing stamps and dies, pigments and mists, cardstock and tools (just to name a few) at Brutus Monroe! And if you happen to have a sweet tooth and like to munch while you craft (like I do, lol), check out Scoozie’s Confections & Curiosities! OMG, I’m hooked! ;) Follow us on Facebook, Instagram and YouTube for tons of crafty inspiration! And come on over and join our Fan Club Facebook Group to share your crafty makes using our products! Thanks so much for stopping by today – we’ll see you next time!

Scrappy hugs,

A little birdie told me…

Howdy peeps! Happy Thursday – another week almost behind us. Time sure is flying by! I’m up on the CutCardStock blog today with a tutorial for making a super cute bird-day mini slimline card. This is another one of those cards that takes almost no time to put together once all the die cutting is done. I used Classic Crest Baronial Ivory along with an assortment of colors in our Lessebo line (my current fav). I also dug into my stash and grabbed some wavy borders, an enamel sun, and cloud and bird brads. Love how this turned out – and I think it could even be considered CAS-ish!

I cut my go-to 3-1/2″ x 6″ mini slimline card base from Classic Crest Baronial Ivory cardstock. I printed the Background Labs Cloud digital background on 32# HP copy paper on my new Canon color laser printer and trimmed it to fit the mini slim card base. I have a background story on printers but I’ll save that for another day, lol! Next, I die cut the bird houses from the Catherine Pooler Home Tweet Home Dies in seven of the eight Lessebo cardstock colors I had out. Since there were so many dies in this set, I left them connected so I wouldn’t lose any of them, and it worked out well. Now I have lots of extra pieces in all those pretty colors to assemble more bird houses for future projects. ;)

I used the Keep It Simple Wavy Borders to cut three layers of ‘hills’ from Lessebo Hunter Green cardstock for my little scene. After assembling the bird houses, I added an Eyelet Outlet bird brad to each one and adhered them to the card front on adhesive foam squares, then added the enamel sun and cloud brad. I heat embossed the sentiment from the Keep It Simple Build-A-Birdhouse stamp set in Hero Arts white embossing powder, fussy cut it and added it to the bottom of the card front which completed the card front.

I cut the inside panel from Classic Crest Baronial Ivory and embellished it with another bird house. I stamped another sentiment from the same Build-A-Birdhouse stamp set in Memento Cottage Ivy ink, and layered the panel on Cherry Red cardstock.

Affiliate links are used in this post at no cost to you – I really appreciate your support!

CutCardStock products used:
Neenah Classic Crest Baronial Ivory cardstock
Lessebo Cherry Red cardstock
Lessebo Splash Blue cardstock
Lessebo Sunflower Yellow cardstock
Lessebo Aubergine cardstock
Lessebo Moss Green cardstock
Lessebo Brick Orange cardstock
Lessebo Bubble Gum Pink cardstock
Lessebo Hunter Green cardstock

Other products used:
PAPER: Background Labs Cloud Digital Background printed on 32# HP copy paper
STAMPS: Keep It Simple Build-A-Birdhouse stamps
INK: Versamark, Memento Cottage Ivy ink
DIES/PUNCHES: Catherine Pooler Home Tweet Home Dies, Keep It Simple Wavy Borders Dies
ACCESSORIES: Fiskars 12″ ProCision Rotary Bypass Paper Trimmer, Bearly Art precision craft glue, My Sweet Petunia Precision Glue Press, Mini MISTI, Big Shot, Scrapbook.com Double-Sided Adhesive Foam Squares, KNC Essentials Enamel Sun; Pergamano Perforating Mat, Eyelet Outlet Cloud/Sun, Cardinal 2, Female Cardinal and Bird Set Brads; Hero Arts White Embossing Powder, Milwaukee Heat Tool, Spellbinders Detail Scissors

I hope you’ve enjoyed today’s project and you’re inspired to get crafty! Be sure to check out all the awesome cardstock and other goodies at CutCardStock (adhesives, labels, stickers, pens, watercolors and ribbon to name a few). And head on over to the CutCardStock Facebook Page and for more inspiration! Also, be sure to join our Creating with CutCardStock Facebook Group for even more crafty inspiration! Thanks so much for stopping by today – we’ll see you next time!

Scrappy hugs,

let it snow

Hey everybody! Can you believe we’re on the down-slide to the end of the year?! Wowzers. Just unbelievable. Our new challenge is live this morning over at Christmas [or not] BINGO Challenges and I’m delighted to share my DT inspiration project for CBC #10 – Anything Goes with Featured BINGO Card. I went with column O this time (purple, pearls and stenciling) and created a pretty mini slimline card featuring what I call the phantom die cutting technique. I’m sure there is a technical name for it but I’m not sure what that is. It’s such a fun technique and really creates a WOW factor. I used the KIS Snowfall Art Stencils and some Ranger distress inks for the background along with the awesome STAMPlorations let it snow die for the phantom die cutting. I totally love how it turned out!

I cut my go-to size mini slim card base of 3-1/2″ x 6″ from Neenah Classic Crest 100# Solar White cardstock along with a layering panel from 80# Solar White. I also cut layering panels from CutCardStock Lessebo Amethyst and Amazon Dark Teal cardstock. Using the KIS Snowfall Art Stencils, Ranger dusty concord, villainous potion and speckled egg distress inks, and some blending brushes I created the background on the 80# Solar White panel. I used the STAMPlorations let it snow die to cut the sentiment into the inked layering panel. I then die cut the sentiment from light aqua craft foam and placed it into the negative space in the layering panel, and then adhered the original die cut one on top. The finishing touch was adding several Eyelet Outlet 5mm purple pearls to accentuate the snowflakes.

I cut the inside panel from Solar White and embellished it with leftover strips of the Lessebo Amethyst and Amazon Dark Teal cardstock on the front. I stamped a sentiment from the Hero Arts Color Layering Holly stamp set in Catherine Pooler Daydream ink, which completed the card.

Affiliate links are used in this post at no cost to you – I really appreciate your support! 

Products used:
CARDSTOCK/PAPER: Neenah Classic Crest 110# and 80# Solar White cardstock, CutCardStock Lessebo Amethyst and Amazon Dark Teal cardstock
STAMPS: Hero Arts Color Layering Holly stamp set
INK: Ranger dusty concord, villainous potion and speckled egg distress inks; Catherine Pooler Daydream ink
DIES/PUNCHES: STAMPlorations let it snow die
ACCESSORIES: Fiskars 12″ ProCision Rotary Bypass Paper Trimmer, Bearly Art precision craft glue, MISTI stamp tool, Big Shot, light aqua craft foam, KIS Snowfall Art Stencils, blending brushes, Hero Arts Sparkle Embossing Powder, Eyelet Outlet 5mm purple pearls

I hope you’ve enjoyed seeing this project and will link up with us this time! We can’t wait to see what you create! Thanks so much for stopping by today – we’ll see you next time! ;)

Scrappy hugs,

Halloween mini slimline

Howdy, peeps! Happy Thursday! I have another ScrapbookingStore DT inspiration project to share today that I created with the October 2024 Scrapbook Kit with Upgrades. I’m thoroughly enjoying all the fun papers and stickers in this month’s collection as well as all the other elements in the upgrades. What an awesome kit! I always love a mini slimline, and this one with an acetate front is super easy and really packs a punch. Although I have to admit that acetate is NOT easy to photograph, lol!

I make my mini slimline cards 3-1/2″ x 6″ which is a legit size to mail through the post office without having to put the card inside a larger envelope. So this card base is 7″ x 6″, scored at 3-1/2″ on the long side, cut from CutCardStock Lessebo Pitch Black cardstock. Next, I cut a piece of clear acetate at 4″ x 6″, scored at 1/2″ on the short side. Finally, I cut a layering panel from a patterned paper in the kit at 3-1/2″ x 6″. I embellished the acetate front with a Halloween banner sticker from the sticker sheet along with several pumpkin stickers and a cat sticker from the upgrades. I added a strip of patterned paper across the bottom for the pumpkins to sit on.

Since the inside panel is a black print, I added an 80# Solar White cardstock signature panel to the back which I embellished with patterned paper strips, a fussy cut sentiment (from a journaling card in the kit) and a pumpkin sticker from the upgrades.

Affiliate links are used in this post at no cost to you – I really appreciate your support!

ScrapbookingStore products used:
October 2024 Scrapbook Kit with Upgrades:
Echo Park Halloween Magic Collection Kit
Upgrades: Brianna Nicole Designz Spooky Realm Stickers
The Paper Studio Pumpkin Stick-A-Bilities
Recollections Black Alpha Stickers

Other products used:
CARDSTOCK/PAPER: CutCardStock Lessebo Pitch Black cardstock, Neenah Classic Crest 80# Solar White cardstock
ACCESSORIES: Fiskars 12″ ProCision Rotary Bypass Paper Trimmer, My Sweet Petunia Precision Glue Press, Nuvo Deluxe Adhesive, Grafix Crystal Clear Craft Plastic, 1/2″ and 1/8″ red liner tape

I hope you’ve enjoyed today’s project and you’re thinking about all the fun you could have with this month’s kit… you really ought to think about joining the Subscription Club! Be sure to Follow us on Facebook, Instagram, Pinterest and YouTube for lots of crafty inspiration! And if you do decide to join the Subscription Club, join our ScrapbookingStore Club Member Group on Facebook for more inspiration and to share your projects! Thanks so much for stopping by today – we’ll see you next time!

Scrappy hugs,

I {heart} School

Hey everybody! I hope you’re having a fabulous week! First of all, prayers going out to friends and family in Florida (where I grew up) and actually to everyone in the path of Hurrcane Milton. May God be with you. I’m delighted to be back with another Keep It Simple DT inspiration project to share today. This slimline shaker card was created with papers, stamps, dies and die cut pieces from our Love To Learn Collection that was released in August. I used our new KIS Slimline Cuts Stitched Square die for the shaker frame and quite a variety of our Sprinkles for the shaker bits. And I even threw a few stamped and die cut images in with the shaker bits for a little interest.

I cut my go-to 3-3/4″ x 9″ slimline card base from Neenah Classic Crest 110# Solar White cardstock along with layering panels from CutCardStock Pop Tone Black Licorice and coordinating papers in the Love To Learn 12×12 Collection Pack. I used acetate and 4-mm adhesive foam from our Back To Basics Shaker Basics along with our new KIS Slimline Cuts Stitched Squares die to create the shaker. I stamped a few images from the Collection Stamps, colored them with alcohol markers, and cut them with the Outline Dies. I filled the shaker with these die cuts and a variety of our Sprinkles. The finishing touch was adding a few blue and white enamel stars from the Stars & Stripes Enamel Stars along with a stamped sentiment that I fussy cut.

I cut the inside panel from 80# Solar White and embellished it with leftover pieces of the papers used on the front. I added some stars from the Die Cut Pieces along with a stamped sentiment, and layered the panel on CutCardStock Lessebo Misty Blue cardstock.

Keep It Simple products used:
Love To Learn 12×12 Collection Pack
Love To Learn Collection Stamps
Love To Learn Outline Dies
Love To Learn Die Cut Pieces
KIS Slimline Cuts Stitched Squares
Back To Basics Stars & Stripes Enamel Stars
Back To Basics Shaker Basics
Sprinkles – Beads-2mm Green Caviar Glass
Sprinkles – Beads-2mm Light Blue Caviar Glass
Sprinkles – Beads-2mm White Pearls
Sprinkles – Beads- 2mm Matte Red
Sprinkles – Beads-2mm Matte Green
Sprinkles – Polymer Clay-Yellow Dots
Sprinkles – Polymer Clay-Back To School Mix
Sprinkles – Polymer Clay-Baby Blue Hearts
Sprinkles – Polymer Clay-Grass Green Sprinkles
Sprinkles – Polymer Clay-Numbers

Affiliate links are used in this post at no cost to you – I really appreciate your support!

Other products used:
CARDSTOCK/PAPER: Neenah Classic Crest 110# and 80# Solar White cardstock, CutCardStock Lessebo Misty Blue and Pop Tone Black Licorice cardstock
INK: Memento Tuxedo Black ink; Spectrum Noir Tri-Blends- JG1/2/3/5, DR1/3/4, IG2/4/5, BT3/4/5, CT1/2/3
ACCESSORIES: Fiskars 12″ ProCision Rotary Bypass Paper Trimmer, Bearly Art precision craft glue, MISTI stamp tool, Big Shot, thin 1-mm foam adhesive squares, red liner tape

I hope you’ve loved seeing this project as much as I loved creating it and you’re inspired to get crafty! Be sure to check out ALL the fun goodies in the Keep It Simple online store! Save 10% on your entire order when you shop online using code LoveToScrap2 at checkout! There is no minimum purchase requirement and no usage limits, AND it combines with product, order, and shipping discounts! Is that cool, or what?! Be sure to Follow us on Facebook, Instagram, and Pinterest for lots of crafty inspiration! Thanks so much for stopping by today – we’ll see you next time!

Scrappy hugs,

Kick Up Your Heels

Hey everybody, Happy Thursday! I’ve popped in this morning with a Pajama Crafter Stamps project created with the awesome Prickley Pear Stamps Kokopelli-Happy Birthday stamps and die which I paired with the Nesting Tag die set (also from Prickley Pear Stamps). This is another project I created prior to leaving the team at the end of February and hadn’t yet showcased. I totally LOVE this stamp set and see lots of possibilities creating with it! This mini slimline in B&W with gray tones featuring a tag on the front was really fun putting together.

The 3-1/2″ x 6″ mini slimline card base was cut from CutCardStock Cougar 100# Smooth White cardstock along with layering panels from CutCardStock Lessebo Pitch Black cardstock and a brick print in the The Paper Studio Entirely Textures 2 12×12 paper pad. Using the Nesting Tag die set, I cut tags from the Cougar and Pitch Black cardstock.

I stamped the images from the Kokopelli-Happy Birthday stamp set in Memento Tuxedo Black ink on a Cougar scrap and cut one of them with the coordinating die and trimmed the other in a strip which I embellished with Eyelet Outlet skinny gold washi tape. I threaded some Really Reasonable Ribbon black and white gingham ribbon through the tag holes and added some Taylored Expressions Gold Drip Drops. I stamped an additional sentiment on the inside which completed the project.

Affiliate links are used in this post at no cost to you – I really appreciate your support!

Pajama Crafter Stamps products used:
Prickley Pear Stamps Kokopelli-Happy Birthday stamp set
Prickley Pear Stamps Kokopelli-Happy Birthday Die
Prickley Pear Stamps Nesting Tag Dies

Other products used:
CARDSTOCK/PAPER: CutCardStock Cougar 100# Smooth White and Lessebo Pitch Black cardstock, The Paper Studio Entirely Textures 2 12×12 paper pad
INK: Hero Arts Unicorn ink, Memento Tuxedo Black ink
ACCESSORIES: Fiskars 12″ ProCision Rotary Bypass Paper Trimmer, Elmer’s Craft Bond Tape Runner, Bearly Art precision craft glue, MISTI stamp tool, Big Shot, Hero Arts White Embossing Powder, Milwaukee heat tool, Therm O Web medium Zots, Really Reasonable Ribbon black and white gingham ribbon, Eyelet Outlet skinny gold washi tape, Taylored Expressions Gold Drip Drops

I hope you’ve enjoyed this project! Be sure to check out all the awesome stamps, dies and other goodies at Pajama Crafter Stamps which is the new home of the Prickley Pear Stamps brand and the Pajama Crafter Stamps line! Keep up with news and sales by following Pajama Crafter Stamps on Facebook, Instagram and Pinterest, and join Pajama Crafter Stamps & Friends for lots of fun crafty ideas and to share your creativity! And finally, be sure to visit the Pajama Crafter Stamps blog and sign up for the newsletter to stay in touch! Thanks so much for stopping by today – we’ll see you next time! ;)

Scrappy hugs,

MOM slimline card

Hey everybody! Happy Tuesday! I’ve popped in this morning with a Keep It Simple DT inspiration project featuring our new KIS Slimline Cuts Stitched Hearts die, some gorgeous floral paper from the new Belle Collection and our new KIS Cuts Twinkling Stars Font Outline Dies. This card has some fussy-cut roses popped up on foam squares and could easily be used for Mother’s Day or Mom’s birthday!

My go-to size 3-3/4″ x 9″ slimline card base was cut from CutCardStock Cougar Smooth 100# White cardstock along with layering panels from CutCardStock Bright Gold Foil and Lessebo Dawn Maroon cardstock. I cut the top layering panel from a floral paper in the Belle Collection using the KIS Slimline Cuts Stitched Hearts die.

I fussy cut four rose clusters which I popped up on foam squares and then added the word MOM cut from the gold foil cardstock using the KIS Cuts Twinkling Stars Font Outline Dies. The finishing touch was adding several pearls from the Kat Scrappiness Gold Pear Mix.

I cut the inside panel from Cougar Smooth 80# White cardstock and embellished it with strips of the floral paper from the Belle Collection and the Dawn Maroon cardstock. I stamped a sentiment using the Back To Basics Birthday Sentiments stamp set in Memento Paris Dusk ink.

Keep It Simple products used:
KIS Slimline Cuts Stitched Hearts
KIS Cuts Twinkling Stars Font Outline Dies
Belle: Once Upon A Time 12×12 Collection Pack
Back To Basics Birthday Sentiments stamp set

Affiliate links are used in this post at no cost to you – I really appreciate your support!

Other products used:
CARDSTOCK/PAPER: CutCardStock Cougar Smooth 100# White, Cougar Smooth 80# White, Lessebo Dawn Maroon and Bright Gold Foil cardstock
INK: Memento Rich Cocoa marker, Memento Paris Dusk ink
ACCESSORIES: Fiskars 12″ ProCision Rotary Bypass Paper Trimmer, Elmer’s Craft Bond Tape Runner, Bearly Art precision craft glue, MISTI stamp tool, Big Shot, Scrapbook Adhesives 3D Foam Squares (small white), Kat Scrappiness Gold Pear Mix

I hope you’ve loved seeing this project as much as I loved creating it and you’re inspired to get crafty! Be sure to check out ALL the fun goodies in the Keep It Simple online store! Save 10% on your entire order when you shop online using code LoveToScrap2 at checkout! There is no minimum purchase requirement and no usage limits, AND it combines with product, order, and shipping discounts! Is that cool, or what?! Be sure to Follow us on Facebook, Instagram, and Pinterest for lots of crafty inspiration! Thanks so much for stopping by today – we’ll see you next time!

Scrappy hugs,

Happy Holidays shaker

Hey everybody! I hope you’ve had a great week! It’s turning out to be a busy Friday morning on my blog! I have a super fun Keep It Simple DT inspiration project to share featuring our new line of Sprinkles. With this feature comes an awesome promo… buy three Sprinkles items and get one free! We have beads, polymer clay, crushes, glitter, rhinestones and sequins… choose from many styles and occasions! And remember to use my code LoveToScrap2 for 10% off your entire order! There is no minimum purchase requirement and no usage limits, AND it combines with product, order, and shipping discounts! Pop over to the Keep It Simple Instagram Page for a fun Hop and Giveaway!

I created an adorable mini slimline shaker card with papers, stamps and dies from our Scandinavian Christmas Collection as well as beads, polymer clay and sequins from our Sprinkles line! I used our new KIS Slimline Cuts Stitched Squares die to cut the shaker apertures. The colors in the Scandinavian Christmas Collection are non-traditional Christmas colors and I love that! I used tulle for the shaker this time rather than acetate. This was just a fun card all the way around!

The 3-1/2″ x 6″ mini slimline card base was cut from Neenah Classic Crest 110# Solar White cardstock along with layering panels from coordinating papers in the Scandinavian Christmas 12×12 Cardstock and Collection Packs. Using the KIS Slimline Cut Stitched Squares die, I cut two apertures in the snowflake patterned paper, adhered tulle on the back side, and added some GKD Shaker Strips.

I stamped the gnome and birds from the Gnomes Collection Stamps in Memento Tuxedo Black ink on 80# Solar White cardstock, colored them with alcohol markers, and cut them with the coordinating Gnomes Outline Dies. I then stamped the snowflake and sentiment in Catherine Pooler Over Coffee ink, cut the snowflake with the coordinating outline die and fussy cut the sentiment.

I added Iridescent Snowflake Sequins, Brown Polymer Clay Dots, White Polymer Clay Hearts, 2mm Matte Red Beads, Candy Cane Red & White Polymer Clay Christmas Mix and Red Peppermint & Chocolate Polymer Clay Mix – all from the new Sprinkles line. I sealed the shaker and adhered the elements to the card front.

I cut the inside panel from 80# Solar White cardstock and embellished it with a leftover strip of the snowflake paper used on the front. I stamped an additional sentiment from the Gnomes Collection Stamps in the brown ink which completed the card.

Keep It Simple products used:
KIS Slimline Cuts Stitched Squares
Scandinavian Christmas 12×12 Cardstock Pack
Scandinavian Christmas 12×12 Collection Pack
Scandinavian Christmas Gnomes Collection Stamps
Scandinavian Christmas Gnomes Outline Dies
KIS Sprinkles Iridescent Snowflake Sequins
KIS Sprinkles Brown Polymer Clay Dots (coming soon)
KIS Sprinkles White Polymer Clay Hearts
KIS Sprinkles 2mm Matte Red Beads
KIS Sprinkles Candy Cane Red & White Polymer Clay Christmas Mix
KIS Sprinkles Red Peppermint & Chocolate Polymer Clay Mix

Affiliate links are used in this post at no cost to you – I really appreciate your support!

Other products used:
CARDSTOCK/PAPER: Neenah Classic Crest 110# Solar White cardstock
INK: Catherine Pooler Over Coffee ink; Spectrum Noir Tri-Blends- TB5/6/9, DR5/6/7, FS6/7/8, TN1/2/4, BG2/3/4; Memento Tuxedo Black ink
ACCESSORIES: Fiskars 12″ ProCision Rotary Bypass Paper Trimmer, Elmer’s Craft Bond Tape Runner, Bearly Art precision craft glue, MISTI stamp tool, Big Shot, ivory tulle, red liner tape, GKD Shaker Strips, Scrapbook Adhesives 3D Foam Squares (small white)

I hope you’ve loved seeing this project as much as I loved creating it and you’re inspired to get crafty! Be sure to check out ALL the fun goodies in the Keep It Simple online store! Be sure to Follow us on Facebook, Instagram, and Pinterest for lots of crafty inspiration! Thanks so much for stopping by today – we’ll see you next time!

Scrappy hugs,

congrats on your new nest

Hi friends! Happy Sunday – I hope you’re having a fabulous weekend and it’s warming up a bit where you are! I’m thrilled to share another Keep It Simple DT inspiration project with you today. This fun new home mini slimline card features dies and stamps from our new Build-A-House Collection! I can’t stop raving about all the products in this collection – from the basic build-a-house dies to all the fun add-on birdhouse, cathouse and doghouse dies and stamps! So much fun! I also used the weathered brick background stamp and quite a variety of Back To Basics 6×9 Collection Packs to create the colorful birdhouse scene. The colors in these paper packs are so bold and inviting, and definite must-haves for your paper stash!

I cut my go-to size mini slimline card base (3-1/2″ x 6″) from Neenah Classic Crest 110# Solar White cardstock along with layering panels from 80# Solar White and a paper from the Rose 6×9 Collection Pack. I stamped the brick background on the 80# Solar white panel in Catherine Pooler Twilight ink using the Weathered Brick Background Stamp.

I used the KIS Cuts Build-A-House and KIS Cuts Build-A-Birdhouse to cut the birdhouse, birds, nest and flowers from all the different papers from the Rose, Royal, Jade, Lilac, Lemon and Mango 6×9 Collection Packs along with the Farmhouse 6×9 Collection Pack, Neenah Classic Crest Solar White and CutCardStock Silk Glitter Opulent Opal.

As I always say about projects like these – the assembly is the most fun! The finishing touch on the front was adding a sentiment stamped in Memento Tuxedo Black ink from the KIS Stamps Build-A-Birdhouse which I cut into a flag.

I cut the inside panel from 80# Solar White and embellished it with a leftover strip of the stamped brick background on the front. I stamped another sentiment from the KIS Stamps Build-A-Birdhouse in black ink and layered the panel on another paper from the Rose 6×9 Collection Pack.

Sharing in the following challenges:
1.https://classicdesignchallenge.blogspot.com/2024/03/classic-design-challenge-03-2024-marapr.html
2.https://craftycatzweeklychallenge.blogspot.com/2024/03/crafty-catz-challenge-668.html
3.https://mytimetocraftchallenge.blogspot.com/2024/03/mttc-530-theme-is-multi-colored-florals.html

Keep It Simple products used:
KIS Cuts Build-A-House
KIS Cuts Build-A-Birdhouse
KIS Stamps Build-A-Birdhouse
Weathered Brick 6×6 Background Stamp
Back To Basics Rose 6×9 Collection Pack
Back To Basics Royal 6×9 Collection Pack
Back To Basics Jade 6×9 Collection Pack
Back To Basics Lilac 6×9 Collection Pack
Back To Basics Lemon 6×9 Collection Pack
Back To Basics Mango 6×9 Collection Pack
Farmhouse Fall 6×9 Collection Pack
Back To Basics Stitched Circles Nested Dies

Affiliate links are used in this post at no cost to you – I really appreciate your support!

Other products used:
CARDSTOCK/PAPER: Neenah Classic Crest 110# and 80# Solar White cardstock, CutCardStock Silk Glitter Opulent Opal 12×12 cardstock
INK: Memento Tuxedo Black ink, Catherine Pooler Twilight ink
ACCESSORIES: Tonic Studios 12″ Guillotine Paper Trimmer, Tombow Mono Dots Adhesive, Bearly Art precision craft glue, MISTI stamp tool, Big Shot, 1/4″ double-sided foam strip

I hope you’ve loved seeing this project as much as I loved creating it and you’re inspired to get crafty! Be sure to check out ALL the fun goodies in the Keep It Simple online store! Save 10% on your entire order when you shop online using code LoveToScrap2 at checkout! There is no minimum purchase requirement and no usage limits, AND it combines with product, order, and shipping discounts! Is that cool, or what?! Be sure to Follow us on Facebook, Instagram, and Pinterest for lots of crafty inspiration! Thanks so much for stopping by today – we’ll see you next time!

Scrappy hugs,