Fa-la-la slimline

Howdy, peeps! I hope you’ll have an awesome Monday! I’m popping in this morning with a Keep It Simple DT inspiration project featuring one of the stamp sets in the new Bizzy Hands Collection just released a few weeks ago! OMGoodness, there are so many stamp sets in this collection to choose from – you’ll want them all! You undoubtedly know that I enjoy creating Christmas projects all year long so I chose the super adorable Christmas Gnomes for this slimline shaker. I also used the new Slimline Cuts Stitched Squares die and an assortment of our new polymer clay and sequins in the Sprinkles line. There’s nothing more fun than a trio of gnome dudes on a shaker! I just can’t get enough of these fun new products!

I cut my go-to slimline size card base (3-3/4″ x 9″) from CutCardStock 100# Cougar Smooth White cardstock along with a green layering panel from a paper in the Bunny Season 6×9 Collection Pack and two layering panels from papers in the Ruby 12×12 Collection Pack. I used the new Slimline Cuts Stitched Squares die to cut the shaker panel from one of the red layering panels. I stamped some musical notes from the Christmas Gnomes stamp set on the shaker panel in Memento Tuxedo Black ink and the gnomes in Memento Espresso Truffle ink on 80# Cougar Smooth White which I colored with alcohol markers and added some accents with a Sakura Clear Star Gelly Roll pen. I fussy cut the gnomes and edged them with a Memento Rich Cocoa marker.

I stamped two sentiments in Memento Tuxedo Black ink from the Christmas Gnomes stamp set on the back panel of the shaker. I used Grafix Crystal Clear Craft Plastic and 1/2″ double-sided foam strips to create the shaker. Then I added Polymer Clay-Candy Cane Red & White Christmas Mix, Polymer Clay-Mouse Christmas Mix and Sequins-Iridescent Snowflakes from the new Sprinkles line for the shaker bits! I adhered the stamped gnomes and added several Jade Enamel Dots.

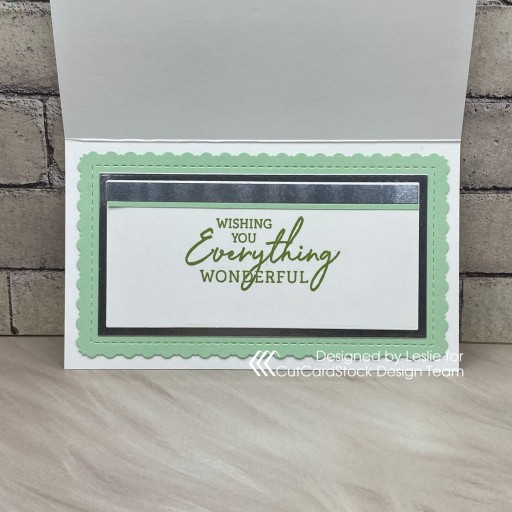
I cut the inside panel from 80# Cougar Smooth White cardstock and embellished it with a wide strip of paper from the Ruby Collection Pack. I stamped a sentiment from the Scandinavian Christmas Gnomes stamps in Tuxedo Black ink and layered the panel on an additional paper from the Ruby Collection Pack.

Sharing in the following challenges:
1. https://aperfecttimetocraft.blogspot.com/2024/03/a-perfect-time-to-craft-open-challenge.html
2. https://hereisaplacetostart.blogspot.com/2024/03/march-2024-anything-goes-woptional.html
3. https://classicdesignchallenge.blogspot.com/2024/03/classic-design-challenge-03-2024-marapr.html
4. https://pennyschallenges.blogspot.com/2024/03/pennys-challenge-567.html
5. https://cinspirations.blogspot.com/2024/03/march-challenge-anything-goes.html

Keep It Simple products used:
Bizzy Hands Christmas Gnomes stamps
Slimline Cuts Stitched Squares die
Sprinkles Polymer Clay-Candy Cane Red & White Christmas Mix
Sprinkles Polymer Clay-Mouse Christmas Mix
Sequins-Iridescent Snowflakes
Back To Basics Ruby 12×12 Collection Pack
Bunny Season 6×9 Collection Pack
Scandinavian Christmas Gnomes stamps
Back To Basics Jade Enamel Dots

Affiliate links are used in this post at no cost to you – I really appreciate your support!

Other products used:
CARDSTOCK/PAPER: CutCardStock Cougar Smooth 100# White, Cougar Smooth 80# White
INK: Memento Espresso Truffle and Tuxedo Black inks; Spectrum Noir Tri-Blends- DR1/3/4/5/6/7, IG2/4/5, FS6/7/8, GB1/3/5, TB2/3/4, LY1/2/3, GY2/3/5, LG1/3/5, EB5/6/7; Sakura Clear Star Gelly Roll pen, Memento Rich Cocoa marker
ACCESSORIES: Fiskars 12″ ProCision Rotary Bypass Paper Trimmer, Elmer’s Craft Bond Tape Runner, Bearly Art precision craft glue, MISTI stamp tool, Big Shot, 1/2″ double-sided foam strips, Grafix Crystal Clear Craft Plastic, red liner tape

I hope you’ve loved seeing this project as much as I loved creating it and you’re inspired to get crafty! Be sure to check out ALL the fun goodies in the Keep It Simple online store! Save 10% on your entire order when you shop online using code LoveToScrap2 at checkout! There is no minimum purchase requirement and no usage limits, AND it combines with product, order, and shipping discounts! Is that cool, or what?! Be sure to Follow us on Facebook, Instagram, and Pinterest for lots of crafty inspiration! Thanks so much for stopping by today – we’ll see you next time!

Scrappy hugs,

faith over fear

Hi everyone! A big ol’ Happy Thursday to you! Another week almost gone! I’m up on the CutCardStock blog today with a tutorial for making a motivational mini slimline card featuring Moss Green, Sweet Mint and White cardstock from our new Lessebo line! This line has replaced the Basis cardstock (which was one of my favorites) and it couldn’t be any better… great weight, great colors and just a great cardstock all around. I also pulled out a pretty rubber stamp that I’ve had for a minute and hadn’t gotten around to using yet.

I cut the 3-1/2″ x 6″ mini slimline card base from Lessebo Moss Green and a layering panel from Lesseo Sweet Mint cut with a Kat Scrappiness Mini Slimline Stitched Rope Die. I stamped the Stampendous Mini Sweet Rose Jar directly on the Sweet Mint panel, colored it with alcohol markers and adhered it to the card base. I stamped the sentiment from the Stampin’ Up Charming Sentiments stamp set in Memento Tuxedo black ink on Sweet Mint and cut it with the coordinating Stampin’ Up Sentiment Silhouette die. The finishing touch was adding several Eyelet Outlet 4mm purple pearls.

I embellished the inside Lessebo White panel with a frame cut from Sweet Mint using two Kat Scrappiness Mini Slimline Stitched Rope Dies. I stamped another sentiment from the Stampin’ Up Charming Sentiments stamp set on a Lessebo White scrap in Tuxedo Black ink and cut it with the coordinating Stampin’ Up Sentiment Silhouettes die.

Sharing in the following challenges:
1. https://hereisaplacetostart.blogspot.com/2024/02/february-2024-monochrom-you-pick-palette.html
2. https://classicdesignchallenge.blogspot.com/2024/02/classic-design-challenge-02-2024-febmar.html

Affiliate links are used in this post at no cost to you – I really appreciate your support!

CutCardStock products used:
Lessebo Moss Green cardstock
Lessebo Sweet Mint cardstock
Lessebo White cardstock

Other products used:
STAMPS: Stampendous Mini Sweet Rose Jar stamp, Stampin’ Up Charming Sentiments stamp set
INK: Memento Tuxedo Black ink; Arteza alcohol markers- YR17, YG17/46, PB16, GS09, GB08
DIES/PUNCHES: Mini Slimline Stitched Rope Dies, Stampin’ Up Sentiment Silhouettes dies
ACCESSORIES: Fiskars 12″ ProCision Rotary Bypass Paper Trimmer, Elmer’s Craft Bond Tape Runner, Bearly Art precision craft glue, MISTI stamp tool, Big Shot, Eyelet Outlet 4mm purple pearls

I hope you’ve enjoyed today’s project and you’re inspired to get crafty! Be sure to check out all the awesome cardstock and other goodies at CutCardStock (adhesives, labels, stickers, pens, watercolors and ribbon to name a few). And head on over to the CutCardStock Facebook Page and for more inspiration! Also, be sure to join our Creating with Card Stock Facebook Group for even more crafty inspiration! Thanks so much for stopping by today – we’ll see you next time!

Scrappy hugs,

You Don’t Look a Day over Fabulous

Hi friends! I hope you had a fabulous New Year’s Eve and you’re ready to embrace 2024! Our new challenge is live this morning over at the newly restructured and renamed Christmas [or not] BINGO Challenges formerly known as Christmas BINGO Challenges. We’re no longer strictly a Christmas challenge… we’ve opened up our challenges to ALL occasions which means you are welcome to create a project for ANY holiday, season or occasion using the featured BINGO card. I’m thrilled to share my inspiration project for ConBC #5 – Anything Goes with Featured BINGO Card – I went with Column O this time and featured layers, stitching and rectangle on this birthday card. I used a variety of dies for a tone-on-tone look with a splash of color, and I love how it turned out!

The 3-1/2″ x 6″ mini slimline card base and two mini slimline layers (using the Kat Scrappiness Mini Slimline Postage Stamp Edge Dies and Mini Slimline Quilted Backdrop Die) were cut from Neenah Classic Crest 80# Solar White cardstock. I also stamped the sentiment from the My Favorite Things Sassy Pants Birthday Greetings 3 stamp set on Solar White, fussy cut it and set it aside. I used the Spellbinders Artful Tulip die set and a variety of CutCardStock Lessebo, Pop Tone and foil cardstock to create the focal image on this card. The finishing touch was adding Want2Scrap white pearls to the background.

The inside panel was cut from Solar White cardstock using a Mini Slimline Postage Stamp Edge Die. I stamped another sentiment from the My Favorite Things Sassy Pants Birthday Greetings 3 stamp set, and added a leftover tulip from the focal image on the front.

Sharing in the following challenges:
1. A Perfect Time To Craft Open Challenge: January #1-2024 – Anything Goes
2. A Place To Start: January 2024 – Anything Goes w/ optional Gatefold Card (no twist)
3. Classic Design Challenge: December #12 – Anything Goes
4. Cut It Up Challenges: #294 – Anything Goes
5. The Crafter’s Cafe Challenge Blog: #303- Feminine

Affiliate links are used in this post at no cost to you – I really appreciate your support! 

Products used:
CARDSTOCK/PAPER: CutCardStock Lessebo White, Lessebo Pitch Black, Lessebo Granite Gray, Lessebo Flame Orange, Lessebo Sunflower Yellow, Lessebo Cherry Red, Pop Tone Jellybean Green, Pop Tone Gumdrop Green and Bright Silver Foil, Neenah Classic Crest 80# Solar White cardstock
STAMPS: My Favorite Things Sassy Pants Birthday Greetings 3 stamp set
INK: Memento Tuxedo Black ink
DIES/PUNCHES: Spellbinders Artful Tulip die set; Kat Scrappiness Mini Slimline Postage Stamp Edge Dies and Mini Slimline Quilted Backdrop Die
ACCESSORIES: Tonic Studios 12″ Guillotine Paper Trimmer, Tombow Mono Dots adhesive, Bearly Art precision craft glue, MISTI stamp tool, Big Shot, 1/4″ double-sided foam strip, Want2Scrap white pearls

I hope you’ve enjoyed seeing this project and will link up with us this time! Remember, we’ve opened up our challenges to all occasions using the featured BINGO card, so come on over and play! Thanks so much for stopping by today – we’ll see you next time! ;)

Scrappy hugs,

Awesome Boys Rule

Hi friends! I’m having a really hard time wrapping my head around how fast 2023 went! Wishing all my online friends a happy and prosperous 2024! Our new challenge is live this morning over at Love To Craft Challenge Blog and I’m delighted to share my DT inspiration project for LTCCB #78 – Anything Goes! I’ve made several of these chocolate bar cards and I always love how they turn out! I used a brown paper in the Keep It Simple Farmhouse Fall Collection because it was the perfect shade of brown for the chocolate bar. I also used a plaid paper and stickers from the Keep It Simple Boys Boys Boys Collection. This collection is on clearance and has been deeply discounted. If you are inclined to go shopping, be sure to use my discount code LoveToScrap2 at checkout to save 10% on your entire order! There is no minimum purchase requirement and no usage limits, plus the code combines with product, order, and shipping discounts!

The 3-1/2″ x 6″ mini slimline card base was cut from Neenah Classic Crest 80# Solar White cardstock. The chocolate bar was created using square punches and a brown print in the Keep It Simple Farmhouse Fall Collection. I ran a BR52 alcohol marker around the edge of each of the chocolate bar squares. The plaid layering panel and stickers are from the Keep It Simple Boys Boys Boys Collection and I used CutCardStock Bright Gold Foil cardstock for the wrapper under the plaid.

The inside panel was cut from Solar White and embellished with a leftover strip of the plaid paper used on the front. I stamped the sentiment from the Keep It Simple Birthday Sentiments stamp set in Memento Rich Cocoa ink and layered the panel on the brown paper used for the chocolate bar.

Sharing in the following challenges:
1. A Perfect Time To Craft Open Challenge: January #1-2024 – Anything Goes
2. A Place To Start: January 2024 – Anything Goes w/ optional Gatefold Card (no twist)
3. AAA Birthday: Game #57 – Rainbow or Use Rainbow Colors

4. Classic Design Challenge: December #12 – Anything Goes
5. Crafts Galore Encore Challenge Blog: #119 – Anything Goes

Affiliate links are used in this post at no cost to you – I really appreciate your support! 

Products used:
CARDSTOCK/PAPER: Neenah Classic Crest 80# Solar White cardstock, CutCardStock Bright Gold Silver cardstock, Keep It Simple Farmhouse Fall and Boys Boys Boys Collections
STAMPS: Keep It Simple Birthday Sentiments stamp set
INK: Memento Rich Cocoa ink; Arteza BR52 alcohol marker
DIES/PUNCHES: EK Success 3/4″ and 1″ square punches
ACCESSORIES: Tonic Studios 12″ Guillotine Paper Trimmer, Tombow Mono Dots adhesive, Bearly Art precision craft glue, MISTI stamp tool, Scrapbook Adhesives 3D Foam Squares Variety Pack (large black)

I hope you’ve enjoyed seeing this project and will link up with us this time! Thanks so much for stopping by today – we’ll see you next time! ;)

Scrappy hugs,

Congratulations mini slimline

Hi everyone! Happy Wednesday – I hope you’re having a fabulous week so far! I’m up on the CutCardStock blog today with a tutorial for making a tiled Congratulations mini slimline. I used several colors of our Pop Tone cardstock along with Silver Foil and Solar White cardstock. I’ve had the Spellbinders Color Block Mini Inverted Squares dies in my stash for a minute and decided it was time to use them!

My mini slimline size is 3-1/2″ x 6″ and the card base was cut from Neenah Classic Crest 80# Solar White. I used the Kat Scrappiness Mini Slimline Fancy Scalloped Dies along with the Waffle Flower Mini Slimline Layers for the layering panels.

The tiles were created with the Spellbinders Color Block Mini Inverted Squares dies, cut from Pop Tone Spearmint, Gumdrop Green, Jellybean Green, Cotton Candy and Razzleberry along with Bright Silver Foil. The sentiment is from Stampin’ Up Charming Sentiments stamps, stamped in Memento Bamboo Leaves ink, and cut with the coordinating Stampin’ Up Sentiment Silhouettes dies. The embellishments are from Kat Scrappiness Silver Pearl Mix.

The inside is pretty similar to the front with another sentiment from the Stampin’ Up Charming Sentiments stamps.

Sharing in the following challenges:
1. A Perfect Time To Craft Open Challenge: #11-2023 – Anything Goes
2. A Place To Start: November 2023 – Anything Goes w/ optional Something for a Child
3. Classic Design Challenge: November #11 – Anything Goes
4. Crafty Catz: #659 – Anything Goes w/ optional 3 Favorite Colors

Affiliate links are used in this post at no cost to you – I really appreciate your support!

CutCardStock products used:
Neenah Classic Crest 80# Solar White cardstock
Pop Tone Spearmint cardstock
Pop Tone Gumdrop Green cardstock
Pop Tone Jellybean Green cardstock
Pop Tone Cotton Candy cardstock
Pop Tone Razzleberry cardstock
Bright Silver Foil cardstock
Neenah Classic Crest DTC 165# Solar White cardstock

Other products used:
STAMPS: Stampin’ Up Charming Sentiments stamps
INK: Memento Bamboo Leaves ink
DIES/PUNCHES: Kat Scrappiness Mini Slimline Fancy Scalloped Dies, Waffle Flower Mini Slimline Layers, Spellbinders Color Block Mini Inverted Squares dies, Stampin’ Up Sentiment Silhouettes dies
ACCESSORIES: Tonic Studios 12″ Guillotine Paper Trimmer, Gina K Designs Adhesive Dot Runner, Bearly Art precision craft glue, MISTI stamp tool, Big Shot, Kat Scrappiness Silver Pearl Mix, 1/2″ double-sided foam strip

I hope you’ve enjoyed today’s project and you’re inspired to get crafty! Be sure to check out all the awesome cardstock and other goodies at CutCardStock (adhesives, labels, stickers, pens, watercolors and ribbon to name a few). And head on over to the CutCardStock Facebook Page and for more inspiration! Also, be sure to join our Creating with Card Stock Facebook Group for even more crafty inspiration! Thanks so much for stopping by today – we’ll see you next time!

Scrappy hugs,

NOEL mini slimline

Hi friends! Happy Wednesday – I hope you’re having a wonderful week! I’m up on the Prickley Pear Stamps blog today with an inspiration project featuring the beautiful Christmas Trees 2 stamps and Tree die! There are SO many options for creating pretty projects with these stamps! I chose to do a tone-on-tone mini slimline using the trees to spell out NOEL, and I love how it turned out! I spritzed some Let’s Resin Chameleon Powder mixed with water in a Mini Mister over the white heat embossed trees just to give them a little color!

I cut my go-to 3-1/2″ x 6″ size mini slimline card base from Neenah Classic Crest 110# Solar White cardstock along with a three-layer die cut frame (using the Kat Scrappiness Mini Slimline Tri-Frame Dies) from CutCardStock Stardream Metallic Eris cardstock. I reserved the inner portion of one of the frame die cuts to put back into the center when assembling the card front. I stamped one of the trees four times on Eris cardstock and heat embossed them with Hero Arts White Embossing Powder using my Milwaukee Heat Tool.

I spritzed some Let’s Resin grape Chameleon Powder mixed with water in a Ranger Mini Mister over the white heat embossed trees and then once dry added the N-O-E-L letters cut from Eris cardstock using the Waffle Flower Bold Alpha Dies. I adhered the trees to the card front using 1/2″ double-sided foam strips and added several gemstones from the Trinity Stamps Sparkling Sapphire Embellishment Mix using my Trinity Pick Up Stick.

Sharing in the following challenges:
1. 613 Avenue Create: November 2023 – Anything Goes w/ optional Embossing
2. A Perfect Time To Craft Open Challenge: #11-2023 – Anything Goes
3. Alphabet Challenge Blog: Q is for Quadruple Shapes or Images
4. Classic Design Challenge: November #11 – Anything Goes
5. Fab ‘n’ Funky Challenges: #584 – Blue Hues
6. If You Give A Crafter A Cookie: #186 – November White
7. Jan’s Digi Stamps Challenge: November/December Anything Goes

Affiliate links are used in this post at no cost to you – I really appreciate your support!

Prickley Pear Stamps products used:
Christmas Trees 2 stamp set
Tree die

Other products used:
CARDSTOCK/PAPER: Neenah Classic Crest 110# Solar White cardstock, CutCardStock Stardream Metallic Eris cardstock
INK: Versamark
DIES/PUNCHES: Kat Scrappiness Mini Slimline Tri-Frame Dies, Waffle Flower Bold Alpha Dies
ACCESSORIES: Tonic Studios 12″ Guillotine Paper Trimmer, Gina K Designs Adhesive Dot Runner, Bearly Art precision craft glue, MISTI stamp tool, Big Shot, Hero Arts White Embossing Powder, Milwaukee Heat Tool, Let’s Resin grape Chameleon Powder, Ranger Mini Mister, 1/2″ double-sided foam strip, Trinity Stamps Sparkling Sapphire Embellishment Mix, Trinity Pick Up Stick

I hope you’ve enjoyed this project! Be sure to check out all the awesome stamps and dies at Prickley Pear Stamps! Save 10% on anything on the site when you shop at Prickley Pear Stamps by using coupon code LESLIE10 at checkout! And be sure to ‘like’ and ‘follow’ the Prickley Pear Stamps Facebook page to keep up with news and sales, and join Prickley Pear Pals (the fan group) for lots of fun crafty ideas and to share your creativity! And finally, we’d love to see you visit the Prickley Pear Stamps blog and become a Follower! Hope to see you there! Thanks so much for stopping by today – we’ll see you next time! ;)

Scrappy hugs,

let it snow

Hey everybody! We had our first snow of the season a couple days ago but it wasn’t much and all melted away! We’re just a mere 6-7 (ish) weeks from Christmas, so are you getting ready?! I’ve been making Christmas cards all year long and I’m still making them! I’m up on the Prickley Pear Stamps blog today with another inspiration project featuring the beautiful Ornaments 2 stamp set. I made a mini slimline featuring three clusters of hanging snowflakes and I really love how it turned out!

I cut a 3-1/2″ x 6″ mini slimline card base from CutCardStock Cougar 80# Smooth White cardstock. Using the Kat Scrappiness Mini Slimline Fancy Scalloped Dies, I cut a Cougar Smooth White panel for the front. I also cut a frame from CutCardStock Stardream Metallic Lagoon cardstock using the Kat Scrappiness Mini Slimline Tri-Frame dies. I stamped three clusters of hanging snowflakes and a sentiment in Catherine Pooler Cummerbund ink. I added gemstones from the Trinity Stamps Aquamarine Ripple Embellishment Mix to the center of each snowflake with my Trinity Pick Up Stick. The finishing touch was adding several Eyelet Outlet Teal Enamel Dots.

Sharing in the following challenges:
1. Classic Design Challenge: October #10 – Anything Goes

Affiliate links are used in this post at no cost to you – I really appreciate your support!

Prickley Pear Stamps products used:
Ornaments 2 stamp set

Other products used:
CARDSTOCK/PAPER: CutCardStock Cougar Smooth 80# White and Stardream Metallic Lagoon cardstock
INK: Catherine Pooler Cummerbund ink
DIES/PUNCHES: Kat Scrappiness Mini Slimline Fancy Scalloped Dies and Mini Slimline Tri-Frame Dies
ACCESSORIES: Tonic Studios 12″ Guillotine Paper Trimmer, CutCardStock Plus High Capacity adhesive, Art Glitter Dries Clear adhesive, MISTI stamp tool, Big Shot, Eyelet Outlet Teal Enamel Dots, Trinity Stamps Aquamarine Ripple Embellishment Mix, Trinity Pick Up Stick

I hope you’ve enjoyed this project! Be sure to check out all the awesome stamps and dies at Prickley Pear Stamps! Save 10% on anything on the site when you shop at Prickley Pear Stamps by using coupon code LESLIE10 at checkout! And be sure to ‘like’ and ‘follow’ the Prickley Pear Stamps Facebook page to keep up with news and sales, and join Prickley Pear Pals (the fan group) for lots of fun crafty ideas and to share your creativity! And finally, we’d love to see you visit the Prickley Pear Stamps blog and become a Follower! Hope to see you there! Thanks so much for stopping by today – we’ll see you next time! ;)

Scrappy hugs,

You’re Awesome

Hey everybody! Happy Tuesday – I hope your week is off to a nice start! I’m delighted to share that the Keep It Simple design team has embarked on a new adventure called Technique Tuesday and I’m the first one to have a go at it! On the third Tuesday of every month our DT members will take turns showcasing a project featuring some sort of fun technique they’ve employed using Keep It Simple products of their choice, and will do a mini tutorial on it.

I created a slimline thank you card featuring the phantom die cutting technique which I absolutely love. I used papers from the Farmhouse Fall collection, Belle Outline Dies and Thank You Sentiments Stamp Set. And the best part is that I upcycled a piece of an empty tissue box. Don’t throw them away when they’re empty because they make the prettiest cards! This one goes perfectly with the green Farmhouse Fall papers!

(1) Using the Belle Outline Dies, die cut the sentiment into the card panel (upcycled tissue box).
(2) Die cut the same letters from white craft foam.
(3) Adhere the card panel to a patterned paper layer cut from a green paper in the Farmhouse Fall 12×12 Cardstock Pack.

Adhere the foam letters into the negative spaces.

Adhere the original letters cut from the card panel on top of the foam letters.

This is an angled view of the ‘phantom’ die cut letters.

This is the completed card front. The smaller stamped portion of the sentiment is from the Thank You Sentiments Stamp Set, stamped on a scrap piece of the green paper used for the layering panel, heat embossed in white, and layered on a scrap piece of Solar White cardstock. Two small Jade enamel dots were added for a little interest.

This is the completed card inside. The embellishing strip was cut from a paper in the 6×9 Cardstock Pack and the layering panel was cut from a paper in the 12×12 Cardstock Pack. The stamped sentiment is from the Thank You Sentiments Stamp Set.

Sharing in the following challenges:
1. Classic Design Challenge: October #10 – Anything Goes

Keep It Simple products used:
Farmhouse Fall 12×12 Cardstock Pack (front and inside layering panels)
Farmhouse Fall 6×9 Cardstock Pack (inside embellishing strip)
Belle Outline Dies
Thank You Sentiments Stamp Set
Jade Enamel Dots

Affiliate links are used in this post at no cost to you – I really appreciate your support!

Other products used:
CARDSTOCK/PAPER: Neenah Classic Crest 110# and 80# Solar White cardstock
INK: Memento Olive Grove ink, Versamark
ACCESSORIES: Tonic Studios 12″ Guillotine Paper Trimmer, Tombow Mono Dots adhesive, Bearly Art precision craft glue, empty tissue box, MISTI stamp tool, Big Shot, Hero Arts white embossing powder, Milwaukee heat tool, ScraPerfect Perfect Pouch, Darice Foamies white craft foam

I hope you’ve loved seeing this project as much as I loved creating it, and you’re inspired to get crafty! Be sure to check out ALL the fun goodies in the Keep It Simple store such as paper, stamps, die cuts, ephemera, washi tape and enamel dots to name just a few! You’ll go cray-cray! Be sure to Follow us on Facebook, Instagram, and Pinterest for lots of crafty inspiration! Thanks so much for stopping by today – we’ll see you next time!

Scrappy hugs,

Haunting mini slimline

Hey everybody! I hope you’re having an amazing week! I have a super cool ScrapbookingStore DT inspiration project to share with you today, created with the awesome October 2023 Scrapbook Kit with Upgrades! I have been having a great time creating projects with all the coordinating products in this month’s collection. Mini slimline cards are my jam these days and I created a hauntingly fun scene on this one which features papers and stickers along with a chipboard accent from the upgrades.

I cut the card base and layered frame (using the Kat Scrappiness Mini Slimline Tri-Frame Dies) from Neenah Classic Crest Solar White cardstock, and the background panel from a paper in the collection. I adhered the two houses and the truck stickers from the sticker sheet to small scraps of CutCardStock Basis White for slight dimension and fussy cut them. I built the scene with several more stickers from the sticker sheet and a chipboard bat from the upgrades, popping the truck up on a foam strip.

I cut the inside panel from Solar White cardstock and embellished it with strips of coordinating paper from the kit and a scrap of Basis White. I added a sentiment sticker from the sticker sheet and layered the panel on CutCardStock Basis Black cardstock.

Sharing in the following challenges:
1. A Perfect Time To Craft Open Challenge: October #10-2023 – Anything Goes
2. A Place To Start: October 2023 – Anything Goes
3. Crafty Gals Corner: #248 – Halloween Colors
4. Halloween Crafts All Year ‘Round: #8 – Anything Halloween Goes
5. If You Give A Crafter A Cookie: #185 – October-Black
6. Wednesday’s Creative Inspirations Challenge Blog: Autumn or Halloween

Affiliate links are used in this post at no cost to you – I really appreciate your support!

ScrapbookingStore products used:
October 2023 Scrapbook Kit with Upgrades

Other products used:
CARDSTOCK/PAPER: CutCardStock Basis Black and Basis White cardstock, Neenah Classic Crest 80# Solar White cardstock
DIES/PUNCHES: Kat Scrappiness Mini Slimline Tri-Frame Dies
ACCESSORIES: Tonic Studios 12″ Guillotine Paper Trimmer, Tombow Mono Dots adhesive, Bearly Art precision craft glue, Big Shot, 1/2″ double-sided foam strips

I hope you’ve enjoyed today’s project and you’re thinking about all the fun you could have with this month’s kit… you really ought to think about joining the Subscription Club! Be sure to Follow us on Facebook, Instagram, Pinterest and YouTube for lots of crafty inspiration! And if you do decide to join the Subscription Club, join our ScrapbookingStore Club Member Group on Facebook for more inspiration and to share your projects! Thanks so much for stopping by today – we’ll see you next time!

Scrappy hugs,

Thanks so much

Hi friends! Happy Friday! The weekends sure seem to be coming around quickly these days! I’m up on the Prickley Pear Stamps blog today with an inspiration project featuring the new Thanks stamp set and coordinating Thanks die set! I created a mini slimline employing the raised inlaid die cut technique which I think always turns out so cool! These are amazing stamps and dies, and the large sentiment works perfectly for this technique and for a mini slimline card!

I cut a 3-1/2″ x 6″ mini slimline card base from CutCardStock Basis 110# Natural cardstock. I then cut a layering panel from a fabric print in the Keep It Simple Farmhouse Fall Collection Pack, die cut the large sentiment from the Thanks die set into the center of the panel, and adhered it to the card front on double-sided foam strips.

I stamped the Thanks sentiment in Memento Cottage Ivy ink on a piece of Basis Natural cardstock and colored it with alcohol markers. I die cut it with the coordinating Thanks die and adhered it into the negative space of the panel on the card front. I stamped the remainder of the sentiment on a Basis Natural scrap, trimmed it and adhered it beneath the sentiment. The finishing touch was stamping the dragonfly on a Basis Natural scrap in Memento Tuxedo Black ink which I colored, die cut and adhered to the upper left of the sentiment.

Sharing in the following challenges:
1. A Perfect Time To Craft Open Challenge: September #9-2023 – Anything Goes
2. A Place To Start: September 2023 – Anything Goes w/ optional All That Glitters
3. Classic Design Challenge: September #9 – Anything Goes
4. Penny’s Paper-Crafty Challenge Blog: #555 – Anything Goes with Paper

Affiliate links are used in this post at no cost to you – I really appreciate your support!

Prickley Pear Stamps products used:
Thanks stamp set
Thanks die set

Other products used:
CARDSTOCK/PAPER: CutCardStock Basis 110# Natural cardstock, Keep It Simple Farmhouse Fall 6×9 Collection Pack
INK: Memento Cottage Ivy and Tuxedo Black inks; Arteza alcohol markers- BR47, B17
ACCESSORIES: Tonic Studios 12″ Guillotine Paper Trimmer, Bearly Art precision craft glue, MISTI stamp tool, Big Shot, 1″ double sided foam strip

I hope you’ve enjoyed this project! Be sure to check out all the awesome stamps and dies at Prickley Pear Stamps! Save 10% on anything on the site when you shop at Prickley Pear Stamps by using coupon code LESLIE10 at checkout! And be sure to ‘like’ and ‘follow’ the Prickley Pear Stamps Facebook page to keep up with news and sales, and join Prickley Pear Pals (the fan group) for lots of fun crafty ideas and to share your creativity! And finally, we’d love to see you visit the Prickley Pear Stamps blog and become a Follower! Hope to see you there! Thanks so much for stopping by today – we’ll see you next time! ;)

Scrappy hugs,