grateful

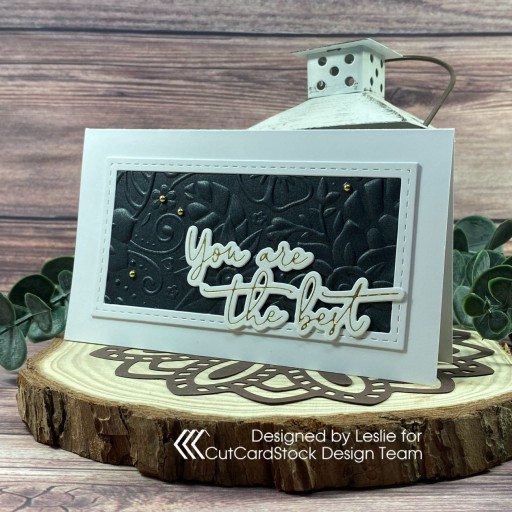
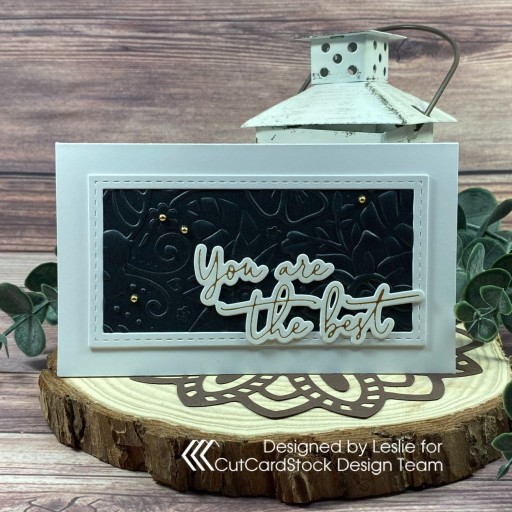
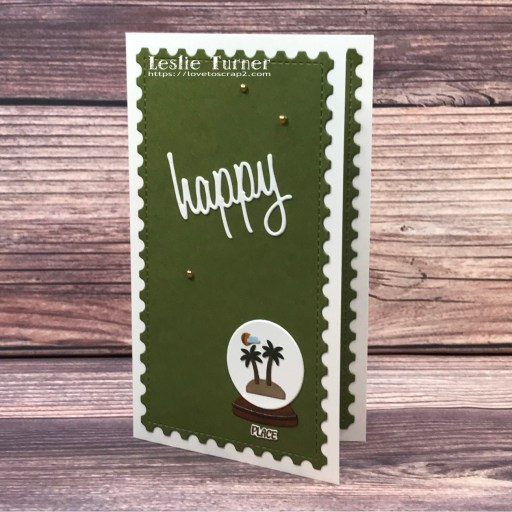
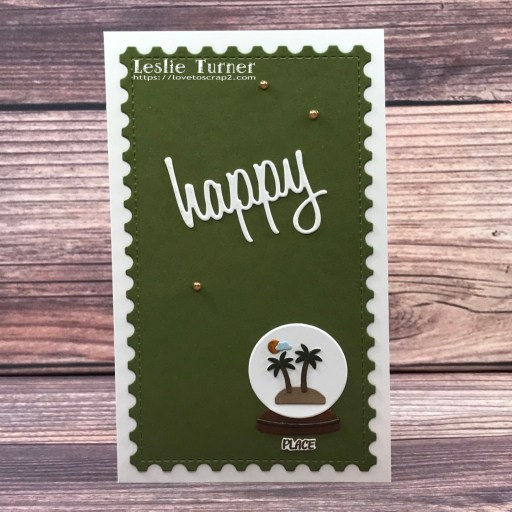
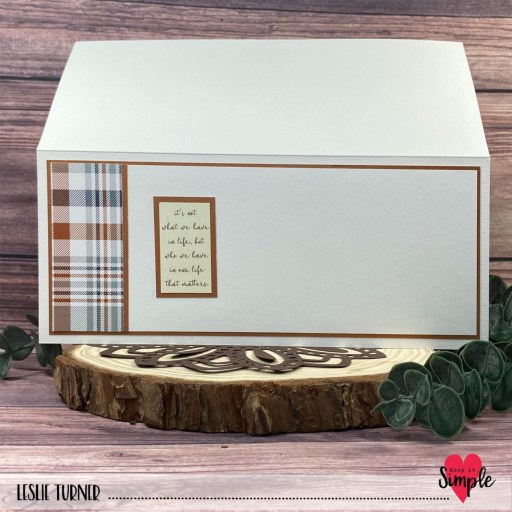
Hello, friends! Happy Thursday! I have another awesome Keep It Simple DT inspiration project to share today created with items in the Farmhouse Fall Collection! Autumn/Fall is my favorite time of the year and I just can’t get enough of all the gorgeous products in this collection. Besides the pretty papers, I used several die cut pieces, but the star of the show on this pretty slimline card is a chipboard word that I colored with an alcohol marker and embellished with a metallic marker for a little interest.

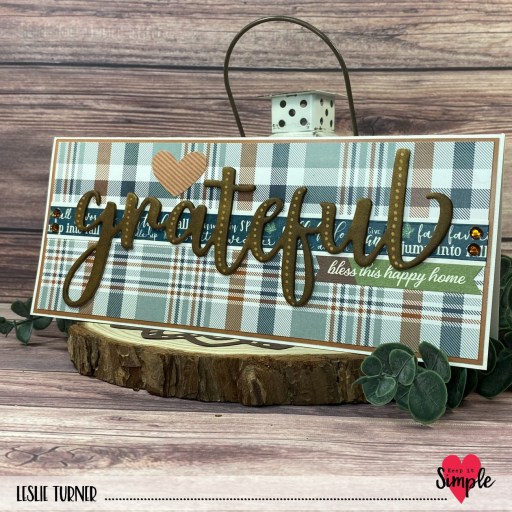
I cut my go-to size 3-3/4″ x 9″ slimline card base from CutCardStock Basis 110# White cardstock along with layering panels from the 12×12 Cardstock Pack and 6×9 Collection Pack. I adhered a strip of washi tape to a Basis 80# White cardstock strip and adhered it horizontally across the top layering panel, and then added a couple topaz gemstones on each side. I colored the chipboard word with an alcohol marker, added dots with a copper metallic marker, and adhered it to the card front. The final touch was adding a couple die cuts from the Falling For You Die Cut Pieces.

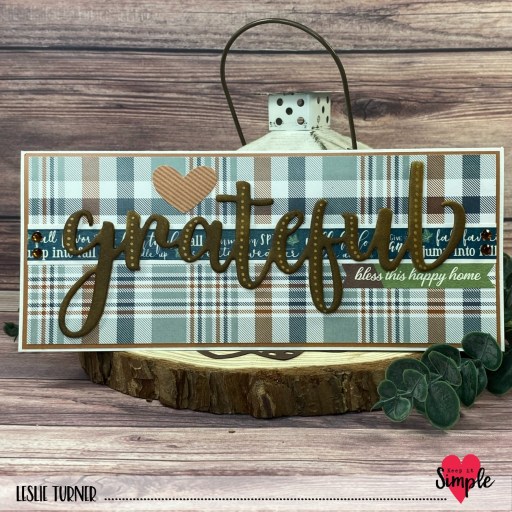
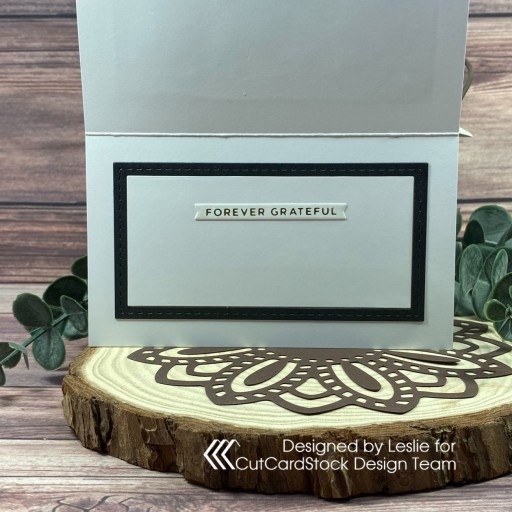
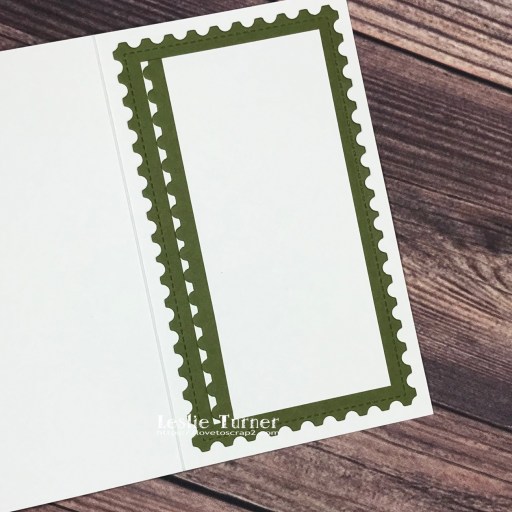
I cut the inside panel from CutCardStock Basis 80# White cardstock and embellished it with strips of the paper from the 12×12 Cardstock Pack and 6×9 Collection Pack used on the front along with another die cut piece that I layered on a paper scrap.

Sharing in the following challenges:
1. A Perfect Time To Craft Open Challenge: September #9-2023 – Anything Goes
2. A Place To Start: September 2023 – Anything Goes w/ optional All That Glitters
3. Classic Design Challenge: September #9 – Anything Goes
4. Cupcake Inspirations: #578 – Plaid
5. Penny’s Paper-Crafty Challenge Blog: #555 – Anything Goes with Paper
6. Wednesday’s Creative Inspirations Challenge Blog: Sentimental

Keep It Simple products used:
Farmhouse Fall 12×12 Cardstock Pack
Farmhouse Fall 6×9 Collection Pack
Farmhouse Fall Falling For You Die Cut Pieces
Farmhouse Fall Chipboard Words

Affiliate links are used in this post at no cost to you – I really appreciate your support!

Other products used:
CARDSTOCK/PAPER: CutCardStock Basis 110# White and Basis 80# White cardstock
INK: BR62 Arteza alcohol marker, American Crafts Copper Metallic Marker
ACCESSORIES: Tonic Studios 12″ Guillotine Paper Trimmer, Bearly Art precision craft glue, topaz gemstones

I hope you’ve loved seeing this project as much as I loved creating it, and you’re inspired to get crafty! Be sure to check out ALL the fun goodies in the Keep It Simple store such as paper, stamps, die cuts, ephemera, washi tape and enamel dots to name just a few! You’ll go cray-cray! Be sure to Follow us on Facebook, Instagram, and Pinterest for lots of crafty inspiration! Thanks so much for stopping by today – we’ll see you next time!

Scrappy hugs,

So Much Fun

Hey everybody! Not sure where this year has gone but the months just continue to fly right on by! I’m delighted to be back with another Keep It Simple DT inspiration project created with papers, stamps and dies in the new Craft Mode Collection! This fun slimline shaker card features stamped and die cut craft supplies included in the shaker mix! How fun is that?!

I cut a 3-3/4″ x 9″ slimline card base from Neenah Classic Crest 80# Solar White cardstock. I then cut a layering panel from a pink print in the Craft Mode 12×12 Collection Pack. Using the Wavy Slimline Die, I cut a shaker panel for the front from a green print in the Craft Mode 12×12 Collection Pack, reserving the negative spaces to use on the shaker, along with an acetate panel.

I stamped the scissors, tape, washi tape and glitter elements from the Craft Mode Stamps in Memento Tuxedo Black ink on Solar White cardstock. I colored them with fine point markers and cut them with the coordinating Craft Mode Outline Dies. I added Kat Scrappiness Crystal Clear Pinwheel Sequin Mix and Pearl Glass Dots along with the die cut craft supplies to the shaker and sealed it up. I stamped a sentiment from the same Craft Mode Stamps, trimmed it and adhered it to the top right corner of the shaker.

I cut the inside panel from Solar White cardstock and embellished it with the green patterned paper used on the front. I stamped a sentiment from the At The Expo Stamps in Memento Tuxedo Black ink and layered the panel on the pink patterned paper used on the front.

Sharing in the following challenges:
1. 613 Avenue Create: August 2023 – Anything Goes w/ optional CAS (no twist)
2. A Perfect Time To Craft Open Challenge: August #8-2023 – Anything Goes
3. Classic Design Challenge: August #8 – Anything Goes
4. Jan’s Digi Stamps Challenges: August Anything Goes
5. Once Upon A Time Challenges: #13 – It Feels Good To Be Yourself (a die-hard crafter!)

Keep It Simple products used:
Craft Mode 12×12 Collection Pack
Craft Mode Stamps
Craft Mode Outline Dies
At The Expo Stamps
Wavy Slimline Die

Affiliate links are used in this post at no cost to you – I really appreciate your support!

Other products used:
CARDSTOCK/PAPER: Neenah Classic Crest 80# Solar White cardstock
INK: Memento Tuxedo Black ink; Bic Mark-It Fine Point markers- Fandango Pink, Petal Pink, Polynesian Purple, Misty Blue, Oceanview Blue, Cloud Nine Grey, Summer Melon, Tiki Hut Tan; Sakura Clear Star Gelly Roll pen
ACCESSORIES: Tonic Studios 12″ Guillotine Paper Trimmer, CutCardStock Plus High Capacity adhesive, Bearly Art precision craft glue, MISTI stamping tool, Big Shot, Grafix Crystal Clear Craft Plastic; Kat Scrappiness Crystal Clear Pinwheel Sequin Mix and Pearl Glass Dots; 1″ double-sided foam strips

I hope you’ve loved seeing this project as much as I loved creating it, and you’re inspired to get crafty! Be sure to check out ALL the fun goodies in the Keep It Simple store such as paper, stamps, die cuts, ephemera, washi tape and enamel dots to name just a few! You’ll go crazy! Be sure to Follow us on Facebook, Instagram, and Pinterest for lots of crafty inspiration! Thanks so much for stopping by today – we’ll see you next time!

Scrappy hugs,

Merry Christmas & Hoppy New Year

Hey everybody! I hope you’re having a great week! I’m up on the Prickley Pear Stamps blog with an inspiration project featuring the NEW Christmas with Spinach and Ramona stamp set! I created a slimline card in a pale pink and green color combo, and OMGoodness, talk about totally adorable! These two couldn’t be any cuter!

I cut a 3-3/4″ x 9″ slimline card base from CutCardStock Basis 80# White cardstock along with layering panels from pale pink, pale green and dark green papers in the Keep It Simple Ruby and Jade 12×12 Collection Packs. I stamped the image from the Christmas with Spinach and Ramona stamp set in Memento Tuxedo Black ink on Basis White cardstock, colored it with alcohol markers, and then fussy cut it. I adhered the image to the card front and stamped the sentiment (from the same stamp set) in Memento Northern Pine ink. The finishing touch was adding several pink gemstones.

Sharing in the following challenges:
1. A Perfect Time To Craft Open Challenge: August #8-2023 – Anything Goes
2. A Place To Start: August 2023 – Anything Goes w/ optional Leaves and/or Trees (playing twist)
3. Classic Design Challenge: August #8 – Anything Goes

Affiliate links are used in this post at no cost to you – I really appreciate your support!

Prickley Pear Stamps products used:
Christmas with Spinach and Ramona stamp set

Other products used:
CARDSTOCK/PAPER: CutCardStock Basis 80# White cardstock, Keep It Simple Ruby and Jade 12×12 Collection Packs
INK: Memento Tuxedo Black and Northern Pine inks; Arteza alcohol markers- RP01/06/09, R18/36, YG04/24/42/43, G17, BR52/95
ACCESSORIES: Tonic Studios 12″ Guillotine Paper Trimmer, Tombow Mono Dots adhesive, Bearly Art precision craft glue, MISTI stamp tool, pink gemstones

I hope you’ve enjoyed this project! Be sure to check out all the awesome stamps and dies at Prickley Pear Stamps! Save 10% on anything on the site when you shop at Prickley Pear Stamps by using coupon code LESLIE10 at checkout! And be sure to ‘like’ and ‘follow’ the Prickley Pear Stamps Facebook page to keep up with news and sales, and join Prickley Pear Pals (the fan group) for lots of fun crafty ideas and to share your creativity! And finally, we’d love to see you visit the Prickley Pear Stamps blog and become a Follower! Hope to see you there! Thanks so much for stopping by today – we’ll see you next time! ;)

Scrappy hugs,

UPcycled Congrats

Howdy peeps! Happy Monday! It sure got here fast, lol! I have another Splitcoast Stampers Dirty Dozen DT inspiration project to share with you this morning – a congrats card created with a piece of an empty tissue box! I’ve made several cards from upcycled tissue boxes over the last few months and always love how they turn out! Nothing like keeping a little something out of the landfill, even if it’s only a small piece!

I cut a 3-1/2″ x 6″ mini slimline card base from CutCardStock Basis 110# Natural cardstock along with a layering panel from CutCardStock Pop Tone Black Licorice cardstock. I trimmed a piece of the tissue box down to size and layered it on the black cardstock and then to the front of the card base. I die cut the sentiment from CutCardStock Basis 80# Natural and Pop Tone Black Licorice using the Kat Scrappiness Congrats Word Die with Shadow. The finishing touch was adding several Eyelet Outlet Black Glitter Enamel Dots.

I cut the inside panel from Basis 80# White and embellished it with a leftover piece of Black Licorice cardstock. I stamped the sentiment from the Keep It Simple Congratulations sentiment stamp set in Memento Tuxedo Black ink and layered the panel on Black Licorice.

Affiliate links are used in this post at no cost to you – I really appreciate your support! 

Products used:
CARDSTOCK/PAPER: CutCardStock Basis 110# Natural, Basis 80# Natural and Pop Tone Black Licorice cardstock
STAMPS: Keep It Simple Congratulations sentiment stamp set
INK: Memento Tuxedo Black ink
DIES/PUNCHES: Kat Scrappiness Congrats Word Die with Shadow
ACCESSORIES: Tonic Studios 12″ Guillotine Paper Trimmer, empty tissue box, Tombow Mono permanent adhesive, Art Glitter Dries Clear adhesive, MISTI stamp tool, Big Shot, Eyelet Outlet Black Glitter Enamel Dots

I hope you’ve enjoyed seeing this project and will consider joining the Splitcoast Stampers Fan Club which costs less than $25 for an entire year! There are tons of member perks (like seeing all the Dirty Dozen DT’s inspiration projects each month) in addition to access to all the other free content on the Splitcoast Stampers website. Be sure to check it out! The subscription is seriously awesome! Thanks for stopping by today – we’ll see you again soon!

Scrappy hugs,

You are the best

Hey everybody! I hope you’re having a good week – it’s almost the weekend! I have an awesome CutCardStock DT inspiration project to share with you today featuring our Stardream Metallic Onyx cardstock and Cougar Smooth White cardstock that I paired with a pretty foiled sentiment. This design is super simple, has some great texture, and would be easy to mass produce with different sentiments.

I cut a 3-1/2″ x 6″ mini slimline card base from Cougar Smooth 100# White cardstock. Using a Kat Scrappiness Mini Slimline Tri-Frame Die, I die cut three stitched frames from Cougar Smooth 80# White cardstock and one from Stardream Metallic Onyx cardstock. I adhered the white frames together for dimension and reserved one of the negative space rectangles for the inside panel.

Using the Sizzix Bohemian Botanicals 3-D Textured Impressions Embossing Folder, I dry embossed the black negative space rectangle (after spritzing the back side with a little water) to use as the focal panel on the card front. I created the sentiment using a Pinkfresh Studio Fancy Script Words Hot Foil Plate along with Spellbinders Glimmer Hot Foil System and a foil roll from the Glimmer Hot Foil Spellbound Variety Pack, and cut it with the coordinating Pinkfresh Studio Fancy Script Words Die. The finishing touch was adding several pearls from the Kat Scrappiness Gold Pearl Mix.

The inside panel consisted of one of the Cougar Smooth 80# White cardstock negative space rectangles and the Stardream Metallic Onyx cardstock frame. I added a sentiment created with a Spellbinders Mini Everyday Sentiments Glimmer Plate, Glimmer Hot Foil System and Glimmer Hot Foil Gold Roll, and cut it with the coordinating Spellbinders Mini Everyday Sentiments Die.

Sharing in the following challenges:
1. Penny’s Paper-Crafty Challenge Blog: #549 – Anything Goes with Paper
2. Shopping Our Stash: #499 – Sentimentally Yours
3. Wednesday’s Creative Inspirations Challenge Blog: June Challenge – Something for the Girls

Affiliate links are used in this post at no cost to you – I really appreciate your support!

CutCardStock products used:
Cougar Smooth 100# White cardstock
Cougar Smooth 80# White cardstock
Stardream Metallic Onyx cardstock

Other products used:
Dies/Punches: Kat Scrappiness Mini Slimline Tri-Frame Dies, Pinkfresh Studio Fancy Script Words Dies, Spellbinders Mini Everyday Sentiments Dies
Accessories: Tonic Studios 12″ Guillotine Paper Trimmer, CutCardStock Plus High Capacity adhesive, Art Glitter Dries Clear adhesive, Big Shot, Sizzix Bohemian Botanicals 3-D Textured Impressions Embossing Folder, Pinkfresh Studio Fancy Script Words Hot Foil Plates; Spellbinders Glimmer Hot Foil System, Glimmer Hot Foil Gold Roll, Glimmer Hot Foil Spellbound Variety Pack and Mini Everyday Sentiments Glimmer Plates; Kat Scrappiness Gold Pearl Mix

I hope you’ve enjoyed today’s project and you’re inspired to get crafty! Be sure to check out all the awesome cardstock and other goodies at CutCardStock (adhesives, labels, stickers, pens, watercolors and ribbon to name a few). And head on over to the CutCardStock Facebook Page and for more inspiration! Also, be sure to join our Creating with Card Stock Facebook Group for even more crafty inspiration! Thanks so much for stopping by today – we’ll see you next time!

Scrappy hugs,

Peace & Happiness

Hi friends! Happy Friday! Is it me, or are the weeks just flying by?! I’m up on the Prickley Pear Stamps blog today with an inspiration project featuring the new Peace stamp set released in February! You know me… I absolutely love bold colors, so that’s the direction I went with this mini slimline! And this stamp set is perfect for using bold colors!

I cut a 3-1/2″ x 6″ mini slimline card base from CutCardStock Basis 110# White cardstock along with layering panels from Basis Yellow cardstock and Hot Off The Press Flowing Ink patterned paper, and then used a Tonic corner punch to cut off the corners. I stamped the PEACE sentiment in Memento Tuxedo Black ink on Basis 80# White cardstock, colored it with Sharpie Ultra Fine Point markers, and fussy cut the letters. I ran a Memento Tuxedo Black marker around the edges of the letters for a more finished look.

I adhered the letters to the background and then stamped the remaining portion of the sentiment in Tuxedo Black ink. I added several Darice tiny clear gemstones (colored with a yellow Arteza Y22 alcohol marker) to the letter P for a little interest. I added a couple die cut hearts that I had laying on my desk from another project, and this completed the card. 

Sharing in the following challenges:
1. 613 Avenue Create: May 2023 – Anything Goes w/ optional Flowers
2. A Perfect Time To Craft Open Challenge: May #4-2023 – Anything Goes
3. Classic Design Challenge: May #4 – Anything Goes
4. Inkspirational: #289 – Word Prompt Mini (mini slimline)

Affiliate links are used in this post at no cost to you – I really appreciate your support!

Prickley Pear Stamps products used:
Peace stamp set

Other products used:
Cardstock/Paper: CutCardStock Basis 110# White, Basis 80# White and Basis Gold, Hot Off The Press Flowing Ink double-sided cardstock
Ink: Memento Tuxedo Black ink (pad and marker); Sharpie Ultra Fine Point markers- teal, purple, rose, orange, yellow, blue and navy; Arteza alcohol marker- Y22
Dies/Punches: Tonic Corner Punch
Accessories: Tonic Studios 12″ Guillotine Paper Trimmer, Tombow Mono permanent adhesive, Art Glitter Dries Clear adhesive, MISTI stamp tool, Darice tiny clear gemstones

I hope you’ve enjoyed this project! Be sure to check out all the awesome stamps and dies at Prickley Pear Stamps! Save 10% on anything on the site when you shop at Prickley Pear Stamps by using coupon code LESLIE10 at checkout! And be sure to ‘like’ and ‘follow’ the Prickley Pear Stamps Facebook page to keep up with news and sales, and join Prickley Pear Pals (the fan group) for lots of fun crafty ideas and to share your creativity! And finally, we’d love to see you visit the Prickley Pear Stamps blog and become a Follower! Hope to see you there! Thanks so much for stopping by today – we’ll see you next time! ;)

Scrappy hugs,

Love You slimline

5/14/23 Sweet Pick at Cupcake Inspirations!

Hi friends! A very Happy Thursday to you! I’m up on the Prickley Pear Stamps blog today with an inspiration project featuring the Love You stamps and dies that were just released in January! Wow, talk about a versatile set… this one is! It can be used for many different occasions – Valentine’s Day, Mother’s Day, Anniversary! I created a ‘love you just because’ slimline because I love this kind of card!

I cut a 3-3/4″ x 9″ slimline card base from Neenah Classic Crest 110# Solar White cardstock along with a strip from 80# Solar White cardstock. I also cut a layering panel and slightly narrower strip from two pretty coordinating pink papers in the Keep It Simple Rose 12×12 Collectiond Pack. I stamped the large sentiment and heart in Memento Tuxedo Black ink on an additional coordinating pink paper (from the same Rose Collection Pack) using the Love You stamps and then cut them with the coordinating Love You dies. I added some shimmery silver detail on the edge of the heart with a Kirarina Wink silver metallic marker. Finally, I added a floral element created with the Pinkfresh Studio In The Meadow Washi Tape and Die along with several Eyelet Outlet pink pearls, which completed the card. 

Sharing in the following challenges:
1. A Perfect Time To Craft Open Challenge: May #4-2023 – Anything Goes
2. A Place To Start: May 2023 – Anything Goes w/ optional And Another Thing (playing twist)
3. Cardz 4 Galz: #198 – Mother’s Day or Flowers for a Friend
4. Classic Design Challenge: May #5 – Anything Goes
5. Crafts Galore Encore Challenge Blog: #111 – May Anything Goes
6. Cupcake Inspirations: #568 – Mother’s Day or Someone Special Feminine
7. Jan’s Digi Stamps Challenge: May Anything Goes
8. Scrapping4fun Challenges: #223 – Alphabet Letter M (Mother’s Day)

Affiliate links are used in this post at no cost to you – I really appreciate your support!

Prickley Pear Stamps products used:
Love You stamps
Love You dies

Other products used:
Cardstock/Paper: Neenah Classic Crest 110# and 80# Solar White cardstock, Keep It Simple Rose 12×12 Collection Pack
Ink: Memento Tuxedo Black ink, Kirarina Wink Silver Metallic Marker
Dies/Punches: Pinkfresh Studio In The Meadow Die
Accessories: Tonic Studios 12″ Guillotine Paper Trimmer, Tombow Mono permanent adhesive, Art Glitter Dries Clear adhesive, MISTI stamp tool, Big Shot, Pinkfresh Studio In The Meadow Washi Tape, American Crafts double-sided foam squares, Eyelet Outlet pink pearls

I hope you’ve enjoyed this project! Be sure to check out all the awesome stamps and dies at Prickley Pear Stamps! Save 10% on anything on the site when you shop at Prickley Pear Stamps by using coupon code LESLIE10 at checkout! And be sure to ‘like’ and ‘follow’ the Prickley Pear Stamps Facebook page to keep up with news and sales, and join Prickley Pear Pals (the fan group) for lots of fun crafty ideas and to share your creativity! And finally, we’d love to see you visit the Prickley Pear Stamps blog and become a Follower! Hope to see you there! Thanks so much for stopping by today – we’ll see you next time! ;)

Scrappy hugs,

happy place note card

Hey everybody! Happy Monday – I hope you had a great weekend! Our new challenge is live over at Love To Scrap Challenge Blog and I’m thrilled to share my project for LTSCB #161 – Anything Goes! I created a mini slimline note card featuring a tiny globe from the Sizzix Tiny Travel Globe Thinlits. I love all of them in this set! And who wouldn’t love being on this island?! I know I would… definitely my happy place!

I cut a mini slimline card base measuring 3-1/2″ x 6″ from Neenah Classic Crest 110# Solar White cardstock along with a background panel cut from CutCardStock Pop Tone Jellybean Green cardstock using a Kat Scrappiness Mini Slimline Postage Stamp Edge Die. I die cut all the tiny globe pieces from 80# Solar White cardstock, colored them with alcohol markers, and assembled and adhered the globe in the right lower corner of the card front. The die cut part of the sentiment was created with a Sizzix Script Celebration Words die (cut from Solar White cardstock), and the stamped part was created with a fussy-cut word from one of the sentiments in the Prickley Pear Stamps Frog Pals Spinach and Ramona stamp set. I finished the front with several Eyelet Outlet brown pearls.

I cut the inside panel from 80# Solar White cardstock, adhered it to a postage stamp edge die cut like the one on the front, and embellished it with a leftover negative space strip. Since this is a note card, I left the inside blank to write a custom message.

Sharing in the following challenges:
1. A Perfect Time To Craft Open Challenge: May #4-2023 – Anything Goes
2. A Place To Start: May 2023 – Anything Goes w/ optional And Another Thing
3. Classic Design Challenge: May #5 – Anything Goes

Affiliate links are used in this post at no cost to you – I really appreciate your support! 

Products used:
Cardstock/Paper: Neenah Classic Crest 110# and 80# Solar White cardstock, CutCardStock Pop Tone Jellybean Green cardstock
Stamps: Prickley Pear Stamps Frog Pals Spinach and Ramona stamp set
Ink: Memento Rich Cocoa ink; Arteza alcohol markers- YG12, B29, Y32/33, BR40/51/82/86
Dies/Punches: Kat Scrappiness Mini Slimline Postage Stamp Edge Dies, Sizzix Tiny Travel Globe Thinlits, Sizzix Celebration Words: Script
Accessories: Tonic Studios 12″ Guillotine Paper Trimmer, Bearly Art precision craft glue, Big Shot, Eyelet Outlet brown Pearl Bling Strip

I hope you’ve enjoyed seeing this project and will link up with us this time! We’d love to see what you create! Thanks so much for stopping by today – we’ll see you next time! ;)

Scrappy hugs,

Merry Christmas mini slimline

Hi friends! Happy Happy Monday! I hope you had a great weekend! It’s finally starting to warm up here… for a minute there we thought Mother Nature was really ticked off because we were getting snow while our family and friends in Florida were enjoying the beach! What’s wrong with that picture?! Our very first challenge is live this morning over at Christmas BINGO Challenges and I’m super stoked to share my DT inspiration project for Challenge #1 – Anything Goes with Featured Christmas BINGO Card!

Here’s a short run-down of how this new challenge works: There will be a BINGO Card featured in each challenge and our designers and participants will need to use at least three items in any column under the B, I, N, G or O on a Christmas project. This is not your typical BINGO card where you go up/down, left/right and diagonally… you can only go up and down using the columns. There is a free space in each column that you are welcome to use if you want. You cannot mix and match columns – you can only use one letter. We really hope you’ll check it out and come play with us! I went with column G and made a mini slimline card with red, stitching and a doily.

I cut a 3-1/2″ x 6″ mini slimline card base from CutCardStock Basis Natural along with a layering panel from CutCardStock Basis Red. Using the Kat Scrappiness Mini Slimline Scalloped Edge Dies, I die cut a panel from a pretty patterned paper from the Carta Bella Christmas Collection Kit. Then, using the Kat Scrappiness Mini Slimline Tri-Frame Dies, I die cut a frame from another Carta Bella paper. I used ‘merry Christmas’ sentiment stickers from the Carta Bella kit. I cut a small Stampin’ Up doily roughly in half and adhered the smaller piece to the bottom left corner and adhered a bow fashioned from a piece of hemp crafting cord. The final touch was adding some small dots of Glossy Accents to the berries on the patterned paper.

I cut the inside panel from CutCardStock Basis Natural cardstock and embellished it with leftover strips of patterned paper and red cardstock used on the front. I stamped a sentiment from the Taylored Expressions In & Out Christmas stamp set in Catherine Pooler Black Jack ink.

Sharing in the following challenges:
1. A Perfect Time To Craft Open Challenge: May #4-2023 – Anything Goes
2. Classic Design Challenge: May #5 – Anything Goes

Affiliate links are used in this post at no cost to you – I really appreciate your support! 

Products used:
Cardstock/Paper: CutCardStock Basis Natural and Basis Red cardstock, Carta Bella Christmas Collection Kit
Stamps: Taylored Expressions In & Out Christmas stamp set
Ink: Catherine Pooler Black Jack ink
Dies/Punches: Kat Scrappiness Mini Slimline Scalloped Edge Dies and Mini Slimline Tri-Frame Dies
Accessories: Tonic Studios 12″ Guillotine Paper Trimmer, Scotch Advanced Tape Glider, Art Glitter Dries Clear adhesive, MISTI stamp tool, Big Shot, Stampin’ Up Tip Top Taupe doily, Hemptique Earthy Pastel crafting cord, cordless glue gun, Glossy Accents

I hope you’ve enjoyed seeing this project and will link up with us this time in our debut Christmas BINGO Challenge! We can’t wait to see what you create! Thanks so much for stopping by today – we’ll see you next time! ;)

Scrappy hugs,

Family Floating Tile Card

Hey everybody! I hope you’re having a great week! I’m stoked to be back to share another ScrapbookingStore DT inspiration project with you today, created with the amazing April 2023 Scrapbook Kit with Upgrades! I like using stickers as the focal element on cards and employed the floating tile technique with the letter tiles on this mini slimline which really packs a punch. The floating tile technique is similar to the floating strips technique where cardstock strips are adhered to acetate and then popped up on foam to achieve the look of ‘floating.’ I’ve made a couple floating strips cards in the past and thought it would be fun to float some tiles! ;)

I cut a 3-1/2” x 6” mini slimline card base from Neenah Classic Crest 110# Solar White cardstock along with two layering panels and a flag from coordinating papers in the collection. I adhered the F-A-M-I-L-Y tiles from the sticker sheet to an acetate strip and popped them up on double-sided foam strips to achieve a ‘floating’ look. I added two floral die cuts from the upgrades and a sentiment sticker from the sticker sheet.

I cut the inside panel from 80# Solar White cardstock and embellished it with a leftover piece of patterned paper used on the front. I trimmed the sentiment from a journaling card in the collection and layered it on a scrap piece of Solar White cardstock.

Affiliate links are used in this post at no cost to you – I really appreciate your support!

ScrapbookingStore products used:
April 2023 Scrapbook Kit with Upgrades

Other products used:
Cardstock/Paper: Neenah Classic Crest 110# and 80# Solar White cardstock
Dies/Punches: Waffle Flower Mini Slimline Layers, Stampin’ Up Banner Triple Punch
Accessories: Tonic Studios 12″ Guillotine Paper Trimmer, Grafix Craft Plastic, Scotch Advanced Tape Glider, Art Glitter Dries Clear adhesive, Big Shot, 1″ and 1/2″ double-sided foam strips

I hope you’ve enjoyed today’s project and you’re thinking about all the fun you could have with this month’s kit… you really ought to think about joining the Subscription Club! Be sure to Follow us on Facebook, Instagram, Pinterest and YouTube for lots of crafty inspiration! And if you do decide to join the Subscription Club, join our ScrapbookingStore Club Member Group on Facebook for more inspiration and to share your projects! Thanks so much for stopping by today – we’ll see you next time!

Scrappy hugs,