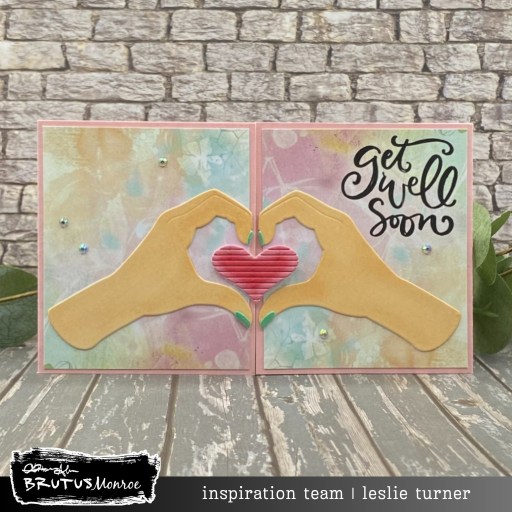
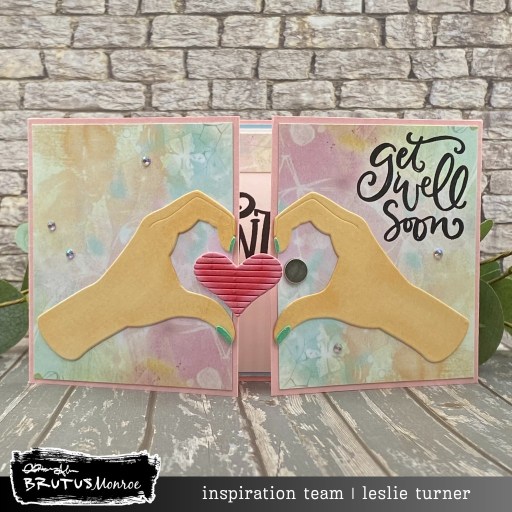
Hi friends, I’m back with my second post of the day. The weeks sure do seem to fly by quickly these days! It’ll be Christmas before we know it… we are officially past the halfway mark of 2025. Yep, that’s my story and I’m stickin’ to it. I’m delighted to share an inspiration project for Brutus Monroe today where I combined the mini slimline size with the gate fold design and came up with a pretty get well card. This card features the amazing Heart Hands Cutting dies which are absolutely perfect for this design. I paired this die set with panels of Pink Lemonade, Sea, and Not Your Mamas Cardstock along with some Spring Splatter Paper. I also used our timeless (and my favorite) Super Sentimental Stamp Set and some Light Pink Flat Back Crystals.
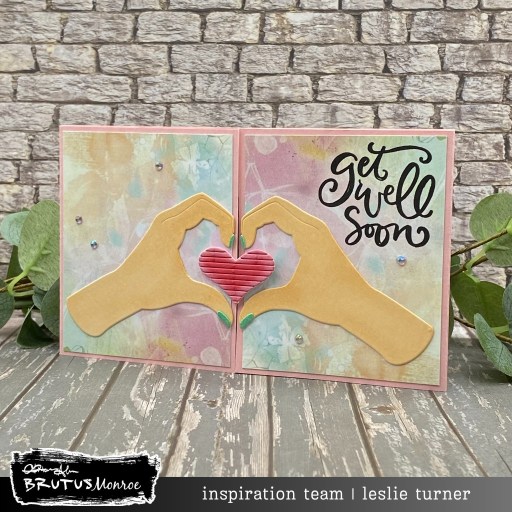
I cut a 3-1/2″ x 6″ mini slimline landscape gate fold card base from Pink Lemonade cardstock along with layering panels from a print in the Spring Splatter 6×6 paper collection. Using the Heart Hands Cutting Dies, I cut the hands, fingernails and heart from Not Your Mamas cardstock and colored them with Copic Ciao alcohol markers.
I added some shimmer to the fingernails with Sakura Clear Star Gelly Roll pen which I topped with some Ranger Glossy Accents. The heart cut a bunch of tiny strips which I backed on a scrap of the white cardstock and then inked the edges with Alabaster ink. I stamped the sentiment from the Super Sentimental stamp set in Raven ink and added a small disc magnet to keep the card closed.
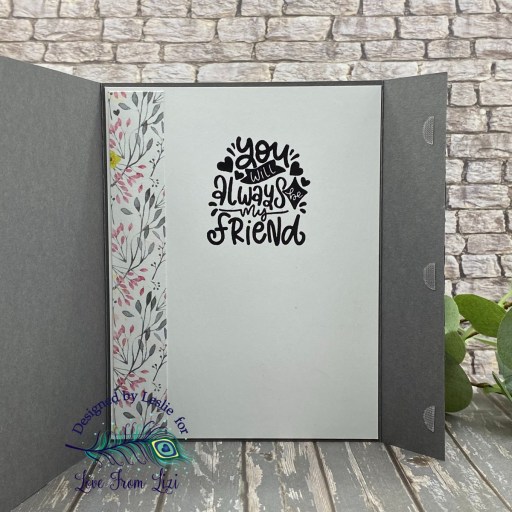
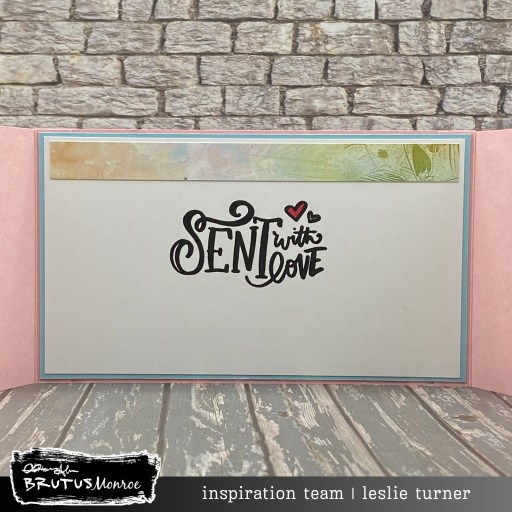
I embellished the inside white cardstock panel with a strip of the patterned paper used on the front. I stamped another sentiment from the Super Sentimental stamp set in Raven ink, colored the heart red, and layered the panel on Sea cardstock.
Affiliate links are used in this post at no cost to you – I really appreciate your support!
Brutus Monroe products used:
BRU 3141 Heart Hands Cutting Dies
BRU 6557 Pink Lemonade Cardstock
BRU 5529 Sea Cardstock
BRU 9494 Not Your Mamas Cardstock
BRU 2051 Spring Splatter 6×6 Paper Collection
BRU 7985 Super Sentimental Stamp Set
BRU 2524 Alabaster White 2×2 Pigment Ink
BRU 2543 Raven 2×2 Detail Ink
BRU 7907 Light Pink Flat Back Crystals
Other products used:
INK: Copic Ciao alcohol markers- E21 Soft Sun, R29 Lipstick Red, BG34 Horizon Green; Sakura Clear Star Gelly Roll pen
ACCESSORIES: Fiskars 12″ ProCision Rotary Bypass Paper Trimmer, Bearly Art precision craft glue, My Sweet Petunia Precision Glue Press, MISTI stamp tool, Big Shot, Ranger Distress Tiny Blending Tool and Distress Tiny Blending Foams, Ranger Distress Collage Medium, Spellbinders Detail Scissors, Ranger Glossy Accents, small disc magnet
I hope you’ve enjoyed seeing this project and you’re inspired to get your craft on! Be sure to check out all the amazing stamps and dies, pigments and mists, cardstock and tools (just to name a few) at Brutus Monroe! And if you happen to have a sweet tooth and like to munch while you craft (like I do, lol), check out Scoozie’s Confections & Curiosities! OMG, I’m hooked! ;) Follow us on Facebook, Instagram and YouTube for tons of crafty inspiration! And come on over and join our Fan Club Facebook Group to share your crafty makes using our products! Thanks so much for stopping by today – we’ll see you next time!
Scrappy hugs,