Collect Moments

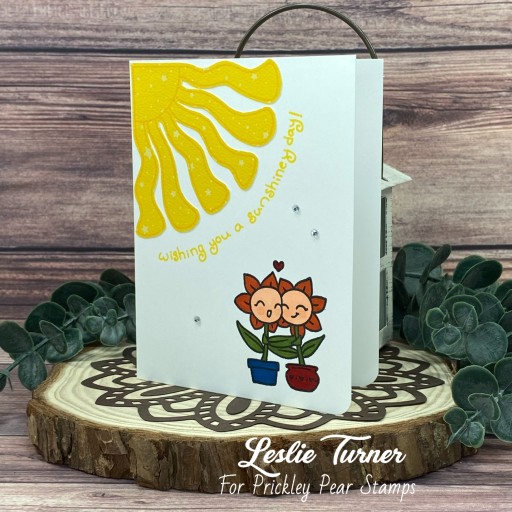
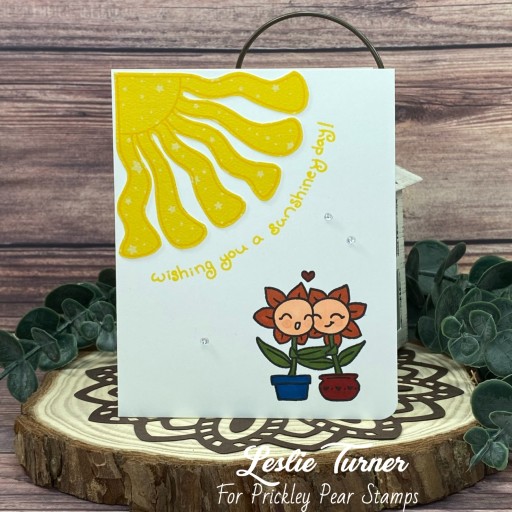
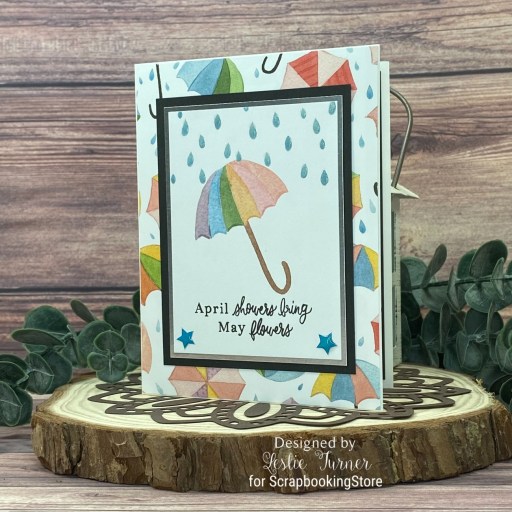
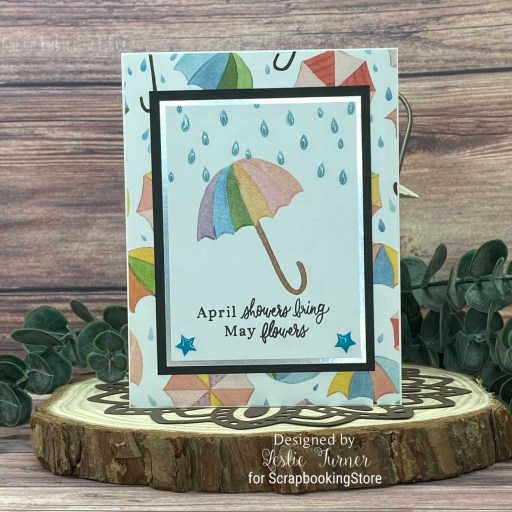
Hi everyone! Happy Tuesday! How did we get through another weekend so quickly?! I’m delighted to be back this morning to share one last ScrapbookingStore DT inspiration project created with the amazing March 2023 Scrapbook Kit with Upgrades! I really like the die cuts in the upgrades in this kit. There are so many options for so many different types of cards that work up quickly, and any crafter with a busy schedule can certainly appreciate that! I created a pretty uplifting friendship card featuring a circular aperture in the front flap showing off a gorgeous foiled die cut.

I cut a standard A2 size side-folding card base from CutCardStock Basis 110# Natural cardstock and die cut a circle into the front flap using a Spellbinders Standard Circles Large die. I die cut a frame from CutCardStock Kale Green cardstock to go around the aperture using the same circle die plus one slightly larger, and added several pearls from the Kat Scrappiness Gold Pearl Mix.

I adhered a die cut from the upgrades into the opening using Stampin’ Up Dimensionals which completed the card. Super simple design that really packs a punch!

Affiliate links are used in this post at no cost to you – I really appreciate your support!

ScrapbookingStore products used:
March 2023 Scrapbook Kit with Upgrades

Other products used:
Cardstock/Paper: CutCardStock Basis 110# Natural and Kale Green cardstock
Dies/Punches: Spellbinders Standard Circles Large dies
Accessories: Tonic Studios 12” Guillotine Paper Trimmer, Art Glitter Dries Clear adhesive, Stampin’ Up Dimensionals, Kat Scappiness Gold Pearl Mix

I hope you’ve enjoyed today’s project and you’re thinking about all the fun you could have with this kit… you really ought to think about joining the Subscription Club! Be sure to Follow us on Facebook, Instagram, Pinterest and YouTube for lots of crafty inspiration! And if you do decide to join the Subscription Club, join our ScrapbookingStore Club Member Group on Facebook for more inspiration and to share your projects! Thanks so much for stopping by today – we’ll see you next time!

Scrappy hugs,

wishing you a sunshiney day!

Hey everybody! Happy Monday! Sure seems like Mondays are rolling around rather quickly! I hope your weather is warming up where you are, and if not, I have the perfect card to warm you up! I’m up on the Prickley Pear Stamps blog today with an adorable CAS-ish card featuring the You Are My Sunshine stamps which are part of the amazing Celestial Collection! Isn’t this sun and those little singing flowers just the cutest things you’ve ever seen?! I can’t stand it!

I cut a standard A2 size side-folding card base from Neenah Classic Crest 110# Solar White cardstock and rounded the bottom right corner. I stamped the sun from the You Are My Sunshine stamps in Catherine Pooler Limoncello ink on a yellow patterned paper from the Keep It Simple Lemon 12 x 12 Collection, fussy cut it, and adhered it to the card base. Next, I stamped those adorable little flowers in Memento Tuxedo Black ink on Solar White cardstock, colored them with alcohol markers, and fussy cut them as well. I stamped the rounded sentiment under the sun in Catherine Pooler Limoncello ink and adhered the flowers in the bottom right corner. The finishing touch was adding a few Darice clear gemstones. 

Affiliate links are used in this post at no cost to you – I really appreciate your support!

Prickley Pear Stamps products used:
You Are My Sunshine stamps

Other products used:
Cardstock/Paper: Neenah Classic Crest 110# Solar White cardstock, Keep It Simple Lemon 12 x 12 Collection
Ink: Catherine Pooler Limoncello ink, Memento Tuxedo Black ink; Arteza alcohol markers- R18/21, YR00/37, YG43, B01
Dies/Punches: Kadomaru Pro corner rounder
Accessories: Tonic Studios 12″ Guillotine Paper Trimmer, Art Glitter Dries Clear adhesive, MISTI stamp tool, Darice clear gemstones

I hope you’ve enjoyed this project! Be sure to check out all the awesome stamps and dies at Prickley Pear Stamps! Save 10% on anything on the site when you shop at Prickley Pear Stamps by using coupon code LESLIE10 at checkout! And be sure to ‘like’ and ‘follow’ the Prickley Pear Stamps Facebook page to keep up with news and sales, and join Prickley Pear Pals (the fan group) for lots of fun crafty ideas and to share your creativity! And finally, we’d love to see you visit the Prickley Pear Stamps blog and become a Follower! Hope to see you there! Thanks so much for stopping by today – we’ll see you next time! ;)

Scrappy hugs,

Dream Crazy Big

Hey everybody! Happy Sunday! I hope you’re enjoying some beautiful weather this weekend! We are finally seeing some higher temps during the day although it still gets a bit chilly at night. I’m stoked to be back with another Keep It Simple DT inspiration project to share today created with the super adorable new Pajama Party Collection! O.M.G. You haven’t seen CUTE until you’ve seen these products! I created a super cute step card using a variety of products in the collection which I paired with cardstock and dies in my stash!

Using the Creative Craft Products High Center Stepper Card die set, I cut the step card base from Neenah Classic Crest Solar White cardstock along with layers from papers in the Pajama Party 6×9 Collection Pack and Pajama Party 6×9 Cardstock Pack. Next, I die cut a stitched mini scallop circle for the front from a pretty pink paper in the Pajama Party 6×9 Cardstock Pack and a second one for the back from Solar White cardstock using the My Favorite Things Mini Scallop Circle STAX. I chose a rainbow element from the Pajama Party Cards & Ephemera Die Cut Pieces and popped it up on the front with double-sided adhesive foam strips. The finishing touch was adding several Back To Basics Black Enamel Dots.

On the back circle die cut, I stamped a rainbow in Ranger spun sugar distress ink and a sentiment in Memento Tuxedo Black ink (both from the Pajama Party Stamp Set) which completed the card.

And here’s one more angled shot so you can see how cool the construction is! I love step cards, and dies make them so easy!

Keep It Simple products used:
Pajama Party 6×9 Collection Pack
Pajama Party 6×9 Cardstock Pack
Pajama Party Cards & Ephemera Die Cut Pieces
Pajama Party Stamp Set
Back to Basics Black Enamel Dots

Affiliate links are used in this post at no cost to you – I really appreciate your support!

Other products used:
Cardstock/Paper: Neenah Classic Crest 80# Solar White cardstock
Ink: Ranger spun sugar distress ink, Memento Tuxedo Black ink
Dies/Punches: Creative Craft Products High Center Stepper Card die set, My Favorite Things Mini Scallop Circle STAX
Accessories: Tonic Studios 12″ Guillotine Paper Trimmer, Tombow Mono permanent adhesive, MISTI stamping tool, Big Shot, double-sided adhesive foam strips

I hope you’ve loved seeing this project as much as I loved creating it, and you’re inspired to get crafty! Be sure to check out ALL the fun goodies in the Keep It Simple store such as paper, stamps, die cuts, ephemera, washi tape and enamel dots to name just a few! You’ll go cray-cray! Be sure to Follow us on Facebook, Instagram, and Pinterest for lots of crafty inspiration! Thanks so much for stopping by today – we’ll see you next time!

Scrappy hugs,

Spring Bendi Card

Howdy peeps! I hope you’re having a great weekend! In my quest to finally blog a handful of projects created while our internet was down, I have another ScrapbookingStore DT inspiration project created with the March 2023 Scrapbook Kit with Upgrades. The variety of the patterned papers and coordinating stickers in the March kit is amazing. As you know, I’m a fun fold fanatic so I created a Spring-themed bendi card from patterned papers and stickers from the collection!

Using the Hot Off The Press Bendi Card Cutting Dies, I die cut the bendi card base pieces from a pretty pink plaid paper in the kit and adhered the panels to each side.

I embellished the panels with stickers from the sticker sheet, Doodlebug Design Lily White Doodle Twine, an Eyelet Outlet mini butterfly brad and several small clear Darice gemstones. This project was so easy, it practically made itself, lol! ;)

Affiliate links are used in this post at no cost to you – I really appreciate your support!

ScrapbookingStore products used:
March 2023 Scrapbook Kit with Upgrades

Other products used:
Cardstock/Paper: Neenah Classic Crest 80# Solar White cardstock
Dies/Punches: Hot Off The Press Bendi Card Cutting Dies
Accessories: Tonic Studios 12” Guillotine Paper Trimmer, Art Glitter Dries Clear adhesive, Big Shot, Doodlebug Design Lily White Doodle Twine, Eyelet Outlet mini butterfly brad, Darice small clear gemstones

I hope you’ve enjoyed today’s project and you’re thinking about all the fun you could have with this kit… you really ought to think about joining the Subscription Club! Be sure to Follow us on Facebook, Instagram, Pinterest and YouTube for lots of crafty inspiration! And if you do decide to join the Subscription Club, join our ScrapbookingStore Club Member Group on Facebook for more inspiration and to share your projects! Thanks so much for stopping by today – we’ll see you next time!

Scrappy hugs,

April Showers Bring May Flowers

Hey everybody! Happy Saturday! Betcha thought it would never get here, lol! Honestly, the time is flying by! I’m back this morning with another ScrapbookingStore DT inspiration project created with the March 2023 Scrapbook Kit with Upgrades that I shared on social media but had to wait until our internet was restored to blog it. I really like the coordinating journaling cards, stickers and papers in the March collection because I can make a card in no time. There are journaling cards and stickers for just about every sheet of patterned paper in the kit! Who doesn’t love that?!

I cut a standard A2 sized side-folding card base from Neenah Classic Crest 110# Solar White cardstock along with a layering panel from the matching patterned paper in the kit, and layering panels from CutCardStock Bright Silver Foil and Pop Tone Black Licorice cardstock. I trimmed the journaling card, layered the panels together, and adhered them to the card front. I added a couple star epoxy stickers from the upgrades and applied Glossy Accents to the raindrops for a little interest.

I cut the inside panel from 80# Solar White cardstock and embellished it with a wide strip of the patterned paper and a narrow strip of the Pop Tone Black Licorice cardstock used on the front. I added a sentiment sticker from the sticker sheet, which completed the card. Easy peasy!

Affiliate links are used in this post at no cost to you – I really appreciate your support!

ScrapbookingStore products used:
March 2023 Scrapbook Kit with Upgrades

Other products used:
Cardstock/Paper: Neenah Classic 110# and 80# Solar White cardstock, CutCardStock Pop Tone Black Licorice and Bright Silver Foil cardstock Accessories: Tonic Studios 12” Guillotine Paper Trimmer, Art Glitter Dries Clear adhesive, Tombow Mono permanent adhesive, Glossy Accents

I hope you’ve enjoyed today’s project and you’re thinking about all the fun you could have with this kit… you really ought to think about joining the Subscription Club! Be sure to Follow us on Facebook, Instagram, Pinterest and YouTube for lots of crafty inspiration! And if you do decide to join the Subscription Club, join our ScrapbookingStore Club Member Group on Facebook for more inspiration and to share your projects! Thanks so much for stopping by today – we’ll see you next time!

Scrappy hugs,

Happy Holidays

Hey everybody! It’s just amazing to me that the month of April is just about over. Where is the time going?! I’ve mentioned several times that my mom always said that the older we get the faster time flies. Boy, she was right! I have an awesome CutCardStock DT inspiration project to share with you today featuring our Kale Green, Scottish Highlands Green and Tartan Red cardstock which I paired with my all-time favorite Neenah Classic Crest Solar White! I’m always in Christmas mode so I used some new Christmas paper and foliage dies in my stash to make this festive card!

Using the Kat Scrappiness Foliage Dies, I die cut the holly leaves and berries and the sprig from CutCardStock Kale Green, Scottish Highlands Green and Tartan Red cardstock and assembled them. Next, I die cut the wreath foliage from CutCardStock Kale Green cardstock and assembled it, adding three sets of holly leaves and berries (reserving the fourth one for the inside).

I cut a standard A2 size side-folding card base from Neenah Classic Crest 110# Solar White cardstock along with a layering panel from a plaid paper in the Craft Consortium Tartan 6×6 double-sided paper pad. I used the Lawn Fawn Happy Happy Happy Add-On stamps and dies for the front sentiment, stamping the sentiment in Memento Northern Pine ink. I added several Darice clear gemstones and a bow fashioned from Really Reasonable Ribbon red ribbon to the wreath.

I cut the inside panel from 80# Solar White cardstock and embellished it with strips of Tartan paper and Kale Green cardstock used on the front as well as the fourth set of holly leaves and berries. Using the Taylored Expressions In & Out Christmas stamp set, I stamped the sentiment in Memento Northern Pine ink.

Affiliate links are used in this post at no cost to you – I really appreciate your support!

CutCardStock products used:
Neenah Classic Crest 110# and 80# Solar White cardstock
Kale Green cardstock
Scottish Highlands Green cardstock
Tartan Red cardstock

Other products used:
Paper: Craft Consortium Tartan 6×6 double-sided paper pad
Stamps: Lawn Happy Happy Happy Add-On stamps, Taylored Expressions In & Out Christmas stamp set
Ink: Memento Northern Pine ink
Dies/Punches: Spellbinders Standard Circles Large and Small dies, Kat Scrappiness Christmas Foliage Dies, Lawn Fawn Happy Happy Happy Add-On dies
Accessories: Tonic Studios 12″ Guillotine Paper Trimmer, Scotch Advanced Tape Glider, Art Glitter Dries Clear adhesive, MISTI stamp tool, Big Shot, Really Reasonable Ribbon red diamond ribbon, EK Tools 3D Dots, Stampin’ Up Mini Dimensions, Darice clear gemstones

I hope you’ve enjoyed today’s project and you’re inspired to get crafty! Be sure to check out all the awesome cardstock and other goodies at CutCardStock (adhesives, labels, stickers, pens, watercolors and ribbon to name a few). And head on over to the CutCardStock Facebook Page and for more inspiration! Also, be sure to join our Creating with Card Stock Facebook Group for even more crafty inspiration! Thanks so much for stopping by today – we’ll see you next time!

Scrappy hugs,

Happy Birthday Silhouette

Hi friends! Happy Friday! I hope you’re planning to do something fun this weekend! I have another ScrapbookingStore DT inspiration project to share that I created with the March 2023 Scrapbook Kit with Upgrades! This is another one that I shared on social media but wasn’t able to blog it until our internet was restored. I tell you… you sure don’t realize how much you depend on internet (every single day) until you don’t have it! I was able to do simple tasks using my phone but writing blog posts on my phone was not in the stars, lol! I know people who do just about everything on their phone on a daily basis and I just can’t… I’m happy if I can charge it every other day. Bahahaha! Okay, on to my project… I really like the upgrades in the March kit and I used primarily die cuts from the upgrades to create this pretty silhouette birthday card. The fact that the die cuts can easily be used in a ‘stand-alone’ fashion for many projects is a definite plus!

I cut a standard A2 size side-folding card base from CutCardStock Basis 110# Natural cardstock. Using a corner die in the JustRite Card Front Basics Dies, I die cut four ornamental corners for the card front from a pretty pink patterned paper in the kit. Using a Cottage Cutz Double-Stitched Ovals die, I cut an oval for the card front from CutCardStock Bright Gold Foil. I then created the focal element by adhering a die cut silhouette, butterfly and flagged sentiment from the upgrades. Using a ruler, I bent the butterfly in half, creating dimension on the wings, and then added brown twine to the sentiment flag.

I cut the inside panel from CutCardStock Basis 80# Natural cardstock and embellished it with strips of CutCardStock Basis Soft Pink and Bright Gold Foil cardstock. I stamped a sentiment from the Stampin’ Up Beautiful You stamp set in Memento Espresso Truffle ink and layered the panel on Basis Soft Pink cardstock.

Affiliate links are used in this post at no cost to you – I really appreciate your support!

ScrapbookingStore products used:
March 2023 Scrapbook Kit with Upgrades

Other products used:
Cardstock/Paper: CutCardStock Basis 110# Natural, Basis 80# Natural, Basis Soft Pink and Bright Gold Foil cardstock
Stamps: Stampin’ Up Beautiful You stamp set
Ink: Memento Espresso Truffle ink
Dies/Punches: JustRite Card Front Basics Dies, Cottage Cutz Double-Stitched Ovals
Accessories: Tonic Studios 12” Guillotine Paper Trimmer, Art Glitter Dries Clear adhesive, Tombow Mono permanent adhesive, Big Shot, MISTI stamp tool, 1/2” double-sided foam strips, Studios Blackbird brown twine

I hope you’ve enjoyed today’s project and you’re thinking about all the fun you could have with this kit… you really ought to think about joining the Subscription Club! Be sure to Follow us on Facebook, Instagram, Pinterest and YouTube for lots of crafty inspiration! And if you do decide to join the Subscription Club, join our ScrapbookingStore Club Member Group on Facebook for more inspiration and to share your projects! Thanks so much for stopping by today – we’ll see you next time!

Scrappy hugs,

Welcome BUNNY Season!

Hey everybody! Happy Thursday! I hope your weather is warming up so can enjoy some outdoor time! I’m stoked to be back with another Keep It Simple DT inspiration project that I’ve shared on social media but wasn’t able to blog because of internet troubles. This super cute peek-a-boo card was created with papers, die cuts, stamps and enamel dots from the new Bunny Season Collection! If you haven’t already seen it, you really need to check it out! So dang adorable!

I cut a standard A2 size side-folding card base from Neenah Classic Crest 110# Solar White cardstock and die cut a trio of apertures in the front flap using the Your Next Stamp Peek-A-Boo Trio die set. I placed several bunny die cuts from the Bunny Season Die Cut Pieces into the apertures and then placed a panel cut from a pink plaid paper from the Bunny Season 6×9 Collection Pack behind the apertures. I stamped a sentiment from the Bunny Season Collection stamp set in Memento Rich Cocoa ink, and added several Bunny Season Enamel Dots.

I cut the inside panel from 80# Solar White cardstock and embellished it with a couple Bunny Season Die Cut Pieces. I stamped another sentiment from the Bunny Season Collection stamp set in Memento Rich Cocoa ink and layered the panel on a print from the Bunny Season 6×9 Cardstock Pack.

Keep It Simple products used:
Bunny Season 6×9 Collection Pack
Bunny Season 6×9 Cardstock Pack
Bunny Season Die Cut Pieces
Bunny Season Collection stamp set
Bunny Season Enamel Dots

Affiliate links are used in this post at no cost to you – I really appreciate your support!

Other products used:
Cardstock/Paper: Neenah Classic Crest 110# and 80# Solar White cardstock
Ink: Memento Rich Cocoa ink
Dies/Punches: Your Next Stamp Peek-A-Boo Trio die set
Accessories: Tonic Studios 12″ Guillotine Paper Trimmer, Art Glitter Dries Clear adhesive, Big Shot, MISTI stamping tool

I hope you’ve loved seeing this project as much as I loved creating it, and you’re inspired to get crafty! Be sure to check out ALL the fun goodies in the Keep It Simple store such as paper, stamps, die cuts, ephemera, washi tape and enamel dots to name just a few! You’ll go cray-cray! Be sure to Follow us on Facebook, Instagram, and Pinterest for lots of crafty inspiration! Thanks so much for stopping by today – we’ll see you next time!

Scrappy hugs,

Dream in full color

Hey everybody! I hope you’re having a fabulous week! This month is flying by – can you believe we’re already on the downslide to May?! I’m up on the Prickley Pear Stamps blog today with an inspiration project featuring the Rainbow Dreams stamps which are part of the amazing Celestial Collection! It’s been ages since I’ve played with my stencils so I got out my mini cloud stencil and some distress ink and created a fun background to compliment these amazing stamps!

I cut a standard A2 size top-folding landscape card base from Neenah Classic Crest 110# Solar White cardstock and stenciled the cloud background with the My Favorite Things Mini Cloud Edges Stencil, Ranger stormy sky distress ink and a blending brush. I stamped the rainbow and clouds from the Rainbow Dreams stamps on Solar White cardstock, colored the rainbow with alcohol markers, and fussy cut them. I added an Eyelet Outlet Mini Butterfly Brad to the rainbow for a little interest. I stamped a sentiment from the Rainbow Dreams stamps in the bottom center of the card front in Memento Tuxedo Black ink, added Cosmic Shimmer Fluffy Stuff to the clouds, and adhered the piece to the card base with Stampin’ Up Dimensionals. The finishing touch was adding several Eyelet Outlet white Enamel Dots. 

Affiliate links are used in this post at no cost to you – I really appreciate your support!

Prickley Pear Stamps products used:
Rainbow Dreams stamps

Other products used:
Cardstock/Paper: Neenah Classic Crest 110# Solar White cardstock
Ink: Ranger stormy sky distress ink; Memento Tuxedo Black ink (pad and marker); Arteza alcohol markers- R21, YR33, Y02, YG04, B14, P13
Accessories: Tonic Studios 12″ Guillotine Paper Trimmer, My Favorite Things Mini Cloud Edges Stencil, blending brush, Art Glitter Dries Clear adhesive, Tombow Mono permanent adhesive, Eyelet Outlet Mini Butterfly Brad, MISTI stamp tool, Cosmic Shimmer Fluffy Stuff, Milwaukee heat tool, Stampin’ Up Dimensionals, Eyelet Outlet White Enamel Dots

I hope you’ve enjoyed this project! Be sure to check out all the awesome stamps and dies at Prickley Pear Stamps! Save 10% on anything on the site when you shop at Prickley Pear Stamps by using coupon code LESLIE10 at checkout! And be sure to ‘like’ and ‘follow’ the Prickley Pear Stamps Facebook page to keep up with news and sales, and join Prickley Pear Pals (the fan group) for lots of fun crafty ideas and to share your creativity! And finally, we’d love to see you visit the Prickley Pear Stamps blog and become a Follower! Hope to see you there! Thanks so much for stopping by today – we’ll see you next time! ;)

Scrappy hugs,

Spring Memory Album

Hi everyone! I hope you’re having a good Wednesday! I’m delighted to be back with another post today to share a ScrapbookingStore DT inspiration project which I’ve shared on social media but was unable to blog until our internet was restored. This Spring-themed memory album was created with items in the March 2023 Scrapbook Kit with Upgrades, and I had THE best time making it! You know how I love me some mini albums! And yes, spring makes me HAPPY! ;) The coordinating papers and stickers in the March kit are pretty amazing!

I cut the album base from Neenah Classic Crest 110# Solar White cardstock and covered the front and back with a pretty floral paper from the kit. I then cut each page from 80# Solar White cardstock and embellished them with coordinating papers. I used stickers from the sticker sheet and die cut ovals (using Cottage Cutz Double-Stitched Oval dies) from CutCardStock Flamingo and Mantis Green cardstock.

I created pull-outs and pull-ups on several of the pages, leaving plenty of room for photos and journaling. I embellished the front with a sentiment from the sticker sheet, added a Velcro circle for the closure and embellished the closure strap with an enamel dot from the upgrades. The final touch was adding a tassel and charm (created with dies from the set) attached with a tiny ball chain and clasp from my stash.

Affiliate links are used in this post at no cost to you – I really appreciate your support!

ScrapbookingStore products used:
March 2023 Scrapbook Kit with Upgrades

Other products used:
Cardstock/Paper: Neenah Classic Crest 110# and 80# Solar White cardstock; CutCardStock Bright Gold Foil, Flamingo and Mantis Green cardstock
Dies/Punches: Concord & 9th Everyday Purse dies, Cottage Cutz Double-Stitched Ovals
Accessories: Tonic Studios 12” Guillotine Paper Trimmer, Art Glitter Dries Clear adhesive, Big Shot, 1/2″ double-sided foam strips, InkyStamper Papercrafting Velcro, tiny ball chain with clasp from stash

I hope you’ve enjoyed today’s project and you’re thinking about all the fun you could have with this kit… you really ought to think about joining the Subscription Club! Be sure to Follow us on Facebook, Instagram, Pinterest and YouTube for lots of crafty inspiration! And if you do decide to join the Subscription Club, join our ScrapbookingStore Club Member Group on Facebook for more inspiration and to share your projects! Thanks so much for stopping by today – we’ll see you next time!

Scrappy hugs,