‘thanks’ lattice card

Hey everybody! Happy Friday and Happy Birthday to me! I’m officially Medicare age today – my Medicare Advantage Plan started on the 1st and I couldn’t be happier! It’s sad when Medicare makes a girl happy! Bahahaha! But you’d totally understand this if you knew how crappy my insurance has been since I retired three years ago.

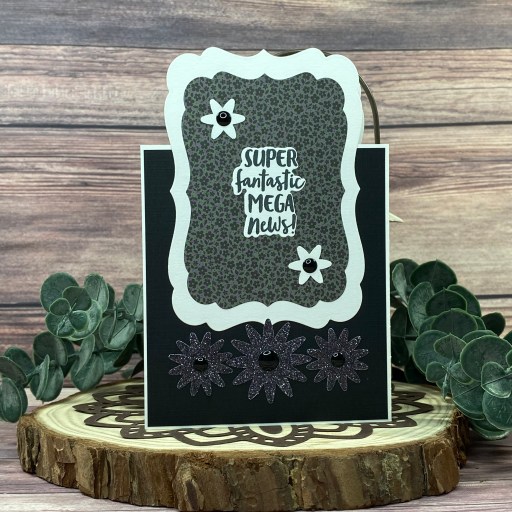
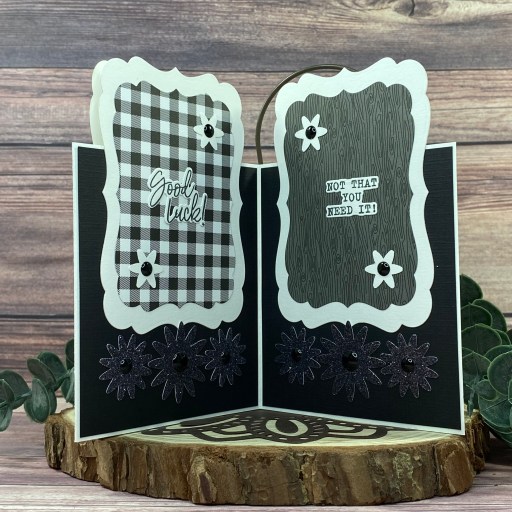
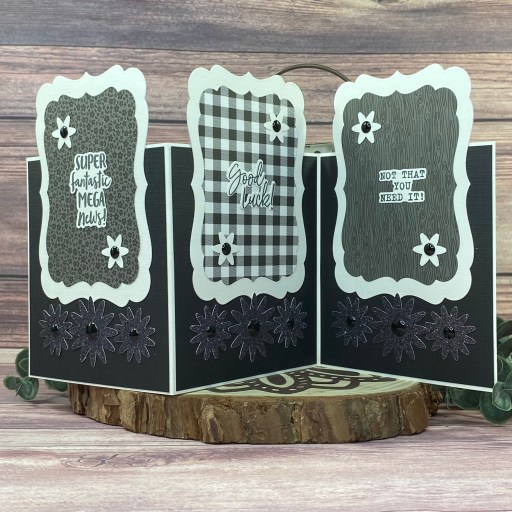
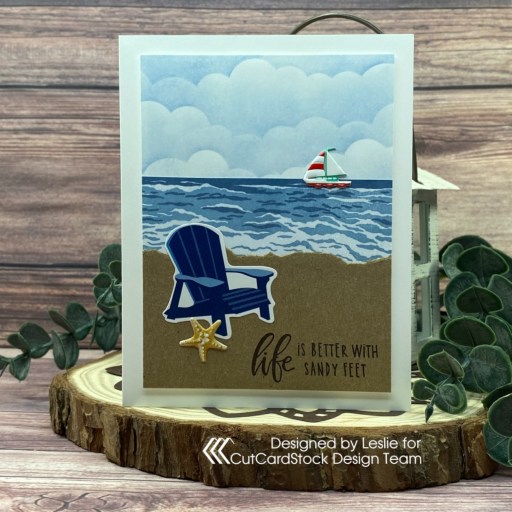
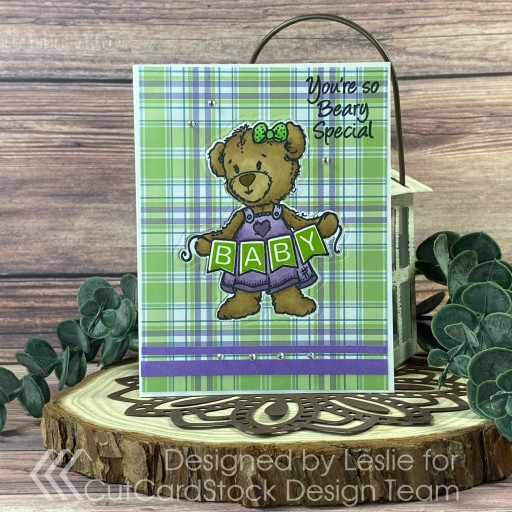
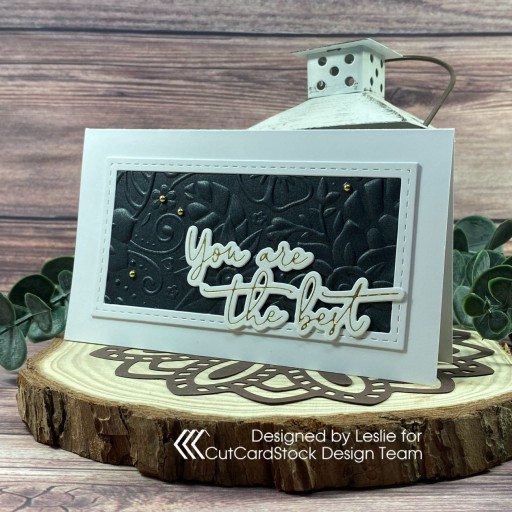
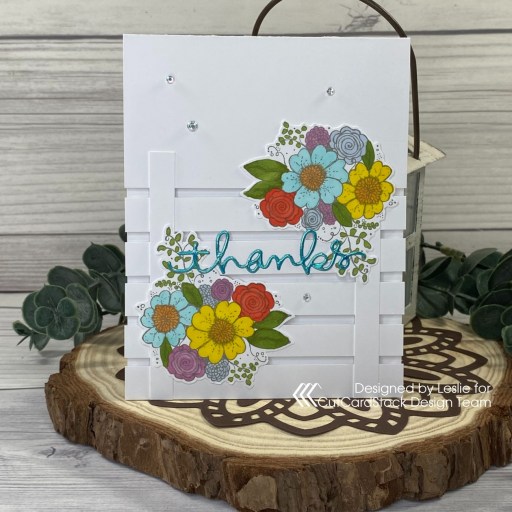
I’m up on the CutCardStock blog today with a pretty DT inspiration project featuring our Cougar Smooth White and Pop Tone Berrylicious cardstock! Lattice cards seem to be sweeping the internet lately and they are so pretty! And surprisingly easy! My inspiration for the lattice card came from THIS tutorial. I became a Stampin’ Up demonstrator back about 8-9 years ago under Brandy, and even though I didn’t stick with it, I still enjoy watching her videos. Our cards are a little different – she made a lattice split card and I made a regular top-folding version with a couple other changes.

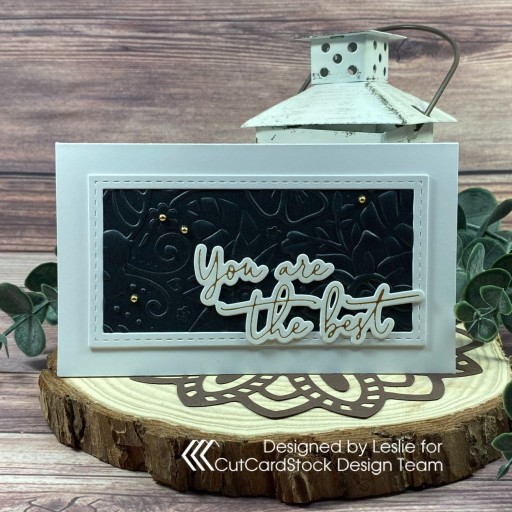
I cut the card base and lattice strips from Cougar Smooth 100# White cardstock along with a backing panel from Cougar Smooth 80# White cardstock. I assembled the lattice and added the backing panel with double-sided foam strips. I laminated a piece of deco foil Glass Slipper transfer sheet to a piece of deco foil Peel N Stick toner sheet, then die cut the ‘thanks’ sentiment using the Simon Says Stamp thanks die.

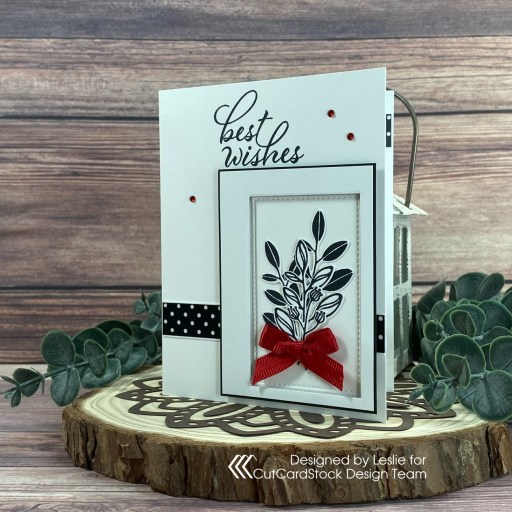
I stamped the floral image from the Unity Stamp Co. Big Summertime Bouquet stamp set twice in Catherine Pooler Twilight ink on Cougar Smooth 80# White cardstock, colored them with alcohol markers, and fussy cut them. I adhered the florals to the lattice along with the sentiment and added several iridescent gemstones.

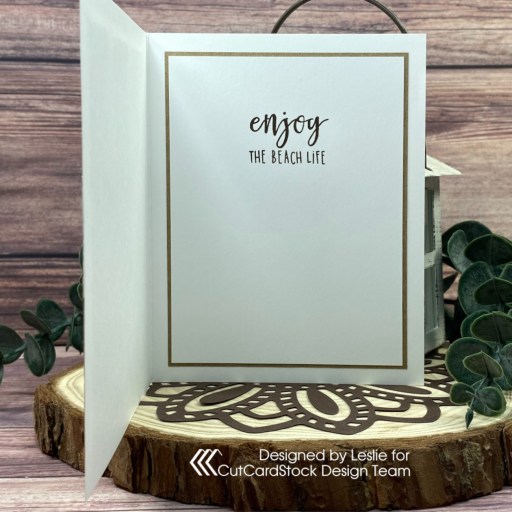
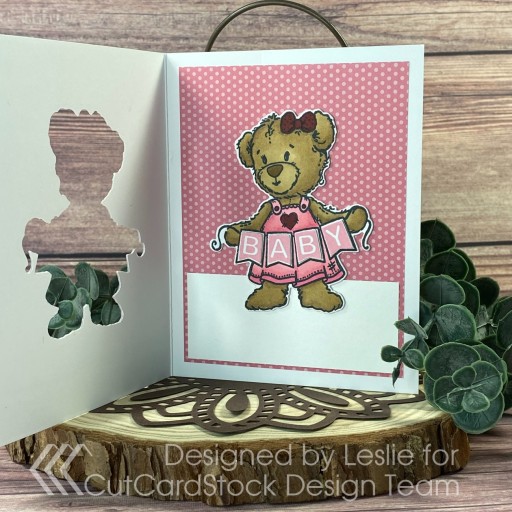
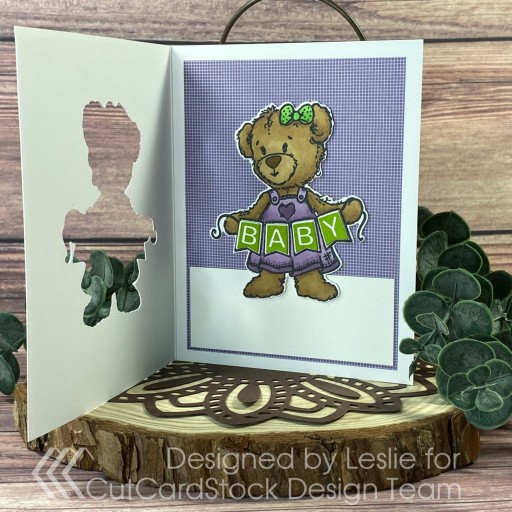
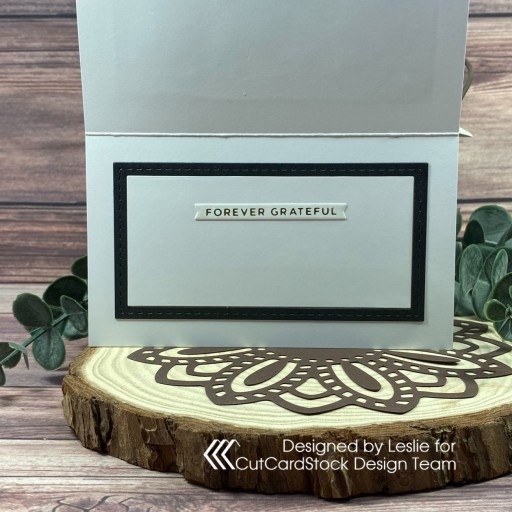
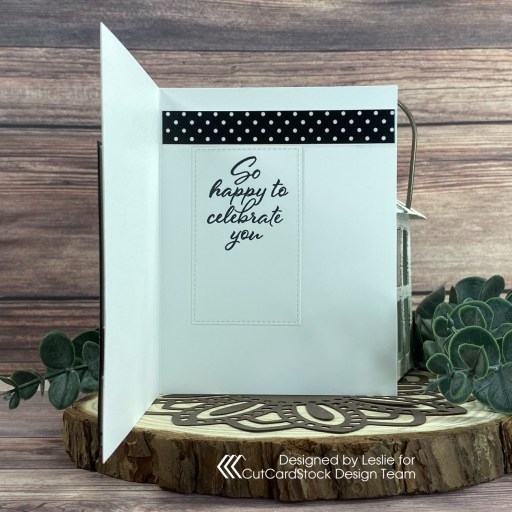
I cut the inside panel from Cougar Smooth 80# White cardstock and embellished it with two thin strips of Pop Tone Berrylicious cardstock. I stamped a sentiment from the Stampin’ Up Charming Sentiments stamp set in Catherine Pooler Twilight ink and cut it with the coordinating Stampin’ Up Sentiment Silhouettes die. I layered the panel on Berrylicious cardstock, which completed the card.

Sharing in the following challenges:
1. 613 Avenue Create: September 2023 – Anything Goes w/ optional Autumn Colors
2. A Perfect Time To Craft Open Challenge: September #9-2023 – Anything Goes
3. Alphabet Challenge Blog: N is for Nature
4. Beautiful Blossoms Challenge: #9 – Anything Goes Flowers w/ optional Mood Board
5. Classic Design Challenge: September #9 – Anything Goes
6. Crafty Catz: #653 – Anything Goes w/ optional Colors of Autumn
7. Jan’s Digi Stamps Challenge Blog: October Anything Goes
8. Make My Monday Challenge Blog: #210 – Make Your Own Background
9. My Time To Craft Challenge Blog: #518 – In The Garden

Affiliate links are used in this post at no cost to you – I really appreciate your support!

CutCardStock products used:
Cougar Smooth 100# White cardstock
Cougar Smooth 80# White cardstock
Pop Tone Berrylicious cardstock

Other products used:
STAMPS: Unity Stamp Co. Big Summertime Bouquet stamp set, Stampin’ Up Charming Sentiments stamp set
INK: Catherine Pooler Twilight ink; Arteza alcohol markers- B59, BG19, Y03, YR25, R14, RP26, YG15/16
DIES/PUNCHES: Simon Says Stamp thanks die, Stampin’ Up Sentiment Silhouettes dies
ACCESSORIES: Tonic Studios 12″ Guillotine Paper Trimmer, Tombow Mono Dots adhesive, Bearly Art precision craft glue, MISTI stamp tool, Big Shot, 1/4″ and 1″ double-sided foam strips, deco foil Peel N Stick Toner Sheets, deco foil Glass Slipper Transfer Sheets, Scotch 3M Laminator, iridescent gemstones

I hope you’ve enjoyed today’s project and you’re inspired to get crafty! Be sure to check out all the awesome cardstock and other goodies at CutCardStock (adhesives, labels, stickers, pens, watercolors and ribbon to name a few). And head on over to the CutCardStock Facebook Page and for more inspiration! Also, be sure to join our Creating with Card Stock Facebook Group for even more crafty inspiration! Thanks so much for stopping by today – we’ll see you next time!

Scrappy hugs,

so-fish-ticated

Hi friends! Happy Thursday! I sure hope your weather is cooling off where you are, even if it’s only just a little bit! It sure has been a warm summer! I’m up on the CutCardStock blog today with a very cool DT inspiration project featuring Neenah Classic Crest Solar White cardstock along with Strathmore Cotton Water Color cardstock. I also used Pop Tone Blue Raspberry cardstock on the inside to bring in the color of inks I used on the front for the coral.

I started by inking a 5×7 panel of Strathmore Cotton Water Color cardstock with Ranger stormy sky and a blending brush. I went around the outer perimeter of the panel with Ranger chipped sapphire, leaving the center of the panel just a tad lighter. I ended by spritzing a tiny bit of Let’s Resin Olive Chameleon Powder mixed with water in a Ranger Mini Mister to give it some shimmer. Unfortunately, the shimmer doesn’t show up well in the photos.

I cut a standard A2 size side-folding card base from Neenah Classic Crest 110# Solar White cardstock. Next, I stamped the angelfish and coral using the Hero Arts Color Layering Royal Angelfish stamp set. I used Memento Tuxedo Black ink along with Catherine Pooler Sauna, Juniper Mist and Rockin’ Red inks for the angelfish. I used Memento Tuxedo Black along with Catherine Pooler Mardi Gras, Aquatini and In the Park inks for the coral. I chose to fussy cut the fish and coral rather than use the coordinating dies, and then ran a Tuxedo Black marker around the edges for a more finished look.

I adhered the coral to the background panel, leaving the tops loose for a dimensional look. I adhered the angelfish and then stamped bubbles in black ink which I colored in with a Kirarina Wink White Pearl marker. I stamped the sentiment in black ink and then adhered the panel to the card base.

I cut the inside panel from Neenah Classic Crest 80# Solar White and embellished it with a leftover strip of the inked panel from the front and a slightly wider strip of CutCardStock Pop Tone Blue Raspberry. I stamped the sentiment and some bubbles (from the same stamp set) in black ink and colored in the bubbles again with the Kirarina Wink White Pearl marker.

Sharing in the following challenges:
1. A Perfect Time To Craft Open Challenge: September #9-2023 – Anything Goes
2. A Place To Start: September 2023 – Anything Goes w/ optional All That Glitters
3. Classic Design Challenge: September #9 – Anything Goes

Affiliate links are used in this post at no cost to you – I really appreciate your support!

CutCardStock products used:
Neenah Classic Crest 110# and 80# Solar White cardstock
Strathmore Cotton 5×7 Water Color cardstock
Pop Tone Blue Raspberry cardstock

Other products used:
STAMPS: Hero Arts Color Layering Royal Angelfish stamp set
INK: Ranger stormy sky and chipped sapphire distress inks; Memento Tuxedo Black ink (pad and marker); Catherine Pooler Mardi Gras, Aquatini, In the Park, Sauna, Juniper Mist and Rockin’ Red inks; Kirarina Wink White Pearl marker
ACCESSORIES: Tonic Studios 12″ Guillotine Paper Trimmer, blending brush, Let’s Resin Olive Chameleon Powder, Ranger Mini Mister, Tombow Mono Dots adhesive, Bearly Art precision craft glue, MISTI stamp tool

I hope you’ve enjoyed today’s project and you’re inspired to get crafty! Be sure to check out all the awesome cardstock and other goodies at CutCardStock (adhesives, labels, stickers, pens, watercolors and ribbon to name a few). And head on over to the CutCardStock Facebook Page and for more inspiration! Also, be sure to join our Creating with Card Stock Facebook Group for even more crafty inspiration! Thanks so much for stopping by today – we’ll see you next time!

Scrappy hugs,

Super Fantastic Mega News!

Happy Hump Day, everybody! I hope you’re having a great week! I’m up on the CutCardStock blog today with an awesome DT inspiration project featuring our Basis White, Basis White 12×12, Royal Sundance Linen Eclipse Black and Silk Glitter Black Prince cardstock. I created a pretty tri-fold congratulations card in a gorgeous black and white color combo. You know how I love me some fun folds! I made one similar to this recently with oval panels. The best part of this particular design is being able to make the panels whatever shape you want! ;)

I cut the tri-fold card base from Basis 80# White 12×12 cardstock along with layering panels from Royal Sundance Linen Eclipse Black cardstock. I then die cut decorative panels for the three panels from Basis 80# White 8.5×11 cardstock along with slightly smaller ones from Doodlebug Design Floral-Graph and Buffalo Check-Woodgrain Rainbow Petite Prints. I used the old-as-the-hills Spellbinders Nestabilities Labels Seventeen dies which I’m sure I’ve had in my stash (along with many others in this line) for close to ten years, lol!

Using the Stampin’ Up Blossom Bunch Punch, I punched quite a few flowers from Silk Glitter Black Prince cardstock and Basis White cardstock, and added Eyelet Outlet Black Enamel Dots to the centers of each. I adhered them across the bottom of the three panels and on each decorative panel. I stamped the sentiments from the Stampin’ Up Charming Sentiments stamp set in Catherine Pooler Black Jack ink and cut them with the coordinating Stampin’ Up Sentiment Silhouettes Dies.

I cut a small signature panel for the back from Basis White which I layered on a coordinating Doodlebug Design pattern.

Sharing in the following challenges:
1. 613 Avenue Create: September 2023 – Purely Anything Goes
2. A Perfect Time To Craft Open Challenge: September #9-2023 – Anything Goes
3. Classic Design Challenge: September #9 – Anything Goes
4. Crafty Calendar Challenge: September Anything Goes
5. Jan’s Digi Stamps Challenges: September 2023 Anything Goes
6. Little Red Wagon: #721 – Square or Rectangle
7. Wednesday’s Creative Inspirations Challenge Blog: September – Sentimental

Affiliate links are used in this post at no cost to you – I really appreciate your support!

CutCardStock products used:
Basis 80# White cardstock
Basis 80# White 12×12 cardstock
Royal Sundance Linen Eclipse Black cardstock
Silk Glitter Black Prince 12×12 cardstock

Other products used:
PAPER: Doodlebug Design Floral-Graph and Buffalo Check-Woodgrain Rainbow Petite Prints
STAMPS: Stampin’ Up Charming Sentiments stamp set
INK: Catherine Pooler Black Jack ink
DIES/PUNCHES: Spellbinders Nestabilities Labels Seventeen Dies, Stampin’ Up Blossom Bunch Punch, Stampin’ Up Sentiment Silhouettes Dies
ACCESSORIES: Tonic Studios 12″ Guillotine Paper Trimmer, Tombow Mono Dots adhesive, Bearly Art precision craft glue, MISTI stamp tool, Big Shot, Eyelet Outlet Black Enamel Dots

I hope you’ve enjoyed today’s project and you’re inspired to get crafty! Be sure to check out all the awesome cardstock and other goodies at CutCardStock (adhesives, labels, stickers, pens, watercolors and ribbon to name a few). And head on over to the CutCardStock Facebook Page and for more inspiration! Also, be sure to join our Creating with Card Stock Facebook Group for even more crafty inspiration! Thanks so much for stopping by today – we’ll see you next time!

Scrappy hugs,

life is better with sandy feet

Hey everybody! Happy Hump Day! I have an awesome CutCardStock DT inspiration project to share with you today featuring our Brown Bag Kraft that I paired with the amazing Neenah Classic Crest 80# Solar White cardstock. This card design is super simple and only requires an inked sky, stamped water and torn kraft paper for the beach sand on the background panel! Then add any other elements you want to create a scene!

I cut a standard A2 size side-folding card base and background panel from Neenah Classic Crest 80# Solar White cardstock. I stamped the water in Catherine Poole Tranquil, Stone Blue and Cove Blue inks using the Hero Arts Color Layering Waves stamp set on a scrap piece of Solar white cardstock which I trimmed and added to the center of the background panel. Using the My Favorite Things Mini Cloud Edges Stencil, a blending brush and Ranger stormy sky distress ink, I created the sky on the upper third section of the panel.

The final step in creating the scene was tearing a piece of CutCardStock Brown Bag Kraft which I adhered to the bottom of the panel, and then trimmed the entire panel. I added an Adirondack chair sticker from the Carta Bella Beach Party Collection Kit along with Eyelet Outlet starfish and boat brads. I stamped a sentiment from the same stamp set in Catherine Pooler Icing on the Cake ink, and adhered the panel to the card base with 1″ double-sided foam strips.

I cut the inside panels from Solar White and Brown Bag Kraft paper, and stamped another sentiment from the Hero Arts stamp set in brown ink.

Sharing in the following challenges:
1. A Perfect Time To Craft Open Challenge: August #8-2023 – Anything Goes
2. Classic Design Challenge: August #8 – Anything Goes
3. Crafty Gals Corner: #246 – Summer Fun
4. My Time To Craft Challenge Blog: #514 – Stenciling (sky/clouds)
5. Outlawz Monday Greetings Challenge: Happy Summer Holiday w/ twist of Sun, Sea or Beach
6. Shopping Our Stash: #503 – Hot Hot Hot
7. Sparkles Monthly Challenges: #167 – Tropical and/or Beach
8. Try It On Tuesday: Let’s Go Outside

Affiliate links are used in this post at no cost to you – I really appreciate your support!

CutCardStock products used:
Neenah Classic Crest 80# Solar White cardstock
CutCardStock Brown Bag Kraft cardstock
Tombow Mono Dots adhesive

Other products used:
PAPER: Carta Bella Beach Party Collection Kit
STAMPS: Hero Arts Color Layering Waves stamp set
INK: Ranger stormy sky distress ink; Catherine Pooler Tranquil, Stone Blue, Cove Blue and Icing on the Cake inks
ACCESSORIES: Tonic Studios 12″ Guillotine Paper Trimmer, My Favorite Things Mini Cloud Edges Stencil, blending brush, MISTI stamp tool, Eyelet Outlet Seashore Brads and Boat & Lighthouse Brads, 1″ double-sided foam strips

I hope you’ve enjoyed today’s project and you’re inspired to get crafty! Be sure to check out all the awesome cardstock and other goodies at CutCardStock (adhesives, labels, stickers, pens, watercolors and ribbon to name a few). And head on over to the CutCardStock Facebook Page and for more inspiration! Also, be sure to join our Creating with Card Stock Facebook Group for even more crafty inspiration! Thanks so much for stopping by today – we’ll see you next time!

Scrappy hugs,

Inlaid Die Cut Window Cards

Hey everybody! Happy Tuesday and Happy Birthday to my sister! I’ve been saying for years now that once her birthday comes around, Christmas is right behind it! I have an awesome CutCardStock DT inspiration project to share with you today featuring our Cougar Smooth White cardstock along with Royal Sundance Burgundy Linen and Pop Tone Grape Jelly cardstock. I discovered with this project that our slightly thicker Cougar White 4×6 Flat Cards are great for adding dimensional die cuts! These baby girl cards with inlaid die cut windows turned out so cute and were such fun to make!

I cut two standard size A2 side-folding card bases from Cougar Smooth 100# White cardstock along with front layering panels from two patterned papers which I washi taped to the card fronts. Using the Dare 2B Artzy Bear Banner die set, I die cut the bear shape apertures into the front flap on each card (through both layers) and removed the washi tape. I tossed the plaid paper negative space pieces and saved the cardstock ones for stamping.

I adhered the plaid paper layering panels and embellishing strips cut from Royal Sundance Burgundy Linen cardstock and Pop Tone Grape Jelly cardstock to each card front. I stamped the bears on the reserved negative spaces in Memento Tuxedo Black ink using the Dare 2B Artzy Bear Banner stamp set, colored them with alcohol markers, and layered each of them onto two more die cuts (cut from slightly thicker Cougar White 110# White Flat Cards) prior to adhering them to the inside of the card.

The B-A-B-Y banner pieces for each card were also stamped on Cougar White 110# White Flat Card in Catherine Pooler It’s a Girl and Lime Rickey inks. I stamped the front sentiment in Memento Tuxedo Black ink in the upper right corner on each of the card fronts and added clear iridescent gemstones.

Here are shots of the inside of each card. The inside panels for each card were cut from coordinating papers along with a Cougar Smooth White cardstock panel for a signature. Typically inlaid die cuts are flat but these cards open up to reveal the window that the dimensional die cut fits into, which is a slightly different twist. ;)

Sharing in the following challenges:
1. 613 Avenue Create: August 2023 – Anything Goes w/ optional CAS (no twist)
2. A Perfect Time To Craft Open Challenge: August #8-2023 – Anything Goes
3. Classic Design Challenge: August #8 – Anything Goes
4. Crafty Calendar Challenge: August Anything Goes
5. Jan’s Digi Stamps Challenges: August Anything Goes

Affiliate links are used in this post at no cost to you – I really appreciate your support!

CutCardStock products used:
Cougar Smooth 100# White cardstock
Cougar White 110# White Flat Cards
Royal Sundance Burgundy Linen cardstock
Pop Tone Grape Jelly cardstock
Tombow Mono Dots adhesive

Other products used:
PAPER: Recollections Bold Basics 8.5×11 paper pad
STAMPS: Dare 2B Artzy Bear Banner stamp set
INK: Memento Tuxedo Black ink; Catherine Pooler It’s A Girl and Lime Rickey inks; Arteza alcohol markers- BR62/74/84, RP15/16, P34/36, G06, R30
DIES/PUNCHES: Dare 2B Artzy Bear Banner die set
ACCESSORIES: Tonic Studios 12″ Guillotine Paper Trimmer, Bearly Art precision craft glue, MISTI stamp tool, Big Shot, clear iridescent gemstones

I hope you’ve enjoyed today’s project and you’re inspired to get crafty! Be sure to check out all the awesome cardstock and other goodies at CutCardStock (adhesives, labels, stickers, pens, watercolors and ribbon to name a few). And head on over to the CutCardStock Facebook Page and for more inspiration! Also, be sure to join our Creating with Card Stock Facebook Group for even more crafty inspiration! Thanks so much for stopping by today – we’ll see you next time!

Scrappy hugs,

Let Your Dreams Set Sail

Hey everybody! I hope you had a good week and you have something fun planned this weekend! I have an awesome CutCardStock DT inspiration project to share with you today featuring our Pop Tone Lemon Drop and Pop Tone Red Hot cardstock which I paired with our Cougar Smooth 100# White cardstock. The Pop Tone line is one of my favorites because of all the beautiful colors. I created a CAS masculine birthday card using a stamp set and punch that I think I’ve only used once and felt like they needed to come out for another play!

I cut a standard A2 size top-fold card base from Cougar Smooth 100# White cardstock. Using the Stampin’ Up Let’s Set Sail stamp set, I stamped the lake and sailboat shadow on the card base in Catherine Pooler Stone Blue and Cove Blue inks. I die cut a stitched circle for the sun from Pop Tone Lemon Drop cardstock using the Keep It Simple Stitched Circles Nested Dies and stamped the lake across the bottom of the circle and fussy cut the border to match up with the lake stamped on the card front.

I ink blended Ranger fossilized amber distress ink around the edges of the circle with a blending brush. Using the same stamp set, I stamped the sailboat elements in Catherine Pooler Rockin’ Red and Twilight inks and punched them with the Stampin’ Up Sailboat Builder punch. I adhered the sun and sailboat, and then stamped the birds and sentiment in Memento Tuxedo Black ink.

I stamped the inside sentiment from the same Stampin’ Up Let’s Set Sail stamp set in Memento Tuxedo Black ink, then adhered Pop Tone Red Hot and Pop Tone Lemon Drop cardstock strips across the top.

Sharing in the following challenges:
1. 613 Avenue Create: July 2023 – Anything Goes w/ optional Nautical (playing twist)
2. A Perfect Time To Craft Open Challenge: July #7-2023 – Anything Goes
3. A Place To Start: July 2023 – Anything Goes w/ optional Life Is A Beach! (playing twist)
4. Classic Design Challenge: July #7 – Anything Goes

Affiliate links are used in this post at no cost to you – I really appreciate your support!

CutCardStock products used:
Cougar Smooth 100# White cardstock
Pop Tone Lemon Drop cardstock
Pop Tone Red Hot cardstock

Other products used:
STAMPS: Stampin’ Up Let’s Set Sail stamp set
INK: Catherine Pooler Stone Blue, Cove Blue, Rockin’ Red and Twilight inks; Ranger fossilized amber distress ink, Memento Tuxedo Black ink
DIES/PUNCHES: Stampin’ Up Sailboat Builder Punch, Keep It Simple Stitched Circles Nested Dies
ACCESSORIES: Tonic Studios 12″ Guillotine Paper Trimmer, Bearly Art precision craft glue, MISTI stamp tool, Big Shot, blending brush

I hope you’ve enjoyed today’s project and you’re inspired to get crafty! Be sure to check out all the awesome cardstock and other goodies at CutCardStock (adhesives, labels, stickers, pens, watercolors and ribbon to name a few). And head on over to the CutCardStock Facebook Page and for more inspiration! Also, be sure to join our Creating with Card Stock Facebook Group for even more crafty inspiration! Thanks so much for stopping by today – we’ll see you next time!

Scrappy hugs,

hey, there!

7/9/23 CAS Weekly Favorite at Splitcoast Stampers!

Hey everybody! Wishing you all a wonderful Friday! I have an awesome CutCardStock DT inspiration project to share that consists mainly of organic/free-form shaped images! This clean and simple card features our Cougar Smooth White, Pop-Tone Black Licorice and Stardream Metallic Amethyst cardstock. AND one of my favorite purple and teal color combos! These stamps have been sitting on my desk for months and I’m not sure why I haven’t used them before now… this is truly one of the easiest cards I’ve ever made!

I cut a standard A2 size side-folding card base along with layering panels from Cougar Smooth 80# White and Pop Tone Black cardstock, and rounded the bottom right corners. I stamped the free-form shaped images from the My Favorite Things Petite Prints stamp set in Catherine Pooler Serenade and Cummerbund inks and Memento Tuxedo Black ink. I added the punched circles in random areas, popping them up on foam pads. I stamped the sentiment from the Stampin’ Up Charming Sentiments stamp set in black ink on a Cougar scrap and cut it with the coordinating Charming Sentiments die. I added a few clear iridescent gemstones which completed the card front.

I cut the inside panel from Cougar cardstock and embellished it with Pop Tone Black Licorice, Stardream Metallic Amethyst and Cougar White strips. I added another sentiment from the same Stampin’ Up Charming Sentiment stamps and dies.

Sharing in the following challenges:
1. 613 Avenue Create: July 2023 – Anything Goes w/ optional Nautical (no twist)
2. A Perfect Time To Craft Open Challenge: July #7-2023 – Anything Goes
3. Classic Design Challenge: July #7 – Anything Goes
4. Crafts Galore Encore Challenge Blog: #113 – July Anything Goes
5. Jan’s Digi Stamps Challenge: July Anything Goes
6. Penny’s Paper-Crafty Challenge Blog: #550 – Anything Goes with Paper

Affiliate links are used in this post at no cost to you – I really appreciate your support!

CutCardStock products used:
Cougar Smooth 80# White cardstock
Pop-Tone Black Licorice cardstock
Stardream Metallic Amethyst

Other products used:
STAMPS: My Favorite Things Petite Prints stamp set, Stampin’ Up Charming Sentiments stamp set
INK: Catherine Pooler Serenade and Cummberbund inks, Memento Tuxedo Black ink
DIES/PUNCHES: Kadomaru Pro corner rounder, Stampin’ Up Charming Sentiments die set
ACCESSORIES: Tonic Studios 12″ Guillotine Paper Trimmer, CutCardStock Plus High Capacity adhesive, Art Glitter Dries Clear adhesive, MISTI stamp tool, Stampin’ Up 3/4″ circle punch, Stampin’ Up Dimensionals, clear iridescent gemstones

I hope you’ve enjoyed today’s project and you’re inspired to get crafty! Be sure to check out all the awesome cardstock and other goodies at CutCardStock (adhesives, labels, stickers, pens, watercolors and ribbon to name a few). And head on over to the CutCardStock Facebook Page and for more inspiration! Also, be sure to join our Creating with Card Stock Facebook Group for even more crafty inspiration! Thanks so much for stopping by today – we’ll see you next time!

Scrappy hugs,

You are the best

Hey everybody! I hope you’re having a good week – it’s almost the weekend! I have an awesome CutCardStock DT inspiration project to share with you today featuring our Stardream Metallic Onyx cardstock and Cougar Smooth White cardstock that I paired with a pretty foiled sentiment. This design is super simple, has some great texture, and would be easy to mass produce with different sentiments.

I cut a 3-1/2″ x 6″ mini slimline card base from Cougar Smooth 100# White cardstock. Using a Kat Scrappiness Mini Slimline Tri-Frame Die, I die cut three stitched frames from Cougar Smooth 80# White cardstock and one from Stardream Metallic Onyx cardstock. I adhered the white frames together for dimension and reserved one of the negative space rectangles for the inside panel.

Using the Sizzix Bohemian Botanicals 3-D Textured Impressions Embossing Folder, I dry embossed the black negative space rectangle (after spritzing the back side with a little water) to use as the focal panel on the card front. I created the sentiment using a Pinkfresh Studio Fancy Script Words Hot Foil Plate along with Spellbinders Glimmer Hot Foil System and a foil roll from the Glimmer Hot Foil Spellbound Variety Pack, and cut it with the coordinating Pinkfresh Studio Fancy Script Words Die. The finishing touch was adding several pearls from the Kat Scrappiness Gold Pearl Mix.

The inside panel consisted of one of the Cougar Smooth 80# White cardstock negative space rectangles and the Stardream Metallic Onyx cardstock frame. I added a sentiment created with a Spellbinders Mini Everyday Sentiments Glimmer Plate, Glimmer Hot Foil System and Glimmer Hot Foil Gold Roll, and cut it with the coordinating Spellbinders Mini Everyday Sentiments Die.

Sharing in the following challenges:
1. Penny’s Paper-Crafty Challenge Blog: #549 – Anything Goes with Paper
2. Shopping Our Stash: #499 – Sentimentally Yours
3. Wednesday’s Creative Inspirations Challenge Blog: June Challenge – Something for the Girls

Affiliate links are used in this post at no cost to you – I really appreciate your support!

CutCardStock products used:
Cougar Smooth 100# White cardstock
Cougar Smooth 80# White cardstock
Stardream Metallic Onyx cardstock

Other products used:
Dies/Punches: Kat Scrappiness Mini Slimline Tri-Frame Dies, Pinkfresh Studio Fancy Script Words Dies, Spellbinders Mini Everyday Sentiments Dies
Accessories: Tonic Studios 12″ Guillotine Paper Trimmer, CutCardStock Plus High Capacity adhesive, Art Glitter Dries Clear adhesive, Big Shot, Sizzix Bohemian Botanicals 3-D Textured Impressions Embossing Folder, Pinkfresh Studio Fancy Script Words Hot Foil Plates; Spellbinders Glimmer Hot Foil System, Glimmer Hot Foil Gold Roll, Glimmer Hot Foil Spellbound Variety Pack and Mini Everyday Sentiments Glimmer Plates; Kat Scrappiness Gold Pearl Mix

I hope you’ve enjoyed today’s project and you’re inspired to get crafty! Be sure to check out all the awesome cardstock and other goodies at CutCardStock (adhesives, labels, stickers, pens, watercolors and ribbon to name a few). And head on over to the CutCardStock Facebook Page and for more inspiration! Also, be sure to join our Creating with Card Stock Facebook Group for even more crafty inspiration! Thanks so much for stopping by today – we’ll see you next time!

Scrappy hugs,

best wishes

6/11/23 Rising Star at A Place To Start!
6/22/23 Winner at Penny’s Paper-Crafty Challenge Blog!

Hey everybody! I hope you’re having a great week! I have an awesome CutCardStock DT inspiration project to share featuring Neenah Classic Crest Solar White cardstock (a staple in my studio) that I paired with our Pop Tone Black Licorice cardstock! This pretty birthday card was created in black and white with just a pop of red, which is one of my all-time favorite color combos! The best part is the supply list for this clean and simple design is minimal and the card is easy to reproduce!

I cut a standard A2 size side-folding card base from Neenah Classic Crest 110# Solar White along with small layering panels from Solar White and CutCardStock Pop Tone Black Licorice. I created an off-center frame by die cutting a stitched rectangle into the Solar White panel using a My Favorite Things Stitched Rectangle STAX die which I retained for later use. I hand cut a rectangle into the Black Licorice panel, adhered the frame panels together, and applied double-sided foam strips to the back.

I applied Doodlebug Design Beetle Black Swiss Dot washi tape to a strip of Solar White cardstock which I layered horizontally beneath the frame. I stamped the sentiment from the Stampin’ Up Layering Leaves stamp set at the top of the card base front in Memento Tuxedo Black ink. I then stamped the florals (from the same stamp set) on Solar White cardstock in black ink, punched them with the coordinating Stampin’ Up Bough Punch, and adhered them to the stitched rectangle which I adhered inside the frame. I added a small red bow fashioned from Stampin’ Up Real Red ribbon and several Eyelet Outlet small red gemstones, which completed the card front.

For the inside, in keeping with the design on the front, I applied Doodlebug Design Beetle Black Swiss Dot washi tape to another strip of Solar White cardstock which I layered horizontally across the top. The final step was stamping the sentiment (from the same Stampin’ Up Layering Leaves stamp set) in Tuxedo Black ink on the second stitched rectangle die cut.

Sharing in the following challenges:
1. 613 Avenue Create: June 2023 – Anything Goes w/ optional Good Old Summertime (no twist)
2. A Perfect Time To Craft: June #6-2023 – Anything Goes
3. A Place To Start: June 2023 – Anything Goes
4. Classic Design Challenge: June #6 – Anything Goes
5. Crafts Galore Encore Challenge: #112 – Anything Goes
6. Penny’s Paper-Crafty Challenge Blog: #548 – Anything Goes with Paper
7. QKR Stampede: #466 – Anything Goes
8. Wednesday’s Creative Inspirations Challenge Blog: June Challenge – Something For the Girls

Affiliate links are used in this post at no cost to you – I really appreciate your support!

CutCardStock products used:
Neenah Classic Crest 110# Solar White cardstock
CutCardStock Pop Tone Black Licorice cardstock

Other products used:
Stamps: Stampin’ Up Layering Leaves stamp set
Ink: Memento Tuxedo Black ink
Dies/Punches: My Favorite Things Stitched Rectangle STAX, Stampin’ Up Bough Punch
Accessories: Tonic Studios 12″ Guillotine Paper Trimmer, Art Glitter Dries Clear adhesive, MISTI stamp tool, Big Shot, Doodlebug Design Beetle Black Swiss Dot washi tape, Darice double-sided foam strips, Stampin’ Up Real Red ribbon, Eyelet Outlet red gemstones

I hope you’ve enjoyed today’s project and you’re inspired to get crafty! Be sure to check out all the awesome cardstock and other goodies at CutCardStock (adhesives, labels, stickers, pens, watercolors and ribbon to name a few). And head on over to the CutCardStock Facebook Page and for more inspiration! Also, be sure to join our Creating with Card Stock Facebook Group for even more crafty inspiration! Thanks so much for stopping by today – we’ll see you next time!

Scrappy hugs,

Celebrate mini slimline step card

Hey everybody! Dang, another weekend has come and gone! Where is the time going?! I have an awesome CutCardStock DT inspiration project to share today featuring Neenah Classic Crest 110# Solar White cardstock that I paired with our gorgeous Stardream Metallic Azalea and Kale Green cardstock! I absolutely love a pink and green color combo, and I’ve been a fan of step cards for many years and have made them in many different sizes. I put my thinking cap on and re-worked the measurements to create one in a mini slimline 3-1/2″ x 6″ size! I’m sharing the measurements for this (as well as my regular slimline size) in the Freebies section of my blog HERE if you’re interested.

I cut the mini slimline size step card base from Neenah Classic Crest 110# Solar White cardstock along with layering panels from Stardream Metallic Azalea cardstock that I ran through the Big Shot with Cuttlebug Swiss Dot and Candy Cane Strip embossing folders. I assembled the card and added a sentiment to the front that I die cut from Kale Green cardstock using the Scrapbook.com Celebrate die. I also added floral die cuts created with the Pinkfresh Studio In The Meadow Washi Tape and Die. The finishing touch was adding several gemstones from the Trinity Stamps Morganite Muse Embellishment Mix with my Trinity Pick Up Stick.

I cut the back panels from 80# Solar White and Stardream Metallic Azalea cardstock and stamped a sentiment from the Stampin’ Up Charming Sentiments stamp set in Memento Cottage Ivy ink.

Sharing in the following challenges:
1. A Perfect Time To Craft Open Challenge: May #5-2023
2. Beautiful Blossoms: #5 – Anything Flowers Goes w/ optional Mood Board
3. Classic Design Challenge: May #5 – Anything Goes
4. Cut It Up: #278 – Send Me Flowers
5. Use Your Stuff: #484 – Use A Technique (fun fold)

Affiliate links are used in this post at no cost to you – I really appreciate your support!

CutCardStock products used:
Neenah Classic Crest 110# and 80# Solar White cardstock
Stardream Metallic Azalea cardstock
Kale Green cardstock

Other products used:
Stamps: Stampin’ Up Charming Sentiments stamp set
Ink: Memento Cottage Ivy ink
Dies/Punches: Scrapbook.com Celebrate die, Pinkfresh Studio In The Meadow Die
Accessories: Tonic Studios 12″ Guillotine Paper Trimmer, Fiskars 12″ SureCut Paper Trimmer, Art Glitter Dries Clear adhesive, Cuttlebug Swiss Dots and Candy Cane Stripes Embossing Folders, MISTI stamp tool, Big Shot, Pinkfresh Studio In The Meadow Washi Tape, 1/4″ and 1″ double-sided foam strips, Trinity Stamps Morganite Muse Embellishment Mix, Trinity Pick Up Stick

I hope you’ve enjoyed today’s project and you’re inspired to get crafty! Be sure to check out all the awesome cardstock and other goodies at CutCardStock (adhesives, labels, stickers, pens, watercolors and ribbon to name a few). And head on over to the CutCardStock Facebook Page and for more inspiration! Also, be sure to join our Creating with Card Stock Facebook Group for even more crafty inspiration! Thanks so much for stopping by today – we’ll see you next time!

Scrappy hugs,