Vintage Yuletide Greetings

Hey everybody, happy Friday! I’m still working on Christmas projects which I do all year long. How about you… have you started on them, are you plugging away, or are you finished? I’m up on the Prickley Pear Stamps blog today with an inspiration project featuring the absolutely gorgeous Cardinals and Cardinals 2 Stamp Sets along with the coordinating Cardinal Die and the Heart Oval Insert Die. This CAS-ish vintage card is a super simple design that would be so easy to mass produce for everybody on your Christmas list.

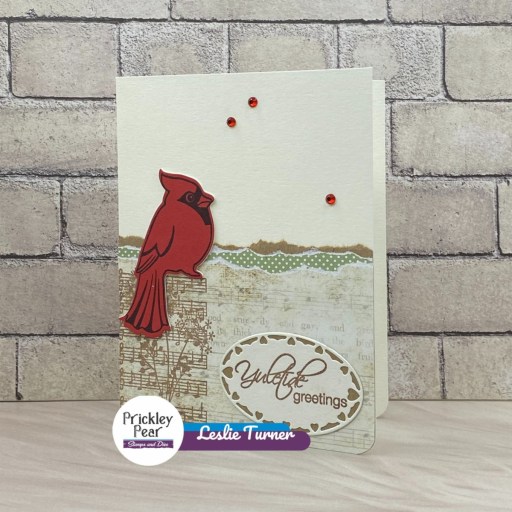
I cut a standard A2 size side-folding card base from CutCardStock Basis 80# Natural cardstock along with layering panels from CutCardStock Brown Bag Kraft Paper and two coordinating papers from the Hot Off The Press Christmas Memories double-sided paper pack. I tore the top edge of the three layering panels and adhered them to the card base. I stamped the floral music image from the Cardinals stamp set on the left edge and the sentiment (from the Cardinals 2 stamp set) on a scrap piece of Basis Natural cardstock, both in Catherine Pooler Over Coffee ink, and cut the sentiment with the Heart Oval Insert Die. I traced around the outside edge of the oval die cut with a pencil onto a scrap piece of kraft paper, hand-cut it just inside the tracing line, and adhered it behind the die cut.

I stamped the cardinal in Memento Tuxedo Black ink on CutCardStock Basis Red cardstock and cut it with the coordinating Cardinal Die. I die cut two additional cardinals and adhered them on top of one another for a little dimension, and then adhered them to the card front. The finishing touch was adding several Eyelet Outlet small red gemstones.

Sharing in the following challenges:
1. A Perfect Time To Craft Open Challenge: #11-2023 – Anything Goes
2. Classic Design Challenge: October #10 – Anything Goes
3. Critter Crazy Challenges: #80 – Anything Goes with a Featured Critter
4. Cut It Up: #290 – Layer It Up

Affiliate links are used in this post at no cost to you – I really appreciate your support!

Prickley Pear Stamps products used:
Cardinals Stamp Set
Cardinals 2 Stamp Set
Cardinal Die
Heart Oval Insert Die

Other products used:
CARDSTOCK/PAPER: CutCardStock Basis Natural and Basis Red cardstock and Brown Bag Kraft paper, Hot Off The Press Christmas Memories 6×6 double-sided papers
INK: Catherine Pooler Over Coffee ink, Memento Tuxedo Black ink
DIES/PUNCHES: Kadomaru Pro Corner Rounder
ACCESSORIES: Tonic Studios 12″ Guillotine Paper Trimmer, Gina K Designs Adhesive Dot Runner, Bearly Art precision craft glue, MISTI stamp tool, Big Shot, Eyelet Outlet red gemstones

I hope you’ve enjoyed this project! Be sure to check out all the awesome stamps and dies at Prickley Pear Stamps! Save 10% on anything on the site when you shop at Prickley Pear Stamps by using coupon code LESLIE10 at checkout! And be sure to ‘like’ and ‘follow’ the Prickley Pear Stamps Facebook page to keep up with news and sales, and join Prickley Pear Pals (the fan group) for lots of fun crafty ideas and to share your creativity! And finally, we’d love to see you visit the Prickley Pear Stamps blog and become a Follower! Hope to see you there! Thanks so much for stopping by today – we’ll see you next time! ;)

Scrappy hugs,

let it snow

Hey everybody! We had our first snow of the season a couple days ago but it wasn’t much and all melted away! We’re just a mere 6-7 (ish) weeks from Christmas, so are you getting ready?! I’ve been making Christmas cards all year long and I’m still making them! I’m up on the Prickley Pear Stamps blog today with another inspiration project featuring the beautiful Ornaments 2 stamp set. I made a mini slimline featuring three clusters of hanging snowflakes and I really love how it turned out!

I cut a 3-1/2″ x 6″ mini slimline card base from CutCardStock Cougar 80# Smooth White cardstock. Using the Kat Scrappiness Mini Slimline Fancy Scalloped Dies, I cut a Cougar Smooth White panel for the front. I also cut a frame from CutCardStock Stardream Metallic Lagoon cardstock using the Kat Scrappiness Mini Slimline Tri-Frame dies. I stamped three clusters of hanging snowflakes and a sentiment in Catherine Pooler Cummerbund ink. I added gemstones from the Trinity Stamps Aquamarine Ripple Embellishment Mix to the center of each snowflake with my Trinity Pick Up Stick. The finishing touch was adding several Eyelet Outlet Teal Enamel Dots.

Sharing in the following challenges:
1. Classic Design Challenge: October #10 – Anything Goes

Affiliate links are used in this post at no cost to you – I really appreciate your support!

Prickley Pear Stamps products used:
Ornaments 2 stamp set

Other products used:
CARDSTOCK/PAPER: CutCardStock Cougar Smooth 80# White and Stardream Metallic Lagoon cardstock
INK: Catherine Pooler Cummerbund ink
DIES/PUNCHES: Kat Scrappiness Mini Slimline Fancy Scalloped Dies and Mini Slimline Tri-Frame Dies
ACCESSORIES: Tonic Studios 12″ Guillotine Paper Trimmer, CutCardStock Plus High Capacity adhesive, Art Glitter Dries Clear adhesive, MISTI stamp tool, Big Shot, Eyelet Outlet Teal Enamel Dots, Trinity Stamps Aquamarine Ripple Embellishment Mix, Trinity Pick Up Stick

I hope you’ve enjoyed this project! Be sure to check out all the awesome stamps and dies at Prickley Pear Stamps! Save 10% on anything on the site when you shop at Prickley Pear Stamps by using coupon code LESLIE10 at checkout! And be sure to ‘like’ and ‘follow’ the Prickley Pear Stamps Facebook page to keep up with news and sales, and join Prickley Pear Pals (the fan group) for lots of fun crafty ideas and to share your creativity! And finally, we’d love to see you visit the Prickley Pear Stamps blog and become a Follower! Hope to see you there! Thanks so much for stopping by today – we’ll see you next time! ;)

Scrappy hugs,

Happy Holidays

Hey everybody! I hope you’re having a great day! I’m up on the Prickley Pear Stamps blog today with an inspiration project featuring the Ornaments 2 stamp set! I totally love clean and simple and this stamp set is perfect for creating this kind of card. There are several different ornaments in this set that you can stamp by themselves or group together.

I cut a standard A2 size side-folding card base from CutCardStock Cougar 100# Smooth White cardstock. I stamped an ornament from the Ornaments 2 stamp set in Catherine Pooler Icing on the Cake ink on a scrap piece of Cougar 80# Smooth White and cut it in a diamond shape using the My Favorite Things Mini Scallop Square STAX. I used a Pentel Slicci gold pen to draw a hanger on the ornament and then layered it on a small panel of CutCardStock Bright Gold Foil cardstock. I stamped the sentiment from the same stamp set in brown ink and added several pearls from the Kat Scrappiness Gold Mix using my Trinity Pick Up Stick.

Sharing in the following challenges:
1. ABC Christmas Challenge: U and V are for? (V for vertical – square die turned vertically to make diamond)
2. Classic Design Challenge: October #10 – Anything Goes

Affiliate links are used in this post at no cost to you – I really appreciate your support!

Prickley Pear Stamps products used:
Ornaments 2 stamp set

Other products used:
CARDSTOCK/PAPER: CutCardStock Cougar 100# Smooth White, Cougar 80# Smooth White, and Bright Gold Foil cardstock
INK: Catherine Pooler Icing on the Cake ink, Pentel Slicci Gold pen
DIES/PUNCHES: My Favorite Things Mini Scallop Square STAX
ACCESSORIES: Tonic Studios 12″ Guillotine Paper Trimmer, CutCardStock Plus High Capacity adhesive, Art Glitter Dries Clear adhesive, MISTI stamp tool, Big Shot, Kat Scrappiness Gold Pearl Mix, Trinity Pick Up Stick

I hope you’ve enjoyed this project! Be sure to check out all the awesome stamps and dies at Prickley Pear Stamps! Save 10% on anything on the site when you shop at Prickley Pear Stamps by using coupon code LESLIE10 at checkout! And be sure to ‘like’ and ‘follow’ the Prickley Pear Stamps Facebook page to keep up with news and sales, and join Prickley Pear Pals (the fan group) for lots of fun crafty ideas and to share your creativity! And finally, we’d love to see you visit the Prickley Pear Stamps blog and become a Follower! Hope to see you there! Thanks so much for stopping by today – we’ll see you next time! ;)

Scrappy hugs,

When witches go riding

Hey everybody! Happy Monday! I hope you had a great weekend! I’m up on the Prickley Pear Stamps blog today with a super cute almost-one-layer card featuring a cat and two bats from the Scary Cat & Bats stamp set that I paired with some digital Halloween paper in my stash. This is a super easy design in traditional Halloween colors that packs a punch!

I already had several patterns of the Printable Cuttable Creatables Halloween Treats Digital Paper Pack (printed on 65# Hammermill copy paper) out on my desk from another project, so I cut two pieces into rectangles and then diagonally into long triangles. I cut a standard A2 size top-folding card base and rounded the bottom right corner. I adhered two of the long triangles to the left side, then stamped the sentiment in Memento Grape Jelly ink. I stamped the cat and two bats in Memento Tuxedo Black ink, and that completed the card. Easy peasy!

Sharing in the following challenges:
1. A Perfect Time To Craft Open Challenge: October #10 – Anything Goes
2. Crafty Calendar Challenge: Autumn Colors/Halloween
3. Critter Crazy Challenges: #79 – Anything Goes with a Featured Critter
4. Halloween Crafts All Year ‘Round: #8 – Anything Halloween Goes
5. Wednesday’s Creative Inspirations Challenge Blog: Autumn or Halloween

Affiliate links are used in this post at no cost to you – I really appreciate your support!

Prickley Pear Stamps products used:
Scary Cat & Bats stamp set

Other products used:
Cardstock/Paper: Neenah Classic Crest 110# Solar White cardstock, Printable Cuttable Creatables Halloween Treats Digital Paper Pack
Ink: Memento Grape Jelly and Tuxedo Black inks
Dies/Punches: Kadomaru Pro Corner Rounder
Accessories: Tonic Studios 12″ Guillotine Paper Trimmer, Bearly Art precision craft glue, MISTI stamp tool

I hope you’ve enjoyed this project! Be sure to check out all the awesome stamps and dies at Prickley Pear Stamps! Save 10% on anything on the site when you shop at Prickley Pear Stamps by using coupon code LESLIE10 at checkout! And be sure to ‘like’ and ‘follow’ the Prickley Pear Stamps Facebook page to keep up with news and sales, and join Prickley Pear Pals (the fan group) for lots of fun crafty ideas and to share your creativity! And finally, we’d love to see you visit the Prickley Pear Stamps blog and become a Follower! Hope to see you there! Thanks so much for stopping by today – we’ll see you next time! ;)

Scrappy hugs,

You Warm My Heart

Hey everybody! Happy Thursday afternoon! I’m up on the Prickley Pear Stamps blog today with an inspiration project featuring the new You Warm My Heart digital card kit created ‘on the fly’ by Prickley Pear Stamps artist, Kayla Ruble, for Joy to use for her live today at the 2023 Virtual Maker’s Retreat! What a great job this artist did in record time! This sweet digital card kit includes two black and white line images, two pre-colored images, snowflake and heart background paper, and a sentiment panel. I used the kit to create an adorable holiday gate fold card!

Be sure to pop over and check out the happenings at the Makers Retreat going on October 3-7! Before I get to my project details, here are a few links that will surely come in handy:
Sign Up for the Makers Retreat
Makers Retreat Schedule
Prickley Pear Stamps Live Stream (today, October 5, at 2:00 PM Central Time)

I cut a standard A2 size gate fold card base from CutCardStock Basis White cardstock along with layering panels from CutCardStock Pop Tone Red Hot cardstock and the background paper in the digital card kit which I printed on Basis White. I created a layered oval panel using the Keep It Simple Stitched Ovals Nested Dies along with the sentiment panel in the kit and the Red Hot cardstock. I adhered a fussy cut pre-colored image to the panel and colored the heart on the coffee cup with a Sakura Clear Star Gelly Roll pen. I affixed Eyelet Outlet red and white polka dot washi tape to Basis White cardstock strips which I adhered down both sides. The finishing touch was adding several iridescent gemstones to the snowflakes.

I cut the inside panel from Basis White and embellished it with a CutCardStock Blue Hydrangea cardstock strip and a washi tape strip. I stamped a sentiment from the Santa Koala and Mrs Claus stamp set in Memento Tuxedo Black ink which completed the card.

Sharing in the following challenges:
1. 613 Avenue Create: September 2023 – Anything Goes w/ optional Autumn Colors
2. A Barrel of Monkeys Challenge: #8 – Etch-A-Sketch (color red)
3. A Perfect Time To Craft Open Challenge: September #9-2023 – Anything Goes
4. Classic Design Challenge: September #9 – Anything Goes
5. Crafts Galore Encore Challenges: #116 – Anything Goes
6. Critter Crazy Challenges: #79 – Anything Goes with a Featured Critter
7. Penny’s Paper-Crafty Challenge Blog: #556 – Anything Goes with Paper

Affiliate links are used in this post at no cost to you – I really appreciate your support!

Prickley Pear Stamps products used:
You Warm My Heart Digital Card Kit
Santa Koala and Mrs Claus Stamp Set

Other products used:
CARDSTOCK/PAPER: CutCardStock Basis 80# White, Pop Tone Red Hot and Blue Hydrangea cardstock
INK: Memento Tuxedo Black ink (pad and marker), Sakura Clear Star Gelly Roll pen
DIES/PUNCHES: Keep It Simple Stitched Ovals Nested Dies
ACCESSORIES: Tonic Studios 12″ Guillotine Paper Trimmer, Tombow Mono Dots adhesive, Bearly Art precision craft glue, MISTI stamp tool, Big Shot, Eyelet Outlet red and white polka dot washi tape, iridescent gemstones

I hope you’ve enjoyed this project! Be sure to check out all the awesome stamps and dies at Prickley Pear Stamps! Save 10% on anything on the site when you shop at Prickley Pear Stamps by using coupon code LESLIE10 at checkout! And be sure to ‘like’ and ‘follow’ the Prickley Pear Stamps Facebook page to keep up with news and sales, and join Prickley Pear Pals (the fan group) for lots of fun crafty ideas and to share your creativity! And finally, we’d love to see you visit the Prickley Pear Stamps blog and become a Follower! Hope to see you there! Thanks so much for stopping by today – we’ll see you next time! ;)

Scrappy hugs,

Thanks so much

Hi friends! Happy Friday! The weekends sure seem to be coming around quickly these days! I’m up on the Prickley Pear Stamps blog today with an inspiration project featuring the new Thanks stamp set and coordinating Thanks die set! I created a mini slimline employing the raised inlaid die cut technique which I think always turns out so cool! These are amazing stamps and dies, and the large sentiment works perfectly for this technique and for a mini slimline card!

I cut a 3-1/2″ x 6″ mini slimline card base from CutCardStock Basis 110# Natural cardstock. I then cut a layering panel from a fabric print in the Keep It Simple Farmhouse Fall Collection Pack, die cut the large sentiment from the Thanks die set into the center of the panel, and adhered it to the card front on double-sided foam strips.

I stamped the Thanks sentiment in Memento Cottage Ivy ink on a piece of Basis Natural cardstock and colored it with alcohol markers. I die cut it with the coordinating Thanks die and adhered it into the negative space of the panel on the card front. I stamped the remainder of the sentiment on a Basis Natural scrap, trimmed it and adhered it beneath the sentiment. The finishing touch was stamping the dragonfly on a Basis Natural scrap in Memento Tuxedo Black ink which I colored, die cut and adhered to the upper left of the sentiment.

Sharing in the following challenges:
1. A Perfect Time To Craft Open Challenge: September #9-2023 – Anything Goes
2. A Place To Start: September 2023 – Anything Goes w/ optional All That Glitters
3. Classic Design Challenge: September #9 – Anything Goes
4. Penny’s Paper-Crafty Challenge Blog: #555 – Anything Goes with Paper

Affiliate links are used in this post at no cost to you – I really appreciate your support!

Prickley Pear Stamps products used:
Thanks stamp set
Thanks die set

Other products used:
CARDSTOCK/PAPER: CutCardStock Basis 110# Natural cardstock, Keep It Simple Farmhouse Fall 6×9 Collection Pack
INK: Memento Cottage Ivy and Tuxedo Black inks; Arteza alcohol markers- BR47, B17
ACCESSORIES: Tonic Studios 12″ Guillotine Paper Trimmer, Bearly Art precision craft glue, MISTI stamp tool, Big Shot, 1″ double sided foam strip

I hope you’ve enjoyed this project! Be sure to check out all the awesome stamps and dies at Prickley Pear Stamps! Save 10% on anything on the site when you shop at Prickley Pear Stamps by using coupon code LESLIE10 at checkout! And be sure to ‘like’ and ‘follow’ the Prickley Pear Stamps Facebook page to keep up with news and sales, and join Prickley Pear Pals (the fan group) for lots of fun crafty ideas and to share your creativity! And finally, we’d love to see you visit the Prickley Pear Stamps blog and become a Follower! Hope to see you there! Thanks so much for stopping by today – we’ll see you next time! ;)

Scrappy hugs,

So doggone lucky

Hi friends! Well, another week is almost behind us and we’ve once again quickly landed on Friday… but that’s not a bad thing! It just means we’re that much closer to Christmas! I’m up on the Prickley Pear Stamps blog today with an inspiration project featuring the super adorable new Doggone Good Friends stamps and dies! I’m sure everybody has that silly ‘ride or die’ friend who would appreciate a card made with these products! I’ve once again employed the inlaid die cut window technique for this fun friendship card, and I’m thrilled with how it turned out!

I cut a standard A2 size side-folding card base from Neenah Classic Crest 80# Solar White cardstock along with a layering panel from a patterned paper in the Keep It Simple Mango 12×12 Collection Pack. I adhered the patterned paper to the card base avoiding adhesive on the center portion where I planned to die cut an aperture for the inlay. Using a die from the Doggone Good Friends die set, I cut an aperture into the front flap of the card base, reserving the white cardstock negative space piece for stamping the focal image from the Doggone Good Friends stamp set.

I colored the image with alcohol markers and cut it with the coordinating Doggone Good Friends die. I stamped the first part of the sentiment on a scrap piece of Solar White cardstock in black ink, trimmed it and adhered it across the top of the card front. I stamped the other two parts of the sentiment directly on the card front and added several clear iridescent gemstones which I colored with a YR32 alcohol marker.

I cut layering panels and an embellishing strip for the inside from additional patterned papers in the Keep It Simple Mango 12×12 Collection Pack, and adhered the focal image through the aperture onto the inside panel. Such a fun card!

Sharing in the following challenges:
1. 613 Avenue Create: September 2023 – Purely Anything Goes
2. A Perfect Time To Craft Open Challenge: September #9-2023 – Anything Goes
3. Classic Design Challenge: September #9 – Anything Goes
4. Crafty Catz: Anything Goes w/ optional twist of Dies
5. Critter Crazy Challenges: #78 – Anything Goes with a Featured Critter

Affiliate links are used in this post at no cost to you – I really appreciate your support!

Prickley Pear Stamps products used:
Doggone Good Friends stamp set
Doggone Good Friends die set

Other products used:
CARDSTOCK/PAPER: Neenah Classic Crest 80# Solar White cardstock, Keep It Simple Mango 12×12 Collection Pack
INK: Memento Tuxedo Black ink; Arteza alcohol markers- YR00/14/17/32, R43, Y02/25/27/39, YG43, NG04, Br82/84; Sakura Clear Star Gelly Roll pen
ACCESSORIES: Tonic Studios 12″ Guillotine Paper Trimmer, Tombow Mono Dots adhesive, Bearly Art precision craft glue, MISTI stamp tool, Big Shot, clear iridescent gemstones (colored with YR32)

I hope you’ve enjoyed this project! Be sure to check out all the awesome stamps and dies at Prickley Pear Stamps! Save 10% on anything on the site when you shop at Prickley Pear Stamps by using coupon code LESLIE10 at checkout! And be sure to ‘like’ and ‘follow’ the Prickley Pear Stamps Facebook page to keep up with news and sales, and join Prickley Pear Pals (the fan group) for lots of fun crafty ideas and to share your creativity! And finally, we’d love to see you visit the Prickley Pear Stamps blog and become a Follower! Hope to see you there! Thanks so much for stopping by today – we’ll see you next time! ;)

Scrappy hugs,

Fully Rely On God

Hey everybody! Happy Monday – I hope you have a great week coming up! I’m up on the Prickley Pear Stamps blog today with another inspiration project featuring the new F.R.O.G. – Fully Rely On God mini 3×3 stamp set! What a powerful message from our sweet little Ramona, and I have to say that I humbly do this every day! I used some gorgeous Chantahlia Design digital papers for this simple A2 card which I paired with CutCardStock Basis Natural and Pop Tone Bubble Gum cardstock.

I cut a standard A2 size side-folding card base from CutCardStock Basis Natural cardstock and then die cut stitched rectangles from from Chantahlia Design Watercolor Florals digital papers (printed on Basis Natural), CutCardStock Pop Tone Bubble Gum and Basis Natural using the Keep It Simple Stitched Rectangles Nested Dies. I stamped the F.R.O.G. image on the Basis Natural stitched rectangle and colored it with alcohol markers and Sharpie Ultra Fine Point markers.

I cut a double-ended flag strip from a coordinating Chantahlia Design digital paper and layered it on Basis Natural. I assembled the card, popping the focal panel up on foam strips, and added several purple gemstones which completed the card.

Sharing in the following challenges:
1. A Perfect Time To Craft Open Challenge: September #9-2023 – Anything Goes
2. A Place To Start: September 2023 – Anything Goes w/ optional All That Glitters
3. Classic Design Challenge: September #9 – Anything Goes
4. Di’s Digi Stamps Challenge: Die Cuts and/or Punches
5. Jan’s Digi Stamps Challenges: September 2023 Anything Goes
6. Wednesday’s Creative Inspirations Challenge Blog: September Challenge – Sentimental

Affiliate links are used in this post at no cost to you – I really appreciate your support!

Prickley Pear Stamps products used:
F.R.O.G. – Fully Rely On God 3×3 stamp set

Other products used:
CARDSTOCK/PAPER: CutCardStock Basis Natural and Pop Tone Bubble Gum cardstock, Chantahlia Design Watercolor Florals digital papers
INK: Memento Tuxedo Black ink; Arteza alcohol markers- RP09, R46, P36, YG46/54, GS09, B18; Sharpie Ultra Fine Point markers- yellow, medium teal, light teal, hot pink, lime green and brown
DIES/PUNCHES: Keep It Simple Stitched Rectangles Nested Dies
ACCESSORIES: Tonic Studios 12″ Guillotine Paper Trimmer, Tombow Mono Dots adhesive, Bearly Art precision craft glue, MISTI stamp tool, Big Shot, 1″ double-sided foam strips, purple gemstones

I hope you’ve enjoyed this project! Be sure to check out all the awesome stamps and dies at Prickley Pear Stamps! Save 10% on anything on the site when you shop at Prickley Pear Stamps by using coupon code LESLIE10 at checkout! And be sure to ‘like’ and ‘follow’ the Prickley Pear Stamps Facebook page to keep up with news and sales, and join Prickley Pear Pals (the fan group) for lots of fun crafty ideas and to share your creativity! And finally, we’d love to see you visit the Prickley Pear Stamps blog and become a Follower! Hope to see you there! Thanks so much for stopping by today – we’ll see you next time! ;)

Scrappy hugs,

Have a Toadally Merry Christmas

Hey everybody! Dang, can you believe how fast the time is flying?! We’re already headed into the middle of September! I’m up on the Prickley Pear Stamps blog today with an inspiration project featuring the new Christmas with Spinach and Ramona stamp set! This is one of the cutest stamp sets I have ever had in my hands and I created an inverted standing triple panel card to show off these adorable little critters!

I cut the card base and front panel from CutCardStock Basis 80# White 12×12 cardstock. I stamped the image from the Christmas with Spinach and Ramona stamp set on the front panel and colored it with alcohol markers, adding some accents with metallic pens. I stamped snowflakes all over the card base and front panel and added clear iridescent gemstones to the center of random snowflakes for some pretty sparkle. I stamped the sentiment on Basis White, trimmed it into three strips, and added it to the front which completed the card.

Sharing in the following challenges:
1. A Perfect Time To Craft Open Challenge: September #9-2023 – Anything Goes
2. A Place To Start: September 2023 – Anything Goes w/ optional All That Glitters
3. Classic Design Challenge: September #9 – Anything Goes

Affiliate links are used in this post at no cost to you – I really appreciate your support!

Prickley Pear Stamps products used:
Christmas with Spinach and Ramona

Other products used:
CARDSTOCK/PAPER: CutCardStock Basis 80# White 12×12 cardstock
INK: Memento Tuxedo Black ink (pad and marker), Catherine Pooler Tranquil ink; Arteza alcohol markers- YG12/13/17/22, RP09/16, R14/15/21, B14/17, Y02, BR52/86, PB16, GS09, YR32; Pentel Slicci Gold, Metallic Violet and Metallic Green pens; Copic black 0.3 multi-liner pen, Sakura White Gelly Roll pen
ACCESSORIES: Tonic Studios 12″ Guillotine Paper Trimmer, Tombow Mono Dots adhesive, Bearly Art precision craft glue, MISTI stamp tool, clear iridescent gemstones

I hope you’ve enjoyed this project! Be sure to check out all the awesome stamps and dies at Prickley Pear Stamps! Save 10% on anything on the site when you shop at Prickley Pear Stamps by using coupon code LESLIE10 at checkout! And be sure to ‘like’ and ‘follow’ the Prickley Pear Stamps Facebook page to keep up with news and sales, and join Prickley Pear Pals (the fan group) for lots of fun crafty ideas and to share your creativity! And finally, we’d love to see you visit the Prickley Pear Stamps blog and become a Follower! Hope to see you there! Thanks so much for stopping by today – we’ll see you next time! ;)

Scrappy hugs,

Thanks so much for all you do

Hey everybody, Happy Monday! It’s the middle of August already and I’m telling you it’ll be Christmas before we know it! I’m up on the Prickley Pear Stamps blog today with an inspiration project featuring the new Thanks stamp set and coordinating Thanks die set! It’s been a minute since I made a tri-fold card and this one has panels on it rather than the typical slanted edge. I can’t say enough about these stamps and dies. Everybody needs thank you cards in their stash and those with a large sentiment sure speak volumes!

I cut a basic tri-fold card base from CutCardStock Basis Natural cardstock along with a layering panel from a floral print in the Melissa Frances 5th Avenue 6×6 paper pad. I stamped the large sentiment, two butterflies and a dragonfly from the Thanks stamp set on Basis Natural and colored them with alcohol markers. I fussy cut the letters and die cut the butterflies and dragonfly with the coordinating dies in the Thanks die set.

Using the Keep It Simple Stitched Ovals Nested dies, I die cut three ovals for each of the panels from Basis Natural and additional prints in the 5th Avenue paper pad, layered them and adhered them to the card base. I added the main sentiment to the first panel and stamped the remaining parts of the sentiment as well as leaf images (from the same stamp set) on the two subsequent panels. I embellished the front panel with a duplicate fussy cut floral image popped up on small foam pads and one of the butterflies, then added the other butterfly and the dragonfly to the other panels. The finishing touch was adding clear iridescent gemstones (colored with an alcohol marker) to each of the panels.

Sharing in the following challenges:
1. A Perfect Time To Craft Open Challenge: August #8-2023 – Anything Goes
2. Classic Design Challenge: August #8 – Anything Goes
3. Make My Monday Challenge: #207 – Three Images of Anything
4. The Crafter’s Cafe Challenge Blog: #300 – Colors of the Garden

Affiliate links are used in this post at no cost to you – I really appreciate your support!

Prickley Pear Stamps products used:
Thanks stamp set
Thanks die set

Other products used:
CARDSTOCK/PAPER: CutCardStock Basis 80# Natural cardstock, Melissa Frances 5th Avenue 6×6 paper pad
INK: Catherine Pooler Sand Castle ink; Arteza alcohol markers- R25/36, YG45/46, YR17/27, CG08, BR62, BG07
DIES/PUNCHES: Keep It Simple Stitched Ovals Nested Dies
ACCESSORIES: Tonic Studios 12″ Guillotine Paper Trimmer, Tombow Mono Dots adhesive, Bearly Art precision craft glue, MISTI stamp tool, Big Shot, Stampin’ Up Mini Dimensionals, clear iridescent gemstones (colored with BG07 alcohol marker)

I hope you’ve enjoyed this project! Be sure to check out all the awesome stamps and dies at Prickley Pear Stamps! Save 10% on anything on the site when you shop at Prickley Pear Stamps by using coupon code LESLIE10 at checkout! And be sure to ‘like’ and ‘follow’ the Prickley Pear Stamps Facebook page to keep up with news and sales, and join Prickley Pear Pals (the fan group) for lots of fun crafty ideas and to share your creativity! And finally, we’d love to see you visit the Prickley Pear Stamps blog and become a Follower! Hope to see you there! Thanks so much for stopping by today – we’ll see you next time! ;)

Scrappy hugs,