You are my sunshine

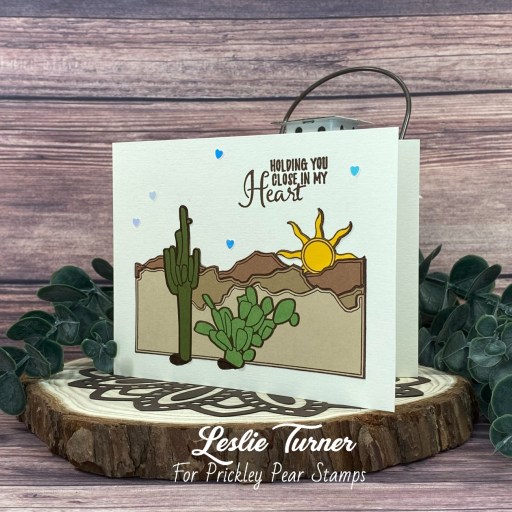
Howdy peeps! Well, it’s nearly the end of March and we are still having some pretty chilly weather out here in southwestern Colorado! I’m up on the Prickley Pear Stamps blog today with a fun fold (you know how I love fun folds!) featuring the You Are My Sunshine stamp set that was just released as part of the Celestial Collection! This stamp set is so stinkin’ cute, I can’t stand it! I had a lot of fun creating this hidden message slider card with it!

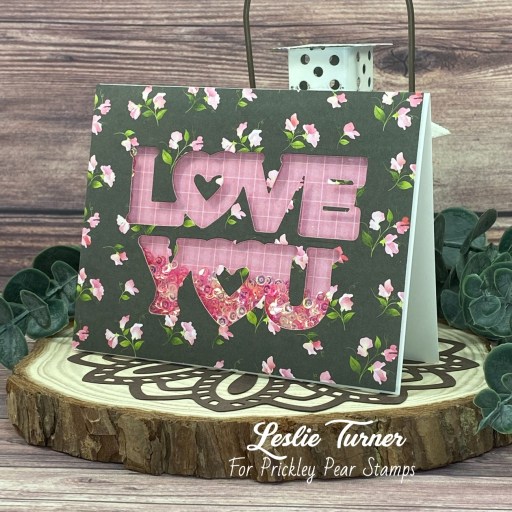
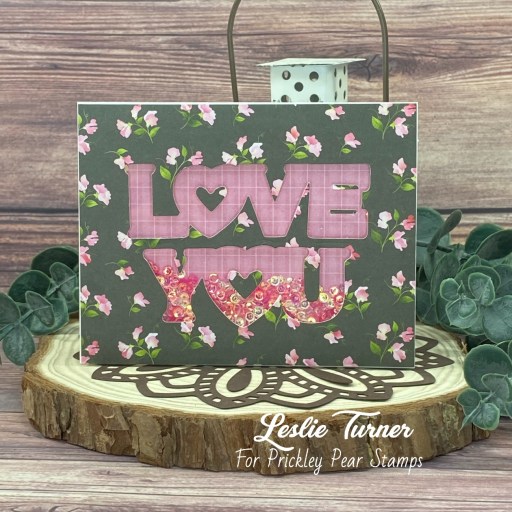
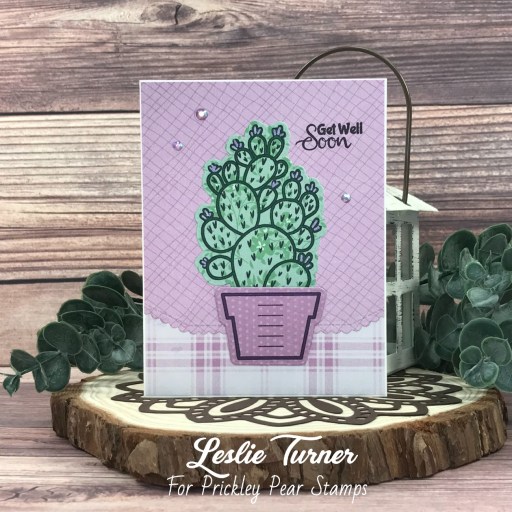
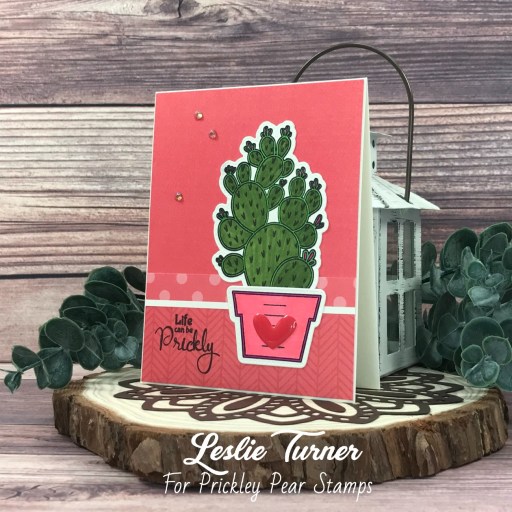
I cut the standard A2 size flat card base from Neenah Classic Crest 110# Solar White cardstock along with the slider mechanism from 80# Solar White cardstock (using my Fiskars 12″ SureCut Paper Trimmer). I then cut several panels from coordinating prints in the Keep It Simple Clementine Collection Pack. I stamped the image from the You Are My Sunshine stamp set in Memento Tuxedo Black ink, colored it with alcohol markers and fussy cut it. I adhered it to a scalloped square die cut (cut with the My Favorite Things Mini Scallop Square STAX) angled into a diamond shape. I fashioned a loop from green Hemptique Earthy Pastel crafting cord for the pull tab.

I stamped the sentiment (hidden message) on the panel inside the slider and added an Eyelet Outlet 4mm pink pearl strip to the bottom of the slider, which completed the project.

Affiliate links are used in this post at no cost to you – I really appreciate your support!

Prickley Pear Stamps products used:
You Are My Sunshine stamp set

Other products used:
Cardstock/Paper: Neenah Classic Crest 110# and 80# Solar White cardstock, Keep It Simple Clementine Collection Pack
Ink: Memento Tuxedo Black ink; Arteza alcohol markers- R21/25, Y12, BG54,YG15, G31
Dies/Punches: Stampin’ Up 1″ circle punch, Kadomaru Pro Corner Rounder, My Favorite Things Mini Scallop Square STAX, small hole punch
Accessories: Tonic Studios 12″ Guillotine Paper Trimmer, Fiskars 12″ SureCut Paper Trimmer, Tombow Mono permanent adhesive, Art Glitter Dries Clear adhesive, 1/4″ double-sided foam strips, MISTI stamp tool, Big Shot, Eyelet Outlet 4mm pink pearl strip, Hemptique Earthy Pastel crafting cord

I hope you’ve enjoyed this project! Be sure to check out all the awesome stamps and dies at Prickley Pear Stamps! Save 10% on anything on the site when you shop at Prickley Pear Stamps by using coupon code LESLIE10 at checkout! And be sure to ‘like’ and ‘follow’ the Prickley Pear Stamps Facebook page to keep up with news and sales, and join Prickley Pear Pals (the fan group) for lots of fun crafty ideas and to share your creativity! And finally, we’d love to see you visit the Prickley Pear Stamps blog and become a Follower! Hope to see you there! Thanks so much for stopping by today – we’ll see you next time! ;)

Scrappy hugs,

Wildly chase your dreams

Hey everybody! Happy Thursday – I hope you’re having a great week! This day is very special every year – it’s my sister’s birthday and she would have been 69 today. She’s been gone a number of years and I still miss her terribly. On a brighter note, I’m up on the Prickley Pear Stamps blog today with an inspiration project featuring the new Rainbow Dreams stamp set that was released yesterday! This stamp set is part of the amazing Celestial Collection, so stay tuned for more inspiration to come! You know how I love fun folds, and this one is an interlocking gatefold! I’ve made a few of these in the past and yes, they are quite fun!

I cut a standard A2 size landscape gatefold card base from Neenah Classic Crest 110# Solar White cardstock along with patterned paper layering panels from the Keep It Simple Lilac 12×12 Collection Pack. I cut two frames from CutCardStock Bright Silver Foil using two Spellbinders A2 Matting Basics A & B dies and adhered them together for a little extra stability. I stamped the rainbow on two layered die cut rectangles (also from the Spellbinders die sets) cut from Solar White cardstock, and colored the rainbow with Kirarina Wink markers and the clouds with an alcohol marker.

I stamped the sentiment on a scrap piece of Solar White cardstock, colored it with a purple Ultra Fine Point Sharpie marker and trimmed it. I popped the sentiment up on double-sided foam strips, and added two Eyelet Outlet Enamel Hearts along with 3mm White Pearl Strips around the silver foil frame, which completed the project.

Affiliate links are used in this post at no cost to you – I really appreciate your support!

Prickley Pear Stamps products used:
Rainbow Dreams stamp set

Other products used:
Cardstock/Paper: Neenah Classic Crest 110# and 80# Solar White cardstock, CutCardStock Bright Silver Foil cardstock, Keep It Simple Lilac 12×12 Collection Pack
Ink: Memento Tuxedo Black ink; Kirarina Wink markers- Baby Pink, Orange, Lemon Yellow, Lime Green, Aqua Blue and Violet; purple Sharpie Ultra Fine Point marker; GB08 Arteza alcohol marker; Copic multi-liner 0.3 black pen
Dies/Punches: Spellbinders A2 Matting Basics A & B dies
Accessories: Tonic Studios 12″ Guillotine Paper Trimmer, Tombow Mono permanent adhesive, Art Glitter Dries Clear adhesive, MISTI stamp tool, Big Shot, double-sided foam strips, Eyelet Outlet 3mm White Pearl Strip and Enamel Hearts

I hope you’ve enjoyed this project! Be sure to check out all the awesome stamps and dies at Prickley Pear Stamps! Save 10% on anything on the site when you shop at Prickley Pear Stamps by using coupon code LESLIE10 at checkout! And be sure to ‘like’ and ‘follow’ the Prickley Pear Stamps Facebook page to keep up with news and sales, and join Prickley Pear Pals (the fan group) for lots of fun crafty ideas and to share your creativity! And finally, we’d love to see you visit the Prickley Pear Stamps blog and become a Follower! Hope to see you there! Thanks so much for stopping by today – we’ll see you next time! ;)

Scrappy hugs,

Peace on Earth

Hi friends! Happy Monday! I hope you had a great weekend and you’re chomping at the bit to get back to work! NOT! Bahahaha! ! I’m up on the Prickley Pear Stamps blog today with a super easy inspiration project featuring the new Peace stamp set released last month! This stamp set so awesome and there’s no doubt in my mind you’ll be seeing more projects I’ve created with it!

I cut a standard A2 size top folding landscape card base from CutCardStock Basis 110# Natural cardstock along with a wood print layering panel from the Carta Bella Christmas Collection Kit. I stamped the sentiment at the top and paper-pieced the large fussy cut letters that I colored with alcohol markers. I adhered a deer from the coordinating sticker sheet in the kit, and the finishing touch was adding several Buttons Galore & More Doo Dadz Embellishments.

Affiliate links are used in this post at no cost to you – I really appreciate your support!

Prickley Pear Stamps products used:
Peace stamp set

Other products used:
Cardstock/Paper: CutCardStock Basis 110# Natural cardstock, Carta Bella Christmas Collection Kit (paper and sticker)
Ink: Memento Tuxedo Black ink (pad and markers); Arteza alcohol markers- R30/43, YG10/22/54, BR64
Accessories: Tonic Studios 12″ Guillotine Paper Trimmer, Art Glitter Dries Clear adhesive, MISTI stamp tool, Buttons Galore & More Pitter Patter Doo Dadz Embellishments

I hope you’ve enjoyed this project! Be sure to check out all the awesome stamps and dies at Prickley Pear Stamps! Save 10% on anything on the site when you shop at Prickley Pear Stamps by using coupon code LESLIE10 at checkout! And be sure to ‘like’ and ‘follow’ the Prickley Pear Stamps Facebook page to keep up with news and sales, and join Prickley Pear Pals (the fan group) for lots of fun crafty ideas and to share your creativity! And finally, we’d love to see you visit the Prickley Pear Stamps blog and become a Follower! Hope to see you there! Thanks so much for stopping by today – we’ll see you next time! ;)

Scrappy hugs,

Love You shaker

Hey everybody! A very Happy Tuesday to you – I hope you’re having a great week! I’m up on the Prickley Pear Stamps blog today with an inspiration project featuring the Love You dies from the January new release! There is a coordinating stamp set that goes with these dies which I didn’t use for this project, but stay tuned for some inspiration coming soon using the stamps and the dies! These are some awesome products and the sky is the limit with how they can be used! I absolutely LOVE shakers and as soon as I had these in my hand I knew I was going to make one!

I cut a standard A2 size top-folding landscape card base from Neenah Classic Crest 110# Solar White cardstock along with layering panels from two coordinating prints in the Hot Off The Press Sweet Pea 6×6 double-sided cardstock pack. I die cut the large sentiment into the floral cardstock using the Love You dies and reserving the negative spaces on the two heart Os and the E. I adhered a piece of Grafix Craft Plastic behind the apertures and added 1/2″ double-sided foam strips to the back of the panel.

I adhered the pink plaid cardstock to the card base and added several pinches of Pretty Pink Posh Strawberry Burst and Ballerina Pink sequins before sealing it up. Really happy with how this turned out!

Affiliate links are used in this post at no cost to you – I really appreciate your support!

Prickley Pear Stamps products used:
Love You dies

Other products used:
Cardstock/Paper: Neenah Classic Crest 110# Solar White cardstock, Hot Off The Press Sweet Pea 6×6 double-sided cardstock pack
Accessories: Tonic Studios 12″ Guillotine Paper Trimmer, Art Glitter Dries Clear adhesive, Tombow Mono permanent adhesive, Big Shot, 1/2″ double-sided foam strips, Grafix Craft Plastic, Pretty Pink Posh Strawberry Burst and Ballerina Pink sequins

I hope you’ve enjoyed this project! Be sure to check out all the awesome stamps and dies at Prickley Pear Stamps! Save 10% on anything on the site when you shop at Prickley Pear Stamps by using coupon code LESLIE10 at checkout! And be sure to ‘like’ and ‘follow’ the Prickley Pear Stamps Facebook page to keep up with news and sales, and join Prickley Pear Pals (the fan group) for lots of fun crafty ideas and to share your creativity! And finally, we’d love to see you visit the Prickley Pear Stamps blog and become a Follower! Hope to see you there! Thanks so much for stopping by today – we’ll see you next time! ;)

Scrappy hugs,

Sending Good Thoughts your way

Hi friends! Well, we busted through another week and it’s Saturday again! But that’s not a bad thing, is it?! I’m back up on the Prickley Pear Stamps blog today with another card featuring the oh-so-gorgeous Brighter Days Ahead stamp set which I absolutely love! Besides the amazing focal image, there are tons of sentiments. A couple days ago I shared a paper-pieced card created with it, so I colored the image on this one with alcohol markers. It’s difficult trying to achieve texture with markers but I think I did okay! ;)

I cut a standard A2 size side-folding card from CutCardStock 110# Basis Natural cardstock and rounded the bottom right corner. I stamped the image in Memento Rich Cocoa ink on 80# Basis Natural and masked the lower right corner of the image. I traced the rounded corner of the card base onto the image, and colored it with alcohol markers. I stamped the sentiment and added several flat sequins which completed the card.

Sharing in the following challenges:
1. Classic Design Challenge: February 2023 #2 – Anything Goes

Affiliate links are used in this post at no cost to you – I really appreciate your support!

Prickley Pear Stamps products used:
Brighter Days Ahead stamp set

Other products used:
Cardstock/Paper: CutCardStock 110# Basis Natural cardstock
Ink: Memento Rich Cocoa ink (pad and marker); Arteza alcohol markers- BR41/43/44/51, YG22/45, Y22
Dies/Punches: Kadomaru Pro Corner Rounder
Accessories: Tonic Studios 12″ Guillotine Paper Trimmer, Art Glitter Dries Clear adhesive, MISTI stamp tool, Picket Fence Studios Spiked Cider Sequin Mix

I hope you’ve enjoyed this project! Be sure to check out all the awesome stamps and dies at Prickley Pear Stamps! Save 10% on anything on the site when you shop at Prickley Pear Stamps by using coupon code LESLIE10 at checkout! And be sure to ‘like’ and ‘follow’ the Prickley Pear Stamps Facebook page to keep up with news and sales, and join Prickley Pear Pals (the fan group) for lots of fun crafty ideas and to share your creativity! And finally, we’d love to see you visit the Prickley Pear Stamps blog and become a Follower! Hope to see you there! Thanks so much for stopping by today – we’ll see you next time! ;)

Scrappy hugs,

Holding you close in my Heart

Hey everybody! I hope you’re having a fabulous week! I’m up on the Prickley Pear Stamps blog today with a beautiful uplifting card created with stamps from the gorgeous Brighter Days Ahead stamp set. I did quite a bit of paper piecing with colored cardstock on this CAS-ish card and I wish you could run your fingers over it and feel all the texture! I love how it turned out!

I cut a standard A2 size side-folding card base from CutCardStock 110# Basis Natural cardstock. I stamped the focal image on the card base in Memento Rich Cocoa ink and then six more times – once on CutCardStock Basis Gold, Basis Light Brown, Sandcastle, Ginger Snap, Pop Tone Jellybean Green and Pop Tone Gumdrop Green cardstock. Then the fun began fussy cutting each element or section and adhering them to the card base. I stamped the sentiment and added several Eyelet Outlet tiny heart sequins which completed the card.

Sharing in the following challenges:
1. Classic Design Challenge: February 2023 #2 – Anything Goes
2. Crafts Galore Encore Challenge Blog: #108 – Anything Goes
3. Scrapping4fun Challenges: #220 – Anything Goes
4. Wednesday’s Creative Inspirations Challenge Blog: February Anything Goes

Affiliate links are used in this post at no cost to you – I really appreciate your support!

Prickley Pear Stamps products used:
Brighter Days Ahead stamp set

Other products used:
Cardstock/Paper: CutCardStock 110# Basis Natural, Basis Gold, Basis Light Brown, Sandcastle, Ginger Snap, Pop Tone Jellybean Green and Pop Tone Gumdrop Green cardstock
Ink: Memento Rich Cocoa ink (pad and marker)
Accessories: Tonic Studios 12″ Guillotine Paper Trimmer, Art Glitter Dries Clear adhesive, MISTI stamp tool, Eyelet Outlet tiny heart sequins

I hope you’ve enjoyed this project! Be sure to check out all the awesome stamps and dies at Prickley Pear Stamps! Save 10% on anything on the site when you shop at Prickley Pear Stamps by using coupon code LESLIE10 at checkout! And be sure to ‘like’ and ‘follow’ the Prickley Pear Stamps Facebook page to keep up with news and sales, and join Prickley Pear Pals (the fan group) for lots of fun crafty ideas and to share your creativity! And finally, we’d love to see you visit the Prickley Pear Stamps blog and become a Follower! Hope to see you there! Thanks so much for stopping by today – we’ll see you next time! ;)

Scrappy hugs,

Get Well Soon

Hey everybody! It’s almost the end of January already! Seems like the weeks are just flying by! I’m up on the Prickley Pear Stamps blog this morning with an inspiration project featuring stamps and dies in the new Southwestern Collection! One can never have too many get well cards in their stash so I created one using the Prickly Pear Cactus stamps and dies that I paired with purple and green patterned papers in my stash. I’ve always loved a purple and green color combo and I love stamping on patterned paper!

I cut a standard A2 size side-folding card base from CutCardStock Basis White cardstock along with layering panels from coordinating patterned papers in the Keep It Simple Lilac and Jade 12×12 Collection Packs. I cut the edge of the larger panel with a My Favorite Things Stitched Scallop Basic Edges 2 die. I stamped the images from the Prickly Pear Cactus stamps in Memento Tuxedo Black ink on purple and green patterned papers and cut them with the coordinating Prickly Pear Cactus dies. I stamped the sentiment in the upper right corner and adhered a few gemstones from the Trinity Stamps Amethyst Accent Embellishment Mix which completed the card.

Affiliate links are used in this post at no cost to you – I really appreciate your support!

Prickley Pear Stamps products used:
Prickly Pear Cactus stamp set
Prickly Pear Cactus die set

Other products used:
Cardstock/Paper: CutCardStock Basis 110# White cardstock, Keep It Simple Lilac and Jade 12×12 Collection Packs
Ink: Memento Tuxedo Black ink; Sharpie Ultra Fine Point Markers- Green and Purple; Kirarina Wink Purple Metallic Marker
Dies/Punches: My Favorite Things Stitched Scallop Basic Edges 2 Die-namics
Accessories: Tonic Studios 12″ Guillotine Paper Trimmer, MISTI stamp tool, Big Shot, Tombow Mono Permanent Adhesive, Art Glitter Dries Clear Adhesive, Trinity Stamps Amethyst Accent Embellishment Mix, Trinity Pick Up Stick, 1-mm thick foam squares

I hope you’ve enjoyed this project! Be sure to check out all the awesome stamps and dies at Prickley Pear Stamps! Save 10% on anything on the site when you shop at Prickley Pear Stamps by using coupon code LESLIE10 at checkout! And be sure to ‘like’ and ‘follow’ the Prickley Pear Stamps Facebook page to keep up with news and sales, and join Prickley Pear Pals (the fan group) for lots of fun crafty ideas and to share your creativity! And finally, we’d love to see you visit the Prickley Pear Stamps blog and become a Follower! Hope to see you there! Thanks so much for stopping by today – we’ll see you next time! ;)

Scrappy hugs,

Life can be Prickly

Hey everybody! Happy Hump Day – I hope you’re having a great week! I’m up on the Prickley Pear Stamps blog this morning with an inspiration project featuring some of the stamps and dies in the new Southwestern Collection that was just released last month! I created a pretty get well card featuring the Prickly Pear Cactus stamps and dies which I paired with some pretty patterned paper in my stash.

I cut a standard A2 size top-folding card base from CutCardStock Basis Natural cardstock along with layering panels and strips from coordinating patterned papers in the Keep It Simple Ruby 12×12 Collection Pack. I stamped the images from the Prickly Pear Cactus stamps in Memento Tuxedo Black ink on Basis Natural cardstock, colored them with alcohol markers and ultra fine point markers, and cut them with the coordinating Prickly Pear Cactus dies. I stamped the sentiment in the lower left corner and added a red enamel heart to the flower pot. I adhered a few gemstones from the Trinity Stamps Andradite Sparkle Embellishment Mix which completed the card.

Sharing in the following challenges:
1. Jan’s Digi Stamps Challenge: January 2023 Anything Goes
2. World Wide Open Design Team Challenge: #1 – January Anything Goes

Affiliate links are used in this post at no cost to you – I really appreciate your support!

Prickley Pear Stamps products used:
Prickly Pear Cactus stamp set
Prickly Pear Cactus die set

Other products used:
Cardstock/Paper: CutCardStock Basis 110# Natural cardstock, Keep It Simple Ruby 12×12 Collection Pack
Ink: Memento Tuxedo Black ink; Arteza alcohol markers- YG43, R35; Sharpie Ultra Fine Point markers- Pink and Lime Green
Accessories: Tonic Studios 12″ Guillotine Paper Trimmer, MISTI stamp tool, Big Shot, Tombow Mono Permanent Adhesive, Art Glitter Dries Clear Adhesive, Eyelet Outlet Enamel Hearts, Trinity Stamps Andradite Sparkle Embellishment Mix, Trinity Pick Up Stick

I hope you’ve enjoyed this project! Be sure to check out all the awesome stamps and dies at Prickley Pear Stamps! Save 10% on anything on the site when you shop at Prickley Pear Stamps by using coupon code LESLIE10 at checkout! And be sure to ‘like’ and ‘follow’ the Prickley Pear Stamps Facebook page to keep up with news and sales, and join Prickley Pear Pals (the fan group) for lots of fun crafty ideas and to share your creativity! And finally, we’d love to see you visit the Prickley Pear Stamps blog and become a Follower! Hope to see you there! Thanks so much for stopping by today – we’ll see you next time! ;)

Scrappy hugs,

Happy Holidays

Hi friends! Happy Thursday! Can you believe there are only a couple days left of July?! Where is the time going?! I’m thrilled to share a Christmas card with you today that I created for Prickley Pear Stamps with their new Sketched Florals Poinsettia stamp set released just yesterday! Wow. Just wow. This set is beyond gorgeous. I see this one getting a lot of use in the years to come!

I cut a standard A2 size top-folding card base and layering panels from CutCardStock Basis 110# White cardstock, a layering panel from CutCardStock Red Wagon cardstock (which I adhered to the card base), and plaid patterned paper panels (which I adhered to the white layering panels). I stamped the poinsettia image on Neenah Classic Crest 110# Solar White cardstock in Ranger black soot archival ink and colored it with Karin Brushmarkers. I cut the colored image with a Cottage Cutz Double-Sided Oval Die and adhered it to the card front. I stamped the sentiment in black soot ink on a scrap piece of Basis White cardstock, trimmed it and layered it on a scrap piece of Red Wagon cardstock, and adhered it to the bottom of the focal image. The final step was adding several Kat Scrappiness gold pearls with my Trinity Pick Up Stick.

And one more peek… I just can get over this image! So gorgeous – and the vibrant Karin Brushmarkers just brought it to life!

Sharing in the following challenges:
1. ABC Christmas Challenge: N is for New, O is for Old (new stamp)
2. Christmas Craft Creations: July Challenge – Patterned Paper

3. Classic Design Challenge: July #7 – Anything Goes
4. Crafty Gals Corner: #233 – Christmas in July
5. Lil Patch of Crafty Friends: #186 – Anything Goes
6. Little Red Wagon: #664 – Stitching Sensations

Affiliate links are used in this post at no cost to you – I really appreciate your support!

Prickley Pear Stamps products used:
Sketched Florals Poinsettia stamp set

Other products used:
Cardstock/Paper: CutCardStock Basis 110# White cardstock, CutCardStock Red Wagon cardstock, Neenah Classic Crest 110# Solar White cardstock, The Paper Studio Four Seasons and Everything In Between -2- paper pad
Ink: Ranger black soot archival ink; Karin Brushmarkers- Fire Red, Olive Green, Lime Green and Canary
Dies/Punches: Cottage Cutz Double-Sided Oval Dies
Accessories: Tonic Studios 12″ Guillotine Paper Trimmer, Tape Runner, Bearly Art precision craft glue, MISTI stamp tool, Big Shot, Kat Scrappiness Gold Pearl Mix, Trinity Pick Up Stick

I hope you’ve enjoyed this project! Be sure to check out all the awesome stamps and dies at Prickley Pear Stamps! If you’d like to save 10% on anything on the site when you shop at Prickley Pear Stamps, use the coupon code LESLIE10 at checkout! And be sure to ‘like’ and ‘follow’ the Prickley Pear Stamps Facebook page to keep up with news and sales, and join Prickley Pear Pals (the fan group) for lots of fun crafty ideas and to share your creativity! And finally, we’d love to see you visit the Prickley Pear Stamps blog that’s in the process of being revived and become a Follower! Hope to see you there! Thanks so much for stopping by today – we’ll see you next time! ;)

Scrappy hugs,

Crazy BFF

Hey everybody! Another week is whizzing by in a super speedy fashion! Hope you’re having a good one! I’ve popped in this morning to share my last card created for the Prickley Pear Stamps new release! I created a total of 16 samples for this new release, so it has taken a minute to share them all, lol! I saved the most bright and cheerful card of the bunch to share last! Love, love, love this whimsical card featuring the Hey Girl Hey stamp set and the Woodgrain Slimline Background stamp.

I cut a standard A2 size side-folding card base from CutCardStock Basis 110# White cardstock along with a layering panel from Colorbok hot pink Seeing Dots cardstock which I adhered to the card base. Using my WRMK Envelope Punch Board, I made a file folder panel from CutCardStock Basis 80# White cardstock, stamped the woodgrain background in Catherine Pooler Lime Rickey ink, and hand-cut a strip of CutCardStock Pop Tone Black Licorice cardstock to go around the edge. I added a strip of Eyelet Outlet wide flower washi tape and a narrow strip of the black cardstock, and adhered the panel to the card front. I stamped the chicken in Memento Tuxedo Black ink, colored her with alcohol markers, and fussy cut her. I added Glossy Accents to her eyes and set her aside to dry. I wanted to bring in more of the black cardstock, so I adhered the fussy cut image to a scrap piece of black cardstock and fussy cut it a second time, leaving just a tiny bit of black border. I adhered the image to the card front and stamped the sentiment in vertical fashion in black ink.

And one more look… super happy with how this turned out! I’ve had such a good time creating with all these stamps from the new release!

Sharing in the following challenges:
1. 613 Avenue Create: #202206 – Anything Goes / optional Let It All Hang Out (no twist)
2. A Perfect Time To Craft Open Challenge Blog: #6-2022 – Anything Goes
3. Classic Design Challenge: June #6 – Anything Goes
4. Crafting Happiness Challenges: #124 – Anything Goes Always
5. Critter Crazy Challenges: #63 – Anything Goes with a Featured Critter
6. Jan’s Digi Stamps Challenge Blog: June Anything Goes
7. Paperbabe Stamps: #169 – Anything Goes
8. Use Your Stuff: #449 – Anything Goes

Affiliate links are used in this post at no cost to you – I really appreciate your support!

Prickley Pear Stamps products used:
Hey Girl Hey stamp set
Woodgrain Slimline Background stamp

Other products used:
Cardstock/Paper: CutCardStock Basis 110# White cardstock, CutCardStock Pop Tone Black Licorice cardstock, CutCardStock Basis 80# White cardstock, Colorbok Seeing Dots cardstock
Ink: Catherine Pooler Lime Rickey ink, Memento Tuxedo Black ink; Arteza alcohol markers- R12/21, YG05/15, BK00, Y33, RP04/15, P05, BG45
Dies/Punches: We R Memory Keepers Envelope Punch Board
Accessories: We R Memory Keepers Large Guillotine Paper Trimmer, Bearly Art precision craft glue, MISTI stamp tool, Eyelet Outlet Flower Washi Tape, Glossy Accents

I hope you’ve enjoyed this project! Be sure to check out all the awesome stamps and dies at Prickley Pear Stamps! If you’d like to save 10% on anything on the site when you shop at Prickley Pear Stamps, use the coupon code LESLIE10 at checkout! And be sure to ‘like’ and ‘follow’ the Prickley Pear Stamps Facebook page to keep up with news and sales, and join Prickley Pear Pals (the fan group) for lots of fun crafty ideas and to share your creativity! And finally, we’d love to see you visit the Prickley Pear Stamps blog that’s in the process of being revived and become a Follower! Hope to see you there! Thanks so much for stopping by today – we’ll see you next time! ;)

Scrappy hugs,