Cane you believe it?

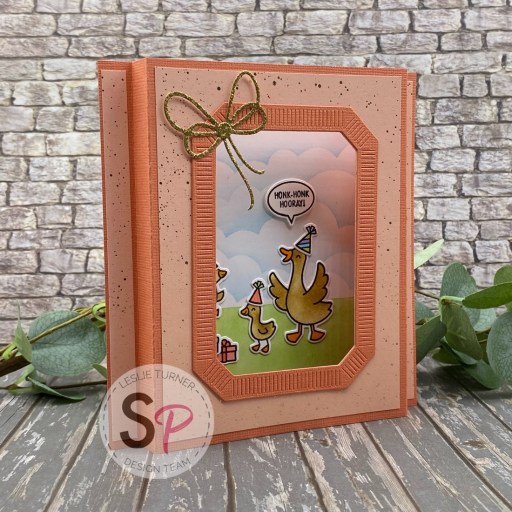
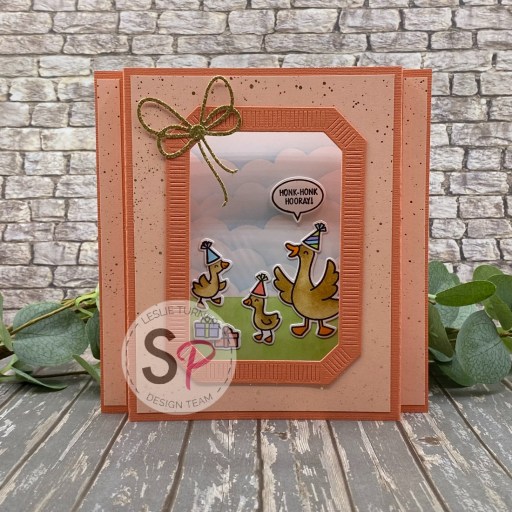
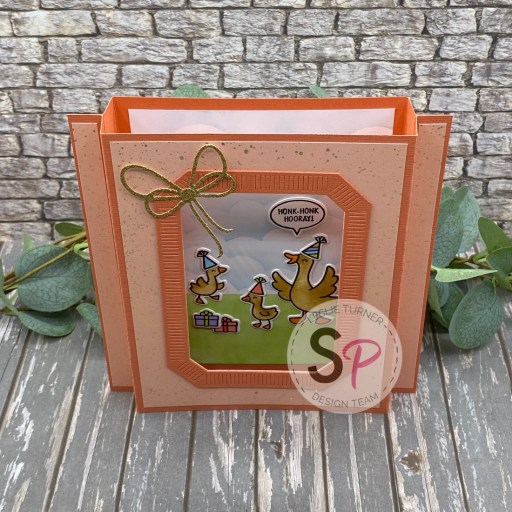
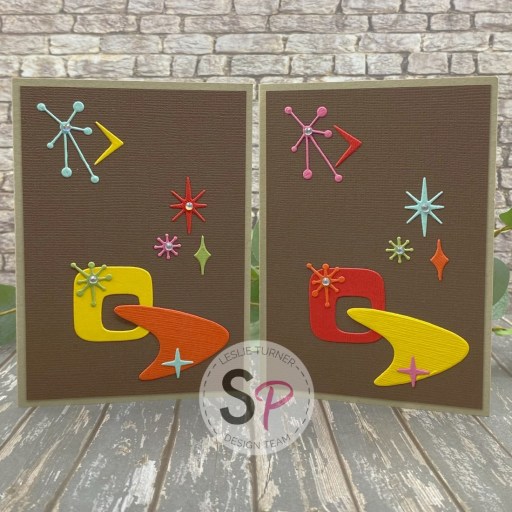
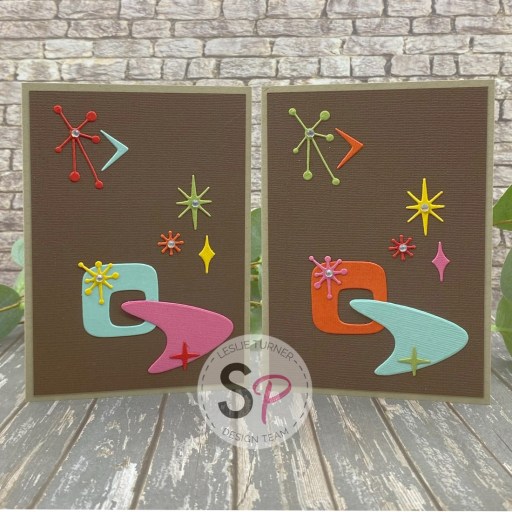
Hey everybody, happy Wednesday – I hope you’re having a fabulous week! I’m up on the Scrapbook Pal blog today sharing a tutorial for making a super cute diamond panel Christmas card featuring the AH-dorable Lawn Fawn Sweet Christmas Mice Stamps, Stencils and Dies! And, as usual, I used quite a few other products on the website to bring this card to life. This is my last project share for Scrapbook Pal – my term has come to an end (the year FLEW by) and I opted to not be considered for an additional term as I’m trying to clear my plate off a little. I sure have loved my time on the team and thank them from the bottom of my heart for the opportunity.

This is my own design so be sure to check out the tutorial on the Scrapbook Pal blog to see how to make it. I used CutCardStock Pop Tone Gumdrop Green and Bright Gold Foil, in addition to Neenah Classic Crest 110# Solar White for the front sentiment and images. The adorable patterned paper is from Lawn Fawn (LOVE).

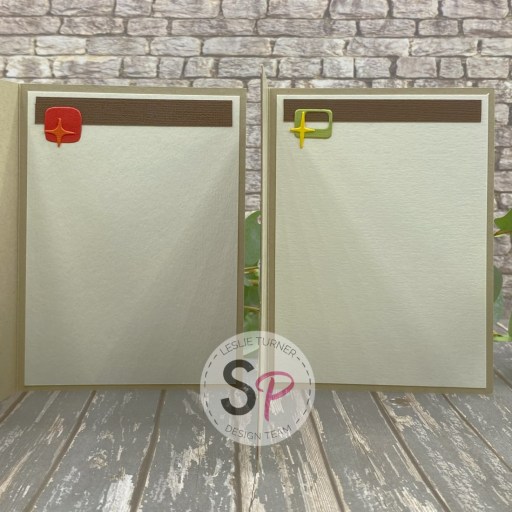
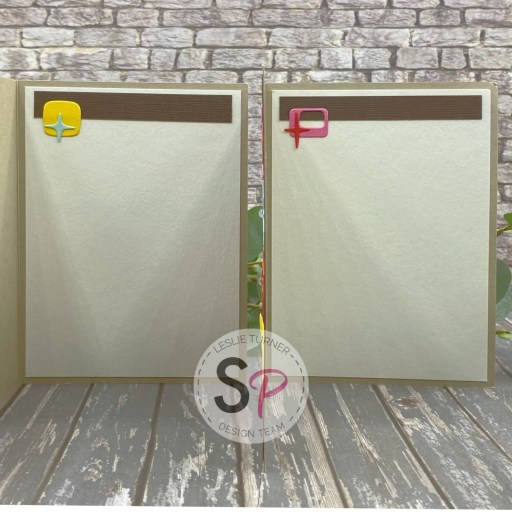
I used 80# Solar White for the inside panel. Super fun and easy card, which would be a good one to mass-produce for those on your Christmas list!

Scrapbook Pal products used:
Lawn Fawn Sweet Christmas Mice Stamps
Lawn Fawn Sweet Christmas Mice Stencils
Lawn Fawn Sweet Christmas Mice Dies
Lawn Fawn All The Sparkles 6×6 Petite Paper Pack
Memento Tuxedo Black Ink
Versafine Onyx Black Ink
Mini MISTI
Ranger Candied Apple Distress Oxide Ink
Ranger Cracked Pistachio Distress Oxide Ink
Ranger Frayed Burlap Distress Oxide Ink
Ranger Peeled Paint Distress Oxide Ink
Ranger Tiny Blending Tools
Ranger Tiny Blending Foams
Ranger-Wendy Vecchi 7″ Make Art Stay-tion
Spellbinders 5/8” Best Ever Craft Tape
Spellbinders 12×12 Scoring Board
My Sweet Petunia Glue Press
Bearly Art Precision Craft Glue
Scrapbook Adhesives E-Z Runner Permanent Strips
Scrapbook Adhesives Thin 3D Foam Squares White

Affiliate links are used in this post at no cost to you – I really appreciate your support!

Other products used:
CARDSTOCK/PAPER: CutCardStock Pop Tone Gumdrop Green and Bright Gold Foil cardstock, Neenah Classic Crest 110# and 80# Solar White cardstock
ACCESSORIES: Fiskars 12″ ProCision Rotary Bypass Paper Trimmer, Big Shot

I hope you’ve enjoyed this project and you’re inspired to get your craft on! Be sure to check out the awesome array of craft supplies in the Scrapbook Pal store… the selection is amazing! And head over to the Scrapbook Pal FacebookPinterest and Instagram pages for more design team inspiration! And if you haven’t yet subscribed to our YouTube Channel, be sure to do that, too, for tons of hands-on crafty inspiration! Thanks so much for stopping by today – we’ll see you next time! 

Scrappy hugs,

Thank you for being a part of my story

Hey everybody, happy Wednesday! I hope your week is going along nicely! I’m up on the Scrapbook Pal blog today sharing a tutorial for making a fun book-themed thank you card featuring the Pinkfresh Studio Twilight Tales Stamps, Stencils and Dies! OMGoodness, this is such a fun suite of products to work with! They make THE best projects for your book-loving friends or family!

I won’t go into huge detail here since there is a tutorial on the Scrapbook Pal website, but I used a Neenah Classic Crest 110# card base which I covered with patterned paper from the Lawn Fawn Watercolor Wishes Rainbow 6×6 Petite Paper Pack. The large focal image is stamped, stenciled, and die cut using products from the Pinkfresh Studio Twilight Tales suite.

I used a variety of Ranger distress oxide inks – which have rapidly become my FAV for stenciling. They blend like butter, y’all, and have THE best silky smooth texture! I added a little bit of detail here and there with Nuvo Gloss White Crystal Drops which took on the color of the ink that looks very cool.

I cut the inside panel from 80# Solar White cardstock, embellished it with a leftover strip of the paper used on the front, and layered it on CutCardStock Basis Gold cardstock. Both the front and inside sentiments were stamped in Versafine Onyx Black ink and cut with the coordinating dies in the collection.

Affiliate links are used in this post at no cost to you – I really appreciate your support!

Scrapbook Pal products used:
Lawn Fawn Watercolor Wishes Rainbow 6×6 Petite Paper Pack
Pinkfresh Studio Twilight Tales Stamps
Pinkfresh Studio Twilight Tales Stencils
Pinkfresh Studio Twilight Tales Dies
Memento Tuxedo Black Ink
Versafine Onyx Black Ink
MISTI Stamp Tool
Ranger Wild Honey Distress Oxide Ink
Ranger Fossilized Amber Distress Oxide Ink
Ranger Fired Brick Distress Oxide Ink
Ranger Picked Raspberry Distress Oxide Ink
Ranger Wilted Violet Distress Oxide Ink
Ranger Broken China Distress Oxide Ink
Ranger Tiny Blending Tools
Ranger Tiny Blending Foams
Ranger-Wendy Vecchi 7″ Make Art Stay-tion
Spellbinders 5/8” Best Ever Craft Tape
My Sweet Petunia Glue Press
Bearly Art Precision Craft Glue
Scrapbook Adhesives E-Z Runner Permanent Strips
Scrapbook Adhesives Thin 3D Foam Squares White

Other products used:
CARDSTOCK/PAPER: Neenah Classic Crest 110# Solar White A2 Folded Card Base and 80# Solar White cartdstock; CutCardStock Savoy 100% Cotton Brilliant White and Basis Gold cardstock
INK: EK Success Dual-Tip Gold Pen, Sakura Clear Star Gelly Roll Pen
ACCESSORIES: Fiskars 12″ ProCision Rotary Bypass Paper Trimmer, Big Shot, Nuvo Gloss White Crystal Drops, Brutus Monroe Topaz Flat Back Crystals, Trinity Pick Up Stick

I hope you’ve enjoyed this project and you’re inspired to get your craft on! Be sure to check out the awesome array of craft supplies in the Scrapbook Pal store… the selection is amazing! And head over to the Scrapbook Pal FacebookPinterest and Instagram pages for more design team inspiration! And if you haven’t yet subscribed to our YouTube Channel, be sure to do that, too, for tons of hands-on crafty inspiration! Thanks so much for stopping by today – we’ll see you next time! 

Scrappy hugs,

HUGS shadow box card

Hey everybody, happy weekend – I hope you’re doing something fun! I’m delighted to share a Scrapbook Pal DT inspiration project with you today featuring the Pinkfresh Studio Shadow Box Frame dies and the Altenew Dynamic Duo: Precious Poppies stamps and stencils, along with lots of other products on the website! I’ve made a few shadow box fun fold cards over the years but this one is literally a shadow box and stands for display! It was so stinkin’ fun to make!

I started by constructing the shadow box frame using the Pinkfresh Studio Shadow Box Frame Dies and Neenah Classic Crest 165# Solar White cardstock which is super sturdy. I embellished the front and sides of the frame with strips of a green and gold speckled print from the Lawn Fawn Spiffier Speckles 6×6 Petite Paper Pack, and also added a panel of a coordinating print from the same paper pad to the back of the frame. I used the My Sweet Petunia Glue Press with Bearly Art precision craft glue for all the construction.

Using the Altenew Dynamic Duo: Precious Poppies Stamps, MISTI Stamp Tool and Memento Tuxedo Black Ink, I stamped the main image on a piece of the 165# Solar White cardstock and left the stamp in the MISTI. Then I stenciled the poppies using the Altenew Dynamic Duo: Precious Poppies Stencils, Ranger Tiny Blending Tools and Foams, and Ranger Candied Apple, Abandoned Coral, Peeled Paint, and Shabby Shutters Distress Oxide Inks, securing each stencil with Spellbinders 5/8″ Best Ever Craft Tape.

I put the stenciled cardstock back into the MISTI and stamped again in Versafine Onyx Black ink to get good, crisp lines. I then stamped the sentiment (from the same stamp set) in Versafine Onyx Black ink, trimmed it, and adhered it with Scrapbook Adhesives 3D Foam Squares. The final touch was adding several red rhinestones from the Keep It Simple Sprinkles collection and several gold pearls from the Kat Scrappiness Gold Pearl Mix. I’ve included a couple additional shots below. Totally love how this turned out!

Scrapbook Pal products used:
Pinkfresh Studio Shadow Box Frame Dies
Lawn Fawn Spiffier Speckles 6×6 Petite Paper Pack
Altenew Dynamic Duo: Precious Poppies Stamps and Stencils
Memento Tuxedo Black Ink
Versafine Onyx Black Ink
MISTI stamp tool
Spellbinders Best Ever Craft Tape
Ranger Candied Apple Distress Oxide Ink
Ranger Abandoned Coral Distress Oxide Ink
Ranger Peeled Paint Distress Oxide Ink
Ranger Shabby Shutters Distress Oxide Ink
Ranger Tiny Blending Tools
Ranger Tiny Blending Foams
My Sweet Petunia Glue Press
Bearly Art precision craft glue
Scrapbook Adhesives 3D Foam Squares White

Affiliate links are used in this post at no cost to you – I really appreciate your support!

Other products used:
CARDSTOCK/PAPER: Neenah Classic Crest Double Thick 165# Solar White cardstock
ACCESSORIES: Fiskars 12″ ProCision Rotary Bypass Paper Trimmer, Big Shot, Keep It Simple Sprinkles-Red Rhinestones, Kat Scrappiness Gold Pearl Mix

I hope you’ve enjoyed this project and you’re inspired to get your craft on! Be sure to check out the awesome array of craft supplies in the Scrapbook Pal store… the selection is amazing! And head over to the Scrapbook Pal FacebookPinterest and Instagram pages for more design team inspiration! And if you haven’t yet subscribed to our YouTube Channel, be sure to do that, too, for tons of hands-on crafty inspiration! Thanks so much for stopping by today – we’ll see you next time! 

Scrappy hugs,

Happy Anniversary Muscle Car Style!

Hey everybody, I hope you’re having a fabulous week – it’s almost Friday! I’m super stoked to share a Scrapbook Pal DT inspiration project created with the new Spellbinders Muscle Car and Classic Sentiments dies. OMGoodness, I couldn’t wait to get my hands on these when they came out. They are awesome and make THE coolest masculine cards! Like most men, Ed loves hot rods, and our anniversary is coming up in November so I just had to make this card for him. I also got the classic car and timeless truck die sets but still need to grab a few other items in this collection to make it complete. Lots of fun coming up with some masculine cards, so stay tuned!

Using the Spellbinders Muscle Car dies, I cut the pieces from CutCardStock Stardream Metallic Flame, Pop Tone Black Licorice and Bright Silver Foil, and a scrap piece of 80# Solar White. I went one step further and made the hood an extra layer for a tad bit of dimension. I affixed some Eyelet Outlet Wide Road Washi Tape to a panel of Neenah Classic Crest 110# Solar White cardstock and attached the muscle car with thin foam squares. I added the panel to a Neenah Classic Crest 110# Folded Card Base, popping it up on Crafty Foam Tape. I cut the sentiment from Pop Tone Black Licorice and 80# Solar White cardstock using the Spellbinders Classic Sentiments dies, which completed the card front.

At this point, I decided to leave the inside blank, simply layering a panel of 80# Solar White on some CutCardStock Stardream Flame. I may add a sentiment later or I may just write a mushy love note. HA! ;)

Scrapbook Pal products used:
Spellbinders Muscle Car Dies
Spellbinders Classic Sentiments Dies
My Sweet Petunia Glue Press
Bearly Art precision craft glue
Scrapbook Adhesives Thin 3D Foam Squares Black
Scrapbook Adhesives Crafty Foam Tape 54 ft White
Scrapbook Adhesive E-Z Runner Permanent Strips

Affiliate links are used in this post at no cost to you – I really appreciate your support!

Other products used:
CARDSTOCK/PAPER: Neenah Classic Crest 110# Solar White Folded Card Base, Neenah Classic Crest 110# and 80# Solar White cardstock, CutCardStock Stardream Metallic Flame, Pop Tone Black Licorice and Bright Silver Foil cardstock
ACCESSORIES: Fiskars 12″ ProCision Rotary Bypass Paper Trimmer, Big Shot, Eyelet Outlet Wide Road Washi Tape

I hope you’ve enjoyed this project and you’re inspired to get your craft on! Be sure to check out the awesome array of craft supplies in the Scrapbook Pal store… the selection is amazing! And head over to the Scrapbook Pal FacebookPinterest and Instagram pages for more design team inspiration! And if you haven’t yet subscribed to our YouTube Channel, be sure to do that, too, for tons of hands-on crafty inspiration! Thanks so much for stopping by today – we’ll see you next time! 

Scrappy hugs,

Honk-Honk Hooray!

Hey everybody, happy Wednesday – I hope you’re having a great week! I’m up on the Scrapbook Pal blog today sharing a tutorial for making a super cute shadow box birthday card featuring the Lawn Fawn Silly Goose! Stamps, Stencils and Dies. I also used the Spellbinders Emerald Cut Labels and Tag Dies along with the Spellbinders Scallop and Stitched Edge Ovals Dies and a ton of other products on the website. This is truly one of the easiest fun folds ever, and it can be tailored for any occasion! You may have seen other versions of the shadow box fun fold but I recently discovered this one and I have to say that I like it the best!

I won’t go into huge detail here (check out my tutorial on the Scrapbook Pal blog for more details) but in a nutshell, I used CutCardStock Bazzill Basics Peach cardstock for the base and Lawn Fawn Spiffier Speckles paper which I LOVE. I cut the aperture in the front using an outline die from the Spellbinders Emerald Cut Labels and Tag Dies, and embellished it with a frame (using the same emerald cut die set) and a bow cut from CutCardStock Gold Glitter cardstock using a die from the Spellbinders Scallop and Stitched Edge Ovals Dies.

Of course, the little scene inside was created with stamped, stenciled and/or colored, and die cut images from the Lawn Fawn Silly Goose! stamps, stencils and dies. I inked the background using some Ranger distress inks and a handmade cloud stencil. This was a fun one and I totally love how it turned out!

I stamped a sentiment from the same stamp set on the back panel and added another goose with party hat and a present. Let me know if you make one of these – you’re gonna love how easy it is!

Affiliate links are used in this post at no cost to you – I really appreciate your support!

Scrapbook Pal products used:
Lawn Fawn Silly Goose! Stamps
Lawn Fawn Silly Goose! Stencils
Lawn Fawn Silly Goose! Dies
Spellbinders Emerald Cut Labels and Tag Dies
Spellbinders Scallop and Stitched Edge Ovals Dies
Spellbinders 12×12 Multi Purpose Scoring Board
Lawn Fawn Spiffier Speckles 6×6 Petite Paper Pack
Ranger-Wendy Vecchi 7″ Make Art Stay-tion
Spellbinders 5/8″ Best Ever Craft Tape
Catherine Pooler 1/2″ Detail Blending Brushes
Ranger Tiny Blending Tool
Ranger Tiny Blending Foam
Spellbinders 3/8″ Mini Blending Brush
Ranger Mowed Lawn Distress Ink
Ranger Tumbled Glass Distress Ink
Ranger Brushed Corduroy Distress Oxide Ink
Ranger Carved Pumpkin Distress Ink
MISTI Stamp Tool
Memento Tuxedo Black ink
Versafine Onyx Black ink
Copic Ciao Alcohol Marker BG01 Aqua Blue
Copic Ciao Alcohol Marker BV02 Prune
Copic Ciao Alcohol Marker R14 Light Rouge
Copic Ciao Alcohol Marker R22 Light Prawn
Copic Ciao Alcohol Marker YG03 Yellow Green
Scrapbook Adhesives E-Z Runner Permanent Strips
My Sweet Petunia Glue Press
Bearly Art Precision Craft Glue
Scrapbook Adhesives Thin 3D Foam Squares White

Other products used:
CARDSTOCK/PAPER: CutCardStock Bazzill Basics Peach cardstock and Gold Glitter cardstock; Neenah Classic Crest 80# Solar White cardstock
ACCESSORIES: Fiskars 12″ ProCision Rotary Bypass Paper Trimmer, Big Shot

I hope you’ve enjoyed this project and you’re inspired to get your craft on! Be sure to check out the awesome array of craft supplies in the Scrapbook Pal store… the selection is amazing! And head over to the Scrapbook Pal FacebookPinterest and Instagram pages for more design team inspiration! And if you haven’t yet subscribed to our YouTube Channel, be sure to do that, too, for tons of hands-on crafty inspiration! Thanks so much for stopping by today – we’ll see you next time! 

Scrappy hugs,

Sending Love

Hey everybody, Happy Wednesday – I hope your week is going along nicely! I’m up on the Scrapbook Pal blog today sharing a tutorial for making a 3D window card featuring the new Gina K Designs Hoots & Owls stamps and dies. I also used the Spellbinders Scallop and Stitched Edge Ovals which I’ve fallen in love with. All of these products are so versatile and I’m sure I’ll get lots of use out of them. The stamp set has five owls and a ton of sentiments, and there are dies for every single one!

I cut the four card base pieces and pop up mechanism from CutCardStock Lessebo Navy Blue cardstock along with layering panels from Dare 2B Artzy Hoot Hoot paper and Orange Plaid paper, both from the Fields of Joy Collection. I was so stoked to find these papers in my stash – they almost looked like they were designed to go with these stamps!

I adhered a narrow 80# Solar White cardstock panel on the back and embellished it with images and a sentiment stamped from the Hoots & Owls stamps and cut with the coordinating dies. I totally love how this turned out! If you want more in-depth details, be sure to see my tutorial on the Scrapbook Pal website.

Affiliate links are used in this post at no cost to you – I really appreciate your support!

Scrapbook Pal products used:
Gina K Designs Hoots & Owls Stamps
Gina K Designs Hoots & Owls Dies
Mini MISTI
Memento Tuxedo Black ink
Copic Ciao R22 Light Prawn
Copic Ciao R35 Coral
Copic Ciao RV21 Light Pink
Copic Ciao YR16 Apricot
Copic Ciao YR68 Orange
Scrapbook Adhesives E-Z Runner Permanent Strips
Spellbinders Scallop and Stitched Edge Ovals
Spellbinders 5/8″ Best Ever Craft Tape
My Sweet Petunia Glue Press
Bearly Art precision craft glue
Scrapbook Adhesives Thin 3D Foam Squares White

Other products used:
CARDSTOCK/PAPER: CutCardStock Lessebo Navy Blue cardstock, Neenah Classic Crest 110# and 80# Solar White cardstock; Dare 2B Artzy Fields of Joy Hoot Hoot Paper and Orange Plaid Paper
ACCESSORIES: Fiskars 12″ ProCision Rotary Bypass Paper Trimmer, Big Shot

I hope you’ve enjoyed this project and you’re inspired to get your craft on! Be sure to check out the awesome array of craft supplies in the Scrapbook Pal store… the selection is amazing! And head over to the Scrapbook Pal FacebookPinterest and Instagram pages for more design team inspiration! And if you haven’t yet subscribed to our YouTube Channel, be sure to do that, too, for tons of hands-on crafty inspiration! Thanks so much for stopping by today – we’ll see you next time! 

Scrappy hugs,

missing you

Hey everybody, happy Thursday – I hope life is treating you well! I’m delighted to share a Scrapbook Pal DT inspiration project with you today which features the Light Burst Cover Plate Die, Flourishes & Sentiments stamps and dies, and Sea Glass ink – all from Catherine Pooler Designs. This pretty friendship card was really easy to make and would be a great one to mass produce to build up your card stash. I have some other ideas brewing in my head for the next time I use this cover plate die, so stay tuned! This cover plate die and the sentiment stamps and dies are super versatile!

I grabbed a Neenah Classic Crest 110# A2 Folded Card Base and added a panel of CutCardStock Lessebo Sweet Mint to the front. Using the Catherine Pooler Light Burst Cover Plate Die, I cut three layers from Celebration Warehouse Seafoam Green Smooth cardstock and adhered them together. I cut just the round center portion from CutCardStock Galax Canvas Texture and again from Light Yellow cardstock and placed the pieces into the negative spaces in the background just to give the design an extra pop of color.

I stamped a sentiment from the Catherine Pooler Flourishes & Sentiments stamp set in Catherine Pooler Sea Glass ink and cut it with the coordinating Flourishes & Sentiments die. I adhered the sentiment in the lower right corner, popping it up on foam squares, and then added an Eyelet Outlet yellow enamel dot, which completed the card front.

I cut the inside panel from 80# Solar White cardstock and embellished it with leftover strips of the Galax and Sweet Mint cardstock. I stamped another sentiment from the Catherine Pooler Flourishes & Sentiments stamps in her Sea Glass ink, cut it with the coordinating die, and layered the panel on Celebration Warehouse Seafoam Green Smooth cardstock.

Affiliate links are used in this post at no cost to you – I really appreciate your support!

Scrapbook Pal products used:
Catherine Pooler Light Burst Cover Plate Die
Catherine Pooler Flourishes & Sentiments Stamps
Catherine Pooler Flourishes & Sentiments Dies
Catherine Pooler Sea Glass ink
Mini MISTI
My Sweet Petunia Glue Press
Bearly Art precision craft glue
Spellbinders 5/8″ Best Ever Craft Tape
Scrapbook Adhesives E-Z Runner Permanent Strips
Scrapbook Adhesives Thin 3D Foam Squares White

Other products used:
CARDSTOCK/PAPER: Neenah Classic Crest 110# Solar White A2 Folded Card Base, CutCardStock Lessebo Sweet Mint, Galax 4×6 Canvas Texture and Light Yellow cardstock, Neenah Classic Crest 80# Solar White cardstock, Celebration Warehouse Seafoam Green Smooth cardstock
ACCESSORIES: Fiskars 12″ ProCision Rotary Bypass Paper Trimmer, Big Shot, Eyelet Outlet Yellow Enamel Dots

I hope you’ve enjoyed this project and you’re inspired to get your craft on! Be sure to check out the awesome array of craft supplies in the Scrapbook Pal store… the selection is amazing! And head over to the Scrapbook Pal FacebookPinterest and Instagram pages for more design team inspiration! And if you haven’t yet subscribed to our YouTube Channel, be sure to do that, too, for tons of hands-on crafty inspiration! Thanks so much for stopping by today – we’ll see you next time! 

Scrappy hugs,

Retro Notecard Gift Set

Hey everybody, hope you’re having a terrific Tuesday and your week has started off nicely! I’m delighted to share a Scrapbook Pal DT inspiration project with you today featuring the Sizzix-Tim Holtz Vault Atomic Retro Thinlits. I am SO in love with this set of dies… probably because I’m retro myself, lol! I created a retro notecard gift set with six 3-1/2″ x 5″ notecards in a coordinating box. This was a really fun project!

Here are shots of the box closed and then open. I hand-cut the box base and lid from CutCardStock Desert Storm cardstock along with panels of Vanilla Bean Brown cardstock for the top and sides. Using most of the dies in the set, I cut a nice variety of the elements in assorted colors using CutCardStock Fruit Punch Pink 4×6 Pearlized Textured, Galax 4×6 Canvas Textured, Yellow Jacket 4×6 Textured, Adobo 4×6 Textured, Seafoam Green 4×6 Canvas Textured, and Habanero Red 4×6 Textured. I embellished the box top a little differently than the cards.

I had several leftover 3-1/2″ x 5″ kraft notecards with envelopes in my stash that my sister sent me years ago, so the cards were a snap to assemble. I cut panels of brown cardstock for the front of each card and used the same placement of the elements but used different colors. I cut inside panels from CutCardStock Basis Natural cardstock and embellished them with strips and elements, and left them blank to write custom messages. I totally love how this project turned out!

Affiliate links are used in this post at no cost to you – I really appreciate your support!

Scrapbook Pal products used:
Sizzix-Tim Holtz Vault Atomic Retro Thinlits
My Sweet Petunia Glue Press
Bearly Art precision craft glue
Scrapbook Adhesives Thin 3D Foam Squares White

Other products used:
CARDSTOCK/PAPER: 3-1/2″ x 5″ kraft notecards with envelopes, CutCardStock Desert Storm, Vanilla Bean Brown, Basis Natural, Fruit Punch Pink 4×6 Pearlized Textured, Galax 4×6 Canvas Textured, Yellow Jacket 4×6 Textured, Adobo 4×6 Textured, Seafoam Green 4×6 Canvas Textured, Habanero Red 4×6 Textured
ACCESSORIES: Fiskars 12″ ProCision Rotary Bypass Paper Trimmer, Big Shot, iridescent gemstones

I hope you’ve enjoyed this project and you’re inspired to get your craft on! Be sure to check out the awesome array of craft supplies in the Scrapbook Pal store… the selection is amazing! And head over to the Scrapbook Pal FacebookPinterest and Instagram pages for more design team inspiration! And if you haven’t yet subscribed to our YouTube Channel, be sure to do that, too, for tons of hands-on crafty inspiration! Thanks so much for stopping by today – we’ll see you next time! 

Scrappy hugs,

Curled in Happiness

Hey everybody, a very happy Wednesday to you! We’re already a week into July… what happened to June, lol?! I’m up on the Scrapbook Pal blog today sharing a tutorial for making a hedgehog friendship card featuring the Gina K Designs Hedgehogs in Happiness Stamp & Die Bundle. If you know me, you know I’m a huge fan of fun folds. Everywhere I turn, I see another one I want to try! There are at least three versions of the corner fold card out there that I’ve seen, and when I got these adorable hedgehog stamps and dies in my hands, I knew I had to use them for this particular card.

I cut the folded portion of the card base (main element) and a couple smaller panels from Stampin’ Up Color Me Autumn DSP. I cut the flat card base and two additional panels from CutCardStock Basis Dark Orange cardstock and the front panel from Neenah Classic Crest Baronial Ivory and CutCardStock Pop Tone Jellybean Green cardstock. The images and sentiments are from the new Gina K Designs Hedgehogs in Happiness Stamp & Die Bundle. I colored the images with Copic Ciao alcohol markers and cut them with the coordinating dies.

And here’s a shot of the inside, with the card opened up and the corner folded back. This really is a delightful fold, and if you’re interested in seeing how I made it, be sure to check out my tutorial on the Scrapbook Pal blog!

Affiliate links are used in this post at no cost to you – I really appreciate your support!

Scrapbook Pal products used:
Gina K Designs Hedgehogs in Happiness Stamp & Die Bundle
Mini MISTI
Versafine Onyx Black ink
Copic Ciao E08 Brown
Copic Ciao E25 Caribe Cocoa
Copic Ciao E29 Burnt Umber
Copic Ciao E31 Brick Beige
Copic Ciao G99 Olive
Spellbinders 1/4″ Best Ever Craft Tape
My Sweet Petunia Glue Press
Bearly Art precision craft glue
Scrapbook Adhesives Thin 3D Foam Squares White

Other products used:
CARDSTOCK/PAPER: CutCardStock Basis Dark Orange and Pop Tone Jellybean Green cardstock, Neenah Classic Crest 80# Baronial Ivory cardstock, Stampin’ Up Color Me Autumn Designer Series Paper
ACCESSORIES: Fiskars 12″ ProCision Rotary Bypass Paper Trimmer, Big Shot

I hope you’ve enjoyed this project and you’re inspired to get your craft on! Be sure to check out the awesome array of craft supplies in the Scrapbook Pal store… the selection is amazing! And head over to the Scrapbook Pal FacebookPinterest and Instagram pages for more design team inspiration! And if you haven’t yet subscribed to our YouTube Channel, be sure to do that, too, for tons of hands-on crafty inspiration! Thanks so much for stopping by today – we’ll see you next time! 

Scrappy hugs,

Let It Snow tag

Hey everybody, I’m back with my second post on this beautiful Sunday! I’m delighted to share a Scrapbook Pal DT inspiration project with you that I created with the Sizzix-Tim Holtz Vintage Sled Thinlits and Sizzix-Catherine Pooler Greetings of the Season Stamp Set along with a few other items carried on the website. It’s been a while since I created a tag and these amazing dies and stamps just ‘screamed’ tag to me. This is an oversized 3-1/4″ x 6-1/4″ tag that could very easily be given as a flat card, and that’s how I made it! ;)

I cut the tag base from Neenah Classic Crest Double Thick 165# Solar White cardstock and covered it with two coordinating prints from The Paper Studio Four Seasons and Everything In Between -2- paper pad, tearing the horizontal striped piece across the top and adhering it to the bottom of the tag at a slight angle.

Using the Sizzix-Tim Holtz Vintage Sled Thinlits, I die cut all the sled pieces from CutCardStock Stardream Metallic Silver, Twine, Pop Tone Red Hot, Pop Tone Gumdrop Green, Pop tone Jellybean Green, Kale Green, and Amaranth cardstock. I conducted an experiment, not entirely sure it was going to work. I ran the Copic Ciao E47 Dark Brown alcohol marker along the ridges on the main sled piece just prior to running it through the Big Shot in hopes it would look like wood, and it did! It’s a little blotchy looking but I thought that added to the vintage feel. I also scribbled this same marker on my finger and rubbed it across the ‘metal’ piece on the top to make it look distressed, and that worked, too! ;)

I stamped a sentiment from the Sizzix-Catherine Pooler Greetings of the Season Stamp Set in Versafine Onyx Black ink and inked the edges of the tag in white ink. I added Eyelet Outlet Clear Glitter Enamel Dots randomly over the background over top of the snow drops on the patterned paper. The finishing touch was looping some Really Reasonable Ribbon canvas stitched ribbon through the hole at the top and tying it with Lawn Fawn Lawn Trimmings White Hemp Twine.

I stamped another sentiment from the Sizzix-Catherine Pooler Greetings of the Season Stamp Set on the back in Versafine Onyx Black ink. I totally love how this turned out… tags are such fun!

Affiliate links are used in this post at no cost to you – I really appreciate your support!

Scrapbook Pal products used:
Sizzix-Tim Holtz Vintage Sled Thinlits
Sizzix-Catherine Pooler Greetings of the Season Stamp Set
Versafine Onyx Black ink
Copic Ciao E47 Dark Brown alcohol marker
Lawn Fawn Lawn Trimmings White Hemp Twine
MISTI stamp tool
Spellbinders 1/4″ Best Ever Craft Tape
My Sweet Petunia Glue Press
Bearly Art precision craft glue
Scrapbook Adhesives E-Z Runner Permanent Strips

Other products used:
CARDSTOCK/PAPER: Neenah Classic Crest Double Thick 165# Solar White cardstock, CutCardStock Stardream Metallic Silver, Twine, Pop Tone Red Hot, Pop Tone Gumdrop Green, Pop tone Jellybean Green, Kale Green, and Amaranth cardstock; The Paper Studio Four Seasons and Everything In Between -2- paper pad
DIES/PUNCHES: WRMK Crop-A-Dile Big Bite
ACCESSORIES: Fiskars 12″ ProCision Rotary Bypass Paper Trimmer, Big Shot, Eyelet Outlet Clear Glitter Enamel Dots, Really Reasonable Ribbon canvas stitched ribbon

I hope you’ve enjoyed this project and you’re inspired to get your craft on! Be sure to check out the awesome array of craft supplies in the Scrapbook Pal store… the selection is amazing! And head over to the Scrapbook Pal FacebookPinterest and Instagram pages for more design team inspiration! And if you haven’t yet subscribed to our YouTube Channel, be sure to do that, too, for tons of hands-on crafty inspiration! Thanks so much for stopping by today – we’ll see you next time! 

Scrappy hugs,